1
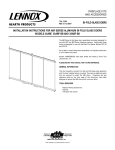
INSTALLATION MANUAL
CO-AXIAL VERTICAL FLUE KIT FOR SEELEY INTERNATIONAL
BRAEMAR ECO-SUPERSTAR SH18, SH25 & WF25 HEATERS
INTRODUCTION
This manual covers the following items with respect to installing a co-axial vertical flue kit for a Braemar
Ecostar SH & WF25 Heater:
zSelecting a location for the heater
zCutting the wall opening
zInstalling the upper and lower heater mounting brackets
zInstalling the flue system and flue terminal
Installation of the heater and the connection of the flue system to the heater is covered in the installation
manual supplied with each heater.
SAFETY
This Braemar Ecostar Heater Flue Kit must be installed in accordance with these instructions, local gas
fitting regulations, municipal building codes, electrical wiring regulations, Australian Standard AS/NZS 5601
Gas Installations and any other relevant statutory requirements.
Ensure that the heater is located to maintain the minimum clearances from the flue terminal as specified in
AS/NZS 5601.
Measurement is taken from the edge of the flue terminal.
Employers and Employees Responsibility
The installation and maintenance of gas space heating systems, particularly at height, has the potential to
create Occupational Health and Safety issues for those involved. Installers are advised to ensure they are
familiar with relevant State and Federal legislation, such as Acts, Regulations, approved Codes of Practice
and Australian Standards, which offer practical guidance on these health and safety issues. Compliance
with these regulations will require appropriate work practices, equipment, training and qualification of
workers. Seeley International provides the following information as a guide to contractors and employees to
assist in minimising risk.
Risk Assessment
A risk assessment of all hazardous tasks is required under legislation. A risk assessment is an essential
element that should be conducted before the commencement of work, to identify and eliminate the risk of
falls and other risks, or to minimise these risks by implementing control measures. This does not need to be
a complicated process - it is a matter of assessing the job to be done and considering what actions are
necessary so the person doing the job does not injure themselves.
This should be considered in terms of:
zWhat are the chances of an incident occurring?
zWhat could the possible consequences be?
zWhat can be done to reduce, or better still, eliminate the risk?
Some points to consider when working on or in a roof:
zWhat is the best and safest access to the roof and working areas?
zWhat condition is the roof in? Should the roof structure and surface be checked?
zDoes the worker have appropriate footwear?
zAre all power cables/extension leads safe and appropriately rated?
zAre all ladders, tools and equipment suitable and in good condition?
zWhere ladders are to be used, is there a firm, stable base for them to stand on? Can they be tied or
secured in some way at the top.
zIs there a roof anchor to attach a harness and lanyard to? If so, instruction should be issued for the use
of an approved harness or only suitably trained people used.
zAre all tools and materials being used, prevented from slipping and falling onto a person at ground
level?
zIs the area below the work area suitably protected to prevent people entering this area.
zDoes the work schedule take into account weather conditions, allowing for work to be suspended in
high winds, thunder storms/lightning or other types of weather giving wet, slippery surfaces?
zIs there an on-going safety check system of harnesses, ropes, ladders and access/lifting equipment,
and where they exist on roofs, anchor points before the commencement of work?
zIs there a system which prevents employees from working on or in roofs if they are unwell or under the
influence of drugs or alcohol?
zAre there any special conditions to consider i.e. excessive roof pitch, limited ground area, fragile roof,
electrical power lines?
1
1
INSTALLATION KITS & HEATER LOCATION
Co-Axial Vertical Flue Kit (Supplied with 3.6 metres of flue)
Co-Axial Short Flue
Offset Kit
Co-Axial Long Flue
Offset Kit
Kit P/N 093062
Kit P/N 089997
Kit P/N 093079
The maxium allowed vertical flue length is 6 metres, made up of:
This Kit P/N 093055
Co-Axial Flue
Extension Kit.
(additional length
750mm)
z One Co-Axial Wall Cavity Flue Kit and three Co-Axial Flue Extension Kits, or
z One co-axial Wall Cavity Flue Kit, one Co-Axial Flue Extension Kit and one Co-Axial Flue Offset Kit.
This kit suits the following installation types:
INTERNAL OR EXTERNAL WALL
1800mm
WF25
SH18 or SH25
INBUILT ONLY
WF25
INBUILT
1050mm - SH25
900mm - SH18
POOR
INTERNAL OR EXTERNAL WALL
WF25
CONSOLE
INTERNAL OR EXTERNAL WALL
CEILING
FAIR
GOOD
FLOOR 100 - 200mm
Minimum side clearances
300 mm
minimum
300 mm
minimum
2000 mm minimum
When selecting a location for the space heater, the following points must be considered to ensure optimum
heater performance:
zAvoid corners, as this can lead to poor distribution of heated air.
zLocate wall studs - for an inbuilt installation the stud spacing (measured from inside to inside) must be
between 405 and 430mm - a false stud must be fitted if the spacing is greater than 430mm - an
alternative location must be selected if the spacing is less than 405mm.
zEnsure that roof timbers will not obstruct the flue.
zEnsure that concealed piping or wiring within the wall cavity will not obstruct the installation.
zIf a rear register is to be fitted, select a location to ensure that wall studs do not obstruct the rear register.
zDo not obstruct the air outlet, or the rear register, with furniture as this can lead to poor distribution of
heated air and short-cycling of the heater.
zAvoid placing the heater so that it faces across a room - along the room is better.
zMaintain clearances from the sides of the heater as shown above.
zMaintain a clearance of 100-200mm from the floor.
2
2
INBUILT FLUE INSTALLTION DETAILS
1. Cut opening for heater through plaster wall between wall studs.
2. Cut opening for flue in top plate
3. Cut opening for flue in nogging (or remove nogging entirely)
4. Fold out top and bottom mounting bracket tabs (4 tabs total) to suit spacing between wall stud.
5. Mount the top mounting bracket against the top of the cut out, fixing to the wall studs with the supplied
fasteners.
6. Mount the bottom mounting bracket with the supplied fasteners, as shown. The dimension given is from
the top edge of the flange on the side of the top mounting bracket to the bottom edge of the flange on the
side of the bottom mounting bracket.
Top mounting bracket
4
110mm
2
4
Fold out tabs
Bottom mounting bracket
3
5
405 t
415m o
m
6
275-3
75mm
From
Floor
1020 for SH25 Models
870 for SH18 Models
840m
690mm for SH
25
m for
SH18 & WF25
100 t
o 200
1
mm
3
3
INBUILT FLUE INSTALLTION DETAILS
7. Slide aluminium tube with spacer into DWV pipe and joiner. (repeat process for as many lengths that are
required to extend through top plate into roof cavity.)
7
8. Slide previously assembled DWV pipe and aluminium tube assembly sections up into wall cavity, Joining
aluminium tube together with a bead of “Silicone” as you go.
9. Join aluminium tube assembly sections (in wall cavity already) to bottom flue assembly with a bead of
“Silicone”. (the bottom flue assembly is a piece of aluminium tube fixed within a section of DWV, shown in
illustration below).
10. Slide bottom flue assembly and attached tube assembly sections up into wall cavity using tab to lock
bottom flue assembly to top mount bracket.
`
IMPORTANT
EXPANDED END OF ALUMINIUM
TUBE MUST FACE UPWARDS &
ALL JOINS MUST BE SEALED
WITH A BEAD OF “SILICONE”
8
10
Bottom flue
assembly
4
4
CONSOLE FLUE INSTALLTION DETAILS
IMPORTANT
FOR TIMBER STUD WALLS, THE TOP MOUNTING BRACKET MUST BE ATTACHED TO WALL STUD ON AT LEAST ONE
SIDE OR IN THE CENTRE, AND BOTTOM MOUNTING BRACKET MUST BE ATTACHED TO AT LEAST ONE WALL STUD.
1. Attach top mounting bracket to wall, fixing to the wall stud on at least one side or centre with the supplied
fasteners.
2. Attach the bottom mounting bracket with the supplied fasteners, as shown. The dimension given is from
the top edge of the flange on the side of the top mounting bracket to the bottom edge of the flange on
the side of the bottom mounting bracket.
IMPORTANT
CENTRE LINE FOR CORNICE CUT OUT IS OFF SET BY 8mm TO INSTALLERS RIGHT FROM CENTRE OF TOP
BRACKET WHEN STANDING IN FRONT OF BRACKET
3. Mark centre for cornice cut out and cut away cornice.
4. Using cornice centre line as starting point measure 133mm to installers right, 46mm away from wall and
mark location on ceiling for flue hole.
5. Cut 85mm hole in ceiling using previously marked location as hole centre.
133m
m
4
47
corni 5mm
ce cu
5
tout
85mm hole
46mm
CLCornice
Cutout
CLCornice
Cutout
8mm off set
1
840m
CL
Mount
Brackets
m for
WF2
5
2
275-3
75mm
From
Floor
3
5
5
CONSOLE FLUE INSTALLTION DETAILS
6. Slide aluminium tube with spacer, into DWV pipe and joiner. (repeat process for as many lengths that are
required to extend through previously cut hole in ceiling.)
6
7. Install the bottom flue assembly (the bottom flue assembly is a piece of aluminium tube fixed within a
section of DWV, shown in illustration below)
8. Slide previously assembled DWV pipe and aluminium tube assembly up through hole in ceiling .
9. Run a bead of “Silicone” around the bottom of the aluminium tube already located through hole in
ceiling. Then connect the inner and finally the outer.
IMPORTANT
EXPANDED END OF ALUMINIUM
TUBE MUST FACE UPWARDS &
ALL JOINS MUST BE SEALED
WITH A BEAD OF “SILICONE”
9
8
7
Bottom flue
assembly
6
REPLACEMENT WF INBUILT FLUE INSTALLTION DETAILS
6
1. Remove existing Wall Furnace flue and flue support bracket.
2. Fold out top and bottom mounting bracket tabs (4 tabs total) to suit spacing between wall studs.
3. Attach the top mounting bracket inside cut out at required height for installation type , fixing to the wall
studs with the supplied fasteners.
4. Attach the bottom mounting bracket with the supplied fasteners, as shown. The dimension given is
from the top edge of the flange on the side of the top mounting bracket to the bottom edge of the
flange on the side of the bottom mounting bracket.
Top mounting bracket
2
Fold out tabs
Bottom mounting bracket
3
840m
m for
WF2
5
4
275-3
75mm
From
Floor
2
7
REPLACEMENT WF INBUILT FLUE INSTALLTION DETAILS
7
5. Slide aluminium tube with spacer into DWV pipe and joiner. (repeat process for as many lengths that are
required to extend through top plate into roof cavity.)
5
6. Slide previously assembled DWV pipe and aluminium tube assembly sections up into wall cavity, Joining
aluminium tube together with a bead of “Silicone” as you go.
7. Join aluminium tube assembly sections (in wall cavity already) to bottom flue assembly with a bead of
“Silicone”. (the bottom flue assembly is a piece of aluminium tube fixed within a section of DWV, shown in
illustration below)
8. Slide bottom flue assembly and attached tube assembly sections up into wall cavity using tab to lock
bottom flue assembly to top mount bracket.
IMPORTANT
EXPANDED END OF ALUMINIUM
TUBE MUST FACE UPWARDS &
ALL JOINS MUST BE SEALED
WITH A BEAD OF “SILICONE”
7
8
Bottom flue
assembly
8
REPLACEMENT WF CONSOLE FLUE INSTALLTION DETAILS
8
IMPORTANT
FOR TIMBER STUD WALLS, THE TOP MOUNTING BRACKET MUST BE ATTACHED TO WALL STUD ON AT LEAST ONE
SIDE OR IN THE CENTRE, AND BOTTOM MOUNTING BRACKET MUST BE ATTACHED TO AT LEAST ONE WALL STUD.
1. Remove existing Wall Furnace flue and flue support bracket.
IMPORTANT
WHEN ATTACHING TOP AND BOTTOM MOUNT BRACKETS, LOCATE CENTRE LINE OF EXISTING CORNICE CUT OUT
AND OFF SET CENTRE OF MOUNT BRACKETS BY 8mm TO INSTALLERS LEFT IN RELATIONSHIP TO CORNICE
CENTRE LINE.
2. Attach top mounting bracket to wall at required height for installation type, fixing to the wall stud on at
least on side or centre with the supplied fasteners.
3 Attach the bottom mounting bracket with the supplied fasteners, as shown. The dimension given is from
the top edge of the flange on the side of the top mounting bracket to the bottom edge of the flange on
the side of the bottom mounting bracket.
4. Using cornice centre line as starting point measure 133mm to installers right, 46mm away from wall and
mark location on ceiling for flue hole.
5. Cut 85mm hole in ceiling using previously marked location as hole centre.
133m
m
4
5
85mm hole
46mm
CLCornice
Cutout
CLCornice
Cutout
8mm off set
2
CL
840m
Mount
Brackets
m for
WH2
5
3
275-3
75mm
From
Floor
9
9
REPLACEMENT WF CONSOLE FLUE INSTALLTION DETAILS
6. Slide aluminium tube with spacer into DWV pipe and joiner. (repeat process for as many lengths that
are required to extend through previously cut hole in ceiling.)
6
7. Install the bottom flue assembly (the bottom flue assembly is a piece of aluminium tube fixed within a
section of DWV, shown in illustration below)
8. Slide previously assembled DWV pipe and aluminium tube assembly up through hole in ceiling.
9. Run a bead of “Silicone” around the bottom of the aluminium tube already located through hole in ceiling.
Then connect the inner and finally the outer.
IMPORTANT
EXPANDED END OF ALUMINIUM
TUBE MUST FACE UPWARDS &
ALL JOINS MUST BE SEALED
WITH A BEAD OF “SILICONE”
9
8
7
Bottom flue
assembly
10
EXTEND FLUE INTO ROOF SPACE & INSTALL FLUE TERMINAL
10
1. From within the roof space, install the top plate based on installation type.
Inbuilt - Locate top plate support over flue, attaching top plate to either side of flue.
Console - Locate top plate support over flue, attaching one side of support to top plate
Replacement WF Inbuilt - Locate top plate support over flue, attaching top plate to either side of flue. Install short flue
offset Kit part number 089997 (using “Silicone” on the aluminium inner flue as previously) to align flue with existing flue
hole in roof.
Replacement WF Console - Locate top plate support over flue, attaching one side of support to top plate. Install short flue
offset Kit part number 089997 (using “Silicone” on the aluminium inner flue as previously) to align flue with existing flue
hole in roof.
2. Install additional DWV and aluminium flue sections (using “Silicone” on the aluminium inner flue as previously) to
extend the flue through the roof.
INBUILT INSTALLATION
Either side support plate
of flue attached to top plate.
REPLACEMENT WF INBUILT INSTALLATION
Short offset flue kit P\No: 089997
Either side support plate
of flue attached to top plate.
CONSOLE INSTALLATION
One side of support plate
attached to top plate.
REPLACEMENT WF CONSOLE INSTALLATION
Short offset flue kit P\No: 089997
One side of support plate
attached to top plate.
11
EXTEND FLUE INTO ROOF SPACE & INSTALL FLUE TERMINAL
11
3. Cut the inner flue to suit the installation and to conform with all necessary regulations (making sure there is at least
500mm between the edge of the flue cowl and the roof). Cut the outer flue so the inner aluminium flue protrudes
70mm to 80mm past the outer.
4. Seal the hole in the roof with appropriate flashing.
5. Run a bead of sealant around the top of the inner flue so the inner will seal on the seat within the flue terminal.
(m 500
ini m
mu m
m)
3
70-80mm
5
6. Secure the flue terminal to the flue with the tek-screws supplied, ensuring the inner flue seals cleanly on the seat within
the terminal.
DWV outer MUST be cut to ensure
aluminium inner sits cleanly on this seat
Aluminium inner flue must sit inside
this spigot in the centre plate
DWV Outer
6
Assembled
DWV Outer
Un-Assembled
Aluminium Inner
6
Aluminium Inner
6
Seeley International Pty Ltd has a policy of continuous improvement and may therefore make changes to these specifications
without notice. Whilst every care has been taken to assure the accuracy of the data in this manual, Seeley International does
not assume any liability for errors and/or omissions. Braemar is a registered trademark of Braemar Industries Pty Ltd.
Seeley International Pty Ltd ACN 23 054 687 035
www.seeley.com.au
12
COMPLETED INSTALLATION
12
Flue installation is complete -- refer to the instructions supplied with the Braemar Ecostar SH18, SH25 & WF25
Heaters for heater installation.
New Inbuilt Installation
New Console Installation
Replacement WF Inbuilt Installation
Replacement WF Console Installation
Warranty Service
Australia 1-300-650-644
seeleyinternational.com
It is the policy of Seeley International to introduce continual
product improvement. Accordingly, specifications are subject to
change without notice. Please consult with your dealer to
confirm the specifications of the model selected.
636696b