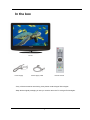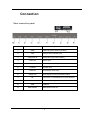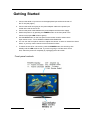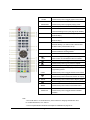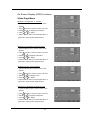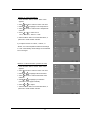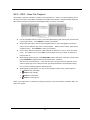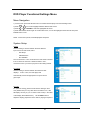
1
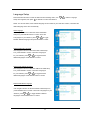
High Definition LCD TV / DVD combo Kogan PRO22 USER MANUAL Safety information To ensure reliable and safe operation of this equipment, please read carefully all of the instructions in this user guide, especially the safety information below. Electrical safety ·The TV set should only be connected to a mains power supply which matches that stated on the label on the mains power adaptor. ·To prevent overload, don’t share the same mains power supply socket with too many other items of equipment. ·Be careful to route the mains power cable away from areas where people can trip over it. ·Unplug the TV when it is not going to be used for a long time. Disconnect both the aerial and the main power cable. ·Take care not to expose the TV set or the remote control to water or moisture. ·Pull the plug out immediately, and seek professional help if: - the mains power plug or cable is damaged - liquid is spilt onto the TV set, or if it is accidentally exposed to water or moisture - anything accidentally penetrates the ventilation slots - the TV set doesn’t work normally. ·Never remove the cover, there are no user-serviceable parts inside. Allow only qualified service personnel to repair this equipment. ·To avoid leakage, take out the remote control batteries when: - the batteries are exhausted - you are not going to use the remote control for a long time. ·Batteries should be recycled or disposed of in a proper manner. Physical safety ·Make sure the set is positioned at least 5cm (2inch) from the wall or furniture. ·Never tap or shake the screen for any reason. ·Take care not to drop or sit on the remote control. ·Clean the set using only a soft, clean, dry cloth. Do not use any solvents. 1 OPERATING INSTRUCTIONS Contents Safety information--------------------------------------------------------------------------------------- 1 Electrical safety ----------------------------------------------------------------------------------------- 1 Physical safety ------------------------------------------------------------------------------------------ 1 In the box -------------------------------------------------------------------------------------------------- 3 Connection ------------------------------------------------------------------------------------------------ 4 Rear connection panel -------------------------------------------------------------------------------- 4 Getting Started ------------------------------------------------------------------------------------------- 5 Front panel controls ------------------------------------------------------------------------------------ 5 The Remote control ------------------------------------------------------------------------------------- 6 Using the remote control for normal TV functions ---------------------------------------------- 6 Initial Setup Instruction Guide ---------------------------------------------------------------------- 8 Power ON/OFF: Standby mode -------------------------------------------------------------------- 8 Selection of Input Mode ------------------------------------------------------------------------------ 8 On Screen Display (OSD) Menu -------------------------------------------------------------------- 9 Navigating the OSD Menu--------------------------------------------------------------------------- 9 Video Page Menu -------------------------------------------------------------------------------------- 10 Audio Page Menu -------------------------------------------------------------------------------------- 13 TV Page Menu (Only for TV) ------------------------------------------------------------------------ 14 Setup Page Menu -------------------------------------------------------------------------------------- 17 Parental Page Menu ---------------------------------------------------------------------------------- 19 DVD Player Operation ----------------------------------------------------------------------------------- 22 Basic Disc Operation----------------------------------------------------------------------------------- 22 Supporting DVD Formats------------------------------------------------------------------------------ 24 DVD Functions Operating Instructions------------------------------------------------------------- 25 MP3 / JPEG / Video File Playback----------------------------------------------------------------- 28 DVD Player Functional Settings Menu------------------------------------------------------------- 29 Menu Navigation---------------------------------------------------------------------------------------- 29 System Setup-------------------------------------------------------------------------------------------- 29 Language Setup---------------------------------------------------------------------------------------- 31 Troubleshooting ------------------------------------------------------------------------------------------ 32 Maintenance ----------------------------------------------------------------------------------------------- 33 Handling Discs--------------------------------------------------------------------------------------------- 34 Features and Specifications-------------------------------------------------------------------------- 35 2 In the box TV set Power supply Power supply cable Remote control - If any of the accessories are missing, then please contact Kogan Technologies. - Keep all the original packaging in case you need to return the TV to Kogan Technologies. 3 Connection Rear connection panel DC DC Number Name Function Description 1 HDMI HDMI input jacks (audio and video) 2 VGA VGA (D-sub) computer input 3 VGA Audio IN 4 YPbPr IN 5 AUDIO OUT 6 S-VIDEO S-Video input 7 CVBS IN AV analogue video input 8 AUDIO L/R 9 RF Connect to TV cable/antenna or DVB-t antenna 10 DC Connect to the supplied Power Adaptor 11 USB 12 MMC/MS/SD VGA audio input (3.5mm stereo) YPbPr input Audio output for all input sources (3.5mm stereo) Audio signal input for AV/YPbBr/S-Video USB Slot MMC/SD/MS card slot 4 Getting Started 1. Connect the aerial or input source to the appropriate input socket at the rear of the TV set (see page 4). 2. Connect the small round plug on the power adaptor cable to the power input socket at the rear of the TV set. 3. Connect the power cable between the power adaptor and the mains supply. 4. Switch the power on by pressing the POWER button on the front panel or the remote control (the LED will show green). 5. Use the AV/TV button on the front panel or the remote control to select which input source to use : TV-AV-SVIDEO-YPBPR-VGA-HDMI-DVD 6. You can use the front panel controls to adjust the volume or select a channel as shown below, or you may use the remote control for these functions. 7. To switch the set off for a short time, press the POWER button, the set will go into standby and the LED will show red. If you are not going to use the set for some time, switch the power off completely by unplugging the mains cable. Front panel controls 5 The Remote Control Using the remote control for normal TV functions 1. Insert two AAA batteries, making sure that the polarity is correct as marked inside the compartment. 2. Aim the remote control at the IR sensor just below the green light (see page 5 for diagram). Keep this area clear at all times. 3. Do not press the buttons on the remote too quickly – allow the TV time to respond. 01. POWER 02. MUTE : : Press to enter or exit the standby mode Press to turn on or off speaker output 03. DISPLAY: Press to show or remove status display 04. VOL+: Press to increase volume 05. VOL-: Press to decrease volume 06. Numbers: Press to select a channel 07. AV/TV: Press to select input source 08. PMODE: Press to select picture display mode. 09. ENTER: Press to confirm your selection 10. Directions: Press to Select up, down, left, and right in menu screens. 11. LCD Menu Press to display the LCD Menu system (see p.9) 12. STOP Press to stop play in DVD mode 13. PLAY/PAUSE Press to start or pause play in DVD mode 14. ANGLE In DVD mode, press to select viewing angles. 14. In DVD mode press to skip to the next chapter. SUBTITLE Press to activate subtitles for Digital TV programs where available. 16. A/E Press in TV mode to make the current channel a Favourite OSD In DVD mode press to display video details 17. FAV: Press to enter the Favourites menu directly SLOW In DVD mode press to toggle slow motion speeds 18. TIMER: Press to display the time 19. SLEEP: Press to enter Sleep mode, where the TV will automatically enter standby mode after a period of time (toggle between “Off” and between 15 minutes and up to 240 minutes) 6 20. GREEN ZOOM Press to activate the “GREEN” function in teletext In DVD mode press to toggle graphic zoom levels. Press to activate the “RED” function in teletext 21. RED PROGRAM In DVD mode press to program playing order 22. EJECT Press to eject a disc from the DVD Player 23. DVD SETUP In DVD mode press to enter the DVD Player Functional Settings menu (see page 29 for details) 24. CH+ Press to select next TV channel up (see p.15 “Channel Skip”) 25. CH- Press to select next TV channel down (see p.15 “Channel Skip”) 26. DOT Press the number buttons with this to select channels directly (i.e. channel 108-1 would need the DOT button pressed after the 8). 27. SMODE Press this button to toggle between preset sound modes for different echoing effects. 28. EXIT Press this button to exit in a menu. 29. In DVD mode, press to toggle fast forward speeds TEXT Press to enter or exit teletext mode for TV/DVB 30. In DVD mode press to toggle rewind speeds. 31. In DVD mode press to go to previous chapter. 32. REPEAT In DVD mode press to toggle repeat play settings. 33. EPG In TV/DVB mode, press to display the Electronic Programming Guide LANG 34. In DVD mode press to toggle between audio tracks Press to access subpages for teletext AB In DVD mode press to select A-B section for replay 35. GOTO In DVD mode press to enter track to skip to (p.26) 36. Press to toggle between display aspect ratios. / SIZE 37. YELLOW Press to activate the “YELLOW” function in teletext MENU In DVD mode press to return to the DVD menu. 38. BLUE Press to activate the “BLUE” function in teletext SUBTITLE In DVD mode press to toggle between subtitles available. Note: - The TV will return to TV mode when any of the buttons for changing channels are used, i.e. the Number buttons, CH+ and CH- - A more complete DVD mode button description is available from page 25-27. 7 Initial Setup Instruction Guide Power ON/OFF: Standby mode - Press POWER ( ) button on the remote control or on the side panel to turn on the unit. [The power indicator changes from red to green] - Press POWER ( ) button on the remote control or on the side panel again to return the display to standby mode. [The power indicator changes from green to red] Selection of Input Mode - Press the Input (AV/TV) button to display the signal source menu. - Press or button to select the signal source you desire, then press the Enter button to confirm. When selecting the input source, the screen will display the information of the selected input source. For example: TV mode - When there is no signal from the selected source or channel, a warning message will be displayed. - If you see the “No Signal!” warning, you can select a different channel or press the Input (AV/TV) button to change the selected source. - When you first receive your new TV, it is advisable to perform a new “Channel Scan” to setup your set to receive all of the channels available in your area. Follow the section “Using Channel Scan”’ on page 15. 8 On Screen Display (OSD) Menu After you have installed the batteries in the remote control, you can set setting preferences on the TV using the OSD menu system. Navigating the OSD menu: - The buttons used in the OSD menu include: ’MENU’ (LCD MENU), - , ‘ENTER’ and ‘EXIT’. Whatever input source is currently selected, press the Menu button to open the OSD Menu for that source, then or to select the sub menu pages The sub menu pages are displayed in the following sequence (circular display): Video Audio TV Setup Parental Note: The TV sub menu page will only appear for the TV mode OSD Menu. When pressing the Menu button on the remote control or on the side panel, it will change in the following sequence: Main Menu Press Menu or Exit Sub Menu Press Exit Exit Previous Menu 1. Press the Menu button to display the menu system. 2. Press or button to select the menu pages. 3. Press the Enter or 4. Press or button to enter. button to select an item. 5. Press button to select or adjust a setting. 6. If you do not make a selection within several seconds, the main menu will close automatically, 7. Press the Menu or Exit button exit the OSD menu. NOTE: The main TV OSD Menu is not accessible when in DVD mode. The audio and picture settings for DVD mode are the same as for TV, AV and S-VIDEO mode, so go to one of these first to change DVD mode settings. 9 On Screen Display (OSD) Functions Video Page Menu Adjustment of “Brightness” or “Contrast” 1. Press the Menu button, and the “Video” menu appears. 2. Press or Enter to enter the “Video” sub menu 3. Press or 4. Press or . to highlight your selection. to adjust. 5. Press the Menu button to exit the OSD Menu, or press Exit to select another OSD submenu. Adjustment of “Saturation” (inactive for VGA) 1. Press the Menu button, and the “Video” menu appears. 2. Press or Enter to enter the “Video” sub menu 3. Press or 4. Press or . to highlight “Saturation”. to adjust. 5. Press the Menu button to exit the OSD Menu, or press Exit to select another OSD submenu. Adjustment of “Hue” (only for NTSC) 1. Press the Menu button, and the “Video” menu appears. 2. Press or Enter to enter the “Video” sub menu 3. Press or 4. Press or . to highlight “Hue”. to adjust. 5. Press the Menu button to exit the OSD Menu, or press Exit to select another OSD submenu. Adjustment of “Sharpness” (inactive for VGA) 1. Press the Menu button, and the “Video” menu appears. 2. Press or Enter to enter the “Video” sub menu 3. Press or 4. Press or to highlight “Sharpness”. to adjust. 5. Press the Menu button to exit the OSD Menu, or press Exit to select another OSD submenu. 10 . Selection of “Color Temperature” 1. Press the Menu button, and the “Video” menu appears. 2. Press or Enter to enter the “Video” sub menu 3. Press or 4. Press or Enter to enter the Color Temperature . to highlight “Color Temperature”. submenu. 5. Press or to select one of: “Cool”, “Standard”, “Warm” or “User” 6. Press the Menu button to exit the OSD Menu, or press Exit to make another selection. If you adjust one item of “R Gain”, “G Gain”, or “B Gain”, the color temperature selection will change to “User” automatically. Other settings can be selected but not changed. Selection of “Advanced Video” (Inactive for VGA) 1. Press the Menu button, and the “Video” menu appears. 2. Press or Enter to enter the “Video” sub menu 3. Press or 4. Press or Enter to enter the Advanced Video to highlight “Advanced Video”. submenu. to highlight your selection 5. Press or (see table on next page for details) 6. Press or to adjust. 7. Press the Menu button to exit the OSD Menu, or press Exit to make another selection. 11 . Table of Advanced Video Adjustment Settings Setting Options Description Off, Low, Medium, Select to control the sharpness Strong, Auto and noise reduction. CTI Off, Low, Medium, Strong Select to improve the dynamic color level. Flesh Tone On, Off DNR Select “On” to correct the flesh tone automatically. Adaptive When this is on, this feature will set Luma On, Off the contrast and brightness levels Control for optimum performance. Selection of “VGA” (only for VGA) 1. Press the Menu button, and the “Video” menu appears. 2. Press or Enter to enter the “Video” sub menu 3. Press or 4. Press or Enter to enter the VGA submenu. to highlight “VGA” Selection of “Auto Adjust” After entering the “VGA” menu: 1. Press or to highlight “Auto Adjust” 2. Press or Enter to confirm your selection. 3. Press the Menu button to exit the OSD Menu, or press Exit to make another selection. Note: This item will auto-adjust the picture display. Selection of “H. Position”, “V. Position”, “Phase”, “Clock”. After entering the “VGA” menu: 1. Press 2. Press or or to highlight your selection to adjust. 3. Press the Menu button to exit the OSD Menu, or press Exit to make another selection. 12 . Table of VGA Display Adjustment Items Description H. Position V. Position Phase Clock Use or button to select it. Use or button move the display left or right. Use or button to select it. Use or button to move the display up or down. Use or button to select it. Use or button to adjust. Use or button to select it. Use or button to adjust. Audio Page Menu Adjustment of “Balance”, “Bass” or “Treble” 1. Press the Menu button, and then press until the “Audio” menu appears. or 2. Press or Enter button to enter the “Audio” menu. 3. Press or to highlight your selection. 4. Press or to adjust. 5. Press the Menu button to exit the OSD Menu, or press Exit to make another selection. Selection of “Sound Surround” 1. Press the Menu button, and then press until the “Audio” menu appears. or 2. Press or Enter button to enter the “Audio” menu. 3. Press or to highlight your “Surround Sound” 4. Press or to select “On” or “Off” 5. Press the Menu button to exit the OSD Menu, or press Exit to make another selection. 13 Selection of “SPDIF Type” 1. Press the Menu button, and then press until the “Audio” menu appears. or 2. Press or Enter button to enter the “Audio” menu. 3. Press or to highlight “SPDIF Type”. 4. Press or to select “Dolby Digital”, “PCM” or “Off”. 5. Press the Menu button to exit the OSD Menu, or press Exit to make another selection. TV Page Menu (Only for TV) Setting the “Country Region” 1. Press the Menu button, and then press until the “TV” menu appears. or 2. Press or Enter button to enter the “TV” menu. 3. Press or to highlight “Country Region”. 4. Press or to select “NSW/ACT”, “VIC”, “QLD”, “SA”, “WA”, “TAS”, “NT”. 5. Press the Menu button to exit the OSD Menu, or press Exit to make another selection. Using the “Audio channel” (Analogue TV OSD Menu only) 1. Press the Menu button, and then press until the “TV” menu appears. or 2. Press or Enter button to enter the “TV” menu. 3. Press or to highlight “Audio Channel”. 4. Press or to select Mono, Stereo, Dual1 or Dual2. 5. Press the Menu button to exit the OSD Menu, or press Exit to make another selection. 14 Using the “Channel Scan” 1. Press the Menu button, and then press he “TV” menu appears. or 2. Press or Enter button to enter the “TV” menu. 3. Press or 4. Press or Enter button to start the channel search. to highlight “Channel Scan”. 5. Press the Menu button to exit the OSD Menu, or press Exit to make another selection. Note: - This may take a few minutes to complete a full scan - The channels found will store automatically. - This TV will scan for Analogue and Digital channels - All previously stored channels, as well as channel related information (eg. Channel Block, Channel Skip), is deleted when performing this scan. Using the “Channel Skip” This feature allows you to choose which channels will be part of the normal channel rotation when using the CH+ and CH- buttons. Channels chosen to be skipped will still be accessible by entering it's channel number directly, eg. 20 for HDTV ABC. 1. Press the Menu button, and then press or until the “TV” menu appears. 2. Press or Enter button to enter the “TV” menu. 3. Press or 4. Press or Enter button to enter the submenu. to highlight “Channel Skip”. 5. Press or to choose a channel, then press Enter to confirm or cancel your selection. 6. When you select , this channel will be skipped. 7. Press the Menu button to exit the OSD Menu, or press Exit to make another selection. 15 Selection of “Channel Edit” or 1. Press the Menu button, and then press until the “TV” menu appears. 2. Press or Enter button to enter the “TV” menu. 3. Press or 4. Press or Enter button to enter the submenu. 5. Press or Enter or to highlight “Channel Edit”. to choose a channel, then press to enter the Edit Submenu (below) 7. When finished, press the Menu button to exit the OSD Menu, or press Exit to make another selection. Channel Edit Submenu Note: for digital channels, only Channel Number and Channel Name information can be changed. - Channel Number: use the number buttons to assign a new channel number. This may be up to 4 digits. - Channel Name: use the Number buttons to enter letters or numbers in the Channel Name (1 = ABC, 2=DEF, etc. eg. Press 1 twice to enter B). - See table below for a list of options for the other Channel Edit settings. These can be edited for analogue channels only. Settings Options Frequency 0~999. Use DOT button for decimal point. Color system Auto, PAL, SECAM, NTSC Sound system BG, A2 BK, L, L’, I, DK, DK, A2 DK, A2 DK1 “Analog channel Fine Tune” Please note that this function has been by replaced by the “Channel Scan” option, which will search for both analogue and digital channels. Manual changes to analogue channel tuning can be made from the Channel Edit menu. 16 Setup Page Menu Use of the “Time Setup” menu or 1. Press the Menu button, and then press until the “Setup” menu appears. 2. Press or Enter button to enter the “Setup” menu. 3. Make sure “Time Setup” is highlighted, press or 4. Press as required. or Enter button to enter the submenu. 5. Press or to choose “Time Zone”, “Time” or “Sleep Timer”. 6. When finished, press the Menu button to exit the OSD Menu, or press Exit to make another selection. Time Setup Submenu Selection of “Time Zone” After entering the “Time Setup” submenu: 1. Make sure "Time Zone" is highlighted, press or 2. Press as required. or to select your timezone. Australian Timezones are as follows: - GMT+8:00 Perth - GMT+9.30 Darwin and Adelaide - GMT+10:00 Canberra, Melbourne, Sydney, Brisbane, Hobart 3. Press the Menu button to exit the OSD Menu, or press Exit to make another selection. ”Time” Options After entering the “Time Setup” submenu: 1. Press or to highlight “Time”. 2. Press or Enter button to enter the “Time” submenu. - When “Auto Synchronisation” is set to “Off”, Date and Time information can be changed using the Number buttons. - When “Timer” is set to “On”, the TV will turn On and Off from Standby mode every day at the “Power On/Off Timer” times. Use the Number button to edit these times. Note: If the unit is unplugged, or main power is otherwise disrupted, the memory for all Time settings will be lost. 17 “Sleep Timer” Option This option is replaced by use of the SLEEP button on the remote control. See Page 6, button 19 for more details. “Reset Default” Selecting this option will return items in the setup menu to factory default (Note: this will not reset the Parental password) 1. Press the Menu button, and then press or until the “Setup” menu appears. 2. Press or Enter button to enter the “Setup” menu. 3. Press or 4. Press or Enter button and the “Are you sure” to highlight “Reset Default”. Popup menu will appear. 5. Press or to choose between “OK” and “Cancel”. Choose “OK” to reset default. 6. Press the Menu button to exit the OSD Menu, or press Exit to make another selection. 18 Parental Page Menu Some programs and movies include signals that classify the content of the program (dialog, language, sex, violence). The “Parental” control feature in this detects the signals and blocks the programs according to your selections. To use this feature, perform the following. 1. Press the Menu button, and then press or until the “Parental” option is highlighted. 2. Press 3. Use 0-9 buttons input the password, and the or Enter button to enter. Parental Control menu will appear. Note: The initial password for the system is “0000”. If you have changed the password and forgotten it, please contact Kogan Technologies. It is advised that the password be changed the first time the Parental Menu is accessed. Do not forget your new password! Using the “Change Password” function 1. After entering the “Parental” menu, press to highlight “Channel Password”. 2. Press or or Enter button to confirm. 3. Using 0-9 Number buttons, enter your new password in the “New Password” blank. 4. Using 0-9 Number buttons, enter your new password again in the “Confirm Password” blank. 5. When this is complete, the previous menu will be displayed. 19 Using the “Program Block” function 1. After entering the “Parental” menu, press to highlight “Program Block”. or 2. Press or Enter button to confirm. 3. Press to choose from the following options: - Block All - No Block - Block R and above: restricted 18+ - Block AV and above: adult audience. Strong violence 15+ - Block MA and above: adult audience 15+ - Block M and above: mature audience 15+ - Block PG and above: Parental guidance suggested - Block G and above: suitable for all audiences 4. Press the Menu button to exit the OSD Menu, or press Exit to make another selection. Using the “Input Block” function 1. After entering the “Parental” menu, press to highlight “Input Block”. 2. Press or or Enter button to confirm. 3. Press or to choose an input from “TV”, “AV”, “S-Video”,“YPbPr”, “VGA”, “HDMI”, “DVD” 4. Press Enter button to confirm your selection. 5. When you select , all signals from this input source will be blocked from being displayed. 6. Press the Menu button to exit the OSD Menu, or press Exit to make another selection. 20 Using the “Clean All” function or 1. After entering the “Parental” menu, press to highlight “Clean All”. 4. Press or Enter button and the “Are you sure” Popup menu will appear. 5. Press or to choose between “OK” and “Cancel”. Choose “OK” to Clean All. This will remove all Parental Blocks from the system (the password changes will remain). 6. Press the Menu button to exit the OSD Menu, or press Exit to make another selection. Using the “Channel Block” item 1. After entering the “Parental” menu, make sure "Channel Block" is highlighted, press 2. Press or as required. or Enter button to confirm. 3. Press or to choose from the saved channels. 4. Press Enter button to confirm your selection. 5. When you select , this channel will be blocked from being displayed. 6. Press the Menu button to exit the OSD Menu, or press Exit to make another selection. 21 DVD Player Operation Basic Disc operation 1. Turn ON and OFF the DVD function Turn on the LCD TV and then press AV/TV repeatedly to select DVD mode. 2. Insert disc into DVD slot Insert the disc into the Disc slot, with the (printed side of the disc facingt towards back of the unit). The player will load the disc automatically. There will be an on screen indication “CLOSE” then “READ” during this process. After loading the disc content, the TV will switch to play mode automatically. If the disc has already been placed inside when the TV is switched to DVD mode, the disc will be read automatically. Please ensure make sure that when inserting the disc, the shiny side of the disc should be facing you. If you insert the disc incorrectly, you may damage the DVD mechanism. 3. Playing the disc Depending on the disc type and content, the disc menu will display for your selection, or it will automatically play in sequence. When playing the disc, you may use to toggle between Play and Pause mode. Also: a) Press button once to stop. Press button to resume from where you stopped. b) Press button twice to stop. Press button to start from the beginning. This unit supports Menu, Sequential and Program playback. i) Menu playback (for DVD, Super VCD and VCD 2.0 discs) Any time after the disc has loaded, press the Yellow/MENU button: z For DVD discs, this will bring up the DVD disc menu (Root Menu). Use the navigation buttons to select and contents, press Enter or z button to start from the highlighted content. For Super VCD& VCD 2.0 discs, this will display PBC mode, and then toggle between PBC On and Off. When PBC is switched from Off to On, the screen will display the Super VCD or VCD2.0 disc menu. From this screen, use the numeric buttons to select the track for playback. When PBC is Off, you will be able to choose which track to play from at any time. Just use the numeric buttons to select your track. Note: For tracks over 10, press DOT button first (eg. To select track 15, press DOT then 5, for track 38 press DOT three times then 8). 22 ii) Sequential playback (for DVD / Super VCD / VCD / CD / CD-G / HD-CD and Mp3/MPG discs) Apart from discs with menus (most DVDs, Super VCD and VCD 2.0), sequential playback will commence automatically upon insertion of the disc. iii) Program playback (for DVD / Super VCD / VCD / CD / CD-G / HD-CD and Mp3 / JPEG discs) z Using Program playback, you can select up to 16 tracks from the disc to playback in a programmed order. z The On Screen Display for Program playback will appear as below, as you can see the DVD programming also requires the selection of the Title and Chapter. DVD discs Super VCD / VCD / CD / CD-G / HD-CD discs z In the highlighted area input the Title and Chapter or Track number using the numeric buttons. Use the navigation buttons to the next slot to program. z Once the selection is completed, press button to start Program playback, or highlight the “PLAY” with the navigation buttons and then press ENTER button to start. z While playing in Program mode, you may press PROGRAM button to display the menu for editting. Highlight “CLEAR” and press ENTER button to clear all selections. Alternatively press twice to exit Program mode (will return to Sequential playback mode). 23 button Supporting DVD formats This product can play the following DVD disc formats: Disc Type Disc Size (Diameter) Recording Time Recorded Content DVD 12cm Single side: 120mins. Approx DVD format: Remarks Compressed digital audio and video Double sides: 240mins. Approx Super VCD 12cm 45mins. Approx MPEG 2: Compressed Included SVCD digital audio and video VCD 12cm 74mins. Approx MPEG 1: Compressed Included VCD2.0 / digital audio and video VCD1.1 / VCD 1.0 / DVCD CD 12cm 74mins. Approx CD-DA: Digital audio HD-CD 12cm 74mins. Approx HD-DA: Digital audio MP3 / JPG / MPG 12cm 600mins. Approx Digital audio, photo and video Note: Also support DVD-R, CD-R, CD-RW playback. WARNING! DO NO NOT INSERT OR PLAY 8CM DISC, THEY WILL GET STUCK. DVD Region Code: ALL This DVD player will playback DVDs from all regions of the World: 24 DVD Functions Operating Instructions Please refer to the remote control guide on page 7 for button number references. 1. Play (for DVD / Super VCD / VCD / CD / CH-G / HD-CD and MP3 / JPEG /MPG input) z For DVD discs, press from the root or title menu. While playing the DVD, you may play your favorite title directly with title selection by pressing the GOTO button. z For Super VCD & VCD discs, while playing the disc, you may select tracks with the numeric buttons when PBC is off (Press Yellow/MENU to toggle PBC). z For CD, CD-G & HD-CD discs, while playing the disc, you may play your favorite tracks by numeric buttons. z For MP3 / JPEG /MPG input, you may play your favorite tracks by numeric buttons from the content menu. NOTE: In the above, for tracks 1-10, use numeric buttons directly (0 for 10); for tracks over 10, press DOT button first. (E.g. track 15, press DOT then 5, for track 38 press DOT three times then 8) 2. Previous / Next (for DVD / Super VCD / VCD / CD / CH-G / HD-CD and MP3 / JPEG /MPG input) z 3. While playing the disc: ♦ Press button to play to the last Title / Chapter / Track. ♦ Press button to play to the next Title / Chapter / Track. Forward z / Backward (for DVD / Super VCD / VCD / CD / CH-G / HD-CD & MP3/JPEG/MPG input) While playing the disc: ♦ There are 4 speeds for forward. Press to toggle between different speeds in sequence: FORWARDx2 / FORWARDx4 / FORWARDx8 / FORWARDx20 / Play ♦ There are 4 speeds for backwards. Press to toggle between different speeds in sequence: BACKWARDSx2 / BACKWARDSx4 / BACKWARDSx8 / BACKWARDSx20 / Play ♦ While in fast forwards or backwards mode, press to resume normal playback. NOTE: During Forward or Backward, the sound will be off for all video. 4. Slow motion (for DVD / Super VCD / VCD discs) z While playing the disc, ♦ Press SLOW to toggle between different speeds in sequence: SF1/2, SF1/3, SF1/4, SF1/5, SF1/6, SF1/7, PLAY. ♦ While in slow motion, you may press to resume normal speed. NOTE: During slow motion, the sound will be off. 5. Pause (for DVD / Super VCD / VCD / CD / CH-G / HD-CD and MP3 / JPEG /MPG input) -For all formats, press to pause, and press 25 to resume. 6. Repeat (for DVD / Super VCD / VCD / CD / CH-G / HD-CD and MP3 / JPEG /MPG input) z Press REPEAT once to display the current repeat mode. z For Super VCD, VCD, CD, CD-G, HD-CD discs, while playing in sequence mode, press REPEAT to toggle between the following modes in sequence: REPEAT (OFF) / REPEAT (1) / REPEAT (ALL) z For DVD discs, press REPEAT to toggle between the following modes in sequence: REPEAT (OFF) / REPEAT (CHAPTER) / REPEAT (TITLE) / REPEAT (ALL). z For MP3/JPEG/MPG input, press REPEAT to toggle between the following modes in sequence. REPEAT (OFF) / REPEAT (1) / REPEAT (DIRECTORY) / REPEAT (ALL). 7. Display (for DVD / Super VCD / VCD / CD / CH-G / HD-CD and MP3 / JPEG /MPG input) z Press AE/OSD to activate the on-screen display showing current title, chapter, time and other information. z For DVD discs, ♦ Press AE/OSD once to display first page as shown below: Press AE/OSD again to display the second page as shown below: z For Super VCD discs: ♦ Press AE/OSD once to display first page: Disc type, Track-/-(current /full), mute status, PBC status, repeat mode status, current track time. ♦ Press AE/OSD again to display second page: audio-/--(current /full) or OFF, audio type, language, subtitle-/-(current /full) or OFF. z For CD / CH-G / HD-CD and MP3 / JPEG discs, ♦ Press AE/OSD once to display first page: Disc type, track-/-(current /full), mute status, repeat mode status, current track time. z 8. For all media types, press Press AE/OSD again to turn off the on screen display. Title Skip (for DVD / Super VCD / VCD / CD / CH-G / HD-CD and MP3 / JPEG discs) z This function allows you to skip to your favourite Title / Chapter / Track. z Press GOTO to activate the on screen scroll-down menu for Title Skip. According to the highlighted area, input your favorite Title / Chapter / Track number by numeric buttons or input the playback time. After editing, press ENTER to start. If the input is invalid, it will not function. 26 9. Audio (for DVD / Super VCD / VCD / CD / CH-G / HD-CD and MP3 / JPEG discs) z Press LANG once to display current audio mode. z Press again to toggle between different audio modes in sequence. ♦ For DVD discs, toggle between audio tracks offered, such as different language, directory commentary, Dolby Digital, etc. ♦ For Super VCD & VCD discs, select from: Stereo – L – R - Auto L - Auto R ♦ For CD, CD-G, HD-CD, MP3 discs, select from: Stereo- L –R 10. Subtitle (for DVD and Super VCD discs) z Press BLUE/SUBTITLE button once to display current subtitle. z Press again to toggle between different subtitle modes in sequence. 11. Angle (for DVD disc) z Press ANGLE once to display current playback angle. z Press again to toggle between different playback angle codes in sequence. NOTE: Only valid for DVDs with multi-angle. 12. Zoom (for DVD / Super VCD / VCD / MP3 and JPEG discs) z Press GREEN/ZOOM to zoom in the picture. z There are 6 zoom modes, press GREEN/ZOOM to toggle between the zoom modes in sequence: Zoom2 – Zoom3 – Zoom4 – Zoom1/2 – Zoom1/3 – Zoom1/4 – Zoom OFF z In Zoom modes 2-4, you may use the navigation buttons to pan the picture for favorite portion. 13. Repeat A-B (for DVD / Super VCD / VCD / CD / CH-G / HD-CD and MP3 / JPEG discs) z In normal playback, fast forward of fast reverse, press AB at where you want to start the repeat portion. There will be have an on screen indication “REPEAT A”. z Press AB button again at where you want to stop the repeat portion. There will be on screen indication “REPEAT A. B”. z The repeat function will then start playback from A to B automatically. Press AB again to cancel. There will be an on screen indication “A B CANCEL”. z Repeat A-B will only function within the same track, title or chapter. 27 MP3 / JPEG / Video File Playback After loading a data disc, USB Drive or Memory Card (see page 30 – “Source” for more information), the TV will start to scan for the stored MP3s, JPEG photos and MPG videos folders. It will automatically display the MP3 contents and start to play the first file (highlighted file). The screen is as follows. z Use the navigation buttons to check your favorite folder/directory (left column) and choose the file to play (right column). Press ENTER to confirm your selection. z When in the right column, press the right navigation button to move the highlight to the bottom menu to choose between mp3, photo or video playback. When in the left column, press the left navigation button. Press ENTER to confirm your selection. z Press numeric buttons to select the contents directly for selections 1-10 (0 for 10) in the current mode. For numbers over 10, press DOT for each multiple of ten (eg. to select 25, press DOT twice and then 5). z While displaying JPEG photos, press PROGRAM to select slide effects. There are 17 slide modes, press PROGRAM to toggle between the following modes in sequence: Start from top / start from bottom / start from left / start from right / start from upper left corner / start from upper right corner / Merge from left / right Horizontal blades / Vertical blades / Merge from 4 corners / Random playback / Slide effect OFF z While displaying JPEG photos, you may use the navigation buttons to flip / rotate the picture. ♦ button to flip horizontally, ♦ button to flip vertically, ♦ button to rotate left 90º, ♦ button to rotate right 90º NOTE: If your MPG movie or JPG photo is playing very slowly, it may be recorded in a resolution that is too high for this system. 28 DVD Player Functional Settings Menu Menu Navigation 1) In DVD mode, press DVD SETUP button to activate the DVD player Functional Settings menu. 2) Press or to move and highlight between different sub-menus. 3) Press or or ENTER to enter the highlighted sub-menu. 4) Press DVD SETUP button again to exit the OSD menu, or move the highlight to EXIT SETUP then press ENTER button to exit. NOTE: In DVD Set up mode, all media playback will pause. System Setup Source Use this setting to choose between the three different input sources in DVD mode, that is: - Disc Player - USB flash drive - SD card/MMC The TV will revert to “Auto” mode when the DVD mode is started. If the TV does not read from a desired media in “Auto”, choose the source you want to play from in this setting instead. TV System Use this setting to choose between the NTSC and PAL displays. If set to “Auto”, the DVD player will automatically choose the appropriate TV system for the given input. TV Type For optimum viewing, please ensure that this setting is set to 16:9 (Widescreen). For any video that is recorded in 4:3, it will still display correctly on your TV when in this mode (i.e. the sides of the display will be blacked out). Use the SIZE button to adjust the display proportions as the video is playing as required. 29 Password - To edit the rating setting, press to highlight the , use the Number buttons to enter the default password “0000”, then press ENTER to confirm and unlock. -To change the password, input any 4 digit number when the Unlock symbol is showing. Once the 4 digit number is entered, that will be the new password and the new lock will be activated. Rating To restrict the playback of rated discs, you can select the rating setting according to your preference. The rating restriction is divided into eight categories from KID SAFE to ADULT. NOTE: This setting is editable only when the password has been entered and the unlock symbol is showing in the password menu. The restrictions will not be in place unless a new password has been entered so that the lock symbol is showing in the password menu. Default Setting Press to highlight “RESTORE”, then press ENTER to restore settings to factory default. NOTE: this will not reset the password. . 30 Language Setup Press DVD SETUP button to enter the DVD Functional settings menu, use Setup menu appears, then press or until the Language or ENTER to confirm the selection. NOTE: For all of the below, if the selected language is not included in your DVD disc content, it will select the default language of the disc automatically. OSD Language Use navigation buttons to select the OSD LANGUAGE setup icon, press ENTER button to confirm. There are 6 languages for your selection, press or to toggle between different languages and press ENTER to confirm. Default DVD Audio Language Use navigation buttons to select the AUDIO LANG setup icon, press ENTER to confirm. There are 6 languages for your selection, press or to toggle between different languages. Press ENTER to confirm. Default DVD Subtitle Language Use navigation buttons to select the SUBTITLE LANG setup icon, press ENTER to confirm. There are 6 languages for your selection, press or to toggle between different languages. Press ENTER button to confirm. Default DVD MENU Language Use navigation buttons to select the MENU LANG setup icon, press ENTER button to confirm. There are 6 languages for your selection, press or to toggle between different languages. Press ENTER button to confirm. 31 Troubleshooting Before contacting a service technician for any problems that arise, perform the following simple checks. If the problem persists, unplug the LCD TV and contact Kogan Technologies. PROBLEM POSSIBLE SOLUTION - Check that the main plug has been properly connected to a power outlet. No sound and picture - Check that you have pressed the POWER button on the front of TV set. - Check the picture contrast and brightness settings. - Check the volume. Normal picture but no - Sound muted? Press the MUTE button. sound - Try another channel as the problem may be with the broadcast. - Are the audio cables installed properly? - Check if there is any object between the product and remote control The remote control does Not work causing an obstruction. - Are batteries installed with correct polarity (+ to +, - to -)? - Correct remote operating mode set: TV, VCR etc.? - Install new batteries. Power is suddenly turned - Is the sleep timer set? off - Is the Power On/Off Timer (page 16) option on? Picture appears slowly after switching on - This in normal, the image is muted during the product startup process. Please contact you service center, if the picture has not appeared after five minutes. - Adjust the color in menu option. No or poor color or poor - Try another channel, the problem may be with the broadcast. picture - Are the Video cables installed properly? - Change the Video OSD Settings (page 10-12) Horizontal/vertical bars Or picture shaking Poor reception on some channels Lines or streaks in pictures No output from one of the speakers - Check for local interference such as an electrical appliance or power tool. - Station or cable product experiencing problems. Tune to another station. - Station signal is weak, reorient antenna to receive weaker station. - Check for sources of possible interference. - Check the antenna (Change the direction of the antenna). - Adjust balance in menu option. 32 The following troubleshooting problems below refer only to VGA mode. PROBLEM The image is not appearing on the screen properly Vertical bar of stripe on back ground & Horizontal Noise & Incorrect position. POSSIBLE SOLUTION - Adjust resolution, horizontal frequency, or vertical frequency. - Check it whether the signal cable is connected or loose. - Check the input source. - Activate the auto adjust function (see page 12) - Configure or adjust clock, phase, or H/V position settings Screen color is unstable - Check the signal cable. or single color. - Reinstall the PC video card. Maintenance Early malfunctions can be prevented. Careful and regular cleaning can extend the amount of time you will have your new TV. Be sure to turn the power off and unplug the power cord before you begin any cleaning. Cleaning the screen The LCD screen should be handled with care. It is recommended to use anti-static wipes or an LCD-screen cleaning kit if you need to clean the screen. Cleaning the cabinet To remove dirt or dust, wipe the cabinet with a soft, dry, lint-free cloth. Please be sure not to use a wet cloth. Extended Absence If you expect to leave your TV dormant for a long time (such as a vacation), it’s a good idea to unplug the power cord to protect against possible damage from lightning or power surges. 33 Handling Discs 1. To remove a disc from its storage case, press on the center of the case and take the disc out. 2. Hold the disc by the edges, to avoid touching the Recorded side of the disc. Cleaning discs 1. Fingerprints and dust should be carefully wiped from the disc’s surface with a soft Cloth. Audio discs and DVD discs have no grooves to collect dust and microscopic debris so gently Wiping with a soft cloth should remove most particles. Wipe in a straight line from the inside to the outside of the disc. Small dust particles and light stains should have no effect on reproduction quality. 2. Never use chemicals such as record sprays, antistatic sprays, Benzine, or thinners to clean the discs. These chemicals can irreparably damage the disc’s surface. 3. Discs should be returned to their cases after use. This avoids serious scratches that could cause the laser pickup to skip. 4. Do not expose discs to direct sunlight, high, humidity, or high temperature for extended periods. Exposure to high temperatures can warp the disc. 5. Do not stick paper or write anything with a ball point pen on the label side of the disc. 34 Features ·High Definition display. ·Support HDMI Interface (HIGH-DEFINITION MULTIMEDIA INTERFACE). ·DVD and DVB-T All in One. ·RF, HDMI, VGA, YPbPr, AV, S-Video, DVD, USB, Card Reader inputs. ·Stereo audio inputs. ·Automatic or manual channel search. ·Auto-shutdown to save power when no signal is present. Specifications TV TV System PAL/Secam/NTSC Screen size 22“ (diagonal) Resolution 1680 x (RGB) 1050 Aspect Ratio 16:10 Response time 5ms Aerial input 75Ω (unbalanced) Audio output power 2 x 5W Mains power 12V 5A Power consumption Stand by: 3W, Operating <42W Remote control Yes Type Infra-red Control distance 8m Control angle 30°(horizontal) Batteries 2 x 1.5V size AAA Dimensions 54cm x 46cm x 21cm DVD Disc Physical Format DVD/CD/VCD/MP3/JPEG/CD-R/RW DVD±R/RW DVD Video Output Format PAL / NTSC Video Decompression MPEG2(ISO/IEC-13818), MPG1, JPEG, MPEG4, WMA 35