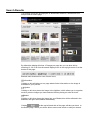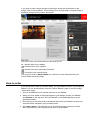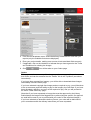
1
lookat.me™
user manual
digital asset and
archive collection
management
lookat.me™ user manual
Contents
digital asset and archive collection management
lookat.me™ user manual
1
lookat.me™ user manual
2
lookat.me™ user manual
3
Introduction
4
Administrative functions
23
Overview
23
Configuration options
41
lookat.me™ user manual
Thank you for choosing lookat.me, a complete digital asset and archive collection
management system.
This manual provides an introduction to the user interface for lookat.me™ version 2.
Typographical Conventions
The following typographical conventions are used in lookat.me™ manuals.
italics
Introduces new terms that
you may not be familiar
with and occasionally
indicates emphasis.
bold
Emphasises important
information and field
names.
UPPERCASE
Indicates keys or key
combinations that you can
use. For example, press
the ENTER key.
monospace
Indicates syntax examples,
values that you specify, or
results that you receive.
monospaced
italics
Indicates names that are
placeholders for values you
specify; for example,
filename.
monospace
bold
Indicates the results of an
executed command.
vertical rule |
Separates menus and their
associated commands. For
example, select File | Copy
means to select Copy from
the File menu. Also,
indicates mutually
exclusive choices in a
command syntax line.
Typographic conventions © Serena 2006
User manual version 2.0
July 2006
Cover:
Left image: Don Fuchs, Beach, Cocos Island, Indian Ocean
Right image: Peter McNeill Lasseter’s Expedition
Introduction
lookat.me™
digital asset and archive collection management
lookat.me™ is an advanced, robust, economical and user-friendly digital asset and
archive collection management system.
It has been designed to make life easier for anyone who needs to maintain an
accessible and well organised asset library. The system has been created using
leading-edge technology, but is simple to use, saving our clients valuable time and
ensuring efficient distribution of images and other electronic assets over the internet.
lookat.me™ is a flexible system that can be extended easily with the e-commerce
and rights management module, license.me™.
Who uses lookat.me?
lookat.me™ galleries are used by people who need to manage images, videos or
other digital assets: this can include anyone from a small business operator, such as
a commercial photographer, to a larger organisation, such as a tourism body, art
gallery or corporation. Anyone who deals with digital assets professionally, and who
needs a time and cost-effective means to distribute them can benefit from an online
gallery.
Types of assets
Any assets which can be stored electronically, such as photographs, logos and
MPEG movies, can be distributed and accessed online with lookat.me™.
A lookat.me™ system can also manage branding by giving controlled access to
images, logos and style guides. Your staff and partners will have controlled access
to consistent information.
How do they work?
Images and other digital assets are stored on a computer, either at me™ or on a
server of your choice. They can then be accessed by either the general public, or
have limited access only, using a password. With the addition of the license.me™
system, assets can also be rights managed (which means payment according to
usage) if required, depending on your needs.
Technical help
Cookies
Cookies are small amounts of information stored on your computer by Internet sites
you visit.
You must choose to accept the cookie when prompted, in order to log in to this site.
Please log in to the site again after changing the cookie setting.
How to setup cookies for MS Internet Explorer™
1. Go to Tools -> Internet Options -> Privacy -> Advanced
2. Choose "Override automatic cookie handling"
3. Choose "Prompt" for First-party Cookies
4. Choose "Prompt" for Third-party Cookies
This setting will allow you either to accept or reject the cookies.
How to download a digital Image file
You will require special software to view the downloaded files.
The materials available to download have been converted to a digital file. In order to
minimise the time it would take to download a large digital file, the images have
been compressed to a JPEG format.
If you are having problems downloading please check with your administrator to see
if there are download restrictions in place with your network or ISP before contacting
Technical Help at the email address listed on the Contact us page.
Using Zip, a public domain software product that uses non-loss compression, the
images are compressed so that they can be downloaded directly to your desktop in
less time.
You will require software to unzip (expand) the images you have downloaded from
the site. Using WinZip™ or StuffIt Expander™ you can expand the file back to its
original file size. If you don't have WinZip or StuffIt Expander™ you can download
the software from the Internet for free.
Click here to download WinZip™ for Windows™.
Click here to download StuffIt Expander™
How to expand a compressed file using WinZip:
1.
2.
3.
4.
5.
6.
7.
Click the 'Download image' button
When the dialog box appears select "SAVE". DO NOT select "open".
Locate the file on your hard drive and double click it.
A WinZip window will appear. Click 'I agree'
Highlight (one click only) the image file and select 'Extract' from the top menu bar
Select the location to store the image and click the 'Extract' button
The expanded file will be saved to the specified location
How to expand a compressed file using StuffIt Expander™:
1. Click the 'Download image' button
2. Save the file to your hard drive
3. Launch StuffIt Expander™
4. Select 'Expand' from the menu bar
5. Select the .zip file and click 'Open'
6. The .zip file will convert to an expanded file that you can double click to open or
simply drag and drop the .zip file onto the StuffIt Expander™ icon to expand it.
If you have difficulty downloading files, your Internet connection may be busy.
Please try again within [48] hours from your requests page.
How to preview and download a digital video file
Videos include a short preview movie that can be viewed directly from your browser.
Simply click on the preview image to begin playing. This requires a QuickTime
plugin.
Click here to download QuickTime.
Videos can be ordered simply by adding them to your basket and placing your order
as described above.
Latest Browsers
Some areas of this site may not display correctly on older versions of your browser.
You can get the latest version of popular browsers here:
Click here to download Microsoft Internet Explorer 6.
Click here to download Netscape 6.
Click here to download Firefox
For all technical enquiries please email: [email protected]
Printing
If your printer clips the side of the page when printing from this site (eg lightboxes)
try one of the following:
• in Page Set Up, set margins to zero or the smallest size allowed
• in Page Set Up, choose landscape instead of portrait
• in Page Set Up, choose "shrink to fit" if that option is available. or, if the above
techniques do not help,
• copy the web page (Control-A then Control-C) and paste it (Control-V) into a blank
document in Outlook, Outlook Express or Microsoft Word, save and print the
document.
New Users
The site can be configured to allow browsing and adding to the basket as a guest. In
this instance you do not have to provide personal details until you wish to make an
order.
The site can also be configured to require all users to register before they can make
orders, or even browse assets. This depends on the business rules of the library
owner.
In this case new users can register by completing the following steps:
1. Click the Register link in the right hand navigational bar (see diagram). This will
take you into the Registration Page.
2. Complete the form, ensuring that all fields marked with red asterisks are
completed correctly. The “User Type” must be filled in correctly because this
determines your access and fee schedule.
when the form is completed. This will submit your details to
3. Click
the Administrator of the site for processing.
If you meet the criteria (see User Type Definitions under the “Useful Info” link on the
top menu), your application will be approved and you will be sent an e-mail
containing your Username and Password. This process may take up to one
business day (Australian EST).
You now can access the site by logging in with your Username and Password.
Existing Clients
Logging in with your Username and Password:
1. Go to the Log In dialog box (located in the side bar on the right).
2. Complete the following fields;
• Username
Enter your username
• Password
Enter your password
. You will then be taken to the Search Page.
3. Click
Password Reminder
1. Go to the Login dialog box (located in the side bar on the right)
2. Click Password Reminder
3. The Password Reminder page will appear.
4. Type in your email address.
5. Click
,
Your Password and Username will be emailed to you directly.
Home Page
From this page you will be able to access the site’s website, register and view the
art gallery.
The Home page is divided into a number of different sections, allowing you to
navigate through the site. The sections are as follows: the top menu, the footer
menu, right-hand navigation bar, Mini Collections, the Gallery, Information and
Banner. (see diagram below).
To use any of the functions on the Home page you must log in with a username and
password (see above instructions).
Top Menu
The top menu is used to access specific functions of the site. However, please note
that these functions will only be available after you have logged in as a registered
user.
The top menu, which remains the same on each page of the site, is a navigation bar
that will lead you into a number of different pages and functions within the site. The
pages you can access through the Top Menu are: Home, Search, Basket, Orders,
Lightbox, Help, Useful Info, Administration (if authorised).
Home
This option will allow you to return easily to the Home Page of the site from any
page in the website.
You can also access the Home Page by clicking on the site logo, located on the
banner at the top of the page.
Search
Selecting this option will take you directly into the Search Page, which will allow you
to search for images and other resources available on the site. See below for more
detailed instructions pertaining to the search page, under the heading “Search
Page”.
Basket
Selecting this option will take you into your current Shopping Basket. If you have
selected images or other resources, these will appear in the Shopping Basket,
pending confirmation of your order.
The Shopping Basket contains a summary of the imagery you have selected to
purchase.
You can remove, or proceed to purchase an item from your Shopping Basket at any
time.
Please note, if there are any restrictions on any of the items you have selected, the
request will be sent to the Administrator for approval.
You will be notified by email if your request has been approved, and given a web
address link that will take you to a page where you can resume your order.
Located beneath each image in your Basket is a set of four icons:
Check Box
Clicking on this allows you to select the image, either to remove it from your basket,
or to process an order for the image. Clicking on the icon again will deselect the
image.
Information
Clicking on this will take you to a page where further information on the image is
available for your perusal.
Lightbox
Clicking on this icon places the image in the Lightbox, which allows you to organise,
email or print the images you have selected, before placing an order for them.
Discard
Clicking on this icon will remove the image from the Shopping Basket.
Alternatively, you can click on Check All (the link is located near the top of the
Basket).This will select all the images currently in the Shopping Basket. You can
then clear all the items from your Basket, or proceed to order.
Requests
Selecting this option will allow you to view by date the orders that you have created
(see “How to Order” below for instructions on how to place an order)
Clicking on the invoice number on this page will take you to a Tax Invoice/ Receipt
page detailing the specifics of your order.
- Clicking on this button on the Tax Invoice/ Receipt page will also
allow you to print any of your previous orders
Clicking
Orders page.
on the Tax Invoice/ Receipt page will take you back to the
Lightbox
This function allows you to create a Lightbox and place images into them while
searching the website prior to purchase. This is a very handy function if you are
conducting a search for multiple projects, require approval for the images selected,
or if you are doing an initial search for your project. This function also allows you to
print the images and e-mail images to other parties for approval. For security, a
watermark will appear on these images. However, the watermark will disappear
upon purchase or download.
Options within the Lightbox menu:
Clicking on the scrolling arrow will allow you to select which of your created
Lightboxes you wish to view.
Immediately below this field are four options:
Delete this lightbox
This will allow you to delete the selected Lightbox.
Edit
This option allows you rename the Lightbox.
Check all
This option selects all the items in the Lightbox.
Uncheck all
This option deselects all the items in the Lightbox.
With the selected items in the Lightbox:
Clicking on this button removes the items from the Lightbox.
Clicking on this button places the items into the Shopping Basket.
You may also create multiple Lightboxes using the “Create a new Lightbox” option.
To create a new Lightbox:
1. Enter the name and description of the new Lightbox into their respective fields.
2. Click
.
Help
Selecting this option will provide you with the help menu. This page provides you
with instructions on how to use the site and troubleshoot problems.
Useful Information
Selecting this option will provide you with access to a number of options for
information about:
•
•
•
•
•
The site
Copyright Free & Restricted Images
User Type Definitions
Suppliers
Photographers
In addition, there is an online feedback form available, which allows you to make
comments or contact the site. From the “Useful Information” menu, you may also
access the page allowing you to change your registration details.
Right-Hand Sidebar (Home Page)
The right-hand sidebar is located on the Home Page in the dark grey shaded area.
The menu available within this sidebar provides you with shortcuts to the functions
you may use most frequently on the site.
You can log out or change your password using options in this side bar.
User Info
will take you to the page containing your registration
Clicking on
or password details. From this page you will be able to select a new password.
Search
This shortcut allows you to access the Search Function of the website from the page
you are currently on.
To use the Search shortcut:
3. Type in your search term in the blank text field.
4. From the dropdown menu below the text field, select how you wish the search to
be performed.
5. Click
.
Basket
This shortcut allows you access to your Shopping Basket.
y
Click “Go to” to view your shopping basket
y
Click
required item.
y
Click
to contact the administrator to obtain a quote for the
to empty your shopping basket.
Lightbox
This shortcut in the sidebar allows you to easily view your Lightbox; place items from
your Lightbox into your Shopping Basket; remove all the items in your Lightbox;
email the lightbox to a selected person; and create a new Lightbox.
Footer Menu
This menu is located at the foot of each page within the site.
The footer menu provides a selection of information pages regarding the site, as
well as links to both the corporate website and Media Equation’s official website.
Terms & conditions: Clicking on this will provide you with the terms and conditions
for use of any images on the site. This should be read prior to ordering or
purchasing any assets on the site. Misuse of assets may constitute a breach of
copyright
Copyright: Clicking on this will provide you with explanations of the copyright
restrictions that apply to the assets available on the site.
Disclaimer: Clicking on this will display the Privacy and Disclaimer statement.
Corporate Site: Clicking on this will link you directly to the organisation’s corporate
website.
Media Equation Pty Ltd: Clicking on this will link you directly to the official website of
Media Equation, the company with which the site was collaboratively developed.
Mini Collections
A Mini Collection is a pre-selected collection of images set out as representative of
specific topics. This provides an excellent starting point for a search if you are
unsure about what you are looking for. Depending on how the site is configured you
may have to be logged in with a username and password to access the Mini
Collection
The Mini Collections can be accessed through the sidebar on the left-hand side of
the Home Page, or through the Search page.
Accessing Mini Collections from the Home page:
1. Log in using your Username and Password
2. Click Home on the Top Menu
3. Click on an individual image (title of Mini Collection is under the image) This will take
you into the individual Mini Collection (see below)
Accessing Mini Collections from the Search page:
1. If required, log in into the site with username and password
2. Click Search on the Top Menu
3. Locate the “Mini Collection Search” dialog box.
See below for information on how to search by Mini Collections.
Searching for Items
The Search page will become available when you have logged on, providing you
with access to the following Search tools:
•
•
•
•
•
•
Search
Advanced Search
Regional Search
Category/ Keyword Search
Mini Collection Search and
Video Collection Search.
Set out below is a diagram of the Search page.
Basic Search
This search should be utilised when you have a specific subject to find, such as the
title or number of an image.
To use the Search:
1. Type in desired search in “Search for” field. For example, type the name of the item
you are looking for, an adjective that describes its characteristics, or a word that
describes your concept. The search engine is not case sensitive so it does not
matter if you use caps or lowercase, or any combination of these.
2. If required, link key words with “AND”, “NOT” and “OR”.
3. From the “Category” dropdown menu, select which collection you wish to search in Art, Photography or Video.
4. After selecting all of your requirements click
. This will bring you to
the Search Results page, where you will be provided with a number of thumbnails
matching your search requirements.
5. Click back to return to the Search page, where you will be able to begin a new
search or edit your current search.
Search by Mini Collections
Mini Collections include pre-selected images on specific topics and destinations
within Australia. Mini Collections feature the best of the available images for a
specific topic.
A Mini Collection is a great start when a client is not sure what they are looking for,
as it provides a good range of images to choose from.
To use the Mini Collections Search:
1. Select the category for your search from the “Category” dropdown menu.
2. Select which Mini Collection you wish to search from the “Mini Collections”
dropdown menu.
3. Click
. This will take you into the Mini Collection you have selected.
Search Results
Your search results will be displayed as thumbnails. Below is a screen shot of a
sample search results page.
By default the display will show 15 images per page but you can alter this by
selecting 10, 30 or 60 from the search display menu in the top right corner or at the
bottom of the page.
Beneath each thumbnail is a set of three icons:
Information
Clicking on this will take you to a page where further information on the image is
available for your perusal.
Lightbox
Clicking on this icon places the image in the Lightbox, which allows you to organise,
email or print the images you have selected, before placing an order for them.
Basket
Clicking on this icon places the image into your Basket; this will be reflected in the
Basket in the right- hand sidebar immediately.
at the top left-hand side of the page will take you back to
Clicking
the Search page, where you will be able to start a new search or edit your search.
If you wish to have a larger preview of the image, along with information on the
image, click on the thumbnail. This will bring you to a page where a large preview is
available, along with the product information.
The set of icons in the Information box will allow you to:
- Add the item to your basket
- Add the item to your Lightbox
- Add the item to an active Mini Collection
- Go back to your search results
You may also click on More Details >> (the link is in the information box) for
further details about the image.
How to order
If you would like to order or purchase items, you must add the item to your Shopping
Basket. You can do this directly from the "Search Results" page or from the image
"Information" page.
1. Click on the Basket icon to add the resource to your Basket.
2. When you have added all required images to your Basket, access your Basket click Basket on the top menu OR click “Go to” in the Basket dialog box in the
right hand sidebar.
3. Ensure that you have removed all unwanted items from your Basket, as items not
removed will be included in your purchase order.
4. Click Get a quote. This will bring you to the following page, where you will be
able to process the order request for the items in your Basket.
5. From the first dropdown menu, select the delivery format/size for each item you
require (only the available formats are displayed).
6. Enter your project details, making sure to enter all red asterisked fields correctly.
7. If applicable, click on the checkbox to indicate that you have agreed to the Terms
and Conditions for ordering the images.
8. Click
. You will be taken to your Orders page.
Orders
This page contains a summary of the images you have requested for purchase and
their costs, and can be accessed via the “Orders” link in the Top Menu (see above
instructions)
If you have been granted free imagery, you will be able to download these images
immediately from the Orders page.
If you have selected copyright-free images and are required to pay, you will be taken
to the e-commerce payment facility to pay for the imagery by credit card. If you have
been allocated a discount you may not be required to pay, and you will proceed to
an online "Order Summary" page.
(Note that if you have requested an image that must be approved by the Library
Administrator the image will be flagged with a yellow triangular symbol. On approval
an email will be sent to you to proceed with your order for the restricted images.)
If you have selected an alternative delivery format, your order will be delivered to
you in accordance with the delivery instructions you have requested.
Administrative functions
Overview
Your clients will be able to search your gallery using keywords and track the
progress of their requests and approved orders. They can also reattempt a
download if they have a problem with the first attempt.
These features minimise user enquiries. The lookat.me™ Help Desk promptly takes
care of any questions or routine technical enquiries that users may have, that would
otherwise be directed to your marketing staff.
Types of collections
lookat.me™ has an exciting facility to create Mini Collections of images for particular
purposes. Combined with remote authoring, regional or overseas staff can create
their own customised Mini Collections to suit local market tastes and cultural
sensitivities. A remote administrator can ensure that media users in their area only
access the images that support the marketing strategy for that area. Mini Collections
can be created in a few minutes and they can be easily edited or renamed in
response to new events and promotions.
Light box or Favourites
The lookat.me™ light box (or favorites) function is a hugely popular feature for the
ad agency and graphic designer demographic. Such clients tend to work with very
tight deadlines and the light box feature can help users gain fast internal approval
for selected images from their account manager or clients. Users have the
opportunity to create a light box, add selected images and then email those images
to their account manager or their client for approval. This functionality speeds the
approval cycle for clients accessing images and creates a user-friendly process that
attracts clients back to the site. lookat.me™ systems currently house about 2,000
active light boxes.
Administrative reports
You can access transactional data on the lookat.me™ server via the report
generator in the administrative interface:
- Orders report
- Access history
Reports can be sorted and filtered by user type and date range. Optionally, data can
be saved from the reports and imported into many accounting or analysis packages
from Oracle or SAP to MYOB.
Rights management
license.me™ is the rights management extension to the lookat.me™ online gallery
system.
The license.me™ rights management system is ideal for any organisation that has
control over copyrighted images: galleries, museums, tourism organisations,
publishers, photographers and artists or their agents or estates.
license.me™ includes e-commerce and is suitable for commercial sales and allows
for variable quotation and invoicing of assets according to the proposed usage. This
enables our clients to take into account the rights that have been negotiated with
content creators / photographers and talent.
Simple rights management
license.me™ can be configured to allow you to quote every usage request on its
merits. This is a good way to start, allowing you to develop business rules as pattern
emerge.
Advanced right management
For larger volumes a degree of automation is possible.
Once a user has found an image they wish to use, license.me™ can calculate the
usage fee based on parameters such as circulation, exposure, the lifespan of the
campaign and type of publication (advertisement, documentary, book, newspaper,
magazine etc).
You can also have some assets automatically quoted while others come to you for
assessment-you decide.
Audit trail
The audit trail of the rights management system allows royalties to be calculated for
distribution to the rights owners where required. Users who have licensed videos
and images from the site can return months later and renew their rights or reapply
for new projects. As an administrator, you can also add covenants to images
defining the applications for which the assets may or may not be used.
How it affects you
It is important that artists’ rights are correctly managed otherwise an organisation
may run the risk of litigation. By using a rights managed system, you have the
comfort of knowing that you can put in place all necessary structures to meet your
obligations as custodians of copyright images and talent rights.
User registration and approval, setting user privileges
1. From the Administration menu, click on Approve Users.
2. This will take you to a page containing a list of users whose status is pending.
Click on a particular user number. This will take you to a page containing the
user details.
3. Using the respective dropdown menus, set the privileges for the user, such as
the Access Level, the Metadata Level and the User Status.
4. Select Mini Collections if applicable.
5. Set price adjustments and choose which formats are available, if applicable.
6. To notify the user of the approval or rejection by a standard email, click on the
“With email” checkbox.
7. Click
respectively.
or
to approve or reject the user
Managing users
1. From the Administration Menu, click on Manage Users.
2. Using the sort tools and their respective dropdown menus (shown below), you
will be able to:
•
Sort the users by their registration date
•
Set the display of user names in ascending or descending alphabetical
order
•
Set the display of user names by Name, Date, Company or User Type
•
Set the display of user names to show all users in the selected category, or
only users whose status is Pending, Active, Rejected or Expired
•
Set the display of user names to show all users, or only users with a
particular level of access within the website, namely Manager; Admin;
Admin- Report; Remote- Upload; Supplier; Staff; User
After setting the user name display, click
according to your selected settings.
to display the user names
You may also click
to download the user information in a Comma
Separated Values file format. This is a simple file data format that is supported by
almost all spreadsheet software, such as Microsoft Excel.
Upon completion of the download, a pop-up window will appear to allow you to
select whether you wish to Open, Save or Cancel the downloaded file.
Using the panel shown below, select the user names which you require displayed
according to your selected settings (see above). The user names will be displayed
alphabetically, according to their last names.
(Note: Users who enter names which cannot be allocated into alphabetical
categories can be viewed under “Other”.)
Approving item requests or orders
1. From the Administration menu, click on Approve Requests or Video Orders.
2. Select a user and click on the invoice number. This will take you to a page with
the user details and a list of the items requested. To approve a particular
request, click on the “Approve” check box next to the item.
3. To notify the user of the request approval or rejection by a standard email, click
on the “With email” checkbox.
or
4. When all the required checkboxes have been ticked, click
at the bottom of the page.
Editing image data for individual images
1. From the Administration menu, click on Edit Items. This will bring you to the
following page:
2. From the “Order by” dropdown menu, select the order in which you wish the
items to be displayed - by default; or by date, in reverse order.
3. From the “Access Level” dropdown menu, select the level of access you require.
4. Click on “Show Images”. The Search results page will display the required items
as thumbnail images.
5. Click on the thumbnail image. This will bring you to a page where information
about the item is displayed.
6. Click on “Edit this image” information page with editable fields.
7. Upon completion of the relevant changes, click
or
also have the option to
. This will take you to an
to proceed. You
.
Changing the access level of images
1. From the editable information page (see above instructions on how to get to this
page), locate the Access section (see image below).
2. Select the relevant access level from the dropdown menu and click on it to make
the change.
Adding an image to a category group
1. On the editable information page, locate the Advanced search pairs section
(see image below).
2. From the “Category” dropdown menu, select the category you wish the image to
be added to.
3. From the “Keyword” dropdown menu, select the keyword you wish the image to
be tagged with.
4. Click
.
Adding an item to a Mini Collection
1. On the editable information page, locate the Mini Collections section (see image
below).
2. From the “Category” dropdown menu, select the category of mini collections you
wish the item to be placed into.
3. From the “Mini Collections” dropdown menu, select the mini collection you wish
the item to be placed into.
4. Click
heading.
. Your selections will appear under the Mini Collections
5. To remove the item from the mini collection you have just selected, click on the
[remove] link located next to the listed mini collection
Updating an image preview
1. On the editable information page, locate the Update preview section.
2. To select a new preview image, click
image from the pop up window that appears.
. Choose the required new
3. Check or uncheck the “Use watermark” option.
4. Click
.
To refresh the page and view the new image preview, click
To make adjustments to the preview, click
page where you can
•
edit the modulation of the image
•
rotate the image
•
sharpen the image
•
crop the image
•
change the background colour
.
. This will bring you to a
Note that the check boxes next to each adjusted category need to be clicked on in
order for the changes to be registered. Upon completion of the required changes,
click
. If you need to make further changes, click
.
Reports
From the Administration menu, click on Reports. This will take you to a page
where you can select the category of reports you wish to view/ edit.
Lightbox Report
This report gives details on:
•
the total number of Lightboxes
•
the total number of Lightbox owners
•
the average number of Lightboxes a person owns
Orders Report
This report gives the details of all orders made for images.
1. Using the respective dropdown menus, you may select how you wish the orders
to be displayed:
•
“Show From” and “Show To” - Only orders made within a selected time
period are shown
•
“Direction” - Orders are arranged in ascending or descending order
•
“Sort By” - Orders are sorted by date, status, price, images, date paid or
country
•
“Show order status” - Only orders with a selected status are shown
•
“ Show payment status” - Only orders with a selected payment status are
shown
•
“Show access group” - Only orders made by a selected access group are
shown
2. Click
when all required settings have been selected.
Alternatively, you may click
to download the data in Comma
Separated Values file format.
You may also click on the order number to view the tax invoice/ receipt for the
selected order.
Revenue Report
This report gives the details of the revenue received over a selected period of time.
2. Using the respective dropdown menus, you may select how you wish the orders
to be displayed:
•
“Show From” and “Show To” - Only orders made within a selected time
period are shown
•
“Direction” - Orders are arranged in ascending or descending order
when all required settings have been selected.
3. Click
to download the data in Comma
Alternatively, you may click
Separated Values file format.
You may click on the order number to view the tax invoice/ receipt for the
selected order.
You may also click on the item number to view information on the item
purchased.
Access Report
This report gives the date, time and duration of access to each library by individual
users.
1. Using the respective dropdown menus, you may select how you wish the reports
to be displayed:
•
“Show From” and “Show To” - Only users within a selected time period
are shown
•
“Direction” - Users are arranged in ascending or descending order
•
“Sort By” - User names are sorted either by name or date
2. Click
when all required settings have been selected..
Alternatively, you may click
to download the data in Comma
Separated Values file format.
Most Popular Items Report
This report details the items for which the most number of orders have been placed.
1. Using the “Show From” and “Show To” dropdown menus, you may select which
time period you wish the reports to be given for.
when all required settings have been selected.
2. Click
to download the data in Comma
Alternatively, you may click
Separated Values file format.
3. Clicking on the thumbnail image next to the order number will bring you to a
page giving further information on the item ordered.
Mini Collections Access History Report
This report gives the viewing history of each of the Mini Collections which have been
accessed.
1. Using the “Show From” and “Show To” dropdown menus, you may select which
time period you wish the reports to be given for.
when all required settings have been selected.
2. Click
to download the data in Comma
Alternatively, you may click
Separated Values file format.
Search History Report
This report shows the search terms which users have employed in the search
function of the website, along with the number of times these terms have been used.
1. Using the “Show From” and “Show To” dropdown menus, you may select which
time period you wish the reports to be given for.
2. Click
when all required settings have been selected.
to download the data in Comma
Alternatively, you may click
Separated Values file format.
3. Clicking on the arrow link next to each listed search term will display the name of
the user who used the term.
Undeleting Items/ Manage Archived Items
This report shows the items which have been deleted or archived, and allows you to
reinstate or undelete the items.
1. Using the respective dropdown menus, you may select how you wish the reports
to be displayed:
•
“Show From” and “Show To - only items within a certain time period are
displayed
•
“Direction” - Items are displayed in ascending or descending order
•
“Sort By” - Items are sorted by item name, title or date
•
“Show’ - Items shown are either deleted or archived items, or both.
2. Click
when all required settings have been selected.
Alternatively, you may click
to download the data in Comma
Separated Values file format.
From this page you may click on the individual items and reinstate them by
clicking the “Reinstate” link next to each item.
3. If you wish to edit the individual images, click on the “Edit” link next to each item.
This will take you to a page with editable information fields (see Editing
Individual Images). From this page you may click on
or
to delete or archive items respectively.
Expiry Dates
This report shows the expiry dates of items.
1. Using the respective dropdown menus, you may select how you wish the
reports to be displayed:
•
“Show From” and “Show To - only items within a certain time period are
displayed
•
“Direction” - Items are displayed in ascending or descending order
•
“Sort By” - Items are sorted by item name, title or date
•
“Show’ - Report shows either All, Available, Archived or Deleted items.
when all required settings have been selected.
2. Click
Alternatively, you may click
to download the data in Comma
Separated Values file format.
Summary Report
This report gives you an overall report on the orders that have been placed.
1. Using the respective dropdown menus, you may select how you wish the
reports to be displayed:
•
“Show From” and “Show To - only items within a certain time period are
displayed
•
“Direction” - Items are displayed in ascending or descending order
•
“Sort By” - Items are sorted by item name, title or date
•
“Show’ - Report shows either All, Available, Archived or Deleted items.
when all required settings have been selected.
2. Click
to download the data in Comma
Alternatively, you may click
Separated Values file format.
Uploading images
To upload a new image individually:
1. From the Administration menu, click Upload.
2. Click
(see image below) to select an image.
3. Click on the “Replace existing” checkbox if the current image is to be replaced.
4. Click
.
To upload images in bulk:
1. From the Administration menu, click on Bulk Upload. This will bring you to the
following page:
2. Click
to select an image; the file will appear in the dialog box. Repeat
this step with further images you need to upload.
3. If you wish to remove an image file, click on the file and click
.
4. If you wish the existing image to be replaced, click on the “Replace Existing”
checkbox.
5. When all the required images have been selected (the image files should appear
in the dialog box), click
.
Editing the default data for uploaded images
Each image will be uploaded with a set of default data. To change the default data:
1. Click on the edit default data link at the bottom of the page.
This will bring you to a page with editable information fields. Type in the required
changes into the text fields, or select from the dropdown menus.
•
To add an image to a category and tag it with a keyword, select the
category and keyword from the respective dropdown menus and click
.
•
To add an image to a Mini Collection, select the category and mini
collection from the respective dropdown menus and click
.
2. When all the required changes have been made, click
bottom of the page.
at the
Editing Mini Collections
Adding a new Mini Collection
1. From the Administration menu, click on Mini Collections. This will bring you to
the following page, where you can add a Mini Collection to the existing selection:
2. Type in the name and description of the Mini Collection into the respective
editable fields.
3. From the “Type” dropdown menu, select whether the Mini Collection is private or
public.
4. From the “Show in Search” dropdown menu, select whether the Mini Collection
will show up in searches.
5. From the “Category” dropdown menu, select which category the Mini Collection
is to be placed into.
Note: You may edit the categories available by clicking on the Edit Categories
link at the bottom of the section (see Editing Mini Collections Categories for
instructions).
6. From the “Show in Sample” dropdown menu, select whether the Mini Collection
will show up in the selection of sample Mini Collections.
7. When all required information has been entered, click
.
*Editing Mini Collections categories
This will bring you to a page where you can make the required changes (see
image below).
•
To delete an existing category, click on the “Delete” checkbox next to its
name.
•
To add a new category, type the name of the category in the blank text
field at the bottom.
When all required changes have been made, click
changes.
to save the
Editing an individual Mini Collection
1. From the Administration menu, click on Mini Collections. This will bring you to
a page listing all the available Mini Collections.
2. Click edit, next to the name of the Mini Collection you wish to edit. This will
bring you to a page where you can make the required changes to the Mini
Collection using the editable text fields and dropdown menus (see below).
to save the
3. When all the changes have been entered, click
changes; or click
to delete the Mini Collection.
4. You may also choose to edit the individual images in the Mini Collection by
clicking on the thumbnail of the image you wish to edit. See Editing image data
for individual images (above) for instructions on editing the image data.
Sharing Mini Collections
To share a Mini Collection with a selected audience:
1. From the Administration menu, click on Mini Collections. This will bring you to
a page listing all the available Mini Collections.
2. Click edit, next to the name of the Mini Collection you wish to edit. This will
bring you to the page shown above.
3. Click Share, located at the top right hand corner of the page. This will bring you
to a page where you can choose the settings for sharing the Mini Collection (see
image below).
4. From the “With” dropdown menu, select who you wish to share the Mini
Collection with. To share the Mini Collection with more than one organization,
hold down the Ctrl button while clicking on the required organizations.
5. You may rename the collection by typing the new name into the “New Collection
Name” text field.
6. Select the end date for when the collection will be available to you selected
audience from the “Expiry Date” dropdown menu.
7. If a message needs to be included, type this into the editable “Message’ text
field.
8. Enter any required notes into the editable “Note” text field. The note field will not
be sent to the selected audience, and is kept for your own records.
9. When all required settings have been selected, click
.
Updating the Mini Collection search index
1.
From the Administration menu, click on Mini Collections. This will bring you to
a page listing all the available Mini Collections.
2. Scroll down to the bottom of the page and locate the Actions box (see image
below).
3. Click Update Mini Collection search index. This will automatically update
the index. You will be given a screen notification (see below) when this is done.
Mini Collections Multi Add function
This function allows you to create your own mini collection from a selection of
images.
To use the multi-add function:
1. From the Administration menu, click on Mini Collections - Multi Add.
2. You will first need to select the images you wish to add to the Mini Collection. To
do this, locate the Add Filter section (see image below).
3. From the “Field” dropdown menu, select the filter which you wish to apply to your
image search. If more than one filter is required, hold down the Ctrl button while
clicking on all required fields.
4. From the “Type” dropdown menu, select whether the filter “Includes” or “Does
Not Include” your customised text.
5. In the editable “Text” field, type in the images you wish to search for.
. This will display your search requirements in the Filters
6. Click
section (see image below). You have the option to remove the filter by clicking
on the remove link next to the unwanted filter.
7. In the Access section, select the level of access which you wish to apply to the
Mini Collection search from the “Access level” dropdown menu (see image
below).
8. You may preview the images in your search by clicking on the
button in the Actions category (see image below).
9. Locate the Mini Collections section (see image below).
10. From the “Category” dropdown menu, select the Category of Mini Collections
you wish to add your Mini Collection of images to.
11. From the “Mini Collection” dropdown menu, select the Mini Collection you wish
to add your selected images to.
. This will display your selected requirements. You may
12. Click
remove any of the requirements by clicking on the “remove” link.
13. When you have made all required selections, click
.
Accepting Shared Items
1. From the Administration menu, click on Accept Shared Items.
2. This will take you to a page which lists the resources which various
organisations have shared with you (see below).
3. From the dropdown menu, select the category under which you wish the
resources to be placed.
4. You may accept the shared resources, reject them or preview them, by clicking
on the respective buttons.
Email management
To send a standard email to a selected user type/s:
1. From the Administration menu, click Targeted Email.
2. Select the user type from the selection menu. To select multiply user types, hold
down the control button and click on the required user types,
3. Enter the Subject and Message in their respective fields.
4. Click
.
Editing Photographer Listings
1. From the Administration menu, click on Edit Photographer Listing. This will
bring you to a page where the photographers’ names are listed.
2. Click “Show details” to show details of all photographers listed. Or, click on the
plus sign on the left of a photographer’s name to view details for that individual
photographer.
3. If a thumbnail is available, click on it to view thumbnails of all images by that
photographer.
4. Click on the thumbnail of the image you wish to edit; or click on the information
icon below the image on the image.
5. Click
information fields.
. This will bring you to a page containing information
. This will bring you to a page with editable
6. Make the required changes to the image data and click
the changes.
to save
Editing Styles
1. From the Administration menu, click on Edit Styles. This will bring you to a
page where you can edit the colours on the website (see below).
2. Enter the hex colours into the text fields for the portions of the website you wish
to make changes to. The change in colour will be displayed in the “New” colour
preview box.
3. Click
to save the changes made.
Configuration options
Brand access management –
Additional questions on registration form for users requesting access to brand logos
and graphics
Image Captions beneath image
upon download the system takes the current image caption and embeds it into a
white space added beneath the image along with a client logo and possibly the
usage data as a means of reminding users the terms of the licence.
Multiple lightboxes
Option for a single lightbox or multiple lightboxes
Search to lightbox
Option to transfer an entire search result to a lightbox
Larger Preview
Option to click on the preview image and see a larger preview that fits in a 600 pixel
window
Default values override XMP
Option to have the default upload data take precedence over the embedded XMP in
an image
(As default, the XMP normally takes precedence over data in the upload section –
this option provides the alternative method.)
Set order expiry
Option for admin to set download expiry
Empty basket on order
Option to empty the basket when an order is placed or retain the contents
In Rights management it’s best to keep the contents so that alternative quotes can
be obtained. Eg quotes for different print runs
In image download and print ordering it’s best to empty the basket to prevent
inadvertent double ordering, although we could also have a JS warning if a user
clicks OK twice
Caption file
Option to create a caption file that is auto emailed to the user after the image is
downloaded, to ensure the right caption and spelling is used in the publication
XMP export
Latest caption data gets embedded as XMP in image file header at the time of
download
Default Mini collection category
Option to nominate one mini collection category as the default when making new
mini collections
Order override
Override payment – mark an order as paid and enter a reference number – allows
payment by cheque and VIP account holders
Login timeout
Sets a limit on sessions
Visitor to register
Forces visitor to re-register to access the library Used with trap_visiting. Not a good
idea. Better to have off. Then user has only one login but access to two, or more,
sites.
trap visiting
If the user is a member of another library then they are redirected to a “visiting”
page. They are given the option to request access to the site or browse as public
user. When they request access they are added the library’s pending user list or, if
visitor_to_register, is turned on they have to re-register.
days to expire
not defined
priority order
Ascending or descending priority
popup video
Video pops up in new window, for clients with videos > 320 pixels wide. A constraint
of the current layout that could be changed
project code property id
In the shared tourism network each STO has a project code ID
multi search pairs
A search tool that allows users to select multiple keywords from one or more
categories
Lightbox to Mini Collection
Feature for admin user to add the contents of a lightbox to the active mini collection
video_mc_search
This is a workaround to have a set of video mini collections with just videos
searchable in a separate box on the search page. We only have Categories of mini
collections, we need classes based on object types for example
multi_creator
Multiple
invoice_header
Allows for a letterhead style banner on the order/Tax invoice page
bank_fee_me_fee
login goto
Takes user to nominated page eg search page rather than the default first logged in
page.
Could be restructured for integration with existing websites
mini results
No description available
restricted_user_override
Similar to restricted_item_override. Forces all users restricted_user field to be set to
"No". restricted_user field some times called "Approval Required". If image require
approval then order will need approval. Allows admin to order restricted images
without having to approve their own orders
restricted_item_override
Forces all items to use the value of the option as their restricted_item value. This
value is the same as approval required on some sites.
register_on_hold
Option to to assign the status of “On Hold” to registration applications. Useful for
when there are several admin users who do diligence on applicants before
approving them. Sometimes the user has to supply more information
Auto registration
The system used for AG where users can shop anonymously until the point where
they choose to order, they provide some name address details and are auto
registered.
format_with_price
Some clients want the sizes to be in mm, others in pixels
lightbox_slideshow
Save search results
for each user, perhaps with cookies
no_hide_side_bar
option to remove “hide sidebar” link
me_num_search
Option to use me numbers or legacy number
Generate unique IDs – dumb numbers
Generate unique IDs – smart numbers
Inventory control for Merchandise module
(we had this in version 1 bookshop version, it counts down items so that that cannot
be ordered if they are out of stock.)
Splash Page With Rotating Images
Description
Custom Report generator
Description
Feedback form
Description
meta_approve
When an assets is changed or uploaded it has to be approved before it can be used.
May have to add item approve to the admin menu. Ideally you could have this
overridden by high level users so they do not have to approve their own work ( a
common complaint)
price_inc_gst
Most sites add GST to the base price of items. However for AG the price includes
GST. This option stops the GST being added.
download alert group
A comma separated list of group ids (group ids can be found by looking at the
source of the edit user page.) that will trigger an email to admin when they download
an image
default page_function
Page function to use when none given.
search field exclude
A comma separated list of item_prop fields to exclude from the search. The id of a
field can be worked out by viewing the source of the edit item page.
no_mini_collection_index
By default when an item is updated the names of the mini collections it is in are
added to one of its fields so it can be searched. This option prevents that from
happening.
default_user_group
If no default user group is added users are added to the public group. Group id can
be worked out via the user/edit_group function or by viewing the source of the edit
user page
require_price_in_delivery
Makes sure all items have prices. There should be no TBA values. This is an option
for sites that have no rights quoting but only fixed price objects
hide_money
Hides $ icon and other money references. Icons and some text changes in DynText
still required. Developed for Councils
instant_register
Allows users to be instanly registered. Used on AG prints. Username = email Best
used with public_basket option.
public_basket
Allows public unregistered users to add items to basket. Basket is stored in server
session data (may expire after 2hours - depends on server setup). If there is a
session basket and user logs in the contents of the session basket are added to
users database basket. Not compatible with NTTC logo module.
search_photographer_list
Adds a link on the search page to the creator listing
search_pairs
Turns on the category/keyword search on the search page
blank_project_details
When placing an order the project details on the enter detail page will allways be
blank. Default action is to use the previous project details.
staff_section
Part of the NT branding module. Shows different set of questions when staff order
branding image