1
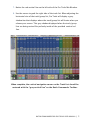
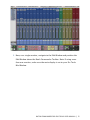
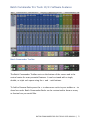
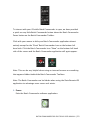
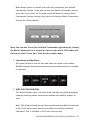
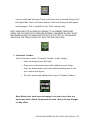
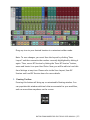
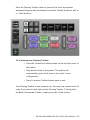
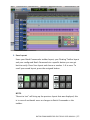
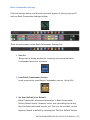
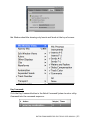
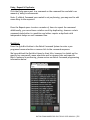
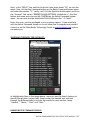
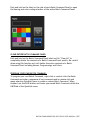
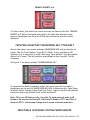
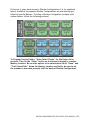
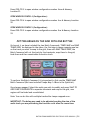
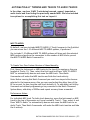
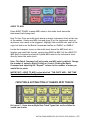
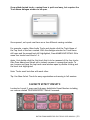
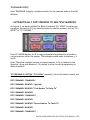
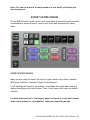
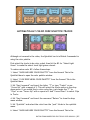
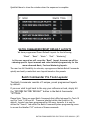
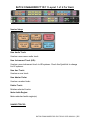
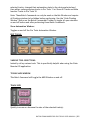
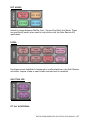
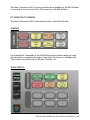
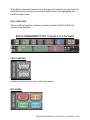
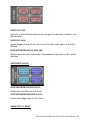
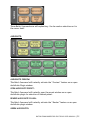
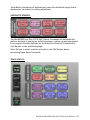
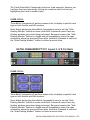
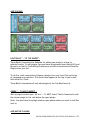
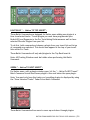
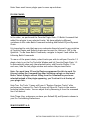
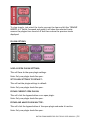
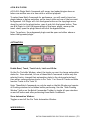
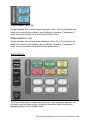
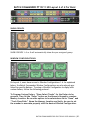
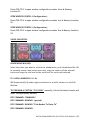
BATCH COMMANDER FOR PRO TOOLS
USER MANUAL
Version 2.0.0
Updated 3/9/2015
BATCH COMMANDER FOR PRO TOOLS USER MANUAL 1 Updated 3/9/2015
Contents SYSTEM REQUIREMENTS ......................................................................................................... 3 INSTALLING BATCH COMMANDER PRO TOOLS 10/11 ............................................................... 4 Setting Up & Aligning Pro Tools ......................................................................................................................................................... 4 BATCH COMMANDER PRO TOOLS 10/11 SOFTWARE FEATURES ................................................ 9 Batch Commander Toolbar .................................................................................................................................................................. 9 Batch Commander Settings ................................................................................................................................................................ 16 Saving a Pro Tools Session ................................................................................................................................................................. 18 Saving a Batch Commander Session .............................................................................................................................................. 18 Restoring to Factory Default ............................................................................................................................................................. 20 BATCH COMMAND SYSTEM FOR PRO TOOLS 10/11 .............................................................. 21 BATCH COMMANDER FOR PRO TOOLS USER MANUAL 2 System Requirements
The Batch Commander is a MAC application, for optimal performance we
recommend the following specifications.
•
OSX 10.7 (Lion,) OSX 10.8 (Mountain Lion,) OSX 10.9 (Mavericks,) and
OSX 10.10 (Yosemite.)
•
Pro Tools 10, Pro Tools 11, Logic Pro X.
•
Slate Remote iOS Application (Optional.) Available on the App Store.
•
Intel i7 or Xeon processor with a clock speed of at least 2.4 GHz.
•
Minimum 4GB RAM (We recommend 8GB RAM.)
•
Graphics card with minimum 512MB memory, though 1GB graphics
memory is recommended.
•
Graphic & Batch Command response speed will vary depending on the
capabilities of the computer’s capacity.
•
Most display sizes supported. (Note: Default layouts may appear
differently on various displays, but all Batch Commands are available to
every user. Hit customize toolbar to view Batch Commands and relocate
to accommodate all display sizes.)
BATCH COMMANDER FOR PRO TOOLS USER MANUAL | 3
Installing Batch Commander Pro Tools 10/11
Open the installer and follow the directions on the Installer. Once the
applications have been placed into your applications folder and your drivers
have been downloaded, add the applictions to your dock for easy access.
Setting Up & Aligning Pro Tools
Setting up Pro Tools with Batch Commander is a one-time operation for
Pro Tools sessions. On the Pro Tools menu bar;
1. First, navigate to your Apple on the OS Finder > Dock > Turn Hiding On.
Note: With the Slate Remote iOS application, you can hide the Batch
Commander application after launch and keep your dock visible if you’d
prefer.
2. Under "View" on the Pro Tools Menu Bar, navigate to "Mix Window Views."
3. For Pro Tools 10, you will need to display 2 sets of inserts and 1 set of
sends. For Pro Tools 11, due to the extended faders, you will need to
display 1 set of inserts and 1 set of sends.
Note: If you have a different configuration, of Inserts/Sends – you may
need to adjust your default Batch Commands utilizing the QuickList items
labeled accordingly to your specific rack assignment.
4. Confirm you have your group and track lists displayed on the left of the
Pro Tools Mixer.
5. Hit the green “Maximize” button on the top left of the Pro Tools Mix
Window.
6. Launch the Batch Commander software application.
BATCH COMMANDER FOR PRO TOOLS USER MANUAL | 4
7. Notice the red vertical line on the left side of the Pro Tools Mix Window.
8. Use the mouse to grab the right side of the track list. When adjusting the
horizontal size of the track/group list, Pro Tools will display a grey
shadow bar that displays where the track/group list will locate when you
release your mouse. This grey shadow displayed when the track/group
lists are being resized fits perfectly inside of the provided vertical red
line.
When complete, the vertical navigation cursor on the Track List should be
centered with the “grey vertical line” on the Batch Commander Toolbar.
BATCH COMMANDER FOR PRO TOOLS USER MANUAL | 5
9. Now, on a single monitor, navigate to the Edit Window and position the
Edit Window above the Batch Commander Toolbar. Note: If using more
than one monitor, make sure the main display is set to your Pro Tools
Mix Window.
BATCH COMMANDER FOR PRO TOOLS USER MANUAL | 6
10.
Touch the “Hide Batch Commander” button on the top left of the
Batch Commander Toolbar.
11.
Save Pro Tools by touching the SAVE PRO TOOLS button on the
lower left of the Batch Commander Toolbar and you are ready to mix.
Note: Previous window layouts saved in Pro Tools will need to be realigned
and saved.
BATCH COMMANDER FOR PRO TOOLS USER MANUAL | 7
Enable Assistive Devices:
On OSX Lion (10.7) or OSX Mountain Lion (10.8,) you will need to
“Enable Assistive Devices by opening System Preferences and
clicking “Accessibility.” On the bottom left of the window, check the
box, “Enable Assistive Devices” and close the window.
OSX Mavericks (10.9) & OSX Yosemite (10.10) Users Only:
If you’re on an OSX Mavericks machine, you are not able to “Enable
Assistive Devices. Instead, you’ll need to authorize a few
applications in the System Preference’s Security and Privacy. On the
“Privacy” tab, click the “Accessibility option on the left. Now within
the “Allow the apps below to control your computer” area, drag the
following applications from your applications folder to the list and
confirm that a checkmark appears to the left of each application.
1) Automator (Located: Applications>Utilities folder.)
2) Terminal (Located: Applications>Utilities folder.)
3) Logic Pro X.
4) Batch Commander.
BATCH COMMANDER FOR PRO TOOLS USER MANUAL | 8
Batch Commander Pro Tools 10/11 Software Features
Batch Commander Toolbar
The Batch Commander Toolbar rests on the bottom of the screen and is the
control center for many essential features. It can be viewed with a single,
double, or triple rack space using the + and – rack buttons.
To Add or Remove Racks press the + to show more racks in your toolbar or – to
show less racks. Batch Commander Racks can be customized to show as many
or few tools as you would like.
BATCH COMMANDER FOR PRO TOOLS USER MANUAL | 9
To interact with your OS while Batch Commander is open, we have provided
a quick an easy Hide Batch Commander button above the Batch Commander
Power button on the Batch Commander Toolbar.
Click with your mouse to hide your Batch Commander application almost
entirely except for the “Show” Batch Commander Icon on the bottom left
hand side. Click the Batch Commander Icon “Show” on the bottom left hand
side of the screen and the Batch Commander application will again appear.
Note: This can be very helpful when using an internet browser or something
that appears hidden behind the Batch Commander Toolbars.
Note: The Batch Commander can be hidden when using the Slate Remote iOS
application to advantage more screen real estate.
1. Power:
Exits the Batch Commander software application.
BATCH COMMANDER FOR PRO TOOLS USER MANUAL | 10
When power button is clicked, users will be prompted to save a Batch
Commander Session. If you wish to save your Batch Commander session,
press yes. If not, press no. Pressing cancel will keep the current Batch
Commander Session running. (See section on Saving a Batch Commander
Session for further details.)
Note: You can also Force Quit the Batch Commander application by clicking
the Batch Commander Icon, located on the top right of the OSX Finder and
clicking to select “Force Quit” from the drop-down menu.
2. Commands and Modifiers:
All normal functions such as Save and Undo are found in the toolbar.
Modifier buttons latch when touched once and unlatch when a command
is executed.
3. HIDE FLOATING WINDOW:
This button alllows users to quickly show and hide any floating windows
showing including sends, automation window and multiple plugins at
once.
Note: This button should be used when performing any Batch Commands
in Pro Tools that require mouse-clicks before excecuting the Batch
Command. This is available in Pro Tools versions only.
BATCH COMMANDER FOR PRO TOOLS USER MANUAL | 11
You can show and hide your Track and Groups list as desired. Simply click
the Show/Hide Track List button and the Track and Group list will appear
and disappear. This is available in Pro Tools versions only.
NOTE: MIXER MUST BE ALIGNED ACCORDING TO ALIGNMENT PROCEDURE
ABOVE FOR THIS FEATURE TO PERFORM PROPERLY. MAXIMIZE THE PRO TOOLS
MIX WINDOW USING THE GREEN BUTTON ON THE TOP LEFT OF THE WINDOW
AND ALIGN THE TRACK/GROUP LIST WITH THE RED LINE GUIDE.
4. Customize Toolbar:
Tap this button to enter “Customize Toolbar” mode. Simply:
•
Press the button and it will latch.
•
Drag icons and buttons around the toolbar to your liking.
•
Press the button again and it will unlatch allowing you to use
your custom tool layout.
•
This also works with adding tools to your “Floating Toolbar.”
Note: When tools have been rearranged, you must have them to a
layout and save a Batch Commander Session (.bclay) for the changes
to take effect.
BATCH COMMANDER FOR PRO TOOLS USER MANUAL | 12
Drag any icon to your desired location in customize toolbar mode.
Note: To save changes, you must Save the Layout by clicking “Save
Layout” and then overwrite the number currently highlighted by hitting it
again. Then, save a BC Session by hitting the “Save BC Session” button,
name and locate it on your Hard Drive. Now, you will be able to Load this
from Settings at any time. Please refer to the Save Layout, Save BC
Session and Load BC Session items for more details.
5. Floating Toolbar:
Pressing this button will bring up a customizable floating window. You
can populate this window with tools that are essential to your workflow,
and can move them anywhere on the screen.
BATCH COMMANDER FOR PRO TOOLS USER MANUAL | 13
Once the Floating Toolbar button is pressed, the semi-transparent
window will appear with the familiar Customize Toolbar button as well as
+/– Rack buttons.
To customize your Floating Toolbar:
•
Press the Customize Toolbar button on the top left corner of
the palette.
•
Drag desired tools to the palette. The palette will
automatically resize to fit more or less tools in your
configuration.
•
Press Customize Toolbar button again to exit.
Your Floating Toolbar is now ready to use. You may now remove racks all
racks if you want to work with just the Floating Toolbar. To bring back
the Batch Commander Toolbar, simply press the + Rack button.
BATCH COMMANDER FOR PRO TOOLS USER MANUAL | 14
6. Save Layout:
Saves your Batch Commander toolbar layout, your Floating Toolbar layout
and your configured Batch Commands to a specific button you can get
back to easily. Press Save layout and choose a number 1-8 to save. To
recall your saved layout, press the assigned button.
NOTE:
“Revert to Last” will bring up the previous layout that was displayed, this
is in case of accidental saves or changes to Batch Commands or the
toolbar.
BATCH COMMANDER FOR PRO TOOLS USER MANUAL | 15
Batch Commander Settings
Click the Settings button and the tool racks will appear. At the very top you’ll
notice a Batch Commander Settings toolbar.
There are ten buttons on the Batch Commander Settings bar.
1. Save As:
Brings up the dialog window for renaming and saving the Batch
Commander session to a location.
2. Load Batch Commander Session:
Loads a previously saved Batch Commander session. (.bclay file)
3. Set User Default/User Default:
Batch Commander automatically launches in Batch Commander
Factory Default layout. However, once a user gets things to the way
they like them with saved layouts, etc. The user can set their current
layout to launch at default by touching the “Set User Default” button.
BATCH COMMANDER FOR PRO TOOLS USER MANUAL | 16
Once highlighted to “User Default,” the user knows that they are using
their layout as default.
4. Restore Factory Default/Factory Default:
Restores the Batch Commander software application to factory
settings which is based on the “Basic” Preset Default Layout.
5. VIDEO:
Direct link to our Batch Commander Videos on our SlateTV Channel.
6. USER MANUALS:
Open the Batch Commander User Manual directly from your software.
7. FORUM:
Access the User Forum for to join the Slate Media Technology
community to find answers and even exchange Batch Command ideas.
8. CHECK FOR UPDATES:
BATCH COMMANDER FOR PRO TOOLS USER MANUAL | 17
Easily check to confirm your Batch Commander software is up-to-date.
Note: We have by default set your application to Check for updates at launch,
however this will require a connection to the internet to deliver an update
notification.
9. SWITCH BC:
Easily change between DAW Batch Commander support by hitting the Switch BC
button and then from the drop-down menus, changing the DAW selection and
hitting “Ok.” Note: You must close the previous DAW and open the DAW you’re
changing to before hitting “Ok”.
Saving a Pro Tools Session
On the Batch Commander Toolbar, we have included a Save Pro Tools button
that allows you to easily save your Pro Tools progress. Remember, your Pro
Tools session is a different file than your Batch Commander Session so be sure
to save both frequently when changes have been made.
Saving a Batch Commander Session
BATCH COMMANDER FOR PRO TOOLS USER MANUAL | 18
The Batch Commander software application allows you to save your current
layouts, icons, and other customizations to a dedicated session folder. You can
save this file with your DAW sessions and instantly recall them at any point in
time.
To Save A Batch Commander Session:
1. Hit the Save Batch Commander Session button.
2. Choose a folder you want to save the session to and give the file a name.
3. Press Save.
To Load a Batch Commander Session:
1. Press the Load Batch Commander Session button.
2. Locate your previously saved Batch Commander Session folder and press
open.
BATCH COMMANDER FOR PRO TOOLS USER MANUAL | 19
3. Your Batch Commander session will now load exactly as you saved it.
Restoring to Factory Default
1. Press the button for Restore Factory Default.
2. You will be prompted with a warning. Press “OK” if you wish to restore
the Batch Commander software application to its factory settings, press
cancel if you don’t want to complete this action.
BATCH COMMANDER FOR PRO TOOLS USER MANUAL | 20
BATCH COMMAND SYSTEM FOR PRO TOOLS 10/11
NOTE: THE BATCH COMMAND SYSTEM REQUIRES THE “ENGLISH” KEYBOARD
TO BE ACTIVE IN THE OSX KEYBOARD PREFERENCES.
The Batch Command System is a series of single buttons that can execute up
to one thousand key commands, menu selections and mouse clicks. The
software is complete with over eighty preset Batch Commands, however it
is very easy for users to create their own and even share with other Batch
Commander users.
The Batch Command System window contains multiple functions as
explained below.
Editing A Batch Command:
RIGHT-CLICK or CONTROL-CLICK one of the Batch Command buttons on the
Batch Commander Toolbar. The Batch Command Menu will launch and you can
use the various buttons explained below to accomplish your goal.
TROUBLESHOOTING:
For most Batch Commands to work you will need to enable “Keyboard Focus
View.”
BATCH COMMANDER FOR PRO TOOLS USER MANUAL | 21
Edit Window should be set to “Link Timeline and Edit Selection” and “Link
Track and Edit Selection” modes.
Viewing Plug In’s by Category and manufacturer in Pro Tools Preferences must
also be selected for some BC’s to work.
Many of the Batch Commands reference the Default EQ and Default Dynamics
that can be selected in the Pro Tools Preferences. If you leave these empty,
any referencing a Default EQ or Default Compressor will not function.
BATCH COMMANDER FOR PRO TOOLS USER MANUAL | 22
Mix Window should be showing only Inserts and Sends at the top of screen.
Key Command:
Click the Key Command button in the Batch Command System to enter a Key
Command into the command sequence.
BATCH COMMANDER FOR PRO TOOLS USER MANUAL | 23
Delay, Repeat & Duplicate:
Click the Delay space next to a command on the command line and add in an
amount of delay in mileseconds.
Note: If a Batch Command you created is not performing, you may need to add
some delay to the sequence.
Press the Repeat space to enter a number of times to repeat the command.
Additionally, you can achieve a similar result by duplicating, however certain
commands take better to repetition and others require a duplicate with
independent delays on each command line.
QuickList:
Press the QuickList button in the Batch Command System to enter a preprogramed menu selection or mouse-click to the command sequence.
We have defined the QuickList items by their title, however for details on the
specific key commands, menu selections and/or mouse clicks each specific
Batch Command is performing, please review our Batch Command programming
information below.
BATCH COMMANDER FOR PRO TOOLS USER MANUAL | 24
Remove:
Select an undesired Key Command or QuickList item by touching and
highlighting it and then hit Remove to eliminate the selected item from the
command sequence.
Clear All:
Clear All will completely eliminate all programmed information in the Batch
Command menu associated with the selected button. This includes Name &
Color.
Name & Color:
On the bottom left of the Batch Command Menu there is an empty bar for
naming your Batch Command and a block of multiple colors to choose a color
for the Batch Command on the Batch Commander Toolbar. You can also choose
the “MORE” option and select a custom color from a full RGB color spectrum.
Save:
Use the Save button to save a custom Batch Command. Be sure to give it a
name you will recognize in the QuickList.
BATCH COMMANDER FOR PRO TOOLS USER MANUAL | 25
USING THE QUICKLIST MENU:
Once the QuickList button has been pressed a menu will appear with multiple
tabs of preset Batch Commands labeled, “General,” “Music,” and “Post.” Also
we have included the “User” tab that collects the Batch Commands you have
saved to add to different layouts and locations quickly.
To Add a QuickList item to the command line, scroll through on the various
tabs and select an item. Then, use the LOAD button to place a QuickList item
into the command line.
CUSTOMIZING A QUICKLIST BATCH COMMAND:
We have pre-programmed over 100 preset Batch Commands for you, however
there is a lot of potential for customization. As an example, we have included a
“Pitch Shift +12 Cents” Batch Command, however you want it to “Pitch Shift +5
Cents.” This is how it’s done.
First, RIGHT CLICK or CONTROL-CLICK an empty Batch Command to open the
programming menu.
Note: You can overwrite an existing Batch Command by RIGHT-CLICKING or
CONTROL-CLICKING a button and hitting CLEAR ALL. Now you can either
program a fresh Batch Command, or hit CONFIRM to leave it empty.
Now, from the QuickList “Music” tab, scroll down to “OPEN PITCH SHIFT &
MODIFY SETTINGS (AudioSuite).” Click the select button on the QuickList
window and watch the selection move into your command sequence on the
Batch Command System menu.
BATCH COMMANDER FOR PRO TOOLS USER MANUAL | 26
Next, in the “DELAY” box next to the Action Item enter about “50” ms into the
space. Now, hit the Key Command button on the Batch Command System menu
and enter the number “5.” Lastly, we’ll hit the QuickList button again and from
the “General” tab, select “RENDER PLUGIN SETTINGS (AudioSuite).” Give the
button and name and color and hit CONFIRM on the Batch Command System
menu. You can now see the AudioSuite Pitch Shifting to the “+5 Cents.”
Note: As a user, you are privileged to our on-going support. If you need help
with the Batch Command System or do not know how to program one yourself,
contact us on the Slate Media Technology Forum on www.slatemt.com and we
can assist you.
SEARCHING THROUGH THE QUICKLIST:
As highlighed in blue in the image above, users can use the Search feature to
search through their various tabs. Simply enter the desired text and look
through the different tabs to see the top results for each section, being
“General,” “Music,” “Post” and “User.”
NAMING BATCH COMMAND PANELS:
BATCH COMMANDER FOR PRO TOOLS USER MANUAL | 27
Push and hold on the label on the side of each Batch Command Panel to open
the Naming and color coding interface of the entire Batch Command Panel.
CLEAR ENTIRE BATCH COMMAND PANEL:
Push and hold on the Batch Command Panel label and hit “Clear All” to
completely delete the contents of a Batch Command Panel quickly. Be careful
when using this function as it will delete the entire contents of a Batch
Command Panel including Names, Programmings and Colors.
PROGRAM YOUR OWN BATCH COMMAND:
To program your own Batch Command, right-click or control-click the Batch
Command and enter a sequence of key commands and/or mouse click and
menu selection QuickLIst items to create a custom Batch Command. When
finished, use the SAVE button and locate your saved Batch Command within the
USER tab of the QuickList menu.
BATCH COMMANDER FOR PRO TOOLS USER MANUAL | 28
Import & Export:
Easily share customized Batch Commands on our Slate Media Technology Forum
by visiting our website: www.slatemt.com and click on the Forum, located
under the Support tab or just going to Batch Commander Settings and clicking
the “Forum” button. Create a Batch Command and Save it to your User Tab.
Then, just selected it in your User tab and hit Export. It will export to the
location you choose.
You can also Import Batch Commands you find on the Forum or even Batch
Commands other engineers in your studio have created.
BATCH COMMANDER FOR PRO TOOLS USER MANUAL | 29
How To Access What You Saw In The Video:
Before covering the four preset default “Basic” layouts for Batch
Commander and their associated Batch Commands, here are a few that can
be seen in the “Introducing Slate Remote with Batch Commander & RAVEN”
video on our YouTube Channel. (youtube.com/slatedigitaltv)
AUTOMATICALLY ADDING A PLUGIN CHAIN TO MULTIPLE TRACKS:
In the video, we performed the Favorite Plugin Chain 1-5 Batch Command that
added five plugins to our selected tracks. We have added six different
variations on this video Batch Command including Add Default EQ and Dynamic
Chain.
It is important to note that users can customize these to be set to any variation
of Favorite Plugins and Default plugins and account for Native vs. DSP in the
QuickList. To use these Batch Commands, navigate to Layout 3 and utilize the
following Batch Commands:
To use on of the preset chains, select tracks you wish to add your Favorite 1-5
plugin chain to on the Pro Tools Mix Window and hit Favorite Plugin Chain 1-5
to automatically show only the selected tracks, add Favorite Plugins 1-5 to
each one, hide the last plugin window and restore the previous tracks.
Note: You must have 5 Favorite Plugins programmed for this to work. Do
this my holding the Command Key when initiating a plugin on the Insert
Racks. Select a plugin without lifting from the Command key and once
selected instead of the plugin appearing, you’ll notice it is at the top of
your plugin lists.
Note Two: Pro Tools 11 users will have it “Restore Previous Tracks” after
performance, however Pro Tools 10 users will Show All Tracks in the session
including hidden tracks. You can adjust this by Removing it from the command
line if so desired.
Note Three: Also, make sure you have your Default EQ and Dynamics chosen in
your Pro Tools Mixing Preferences.
BATCH COMMANDER FOR PRO TOOLS USER MANUAL | 30
REMOVE INSERTS A-E:
To clear inserts, just select the tracks you want to clear and hit the “REMOVE
INSERTS A-E” Batch Command and again it will show the selected tracks
remove the plugins from Inserts A-E and then restore the previous tracks
displayed.
CREATING AN INSTANT HEADPHONE MIX: PTHD ONLY
Next in the video, we covered making a HEADPHONE MIX with a selection of
tracks. The Pro Tools feature “Copy Mix To Send” is only available in HD
Systems, so it is important to note, that using “New Aux Bus” may be a better
option for LE users. This will perform everything but the Copy Mix To Edit
command.
On Layout 4, we have included “HEADPHONE MIX HD.”
To excecute the Batch Command, select the tracks you wish to create a
headphone mix for and hit HEADPHONE MIX (HD) to automatically, Show Show
Selected Tracks, Create A New Strero Aux Track, copy the send to all selected
tracks and then copy the Mix Level to the Send Level.
Note: This is an HD feature only, Copy Mix To Send does not exist in LE
Systems. Be sure to be showing 5 Inserts and 5 Sends in PT11 and 10ins 5
Sends on PT10. Inserts may change due to screen size and resolution.
CREATING & ACCESSING CUSTOM FADER GROUPS:
BATCH COMMANDER FOR PRO TOOLS USER MANUAL | 31
On Layout 4, users have access to Window Configurations 1-6. As explained
below, the Batch Commander Window Configurations are also already prelinked to specific Markers. To setup a Window Configuation to diplay with
custom faders, follow the following protocol.
To Program Custom Faders, “Show Select Tracks” for the Faders to be
grouped. Then hit the “Enter” button on the Numeric Keypad to create a
Memory Location. Be sure the options to be selected are set to “None” and
“Track Show/Hide.” Name the Memory Location and lastly, be sure to set
the number to associate properly with the desired Window Configuration.
BATCH COMMANDER FOR PRO TOOLS USER MANUAL | 32
IMPORTANT: Memory Locations 89-99 have been pre-programmed in the
window configurations to allow you to program custom groups of faders to
launch with associated plugins.
Examples: MEM LOCATION 89 = Con Fig 1, MEM LOCATION 90 = Con Fig 2,
etc.
Now, just save your Window Configuration with the New Window
Configuration Batch Command and number and name it accordingly. Now,
they should be able to be referenced through our Window Configuration 110 Batch Commands.
Note: Window Configurations 6-10 can be located in the QuickList for
custom programming.
OPEN WINDOW CONFIG 1 (Configuration):
Press CON FIG 1 to open window configuration number one & Memory Location
89.
OPEN WINDOW CONFIG 2 (Configuration):
Press CON FIG 2 to open window configuration number two & Memory Location
90.
OPEN WINDOW CONFIG 3 (Configuration):
BATCH COMMANDER FOR PRO TOOLS USER MANUAL | 33
Press CON FIG 2 to open window configuration number three & Memory
Location 91.
OPEN WINDOW CONFIG 4 (Configuration):
Press CON FIG 4 to open window configuration number four & Memory Locaiton
92.
OPEN WINDOW CONFIG 5 (Configuration):
Press CON FIG 5 to open window configuration number five & Memory Location
93.
PUTTING DRUMS ON THE GRID WITH ONE BUTTON:
On Layout 4, we have included the two Batch Commands, TEMPO MAP and SNAP
TRANS GRID. As displayed in the video, the first step is tempo mapping one bar
on the track you want to snap to the grid, then with SNAP TRANS GRID, the
Batch Command will cut the track by the transients, snap them to the grid,
fade them and then consolodate the entire track.
To perform this Batch Command, it is important to first use the TEMPO MAP
Batch Command (We have included Tempo Map 1-4 Bars in the QuickList.)
Once tempo mapped, Select the audio you wish to modify and press SNAP TO
GRID FADE CONSOLIDATE to separate transients and snap to the grid, new
regions will be faded and consolidated.
Note: You can do this with multiple tracks after tempo mapped once.
IMPORTANT: The delay may need to be adjusted pending the size of the
audio track you are performing the function on to allow for more time.
BATCH COMMANDER FOR PRO TOOLS USER MANUAL | 34
AUTOMATICALLY TURNING MIDI TRACKS TO AUDIO TRACKS:
In the video, we show 5 MIDI Tracks being bounced, named, imported as
audio tracks and then hiding the previously needed MIDI. We have included
two options for accomplishing this task on Layout 4.
MIDI TO AUDIO:
By default, we have included MIDI TO AUDIO (1 Track) however in the QuickList
you can access the 1-10 different MIDI TO AUDIO options, if preferred.
Our included 1-10 different MIDI TO AUDIO options will show only the selected
MIDI tracks and perform the conversion to the number of MIDI tracks you set
the MIDI TO AUDIO Batch Command to.
To Create Your Own Custom Versions of these Manually:
First, Move the Instrument or MIDI tracks to the top of the session so they are
located at Tracks 1-5. Then, select the first track and Press “MIDI TO AUDIO 1
BAR” to automatically bounce and name the MIDI track. Then Batch
Commander will make the MIDI inactive and hide the track entirely.
Note: Before running this Batch Command you must have import after bounce
selected in the bounce menu. Also you may need adjust the delay time of the
BC to account for how long the midi track actually is. To add delay just hit Key
Command and without programming a key command in the Batch Command
System Menu, add delay of 9999ms and repeat as many times as needed.
Performance Notes:
For individual MIDI track To Audio track bouncing, move the Instrument or MIDI
track to the top of the session so it's are located at Track 1. Then, select it and
Press "MIDI To Audio” to automatically bounce and name the MIDI track to an
Audio Track. Then Batch Commander will make the MIDI track inactive and hide
the it entirely.
BATCH COMMANDER FOR PRO TOOLS USER MANUAL | 35
TIP: Before running this Batch Command YOU MUST HAVE “Import After
Bounce” selected in the bounce menu.
Also you may need to adjust the delay time of the Batch Command to account
for the length of the MIDI Track (as this varies from user to user and session to
session.)
Then Bounce To Disk Key Command (CMND-OPTION-B)
To add delay time, use a Blank Key Command with a Delay on the right column,
and a repeat of 3-24 of the Batch Command Menu Command Line.
Then, Set to 9999ms and repeat as many times as needed using the repeat
column next to the delay.
A delay time of 9999ms and repeat of 6 will add to 1min
A delay time of 9999ms and repeat of 12 will add to 2min
A delay time of 9999ms and repeat of 18 will add to 3min
A delay time of 9999ms and repeat of 24 will add to 4min
HOW TO BOUNCE 5 MIDI: (QuickList Item: “5 MIDI TO AUDIO”)
Performance Notes:
Move 5 Midi tracks to top of session to be Tracks 1-5. This is important as the
Batch Command relies on track number to function correctly.
Also, make sure import after bounce is enabled
Note: There is a 10 Second Delay Time for bouncing so if your system requires
longer to bounce, you will need to repeat the delay time to compensate for the
amount of MIDI attempting to bounce.
Order:
BATCH COMMANDER FOR PRO TOOLS USER MANUAL | 36
Track Selection status should be set accordingly.
Move cursor before or on midi track lane.
Hit bounce 5 MIDI
Macro 1
Copies the track name.
Macro 2
Solos the track.
Macro 3
Selects the region and all regions on the track.
Macro 4
Bounces to disk.
Tabs to name window and paste the name from clipboard. In Pro Tools 10 hit
replace tab with enter.
Macro 5
Waits for the bounce and hits enter.
Macro 6
Scrolls to first MIDI track and makes inactive.
Macro 7
Repeats from Macro 1. Set this to repeat as many stems as desired.
AUTOMATICALLY TURNING AUDIO TRACKS TO MIDI TRACKS:
Located on Layout 4, the AUDIO TO MIDI Batch Command will automatically
paste a copied MIDI note down to the next track pasting the notes according
to the transients of the audio track above it.
BATCH COMMANDER FOR PRO TOOLS USER MANUAL | 37
AUDIO TO MIDI:
Press AUDIO TO MIDI to paste MIDI notes to the audio track above the
instrument track being used.
How To Use: Place an audio track above an empty instrument track at the top
of the session. Create one MIDI note and place it on the instrument track on
whichever note needs to be triggered. Highlight the one MIDI note and hit the
copy/cut button on the Batch Commander toolbar or CMND+C or CMND+X
Locate the transport cursor on the audio track above the MIDI track at a
location you would like to start copying the AUDIO to MIDI. Hit the AUDIO TO
MIDI Batch Command and watch it paste MIDI notes to the instrument track
directly below the audio track.
Note: This Batch Command will only paste one MIDI note by default. Change
the number of notes by Right-Clicking or Control-Clicking the Batch
Command and adjusting the “Repeat” column to the number of notes you
would like to paste.
IMPORTANT: AUDIO TO MIDI is also labelled “TAB PASTE MIDI - ONE TIME
Repeat As Needed” in the QuickList.
CREATING & AUTOMATICALLY NAMING NEW TRACKS:
On Layout 1, there are multiple New Track Types that can be clicked to
create new tracks.
BATCH COMMANDER FOR PRO TOOLS USER MANUAL | 38
Once added desired tracks, naming them is quick and easy, but requires the
Track Name dialogue window to be open.
Once opened, on Layout one there are a few different naming varieties.
For example, create 4 New Audio Tracks and douple-click the Track Name of
the Top track of the four created. With the dialogue window for Track Name
still open and the named text still highlighted, Press NAME LEAD VOCALS X4 to
name four tracks Lead Vocals 1-4.
Again, first double-click the first track that is to be renamed of the four tracks
then Press Name Lead Vocals x4 to instanly rename 4 consequtive tracks. To
use, be sure and have the top track name window open by double clicking and
the track text highlighted.
Note: Tracks must be inline with each other.
Tip: Use Show Select Tracks for easy organization and naming in full sessions.
FAVORITE EFFECT PRESETS:
Located on Layout 2, users can find many AudioSuite Preset Renders including
our custom created TELEPHONE EFFECT Batch Command.
BATCH COMMANDER FOR PRO TOOLS USER MANUAL | 39
TELEPHONE EFFECT:
Press TELEPHONE to apply a telephone effect to the selected audio in the Edit
Window.
AUTOMATICALLY COPY REGIONS TO MULTIPLE MARKERS:
On Layout 4, we have included the Batch Command “FLY HOOK” however you
can adjust the text to FLY any selected audio to specific markers, such as “FLY
VERSE” or “FLY CHORUS.”
Press FLY HOOK Markers 4 6 8 to copy and paste selected section of audio to
various markers within the session. This example would paste to Markers 4, 6
and 8.
Note: There are multiple versions of preset markers to fly to labeled in the
QuickList, along with Markers 1-15 created to allow for self-programming to
desired markers.
TO PROGRAM A CUSTOM “FLY HOOK” manually, follow the below formula and
insert the appropriate Markers:
KEY COMMAND: COMMAND-C
KEY COMMAND: NUMPAD-. (period)
KEY COMMAND: NUMPAD-“First Marker To Paste To”
KEY COMMAND: NUMPAD-.
KEY COMMAND: COMMAND-V
KEY COMMAND: NUMPAD-.
KEY COMMAND: NUMPAD-“Second Marker To Paste To”
KEY COMMAND: NUMPAD-.
KEY COMMAND: COMMAND-V
BATCH COMMANDER FOR PRO TOOLS USER MANUAL | 40
Note: You can set these to as many markers as you want by following the
above sequence.
EXPORT ENTIRE SESSION:
On the MUSIC Preset Layout, users can hit one Batch Command to automatically
consolodate all selected tracks, export each track and automatically name
them.
EXPORT ENTIRE SESSION:
When you are ready to export the tracks of your session's dry files to another
DAW press the Batch Command "Export Entire Session."
It will highlight all tracks in the session, consolidate the tracks and name the
regions according to the track name. Then, it will export the tracks to default
location.
For More Advanced work, the Regions panel on Layout 2 on the Music layout
offers more options for consolidation, fading and exporting as well.
BATCH COMMANDER FOR PRO TOOLS USER MANUAL | 41
AUTOMATICALLY COLOR CODE SELECTED TRACKS:
Although not covered in the video, the QuickList has lot of Batch Commands for
using the color palette.
First select the tracks to be color coded, then hit the BC for “Select Light
Green” in make the select track light green colored.
To make custom color BC’s follow these steps.
1. Select “SHOW AND HIDE COLOR PALETTE” from the General Tab in the
Quicklist Menu to open the color palette window.
2. Select “CLICK DROP MENU COLOR PALETTE” from the General Tab in the
Quicklist Menu.
3. Hit “Key Command” and insert the letter “T” or type “Tracks” or use
“Cursor Up” with a repeat of 5. This will select the tracks option in the drop
down menu. If you would like to color code clips, just change the “T” to
“Clips” or use “Cursor Up” with a repeat of 5 and “Cursor Down” to select Clips
in Tracks
4. Hit “Key Command” and insert the command “Return” to close the drop
menu window.
5. Hit “Quicklist” and select the color from the “post” folder in the quicklist
menu.
6. Select “SHOW AND HIDE COLOR PALETTE” from the General Tab in the
BATCH COMMANDER FOR PRO TOOLS USER MANUAL | 42
Quicklist Menu to close the window when the seqeunce is complete.
BATCH COMMANDER PRESET DEFAULT LAYOUTS
We have programmed Preset Default Layouts for the following:
“Blank” – “Basic” – “Music” – “Post” – “Mastering”
In this user manual we will cover the “Basic” layout, however we will be
releasing specific layout manuals and video tutorials progressively for the
more advanced Music, Post and Mastering layouts.
The user has full flexibility to relocate, reprogram and delete Batch Commands
quickly and easily create their own layouts based on the presets.
Batch Commander Pro Tools Layouts:
The Batch Commander consists of 5 unique, preset programmed layouts
by default.
If you ever wish to get back to the way your software arrived, simply hit
the “RESTORE FACTORY DEFAULT” button in the Batch Commander
“SETTINGS.”
Please Note: There are some Batch Commands that differ between Pro Tools 10
and Pro Tools 11 HD and LE – These are labelled within the QuickList. By
default, layouts have been programmed for HD users, however it is easy to
utilize the “Search” tab within the Batch Command System programming menu
to access the labelled “LE” verisons of these commands.
BATCH COMMANDER FOR PRO TOOLS USER MANUAL | 43
BATCH COMMANDER PT10/11 Layout 1 of 4 For Basic
Session Setup:
New Audio Track:
Creates a new mono audio track.
New Instrument Track (HD):
Creates a new instrument track in HD systems. Check the QuickList to change
for LE systems.
New Aux Track:
Creates an aux track.
New Master Fader:
Creates a master fader.
Delete Track:
Deletes selected tracks.
Mute Audio Region:
Mutes selected audio region(s).
NAMING TRACKS:
BATCH COMMANDER FOR PRO TOOLS USER MANUAL | 44
Press one of the Naming Batch Commands X4 or X8 to name four or eight tracks
from top to bottom, or left to right for you.
To perform any of the preset naming Batch Commands, double-click the first
track to be renamed of the four or eight tracks. Then, Press Name ___ x4 or X8
to instanly rename 4 consequtive tracks.
Note: Be sure and have the top track name window open by double-clicking and
the track text highlighted.
Note Two: Tracks must be inline with each other. You can use Show Selected
Tracks to get them all in one place before performing for easy use, but not
required.
Copy And Paste Name X4 or X8:
Similar to the preset naming Batch Commands previously explained, these will
actually copy the highlighted text after double-clicking the track title to open
the naming dialogue.
AUTOMATION:
Enable Read, Touch, Touch Latch, Latch and Write:
On the Pro Tools Mix Window, select the tracks you want to change automation
status for. Once selected, hit one of these Batch Commands to show only the
BATCH COMMANDER FOR PRO TOOLS USER MANUAL | 45
selected tracks, changed their automation state to the choice selected and
then either restore previous tracks in Pro Tools 11 or Show All Tracks and Hide
Inactive Tracks in Pro Tools 10.
Note: These Batch Commands can only be used on the Mix Window and require
all floating windows to be hidden before performing. Use the “Hide Floating
Window” button on the Batch Commander Toolbar to toggle all open windows
on and off before and after performing these Batch Commands.
Show Automation Window:
Toggles on and off the Pro Tools Automation Window.
EDIT TOOLS:
VARIOUS TOOL SELECTIONS:
Instantly call up various tools. This is specifically helpful when using the Slate
Remote iOS application.
TOGGLE MIDI WINDOW:
This Batch Command will toggle the MIDI Window on and off.
TRACK SIZE:
Quickly increase or decrease the size of the selected track(s).
BATCH COMMANDER FOR PRO TOOLS USER MANUAL | 46
EDIT MODES:
Instantly change between Shuffle, Spot, Slip and Grid/Reel Grid Mode. These
are specifically useful when used in conjunction with the Slate Remote iOS
application.
FADES:
Use these various fade Batch Commands on audio selections in the Edit Window
and either require a fade or need a fade removed and/or modified.
SELECTION SIZE:
FIT ALL WAVEFORMS:
BATCH COMMANDER FOR PRO TOOLS USER MANUAL | 47
This Batch Command will fit as many waveforms as possible to the Edit Window
to see most if not your entire Pro Tools session in the Edit Window.
FIT SELECTION TO WINDOW:
This Batch Command will fit the selected audio to the Edit Window.
COMPING:
Use these Batch Commands in the Edit Window when either creating a comp
with playlists or navigating through a comp with the Cursors or changing the
Track Lanes from Waveform to Volume, Playlists, etc.
TRACK STATUS:
BATCH COMMANDER FOR PRO TOOLS USER MANUAL | 48
These Batch Commands function as to be expected, however you just have the
track selected by clicking the waveform itself and not just highlighting the
track to enable tracks.
SOLO CLEAR (HD):
This is an HD only button, however we have included the SOLO CLEAR (LE)
version in the QuickList.
BATCH COMMANDER PT10/11 Layout 2 of 4 For Basic
VIEW START/END:
Instantly view the first or last track in the session.
EDIT MODES:
BATCH COMMANDER FOR PRO TOOLS USER MANUAL | 49
Instantly change between Shuffle, Spot, Slip and Grid/Reel Grid Mode. These
are specifically useful when used in conjunction with the Slate Remote iOS
application.
TRACK SIZE:
Increase or Decrease the selected track size. Be sure to click on the waveform
and not the track name itself.
SELECTION SIZE:
FIT ALL WAVEFORMS:
This Batch Command will fit as many waveforms as possible to the Edit Window
to see most if not your entire Pro Tools session in the Edit Window.
FIT SELECTION TO WINDOW:
This Batch Command will fit the selected audio to the Edit Window.
CLIP GAIN:
BATCH COMMANDER FOR PRO TOOLS USER MANUAL | 50
SHOW CLIP LINE:
Show the clip line before adjusting the clip gain to selections of audio in the
Edit Window.
SHOW CLIP GAIN:
Quickly toggle on and off the Clip Line or Clip Gain fader option in the Edit
Window.
INCREASE/DECREASE CLIP GAIN 1dB:
Select a piece of audio to increase or decrease the clip gain by 1dB in either
direction.
GRID/NUDGE VALUE:
INCREASE/DECREASE GRID VALUE:
Adjusts the Grid Value for Pro Tools.
INCREASE/DECREASE NUDGE VALUE:
Adjusts the Nudge Value for Pro Tools.
NUDGE LEFT or RIGHT:
BATCH COMMANDER FOR PRO TOOLS USER MANUAL | 51
These Batch Commands are self-explanitory. Can be used on selections or for
the cursor itself.
AUDIOSUITE:
AUDIOSUITE PREVIEW:
This Batch Command will instantly activate the “Preview” feature on an open
AudioSuite Plugin window.
OPEN AUDIOSUITE PRESET:
This Batch Command will instantly open the preset window on an open
AudioSuite plugin for selection of desired preset.
RENDER AUDIOSUITE PLUGIN:
This Batch Command will instantly activate the “Render” feature on an open
AudioSuite plugin window.
GREEN AUDIOSUITES:
BATCH COMMANDER FOR PRO TOOLS USER MANUAL | 52
These Batch Commands will automatically open the AudioSuite plugin that is
displayed on the button for setting adjustment.
AUDIOSUITE RENDERS:
The Red RENDER and Pink PITCH SHIFT Batch Commands will automatically
perform the task of opening an AudioSuite plugin, making a preset adjustment
to accomplish the task displayed on the button and then will automatically
click Render on the AudioSuite plugin.
Note: Be sure to select a section of audio on the Edit Window before
performing these Batch Commands.
TRACK STATUS:
BATCH COMMANDER FOR PRO TOOLS USER MANUAL | 53
The Track Status Batch Commands function as to be expected, however you
just have the track selected by clicking the waveform itself and not just
highlighting the track to enable tracks.
FADER FOCUS:
These Batch Commands will perform mouse-clicks to display a specific track
type on both the Mix and Edit windows.
Note: Before performing these Batch Commands be sure to use the “Hide
Floating Window” button as mouse-click Batch Commands cannot have any
floating windows open when being performed. Be aware however the “Hide
Floating Window” button is a toggle and will immediately return the open
windows to where the previously were after the Batch Command is used and
the “Hide Floating Window” button is clicked a second time.
BATCH COMMANDER PT10/1 Layout 3 of 8 For Basic
FADER FOCUS:
These Batch Commands will perform mouse-clicks to display a specific track
type on both the Mix and Edit windows.
Note: Before performing these Batch Commands be sure to use the “Hide
Floating Window” button as mouse-click Batch Commands cannot have any
floating windows open when being performed. Be aware however the “Hide
Floating Window” button is a toggle and will immediately return the open
windows to where the previously were after the Batch Command is used and
the “Hide Floating Window” button is clicked a second time.
BATCH COMMANDER FOR PRO TOOLS USER MANUAL | 54
ADD PLUGINS:
LIGHT BLUE “… TO TOP INSERT”:
These Batch Commands are designed for adding one plugin at a time to
selected tracks. To add plugins you must have programmed your Default EQ and
Dynamics in the Pro Tools Mixing Preferences as well as have selected Favorite
Plugins from your list.
To do this, hold command and choose a plugin from your insert list and let go
of command once selected. This should now appear at the top of your insert
lists within Pro Tools.
These Batch Commands will only add plugins to the Top Rack Insert A.
GREEN “… TO NEXT INSERT”:
With a plugin window open, hit the “… To NEXT Insert” Batch Command to add
the chosen plugin to the rack below the open plugin.
Note: You must have the plugin window open above where you want to add the
next to.
ADD NATIVE PLUGINS:
BATCH COMMANDER FOR PRO TOOLS USER MANUAL | 55
LIGHT BLUE “… Native TO TOP INSERT”:
These Batch Commands are designed for Native users adding one plugin at a
time to selected tracks. To add plugins you must have programmed your
Default EQ and Dynamics in the Pro Tools Mixing Preferences as well as have
selected Favorite Plugins from your list.
To do this, hold command and choose a plugin from your insert list and let go
of command once selected. This should now appear at the top of your insert
lists within Pro Tools.
These Batch Commands will only add plugins to the Top Rack Insert A.
Note: All Floating Windows must be hidden when performing this Batch
Command.
GREEN “… Native TO NEXT INSERT”:
For Native users, with a plugin window open, hit the “… NativeTo NEXT Insert”
Batch Command to add the chosen plugin to the rack below the open plugin.
Note: You must only have the tracks you’re adding plugins to displayed by using
the “Show Selected Tracks” Fader Focus Batch Command.
PLUGIN RACKS:
These Batch Commands allow users to move up and down through plugins.
BATCH COMMANDER FOR PRO TOOLS USER MANUAL | 56
Note: Users must have a plugin open to move up and down.
PLUGIN CHAINS:
In the video, we performed the Favorite Plugin Chain 1-5 Batch Command that
added five plugins to our selected tracks. We have added six different
variations on this video Batch Command including Add Default EQ and Dynamic
Chain.
It is important to note that users can customize these to be set to any variation
of Favorite Plugins and Default plugins and account for Native vs. DSP in the
QuickList. To use these Batch Commands, navigate to Layout 3 and utilize the
following Batch Commands:
To use on of the preset chains, select tracks you wish to add your Favorite 1-5
plugin chain to on the Pro Tools Mix Window and hit Favorite Plugin Chain 1-5
to automatically show only the selected tracks, add Favorite Plugins 1-5 to
each one, hide the last plugin window and restore the previous tracks.
Note: You must have 5 Favorite Plugins programmed for this to work. Do
this my holding the Command Key when initiating a plugin on the Insert
Racks. Select a plugin without lifting from the Command key and once
selected instead of the plugin appearing, you’ll notice it is at the top of
your plugin lists.
Note Two: Pro Tools 11 users will have it “Restore Previous Tracks” after
performance, however Pro Tools 10 users will Show All Tracks in the session
including hidden tracks. You can adjust this by Removing it from the command
line if so desired.
Note Three: Also, make sure you have your Default EQ and Dynamics chosen in
your Pro Tools Mixing Preferences.
REMOVE INSERTS A-E:
BATCH COMMANDER FOR PRO TOOLS USER MANUAL | 57
To clear inserts, just select the tracks you want to clear and hit the “REMOVE
INSERTS A-E” Batch Command and again it will show the selected tracks
remove the plugins from Inserts A-E and then restore the previous tracks
displayed.
PLUGIN OPTIONS:
SAVE AS OPEN PLUGIN SETTINGS:
This will Save As the open plugin settings.
Note: Only one plugin should be open.
SET PLUGIN SETTINGS TO DEFAULT:
This will set the plugin settings to default.
Note: Only one plugin should be open.
BYPASS CURRENT OPEN PLUGIN:
This will click the bypass button on an open plugin.
Note: Only one plugin should be open.
BYPASS AND MAKE PLUGIN INACTIVE:
This will click the bypass button of the open plugin and make it inactive.
Note: Only one plugin should be open.
BATCH COMMANDER FOR PRO TOOLS USER MANUAL | 58
A/B & B/A PLUGIN:
A/B & B/A Plugin Batch Commands will survey two loaded plugins above or
below one another one at a time with or without playback.
To setup these Batch Commands for perfomance, you will need to have two
plugins above or below eachother on the insert racks and one of the two must
be bypassed. A/B Plugin will click the bypass button on the top plugin move
down the rack to the plugin below, open it and click the bypass button. Then
use B/A Plugin to click the bypass plugin of the lower plugin, move up the
insert chain, open the plugin above and click the bypass button.
Note: To perform, the unbypassed plugin must be open and either above or
below the bypassed plugin.
AUTOMATION:
Enable Read, Touch, Touch Latch, Latch and Write:
On the Pro Tools Mix Window, select the tracks you want to change automation
status for. Once selected, hit one of these Batch Commands to show only the
selected tracks, changed their automation state to the choice selected and
then either restore previous tracks in Pro Tools 11 or Show All Tracks and Hide
Inactive Tracks in Pro Tools 10.
Note: These Batch Commands can only be used on the Mix Window and require
all floating windows to be hidden before performing. Use the “Hide Floating
Window” button on the Batch Commander Toolbar to toggle all open windows
on and off before and after performing these Batch Commands.
Show Automation Window:
Toggles on and off the Pro Tools Automation Window.
MIXER DISPLAY:
BATCH COMMANDER FOR PRO TOOLS USER MANUAL | 59
TOGGLE INSERTS A-J (10):
Toggle between five and ten inserts displayed. Note: The (10) indicates how
many total racks can be visible to use this Batch Command. If displaying 15
racks, be sure to switch the QuickList item before using.
TOGGLE SENDS A-J (10):
Toggle between five and ten sends displayed. Note: The (10) indicates how
many total racks can be visible to use this Batch Command. If displaying 15
racks, be sure to switch the QuickList item before using.
TRACK STATUS:
The Track Status Batch Commands function as to be expected, however you
just have the track selected by clicking the waveform itself and not just
highlighting the track to enable tracks.
BATCH COMMANDER FOR PRO TOOLS USER MANUAL | 60
BATCH COMMANDER PT10/11 HD Layout 4 of 4 For Basic
SHOW GROUPS:
SHOW GROUPS 1-6 or 8 will automatically show the pre-assigned group.
WINDOW CONFIGURATIONS:
On Layout 4, users have access to Window Configurations 1-6. As explained
below, the Batch Commander Window Configurations are also already prelinked to specific Markers. To setup a Window Configuation to diplay with
custom faders, follow the following protocol.
To Program Custom Faders, “Show Select Tracks” for the Faders to be
grouped. Then hit the “Enter” button on the Numeric Keypad to create a
Memory Location. Be sure the options to be selected are set to “None” and
“Track Show/Hide.” Name the Memory Location and lastly, be sure to set
the number to associate properly with the desired Window Configuration.
BATCH COMMANDER FOR PRO TOOLS USER MANUAL | 61
IMPORTANT: Memory Locations 89-99 have been pre-programmed in the
window configurations to allow you to program custom groups of faders to
launch with associated plugins.
Examples: MEM LOCATION 89 = Con Fig 1, MEM LOCATION 90 = Con Fig 2,
etc.
Now, just save your Window Configuration with the New Window
Configuration Batch Command and number and name it accordingly. Now,
they should be able to be referenced through our Window Configuration 110 Batch Commands.
Note: Window Configurations 6-10 can be located in the QuickList for
custom programming.
OPEN WINDOW CONFIG 1 (Configuration):
Press CON FIG 1 to open window configuration number one & Memory Location
89.
OPEN WINDOW CONFIG 2 (Configuration):
Press CON FIG 2 to open window configuration number two & Memory Location
90.
OPEN WINDOW CONFIG 3 (Configuration):
BATCH COMMANDER FOR PRO TOOLS USER MANUAL | 62
Press CON FIG 2 to open window configuration number three & Memory
Location 91.
OPEN WINDOW CONFIG 4 (Configuration):
Press CON FIG 4 to open window configuration number four & Memory Locaiton
92.
OPEN WINDOW CONFIG 5 (Configuration):
Press CON FIG 5 to open window configuration number five & Memory Location
93.
VIDEO FAVORITES:
HEADPHONE MIX (HD):
Select the tracks you want to send to the headphones, push Headphone Mix HD
to instantly create a new stereo aux track, copy the send to all the selected
tracks and copy the mix level to the send level for each track selected.
FLY HOOK (MARKERS 4-6-8):
Will Automatically fly audio region selections to specific markers on the Edit
Window.
TO PROGRAM A CUSTOM “FLY HOOK” manually, follow the below formula and
insert the appropriate Markers:
KEY COMMAND: COMMAND-C
KEY COMMAND: NUMPAD-. (period)
KEY COMMAND: NUMPAD-“First Marker To Paste To”
KEY COMMAND: NUMPAD-.
BATCH COMMANDER FOR PRO TOOLS USER MANUAL | 63
KEY COMMAND: COMMAND-V
KEY COMMAND: NUMPAD-.
KEY COMMAND: NUMPAD-“Second Marker To Paste To”
KEY COMMAND: NUMPAD-.
KEY COMMAND: COMMAND-V
Note: You can set these to as many markers as you want by following the
above sequence.
MIDI TO AUDIO (1 TRACK):
In the video, we show 5 MIDI Tracks being bounced, named, imported as audio
tracks and then hiding the previously needed MIDI. We have included this
option for one track by default to accomplish this task on Layout 4.
We have created the Batch Commands for up to 10 MIDI Track conversions to
Audio. Be sure and select the correct one from the QuickList to convert the
correct amount.
AUDIO TO MIDI (1 TRACK):
Located on Layout 4, the AUDIO TO MIDI Batch Command will automatically
paste a copied MIDI note down to the next track pasting the notes according to
the transients of the audio track above it.
Press AUDIO TO MIDI to paste MIDI notes to the audio track above the
instrument track being used.
How To Use: Place an audio track above an empty instrument track at the top
of the session. Create one MIDI note and place it on the instrument track on
whichever note needs to be triggered. Highlight the one MIDI note and hit the
copy/cut button on the Batch Commander toolbar or CMND+C or CMND+X
Locate the transport cursor on the audio track above the MIDI track at a
location you would like to start copying the AUDIO to MIDI. Hit the AUDIO TO
MIDI Batch Command and watch it paste MIDI notes to the instrument track
directly below the audio track.
Note: This Batch Command will only paste one MIDI note by default. Change
the number of notes by Right-Clicking or Control-Clicking the Batch
Command and adjusting the “Repeat” column to the number of notes you
would like to paste.
BATCH COMMANDER FOR PRO TOOLS USER MANUAL | 64
IMPORTANT: AUDIO TO MIDI is also labelled “TAB PASTE MIDI - ONE TIME
Repeat As Needed” in the QuickList.
TEMPO MAP (1 BAR) & SNAP TO GRID FADE CONSOLIDATE:
On Layout 4, we have included the two Batch Commands, TEMPO MAP and SNAP
TRANS GRID. As displayed in the video, the first step is tempo mapping one bar
on the track you want to snap to the grid, then with SNAP TRANS GRID, the
Batch Command will cut the track by the transients, snap them to the grid,
fade them and then consolodate the entire track.
To perform this Batch Command, it is important to first use the TEMPO MAP
Batch Command (We have included Tempo Map 1-4 Bars in the QuickList.)
Once tempo mapped, Select the audio you wish to modify and press SNAP TO
GRID FADE CONSOLIDATE to separate transients and snap to the grid, new
regions will be faded and consolidated.
Note: You can do this with multiple tracks after tempo mapped once.
IMPORTANT: The delay may need to be adjusted pending the size of the
audio track you are performing the function on to allow for more time.
CLIP COLOR:
MAKE SELECT CLIPS-TRACKS COLORS:
Select the track and clip to instantly color code to the described color on the
Edit Window.
MAKE SELECT CLIPS COLORS:
Select the clip to instantly color code to the described color on the Edit Window.
MAKE SELECT TRACKS COLORS:
BATCH COMMANDER FOR PRO TOOLS USER MANUAL | 65
Select the track to instantly color code to the described color on the Mix or Edit
Window.
MENU ITEMS:
Open windows and menu items.
MENU ITEMS:
Open windows and menu items.
MENU ITEMS:
Open windows and menu items.
MIDI ZOOM & IMPORT AND EXPORT:
BATCH COMMANDER FOR PRO TOOLS USER MANUAL | 66
UPLOAD TO DROPBOX:
Locates Session and uploads it to Dropbox. Be sure to be signed into Dropbox.
EXPORT ENTIRE SESSION:
When you are ready to export the tracks of your session's dry files to another
DAW press the Batch Command "Export Entire Session."
It will highlight all tracks in the session, consolidate the tracks and name the
regions according to the track name. Then, it will export the tracks to default
location.
MIDI ZOOM IN:
Zoom in on a MIDI note in a Piano Roll view.
MIDI ZOOM OUT:
Zoom out on a MIDI note in a Piano Roll view.
REMOTE:
BATCH COMMANDER FOR PRO TOOLS USER MANUAL | 67
These Basic functions have been included on Layout 4 for basic mobile
functionality when using the Slate Remote application.
BATCH COMMANDER FOR PRO TOOLS USER MANUAL | 68