1
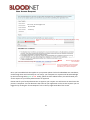
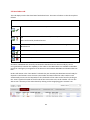
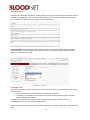
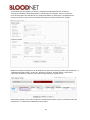
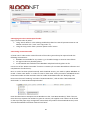
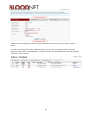
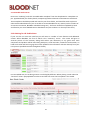
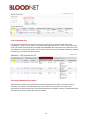
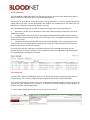
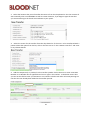
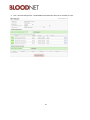
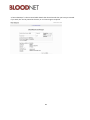
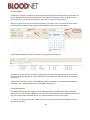
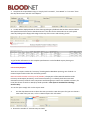
BLOODNET USER MANUAL Streamline your blood orders with Australia’s national online blood ordering system 17 May 2014 1 Contents Overview…………………………………………….. 1.1 About BloodNet 1.2 Website Addresses 1.3 Document Control 1.4 Glossary 1.5 Registering for the Blood Portal as a New User 1.6 Requesting access to your BloodNet site 1.7 Logging onto the System 1.8 Home Page and Main Menu 1.9 Changing your Facility 1.10 Requesting Access to a new BloodNet site 1.11 Removing Access to a BloodNet site 5 5 5 5 7 10 12 13 14 14 15 Ordering……………………………………………………………………………………………………………………………… 2.1 Ordering Summary 2.2 Draft Orders 2.3 Sent Orders 2.4 Dispatched Orders 2.5 Cancelled Orders 2.6 Finalised Orders 2.7 Placing a Stock Order 2.8 Placing a Patient Specific Order 2.9 Creating a Downtime Order 2.10 Copy Orders 2.11 Printable Order Forms 2.12 Search Orders 2.13 LIS Enabled sites 17 17 18 21 21 21 22 24 30 33 36 37 38 Receipting……………………………………………………………………………………………………………………………… 3.1 Receipting Overview 3.2 Receipted Issue Notes Tab 3.3 Cancelled Issue Notes 3.4 Identify and Issue Note 3.5 Receipting Blood Components 3.6 Receipting Blood Products 3.7 Entering “Feedback” for components and Products 3.8 Receipting Issue Notes Manually 3.9 Viewing and Editing and Issue Note that has been 100% Receipted 3.10 Completing and Issue Note 3.11 Searching Issue Notes 3.12 LIS Enabled sites 41 41 42 42 43 45 46 48 49 49 50 51 Fate……………………………………………………………………………………………………………………………………… 4.1 Fate Overview 4.2 Transfer 4.3 Discard 53 54 56 Administration…………………………………………………………………………………………………………………… 5.1 Facility Administration 5.2 Edit My Facility 5.3 Configuration 5.4 Edit Order Template 5.5 Add a Component or Product to the Routine Order Template 5.6 Set the “Max Stock” Value 5.7 Delete a Component or Product from the Routine Order Template 5.8 Access Approval 5.9 Status Levels 5.10 Revoking User Access to a BloodNet site 5.11 News Management 5.12 Archiving Old News Item 62 62 62 64 64 64 64 64 65 66 67 67 Support Phone: 13 000 BLOOD (13 000 25663) email: [email protected] Fax: 02 6151 5210 Creative Commons With the exception of the BloodNet and National Blood Authority logos, this document is licensed under a Creative Commons Attribution 3.0 Australia licence. The document should be attributed as the BloodNet User Manual, v23 published by the National Blood Authority. 3 1. BloodNet Overview 4 1.1 About BloodNet Operated by the National Blood Authority (NBA), BloodNet is Australia’s online blood ordering and inventory management system, enabling staff in pathology laboratories to place orders online for blood and blood products, record inventory levels and to record the final fate of each unit (e.g. discarded, transferred or transfused). Data from BloodNet is used to: Support supply and demand management including supply planning Determine the quantities and locations of blood stocks, nation-wide on a daily basis Improve the supply process and provide daily feedback to the Blood Service Report on the extent to which supply is meeting demand Support approval of payments for blood products Monitor wastage Monitor the movement of Blood and Blood Products throughout Australia It is therefore important that BloodNet is used comprehensively and correctly by all pathology laboratory users. 1.2 Website Addresses BloodNet is accessible through the BloodPortal which is a live internet site. Computer users must be able to access the internet site to log into and work with BloodNet. This may require firewall or other configuration. To access BloodNet, click on the ‘BloodPortal’ button on the NBA website at http://www.blood.gov.au 1.3 Document Control The latest version of the BloodNet User Manual is available from the NBA website (http://www.blood.gov.au/bloodnet) and under the “Help” tab within the BloodNet site. Printed copies of the manual are uncontrolled documents. 5 1.4 Glossary BloodPortal The central user management and authentication system that provides access to BloodNet and a range of other blood sector systems operated by the NBA. Users can also update their contact details held by the NBA and subscribe to a range of mailing lists relating to transfusion within the BloodPortal. Blood Service Australian Red Cross Blood Service Facility Administrator A user who can place and receipt orders, and can also modify BloodNet configuration for their hospital/facility. This user can also approve the access of other users for their hospital/facility. Facility User A user who can place orders and receipt products for their hospital/site LIS Laboratory Information System LIS Administrator Responsible for monitoring and configuring anything required for LIS interfacing with BloodNet NBA National Blood Authority System Administrator Member for the NBA’s Blood Systems Support Team who can modify any parameter within BloodNet 6 1.5 Registering for the Blood Portal as a New User Navigate in a web browser to https://portal.blood.gov.au and click on New User? Create an Account as highlighted by the red arrow below. 7 This will take you to the registration page shown below which will enable you to create a new BloodPortal account 8 After completing the form click the “Save” button; you will then be presented with the screenshot below indicating that your account has been registered. A temporary password will be sent through to your nominated email address and mobile phone number. You have now finished registering your BloodPortal account. The next step is to login and request access to BloodNet. Navigate in a web browser to https://portal.blood.gov.au. You will need to enter the username you created for the BloodPortal and the temporary password you should have now received via email or SMS. Note: When logging in for the first time you will be prompted to change your password. 9 1.6 Requesting access to your BloodNet site After logging in you will see the BloodPortal home page as shown below. Please click on the BloodNet link to request access to your BloodNet Facility. You will then be directed to the BloodNet Access Request and Approval page. Please click on “Add Role” and then choose relevant state/territory, facility and respective role as outlined below. BloodNet Roles: Facility User: General user of BloodNet to order, receipt and fate blood and blood products Facility Administrator: has the ability to order, receipt and fate blood and blood products as well as the access to approve users, change templates and add news items. Facility Administrators are also approved as facility users. LIS Administrator: Responsible for monitoring and configuring anything required for LIS interfacing with BloodNet. You should only select this option if you are involved in implementing a BloodNet-LIS interface at your facility. 10 Test Dummy [email protected] 02) 6111 0000 TestDummy Please click on add role and choose your Role, State/Territory and Facility before clicking “Save” Please accept the BloodNet User Conditions Once you have added a role and accepted the User Conditions please click “Submit” and wait for your role to be accepted. Once you have added role that applies to your position please click on the BloodNet User Conditions, read through them and click accept or not accept, your acceptance or rejection will be acknowledge by the link turning either green or red. Finally, please click the Submit button; this will forward your access request to your facility administrator for approval. Please wait for your facility administrator to approve your request. You will receive an email once the process is complete. You can determine the status of your application on this screen anytime you are logged on by clicking the “Access Request” link on the top right hand side of the screen. 11 1.7 Logging onto the System Access to BloodNet is through the BloodPortal (https://portal.blood.gov.au) using your unique username and password, once you have entered your details click “log In” or simply press “enter” on the keyboard. The username and password are needed each time you access the system. If you forget your username or password please click on the buttons shown above labelled “Forgot Username?” or “Forgot Password?” This will enable an email or SMS to be generated with either your username or a temporary password being sent to you. If you are a new user please click on “New User? Create an Account” and follow the registration process as outlined in step 1.5 Once you have logged in to the BloodPortal you will see the home screen, click on the BloodNet link and if you have been granted access this will take you straight to your laboratory’s BloodNet home page. 12 1.8 Home Page and Main Menu After logging into the BloodNet System, you will be automatically directed to the home page. At the top of the page on the right hand side is the session information which includes your name, the facility you are logged in under and the time zone. The home page displays any “News Items” posted by either Facility Administrators or Blood Systems Support Staff. News items which have been posted by Facility Administrators will only appear on their individual facility’s homepage with the author being the Facility Administrator; however news items which have been posted by NBA Support will be visible to all BloodNet facilities. In addition recent news items from the NBA website will be displayed on an RSS feed on the right hand side of the screen. There are a number of menu items available on the BloodNet main menu bar: Home: To return to the home screen. Returning to the home screen will also show alert messages such as pending access requests or inventory is below the stock alert threshold for LIS-enabled sites. Inventory: For LIS-enabled sites the Inventory screen provides a snap shot of stock levels including Max Stock, Stock Level Alert and On Hand stock. This allows users to view their stock levels without having to create an order. Ordering: Allows the user to place orders and view the status of orders. Order searches and printable order forms are also available here. Receipting: Allows receipt of orders and searching of issue notes. Fate: Allows the user to view or record the discard and/or transfer of units. Reporting: Provides access to Fate and Inventory Reports. Administration: Allows Facility Administrators to edit facility details, edit ordering templates, view and action requests for access to BloodNet for your facility and add/edit news items. Help: Contains links to the latest User Materials, Contact form to email Blood Systems Support staff and a link to the Blood Service Inventory and Distribution centres contact details. Feedback: Allows submission of feedback regarding BloodNet at any time while using the system, an email is then generated and sent straight to the Support Team. Change Facility: If you have access to more than one BloodNet facility you are able to switch between without having to log out and log back in again simply by clicking here BloodPortal: This will link you back to the BloodPortal page to access other NBA systems and subscriptions. Access Request: If you need to apply for access to another BloodNet site please click here to add a role at another facility Logout: Used to log out of the BloodNet system and BloodPortal application. 13 1.9 Changing you Facility If you work at multiple sites and have already been approved to access those BloodNet sites please click on the “Change Facility” to choose the BloodNet facility you need to access. It will then open the following page and display all of the sites you are approved to access. Once you have located the Facility that you need to access, click “select facility” on the left hand side of the screen and you will be redirected to the home page of that facility. 1.10 Requesting Access to a new BloodNet site If you require access to a new BloodNet site click on “Request Access” and follow the process outlined in Step 1.6. The facility Administrator will then need to approve your request before you are able to access that facilities BloodNet page. 14 1.11 Removing Access to a BloodNet site An important part of BloodNet is ensuring the privacy of patient data is maintained. It is important that when a staff member leaves the organisation that their access in BloodNet is removed. Facility Administrators should undertake this process on a regular basis to ensure that only current staff have access to BloodNet. To remove access to BloodNet: 1. 2. 3. 4. 5. Select the ‘Access Approvals’ item from the Administration Menu Locate the relevant user and select ‘Action’ Select ‘Rejected’ in the ‘Outcome’ drop down list Provide a comment as to why access is being rejected. Select ‘Save’ 15 2. Ordering 16 2.1 Ordering Summary Orders can be viewed in summary by status by hovering over the word “Ordering” and selecting “Orders by Status”. Within this summary screen there are 5 tabs Draft Orders: Displays orders that have been partially completed and saved but not sent to the Blood Service Sent Orders: Displays orders that have been sent to the Blood Service and the orders acknowledgement status Dispatched Orders: Displays orders that have been fulfilled and linked to the relevant issue note Cancelled Orders: Displays orders which have been cancelled by the facility Finalised Orders: Displays orders which have been receipted into BloodNet If BloodNet is left open on any of the Ordering tab views, the screen will auto-refresh every two minutes to allow the user to monitor the status of the orders. Additionally there is a search functionality on right hand side of the column header allowing user to search each of the order status tabs. 2.2 Draft Orders tab The “Draft Orders” tab displays orders that have been partially completed and saved, but not sent to the Blood Service. Draft orders can be selected, completed and sent to the Blood Service, or cancelled if no longer required. If a draft order requires completion click “edit” on the left hand side of the screen on the row that correlates with the order you need to complete this will redirect you to the ordering wizard you will now be able to complete your order. If you need to cancel an order which is still in draft form click “Cancel” on the right side of the screen. A pop up box will appear asking if you wish to cancel the order, click “Ok” to continue. The order will be cancelled, and available to view under the “Cancelled Orders” tab. Any draft orders where the stock required is zero will be automatically deleted from the system after 48 hours. 17 2.3 Sent Orders tab This tab displays orders that have been finished and sent. The status of orders on this tab may be as follows: Order Transmission Related Symbols The Blood Service has confirmed receipt of an electronic order An order has been transmitted electronically but receipt of the order has not yet been confirmed by the Blood Service A “Downtime” order, whereby the order was finalised without being sent to the Blood Service The fax was successfully delivered The Fax status is unknown The fax delivery failed All orders in BloodNet are normally transmitted to the Blood Service electronically by secure encrypted email; however the capability to fax orders to the Blood Service is available in BloodNet purely for contingency arrangements if the electronic link between BloodNet and the Blood Service fails. Orders will remain in the “Sent Orders” tab until they are issued by the Blood Service and ready for dispatch to the facilities. Once the issue note number has been linked the order number it will automatically move into the “Dispatched” tab. The details of the order can be found by clicking on the “View” hyperlink located on the left side of the screen next to the order number. You are also able to see a summary of the order details by clicking on the magnifying glass ‘Preview’ icon. 18 2.3.1 Finalising Orders If a BloodNet order number has not been entered correctly onto the Consignment Issue note by the Blood Service BloodNet will not be able to associate the order with the issue note and therefore the order will remain under the “Sent Orders” tab. Products and components can still be receipted however the order will remain under “Sent Orders” until finalised manually. To finalise a BloodNet Order click “finalise”. The below pop up box will appear. Click “Ok” to finalise the order. Note: This function is only available to those BloodNet Administrators. 2.3.2 Cancelling Orders An order that has been sent to the Blood Service can only be cancelled while the order is displayed on the “Sent Orders” tab. To cancel a sent order click the “Cancel” link for the order and enter a reason for the cancellation, click “Next” followed by “Submit Cancellation”. Note: If the order is displayed in the “Dispatched” tab contact the Blood Service to determine if the order can be cancelled. Important Note: Check the delivery status of your cancelled order in BloodNet after it has been sent to ensure the cancellation notice delivery has been successful. 2.4 Dispatched Orders tab Once the Blood Service creates an Issue Note and links it with the BloodNet order number the order will automatically move into the “Dispatched Orders” tab. The BloodNet order details and the Blood Service Issue Note assigned to the order are visible under this tab allowing user to determine when ordered items have been dispatched from the Blood Service. 19 2.5 Cancelled Orders tab This tab displays all of the orders which have been cancelled, from either “Draft Orders” or “Sent Orders”. Those that display a symbol under “Status” are orders which have been sent, and those without a symbol are draft orders which have been cancelled. To view the order cancellation details click “View” which will display the cancellation summary if the order has been sent or the order summary if the order was cancelled in draft form. 2.6 Finalised Orders tab This tab displays all the orders which have been finalised either by being receipted in BloodNet or finalised manually. 2.7 Placing a Stock Order To place a stock order hover over the word “Ordering” in the menu bar and select “New Stock Order”. There are 3 steps to complete the order. 20 2.7.1 Order Details Complete all information required in “Order Details” ensuring all mandatory fields (marked with red asterisk) are completed. If you are unsure which order priority is required, click the “information” icon to display the definitions. Click “Next” to move onto Step 2. Important Note: It is possible for Facility Administrators to remove the default delivery method within the Administration module. This will ensure staff are correctly selecting the appropriate delivery method for every order. 2.7.2 Order Items Step two involves entering the required items to be ordered. There are two methods of calculating these amounts: Enter the number of units needed in the “Required” column or Complete the “On Hand” column with current stock numbers and press the “Calculate Required Quantities” button. Components and products are split into the following tabs; Red cells, Platelets, Frozen, Immunoglobulins, Factor Concentrates and Albumin. Click on those tabs to enter the details of each component as required. Click “Next” to move to next Step. 21 Note: The ‘Calculate Required Quantities” needs to be used on each tab. 2.7.3 Confirm and Send Ensure all details under “Order Details” and “Order Items” are correct including delivery address, delivery time and date required. Click “Back” if you need to edit any details before sending. Once all details have been confirmed press “Send Order” to complete the ordering process and send your order to the Blood Service Inventory & Distribution site for fulfilment. You can set up orders to automatically print when the order is sent under Administration – Edit My Facility. Note: If your order is still awaiting acknowledgement as received by the Blood Service the status will be an orange question mark, however if your order has been acknowledged it will have a green tick next to the email icon. Acknowledgement usually takes 2-7 minutes. Click the “Resend” option if order remains unacknowledged after 20 minutes. 22 2.8 Placing a Patient Special Order To place a patient special order, select “New Special Order” in the ordering drop down menu. Complete all information required in step one “Order Details” ensuring all mandatory fields (denoted by a red asterisk) are completed. Select either “Add Patient & Fresh Component” or “Add Patient & Manufactured Product” 23 A second window will appear (see below), complete all required details for the patient ensuring all mandatory fields (denoted by a red asterisk) are complete. Select a component from the drop down box followed by any required modifiers or phenotypes, required quantity and priority (refer to 2.9). Once all required information has been entered click “update”. Additional components/products can be added to the patient by selecting “Add Fresh Component” or “Add Manufactured Product” under the “Add Item to Patient” heading. When a subsequent component is added to a patients order the blood group will be copied across. Add another patient to the order if required. To add another patient, click on “Add Patient & Fresh Component” or “Add Patient & Manufactured Product”. 24 2.8 Copying a Previous Patient Special Order Copy a previous order by either: Using “Search Orders” in the ordering module drop down list. Search by Patient Name or UR Number and then click “view” and “copy order” or; Using the ‘Copy orders from a previous patient order’ button. 2.9 Creating a Downtime Order A “Down Time” order can be created for each of the order types and may be required under the following circumstances: BloodNet is unavailable for any reason e.g. a scheduled outage or internet access failure. An urgent order was placed by phone. A staff member was unfamiliar with BloodNet and placed order by phone or fax. Correct use of the “Down Time Order” function is necessary for accurate demand data collection and completeness of order history. Once an order has been placed manually with the Blood Service, you need to update BloodNet to record a “Down Time Order”. In order to create a ‘down time’ order you need a valid Blood Service Issue Note number and the Issue Note must be visible on BloodNet under the “Receipting” tab. Hover over the word “Ordering” and select “Downtime Orders”, click on either “New Downtime Stock Order” or “New Downtime Special Order” Enter the Blood Service Component Issue Number into the “Issue Note Number(s)” field. If there is more than one, separate the numbers by space or comma. (The supplier issue number can be found on the top of the paper copy consignment received with the products from the Blood Service). Once all Issue Note Numbers have been entered click “Next” 25 Complete the ordering form with the original product details and click “Next” and then “Finalise Order”. You will now be redirected to the “Orders by Status” screen where you will be able to view your downtime order under “Finalised Orders”. Downtime orders are identifiable by the blue hand symbol under the “status” column. 26 2.11 Printable Order Forms Hover over “Ordering” and click “Printable Order Template” from the drop down list. Templates are pre- populated with your facility details, component/product selections and maximum stock levels. These templates should be printed and saved in your forms folder, and should be used to place an order with the Blood Service if you are unable to access BloodNet for any reason (such as a failure of an internet connection, BloodNet scheduled outage etc.). The forms should be completed by hand and faxed to your normal Blood Service distribution site (the number is on the top of the form). 2.13 Ordering for LIS Enabled sites If your site has an active LIS interface you will notice a number of extra features and additional screens within BloodNet, the first of which is the “Inventory” screen. This screen will give an accurate picture of the Inventory being held within your laboratory at any given time. Each component and product will be listed along with price, stock level alert, maximum stock number, on hand stock value and how long ago the LIS was updated. This information is drawn directly from your LIS system at specified intervals throughout the day. For LIS enabled sites, the ordering screens are also slightly different. When placing a stock order the “On Hand” value is prepopulated from the LIS and the time since the last update is also visible. 27 3. Receipting 28 3.1 Receipting Overview Receipting units received in BloodNet is a crucial link in the information flow and accountability framework for laboratories, jurisdictions and the NBA. Receipting data confirms that units were received by the laboratory which in turn enables the jurisdiction and the NBA to satisfy their obligations under their financial management accountability framework in relation to paying supplier invoices for these units. In jurisdictions where blood budgets are devolved, it assists laboratory staff to ensure that they are not incorrectly invoiced for units that are damaged or not received. Under the Receipting there are three tabs: Unreceipted Issue Notes 100% Receipted Issue Notes Cancelled Issue Notes Issue notes which have been received electronically from the Blood Service are located on the “Unreceipted Issue Notes” tab until they are 100% receipted, at this time they will move to the “100% Receipted Issue Notes” tab. Those Issue Notes which have been linked to a BloodNet order will display the BloodNet order number (s) under the “Assigned Orders” column. The receipting screen will refresh every two minutes if left open on any tab. 3.2 Receipted Issue Notes Tab Issue notes which have been 100% receipted can be found under the “100% Receipted Issue Notes” tab. 29 3.3 Cancelled Issue Notes Cancelled Issue Notes are those which have been cancelled by the Blood Service when the issue note needs to be amended or reissued from Inventory and Distribution. 3.4 Unreceipted Issue Notes Consignments need to be received in BloodNet using the receipting module and this can be done from Receipting – “Issue Notes by Status” and selecting the “Unreceipted Issue Notes” tab. To start the receipting process click “Receipt” against the relevant issue note. The issue number can be found at the top of the Blood Service issue note. If there is no paper issue note in the consignment, select a product from the consignment, click in the “Find by Donation Number” field at the top of the screen and scan the product donation number, the relevant issue note will be highlighted Note: Components and product are colour coded as per Blood Service Shipper tape e.g. red cells are green, platelets are yellow, frozen products are blue. 30 3.5 Receipting Blood Components Scan the donation number from a unit in the consignment. BloodNet will automatically place a “1” in the “Received Quantity” column; a green “tick” will also be entered under the “Receipted” column. The line on which the item is located will also be highlighted in bold font to ensure visibility of items receipted. Continue to scan each component until all have been scanned for the issue note then click finish and save. Note: There will be occasions when the order cannot be 100% receipted by scanning e.g. a product listed on the issue note was not received. In such circumstances, the order will need to be closed manually. This can be done by Facility Administrators clicking on the word “receipt” and setting the Received Qty as zero. Feedback must be provided, see 3.7 below. Additionally the Blood Service must be notified to ensure traceability. 31 3.6 Receipting two components with same Donor Identification Number From time to time a facility may receive two blood components with the same donor identification number listed on one Issue Note e.g. Paediatric Red Cells “1 of 4” and “2 of 4”. To properly identify the respective component to receipt in, the component code needs to be scanned in addition to the donation number. A pop up window will appear after scanning in the donation number to scan in the “Component Code”. When the Component Code is entered, BloodNet will receipt the correct line of the Issue Note and you may proceed to receipt further items. Note: Some facilities will have pop-up blocking enabled which will prevent this pop-up from appearing. You may be able to enable pop-ups for this site. You may need to talk to your IT administrator about this. 3.6 Receipting Blood Products The process for receipting blood products is similar to that for blood components. Note the following exceptions: Scan one barcode for each lot number BloodNet will automatically place a tick in the “Receipted” box and enter the number “1” to the received quantity box. 32 If you are receipting more than one item with the same lot number, enter the actual quantity received into the “Scan or Enter a Donation/Lot Number” box and then scan the lot number to enter the correct amount in the “Received Qty” column. 3.7 Entering “Feedback” for components and products There may be occasions when a product received is not suitable for use or you wish to provide feedback to the Blood Service. This may occur if, for example: Product received is outside of specified temperature range Product is out of date Product is Damaged Product container is damaged Product was not ordered Product was delivered to the wrong address. 33 To provide feedback tick the check box on the far right hand side of the screen against the unit/product you wish to put feedback against. Click “Add Feedback”, a second window will open. Complete the details of the feedback and click “Save Feedback” The word “Feedback” will now appear on the line of the product which you have just entered feedback for. Continue to receipt the rest of the issue note as normal and click “Finish and Save”. 34 If feedback is entered accidently, tick the check box on the right side and click “Remove Feedback”. Note: Feedback is mandatory when the receipted quantity of a product is zero. Important Note: A report is sent automatically from BloodNet to the Blood Service and Jurisdictional Blood Policy Officers each morning listing all issue note lines where the “Feedback” box is ticked, and showing the reason. This information forms an important link in the quality cycle for the Blood Service. The Blood Service will manage such feedback in accordance with its established procedures for handling customer feedback and may well contact you in relation to feedback raised as your name and nominated contact number will be sent through with the information. Such contact will take place outside the framework of BloodNet. 3.8 Receipting Issue Notes Manually Using Facility Administrator Role: Select the order to be receipted from the “Unreceipted Issue Notes” tab on the receipting page. Click “receipt” on the left hand side Click the word “receipt” for each component or product. If there is a problem with a component or product that has been delivered, apply feedback as per point 3.7 above. Click the “Finish and Save” button. 3.9 Viewing and Editing an Issue Note that has been 100% Receipted. Once and issue note has been 100% receipted and saved it moves to the “100% Receipted Issue Notes” tab. You are able to view the way an issue note was receipted and change the way an issue note was receipted e.g. change the “Received Qty” if required. You are also able to add to or edit any “Feedback” that has been recorded, or Un-receipt and issue note by using the Administrator role to un-tick the “Receipted” word and re save it. In order to do any of these functions click the “edit” or “view” link on the left hand side of the screen on the same line as the issue note you wish to edit or view. Functions are then performed in the same way as for an un-receipted issue note. Note: Unreceipting one or more “receipted” items once the issue note has been opened using the 35 “edit” button will move the issue note back to the “Un-receipted Issue Notes” tab when it is saved. This can be useful in the BloodNet Training site to make issue notes available for manual receipting. 3.10 Completing an Issue Note The “% Receipted” value shown on the Un-Receipted issue note tab relates to the proportion of lines that have been marked as being receipted, it does not relate to the order fulfilment ratio of “Issued” to “Receipted” Quantities. In the example about 1 out of 3 products have been receipted therefore 50% of the Issue note has been receipted before it was saved. The user is able to click “receipt” and continue to receipt the remaining products on the issue note and then save it to move it into “100% Receipted Issue Notes”. 3.11 Searching Issue Notes You are able to search for an issue note at any time by either the Issue Note Number, or a specified date range. To conduct a search, hover over the word “Receipting” in the top menu and click on “Search Issue Note”. Enter the issue note number or date range and click “search” a list of Issue Notes will appear that meet your specific requirements. From here you can either “View” the issue note, “edit” or view the assigned order by clicking on the order number on the far right hand side of the screen. You are also able to see a preview summary of the issue note including required date, who the order was sent by, along with the date, time and person who last receipted the issue note simply by clicking the magnifying glass icon on the far left hand side of the screen. 36 3.12 LIS Enabled sites For those sites which have an active LIS interface, you will see an additional tab under your “Receipting”, “Issue notes by status” tab called “100% Imported into LIS”. This is to show all of the issue notes which have been fully receipted within BloodNet and then pushed or pulled across into your Laboratory information system. This function removes the need to double handle each product by entering it separately into both systems. 3.13 Search Donation/Lot number A donation/lot number can be searched from the Receipting menu. When you click on ‘Search Donation / lot number” the following search screen will come up where you can enter the donation/lot number and relevant result will be displayed. Clicking the “History” link will display the discard/transfer history of that donation/lot number. 37 38 4. Fate 39 4.1 Fate Overview The Fate Module enables laboratories to record their transfer of units to other laboratories and the discard of blood and blood products issued by the Blood Service. The analysis of such data by hospitals, suppliers and governments is crucial to enable appropriate supply planning to occur so that components and products are available when and where they are required for use without unnecessary discards occurring. The Fate Module facilitates the transfer and discard of products but also has the ability to: Record the transfer of units between not only other laboratories but custom sites such as Air Ambulance services; Linkage between the actual issue of units being transferred and discarded and the transfer or discard episode, drawing through the age of the units upon issue , the original facility that they were issue to and so forth; Integration of transfer and discard data into the other BloodNet reports including unit issues and inventory levels to provide holistic reporting that can be generated on demand by end users to timelines that suit the needs to the facility. For those who have their Laboratory Information System (LISs) interfaced the creation of Fate episodes that you currently complete in your LIS will move directly into BloodNet and will be able to be viewed and reported against as required. 4.2 Transfer Out A transfer out is required in BloodNet when you are physically transferring components/product to another facility. This transfer episode must be completed if that facility is also on BloodNet. A transfer out episode can contain any amount of blood and/or blood products as long as they are all going to the same location on the same day. To complete a transfer of blood or blood product to another site follow the five steps below: 1. Select “New Transfer Episode Out” located under the Fate menu. 40 2. Select the location that you will transfer the items to from the drop down list. This list contains all sites nationally who are on BloodNet as well as custom locations, if you begin to type the site that you are transferring to the list will narrow down to your option. 3. Select the reason for the transfer from the drop down list. If the unit is to be transferred with a patient select that option from the list, click on the box next to “Is this a Patient Transfer?” and enter in any relevant details. 4. Add the component/s or product/s to the transfer episode. Click in the Scan or Enter a Donation Number or Lot Number box as applicable and scan or type in the number. In the below screen shot you can see the field to enter you Donation or Lot number circled in red and a red arrow pointing to a unit that has now already been added to the transfer episode. 41 5. As the last step click Save Transfer Episode at the bottom of the page and you will be directed to your completed transfer receipt to print, sign and add to the shipper for transfer. 4.3 Transfer In A transfer in is required in BloodNet when a unit is transferred from another BloodNet facility but they have not done the transfer in BloodNet. To complete a transfer of blood or blood product to another site follow the five steps below: 1. Select “New Transfer Episode In” located under the Fate menu. 2. Select the reason for the transfer from the drop down list. If the unit is to be transferred with a patient select that option from the list, click on the box next to “Is this a Patient Transfer?” and enter in any relevant details if possible. 3. Add the component/s or product/s to the transfer in episode. Scan or Enter a Donation or Lot Number as applicable. This will automatically populate the transferred from location. 42 If you have multiple units with the same donation number, e.g. split apheresis units, a pop up box will appear for you to select the appropriate component. 5. As the last step click Save Transfer Episode at the bottom of the page and you will be directed to your completed transfer receipt to print and sign. 4.4 Discard Creating a Discard record can be achieved in four easy steps and takes less than one minute to complete. A “New Discard” can contain one or more units (either Blood components and/or Blood products supplied by the Blood Service), depending on your need and laboratory practice. 1. Hover over the word “Fate” and click on “New Discard Episode” 2. Select the “Location Discard Occurred” and “Discard Reason” from the drop down lists. If you are recording a Discard retrospectively you can override the current date to reflect the actual date of discard. 43 If you are unsure of the most appropriate “Discard Reason”, simply click the “Definitions” link next to the drop down list and an explanatory screen with a list of all reasons and a description of their use will be displayed. Simply click on the relevant reason to select that reason and to close the explanatory screen. 3. Scan the Donation number barcode into the “Scan or Enter a Donation Number” field and click “Add component”. BloodNet will retrieve all remaining data and add this unit automatically to the discard record. To add any additional unit (s) simply scan the next donation number. You can enter multiple units per discard record, and a discard record can contain both blood components and blood products. The benefit of entering multiple units on one discard record is that you will only need to enter the “Discard Reason” and “Location Discard Occurred” values once. 44 If you have selected the incorrect unit(s) click “Remove” on the far right side of the page and the unit will be taken off the discard episode. If the entered donation number is not found at your facility, you will be presented the following screen where you have the functionality of being able to search across all the facilities. After doing the search, you can do a ‘Transfer In’ of the item to your own facility by clicking on following link 45 You will then be redirected to a new Transfer In screen as shown below. Once you click on ‘Save Transfer Episode’ button on the following screen, ‘Transfer In’ of the item to your facility will be completed 46 4. Click “Save Discard Episode”. The BloodNet Discard Receipt will now be available to view. 47 A “Discard Receipt” is then created which details the discard record that you have just created. If you wish, this can be printed at the time, or at a later stage as required. 48 5. Administration Support Phone: 13 000 BLOOD (13 000 25663) email: [email protected] Fax: 02 6151 5210 5. Administration There are three choices available from the “Administration” menu item: Facility Administration Access Approvals News Management 5.1 Administration There are three sub-menus under Facility Administration: Edit My Facility Edit Order Template Manage discard locations 5.2 Edit My Facility This function allows editing of facility contact, location and delivery details. Hover over the “Administration” menu item, and select “Edit My Facility” from the dropdown list. Select the “Edit” button to make necessary changes to the facility details. Ensure changes are correct, then click “Update”. To remove the default delivery method, select the “blank” option under “delivery method”. This will ensure that staff are required to choose the most appropriate delivery method for each order placed through BloodNet. To remove the default Inventory and Distribution site; select the “blank” option under “default distribution site”. This will ensure staff are required to choose the most appropriate distribution site for each order placed through BloodNet. To automatically be taken to Print Screen when the order is ‘Sent’, select ‘Print Order when order sent? To ‘Yes’. By default this option is ‘No’. Click the “Cancel” button at any time to cancel any field changes. 50 5.3 Configuration The configuration box at the end of “Edit My Facility” page allows for: BloodNet to be configured dependent on the type of local barcode scanners and whether they transmit start/stop codons. Tick the box to turn on/off. the setup of an email distribution list to receive an emailed copy of all orders and all sent order failures. Note: When multiple em ail addresses are entered , use a semi-colon between addresses, and do not include any spaces. 51 5.4 Edit Order Template The order template has been divided into Red Cells, Platelets, Frozen, Immunoglobulins, Factor Concentrates and Albumin. These fields are available in vertical tabs and the order template can be customised to each type of blood component. You can move individual line items up and down using the arrows on the right. 5.5 Click on each individual row to edit Click on ‘Add Red Cells’ to be able to add new red cells component to order template from the following screen. Select the blood component that you want to be part of order template and then press the button “Add selected items to order template” to make sure the items are part of order template. 52 Click the Edit link to open a page where the Max stock and Min Order Quantity can be updated. Update the Max Stock and Min Order Quantity on this page and click on Update to update the component on this page. Answer “Ok” to the prompt “Are you sure you want to add this component/product?” 5.6 Manage Discard Location For non LIS enabled sites, manage discard location functionality has been incorporated to add/edit /delete discard locations Clicking on Manage Discard locations under the administration menu provides the option to add custom discard locations that will be available in the drop-down of ‘Location Discard Occurred’ field under New Discard 5.7 Access Approval Facility Administrators can accept or reject access requests to their BloodNet facility using the Access Approvals menu functionality. All requests submitted by staff are automatically assigned to the relevant Facility Administrator. Notification of an access request with applicant’s details occurs via email. Hover over the “Administration” menu item and select “Access Approvals” from the drop-down list. Search for the applicant by entering in their Username Click on ‘Action” and select appropriate outcome. Note: if rejecting an applicant please provide a comment in the section provided. 53 Facility administrators can also view a list of current users for their laboratory simply by clicking on “Approval Status” and selecting “Accepted”, a list of current users will be displayed along with the approver and approved date. 5.9 Status Levels Pending: The access request is awaiting action until the user is accepted or rejected. All users with pending status do not have access to BloodNet. Rejected: This is for users who have; requested access to an incorrect facility; discontinued work at a facility; requested access for an incorrect role. These users will not have access to your BloodNet facility. Accepted: This status is for users who have requested access to the correct facility with the correct role and require access to your BloodNet facility. Once they are accepted they will have immediate access to your BloodNet facility. 54 5.10 Revoking User Access to a BloodNet site If you are required to reject a user’s access search for their username as detailed above, click “action” and change the “outcome” to “rejected”. This may be needed if a staff member has moved onto another lab. Access can also be reinstated if they return to your laboratory in the same way, by searching for their username, clicking “action” and changing the “outcome” back to “accepted”. 55 5.11 News Management This functionality allows staff to post news items on the BloodNet home page for their local facility. Hover over the “Administration” menu item and select “News Management” from the dropdown list. Select “Create News Item” button from the left of the screen and the news item template will appear. Enter the Title and enter the content within the free text field. Edit the font size and style using the buttons within the top of the text box. Select status as “Active”. Click the “Insert” button. The news item will now be located on the front page of your facility for all users from your facility to see. 5.3.1 Archiving Old News Item News items that are no longer required to be displayed can be archived, to remove them from the main News page. To archive News items, perform the following steps: 1. 2. 3. 4. Hover over the “Administration” tab and click on “News Management”. Select the news item to be archived by clicking “edit” on the left hand side of the screen Scroll down to the bottom of the page Change the status from “Active” to “Inactive” 6. Click the “Update” button. 56 6. Reporting Support Phone: 13 000 BLOOD (13 000 25663) email: [email protected] Fax: 02 6151 5210 6.1 Reporting Overview The “Report” menu provides access to Facility specific and National reports broken down into Fate Reports, Feedback, and Inventory categories. These reports are pre-defined and are available by hovering over the “Reporting” tab and clicking on “Reports”. The detailed specifications for each report are available from the NBA website at http://www.blood.gov.au/bloodnet-reports 58 6.2 Fate Reports: A selection of reports is available to capture both discard and transferred data across a selected time period. Blood Products and Blood Components are captured in separate reports to allow for more specific searches. The format of each report is the same, to generate a Fate report: Select the report you wish to run simply by clicking on the report name. Use the drop down menus and date picker to specify a date range you would like data for and click “View Report”. A table will be displayed with all of the data for the requested time period. This data can be extracted to an excel spread sheet by clicking on the floppy disk icon on the top of the screen and selecting “excel”. These reports can be run whenever required and for any specified time frame. Follow the same steps to run the “Discard Blood Products (FATE002)”, “Transfer Blood Component (FATE003)” and “Transfer Blood Products (FATE004)” reports also. 6.3 Feedback Report: The National Health Provider Feedback report (REC001) shows the feedback comments reported when the unit received is not suitable for use or for any other feedback reasons regarding the issue of the units ordered from the Blood Service. To run the Feedback report for your facility: 1. Click on the report name under “Reporting” from the main menu bar and the “Reports” tab on the drop down menu. 59 2. Complete the required date range, or simply click “Last week”, “Last Month” or “Last Year” from the drop down menu and click “View Report”. 3. A table will be displayed with all of the data regarding any feedback that has been entered within the specified time frame back to the Blood Service. This data can be extracted into an excel spread sheet by clicking on the floppy disk image on the top of the screen and selecting “Excel”. To get further information or the complete specifications on the feedback report please go to https://www.blood.gov.au/Reporting/ 6.4 Inventory Reports: There are six reports under the “Inventory” heading within BloodNet reporting, one of which is a national report and the other five are facility specific. National Health Provider Inventory Level (INV001): The purpose of the National Health Provider Inventory Level Report (Previously: Current State Inventory) is to identify both the nominated maximum inventory levels for each component and blood group as well as the available inventory for issue (also known as Stock on Hand) by health providers. This report is intended for Pathology Services Only. To run this report simply click on the report name: 1. Use the drop down menu to select the state you wish to view the report for (you can choose a state other than your own, or for a national report click “All States”. 2. Choose the number of “Previous Days to Check” 60 3. Click “View Report” 4. A table will be displayed showing the inventory per hospital and per product. Use the page turn buttons to move between states and be aware of the legend on the top right hand side of the page to explain the colour coding. 61 7. Help Support Phone: 13 000 BLOOD (13 000 25663) email: [email protected] Fax: 02 6151 5210 7.1 BloodNet Support Contact Details Blood Systems Support offers 24 hours, 7 days a week support, 365 days of the year. You can access the Blood Systems Support contact details by hovering over the Help tab and clicking on Contact Us. You can then contact support via phone or email of fill in the contact form as shown below. Note: Your name, email and work phone will be pre populated in the fields below if they are in your BloodPortal account. 7.2 BloodNet User Documentation To access the BloodNet documentation, hover of the Help tab and click on BloodNet User Documentation. This will link you to the Quick Start Guides and current User Manual for BloodNet . These will be regularly updated with only the most up to date versions available through BloodNet. 63 7.3 Bloodnet User Reference Group (BURG) Documentation – This link will take you to BURG documentation Clicking on BURG documentation takes you to the meeting details and corresponding documentation for those meetings 7.4 Contact details for the Blood Service Inventory and Distribution sites The fourth item under the Help tab is the contact details for the Blood Service Inventory and Distribution sites. If you click on this link it will open a separate internet tab and take you through to the Blood Service website for the most up to date contact details of your local Inventory and distribution centre. 64