1
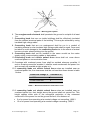
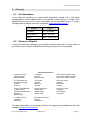
www.jva-fence.com.au JVA PET Series User Manual (PET100, PET80, PET80R) This page is intentionally left blank JVA PET Series User Manual Congratulations on your choice of a JVA Energiser. In choosing to purchase the JVA brand you have opted for the highest quality in electric fencing. Please read this manual entirely before installing your new energiser. All JVA products offer a three-year warranty against faulty components and workmanship but excludes Acts of God, i.e. lightning, flood damage, etc. or malicious damage to the unit or faulty application. To ensure your eligibility for this warranty program, please retain your proof of purchase. DANGER! Risk of Shock! High voltages exist inside the electric fence energiser and on the fence terminals. © JVA Technologies Pty Ltd 18 March 2012 Page 1 JVA PET Series User Manual Table Of Contents 1 2 3 4 5 IMPORTANT NOTES – PLEASE READ .......................................................... 4 1.1 Electric Fences .................................................................................................... 4 1.2 Energisers ........................................................................................................... 4 1.3 Power Supply Options ......................................................................................... 4 JVA PET SERIES MODELS AND FEATURES ................................................ 5 2.1 Features .............................................................................................................. 5 2.2 Specifications ...................................................................................................... 6 PARTS OF THE ENERGISER .......................................................................... 7 3.1 Fence Connectors ............................................................................................... 8 3.2 Energiser LED Display ......................................................................................... 8 INSTALLATION ................................................................................................ 9 4.1 Mounting the Energiser ........................................................................................ 9 4.2 Connecting to the Fence .................................................................................... 10 OPERATION ................................................................................................... 11 5.1 Recharging ........................................................................................................ 11 5.2 Electric Fences .................................................................................................. 11 5.3 Benefits Of Electric Fences ................................................................................ 12 5.4 Applications ....................................................................................................... 12 5.5 Earth Return System ......................................................................................... 12 5.6 Fence Return System ........................................................................................ 13 5.7 Earthing Your PET Energiser ............................................................................. 13 5.8 Pest Control ....................................................................................................... 13 5.9 Strip Grazing/Pet Control ................................................................................... 14 5.10 Semi-Permanent and Permanent Fences .......................................................... 14 5.11 The Importance of Insulators ............................................................................. 14 5.12 Maintenance ...................................................................................................... 15 © JVA Technologies Pty Ltd 18 March 2012 Page 2 JVA PET Series User Manual 6 7 COMMON ENERGISER PROBLEMS ............................................................ 16 6.1 Moisture and Ants .............................................................................................. 16 6.2 Lightning ............................................................................................................ 16 6.3 Flat Batteries (Battery Units Only) ...................................................................... 16 COMMON FENCE PROBLEMS ..................................................................... 17 7.1 Testing the „Earth‟. ............................................................................................. 17 7.2 Testing the Fence, Finding Shorts ..................................................................... 17 8 INSTRUCTIONS FOR INSTALLATION AND CONNECTION OF ELECTRIC FENCES IN AUSTRALIA AS REQUIRED UNDER AS60335.2.76 ....................... 18 8.1 Definitions .......................................................................................................... 18 8.2 General Requirements For Electric Fences ....................................................... 18 8.3 Particular Requirements For Electric Animal Fences In Australia ....................... 20 8.3.1 Prohibited Mounting ....................................................................................... 20 9 WARRANTY.................................................................................................... 21 9.1 For Assistance ................................................................................................... 21 9.2 Service or Repairs ............................................................................................. 21 © JVA Technologies Pty Ltd 18 March 2012 Page 3 JVA PET Series User Manual 1 Important notes – PLEASE READ 1.1 Electric Fences 1. Do not allow children or elderly persons to touch the energiser or fence live wires. Electric fences are not toys. 2. Electric fences should only be installed with regard to the relevant Standards and work place health and safety requirements. 3. Electric fence should be signed: every 10m in areas with public access, every 1 km in rural areas. 4. Electric fences must have an „earth‟ (Also commonly referred to as ground). An electric fence earth is one or more pieces of metal (eg. 1.8m Galvanized earth rods) driven into the soil. 1.2 Energisers 1. The PET energiser places a very short, very high voltage pulse on the fence live wires approximately once every second. The fence is „safe‟ in that the pulse is too short to cause electrocution. Please be advised that there is always a risk associated with any device designed to impart an electric shock. Do not allow children or elderly persons to touch the energiser or fence live wires. 2. The maximum length of fence able to be energised depends on many factors, for example the earth resistance, number and spacing of wires on the fence, type/quality of insulators, resistance of wire etc. The amount of grass or shrubbery touching the wires also alters the performance. Fence circuit layout is very important. Another factor to consider is acceptable fence voltage, for some stock situations this is 3kV others require more or less. Therefore the rated mileage of fence that the energiser will power effectively is a guide only. 3. DANGER! The Energiser should never be operated with the cover removed as high voltages exist inside the enclosure while operating. High voltage may remain on some internal parts long after the unit has been switched off. 1.3 Power Supply Options The JVA PET energiser series of electric fence energisers can be powered from a range of power sources. 12 volt external battery (not supplied) 12 volt battery with solar panel (not supplied) 240Vac via power pack (supplied) Two D cell batteries via battery backpack (supplied with PET80) Rechargeable battery backpack (supplied with PET80R) Important Note: Always ensure adequate ventilation is given to the external 12 volt battery. Lead Acid batteries may emit explosive gases while charging! © JVA Technologies Pty Ltd 18 March 2012 Page 4 JVA PET Series User Manual 2 JVA PET Series Models and Features 2.1 Features Mains powered Battery powered Digital control “Smooth” wave shape Ant & moisture protection UV stable enclosure Basic lightning protection Power surge protection Reverse battery protection Self resetting fuse Portable Solar capability^ Low battery indication Flat battery indication Over discharge battery protection Battery life maximisation Energy output Power consumption at 12 Vdc Warranty Power adapter included Fence leads included Battery leads included D cell battery backpack included Rechargeable backpack included Battery charger included PET100 PET80 PET80R * * * * * * * * * * * * * * * * 0.11 Joules 20mA 3 Years * * * * * * * * * * * * * * * * * * * * * * * * * * * * * * * 0.08 Joules 15mA 3 Years * * * 0.08 Joules 15mA 3 Years * * * * * Battery life maximization works by slowing the frequency of high voltage pulses just before the battery dies to keep the energiser going for as long as possible without damaging the battery. When working in this mode the red status LED will flash at the same time as the green Energiser OK LED to warn the battery is getting low. The over discharge battery protection will stop the energiser when the battery is flat and flash the status LED twice each second. If too much charge is pulled from the battery it will be permanently damaged and never hold the same amount of charge again. The PET energiser will automatically restart once the battery voltage returns to a normal level. The compact design of the PET series makes it easy to move and setup. The reverse battery protection protects the energiser from damage in the event you are having a bad day and connect the external battery the wrong way around. The PET series of energisers seals the electronics inside a durable UV Stable case to protect from ants, moisture and dust to maximise reliability. The PET series utilizes the latest digital microcontroller technology to extend battery life, provide useful feedback on the energiser status, and increase reliability and performance. All energisers in the JVA PET series can be powered from mains via the 12 volt plug pack supplied with each unit, or from a battery. ^To use with a solar panel, an external 12 volt sealed lead acid battery, solar panel and solar regulator are required (not supplied with this kit). © JVA Technologies Pty Ltd 18 March 2012 Page 5 JVA PET Series User Manual 2.2 Specifications Specifications 7.2Ah 20Ah 40Ah 100Ah Days From Battery * 20mA 8 24 49 122 - 12 to 15Vdc 15mA - - - - 4 12 to 15Vdc 15mA - - - - 7 Energiser output voltage # Stored Energy Power Input Range ~12V drain PET100 7.5kV 0.13J 12 to 15Vdc PET80 7.0kV 0.1J PET80R 7.0kV 0.1J Model Expected days from external 12 volt battery source Peak Output Energy 0.11 ^ 0.08 & 0.08 # No load, actual voltage on a short fence can be as high as 10kV ~ Current drain rating is for a 12V power source. Current drain will vary with voltage. * The number of days which can be expected from the compact battery arrangement. ^ For new D cell batteries with a rated voltage of 1.5 volts and a capacity of 7000mA Hours or more. & For a new rechargeable battery pack fully charged. Due to our policy of continual improvement, specifications are subject to change without notice. © JVA Technologies Pty Ltd 18 March 2012 Page 6 JVA PET Series User Manual 3 Parts of the Energiser PET100, PET80, PET80R 5 1 2 3 8 4 7 6 1. 2. 3. 4. 5. 6. 7. 8. On/Off Switch Status indicator (service error, low and flat battery warning) (red LED) Energiser On and OK indicator (green LED) Rubber O-ring seal between front and back case pieces Power Cable Input (mains 12V plug pack or external 12V battery) Fence connection terminal Earth connection terminal Model Number © JVA Technologies Pty Ltd 18 March 2012 Page 7 JVA PET Series User Manual 3.1 Fence Connectors Earth terminal Fence terminal Fence Connections 1. The earth terminal should be connected to a suitable electric fence earth rod. 2. The “Fence” terminal should be connected to the live wires of the fence. 3.2 Energiser LED Display This feature is included on all units. Status LED Energiser OK LED LED display 1. Status red LED – Will flash a service error code in the event there is an internal fault with the PET energiser, or a flat battery warning when the battery is flat. If the Status LED flashes as the Energiser OK LED flashes, this means the battery is getting low and the PET energiser is running in battery maximisation mode. 2. Energiser OK green LED – Flashes with each pulse to show the unit is on and operating correctly. Important Note: If there is a fault the green LED will stop flashing and the red LED will flash an error code. If the red LED flashes twice every second, the battery is low and the energiser has stoped operating to protect the battery. For all other error codes the energiser needs to be returned for servicing. © JVA Technologies Pty Ltd 18 March 2012 Page 8 JVA PET Series User Manual 4 Installation 4.1 Mounting the Energiser 1. Location of Energiser: If possible keep the energiser in a cool and dry environment (either indoors or covered) to maximise reliability. When selecting a location for your energiser, be mindful of thieves. 2. Mounting the Energiser It can be hung from a fence on the hook moulded into the back of the case. It can be hung from two screws spaced 4 cm apart horizontally. To deter any water ingress keep the energiser upright when located outdoors. Do not allow the pet energiser to be immersed in water. © JVA Technologies Pty Ltd 18 March 2012 Page 9 JVA PET Series User Manual 4.2 Connecting to the Fence 1. The electric fence requires an „earth‟. Drive a galvanized earth rod into the earth. Attach a wire from the Green Earth Connector on the front of the energiser to the earth stake. 2. Connect a wire from the fence connector on the front of the energiser to the live wire of the fence. 3. Powering the Energiser: Mains Power Source (PET100, PET80, PET80R): Plug the 12 volt power adapter supplied with the energiser into an AC power source and the other end into the DC socket on the side of the energiser. Turn the mains power switch on and then press the power button on the front of the energiser. External battery Power Source (PET100): For information on selecting a battery see the specification table in section 3.2. Plug the battery power cable into the DC socket on the side of the energiser. Then connect the alligator clips to the battery. Red to positive and black to the negative battery terminals. Press the power button on the front of the energiser. If the battery is low, the red LED will flash as the green LED flashes to indicate it is running in battery maximisation mode. If the battery is flat, the energiser will not start and the red LED will flash twice to indicate the battery requires a recharge. D Cell Battery Power Source (PET80): Put two D cells into the battery backpack and plug the battery backpack onto the back of the energiser. Press the power button on the front of the energiser. If the batteries are low, the red LED will flash as the green LED flashes to indicate it is running in battery maximisation mode. The PET80 will continue to run for as long as it can as the D Cell batteries are assumed to be disposable (non-rechargeable). As a result, the red LED may not flash twice to indicate the battery is flat. Rechargeable Battery Power Source (PET80R): Plug the rechargeable backpack onto the back of the energiser. Press the power button on the front of the energiser. If the battery is low, the red LED will flash as the green LED flashes to indicate it is running in battery maximisation mode. If the battery is flat, the energiser will not start and the red LED will flash twice to indicate the battery requires a recharge. © JVA Technologies Pty Ltd 18 March 2012 Page 10 JVA PET Series User Manual 5 Operation 5.1 Recharging 1. External 12 volt battery (PET100): The external 12 volt battery can be recharged using either a solar panel (coupled with a solar regulator) or a 12 volt battery charger. The PET100 does not need to be disconnected or turned off while charging the battery. Always ensure adequate ventilation is given to the external 12 volt battery while charging. Rechargeable backpack (PET80R): The rechargeable backpack can be recharged by simply plugging in the external 12 volt power supply supplied with the energiser for 4 hours. When not in use store the PET80R rechargeable battery in a cool location and recharge every 4 months. The PET80R rechargeable battery life is shortened considerably if it is: a) left in a discharged state or b) exposed to high temperatures 5.2 Electric Fences Electric fence energisers work by placing a short, high voltage pulse on fence wires. Although the voltage is very high (up to 10,000V) the pulse is too short to cause electrocution. The result is a zap similar to a static electricity shock from a car seat. The high voltage comes from the Fence terminal of the energiser and is connected to the fence wire or electric fence tape to make a “live” or “hot” wire. Live wires must be insulated (eg. with insulators) from earth or any conductive material touching earth (eg. fence posts). The other connection on the energiser is the „earth‟ (or ground). Electric fences need „earthing‟ to complete the circuit: When anything touches the live wire current will flow from the live wire, through the animal to earth back to the „earth‟ rod and into the energiser earth terminal. You should not feel a shock from the earth connection or earth rod. If you do, the „earth‟ is probably not sufficient. An electric fence „earth‟ is some metal in contact with the soil. The more metal in the earth the better, the more moist the soil the better. The larger the energiser and the longer the fence the more „earth‟ is required. For best results place the energiser in the middle of long lines of fence. A cartwheel pattern of farm fences with the energiser positioned centrally is more effective than a tree arrangement with the energiser at the base of the trunk with many branches. The fence and the „earth‟ can be measured with an electric fence Digital Voltmeter or a JVA Electric Fence Fault Finder. © JVA Technologies Pty Ltd 18 March 2012 Page 11 JVA PET Series User Manual 5.3 Benefits of Electric Fences An electric fence offers a psychological barrier as well as a physical barrier. The risk of injury to livestock is lower than with barbed wire fences. Electric fences cost less to install and maintain than conventional fencing. Users enjoy low maintenance costs because their stock stays off the fence. Their use is versatile they can be permanent or portable systems, they can be arranged in variety a of designs to suit different needs and environments they are quick and easy to erect They improve pasture and grazing control. 5.4 Applications Your PET energiser is perfect for strip grazing, temporary yards or horse corals and keeping your pets out of the garden. Please check with your local animal protection society as to whether they allow this. At 0.2 stored Joules the PET is ultra safe, being more than 10 times lower than the limits as set in the relevant Australian Standards. The shock from a PET energiser is about the same as you get from static when sliding out of a car seat in winter. It is very light and portable, will run for months from a large 12V battery and even warns you when the battery is getting low. 5.5 Earth Return System The Earth Return (also called Ground Return) configuration is the most common method for electric fences, particularly smaller fence applications like “strip grazing”, due to its lower cost and ease of setting up. The fence live wire(s) are electrified and rely on the dirt to complete the circuit back to the PET energiser Earth terminal when an animal touches the fence. © JVA Technologies Pty Ltd 18 March 2012 Page 12 JVA PET Series User Manual 5.6 Fence Return System The Fence Return configuration for electric fences is used where the soil could be too dry to complete the circuit, or the animals are likely to try to force their way through between the fence wires. In this system earth wire(s) are also run along the fence with the live wire(s) to provide a low resistance path for the current to return to the energiser. In this system if the soil is moist enough it will also function as a return path for the current when the animal touches the live wire, but if the soil is not moist or has poor conductance, this system will keep your fence effective provided the animal touches both a live and the earth wire simultaneously. 5.7 Earthing Your PET Energiser The best way to earth your PET energiser is using a 1 meter galvanized earth stake. If the earth stake is too rusty it may not work properly. The best place to locate the earth stake is somewhere close to where the fence starts and that is kept damp like a garden bed, a water course, or the overflow from a rain water tank. Do not connect the earth of your PET energiser to a metal shed or the same earth your home electricity system uses. It is also advised not to use any metal water pipes as this could lead to someone receiving a shock from a tap. 5.8 Pest Control The PET energiser is perfect for powering snail control tape. The snail fence is an excellent environmentally friendly alternative to using toxic chemicals to protect your garden from snails and slugs. © JVA Technologies Pty Ltd 18 March 2012 Page 13 JVA PET Series User Manual 5.9 Strip Grazing/Pet Control There are many options available when setting up a temporary fences, but the most common is a single live wire set at height that the animals cannot step over or crawl under without getting a shock. For posts there are a range of plastic tread ins, round metal posts with insulated “pig tails” or Y posts with pin lock insulators. For these short temporary fences, poly tape or rope woven with fine stainless steel conductors is a good choice. It is light, highly visible and can be easily rolled up when not in use. Safety signs need to be fitted as per the requirements outlined in the “General requirements for electric fences” part of this manual. 5.10 Semi-Permanent and Permanent Fences Steel posts are the quickest and easiest way to set up a fence, but timber and fibreglass posts can also be used. Make sure that the wires are tight enough that there is no sagging. 2.5mm galvanized fence wire is recommended as poly tape or rope will degrade and break over time. Safety signs need to be fitted as per the requirements outlined in the “General requirements for electric fences” part of this manual. 5.11 The Importance of Insulators If the live wire is not well insulated the fence load will be much higher, this means for any given length of fence the voltage will be lower. Pieces of wood and garden hose are not good insulators. Use the ones made for the job and you will get a better result. In a fence return system the earth wire(s) do not need to be insulated, in fact if you are using steel intermediates the more times the earth wire touches a metal post the better it is “earthed”. UV stable poly insulators will last much longer than non-UV stable plastics. Plastic insulators are not as susceptible to fracture as ceramic insulators. However, ceramic insulators are better in grass fire prone areas as they do not melt. © JVA Technologies Pty Ltd 18 March 2012 Page 14 JVA PET Series User Manual 5.12 Maintenance On permanent fences maintaining the fence is important, especially during the warmer months when plant growth is at its highest and after any large weather events. 1. Check the fence voltage using an electric fence volt meter. The JVA fault finder will also detect faults and direct you towards them. 2. Keep vegetation away from the fence. If it touches the fence it will reduce its performance. Along permanent fence lines you may wish to use a weed killer to deter any growth. 3. Check that nothing has fallen against the fence and that the wires are not broken or have been unclipped from insulators. 4. The PET energiser battery must be checked. If the PET energiser is flashing a low battery warning it is time to recharge or replace the battery. © JVA Technologies Pty Ltd 18 March 2012 Page 15 JVA PET Series User Manual 6 Common Energiser Problems The most common problems with electric fence energisers are: Moisture and Ants Lightning Flat batteries 6.1 Moisture and Ants Moisture and Ants should not be a significant problem for the JVA range of energisers as they come in a weatherproof case. Keeping the energiser off the ground and mounted vertically will minimise both these issues. 6.2 Lightning The JVA range of energizers is covered with a three-year warranty that excludes Lightning. Surge protection components inside the energiser are fitted to reduce the risk of damage by lightning. However, nature is capable of performing more extremely than we can test for in the laboratory so, to ensure the wellbeing of your JVA investment for the longer term, it is recommended that a Lightning Protection Kit is installed to prevent lightning damage and possible costly repairs. 6.3 Flat Batteries (Battery Units Only) The JVA series energisers require a battery that is in good condition to run correctly. The energiser will protect the battery by slowing down and eventually stopping altogether as the battery charge is depleted. For best results check on the energiser at regular intervals. If you are not getting the expected life from the battery consider having it checked by an auto electrician. If the battery fails it should be recycled, not sent to land fill. Return it to the manufacture if unsure. © JVA Technologies Pty Ltd 18 March 2012 Page 16 JVA PET Series User Manual 7 Common Fence Problems The most common problem with electric fences is low voltage on the live wires caused by Insufficient „earth‟ Shorts on the fence For tips on fence construction please see an Electric Fencing Manual. 7.1 Testing the ‘Earth’ The „earth‟ is essential to all electric fence systems. Larger energisers require more earth rods. Additionally, all energisers require a low resistance wired connection from the energiser earth terminal to the earth rod. Short the end of your fence to earth by hammering a metal stake into the soil and connecting this to the live fence wire. Using an electric fence volt meter or a JVA Electric Fence Fault Finder (do not use a standard multimeter) check what the voltage is at the earth terminal of the pet energiser. In general you should see a reading less than 300 volts (0.3kV). 7.2 Testing the Fence, Finding Shorts To test the performance of the fence or find faults on the fence an electric fence voltmeter is essential and a JVA Electric Fence Fault Finder is even better. An effective fence will have more than 2 kV (2000 volts). © JVA Technologies Pty Ltd 18 March 2012 Page 17 JVA PET Series User Manual 8 Instructions for installation and connection of electric fences in Australia as required under AS60335.2.76 8.1 Definitions Connecting lead an electric conductor, used to connect the energiser to the electric fence or the earth electrode Electric animal fence an electric fence used to contain animals within or exclude animals from a particular area Electric fence a barrier which includes one or more electric conductors, insulated from earth, to which electric pulses are applied by an energiser 8.2 General Requirements For Electric Fences 1. Electric animal fences shall be installed and operated so that they cause no electrical hazard to persons, animals or their surroundings. 2. Electric animal fence constructions which are likely to lead to the entanglement of animals or persons shall be avoided. 3. An electric animal fence shall not be supplied from two different energisers or from independent fence circuits of the same energiser. For any two separate electric animal fences, each supplied from a separate energiser independently timed, the distance between the wires of the two electric animal fences shall be at least 2 m. If this gap is to be closed, this shall be effected by means of electrically non-conductive material or an isolated metal barrier. 4. Barbed wire or razor wire shall not be electrified by an energiser. 5. Any part of an electric animal fence that is installed along a public road or pathway shall be identified at frequent intervals by warning signs securely fastened to the fence posts or firmly clamped to the fence wires. 1. The size of the warning sign shall be at least 100 mm x 200 mm. 2. The background colour of both sides of the warning sign shall be yellow. The inscription on the sign shall be black and shall be either: a) the symbol of Figure 1, or b) the substance of TAKE CARE – ELECTRIC ANIMAL FENCE. 3. The inscription shall be indelible, inscribed on both sides of the warning sign and have a height of at least 25 mm. © JVA Technologies Pty Ltd 18 March 2012 Page 18 JVA PET Series User Manual Figure 1 – Warning plate symbol 6. The energiser earth electrode shall penetrate the ground to a depth of at least 1 m. 7. Connecting leads that are run inside buildings shall be effectively insulated from the earthed structural parts of the building. This may be achieved by using insulated high voltage cable. 8. Connecting leads that are run underground shall be run in a conduit of insulating material or else insulated high voltage cable shall be used. Care must be taken to avoid damage to the connecting leads due to the effects of animal hooves or tractor wheels sinking into the ground. 9. Connecting leads shall not be installed in the same conduit as the mains supply wiring, communicating cables or data cables. 10. Connecting leads and electric animal fence wires shall not cross above overhead power or communication lines. 11. Crossings with overhead power lines shall be avoided wherever possible. If such a crossing cannot be avoided, it shall be made underneath the power line and as nearly as possible at right angles to it. 12. If connecting leads and electric animal fence wires are installed near an overhead power line, the clearances shall be not less than those shown in table 1 below. Power line voltage V Clearance m 1 000 >1 000 <=33 000 >33 000 3 4 8 Table 1 – Minimum Clearances from Power Lines 13. If connecting leads and electric animal fence wires are installed near an overhead power line, their height above the ground shall not exceed 3m. This height applies either side of the orthogonal projection of the outermost conductors of the power line on the ground surface, for a distance of 2 m for power lines operating at a nominal voltage not exceeding 1,000 V 15 m for power lines operating at a nominal voltage exceeding 1,000 V. © JVA Technologies Pty Ltd 18 March 2012 Page 19 JVA PET Series User Manual 8.3 Particular Requirements For Electric Animal Fences In Australia 14. A distance of at least 10 m shall be maintained between the energiser earth electrode and any other earthing system connected parts such as the power supply system protective earth or the telecommunication system earth. 15. Electric animal fences intended for deterring birds, household pet containment or training animals such as cows need only be supplied from low output energisers to obtain satisfactory and safe performance. 16. In electric animal fences intended for deterring birds from roosting on buildings, no electric fence wire shall be connected to the energiser earth electrode. A warning sign shall be fitted to every point where persons may gain ready access to the conductors. 17. A non-electrified fence incorporating barbed wire or razor wire may be used to support one or more off-set electrified wires of an electric animal fence. The supporting devices for the electrified wires shall be constructed so as to ensure that these wires are positioned at a minimum distance of 150 mm from the vertical plane of the non-electrified wires. The barbed wire and razor wire shall be earthed at regular intervals. 18. Where an electric animal fence crosses a public pathway, a non-electrified gate shall be incorporated in the electric animal fence at that point or a crossing by means of stiles shall be provided. At any such crossing, the adjacent electrified wires shall carry warning signs. 8.3.1 Prohibited Mounting Electric fence conductors should not be mounted on a support used for any overhead power line. © JVA Technologies Pty Ltd 18 March 2012 Page 20 JVA PET Series User Manual 9 Warranty 9.1 For Assistance If you have any questions or need further assistance, please call a JVA sales representative, service department on the relevant number below, or email us at: [email protected] For more information on our complete range of electric fencing products please see the JVA website: www.jva-fence.com.au Region Phone Australia 07 3103 0582 South Africa 0861 782 349 Other +61 7 3103 0582 9.2 Service or Repairs If service is required, package your energiser carefully and return it to the place of purchase or your nearest JVA distributor along with your proof of purchase. South African Stores 46 Montrose Drive, Pietermaritzburg KwaZulu Natal 7 Suffert St. Pinetown KwaZulu Natal Unit 6 Viking Business Park Viking Way, Epping Industria, Cape Town. Western Cape 977 Voortrekker St. Wonderboom South Pretoria Gauteng 14 Kelly Rd Jet Park Boksburg Gauteng 19A Suez Street Nirvana Polokwane Limpopo Unit D1, Waterfall Park 15 Rapid Street Riverside Industrial Park Nelspruit Mpumalanga 45 Mangold Street Newton Park Port Elizabeth Eastern Cape 4a Monument Rd Oranjesig Bloemfontein Free State 174 Bernie Street Kya Sands Randburg 602 Ondekkers Road Delarey Roodepoort For more information on our range of electric fencing products, please see the JVA website: www.jva-fence.com.au © JVA Technologies Pty Ltd 18 March 2012 Page 21 JVA PET Series User Manual © JVA Technologies Pty Ltd 18 March 2012 Page 22 JVA PET Series User Manual Manufactured for JVA by Pakton Technologies The JVA logo is a trademark of JVA Technologies Pty Ltd © JVA Technologies Pty Ltd 18 March 2012 Page 23