1
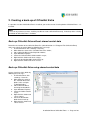
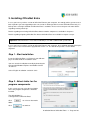
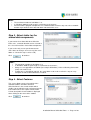
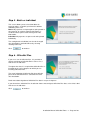
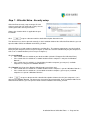
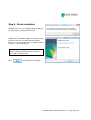
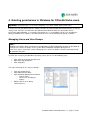
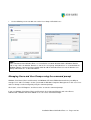
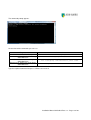
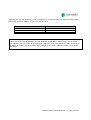
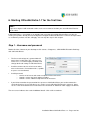
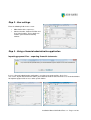
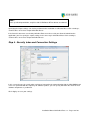
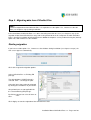
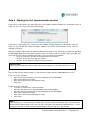
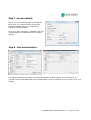
Installation Manual
OfficeNet Extra 1.7
You can start working with OfficeNet Extra if you have:
•
•
•
signed and returned your Electronic Banking contract to the bank;
received your smartcard and personal PIN;
sent the activation order to the bank (thus confirming your receipt
of the smartcard, PIN and software) and have received your bank
password.
Please contact your account manager if you have a question regarding
your Electronic Banking contract.
If you have used OfficeNet Extra before and above mentioned items are
already arranged, you can start using the new version after installation
right away.
Please refer to this manual for detailed information regarding installation and use of OfficeNet Extra.
While you are using OfficeNet Extra, you can easily get topic related Help by pressing the <F1> key.
Up-to-date information and answers to frequently asked questions are available at www.abnamro.nl/ebs.
In case you have any questions please contact our Electronic Banking Service Desk at 0900-1470 (or +31
102820430 from abroad).
We hope you enjoy using OfficeNet Extra.
Disclaimer
This document has been drafted with the highest possible care. Nevertheless ABN AMRO can not be held
responsible for the correctness and completeness of the information supplied.
Installation Manual OfficeNet Extra 1.7 - Page 2 of 25
Contents
1.
SYSTEM REQUIREMENTS
4
2.
CREATING A BACK-UP OF OFFICENET EXTRA
5
BACK-UP OFFICENET EXTRA WITHOUT SHARED CENTRAL DATA
BACK-UP OFFICENET EXTRA USING SHARED CENTRAL DATA
5
5
3.
INSTALLING OFFICENET EXTRA
6
STEP 1 - START INSTALLATION
STEP 2 - SELECT FOLDER FOR THE PROGRAM COMPONENTS
STEP 3 - SELECT FOLDER FOR THE SHARED DATA COMPONENTS
STEP 4 - SELECT FEATURES
STEP 5 - BATCH OR INDIVIDUAL
STEP 6 - OFFICENET PLUS
STEP 7 - OFFICENET EXTRA - SECURITY SETUP
STEP 8 - FINISH INSTALLATION
4.
GRANTING PERMISSIONS IN WINDOWS FOR OFFICENET EXTRA USERS
MANAGING USERS AND USER GROUPS
MANAGING USERS AND USER GROUPS USING THE COMMAND PROMPT
5.
TRANSFERRING OFFICENET DATA TO A NEW COMPUTER
SITUATIONS
STEPS
6.
8.
STARTING OFFICENET EXTRA 1.7 FOR THE FIRST TIME
THE OFFICENET EXTRA MODULES
11
12
13
13
13
13
13
13
13
13
13
13
13
THE OFFICENET DIRECT MODULE
THE DOMESTIC PAYMENTS MODULE
THE DIRECT DEBITS MODULE
THE FOREIGN PAYMENTS MODULE
13
13
13
13
QUICK REFERENCE GUIDE
13
CREATING, AUTHORISING AND SENDING PAYMENT ORDERS
VIEWING REPORTS
9.
11
13
13
STEP 1 - USERNAME AND PASSWORD
STEP 2 - USER SETTINGS
STEP 3 - USING A FINANCIAL-ADMINISTRATIVE APPLICATION
STEP 4 - SECURITY TOKEN AND CONNECTION SETTINGS
STEP 5 - MIGRATING DATA FROM OFFICENET PLUS
STEP 6 - STARTING THE FIRST COMMUNICATION SESSION
STEP 7 - ACCOUNT DETAILS
STEP 8 - USER AUTHORISATIONS
7.
6
6
7
7
8
8
9
10
OVERVIEW OF FUNCTION KEYS
13
13
13
Installation Manual OfficeNet Extra 1.7 - Page 3 of 25
1. System requirements
OfficeNet Extra 1.7 is developed for Windows 2000, Windows XP and Windows Vista operating systems.
OfficeNet Extra 1.7 can’t be installed on operating systems of which Microsoft has stopped giving support,
such as Windows 95, 98 and NT.
To be able to install OfficeNet 1.7, your computer requires:
•
•
•
•
125Mb of free disk space;
CD-rom player;
1 free USB port for the smartcard reader;
Internet connection for communication with the ABN AMRO bankserver.
Installation Manual OfficeNet Extra 1.7 - Page 4 of 25
2. Creating a back-up of OfficeNet Extra
If a previous version of OfficeNet Extra is installed, you need to create a backup before OfficeNet Extra 1.7 is
installed.
Note:
In case of any unforeseen errors, it will be possible to restore OfficeNet Extra only, if a backup of the existing
installation of OfficeNet Extra is available.
Back-up OfficeNet Extra without shared central data
Determine the location of the OfficeNet Extra files (default location is C:\Program Files\OfficeNet Extra)
and create a back-up of this folder by following the next steps:
1. In OfficeNet Direct click <Settings / General>;
2. Write down the name of the “Location Data Files” folder;
3. Close OfficeNet Direct and all opened modules;
4. Open Windows Explorer;
5. Locate the OfficeNet Extra folder noted in step 2;
6. Right-click this folder and select <Copy>;
7. Select the destination folder for the back-up;
8. Right-click this folder and select <Paste>.
Back-up OfficeNet Extra using shared central data
Create a back-up of this folder by
following the next steps:
1. In OfficeNet Direct click
<Settings / General>;
2. Write down the name of
the “Location Data Files”
folder. In this example
T:\Appl\OfficeNet
3. Close OfficeNet Direct
and all opened modules;
4. Open Windows Explorer;
5. Locate the folder noted in
step 2;
6. Right-click this folder and
select <Copy>;
7. Select the destination
folder for the back-up;
8. Right-click this folder and
select <Paste>.
Installation Manual OfficeNet Extra 1.7 - Page 5 of 25
3. Installing OfficeNet Extra
In case you have a previous version of OfficeNet Extra on your computer, we strongly advise you to create a
back-up before you start upgrading to the new version. It will be possible to restore OfficeNet Extra only, if a
backup of the existing installation of OfficeNet Extra is available. Please refer to chapter 2 for more details
regarding creating a back-up.
Details regarding transferring OfficeNet Extra data to another computer are available in chapter 5.
Details regarding migrating OfficeNet Plus data to OfficeNet Extra are available in chapter 6 step 5.
Important: OfficeNet Extra 1.7 has to be installed by a user with “administrator” permissions.
In case you have a previous version of OfficeNet Extra on your computer, the installation wizzard will skip the
steps 2 and 3. Your version will be upgraded to version 1.7. The data of the previous version will be
migrated.
Step 1 - Start installation
Insert the OfficeNet Extra 1.7 CD-rom in your CD-rom
player and wait untill the installation starts.
You can start the installation manually by browsing the
CD-rom with Windows Explorer and double-click on
“Install.exe”.
Select “English Installation” and click <OK>.
Step 2 - Select folder for the
program components
In this screen you can select the local folder
where the program components should be
installed.
The default folder is:
C:\Program Files\OfficeNet Extra\
Click
folder.
to select an alternative
Click
to continue.
Installation Manual OfficeNet Extra 1.7 - Page 6 of 25
Note:
The maximum number of sub-folders is 5;
In Windows 2000 the path length is restricted to 33 characters;
Do not install the program components in a network location. Refer to step 3 to select a network
location if you want to share data with other OfficeNet Extra users.
•
•
•
Step 3 - Select folder for the
shared data components
If you want to share data with other OfficeNet
Extra users, a network location can be selected in
this screen to install the shared data components.
If you are the only user or you do not want to
share data, no changes are necessary (the same
folder as selected in step 2 can be used).
Click
to continue.
Note:
•
•
•
•
The maximum number of sub-folders is 5;
In Windows 2000 the path length is restricted to 33 characters;
Always use a mapped drive and folder (for example M:\Ondata). Universal Naming Convention
(UNC) can not be used;
In order to use shared data properly, the same folder needs to be used in this step on every
computer on which OfficeNet Extra is installed.
Step 4 - Select Features
This screen allows you to select which of the
available modules should be installed.
OfficeNet Direct is the central module which
enables you to authorise and send your payments
to the bank and receive reports from the bank.
A short description of each module is displayed
when clicking on the name of the module.
Click
to continue.
Installation Manual OfficeNet Extra 1.7 - Page 7 of 25
Step 5 - Batch or individual
This screen allows you to select how domestic
payment orders, created in your financial software
should be processed.
Batch: All payments are kept together and reported as
one payment. A separate contract with Equens is
needed. Contact your account manager for more
information.
Individual: All payments are processed and reported
individually.
The setting batch or individual can also be changed
after installation in OfficeNet Direct by selecting
<Settings\General>
Click
to continue.
Step 6 - OfficeNet Plus
If you are a user of OfficeNet Plus, it is possible to
migrate your data to OfficeNet Extra. Select <Yes, I
want to use the old data>.
To migrate the data, it is required that OfficeNet Plus is
installed on the same computer on which you are
installing OfficeNet Extra.
The actual migration of OfficeNet Plus data will take
place when OfficeNet Extra is started the first time
after installation.
Read more about migration of OfficeNet Plus data in step 5 of chapter 6.
If you do not have OfficeNet Plus installed or choose not to migrate OfficeNet Plus data, select <No, I don’t
want to use the old data>.
Click
to continue.
Installation Manual OfficeNet Extra 1.7 - Page 8 of 25
Step 7 - OfficeNet Extra - Security setup
OfficeNet Extra Security setup manages file and
registry permissions for enhanced security so users
can be granted the correct permissions.
Choose the situation which is applicable for your
installation.
Click
to open a document with a detailed description about this item.
This document can also be opened manually. In the installation folder of the OfficeNet Extra binaries you can
open the folder \OESS and double-click OESS_UK.html.
OfficeNet Extra uses both program components and data files. The program components must be installed
locally on your computer (refer to step 2 of chapter 3). Data files can be installed locally on your computer as
well as on a network location (refer to step 3 of chapter 3).
Click ‘Local/Shared’
• If the central data is installed on your local hard disk (default C:\Program files\OfficeNet Extra);
• If the central data is installed on a network location and the computer is not part of a Windows
Domain *;
• If the central data is installed in a shared folder of another computer (‘peer to peer’) and both
computers are not part of a Windows Domain *.
Click ‘Domain’ only if you have ‘Domain Administrator’ permissions and
• If the central data is installed on a network location and the computer is part of a Windows Domain *;
• If the central data is installed on a shared folder of another computer (‘peer to peer’) and both
computers are part of a Windows Domain *.
* Click
to open a document with a detailed description of how to check if your computer is (or is
not) part of a Windows Domain. This document can also be opened manually. In the installation folder of the
OfficeNet Extra binaries you can open the folder \OESS en double-click OESS_UK.html.
Installation Manual OfficeNet Extra 1.7 - Page 9 of 25
Step 8 - Finish installation
Windows Vista users are required to log off and log
on again before starting OfficeNet Extra.
Windows XP en Windows 2000 users do not need to
log off first and can start OfficeNet immediately.
For these users the option ‘Start the OfficeNet Direct
module’ is selected by default.
Note:
Before starting OfficeNet Direct, first connect
your USB smartcard reader.
Click
to complete the installation.
Installation Manual OfficeNet Extra 1.7 - Page 10 of 25
4. Granting permissions in Windows for OfficeNet Extra users
Important: OfficeNet Extra 1.7 has to be installed by a user with “administrator” permissions.
In many cases the one who installs the software and the one who will work with OfficeNet Extra are not the
same person. To make sure that those who will work with OfficeNet Extra are granted the correct
permissions within Windows, a user group “OfficeNetUsers” is created within “Local Users and Groups”
during installation of the software. The OfficeNet Extra users can be added to this group as follows:
Managing Users and User Groups
Note:
Windows Vista Home (Basic and Premium) and Windows XP Home Edition do not offer the possibility to
manage Users and User Groups via the system tools of Windows Computer Management.
In this case, please refer to the section “Managing Users and User Groups using the command prompt“
for detailed instructions.
To check the version of your Windows operating system you can use the following steps:
•
•
•
Click 'Start' or go to your Desktop-view;
Right-click '(My) Computer’;
Click 'Properties’.
The steps to manage Users and User Groups:
•
•
•
•
Open the Control-panel;
Open Administrative tools;
Open Computer Management and then
o System Tools;
o Local Users and Groups;
o Groups.
Double-click the User Group
“OfficeNetUsers”;
Installation Manual OfficeNet Extra 1.7 - Page 11 of 25
•
Use the following screens to add users to the User Group “OfficeNetUsers”.
Note:
If the central data from OfficeNet Extra 1.7 is installed on a network location within a Windows Domain
and at step 7 of the installation “Domain” is chosen, the user group “OfficeNetUsers” is created within the
Windows Domain. Contact your local administrator to add the OfficeNet Extra users to the domain User
Group “OfficeNetUsers” as described above.
Managing Users and User Groups using the command prompt
Windows Vista Home (Basic and Premium) and Windows XP Home Edition do not offer the possibility to
manage Users and User Groups via the system tools of Windows Computer Management. In this case Users
and User Groups can be managed by using the command prompt.
Click ‘Start’, select ‘All Programs’ and ‘Accessories’ to start the command prompt.
If you use Windows Vista Home (Basic and Premium) click ‘Command Prompt’ and select ‘Run as
Administrator’. Windows XP Home Edition users can select ‘Command Prompt’.
Installation Manual OfficeNet Extra 1.7 - Page 12 of 25
The command prompt appears.
An overview of the commands you can use:
Purpose
List all available User Groups
List of users currently in the User Group
“OfficeNetUsers”
Add user ‘Jones’ to User Group
“OfficeNetUsers”
Remove user ‘Smith’ from User Group
“OfficeNetUsers”
Command
net localgroup
net localgroup officenetusers
net localgroup officenetusers jones /add
net localgroup officenetusers smith /delete
Type the required command and press <Enter> to execute it.
Installation Manual OfficeNet Extra 1.7 - Page 13 of 25
5. Transferring OfficeNet data to a new computer
Situations
You are using OfficeNet Plus or OfficeNet Extra 1.3, 1.4, 1.5 or 1.7 on your old computer (you can easily
check the version number of your current OfficeNet Extra by pressing the <F3> key in OfficeNet Direct).
You want to install OfficeNet Extra 1.7 on your new computer and you want to transfer the data of your old
version of OfficeNet Extra or OfficeNet Plus to this new computer.
Note:
If you want to transfer data from OfficeNet Extra version 1.3, you need to install OfficeNet Extra 1.7 as an
upgrade on your old computer first.
If you used OfficeNet Plus on your old computer, you need to install OfficeNet Extra 1.7 on your old
computer first using the option “Yes, I want to use the old data” (chapter 3 step 6). Refer to chapter 6 step 5
for detailed information regarding migration of OfficeNet Plus data to OfficeNet Extra.
If the operating system of your old computer is not supported for OfficeNet Extra 1.7 (refer to chapter 1), you
need to upgrade to OfficeNet Extra version 1.5 first. This version can be downloaded from the ‘Downloads’
tab at www.abnamro.nl/ebs.
Steps
Install OfficeNet Extra 1.7 on your new computer and copy the folders containing the data files as stated in
the table below.
If OfficeNet Extra uses a shared folder with data files (on a network location), it is not required to copy the
folders. By using the same (shared) location during installation of OfficeNet Extra 1.7 on each computer,
OfficeNet Extra uses this existing shared data.
Folder
… \Table
… \Messages
… \Transactions
… \Data\user.def
Contents
i.a. Your account numbers, debtors- and creditors data
i.a. Balance- and transaction data
i.a. Sent and to be send payment orders
Userprofiles
After you have copied these data files you can start OfficeNet Extra 1.7 using the same usernames and
passwords as you used in your old version of OfficeNet Extra (on your old computer).
Note:
Do not copy the entire OfficeNet Extra folder from your old to your new computer. This will prevent
restoring the old version to your new computer.
Installation Manual OfficeNet Extra 1.7 - Page 14 of 25
Optionally you can copy previously saved payment files (*.xls) from the Domestic payments, Direct debits
and Foreign payments modules to your new computer also.
Directory
… \Binnenland betalen\Betaalbestand
… \Incasso\Betaalbestand
… \Buitenland betalen\Betaalbestand
Inhoud
Domestic payments files
Direct debits files
Foreign payments files
Note:
If you transfer your data by burning it on a CD-ROM, the copied folders and files may have the ‘Read
only’ attribute. You can restore this by opening the properties of the “OfficeNet Extra” folder and uncheck
the option ‘Read only’. Select the option ‘Apply changes to this folder, subfolders and files’ and confirm
with <OK>.
Installation Manual OfficeNet Extra 1.7 - Page 15 of 25
6. Starting OfficeNet Extra 1.7 for the first time
Note:
If you are using the USB smartcard reader, make sure to connect it before you start OfficeNet Extra for
the first time.
If OfficeNet Extra 1.7 is installed as an upgrade from a previously installed OfficeNet Extra version, the
existing user profiles already have been migrated. To logon to OfficeNet Direct the username and password,
as used for the previous version, still apply. You can skip the steps in this chapter.
Step 1 - Username and password
Double-click the shortcut on your desktop or click <Start>, <Programs>, <ABN AMRO Electronic Banking>
and <OfficeNet Direct>.
•
The first user that logs on is granted with full
permissions in OfficeNet. This superuser can
create users, reset their logon passwords and
change advanced settings in OfficeNet Direct;
•
A valid username consists of at least 6 and at
most 16 characters. Punctuation marks, symbols
or spaces are not allowed;
•
A valid password
o consists of at least 6 and at most 8 alphanumerical characters;
o contains at least one letter and one number;
o contains at least 4 different alphanumerical characters.
•
If you fail to remember the password of the superuser of OfficeNet Direct, you need to contact the
servicedesk to have it reset. All other users can be reset in OfficeNet Direct by the superuser. Go to
<Users> click on the blocked user and remove the checkmark at “Blocked”. Click <Apply> to confirm;
The next screen indicates the need of additional details. Click <OK> to continue.
Installation Manual OfficeNet Extra 1.7 - Page 16 of 25
Step 2 - User settings
Enter the following fields in this screen:
•
•
Abbreviation of the superuser;
Contract number, Contract PO Box and
User Serial number. These details are
stated in your Electronic Banking
contract.
Step 3 - Using a financial-administrative application
Importing payment files – exporting financial statements
In case a financial-administrative application is used to create payment files, click <Yes>.
The screen “Import OfficeNet Extra” allows you to indicate whether OfficeNet Extra uses the default folders
for import of payment files or uses other specific folders.
Installation Manual OfficeNet Extra 1.7 - Page 17 of 25
Note:
In the specified import folders, only files with CLIEOP03 or BTL91 format are allowed.
Specifying the import settings can also be performed after installation in OfficeNet Direct. Click <Settings>,
<Conversions> and select <Import OfficeNet Direct>.
If the financial statements received by OfficeNet Extra are to be used in your financial-administrative
application, you can specify the export settings in the same way in OfficeNet Direct. Click <Settings>,
<Conversions> and select <Export OfficeNet Direct>.
Step 4 - Security token and Connection Settings
In this screen the type of security token and type of connection for communication with the ABN AMRO bank
server are specified. With the frequency for software updates, you can specify how often the check for new
software components is performed.
Click <Apply> to save your settings.
Installation Manual OfficeNet Extra 1.7 - Page 18 of 25
Step 5 - Migrating data from OfficeNet Plus
Note:
In order to migrate data from OfficeNet Plus, it is required to use the option “Yes, I want to use the old
data” (see chapter 3 step 6) during installation.
If the central data of OfficeNet Extra 1.7 is to be shared by more than one user (see chapter 3 step 3), the
migration of data from OfficeNet Plus only needs to be performed on the first computer on which OfficeNet
Extra is installed. Installation of OfficeNet Extra on additional computers can be performed using the (default)
option “No, I don’t want to use the old data”.
Starting migration
If you have used the option “Yes, I want to use the old data” during installation (see chapter 3 step 6), the
next screen appears automatically.
Click <Ok> to go to the migration options.
Select “OfficeNet Plus” as Existing EB
package.
The default folder C:\HNKZ already is
selected. Click … to change the path.
Select the items that need to be migrated
by clicking the checkboxes of your choice.
Greyed-out items are not applicable for
the selected Existing EB package.
By clicking
once.
you can select all items at
Click <Apply> to start the migration of the OfficeNet Plus data.
Installation Manual OfficeNet Extra 1.7 - Page 19 of 25
Step 6 - Starting the first communication session
If you have used the option “No, I don’t want to use the old data” during installation (as described in step 6 of
chapter 3), the next screen will appear automatically.
If you have used the option “Yes, I want to use the old data” during installation (as described in step 6 of
chapter 3), you need to click <Communication>, <Manual> to start the communication session, after the
migration is finished.
A bank password is required to start communication with the bank server. This bank password was provided
by ABN AMRO Bank and sent to you by separate mail. The first time you are using this bank password, you
must change it to a bank password of your choice. The next criteria are applicable:
o consists of at least 6 and at most 8 alphanumerical characters;
o contains at least one letter and one number;
o contains at least 4 different alphanumerical characters.
Important note:
If you fail to remember the bank password, you need to contact the servicedesk to have it reset.
You can now start the communication session to retrieve reports from the ABN AMRO bank server.
If you are using a calculator:
• Enter the bank password that has been provided to you by ABN AMRO;
• Enter your new bank password;
• Enter your new bank password again to verify;
• Click <OK>.
If you are using a smartcard:
• Insert the smartcard in the smartcard reader;
• Enter the PIN-code that has been provided to you by ABN AMRO;
• Enter the bank password that has been provided to you by ABN AMRO;
• Enter your new bank password;
• Enter your new bank password again to verify;
• Click <OK>.
Note:
If you already have used your bank password with a previous version of OfficeNet Extra or OfficeNet Plus
to communicate with the bank server, you can still use that bank password with OfficeNet Extra 1.7, since
the bank password is related to your Electronic Banking contract- and user serial number.
Installation Manual OfficeNet Extra 1.7 - Page 20 of 25
Step 7 - Account details
After a successful communication session with the
bank server, the account numbers listed in your
Electronic Banking contract are automatically
registered in OfficeNet Direct.
Click <User data> <Accounts> and double-click your
account number(s) to add Account name, Address
and City.
Step 8 - User authorisations
If in “Advanced Settings” the option “Transaction procuration” and/or the option “Screen Properties” are
selected, specific procuration and/or screen authorisations can be specified for each user in the screen “User
Settings”.
Installation Manual OfficeNet Extra 1.7 - Page 21 of 25
7. The OfficeNet Extra modules
The OfficeNet Direct Module
OfficeNet Direct is the central module that provides the link to the other modules (Domestic Payments, Direct
Debits and Foreign Payments) and/or your financial-administration software and also to the ABN AMRO
Electronic Banking computer. The OfficeNet Direct module can be started from the Windows Start menu or
by double-clicking the OfficeNet Direct shortcut on your desktop. The other OfficeNet Extra modules can be
started from within OfficeNet Direct.
The main functions of this module are:
• importing, signing and sending payment orders;
• retrieving and displaying account and intraday information;
• configuring user authorisations;
• exporting information retrieved from the bank (e.g. for use in your financial-administration software);
• importing salary payments created in your financial-administration software.
The Domestic Payments module
Use the Domestic Payments module to create, check and prepare your domestic payments for signing and
sending in OfficeNet Direct. The module can be started from the Windows Start menu or from within
OfficeNet Direct.
This module includes important features such as:
• ability to create normal, urgent, batchgiro and acceptgiro payments;
• various convenient overviews;
• easy-to-use copy functions;
• file storage and import functions for repeat payment orders;
• registration of beneficiaries for frequent use.
The Direct Debits module
The Direct Debits module is used to create direct debit orders. This module also checks the orders and
prepares them for further processing in the OfficeNet Direct module.
Note:
You must set up a direct debit agreement via your ABN AMRO Bank branch before using the Direct
Debits module. You will also need signed authorisation from your debtors.
The Foreign Payments module
Use the Foreign Payments module to create, check and prepare your foreign payments for signing and
sending. The following payment types can be used:
• foreign payments;
• EU-payments;
• cheques;
• urgent payments;
• domestic payments in foreign currencies.
Tip: Press the <F1> button in the modules to open the topic related Help files.
Installation Manual OfficeNet Extra 1.7 - Page 22 of 25
8. Quick reference guide
Creating, authorising and sending payment orders
Creating new payment orders
1.
2.
3.
4.
5.
6.
7.
8.
Start the module of your choice (the steps are similar in each module);
The Detail screen will appear. Double-click the first line in case the Detail screen does not appear;
Complete the fields of the Detail screen;
Click <New> to create a new payment and repeat step 3, or click <Save> and <Close> if no more
payments need to be created;
In the list of created payments select the payments you wish to send (multiple payments can be
selected by using the <CTRL> or <SHIFT> key while clicking the payments);
Click the green checkmark on the button bar at the top of the screen to check the various fields in
the payments. If necessary correct invalid orders and repeat step 6;
Click the button <Prepare for dispatch>;
The ‘Report prepare for dispatch’ is shown, Click the <OK> button to finish the transfer of the
payments to OfficeNet Direct.
Authorising payment orders
Using a calculator as security token:
1. Start OfficeNet Direct and click <Orders> <Imported>;
2. Select the payments you wish to authorise one by one or click the <Select All>
button at the bottom left hand corner of the screen to select all payments;
3. Click the <Authorise> button at the bottom right hand corner of the screen to
authorise the selected orders.
The status of the orders will change to ‘Sendable’.
Using a smartcard as security token:
1. Start OfficeNet Direct and click <Orders> <Imported>;
2. Select the orders you wish to sign one by one or click the <Select All>
button at the bottom left hand corner of the screen to select all orders;
3. Insert the smartcard in the reader, click <Sign> and enter the PIN
code of your smartcard.
The status of the orders will change to ‘Sendable’ (single authorization) or ‘1x signed’ (double
authorization).
Double authorisation (only possible if you use smartcards as security tokens):
1. Click <Change User> at the bottom of the menu to start the logon procedure for the second
authorisation;
2. Click <Orders> <Imported> and select the payments you wish to sign one by one or click the
<Select All> button at the bottom left hand corner of the screen to select all payments;
3. Insert the smartcard in the reader, click <Sign> and enter the PIN code of this smartcard.
The status of the payments will change to ‘Sendable’.
Installation Manual OfficeNet Extra 1.7 - Page 23 of 25
Sending payment orders
Using a calculator as security token:
1. Click <Communication> <Manual>;
2. Select the payments you wish to send one by one or click the <Select All>
button at the right hand side of the screen to select all payments;
3. Enter your bank password and click <Start> at the bottom right hand side;
4. Use the calculator to identify yourself to the bank computer.
Using a smartcard as security token:
1. Click <Communication> <Manual>;
2. Select the payments you wish to send one by one or click the <Select
All> button at the right hand side of the screen to select all payments;
3. Insert the smartcard in the reader;
4. Enter the PIN code of your smartcard;
5. Enter your bank password and click <Start> at the bottom right hand side.
Viewing reports
Start the module OfficeNet Direct.
Using a calculator as security token:
1. Click <Communication> <Manual>;
2. Enter your bank password and click <Start> at the bottom right hand side;
3. Use the calculator to identify yourself to the bank computer.
Using a smartcard as security token:
1. Click <Communication> <Manual>;
2. Insert the smartcard in the reader;
3. Enter the PIN code of your smartcard;
4. Enter your bank password and click <Start> at the bottom right hand
side.
Balance overview
1. Click <Reports> <Balance Overview>;
2. For each account in your contract you will find a balance overview here;
3. Double-click an account to view the daily statements for that account.
Account statements
1. Click <Reports> <Account Statements>;
2. For each account in your contract you will find the account information here. By using filters you can
filter the information that is shown. The option ‘Only show mutations’ for instance, provides in
showing only the dates on which mutations to the accounts have been made;
3. Double-click a date to view the reported transactions of that date.
Value balance
1. Click <Reports> <Value Balance>;
2. The value balance is shown from 6 days before, to 6 days after the system date.
Installation Manual OfficeNet Extra 1.7 - Page 24 of 25
9. Overview of Function keys
F1
F3
Alt+F4
Alt+A..Z
Ctrl+F2
Ctrl+F3
Ctrl+F5
Ctrl+Shift+F2
Ctrl+Shift+F3
Ctrl+Shift+F4
Ctrl+Shift+F5
Ctrl+Shift+F6
Ctrl+Shift+F7
Ctrl+Shift+F9
Ctrl+Shift+F10
Ctrl+Shift+M
Ctrl+Shift+A
F5
F6
F7
F10
F11
F12
General
Show topic related Help
Show version information
Close active module
Open specific underlined menu option
OfficeNet Direct
Orders – Imported
Orders – Sent
Orders – Rejected by Import
Reports – Account Statements
Reports – Common
Reports – Processed
Reports – Unprocessed
Reports – Intraday Messages
Reports – Import Reports
Reports – Balance Overview
Reports – Value Balance
Communication – Manual
Communication – Automatic
Modules Domestic, Foreign and Direct debits
New payment/direct debit
Creditor/direct debit recipient
Opened payment/direct debit
Navigation bar
OfficeNet Direct
Menu bar
Installation Manual OfficeNet Extra 1.7 - Page 25 of 25