1
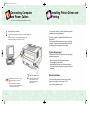
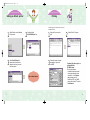
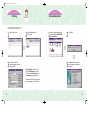
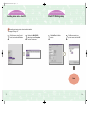
01ML-85G/85G
99.2.18 12:2 PM
∆‰¿Ã¡ˆ2
Installation Guide
ML-85G/85G plus
P/N. JC68-60945A
01ML-85G/85G
99.2.18 12:2 PM
∆‰¿Ã¡ˆ4
Contents
Before using
Installing the Toner Cartridge . . . . . . . . . . . . . . . . . . . . . . 1
Supplying Paper . . . . . . . . . . . . . . . . . . . . . . . . . . . . . . . . . . . . . . . . . . . . . . . . . . . 2
Connecting Computer and Power Cables. . . . . . . . . . . . . . . . . . . . . . 3
Installing Printer Driver and Printing . . . . . . . . . . . . . . . . . . . . . . . . . . . . 4
Driver
Setup
Printing (Windows® 95) . .. .... ... .. . 5
Installing Driver .............................................. 5
Setting as Default Printer . . . . . . . . . . . . . . . . . . . . . . . . . . . . . . . . . . . . . . . . . . . . . . . . 7
Printing . . . . . . . . . . . . . . . . . . . . . . . . . . . . . . . . . . . . . . . . . . . . . . . . . . . . . . . . . . . . . . . . . . . . . . . . . 8
Uninstalling Drivers . . . . . . . . . . . . . . . . . . . . . . . . . . . . . . . . . . . . . . . . . . . . . . . . . . . . . . . . 9
Printing (Windows 3.x) . .... .. .. ... 10
Installing Driver ............................................ 10
Setting as Default Printer . . . . . . . . . . . . . . . . . . . . . . . . . . . . . . . . . . . . . . . . . . . . . . 12
Printing ........................................................................ 13
Uninstalling Drivers ...................................................... 14
Printing to a Network Printer . .. 15
Setting up a Host PC . . . . . . . . . . . . . . . . . . . . . . . . . . . . . . . . . . . . 15
Setting up WPS Driver onto the Client PC . . . . . . . . . . . . . . . . . . . . . . 17
Client PC Sharing Setup . . . . . . . . . . . . . . . . . . . . . . . . . . . . . . . . . . . . . . . . . . . . . . . 18
01ML-85G/85G
99.2.18 12:2 PM
∆‰¿Ã¡ˆ6
Installing the Toner Cartridge
Supplying the Paper
- Remove contents and packing material.
1
2
Place the cartridge on a
Open the Top Cover by
stable surface, then pull out pressing the release button.
the tape attached to top of
cartridge, as shown.
3
Insert the cartridge and
close the cover.
1
Remove the sealing tapes
and slide out the Paper
Cassette.
2
Place blank paper into the
Cassette.
3
Push the Cassette back
into place.
A
• Place a protective sheet of paper
underneath the cartridge, in case of
toner leakage.
• Be careful not to tear the tape while
removing.
Note
1
• Be careful not to spill toner
material when removing the
tape.
• Rock the toner cartridge to distribute
toner material evenly, as shown
below:
• Close the cover by pressing down
until it clicks.
• Follow the above steps to install the
toner cartridge.
• Insert the corner of the paper stack
under metal tab (A).
• Refer to page 4-1 in Operator’s Guide to
set the paper size.
2
01ML-85G/85G
99.2.18 12:2 PM
∆‰¿Ã¡ˆ8
Connecting Computer
and Power Cables
Installing Printer Driver and
Printing
- Be sure to remove power from both computer and printer.
1
Connect printer to computer.
• A printer cable is not included with the printer, and must be supplied by the
user.
• For best performance, use a good quality shielded cable with
IEEE 1284-compatible pin configuration (Centronics).
From this point forward, you will be guided through driver
installation and printing documents.
The setup program is compatible with Windows 3.x and
Windows 95.
This Installation Guide describes only setup and printing
examples. To learn more details about the product, read
the Operator’s Guide supplied with the printer.
System Requirement
(Note that the ML-85G/85G plus printer does not support
switchbox connections.)
- IBM or compatible with 386 or higher processor
- Free disk space of at least 4Mb
- More than 8Mb RAM memory (16Mb recommended,
and note print speed will increase as system memory is
increased.)
Note
3
At temperatures below 50˚F (10˚C), apply
printer power at least an hour before
using.
• This will help maintain print quality.
• In winter time, it is recommended to keep
printer on (Power Save mode).
2
Plug in the power cord.
• Note that this printer does not
have a power switch. It will
automatically shut off after a
period of non-use.
Before Installation
Remove all other printer drivers before running Setup
program, or change the printer ports to ‘FILE’.
If not, printing operation may fail.
4
01ML-85G/85G
99.2.18 12:2 PM
∆‰¿Ã¡ˆ10
Printing (Windows 95)
Installing driver
Turn on printer and computer.
1
When Windows 95 senses the
printer and alerts you with the
message below, click OK.
2
Insert diskette #1 into the floppy
drive and click OK.
• If no message appears: Select Run under Start
menu and type a:\setup (or b:\setup) on the
command line, then press Enter.
5
Setup resumes the
installation.
3
Type your name and company
4
If the below message appears
during installation, insert next
diskette and click OK.
• The information is the same as entered when
Windows 95 was installed. Change and/or
click Next if correct.
6
When installation is
complete, click Finish.
• Setup exits and Windows 95 restarts.
5
6
01ML-85G/85G
99.2.18 12:2 PM
∆‰¿Ã¡ˆ12
Printing (Windows 95)
Printing (Windows 95)
Setting as default printer
Printing
The following sample instructions show how to print
using Microsoft® Word.
1
3
Select Printers under Settings
in Start menu.
2
Double-click the
ML-85G/85G plus icon.
3
Select Set As Default. A
check mark will confirm the
selection next time you open
the Printer menu.
Set as default printer.
7
1
Open the file you want to
print.
Enter the number of copies
and pages to print, and
click OK.
2
Select Print in File menu.
If printing fails, there may be a
problem with the
PC CMOS setup.
To solve this problem:
- Uninstall the previous printer
driver (see next page), then
re-install it. If set to output
only, printing may fail.
- Reboot your PC, run CMOS
setup, and set the LPT mode to
bi-directional.
8
01ML-85G/85G
99.2.18 12:2 PM
∆‰¿Ã¡ˆ14
Printing (Windows 3.x)
Windows 95
Uninstalling driver
Installing driver
Turn on printer and computer.
1
Select ML-85G&85G plus
uninstaller.
2
3
Click Yes.
Uninstaller removes printer
driver program, and restarts
Windows 95.
1
3
Insert diskette #1 into the
drive.
Type a:\setup (or b:\setup) on
the command line, then
click OK.
2
4
Select Run from the Program
Manager File menu.
Type your name and company
name, and click Next.
• The information is the same as entered when
Windows was installed. Chanhe and/or click
Next if correct.
9
10
01ML-85G/85G
99.2.18 12:2 PM
∆‰¿Ã¡ˆ16
Printing (Windows 3.x)
Printing (Windows 3.x)
Installing driver
Setting as default printer
5
7
When the following message
appears, insert the next
diskette and click OK.
6
Setup resumes the
installation.
1
Double-click the Printers icon
in Control Panel.
2
Select ML-85G/85G plus, click
Set As Default Printer, then
Close.
When installation is
complete, click Finish.
Set as default
printer.
• Setup exits, and Windows restarts.
11
12
02ML-85G/85G
99.2.18 12:6 PM
∆‰¿Ã¡ˆ2
Printing (Windows 3.x)
Windows 3.x
Printing
Uninstalling driver
The following sample instructions show how to
print using the Microsoft ® Word application.
1
3
Open a file to print.
2
Select Print from the
File menu.
1
Open Program Manager and
double-click the ML-85G/85G
plus uninstaller.
2
3
Enter the number of
copies and pages to print,
then click OK.
Click Yes.
Uninstaller removes printer
driver program and restarts
Windows.
If printing fails, reboot your PC,
and run CMOS setup to set the
LPT mode to bi-directional. If set
to output only, printing may fail.
Uninstall the previous printer driver
(see next page), then re-install it.
13
14
02ML-85G/85G
99.2.18 12:6 PM
∆‰¿Ã¡ˆ4
Printing on a network printer
Setting up a Host PC printer
Install the print driver before
setting up sharing.
1
Click Start menu, select Control
Panel, and double-click the
Network icon.
5
Click the Sharing tab, check
Shared As, fill in the Shared
Name field, and click OK.
2
Click File and Print Sharing,
check box(es), then click OK.
3
Click Start menu and select
Printers in Settings, then doubleclick the ML-85G/85G plus.
See pages 5 through 14
for instructions on
installing drivers.
4
Select Properties in Printer
menu.
Finish
15
16
02ML-85G/85G
99.2.18 12:6 PM
∆‰¿Ã¡ˆ6
Printing on a network printer
Printing on a network printer
Installing driver onto a client PC
Client PC Sharing setup
Before setting up sharing, printer driver should be installed.
See pages 5 through 14.
1
Click Start menu, select Control
Panel, then double-click Printer.
2
Double-click ML-85G/85G
plus, then choose Properties
from the Printer menu.
1
Click Add Port in Details
section.
2
Click Browse, select your
printer’s name, then click OK.
Finish
17
18