1
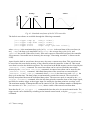
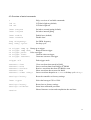
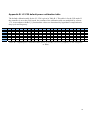
LC-C50 Laser Controller User manual R NT CO E AG LT VO IN E OT M FF RE O 0 -5 V ON E AT UL D O M IN M A UL OD TE T OU R TE IN E NA I TR D AE EM IS SI D se La e oll ntr o rC A IS E BL AB EN LE EQ FR TY DU E CL CY E OD L A U AN M EX R TE NA L ER W PO 0 3. 39 .2 2 20 Version: Date: Authors: 1.0 (Firmware V1.0) 30/01/1999 J. Louwers, M. van Balen 1999 AED Electronics Bertelindislaan 3 5581 CS Waalre The Netherlands OG D AL TE AN L E C F RE M Y NC UE IN 50 -C C rL ON ER GG IN OG AL RD AN RWA FO L TA RD GI DI RWA FO L ER XT TE GA OL NA L L TA ED GI T DI L E C F RE CL CY T TY IMI U D L E R W VS M I T LI ER UR OV RAT PE M TE E Acronyms DC EEPROM LC LCD LED PWM RAM ROM RVC µP Duty Cycle Electrical Erasable Programmable Read Only Memory Laser Controller Liquid Crystal Display Light Emitting Diode Pulse Width Modulation Random Access Memory Read Only Memory Remote Voltage Control Microprocessor Notice Always comply with the local law and regulations when using high power lasers. AED Electronics guarantees operation of the LC-C50 device as is, without additional hardware. AED Electronics dissociates itself from all claims when using the LC-C50. Use of this device is at own responsibility. Please study and follow the instructions in this manual. 2 1. Introduction This manual describes the operation of the laser controller LC-C50. The LC-C50 is designed to control the operation of the Coherent DIAMONDTM G-50/100 Lasers. Typical applications include laser cutting, and engraving, but also the scientific use is supported. Some features of the LC-C50 controller: • • • • • • Digital PWM circuit. Frequency and duty cycle are set through the controller’s serial port, or by potentiometers at the front panel. The laser output power at the selected frequency and duty cycle combination is displayed at the controller’s liquid crystal display (LCD). The default calibration values can be overruled by the user’s calibration data. To calibrate the laser a convenient calibration routine is present in the controller’s firmware. Remote voltage control (RVC) mode allows modulation of the laser output by an externally applied voltage. In the remote voltage control mode, the laser is modulated at a fixed frequency by varying the duty cycle. The duty cycle circuitry assures glitch free operation when the duty cycle is continuously varied. A new value of the new duty cycle is only latched into the PWM circuit after each completed period. Modulation of laser by (user defined) waveforms. Light emitting diodes (LED’s) at the front panel warn the user in case of a laser malfunction. The outline of this manual is as follows: Chapter 2 discusses the general operation of the laser controller, and its front and back panels. Basic operation of the laser controller is described in Chapter 3. The external, serial programming, of the laser controller is addressed in Chapter 4. 3 2. Theory of operation In this Chapter the general operation of the Laser Controller (LC) will be discussed first. Then the switches and connectors at the front and back panels are reviewed. 2.1 General operation The main components of the laser controller are shown schematically in Fig. 2.1. The controller is divided into two printed circuit boards, the main board and the front panel printed circuit board. The main board contains the core of the controller: the microprocessor (µP) and its memory (RAM, ROM and E2PROM). The E2PROM is used to store user data, even if the controller is shut off (like custom waveforms and calibration data). The microprocessor communicates with the user through the front panel by means of switches, potentiometers and a LCD. RS-232 Main Board Front Panel 2 µP RAM ROM EPROM LCD Pulse extension Programmable PWM Laser Enable I/O Interlock RS-485 Driver Safety Key RS-485 Receiver LASER Figure 2.1: Block diagram of the LC-C50 laser controller. The power output of the Coherent DIAMONDTM G-50/100 Laser is set by a Pulse-Width-Modulation (PWM) signal [1]. The output power increases with increasing Duty Cycle (DC) of the PWM-signal. Varying the frequency of the PWM-signal sets the properties of the laser beam. The LC-C50 controller contains a computer programmable PWM-generator with variable frequency. The laser can only be enabled when the enable safety key is in the “enable” position, and the interlock switch is closed. 4 Several control signals are available to check the laser status. These signals are generated by the laser as differential signals (RS-485). RS-485 receivers at the front panel convert these signals to “normal” signals available at the front panel. In case of an error situation, light emitting diodes (LED’s) light up at the front panel. As several of these signals are only active during the high period of the PWM signal, warning pulses as short as 1 µs may be generated. To make these pulses visible, the extension circuit elongates these signals to 0.3 s. 2.2. Front panel The front panel of the LC-C50 controller is shown in Fig.2.2. Several of the connectors and switches present were already briefly mentioned in the previous section. Each of the panel items will now be discussed. AED Laser Controller LC-C50 EMISSION TRIGGER IN GATE IN MODULATE OUT MODULATE INTERNAL REMOTE VOLTAGE CONTROL OFF IN EXTERNAL DISABLE 0-5V IN ON ENABLE ANALOG FORWARD POWER MAN. GATE FREQUENCY 03.39.2220 MODE on MANUAL (on) EXTERNAL ANALOG REFLECTED DIGITAL FORWARD DIGITAL REFLECTED DUTY CYCLE LIMIT VSWR LIMIT OVER TEMPERATURE DUTY CYCLE Fig. 2.2: Front panel of the LC-C50 controller. 2.2.1 Power switch The LC is switched on or off by the power switch. The switch is illuminated if the controller is on. When the switch does not illuminate if the unit is connected to the mains, the fuse at the back of the LC is melted. 2.2.2 Enable safety key switch The enable safety key controls the laser enabling. If the key is in the “disable”-position, the laser cannot be enabled. This is a safe situation. If the key is in the “enable”-position, the laser can be enabled, depending on the selected gating mode (see section 3.2). 2.2.3 Emission indicator The emission indicator is switched on if the laser is enabled. The amount of laser power is dependent on the selected duty cycle and frequency. 2.2.4 LCD The LCD-display provides the user with information about the current settings, the selected mode and current laser power. The back-light can be switched off with a serial command, if the user wants to prevent the LCD light emission (see section 4.2.2). 5 2.2.5 Frequency potentiometer The frequency potentiometer allows the user to set the frequency of the PWM-signal at 21 discrete values: 100, 150, 250, 300, 500, 700 Hz, and 1, 1.2, 1.5, 2 3, 4, 5, 7, 10, 15, 20, 30, 40, 60 and 100 kHz. Intermediate frequencies can be set by a serial command (see section 4.2.3). The selected frequency is shown in the display. 2.2.6 Duty cycle potentiometer The duty cycle potentiometer is used to set the desired duty cycle of the PWM-signal from 0 to 60% in 1% steps. The selected duty cycle is shown in the LCD-display. 2.2.7 Power mode selection switch The mode selection switch sets the desired power mode. In the “manual”-position the frequency and duty cycle settings are set as selected by the potentiometers. In the “external”-position the frequency and duty cycle settings are set via a serial command (see section 4.2.3). In this mode, the controller does not read the position of the two potentiometers. So, the power settings can not be changed accidentally in this mode. 2.2.8 BNC: Trigger in The LC-C50 controller is capable of sending a (user-defined) waveform to the laser. This mode is selected by serial commands. The LC starts sending the waveform to the laser, when a low-to-high TTL transition is sensed at the TRIGGER input. 2.2.9 BNC: Gate in In the default mode, the laser is only enabled, when a high TTL-signal is connected to the GATE IN connector. In this way the laser can be switched on for a certain period by e.g. a pulse generator. By serial commands it is possible to overrule the function of GATE IN, and switch the laser on and off, independent of the GATE IN signal (see sections 4.2.4 and 4.2.5). 2.2.10 Modulation switch The modulation switch allows the user to choose between the internal generated PWM-signal, or a user applied signal at the MODULATE IN input. If an external source is selected, the LCD-display shows “External Modulation”. 2.2.11 BNC: Modulate in The MODULATE IN input may be connected to an external PWM-signal generator (TTL-input). This signal is used for laser modulation, when the external modulation mode is selected (see section 2.2.10). 6 2.2.12 Remote voltage control switch The LC-C50 controller is capable of modulating the laser power, depending on an external applied voltage. This mode is called “Remote voltage control” (RVC), and is selected by setting the RVC switch to ON. During RVC mode, the frequency is set by a serial command, or by the frequency potentiometer, depending on the selected power mode (see section 2.2.7). The duty cycle is varied proportional to the RVC voltage: 0…5V corresponds to 0…100% duty cycle. In the RVC mode the display shows “Rem. Voltage Control”. 2.2.13 BNC: Remote voltage in In the RVC-mode, the duty cycle is varied according to the external applied voltage to the REMOTE VOLTAGE INPUT, as described in section 2.2.12. 2.2.14 BNC: Analog forward The ANALOG FORWARD output is a buffered output of the analog forward signal, as described in Chapter Four of Ref. [1]. 2.2.15 BNC: Analog reflected The ANALOG REFLECTED output is a buffered output of the analog reflected signal, as described in Chapter Four of Ref. [1]. 2.2.15 BNC: Digital forward The DIGITAL FORWARD output is a buffered output of the digital forward signal, as described in Chapter Four of Ref. [1]. A warning LED is present above the BNC connector. This LED is switched on if case of a failed condition (i.e. digital forward signal is continuously). 2.2.16 BNC: Digital reflected The DIGITAL REFLECTED output is a buffered output of the digital reflected signal, as described in Chapter Four of Ref. [1]. A warning LED is present above the BNC connector. This LED is switched on if case of a failed condition (i.e. digital reflected signal is becomes inactive). 2.2.17 BNC: Duty cycle limit The DUTY CYLCE LIMIT output is a buffered output of the duty cycle limit signal, as described in Chapter Four of Ref. [1]. A warning LED is present above the BNC connector. This LED is switched on if case of a failed condition (i.e. duty cycle limit signal becomes active). 7 2.2.18 BNC: VSWR limit The VSWR LIMIT output is a buffered output of the vswr limit signal, as described in Chapter Four of Ref. [1]. A warning LED is present above the BNC connector. This LED is switched on if case of a failed condition (i.e. vswr limit signal becomes active). 2.2.19 BNC: Temperature The TEMPERATURE output is a buffered output of the over temperature signal, as described in Chapter Four of Ref. [1]. A warning LED is present above the BNC connector. This LED is switched on if case of a failed condition (i.e. over temperature signal becomes inactive). 2.2.20 Manual gate As of s/n. 98002 the LC-C50 laser controller is equipped with a manual gate switch. This allows manual gating of the laser. Pressing the manual gate switch down gates the laser momentarily. From this position the switch veers back to its central position (laser off). Lifting the switch gates the laser until the switch is switched back to its central position. 2.3 Back panel Several connectors are present at the back of the controller, see Fig 2.3 LASER AED Electronics RS-232 INTERLOCK POWER made in Holland Type: LC-C50 Voltage: 220-240V~/50Hz S/N: 98xxx Power: 25 Watt Fuse: 250mA (slow) Fig. 2.3: Back panel of the LC-C50 controller 2.3.1 Laser output connector The DB-25 connector at the back of the controller is connected to the laser by a 1:1 Male/Female (ribbon) cable. For a description of the pins of this connector see Ref. [1]. 2.3.2 RS-232 connector The DB-9 RS-232 connector at the back of the connector allows external programming of the controller by means of a terminal, terminal program running on a personal computer, or via a program communicating with the controller. Any regular 3-wire serial cable can be connected to this connector. 8 2.3.3 Interlock connector The interlock connector has several purposes: • Safety interlock e.g. to be connected to the entrance door of the room where the laser is located. • In serial connection with a user supplied water flow switch, to prevent operation of the laser if no cooling water is flowing. The interlock connector is a 3 pole DIN style connector with a screwlock. A schematic of the interlock is shown in Fig. 2.4. If the circuitry between poles 1 and 3 is not shortened, the laser is not enabled. Laser controller +12V 1 enable circuit 3 Fig. 2.4: Interlock circuitry of the LC-C50 controller 2.3.4 Mains connector The main connector and the fuse are also found at the back of the controller. This connector also accommodates the fuse. 9 3. Basic operation This Chapter describes the basic operation of the laser controller. The different modes are discussed. 3.1 Overview of different modes By means of the switches on the front panel and the serial input, the controller can be set to different modes. In this section each of these modes is discussed. Table 3.1 summarizes these different modes. 3.1.1 Standard mode In the standard mode, the PWM settings are controlled by the potentiometers at the front panel, or by serial commands. The setting of the controller is dependent on the position of the power mode control switch. If this switch is in the manual mode, the PWM signal is controlled by the position of the potentiometers (LCD shows “(man)”, Fig. 3.1 top). In the external mode, the controller uses serial commands to set the PWM (LCD shows “(ext)”, Fig. 3.1 bottom). The standard mode is entered if the modulation switch is set to “internal”, and the remote voltage control switch is in the “off” position. The selected frequency, duty cycle, and laser power are shown on the LCD. ) + * , - . / 0 1 !" #$ %& '( 2 4 4 @ ? A B 0 ; 78 9: 5 4 6 5 ;< < 4 C => 3 Fig. 3.1: LCD in “Standard” mode. Top: manual mode, bottom: external control mode. 3.1.2 External modulation mode In the external modulation mode, the PWM-circuit of the laser is replaced by a user supplied PWM signal at the MODULATE IN input. The external modulation mode is entered, when the modulation switch is set to “external”. The position of the power mode control and the remote voltage control switches is insignificant. The LCD shows “External modulation” (Fig 3.2). Fig 3.2: LCD in “External modulation” mode. 10 Mode Power Mode Switch Modulation Switch Remote Voltage Control Switch Manual External Internal Internal Off Off X External X Manual External Internal Internal On On Standard Manual External External modulation Remote voltage control Manual External Table 3.1: Overview of all LC-C50 modes. 3.1.3 Remote voltage control mode In the Remote Voltage Control (RVC) mode, the laser controller generates a PWM signal with a variable duty cycle. The duty cycle is determined from the voltage at the RVC IN input. 0…5V corresponds to 0…100% duty cycle. The frequency of the PWM signal is either read from the position of the frequency potentiometer (power mode control switch in “manual” position, LCD shows “(man)”, Fig. 3.3 top), or a serial command (power mode control switch in “external” position, LCD shows “(ext)”, Fig. 3.3 bottom). The remote voltage control mode is entered if the RVC switch is set to “on”, and the modulation switch is in the “internal” position. The selected frequency is shown on the LCD as is the text “Remote Voltage Control”. The maximum modulation frequency is determined by the computational speed of the controller. A practical value is 1000 Hz. [ X U Y ij T \ Y ] _ Z V ab e X d f c ` V h W ` d h g d W e W Q [ \ ] _ ` X U RS T Y Z DE K F O V W P I N M L G J W H ^ G W Fig. 3.3: LCD in “Remote voltage control” mode. Top: manual mode, bottom: external control mode. 3.2 Gating As default, the laser can be enabled by an active signal on the GATE IN input, the manual gate switch, or by a serial command in all modes (see section 4.2.4). By serial commands the laser can also be switched on and off. 11 3.3 Initialization When the laser is switched on, the laser controller initializes. In this initialization the following actions take place: 1. The laser is disabled; the PWM circuit is disabled. 2. The LCD is updated with an introduction screen. 3. If a user-supplied calibration table is present in the E2PROM, it is copied to RAM. Otherwise a default table is copied to RAM. 4. If the user has defined a custom waveform, it is copied from E2PROM to RAM. 5. The gating mode is set to external gating. 6. The position of the three switches is read, and the laser controller is set to the desired mode. 12 4. Serial commands 4.1 Introduction The LC-C50 laser controller can be configured via its serial port. This configuration can take place by means of a simple terminal (program), or a user-written program communicating with the computers serial port. The default configuration of the controller’s serial port is Baud Rate Data bits Parity Stop bits 9600 bits/s, 8, N, 1. After each carriage return, the LC-C50 scans the input string. After processing the input, the LC-C50 responds with the prompt [LC-C50>]. 4.2 Overview of commands 4.2.1 Help The LC responds with an overview of the available commands if [?] is entered. 4.2.2 LCD related commands The back-light of the LCD can be toggled on or off by the commands [lcd on] and [lcd off] respectively. 4.2.3 PWM related commands In external controlled mode, the frequency of the PWM can be set by the [freq <frequency>] command (100 Hz < frequency < 100 kHz). The PWM clock signal is derived from a 40 MHz clock circuit by a digital divider. This divisor, n, determines the PWM frequency according to: freq = 40 MHz . 100 * n The divisor is n ≥ 4. The controller responds with the frequency set, most closely to the requested frequency. The duty cycle is set by the [duty <duty cycle>] (0 < duty cycle < 100%). 13 4.2.4 External/Internal gating At power-up the LC is set to external gating, and the laser is enabled if an active signal is present at the GATE input, or if the MANUAL GATE switch is pressed. The gate can be overruled by the command [laser intgate]. This situation corresponds to an active GATE input. The gating can be re-set to external gating by the command [laser extgate]. By disabling the laser, the output power is zero, even if the LC has been set to internal gating (next section). 4.2.5 Enable/Disable laser If the laser were set to internal gating, it would continuously be enabled. To be able to disable the laser the command [laser disable] can be used. This command can also be used, if the laser is set to the default external gating, but the user wants to ignore the external gating signal, and does not want to enable the laser. To reset to the default enabled laser use the command [laser enable]. Note that in all cases the interlock and safety key can still disable the laser. 4.2.6 On trigger commands The LC-C50 controller is capable of sending a series of PWM pulses to the laser according to a (user) programmed waveform. This waveform is started when a low-to-high transition is sensed at the TRIGGER input. The controller has to be set to the trigger mode. This trigger mode is selected by the [on trigger] command, which is then followed by a specification of the waveform to follow. For convenience several waveforms are already present in the controllers memory, see Fig. 4.1. The user may also define a custom waveform. The built-in waveforms are ramp (up and down), pulse and sinus. The time scale is in 1 ms units. E.g. the commando: on trigger ramp up 50 1000, generates a ramp up with a final duty cycle of 50%. The total ramp time is 1000 ms, viz. 1 second. The resolution is dependent on the length of the waveform to limit the maximum amount of memory required, according to: 0 < t ≤ 10 sec. 1 msec. 10 < t ≤ 20 sec. 2 msec. 20 < t ≤ 50 sec. 5 msec. 50 < t ≤ 65 sec. 10 msec. After entering the [on trigger…] command the LC generates a wave-table. Depending on the wave-type this may take up to 10 seconds. During this period the LCD shows “Generating wavetable”. The LC then waits for a positive flank on the trigger input. The LCD shows “On trigger ….”. During the waveform, a bar graph is shown on the second line of the LCD. This bar graph displays the current duty cycle. Each solid character represents 5% duty cycle. After finishing a wave, the LC can be triggered again by a positive edge on the trigger input. The trigger mode is ended by the [trigger off] command. 14 duty cycle Ramp Up Pulse Sinus Down time Fig. 4.1: Standard waveforms of the LC-C50 controller. The built-in waveforms are available through the following commands: [on [on [on [on trigger trigger trigger trigger ramp up ramp down pulse sinus <duty> <time>] <duty> <time>] <duty> <time>] <amp> <avg> <period> <time>], where <duty> is the maximum duty cycle (in %), <time> is the total time of the waveform (in ms), <amp> the duty cycle amplitude (in %), <avg> the average duty cycle (in %), and <period> the period of the sinus (in ms). If the user request a sinusoidal waveform, the controller first generates a wavetable into its memory (the message “Generating wavetable” is shown on the LCD). Apart from the built in waveforms, the user may also enter a custom waveform. This waveform can be stored into the nonvolatile memory of the controller when the controller is shut off. This stored waveform is used as the default waveform. The waveform in the RAM memory can be cleared by the [userwave clear] command. The stored waveform can be retrieved from the nonvolatile memory by the [userwave retrieve] command. An entered waveform can be stored by the [userwave store] command. Individual data points of the waveform are entered by the [userwave <time> <duty>] command, where <time> is the time in ms, and <duty> the duty cycle at that time. The data points are automatically sorted when entered. The waveform is linearly interpolated between the individual data-points. The userwave mode is entered by the [on trigger userwave] command. After the last data-point the controller shuts of the output signal, and waits for another trigger at the trigger input. So usually the last data-point has zero duty cycle. The maximum number of datapoints that can be entered is 100. The minimum number of datapoints for a userwave is 2. The [userwave show] shows a table of the entered waveform data. Note that for all [on trigger ..] commands the laser has to be in external control mode. The trigger mode can be disabled by switching to the internal control mode, or by the [trigger off] command. 4.2.7 Laser settings 15 The [settings factory] resets the laser to it’s factory settings: • • • Laser type: G50 Calibration table according to the Appendix B. No user-defined wave form The [settings calibrate] starts the calibration procedure of the laser. The laser is set to sequence of different duty cycles and frequencies. At each of the duty cycle – frequency combination, the user inputs the total laser power. In case the user sets the laser to frequency for which it was not calibrated, the output power is determined by a logarithmic interpolation between the closest frequencies. Calibration can only be carried out in the standard external mode. 16 4.3 Overview of serial commands ? Help, overview of available commands lcd on lcd off LCD back-light on (default) LCD back-light off laser extgate laser intgate Switch to external gating (default) Switch to internal gating laser enable laser disable Enable laser (default) Disable laser freq <frequency> duty <duty cycle> Set PWM frequency Set duty cycle on on on on on trigger trigger trigger trigger trigger ramp up Ramp up on trigger Ramp down on trigger ramp down Pulse on trigger pulse Generate sinus on trigger sinus Generates userwave on trigger userwave trigger off Ends trigger mode userwave userwave userwave userwave userwave Clear waveform data stored in RAM Store waveform data from RAM to E2PROM Retrieve waveform data from E2PROM to RAM Show waveform data as stored in RAM Insert waveform datapoint at <time> with duty cycle <duty> clear store retrieve show <time> <duty> settings factory Reset the controller to facotory settings laser <type> Select the lasertype G50 or G100 settings factory settings calibrate Resets laser to factory settings Starts laser calibration procedure version Shows firmware version and compilation date and time 17 References [1] OEM Manual DIAMONDTM G-50/100 Laser Coherent Laser Group, 5100 Patrick Henry Drive, Santa Clara, CA 95054, USA 18 Appendix A. LC-C50 specifications PWM Output Frequency range Duty cycle range 25 Hz - 133 kHz 0 – 100 % Input signals Trigger Gate External modulation Remote voltage control TTL, input impedance 1 MΩ TTL, input impedance 1 MΩ TTL, input impedance 1 MΩ 0…5 V, input impedance 100 kΩ Output signals Modulate out Digital forward Digital reflected Duty cycle limit VSWR Temperature Analog forward Analog reflected Serial Interlock TTL, output impedance 1 kΩ TTL, output impedance 1 kΩ TTL, output impedance 1 kΩ TTL, output impedance 1 kΩ TTL, output impedance 1 kΩ TTL, output impedance 1 kΩ 0…5V, output impedance 1 kΩ 0…5V, output impedance 1 kΩ RS-232 (-12V/+12V signals) 0/+12V, < 50 mA Physical Properties Size (depth x height x width) Mounting 255 mm x 88 mm x 482 mm Standard 19”-rack, height 2E Power Requirements Single Phase 100-170 VAc / 170-240 VAc 200 mA / 100 mA Environment Storage temperature range Operational temperature range Relative humidity -10°C … 60°C 0°C … 40°C < 95% 19 Appendix B. LC-C50 default power calibration table The default calibration table for the LC-C50 is given in Table B.1. This table is for the G50 mode. If the controller is set to the G100 mode, the contents of the calibration table are multiplied by a factor 1.72, in accordance with Ref.[1]. Intermediate values are determined by logarithmic extrapolation in duty cycle and frequency. duty\freq 100 0 0 10 14 20 18 30 19 40 20 50 20 60 20 150 0 16 23 27 30 31 32 250 0 19 30 38 42 45 46 350 0 19 32 42 48 53 56 500 0 20 35 46 55 61 66 700 0 20 35 47 56 62 67 1k 0 20 36 48 57 64 69 1k2 0 20 36 48 57 64 69 1k5 0 20 35 47 56 64 69 2k 0 20 35 47 56 64 69 3k 0 20 35 47 57 64 70 4k 0 20 36 48 57 64 70 5k 0 20 36 48 57 64 70 7k 0 20 35 47 56 64 70 10k 0 19 34 46 55 63 69 15k 0 19 35 47 56 64 70 20k 0 19 35 47 56 64 70 30k 0 20 36 48 57 65 70 40k 0 21 37 49 58 65 70 60k 0 29 45 55 61 66 69 Table B.1: Default power calibration table for LC-C50 (duty cycle in %, frequency in Hz, and power in Watt). 20 100k 0 38 55 62 65 67 67