1
Standard Performance Evaluation Corporation (SPEC)
Server Efficiency Rating Tool
(SERT) User Guide
1.1.0
7001 Heritage Village Plaza, Suite 225
Gainesville, VA 20155,
USA
SPECpower Committee
Server Efficiency Rating Tool (SERT) - User Guide
Table of Contents
1.
Overview ..................................................................................................................... 4
1.1.
Summary ..............................................................................................................................4
1.2.
Setup Requirements .............................................................................................................4
1.3.
SUT Configuration Requirements ..........................................................................................5
1.3.1.
1.3.2.
1.3.3.
1.3.4.
1.3.5.
1.4.
2.
Platform Requirements..........................................................................................................................5
Storage Requirements ...........................................................................................................................5
Memory Requirements ..........................................................................................................................6
Network Requirements..........................................................................................................................6
Software Requirements .........................................................................................................................7
SERT Installation ...................................................................................................................7
Starting SERT via the Graphical User Interface (GUI) ..................................................... 8
2.1.
Prerequisites for Using the GUI .............................................................................................8
2.1.1.
2.1.2.
On the SUT and Controller system: .......................................................................................................8
On the SUT only: ....................................................................................................................................8
2.2.
Invoking the GUI ...................................................................................................................8
2.3.
Interacting with the GUI .......................................................................................................8
2.3.1.
2.3.2.
2.3.3.
2.3.4.
2.3.5.
2.3.6.
2.3.7.
2.3.8.
2.3.9.
2.3.10.
2.3.11.
3.
Start .......................................................................................................................................................8
SUT Configuration ................................................................................................................................10
SUT Discovery ......................................................................................................................................11
Test Environment .................................................................................................................................12
PTDaemon Configuration.....................................................................................................................14
JVM Configuration ...............................................................................................................................19
JVM Review ..........................................................................................................................................20
Choose Test Suite.................................................................................................................................21
Launch Test ..........................................................................................................................................22
Results..................................................................................................................................................24
Help ......................................................................................................................................................25
Platform Specific Settings ........................................................................................... 26
3.1.
Microsoft Windows ............................................................................................................ 26
3.1.1.
3.1.2.
3.2.
Red Hat Enterprise Linux and SUSE Linux Enterprise Server .................................................. 28
3.2.1.
3.2.2.
3.2.3.
3.3.
Disabling the storage write cache on Microsoft Windows ..................................................................26
Disabling the Windows firewall ...........................................................................................................27
Disabling the storage write cache on Linux .........................................................................................28
Disabling the RHEL6.x/SLES firewall .....................................................................................................28
Disabling the RHEL7 firewall ................................................................................................................28
IBM AIX .............................................................................................................................. 28
3.3.1.
Disabling the AIX firewall .....................................................................................................................29
3.4.
IBM PowerLinux ................................................................................................................. 29
3.5.
32-bit ARM Platform ........................................................................................................... 29
3.6.
Oracle Solaris ..................................................................................................................... 30
3.6.1.
6 May 2015
Disabling the storage write cache on Oracle Solaris ............................................................................30
2 of 40
Copyright © 1988-2015 SPEC
Server Efficiency Rating Tool (SERT) - User Guide
3.6.2.
3.7.
4.
Disabling the Solaris firewall ................................................................................................................30
Lower Performance Platforms ............................................................................................. 31
Power Analyzer Range Settings .................................................................................. 31
4.1.
Automating Range Settings using the GUI ........................................................................... 31
4.2.
Manual Range Settings – Optional ...................................................................................... 32
4.3.
Extracting Range Settings from Full Runs - Optional ............................................................. 32
5.
Using the Collector Scripts .......................................................................................... 32
6.
SERT Command Line Usage......................................................................................... 34
6.1.
SERT Configuration and Start Procedure .............................................................................. 34
6.2.
Generate report files with the reporter scripts .................................................................... 38
7.
Coefficient of Variation (CV) ....................................................................................... 39
7.1.
Host CV .............................................................................................................................. 39
7.2.
Client CV ............................................................................................................................ 39
8.
SUT Minimum Memory Requirement .......................................................................... 39
9.
Known Issues ............................................................................................................. 40
10.
Trademark ................................................................................................................. 40
11.
Copyright Notice ........................................................................................................ 40
SVN Revision:
1920
SVN Date:
2015/05/11 14:25:03
6 May 2015
3 of 40
Copyright © 1988-2015 SPEC
Server Efficiency Rating Tool (SERT) - User Guide
1. Overview
1.1. Summary
Various government agencies around the world are currently working on Energy Efficiency Regulatory Programs
for servers. The SPECpower Committee designed, implemented, and delivered the Server Efficiency Rating Tool
TM
(SERT) , a next-generation tool set for measuring and evaluating the energy efficiency of computer servers.
This User Guide is intended for both novice and experienced SERT testers. It is structured with the basics to get a
novice user up and running quickly and includes a considerable amount of additional details for more experienced
testers.
The SERT is composed of several elements including:
The test harness (called Chauffeur) handles the logistical side of measuring and recording power data
along with controlling the software installed on the SUT and controller system itself.
The Director instructs the System under Test (SUT) to execute the workload.
o
The SUT can be a single or multi node server
The SERT Workload Suite exercises the SUT while the test harness collects the power and temperature
data.
The SPEC Power and Temperature Daemon (PTDaemon) connects to the power analyzer and temperature
sensor and gathers their readings while the workload executes.
The Reporter gathers the environmental, power, and performance data after a run is complete and
compiles it into an easy-to-read format.
A Graphical User Interface (GUI) to simplify setting up and executing the SERT.
Additional background information describing the design and implementation of the SERT may be found in the
SERT Design Document (http://www.spec.org/sert/docs/designdocument.pdf).
1.2. Setup Requirements
For the most basic SERT hardware measurement setup, one of each of the following is required:
System under Test (SUT): the actual system for which the measurements are being taken
Controller (e.g. a server, desktop PC, or laptop): the system to which the power analyzer, temperature sensor,
and the SUT are connected
o
The Controller and SUT are connected to each other via an Ethernet connection.
o
The Power Analyzer and Temperature Sensor are connected to the Controller via device specific
means.
Hardware requirements:
o
o
o
o
o
A hardware configuration capable of running a supported OS and JVM combination.
At least one Network Interface Controller (NIC) with a minimal transfer rate of 1Gbit/s.
At least two communication interfaces for controlling a power analyzer and a temperature
sensor.
Software requirements:
o
o
o
6 May 2015
OS (32 or 64 bit (x86)): Current versions of Microsoft Windows OS and most current Linux
distributions.
A current Java 7 or 8 run time environment.
Vendor specific drivers supporting special power analyzer and / or temperature sensor
connectors, if required.
4 of 40
Copyright © 1988-2015 SPEC
Server Efficiency Rating Tool (SERT) - User Guide
Power analyzer and temperature sensor:
o
Note: Before connecting the power analyzer and the temperature sensor to the Controller and the
SUT, please read the “Power and Temperature Measurement Setup Guide” in the Documentation
directory on the SERT media carefully! The latest version of this document can be found on the SPEC
web site (http://www.spec.org/power/docs/SPEC-Power_Measurement_Setup_Guide.pdf). This
practical guide explains how to set up and run various power analyzers and temperature sensors with
the SPEC PTDaemon.
o
The power analyzer is connected to the Controller and used to measure the power consumption of
the SUT, whilst the temperature sensor is also connected to the Controller and used to measure the
ambient temperature in front of the SUT’s main airflow inlet.
o
Note: This release of the SERT is only intended to be used with servers running on AC power. DC
power measurement is currently not supported.
Only a power analyzer and temperature sensor from the list of accepted measurement devices
(http://www.spec.org/power/docs/SPECpower-Device_List.html) can be used with SERT.
o
o
The power analyzer must have been calibrated within 12 months before a SERT run is performed.
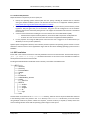
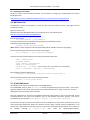
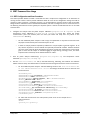
The following block diagram represents a simple SERT environment.
Controller
SUT
OS
PTDaemon
Interface
JVM
Chauffeur
Director
Reporter
GUI
SERT Workload Suite
NIC
NIC
PSU
PTDaemon
Interface
SERT
Temperature Sensor
Power Analyzer
1.3. SUT Configuration Requirements
For a compliant SERT result, a basic set of hardware and software components is needed. In multi node test
setups, all nodes must be equipped with exactly the same hardware and software components, i.e. only
homogeneous configurations are allowed.
1.3.1. Platform Requirements
For the list of supported platforms, please see
http://www.spec.org/sert/docs/SERT-JVM_Options-110.html.
the
SERT
Client
configuration
guide:
1.3.2. Storage Requirements
At least one storage device
6 May 2015
5 of 40
Copyright © 1988-2015 SPEC
Server Efficiency Rating Tool (SERT) - User Guide
For a single drive, a minimum of two partitions are required
o OS partition(s) and one SERT Data partition (min. 20 GB)
For multiple drives, drives should be partitioned as follows:
o First drive: OS partition(s) and one SERT Data partition (min. 20 GB)
o Any additional drive: SERT Data drive (entire drive capacity)
For all storage devices the device cache must be disabled and each device must be configured in “Write
Through” mode; see section 3 for platform specific instructions.
SERT Data partitions may only be hosted on filesystems (e.g., ntfs, ext4, zfs, jfs) that support direct I/O.
RAID arrays of more than one device are not allowed, i.e. each individual storage device must be configured as
JBOD or single disk RAID 0 array.
The content of the storage devices being tested will not be erased. For meaningful results however, it is
strongly recommended to reformat the filesystem on the storage devices before the SERT storage worklets
are started for the first time. The test data files created during the first test run can be reused in subsequent
runs.
1.3.3. Memory Requirements
The following table shows the minimum memory requirements by total system hardware threads.
(Number of CPUs * Cores/CPU * Hardware Threads / Core)
Total System Hardware Threads
Minimum System Memory to Run SERT
1-23
≥ 8 GB
24-37
≥ 12 GB
38-51
≥ 16 GB
52-78
≥ 24 GB
79-105
≥ 32 GB
106-132
≥ 40 GB
133-159
≥ 48 GB
160-187
≥ 56 GB
188-214
≥ 64 GB
215-268
≥ 80 GB
269-323
≥ 96 GB
324-377
≥ 112 GB
378-431
≥ 128 GB
432-486
≥ 144 GB
Note: Some systems may be able to run with less memory than indicated in this table, but performance may be
reduced. For exact minimum memory sizes within each range, please see chapter 8.
Memory should be evenly distributed between processors for best performance; e.g. sockets or physical packages.
In the case of a two socket/processor system, the memory should be equally distributed between the sockets. You
may encounter WARNING messages stating that the coefficient of variation between clients was greater than 5% if
the memory is not evenly distributed.
1.3.4. Network Requirements
At least one Network Interface Controller (NIC) with a minimal transfer rate of 1 Gbit/s
6 May 2015
6 of 40
Copyright © 1988-2015 SPEC
Server Efficiency Rating Tool (SERT) - User Guide
1.3.5. Software Requirements
Required software components per server (host) are:
Exactly one operating system instance (with one user space), including all modules that are installed
during the default installation process. The OS must be from the list of supported software platforms
(http://www.spec.org/sert/docs/SERT-JVM_Options-110.html).
If the system uses a hypervisor by default, the SERT may run in a guest instance (virtual machine) of that
hypervisor. Only one guest may run on each host. The guest must be configured to use all hardware
resources that are not reserved by the hypervisor. Full support for virtualized environments is considered
for the future.
A Java run time environment including one or more instances of a Java Virtual Machine (JVM).
o A 64-bit JVM is required on 64-bit platforms, and a 32-bit JVM is required on 32-bit platforms.
o A version of a Java run time environment from the list of supported software platforms.
For the purposes of running the SERT please ensure that the user is logged on as an Administrator (on
Windows) or as root (on other platforms).
Optional power management software, when installed, must be reported. The operating system must be in a state
sufficient to execute a class of server applications larger than the tool alone. Disabling operating system services is
forbidden
1.4. SERT Installation
Ensure that a Java runtime environment is already installed on the SUT and the Controller. Start the SERT setup via
java –jar SERT-1.1.0-setup.jar and follow instructions on the screen. Ensure that SERT is installed on
the OS partition for both SUT and Controller.
Installing the SERT distribution media will create a directory tree of files and subdirectories.
└───SERT-1.1.0
│─── checkers
│─── discovery
│─── Documentation
│─── images
│─── lib
│─── PTDaemon
│─── redistributable_sources
│─── results
│
└─── XSL-File
│─── SERTUI
│
│─── archive
│
│─── config
│
│─── images
│
│─── lib
│
└─── logs
└─── tools
This document can be found in the Documentation directory, while the various script and batch files discussed
in the following sections are present in the SERT directory or the PTDaemon sub-directory. If the user will be
using multiple machines to perform a SERT test sequence, it will be necessary to unpack (or install) all the files
onto the storage devices which hold the operating system image on each system.
6 May 2015
7 of 40
Copyright © 1988-2015 SPEC
Server Efficiency Rating Tool (SERT) - User Guide
2. Starting SERT via the Graphical User Interface (GUI)
The SERT GUI provides an intuitive way for the user to configure and run a test, and to view and archive the results
of those tests.
2.1. Prerequisites for Using the GUI
The instructions below assume that the GUI will be running on the Controller system, and that the SUT is a
separate host.
2.1.1. On the SUT and Controller system:
Ensure that the firewall is disabled; see section 3 for platform specific instructions.
2.1.2. On the SUT only:
If applicable, please follow the platform specific settings in section 3.
Set the JAVA variable in the serthost.sh/.bat script to the java executable SERT should use. For
example:
o
o
For serthost.bat:
set JAVA=”C:\Program Files\Java\jdk1.7.0\bin\java.exe”
For serthost.sh:
JAVA=/usr/java/jdk1.7.0_71/bin/java
Run [Install directory]\SERT-1.1.0\serthost.bat or serthost.sh
2.2. Invoking the GUI
Open a cmd window and run one of the scripts SERT-1.1.0\SERTUI\run-sertui.bat or runsertui.sh depending on your operating system.
cd [Install directory]\SERT-1.1.0\SERTUI
run-sertui.bat
The command script doesn’t return and will leave the window open.
Note: If power and temperature data is shown as zero or invalid after a test run please verify your connections and
power cycle the Power Analyzer, as the SERT cannot currently repair this misconfiguration.
2.3. Interacting with the GUI
2.3.1. Start
The Start panel of the GUI shows the sequence of steps necessary to run the SERT.
6 May 2015
8 of 40
Copyright © 1988-2015 SPEC
Server Efficiency Rating Tool (SERT) - User Guide
Click Next to continue, or Exit to terminate the GUI.
6 May 2015
9 of 40
Copyright © 1988-2015 SPEC
Server Efficiency Rating Tool (SERT) - User Guide
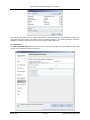
2.3.2. SUT Configuration
The SUT Configuration panel allows the user to configure the IP Address(es) of the SUT.
Specify whether the IP Address of the SUT is the Local Host, or provide the IP Address(es). Multiple IP Addresses
can be provided via a comma-separated list (e.g. 10.0.0.101, 10.0.0.110) or by specifying an IP Address range (e.g.
10.0.0.101-120)
Click Verify, in order for the GUI to verify the connection to the remote service running on the SUT(s). If a failure
occurs, an error message will appear in the lower left corner of the GUI.
When verification is successful, click Next to continue.
6 May 2015
10 of 40
Copyright © 1988-2015 SPEC
Server Efficiency Rating Tool (SERT) - User Guide
2.3.3. SUT Discovery
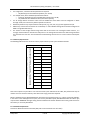
The SUT Discovery panel shows software and hardware configuration retrieved from the SUT. Please wait for the
process to complete, after which a table of discovery items will be shown. Select the Save check box and click Next
to save the configuration values into the test environment file (test-environment.xml). On subsequent
runs, uncheck the Save box to bypass overwriting any configuration changes that might have been made.
If the test configuration is already correctly described in test-environment.xml you should deselect the
Save check box to prevent this information being overwritten by SERTUI.
6 May 2015
11 of 40
Copyright © 1988-2015 SPEC
Server Efficiency Rating Tool (SERT) - User Guide
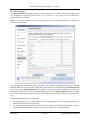
2.3.4. Test Environment
The Test Environment panel allows the user to provide detailed information about the hardware and software
setup used to obtain the SERT results. The information as defined in the Test Environment fields will appear in the
Results Report at the end of the test run. Initially, the default template is populated with sample fields to provide
an example configuration. The discovery process will also populate some fields in certain sections of the test
environment file. If the status of any specific section is listed as “Defaults in use” displayed with a yellow
background, this means that at least one of the fields listed within this section is still using a default value which
does not reflect the actual system being measured. If a section is listed as “Complete” with a green background,
this indicates that all fields within this section have been updated either through discovery value population or
manual editing.
The SUT Discovery from the previous step only partially identifies the configuration. Every section needs to be
checked by the user, and entries must be edited manually as appropriate. These elements must be double-checked
for correctness and examined for proper formatting. Highlight a row in the table and double click to edit the
information associated with that section; e.g. select the Test Information section.
To make changes, double click the field to be edited in the right column, change the value directly, and hit the
Return key. On completion, click OK to save.
6 May 2015
12 of 40
Copyright © 1988-2015 SPEC
Server Efficiency Rating Tool (SERT) - User Guide
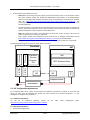
Besides changing the available entries, some test environment sections support adding new groups of items.
Currently this feature is available for Memory DIMM Details and for Disk Drives. Click on the Add Group/Item
button to add a new group of items. The example in the picture below shows three new detail items for DIMM
group [1]. The information in the value fields must be edited as described above. Use the Delete button to delete
the highlighted items. Use the OK button to store the updated information and return to the main Test
Environment panel.
Note that all sections of the test environment information must be complete before continuing further. This is
indicated in the right column of the table showing a green color for all sections.
By clicking on the Save Copy button the user can save a fully populated template for subsequent re-use. Use the
Load button to re-load an existing template in place of the current default template.
After editing test environment fields you can preview the System Under Test section of the result report file by
clicking on the Preview Report button.
Click Next to continue.
Note: For the purposes of informal testing, the user may choose not to edit any of the test environment
information provided by the default template. Simply click Next to continue.
All status fields showing the state “Complete” are highlighted green to represent that all information fields have
been changed from their default values. It does not necessarily indicate that the information within these fields is
correct and valid for publication. The tester has to verify the correctness of all the information manually and make
the required changes.
6 May 2015
13 of 40
Copyright © 1988-2015 SPEC
Server Efficiency Rating Tool (SERT) - User Guide
The default parameters are defined with a leading underscore to clearly mark them as placeholder values that
must be edited to produce valid results. The reporter recognizes default placeholders and highlights these fields
with a yellow background in the result file.
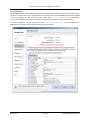
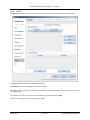
2.3.5. PTDaemon Configuration
The PTDaemon Configuration panel allows the user to view and edit settings associated with temperature and
power instances of PTDaemon. There is a tab for the Power Analyzer and for the Temperature Sensor. Additional
devices can be added with the Add button or removed with the Remove button; this is a convenient way to retain
configuration information in a lab environment where multiple devices are available.
For the Power Analyzer tab, there are four sections:
Measurement Device: Choose which power analyzer is being used from the drop down menu. Once a
device has been selected, only the options appropriate for that device will be displayed in the remaining
sections.
Interface: Choose how the power analyzer is connected to the controller, and specify the interface
address.
6 May 2015
14 of 40
Copyright © 1988-2015 SPEC
Server Efficiency Rating Tool (SERT) - User Guide
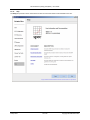
Calibration: Specify the date of last calibration for the power analyzer.
Logging: If needed, save a log and/or debug output file by clicking on the checkbox. This should not
normally be used except under guidance from SERT support personnel.
After making your choices, click on Test Connection to start the connection between the power analyzer and the
controller. Be patient, as this process may take 30 seconds or more.
Power for the different SERT worklets and load levels may vary significantly. This may result in current readings
which fall outside the limits of the given ampere range. This will lead to invalid power readings or high uncertainty
values (>1%), in both cases the result will be marked invalid. In order to avoid such conditions, power ranges must
be adjusted dynamically during a SERT test run. Also, the power analyzer voltage range must be set to match the
standard voltage of the test environment. Proper setting of the voltage range is a prerequisite for correct
calculation of uncertainties.
Both voltage and current ranges can be specified individually per workload, worklet and load level in the
listeners.xml file or under View/Edit Range Settings in the PTDaemon configuration panel.
Range settings from previous runs will be imported from listeners.xml by the SERT UI and only need to be
edited after configuration changes. It is strongly recommended though to check the settings for correctness before
starting a test run.
Starting with SERT version 1.1.0, the GUI offers a method to partially automate the specification of range values by
running a brief test prior to a full SERT run. See Section 4 for instructions on performing a range-setting run.
6 May 2015
15 of 40
Copyright © 1988-2015 SPEC
Server Efficiency Rating Tool (SERT) - User Guide
For the Temperature Sensor tab, there are three sections:
Measurement Device: Choose which temperature sensor is being used from the drop down menu.
Interface: Choose how the temperature sensor is connected to the controller, and specify the interface
address.
Logging: If needed, a log and/or debug output file can be saved by clicking on the checkbox.
After making your choices, click on Test Connection to start the connection between the temperature sensor and
the controller.
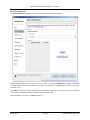
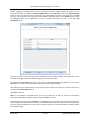
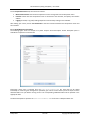
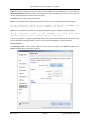
2.3.5.1 View/Edit Device Description
The following figure shows an example of a power analyzer device description. Similar description panel is
available for temperature sensor devices.
Information shown here is imported from the test-environment.xml file. Each field can be edited
individually to match the given configuration. Specifically you need to ensure that the power analyzer has been
calibrated within one year before running the test. The corresponding CalibrationLabel must be specified in the
appropriate field.
The device description is copied to the test-environment.xml file for use in subsequent SERT runs.
6 May 2015
16 of 40
Copyright © 1988-2015 SPEC
Server Efficiency Rating Tool (SERT) - User Guide
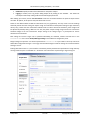
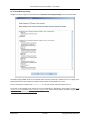
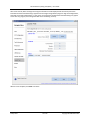
2.3.5.2 View/Edit Range Settings
Voltage and current ranges can be specified in the PTDaemon Device Range Settings panel, see picture below.
The default ranges (none) shown in the example above must be replaced by a suitable current or voltage value.
Range definitions for other workloads, worklets and/or intervals can be added here as well.
The new information is copied to the listeners.xml file and used for subsequent SERT test runs.
The process to find suitable range settings for a given configuration is described in more detail in chapter 2.3.8
Choose Test Suite and chapter 4 Power Analyzer Range Settings. Power analyzer specific information is given in the
SPECpower-Measurement_Setup_Guide.pdf document.
6 May 2015
17 of 40
Copyright © 1988-2015 SPEC
Server Efficiency Rating Tool (SERT) - User Guide
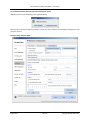
2.3.5.3 Additional Power Analyzer and Temperature Sensor Device
Additional device can be included by pressing the Add button.
Select the device type and modify that setting to match your device. Please note to change the listing port as well
(one port / device).
Example: Power Analyzer added
6 May 2015
18 of 40
Copyright © 1988-2015 SPEC
Server Efficiency Rating Tool (SERT) - User Guide
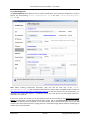
2.3.6. JVM Configuration
The JVM Configuration panel allows the user to select the parameters of the tested SUT configuration in order to
identify the corresponding Client Configuration ID in the local client-configurations110.xml file.
Note: Before selecting configuration parameters make sure that the local copy of the clientconfigurations-110.xml file matches the official version of this file which is available on SPEC’s web site at
http://www.spec.org/sert/docs/client-configurations-110.xml. The GUI will check this for you automatically; it is
reported as the "Latest Web Version". If necessary, you can set a web proxy in the GUI startup scripts (runsertui.bat or run-sertui.sh).
If the version strings don’t match, you can download the latest version by clicking on the Download Latest With
Browser hyperlink. After you have downloaded the latest version, click on the Load Local File button for opening
this version in SERTUI (see picture below). In case the controller doesn’t have internet access you have to find
another system with internet access for copying the file on a removable storage medium and then transferring it to
a folder on the controller system.
6 May 2015
19 of 40
Copyright © 1988-2015 SPEC
Server Efficiency Rating Tool (SERT) - User Guide
The code will automatically pick the correct JVM options for each workload from the specified set and start the
client JVMs with these options. The option sets for all supported platform / OS / JVM combinations have been
defined by the platform manufacturer and must be used for compliant SERT runs.
2.3.7. JVM Review
The JVM Configuration Review panel allows the user to review the JVM options and the number of client JVMs
used for each workload during the measurement.
6 May 2015
20 of 40
Copyright © 1988-2015 SPEC
Server Efficiency Rating Tool (SERT) - User Guide
2.3.8. Choose Test Suite
The Choose Test Suite panel allows the user to choose the test to run, to configure key launch variables, and to
view configuration information about the test. For a compliant run the “Full Test Suite (config-all.xml)”
configuration must be selected.
Note: For the purposes of informal testing, the user may choose to select individual worklets. For a valid run, all
worklets must be enabled.
In the Storage Path Setup section, specify the paths of all configured storage devices under test. Separate
pathname fields are required for each storage device. More devices can be added using the Add Storage Path
button. Each time the Add Storage Path button is clicked, a new pathname field is created at the bottom of the
existing list of pathnames as shown in the following figure. Clicking on the Delete Storage Path button will delete
the currently selected pathname field. You must enter a pathname referencing a filesystem on a storage device
here.
The following requirements apply to pathnames:
The system partition, e.g. “C:” under Windows must not be specified here. Instead only the pathname for the
additional test partition must be given here.
It is recommended to use descriptive pathnames for mounting the test storage devices and to avoid drive
letters for pathname specification. Example: “/SAS-10K_0” instead of “K:” under Windows OS.
6 May 2015
21 of 40
Copyright © 1988-2015 SPEC
Server Efficiency Rating Tool (SERT) - User Guide
Note: According to the SERT run rules, write caches must be disabled for all storage devices. You must select the
Write cache disabled check box to confirm the storage write caches is disabled. If this check box isn’t selected a
warning will be displayed later when the test is launched.
Click Next to continue after making the selections.
Note: If you start SERT and the specified storage path name does not exist, the following message will appear:
Storage verification failed on SUT <SUTNAME>. Storage path <PATHNAME> does
not exist. Would you like to continue launch of test suite?
Note: If there is insufficient free space on the specified storage device(s), the following message will appear:
Storage verification failed on SUT <SUTNAME>, not enough
available. Would you like to continue launch of test suite?
free
space
If either error appears, it is highly recommended that the test be terminated immediately and the reported error
be corrected before restarting the SERT. If the test is not terminated immediately, it will eventually fail.
2.3.9. Launch Test
The Launch Test panel is used to initiate a SERT test, and to monitor its progress. Click Launch to begin the test.
Cancel is available and may be used as necessary.
6 May 2015
22 of 40
Copyright © 1988-2015 SPEC
Server Efficiency Rating Tool (SERT) - User Guide
After a few seconds, Status messages and Progress information will be displayed and the test will proceed as
intended. Estimated Time Remaining is approximate and might be significantly longer for high-end configurations,
especially multi-node configurations. In some cases, the Progress Bar and Estimated Time Remaining may appear
to not show any progress, even though the SERT test is functioning correctly.
When the test completes, click Next to continue.
6 May 2015
23 of 40
Copyright © 1988-2015 SPEC
Server Efficiency Rating Tool (SERT) - User Guide
2.3.10.
Results
The Results panel allows the user to view and archive the results from the test pass that has just completed.
Click View to load the results in the default Web browser.
Click Save As to save the results folder to a location of choice.
Click Save to name, annotate, and save the results folder to the default "Archive" directory and enter them into
the table provided.
Once placed in the archive, the results can be browsed at any time by clicking on View.
The test is now complete. Exit the GUI by clicking on Exit.
6 May 2015
24 of 40
Copyright © 1988-2015 SPEC
Server Efficiency Rating Tool (SERT) - User Guide
2.3.11.
Help
The Help panel provides release information and links to various documents made available to the user.
6 May 2015
25 of 40
Copyright © 1988-2015 SPEC
Server Efficiency Rating Tool (SERT) - User Guide
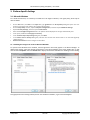
3. Platform Specific Settings
3.1. Microsoft Windows
For a 64-bit environment, it is necessary to enable the “Lock Pages in Memory” user rights policy, which may be
done as follows:
On the Start menu, click Run. In the Open box, type gpedit.msc. The Group Policy dialog box opens. The user
account running this tool needs to be a system administrator.
On the Group Policy console, expand Computer Configuration, and then expand Windows Settings.
Expand Security Settings, and then expand Local Policies.
Select the User Rights Assignment folder. The policies will be displayed in the right hand details pane.
In the pane, double-click Lock pages in memory.
In the Local Security Policy Setting dialog box, click Add.
In the Select Users or Groups dialog box, add the user account that will be used to run the SERT (typically
“Administrator”).
Restart the machine for these changes to take effect.
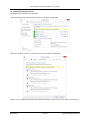
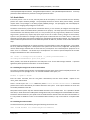
3.1.1. Disabling the storage write cache on Microsoft Windows
For systems with Windows Server installed, each storage device will usually appear in the Device Manager. To
disable write caching, select the desired storage device in the Device Manager, then either double click, or right
click and select Properties. Select the Policies tab to display the interface that allows the disabling of write caching:
This (right) shows write caching enabled, click on the checkbox to disable it; e.g. the tick will disappear.
6 May 2015
26 of 40
Copyright © 1988-2015 SPEC
Server Efficiency Rating Tool (SERT) - User Guide
3.1.2. Disabling the Windows firewall
The firewall may be disabled by the following:
Open the Windows Control Panel and then click on the Windows Firewall applet.
Select Turn Windows Firewall on or off from the left hand side of the Firewall applet.
Click on the Turn off Windows Firewall for the relevant network(s); e.g. Domain, Private or Public, then click on OK.
6 May 2015
27 of 40
Copyright © 1988-2015 SPEC
Server Efficiency Rating Tool (SERT) - User Guide
3.2. Red Hat Enterprise Linux and SUSE Linux Enterprise Server
Transparent Huge Pages (THP) must be enabled when running the SERT in a 64-bit Linux environment. Earlier
versions of RHEL and SLES do not enable this feature by default, although other untested distributions may do so.
To determine whether Transparent Large Pages are enabled for the system, run the following command:
"cat /sys/kernel/mm/redhat_transparent_hugepage/enabled" (RHEL)
-or"cat /sys/kernel/mm/transparent_hugepage/enabled" (SLES11 SP2):
The user should see the following output: "[always] never", with the always in brackets indicating that
Transparent Large Pages are enabled by default on the system. If this file exists, but the output shows [never], or
[mmio], please run the following command at startup to enable Transparent Large Pages:
"echo always > /sys/kernel/mm/redhat_transparent_hugepage/enabled" (for RHEL)
-or"echo always > /sys/kernel/mm/transparent_hugepage/enabled" (SLES11 SP2).
3.2.1. Disabling the storage write cache on Linux
For instructions on how to disable the different write caches, please read the manuals provided by the
manufacturers of the system, controller and storage devices. Different versions of Linux provide different
mechanisms for disabling disk caches, so it may be necessary to contact the manufacturer of your storage device(s)
if neither the manufacturer’s manuals nor the operating system documentation explain how to do this.
3.2.2. Disabling the RHEL6.x/SLES firewall
The firewall may be disabled by issuing the following command as root:
chkconfig iptables off
A reboot is required for the change to take effect.
3.2.3. Disabling the RHEL7 firewall
For RHEL7 and other Linux distributions that use systemctl, the firewall may be disabled by issuing the following
command as root:
systemctl disable firewalld
A reboot is required for the change to take effect.
3.3. IBM AIX
It is necessary to setup large pages correctly.
Sign on as the root user.
Execute the command:
bootinfo –r
This returns the total memory available to the operating system in kilobytes [Value].
Compute the target large pages as follows:
targetLP = Truncate(Value/18780)
(Note: 18780 is a factor designed to allocate approximately 87.25% of available memory for large pages).
Execute the following commands:
vmo –r –o lgpg_regions=[targetLP] –o lgpg_size=16777216 –o v_pinshm=1
bosboot –aD
shutdown –rF
This will cause the system to be rebooted with the large pages set up correctly for the SERT.
6 May 2015
28 of 40
Copyright © 1988-2015 SPEC
Server Efficiency Rating Tool (SERT) - User Guide
3.3.1. Disabling the AIX firewall
AIX does not have a firewall enabled by default. For information on configuring or disabling IPSec, see the AIX
Knowledge Center:
https://www-01.ibm.com/support/knowledgecenter/ssw_aix_71/com.ibm.aix.security/ipsec.htm
3.4. IBM PowerLinux
On IBM Power systems running RHEL 6.x or SLES 11.x with more than 32GB of memory, large pages must be
configured manually.
Sign on as the root user.
Download the newest libhugetlbfs library from the project home, at the following URL:
http://sourceforge.net/projects/libhugetlbfs/files/
Execute the command:
cat /proc/meminfo | grep MemTotal
This returns the total memory available to the operating system in Kilobytes [Value].
Compute the target large pages as follows:
targetLP = Truncate(Value/18204)
(Note: 18204 is a factor designed to allocate approximately 90% of available memory for large pages).
Execute the following command to set the number of large pages:
echo [targetLP] > /proc/sys/vm/nr_hugepages
Create the necessary pseudo-filesystem by executing the following commands
mkdir /libhugetlbfs
groupadd libhuge
chgrp libhuge /libhugetlbfs
chmod 770 /libhugetlbfs
usermod root -G libhuge (this assumes "root" is the SERT user on the system)
mount -t hugetlbfs hugetlbfs /libhugetlbfs
Edit /etc/fstab and add the following line
hugetlbfs /libhugetlbfs hugetlbfs mode=0770,gid=1000 0 0
Execute the following command to mount the huge table space:
hugeadm --create-global-mounts
3.5. 32-bit ARM Platform
The following items need to be considered for a 32-bit ARM platform:
The variable ARM_JAVA_FP_ABI in serthost.sh must be set appropriately for your Java version. The currently
supported HotSpot 7 JRE uses the soft-float ABI so the variable should be set to "armel" in that case. For other
JVMs please consult the vendor's documentation.
Since the supported Linux versions use the ARM hard-float ABI, while HotSpot 7 uses the soft-float ABI, several
non-default libraries may need to be installed in Linux so that HotSpot will function properly. This may be
accomplished via the command "sudo apt-get install -y libc6-armel libsfgcc1".
For processors running at speeds less than 2GHz, some of the worklets may require extra warmup time in order to
reach steady-state performance before the measured intervals begin. Default warmup configurations on all
worklets are a single 30-second warmup, but up to ten 30-second warmup periods are allowed. These values can
be
modified
manually
in
config-all.xml;
their
names
are
cpuWarmupIntervalCount,
6 May 2015
29 of 40
Copyright © 1988-2015 SPEC
Server Efficiency Rating Tool (SERT) - User Guide
memCapacityWarmupIntervalCount, storageWarmupIntervalCount, and hybridWarmupIntervalCount. 5 warmup
periods should be sufficient for processors running at speeds over 1GHz.
3.6. Oracle Solaris
If the Host process is not run as root, discovery data will be incomplete, as some commands that the discovery
process runs require elevated privileges. The psrset(1M) command is used to effect process affinity, and that
requires either root privileges or the PRIV_SYS_RES_CONFIG privilege. See privileges(5) and usermod(1M) for
instructions on assigning that privilege to a normal user.
The Solaris virtual memory system will not overcommit memory, so it is necessary to configure more swap space
than is default in order for the SERT Memory workload to run properly. This swap space will not actually be used,
and will therefore not adversely affect scores; it is only necessary for very large memory allocations to succeed.
Large memory systems may require swap space equal to the size of main memory, though on small memory
systems it may be sufficient to configure swap space equal to about half the size of main memory. Disks used
exclusively for swap space must also be included in the configuration for the Storage workload. It is recommended
that those disks be partitioned with a small 20GiB UFS partition for SERT use, with the rest of the disk dedicated to
swap.
The SERT Storage workload does not support measuring any kind of RAID or other disk aggregation. This includes
ZFS in any multi-disk configuration. All ZFS pools on the system must consist of only a single disk. ZFS filesystems
used for SERT Storage workload data set must have the "primarycache" and "secondarycache" properties set to
either "none" or "metadata". The easiest way to accomplish this is to create a separate filesystem for the SERT
Storage workload data set with a command such as:
zfs create -o mountpoint=/sert/data0 -o primarycache=metadata -o
secondarycache=metadata rpool/sert_data
When possible, UFS should be preferred as the filesystem to use for the SERT Storage workload. It provides
significantly better performance than ZFS in no-cache conditions.
3.6.1. Disabling the storage write cache on Oracle Solaris
The cache on individual storage devices may be disabled using the expert mode of the format(1M) command. This
command requires root privileges to run. For each disk attached to the system, run
format -e <path to disk>
Enter the 'cache' command, then the 'read_cache' subcommand, and then select 'disable'. Repeat for the
'write_cache' subcommand.
There is a shell script in the tools subdirectory called solaris-disable-disk-caches.sh which will
perform these actions automatically for all disks attached to the system. It also reports whether the cache was
successfully disabled for each disk.
Many Solaris-based systems ship with hardware RAID controllers with on-board cache. If it is possible to disable
that cache, it will be done with an HBA-specific configuration utility such as MegaCli for LSI-based RAID controllers.
Consult the documentation for your specific server and HBA model to determine how the cache can be disabled. If
it is not possible to disable the cache on the hardware RAID controller, it may not be used for a compliant SERT
run.
3.6.2. Disabling the Solaris firewall
The Solaris firewall may be disabled by issuing the following command as root:
sudo svcadm disable svc:/network/ipfilter:default
6 May 2015
30 of 40
Copyright © 1988-2015 SPEC
Server Efficiency Rating Tool (SERT) - User Guide
The state of the firewall can be verified using the 'sudo ipfstat -io' command. When the firewall is disabled, its
output will look like
empty list for ipfilter(out)
empty list for ipfilter(in)
3.7. Lower Performance Platforms
The following values in the config-all.xml file may be set to any integer between 1 and 10 to provide additional
warmup time to allow lower performing platforms to reach steady state before measurements start.
<interval-count
<interval-count
<interval-count
<interval-count
id="cpuWarmupIntervalCount">1</interval-count>
id="memCapacityWarmupIntervalCount">1</interval-count>
id="storageWarmupIntervalCount">1</interval-count>
id="hybridWarmupIntervalCount">1</interval-count>
4. Power Analyzer Range Settings
Most power analyzers can be set to multiple current ranges. In order to achieve accurate results, the range
settings on the device must be set appropriately for the load being measured. Most devices support an autoranging mode which will adjust the device automatically as the load changes; however, use of this mode is not
allowed for measurement because it takes time for the range to adjust (during which the measured data may not
be accurate), and because PTDaemon cannot determine the accuracy of the data while the device is in autoranging mode.
The SERT allows you to configure separate ranges for each power analyzer and can adjust the ranges as needed for
each measurement interval. These settings appear in the listeners.xml file. Each PowerAnalyzerListener
includes “voltage-range” and “current-range” parameters. The default configuration includes multiple
current range settings for different load levels, but all are set to the same value: “none”. This indicates that no
change will be made to the settings on the device during a test run.
The range settings may need to be adjusted when making changes to the system under test, the worklets being
tested, or changes to the configuration of the operating system. The validation performed at the end of the run
will determine if power measurement accuracy thresholds are not being met. If your result includes warnings
regarding the power analyzer uncertainty, adjusting the current ranges may resolve the issue.
4.1. Automating Range Settings using the GUI
The Choose Test Suite panel gives you the option to select a “Range Discovery” run rather than the standard SERT
full run. By selecting this option, the tool will run an abbreviated subset of the SERT worklets which should be
sufficient to create range settings that will provide valid measurements in a majority of cases.
The steps to complete such a run are as follows:
1.
2.
3.
4.
5.
6.
7.
Once at the “Choose Test Suite” panel, select the “Range Discovery” choice from the dropdown menu.
For most power analyzers, it is safe to check the “Use Auto Ranges” box and let the analyzer select the
range choices for the run.
Complete the remaining settings on this page as documented previously in the User Guide.
Proceed to the launch page and launch the run.
When the run completes, you will see a message in the lower portion of the panel stating that “range
settings have been updated”
Return to the PTDaemon configuration panel, stop the PTDaemon instance, and then review the range
settings.
Return to the “Choose Test Suite” panel, select “Full Test Suite”, and continue on to make a full run.
6 May 2015
31 of 40
Copyright © 1988-2015 SPEC
Server Efficiency Rating Tool (SERT) - User Guide
Some power analyzers may be unable to select appropriate ranges automatically, and the range setting run will
result in invalid values for ranges. In such a case, you may need to edit range settings from the PTDaemon panel,
setting all range values to “none”, and then manually set the analyzer to a range that will measure the system at its
highest load and rerun the Range Discovery test with “Use Auto Ranges” disabled.
The Range Discovery run should give working settings in most cases, but it is impossible to cover all system types
and analyzer types. If range values generated by the run do not give valid measurement results for a full run, you
may need to use one of the manual processes described below.
4.2. Manual Range Settings – Optional
To configure the ranges manually, replace each of the <voltage-range> and <current-range> entries in
the listeners.xml file with a value appropriate for your system under test. The range setting should
generally be slightly higher than the maximum expected reading during that interval. Each model of power
analyzer will support a specific set of ranges; however, the configuration can use any value, and PTDaemon will
round the range settings up to the next supported range.
4.3. Extracting Range Settings from Full Runs - Optional
The SERT also includes a process for extracting appropriate ranges for your configuration after a full run has been
completed. After a run completes, the results files will be stored in a numbered directory in the results directory,
for example results/sert-0007/results.xml.
Use the directory name from that test and run the following command:
reporter.bat –s –p -r results/sert-0007/results.xml -x
org/spec/power/sert/resources/rangeSettings.xsl -o rangeSettings.txt
-or./reporter.sh –s –p -r results/sert-0007/results.xml -x
org/spec/power/sert/resources/rangeSettings.xsl -o rangeSettings.txt
This will generate a rangeSettings.txt in the same directory as results.xml. This file will contain an
XML listener specification for each power analyzer used in the range setting run. Open the file in a text editor and
follow the instructions (which will be to copy some text from that file to the listeners.xml).
5. Using the Collector Scripts
The SERT package is distributed with two log collection scripts to assist in packaging up various log files and other
critical configuration files for troubleshooting. The collector scripts are intended to be run on both the SUT as well
as the controller system.
The two files are Operating System-specific and may be found in the base SERT installation directory:
collectlogfiles.bat is intended to be executed on a Microsoft Windows Operating System.
collectlogfiles.sh is intended to be executed on a Linux or AIX system.
In order to help SPEC diagnose a failed run, please follow these steps:
1.
Ensure the run has completed and the GUI has been stopped on the Controller side.
2.
On the SUT, open up a command line window, change directories to the base SERT installation directory, and
execute either collectlogfiles.bat (for Windows systems) or collectlogfiles.sh (for Linux
systems).
If you required to share your results files, please use the /r option, e.g. collectlogfiles.bat /r in
order to package up the latest results files, various log files and other critical configuration.
6 May 2015
32 of 40
Copyright © 1988-2015 SPEC
Server Efficiency Rating Tool (SERT) - User Guide
If either of these script files are executed when the SERT has not yet been executed, when no results have
been created or when some other part of the test pass has failed then you may see one or more (up to five)
instances of the following message: The system cannot find the file specified.
3.
Once the script completes, navigate to the SERTlog subdirectory and copy the latest archive file (.zip for
Windows, tar.gz for Linux) to the system for submission to SPEC for analysis. The files will be created in the
following format:
<hostname>_YYYY-MM-DD_HHMM.<zip/tar.gz> (where YYYY is the year, MM is the month, DD is the
day, and HHMM represents the hours and minutes count).
Always ensure the latest log archive file is captured, as a new version will be generated in the SERTlog
subdirectory every time the collectlogfiles script is run on that system.
4.
Follow the above procedure for the controller system, ensuring the correct script is executed for the
Operating System running on the controller.
5.
Use the form on http://www.spec.org/sert/feedback/issuereport.html in order to submit the files.
Note: Technical support requiring involvement of specialists is done by volunteers from our member institutions
(http://www.spec.org/spec/membership.html). Please do not send us any proprietary information in your queries.
If you feel you cannot clearly ask your question without reference to proprietary information please clearly mark
such communications and we will not involve our SERT specialists, but rather will answer your query only if SPEC's
own staff SERT generalists are able to do so.
6 May 2015
33 of 40
Copyright © 1988-2015 SPEC
Server Efficiency Rating Tool (SERT) - User Guide
6. SERT Command Line Usage
6.1. SERT Configuration and Start Procedure
This section provides details to enable a successful test with a simple server configuration as an alternative to
running the GUI. Further sections provide additional details for some of the configuration settings that will be
required in order to perform a successful test pass. It is recommended to read this section as well as the SERT
Design Guide to understand more of the details behind SERT, and how to configure and run it. Please note that in
the following instructions there are typically two script file options: *.bat for the Windows OS and *.sh for UNIX
and Linux OSes.
Configure the analyzer. Edit the power analyzer PTDaemon (runpower.bat or runpower.sh) and
temperature sensor PTDaemon (runtemp.bat or runtemp.sh) script files. Ensure the proper
communication ports and network ports are used. (The batch and script files are present in the
SERT\PTDaemon directory).
o
For each additional power analyzer: Create a copy of runpower.bat or runpower.sh and ensure that
the proper communication ports and network ports are set.
o
In order to analyze problems reported by PTDaemon it may be helpful to generate log files. To do
this, edit the script files to set the LOGFILE and optionally the EXTLOG variables. LOGFILE should be
set to the name of the file which will hold the log output. Log files may not be shared, so the names
given to each must be unique. If extended logging of range settings, warnings, errors, and other
important events is desired, set the EXTLOG variable to "TRUE".
Start all power analyzer PTDaemon(s) (runpower.bat/runpower.sh) and temperature sensor
PTDaemon (runtemp.bat/runtemp.sh).
Edit the test-environment.xml file (in the SERT directory), describing the hardware and software
details of the test setup. The default values in this file need to be changed to match the real test environment.
o
For each additional power analyzer: Add the following section to the test-environment.xml
in the <MeasurementDevices> section and change the default values to match the real
test environment.
<PowerAnalyzer>
<PTDaemonHostname>localhost</PTDaemonHostname>
<PTDaemonPort>8888</PTDaemonPort>
<HardwareVendor>_Energy Minder, Inc.</HardwareVendor>
<Model>_EM1000+ USB</Model>
<SerialNumber>_ser001122</SerialNumber>
<Connectivity>_USB2</Connectivity>
<InputConnection>_Default</InputConnection>
<CalibrationInstitute>_NIST</CalibrationInstitute>
<AccreditedBy>_IQ2 Calibration Laboratory</AccreditedBy>
<CalibrationLabel>_N-32768</CalibrationLabel>
<DateOfCalibration>2010-01-01</DateOfCalibration>
<SetupDescription>_Unknown</SetupDescription>
</PowerAnalyzer>
o
6 May 2015
For multi-node environments: the node quantity needs to be set. An example for a 3
node environment
<Node>
<Quantity>3</Quantity>
34 of 40
Copyright © 1988-2015 SPEC
Server Efficiency Rating Tool (SERT) - User Guide
If the default port numbers in the PTDaemon script files have been changed, the listeners.xml file (in
the SERT directory) must be changed accordingly. Also any range settings for the power analyzer can be
specified in the listeners.xml configuration file.
o
For each additional power analyzer: Add the following section to the listeners.xml and change
the default values to match the real test environment (Note: Do not forget to change the port
number).
<listener enabled="true">
<type>PowerAnalyzerListener</type>
<classpath>
<path>lib/ptdaemonClientApi.jar</path>
</classpath>
<parameters>
<parameter name="hostname">localhost</parameter>
<parameter name="port">8888</parameter>
<parameter name="current-range">
<range-set>
<workloads>Memory</workloads>
<worklets>Flood.*</worklets>
<default-range>none</default-range>
</range-set>
<range-set>
<workloads>Memory</workloads>
<worklets>Capacity.*</worklets>
<default-range>none</default-range>
</range-set>
<range-set>
<workloads>Storage</workloads>
<default-range>none</default-range>
</range-set>
<range-set>
<workloads>Idle</workloads>
<default-range>none</default-range>
</range-set>
<default-range>none</default-range>
<range level="87.5%">none</range>
<range level="75%">none</range>
<range level="62.5%">none</range>
<range level="50%">none</range>
<range level="37.5%">none</range>
<range level="25%">none</range>
<range level="12.5%">none</range>
</range-set>
</parameter>
</parameters>
</listener>
On the system under test, edit the SERT host script file (serthost.bat/serthost.sh – both be found in
the SERT directory) for the appropriate system configuration. For single runs, the KEEPALIVE variable can
be cleared; for multiple consecutive runs, it should remain at the default setting -keepalive.
Check the following specifications for proper values matching the test system configuration:
JAVA = <for a non-default Java Virtual Machine (JVM), change the java command to
the pathname of the java command you want to run>
The serthost.sh/.bat script files currently both include the default definition:
JAVA=java
On the system under test, call the serthost.bat/.sh script file.
6 May 2015
35 of 40
Copyright © 1988-2015 SPEC
Server Efficiency Rating Tool (SERT) - User Guide
Check client-configurations-110.xml is up-to-date, and download the latest version from
http://www.spec.org/sert/docs/client-configurations-110.xml if necessary and copy to base folder. Compare
the version=”YYYYMMDD” string in the header section of the file with your local copy, where the version
string specifies the date this file was last changed in the format year month day, e.g. 20130529.
On the Controller running the Director, edit the SERT configuration file config-all.xml (in the SERT
directory):
o
o
Search for id=”clientConfig” and replace the string “defaultConfig” with the
configuration name from client-configurations-110.xml matching your “processor / OS /
JVM / memory-per-client” combination (Use the guidance on the Client Configuration page
http://www.spec.org/sert/SERT-JVM_Options.html for the correct configuration name.). Chauffeur
picks the correct JVM heap sizes (parameters –Xms and –Xmx), number of JVMs and Java parameters
based on the specifications in client-configurations-110.xml for the selected reference
configuration. The computed values must be used for a valid measurement.
Search for "diskioFilePaths" in the <definitions> section at the beginning.
Edit the following lines:
<parameter id="diskioFilePaths">
<path> [specify pathname of storage test device here]</path>
</parameter>
Change/remove/add path names of the storage devices to be tested.
Each path name should be listed in its own <path> tag.
Edit the director.bat/.sh script files for single runs or the start_director_multiple.bat/.sh
script files to start the desired number of SERT runs. First, the host IP address must be specified in
director.bat/.sh, then edit the following line:
HOSTS=_hostname_or_IP_of_Host_systems_
o
For multi-SUT environments: Add each SUT IP address (separated by a comma) to the HOST
argument. Note: Do not use a space behind the comma(s). An example for 3 SUTS:
HOSTS=10.10.10.1,10.10.10.2,10.10.10.3
On the controller system, call the director.bat/.sh script file for a single run or the
start_director_multiple.bat/.sh script file for multiple consecutive runs.
The duration of the whole test sequence depends on the number of test cases defined above. The result files
for each SERT test run (results.html and results.xml) are stored in a separate directory with a name
beginning with sert-nnnn e.g. sert-0000.
On current releases of the SERT, a typical test pass exercising all worklets (CPU, memory, and Storage I/O) on a
typical two-socket server with 16GB or more of memory and at least two on-board storage devices, may take
four hours or more. This duration is governed by the amount of hardware present in the SUT, so more richly
populated platforms may take longer to execute.
6 May 2015
36 of 40
Copyright © 1988-2015 SPEC
Server Efficiency Rating Tool (SERT) - User Guide
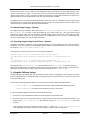
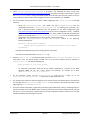
Controller
System under Test
runpower.bat/.sh
serthost.bat/.sh
SPEC PTDaemon
Host JVM
runtemp.bat/.sh
SPEC PTDaemon
director.bat/.sh config-all.xml
Client JVM 1
Director
JVM
Client JVM 2
:
Reporter
:
Reports
----------------------Reports
--------------------------------------------Reports
-----------------------
Client JVM N
---------------------------------------------------------------------------------------------------------------------------------------------------------------------------------------------------------------------------------------------------------------------------------------------------------------------
Figure 2: SERT Startup Procedure
6 May 2015
37 of 40
Copyright © 1988-2015 SPEC
Server Efficiency Rating Tool (SERT) - User Guide
6.2. Generate report files with the reporter scripts
In some cases the user might want to create a new .HTML, .CSV or .txt report from an existing SERT xml output file,
for example after editing user-modifiable fields (configuration information in the TestEnvironment section).
In order to re-generate an .HTML, .CSV or .txt report from the raw files the following comment need to be
used.
reporter.bat [options] {for Windows-based system}
reporter.sh [options] {for Linux/UNIX-based system}
Required option:
-r [SERT xml results file]
Example: reporter.bat –a –r results/sert-0002/results.xml
Additional options:
-a
Generate all report formats (HTML, CSV, and Text)
default: generate only HTML output
-c
Generate CSV report files
-o Output
Output file for generated report
default: match the filename of the raw file, with a .txt, .csv, or .html extension
(to match the report type). May not be used with the -a option
-p
Direct XSL transform (must be used with -x)
default: generate a report from the transformed output
-s
Skip validation. Reports will automatically be marked invalid
-t
Plain ASCII text output
default: generate HTML output
-x XslFile
Use a non-default XSL file to generate the report
Here are some examples of how to use the reporter scripts for regenerating default report files or for generating
special output files:
regenerate all HTML report files
reporter.bat –r results\sert-0000\results.xml
regenerate all default report files
reporter.bat –a –r results\sert-0000\results.xml
generate special CSV report files
reporter.bat -s -c -x results\XSL-File\csv-detail.xsl -o resultsdetail.csv -r results\sert-0000\results.xml
Additional XSL scripts for generating other CSV report files are included in the results/XSL-File folder.
6 May 2015
38 of 40
Copyright © 1988-2015 SPEC
Server Efficiency Rating Tool (SERT) - User Guide
7. Coefficient of Variation (CV)
The coefficient of variation (CV) is defined as the ratio of the standard deviation σ to the mean μ:
It represents the extent of variability in relation to mean of the population. The Host CV and Client CV are
presented as percentage numbers in the SERT report.
7.1. Host CV
The Host CV is calculated from all individual node performance "Scores" for the whole set of nodes (population) is
shown in the report for each interval. The Host CVs are calculated and displayed for multi node runs only, for single
node runs a "0.0%" is displayed.
The Host CV is used by SERT to identify significant deviance of results of some nodes from the mean. Similar results
per node are expected for a homogeneous set of nodes, i.e. the CV should be fairly small. High CV values indicate
greatly different results for one or more nodes. CV values above certain thresholds will cause warnings or error
messages in the SERT result files, and may lead to a run being invalid and thus unsuitable for submission.
7.2. Client CV
The Client CV is calculated from all individual client performance "Scores" for the whole set of clients (JVM
instances) including all nodes for multi node runs (population) is shown in the SERT report for each interval.
The CV is used by SERT to identify significant deviance of results of some clients from the mean. Typically similar
results per client are expected, i.e. the CV should be fairly small. High CV values indicate greatly different results
for one or more clients. For unbalanced configurations, e.g. different types of storage devices (HDD and SSD) or
dissimilar amounts of memory attached to different processors, high CV values are "normal". CV values above
certain thresholds will cause warnings or error messages in the SERT result files, and may also lead to a run being
invalid and thus unsuitable for submission. Warnings can be ignored for unbalanced configurations as high CV
values are expected in this case.
8. SUT Minimum Memory Requirement
For the CPU and Hybrid worklets, Chauffeur allocates a maximum of 256 MB heap space per hardware thread, and
reduces the heap if there isn't sufficient physical memory. Sufficient is defined using the following algorithm:
heap space per thread (64bit) = (physicalMemoryGB - 1) * 0.85 / hardwareThreads
heap space per thread (32bit) = (physicalMemoryGB * 0.875) * 0.85 / hardwareThreads
Example:
Configuration: 8GB physical memory, 32 hardware threads
heap space per thread (64bit) = (8 - 1) *0.85 / 32 = 0.186 GB = 190 MB
In order to ensure that 256 MB will be used per JVM, we can solve the formula above for physicalMemoryGB, and
we get:
minimumMemory (64bit) = 1 + (0.25 * hardwareThreads / 0.85)
minimumMemory (32bit) = (0.25 * hardwareThreads / 0.74375)
Example:
Configuration: 32 hardware threads
minimumMemory (64bit)= 1 + (0.25 *32 / 0.85) = 10.4 GB
Per thread heap space sizes below 256MB may result in lower performance for each client. The SERT harness only
ensures that all clients will be using the same heap size to avoid performance differences between them.
The formulas given above don’t pertain to the memory worklets. These worklets will use all available physical
memory after subtracting the memory used by the operating system and other run time software (JVM etc.).
6 May 2015
39 of 40
Copyright © 1988-2015 SPEC
Server Efficiency Rating Tool (SERT) - User Guide
9. Known Issues
Pease check for the latest updates http://www.spec.org/sert/docs/SERT-FAQ.html.
10.Trademark
SPEC and the names SERT, SPECpower_ssj, and SPEC PTDaemon are trademarks of the Standard Performance
Evaluation Corporation. Additional product and service names mentioned herein may be the trademarks of their
respective owners.
11.Copyright Notice
Copyright © 1988-2015 Standard Performance Evaluation Corporation (SPEC). All rights reserved.
6 May 2015
40 of 40
Copyright © 1988-2015 SPEC