1
MoviejayLP v.2.0
User’s manual
Index
Overview.............................................................................................................................3
Quickstart ..........................................................................................................................4
Chapter 1: The "on air” window...........................................................................................5
The clip palette ..............................................................................................................10
The preview window ......................................................................................................12
The selection window ....................................................................................................15
The programmes selection window ...............................................................................20
The hard disk clips selection window.............................................................................22
The playlists selection window.......................................................................................24
The external feeds selection window.............................................................................26
Chapter 2: The scheduling and database management features......................................28
The programmes database management window.........................................................28
The external feeds management window ......................................................................32
The playlists scheduling window....................................................................................34
The setup window..........................................................................................................41
The station log window ..................................................................................................46
The database utilities module ........................................................................................48
Notes on safety..............................................................................................................50
End User licence agreement...........................................................................................51
Page 2
Overview
A powerful and flexible software able to self-manage your TV station: from live assist to full
automation once you have scheduled playlists. All your video clips digitally stored on hard
disk, without tapes or cassettes, or DVD players skipping because of scratched disks. And,
no controller or dedicated machines, no custom hardware components, just a software
solution as easy to use as your PC, with an excellent price/quality ratio!
Moviejay runs on the widely known Windows XP operating system and uses the familiar
operating environment of a standard PC: a simple and user-friendly interface perfectly
suitable also for non-trained staff.
Tested and constantly improved in cooperation with real-life broadcasters, Moviejay is the
key solution for your broadcasting environment, where computers become the heart of a
TV station: clips, programmes, commercials, pre-recorded shows, grabbed from DVDs or
recorded from an external source, all compressed up tenths of the original size thanks to
Mpeg video formats and digitally stored on Hard Disks.
Moviejay Main features:
Live assist or long-term unmanned full-automation.
Powerful preview window allowing easy setting of fade markers into any video clip with
1/10sec precision.
Works on a standalone PC. No need to install video servers and separate storage
servers: save money on the hardware without missing the possibility of future
upgrades.
Works with broadcast grade MPEG2 hardware decoders for maximum quality and
reliability or uncompressed playout cards allowing seamless back-to-back, multiformat
playout on MPEG1, MPEG2, MPEG4, DivX, Xvid, DV, VOB, AVC/H264, WMV
(Windows Media Video) and more.
Carefully engineered on building blocks, so you may purchase just the needed
channels and features and save money on your initial purchase.
Integrated clip palette: instant fire of graphic video overlays
Unlimited playlists scheduling, featuring auto firing by day and time and forced event
support.
Scheduling of video overlays for any event in the playlist.
Moviejay on-air module and related scheduling/setup features are included in the same
application for maximum easy of use. Of course, thanks to Windows built-in networking
features, sharing computers resources in the network, access and modify information
stored in the on air PC working from the production studio PC or from the Internet.
Scheduling commercial breaks or transfer audio tracks from the production workstation to
the on air studio is simple and fast as a few mouse clicks!
To be continued with more exciting features… stay tuned!!!
Page 3
Quickstart
Here is a short summary of basic operations for speeding up Moviejay initial setup. For
further details we strongly suggest you to carefully read the user’s manual!
If you wish to use Moviejay in a networked environment, the Windows network should
already have been correctly setup and running, and the hard disks on the on air PC (the
boot one and those with video clips) should be shared for network read/write.
Installing your customized USB dongle: Before you insert the USB dongle, run the
SmartKeyDriversInstaller.exe found in the “\drivers\smartkey3” folder into the setup CD.
Then, insert the USB dongle in one of the available USB ports. The dongle is automatically
recognized and installed.
Installing MoviejayLP
1. Insert the installation CD in your CD-ROM drive.
2. Double click on the setup.exe file in the “moviejayLP” folder to start setup.
3. Follow the on-screen guided instructions which will guide you for the rest of the setup
procedure.
4. Copy the wjlogo.bmp file from the main folder of your installation CD to MoviejayLP
installation folder (usually c:\program files\moviejayLP if you choose the default one).
This file is your station logo which is needed for software customization.
5. Click “Start”, “MoviejayLP”, “MoviejayLP” to start the on-air module, which should start
without any problems, then click on “Edit1”, click on the “Setup” button and proceed to
perform initial system setup and configuring your video playout card, etc.
Once you’re done with setup and initial testing, we strongly suggest you to fine tune your
system setup for best performance:
Disable screen savers and power saving modes: from the Windows desktop, click the
mouse right button, select “properties”, click on “screen saver” tab, and from the dropdown menu select “none”. In the “Screen power saving setup” section, click on “setting”
and from the drop down menus “turn down monitor” and “disable hard disks” select
“Never”.
Add MoviejayLP to Windows autostart group, so the software will automatically restart
after a power failure.
In your PC BIOS setup screen, set the “AC Power Loss Restart” (o similar) feature
such as your PC turns on again automatically after a power failure.
Page 4
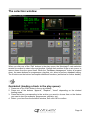
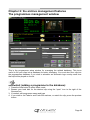
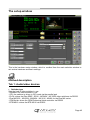
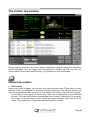
Chapter 1: the “on air” window
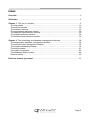
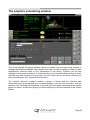
This is MoviejayLP main window: from here you recall clips, programmes and playlists,
read every detail about the current playlist, clip currently playing on the air, and following
clips in the play queue. That’s why it is shown on program startup and for the most part of
program execution. From top to bottom we find:
An upper display, which shows elapsed and remain time for the clip currently playing
on the air, plus various details.
A group of 5 boxes, each one corresponding to an the item in the play queue, with its
own Play, Select and preview buttons.
A bottom display, which shows current date and time, auto fire time of next playlist and
next forced event, and on the right, your station logo.
Page 5
Detailed description
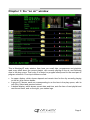
Auto Seq indication (upper display)
Shows the clips’ sequencing mode which can be switched with the Auto Seq
button or automatically when you start playing a video clip. For further details,
please see below the section about the Auto Seq button.
Automation indication (upper display)
Shows the on air mode (i.e. how cips are loaded in the play queue), which is
automatically changed when a playlist is loaded or unloaded. In “live” mode you must
manually load clips in the play queue, while in automation mode (i.e. when a playlist has
been loaded) tracks are added automatically without the need of an operator, for a fully
unmanned operation.
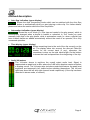
Time display (upper display)
Shows remaining time to the end of the clip currently on the
air. The display takes into account the user-set Fade-Out
marker for the current track (if any), otherwise, the
countdown is done on the total track length. On the bottom
is shown the track’s elapsed time from beginning of the clip.
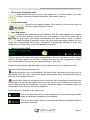
Audio VU-meters
The VU-meter shows in real-time the overall output audio level. Signal is
represented as peak level in dBs, where the 0 dB is the absolute maximum before
a clipping occurs. The VU-meter also includes a peak-hold feature: the peak level
segments are temporarily left visible before resetting themselves. The left and
right bars show the left and right channel levels respectively (if the clip has been
recorded in stereo mode, of course!).
Page 6
On air track Play/Stop button
Stops/restarts the clip currently on air (upper box). This turns useful if you want
to stop a clip which started accidentally, and restart it later on.
Clip palette button
Shows the clip palette window, from which you can overlay logos on
the clip currently playing on the air.
Auto Seq button
Switches clips’ sequencing mode between Auto Seq and manual: this is shown
in the upper display, on the left of the time display. In “Auto Seq” mode clips in
the play queue will started automatically one after another, while in manual
mode MoviejayLP plays the current clip, then stops and keeps waiting until you
press the corresponding Play button. MoviejayLP automatically switches to Auto Seq
mode when you start a clip, to avoid unpleasant oversights.
Boxes On Air/1/2/3/4/5
This is a group of 6 boxes, each one corresponding to the on air clip and one of the next 5
tracks in the play queue. On the left it is shown title and clip type (programme, playlist,
etc.).In the middle of the box an icon corresponding to each clip.
By performing a simple drag-and-drop you may easily move a box to another position.
Meaning of the Sequencing mode icon:
Normal sequence, force mode disabled: the item will be fired when the previous one in
the playlist ends. Of course, should the playlist accumulates delay, the scheduled time for
the item will be delayed as well.
Forced mode: when the scheduled time for the item will be reached, all previous items
in the playlist (if any) will be skipped, the clip on the air now will be faded out and this one
will be played on the air immediately. This way, should the playlist accumulates delay, the
scheduled time for the item will be fully observed.
In the same box, symbols on the right mean:
This is the expected start time of the related item, according to any possible
delay accumulated comparing to the schedule.
This is the item length, which is calculated as difference between fade-out
and fade-in markers.
Page 7
Play buttons 1/2/3/4/5
Start playing the track shown in the corresponding box on the right of the button:
the track moves to the on air box (the top one), the track previously on air is
automatically exchanged with the next one, and the play queue shifts one step
up.
Edit buttons 1/2/3/4/5
Open main selection window, from which you can recall clips or playlists that you
wish to load in the play queue.
Preview buttons 1/2/3/4/5
Open the preview window for the clip shown in the corresponding box: from
there you can preview the clip and eventually edit its fade-in and fade-out
markers.
Up/Down buttons
While you can add to the play queue a great number of tracks, it can
only show only 6 tracks at the same (the on air one and the next 5) in
the 6 available boxes. The Up/Down buttons can shift up and down play
queue viewing point if the queue itself contains more than 5 tracks
(otherwise they have no effect). Boxes data as well as queue positions shown on the Play
and Open buttons are automatically updated according to the actual track position in the
play queue. Keeping the button pressed an auto-repeat feature is started (i.e. same as
clicking the button again and again).
Next playlist indication (bottom display)
Indicates stat time and denomination of next scheduled
playlist. If you click on the start time display, the playlist
selection window will open and the corresponding playlist will be shown. If you click the OK
button into the playlist window, you can as well load the playlist into the play queue.
Date and time indication (bottom display)
Shows current date and time.
Your TV station logo (bottom display)
Clicking on the logo a secret panel appears showing some scrolling informations about the
software and the current version. At the end, your logo appears again automatically. To
avoid that MoviejayLP stops execution in presence of minor errors, error messages are
shown in the same area reserved to the broadcaster logo and at the same time logged for
future reference in a text file named wjerror.log, found in the installation folder, instead of
opening a message box. Once you’ve noted the error message, just double click on the
shown messages to return to the visualization of the logo.
Page 8
Space bar
Same as pressing “Play 1” button: starts the first clip in the play queue.
Enter key
Same as pressing “Play/stop” button: stops/restarts the clip currently playing on-air.
Page 9
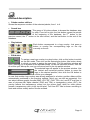
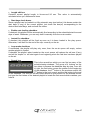
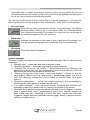
The clip palette
When the clip palette is called from the main on-air module, the following window will be
shown. The clip palette allows to instantly fire short logo overlays on the clips currently
playing on the air.
From top to bottom of the screen, you’ll find:
Indications for the current palette number, and the search buttons, to locate the desired
palette.
A group of 12 buttons, each one corresponding to one of the overlay logos contained in
the selected palette.
Another group of buttons to manage additional features and to close the window.
Page 10
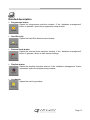
Detailed description
Palette number edit box
Shows the sequence number of the selected palette, from 1 to 4.
Search box
previous record, the 3rd
database.
This group of 4 buttons allows to browse the database step
by step. From left to right, the first button moves the pointer
to the beginning of the database, the 2nd button to the
button to the next record, and the last button to the end of the
Play buttons
Each button corresponds to a logo overlay. Just press a
button to overlay the corresponding logo on the clip
currently on the air.
Edit button
To assign a new logo overlay to a play button, click on this button to switch
on the edit mode. Then click on the desired play button (the button where
to which you want to assign the new logo). The file selection window will
open, allowing you to browse for the desired bitmap. On the file selection window, click OK
to confirm your bitmap file, and you will return back to the clip palette window.
The selected logo will appear in the preview window. Use
the vertical and horizontal position sliders to move the
logo to the desired position, then click the OK button to
confirm your changes.
In case that another logo overlay was already assigned to a button, position sliders will be
automatically positioned in the previous settings, which you can edit as requested. You
can select various graphic formats (BMP, JPG, GIF, PNG, TGA, etc.) and RTF text files. In
case of pictures with Alpha channel (PNG and TGA) or transparency colour (GIF), the
overlay reflects the transparency stored into the picture itself, while for other picture
formats, transparency colour is the top-left pixel. Text from RTF files is shown according to
fonts and colours exactly as the file was created.
Page 11
Station Logo button
Click on this button to switch on/off the overlay of the station logo set in
MoviejayLP setup window.
Clear logo button
Click on this button when you wish to stop the logo overlays fired from the
clip palette or from the programmes’ timeline.
OK button
Closes the clip palette window.
Page 12
The preview window
By clicking on the preview buttons from the main on-air screen, on the bottom part of the
screen the preview window is shown, which allows you to edit fade markers or simply
preview the corresponding clip in a VGA window without affecting the on-air channel. Any
changes made on this window will only be effective for that occurrence of the track in the
play queue: data stored in database tables will not be affected in any way.
Quickstart (setting Start and End markers):
1.
2.
3.
4.
Press “Play/Pause” button to start playing.
Move to the desired marker with the slider, Rew - Fwd - Fast Rew - Fast Fwd buttons.
Press the “Set Start” button to set the Fade-In marker
Press the “Play/Pause” button to restart playing, if you wish you may check your setting
pressing the corresponding “Go Start” button to restart playing from the marker you’ve
just set.
5. If you wish, repeat steps 2 - 3 - 4 to set Fade-out marker.
6. Press the OK button to confirm changes when you’re done.
Page 13
Detailed description
Display
On the upper display, starting from the left you can see the displays related to fade
markers and clip duration: on the right the elapsed and remain time to the end of the clip.
Slider
While the track is playing, just click and
drag this slider to the left or right to
change the clip playing position.
Set Start button
Click on this button to set the Fade-In marker for the clip being previewed.
While the clip is playing, press and release the button when the clip is
exactly positioned on the desired Fade-In position. The set marker will be
shown on the corresponding display on the right of the button. You may also manually edit
values directly on the displays if you wish.
Set End button
Click on this button to set the Fade-Out marker for the clip being
previewed. While the clip is playing, press and release the button when the
clip is exactly positioned on the desired Fade-Out position. The set marker
will be shown on the corresponding display on the right of the button. You may also
manually edit values directly on the displays if you wish.
Go Start button
Click on this button to change the track’s playing position to the user-set
Fade-In marker: this way, you may easily check your Fade-In settings.
Go End button
Click on this button to change the track’s playing position to the user-set
Fade-Out marker: this way, you may easily check your Fade-Out settings.
Page 14
Logo start button
Click on this button to set the start overlay marker on the the clip being
previewed. While the clip is playing, press and release the button when the
clip is exactly positioned on the desired position. The set marker will be
shown on the corresponding display on the right of the button. You may also manually edit
values directly on the displays if you wish.
Logo end button
Like above, sets the end overlay marker.
Play/Pause button
Starts/stops playing the current video track in the preview
window. While in frame still mode, pressing the button
resumes normal play mode.
Rew/Fwd/Fast Rew/Fast Fwd buttons
This group of 4 buttons switches to still frame mode and
changes track’s playing position, allowing extremely precise
cueing of any video track before setting markers:
1.
2.
3.
4.
Rew: 100 milliseconds back
Fwd: 100 milliseconds forward
Fast Rew: 500 milliseconds back
Fast Fwd: 500 milliseconds forward
Cancel button
Cancels changes and closes the preview window.
OK button
Confirms changes and closes the preview window.
Page 15
The selection window
When you click one of the “Edit” buttons in the play queue, the MoviejayLP main selection
window is recalled to select clips and playlists, change their position in the on air queue, or
remove items from the queue itself. When the “Database management” button is pressed
down, the same buttons for programmes, playlists, etc. allow to perform database editing.
The 6 buttons on the bottom accomplish additional functions (see below for further details).
Quickstart (loading a track in the play queue):
1. Press one of the “Edit” button in the on air window.
2. Press one of the buttons “Append”, “Replace”, “Insert” depending on the desired
loading mode.
3. Press the button corresponding to the archive you want to choose from or the feature
you want to load (for example, programmes, playlists, etc).
4. Select your item from the selection window, then click OK to confirm.
Page 16
Detailed description
Programmes button
Opens the programmes selection window. If the “database management”
button is pressed, opens the programmes setup window.
Hard Disk clip
Opens the Hard Disk direct browse window.
External feeds button
Opens the external feeds selection window. If the “database management”
button is pressed, allows to edit channel settings.
Playlists button
Opens the playlists selection window. If the “database management” button
is pressed, opens the playlists setup window.
Log button
Opens the event log window.
Page 17
Setup button
Recalls the system setup window.
Database management button
If you click on this button before opening some of the selection windows,
those windows will be shown in database edit mode. For example, the
programmes database management window will open instead of
programmes selection window.
Append button
Appends the selection to the end of the play queue, and increments the
length of the queue itself by one item.
Replace button
Replaces the selection to the previous item in the box, if any. This is the
default selection option.
Insert button
Inserts the selection in the box corresponding to the “Edit” button pressed;
the queue shifts one step down.
Page 18
Select skin button
Graphic layout of Moviejay is based on “skins”: these are packages of
graphics components which are used to customize software appearance,
from dialog windows to buttons, menus, labels, etc. Thanks to skins, the user
interface can be made good looking according to your own taste. Moviejay
includes a folder with several “skins”: click on this button and browse your
skin folder to select your favorite one. Some examples of skins:
Page 19
Delete button
Removes the item in the box corresponding to the “Edit” button pressed.
Delete Playlist button
Removes the loaded playlist(s) and switches back to “Live” mode (live assist,
manual selection). Moviejay continues to play the clip currently on the air, if
any, and removes any track in the play queue if they belong to a playlist.
Cancel button
Cancel operations and closes the selection window.
Page 20
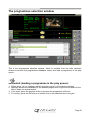
The programmes selection window
This is the programmes selection window, which is recalled from the main selection
window to browse the programmes database, select and load a programme in the play
queue.
Quickstart (loading a programme in the play queue):
1. Follow items 1-4 for “loading a track in the play queue” in the selection window
2. Manually browse the database for the desired programme or type the first letters of the
title to locate the closest match.
3. If you want, press the preview button to preview the programme off the air.
4. To confirm, press the OK button or double click on the selected item in the grid.
Page 21
Detailed description:
Programmes list
The grid shows the list of programmes in the database ordered by title. From left to right:
programme title, category, length.
Quick search box
Type here the first letters of the desired programme to locate the first record that matches
your criteria.
Preview button
Recalls the preview window for the current programme.
Cancel button
Cancels operations and closes the programmes selection window.
OK button
Confirms operations, loads the selected programme in the play queue and
closes the programme selection window.
Troubleshooting:
Before loading the selected programme in the play queue, MoviejayLP performs a file
existence check to see if the video file can be accessed. If the check fails, a dialog box is
shown to warn the user about the problem. In this case, click on the box to close it, select
another programme or press the cancel button to close the selection window.
Page 22
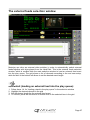
The Hard Disk clip selection window
This window allows to select a clip directly from the Hard Disk, without the need to file the
clip itself to the programmes database first.
Quickstart (loading a clip from the Hard Disk):
1.
2.
3.
4.
Follow items 1-4 for “loading a track in the play queue” in the selection window
Select the folder to browse for the desired clip.
Highlight your favourite clip from the list on the right
To confirm, press the OK button or double click on the selected item in the grid.
Page 23
The playlist selection window
This is the playlist selection window, which is recalled from the main selection window to
browse the playlists database, select and load the playlist in the play queue. On the top of
the window a group of boxes shows general informations about the currently selected
playlist, while in the bottom a grid shows the playlist’s details.
Quickstart (loading a playlist in the play queue):
1.
2.
3.
4.
Follow items 1-4 for “loading a track in the play queue” in the selection window
Browse the database for the desired playlist using the search box.
If you want, highlight an item to set the playlist start point
Press the OK button to confirm: the choosen playlist replaces the one currently on air
(if any).
Page 24
Detailed description:
Playlist name box
Shows the name of the selected playlist, according to the user setup.
Quick search box
Type here the first letters of the desired playlist to locate the first record which matches
your criteria.
Length edit box
Shows current playlist length in hh:mm:ss:1/10 sec.
Start time boxes
Shows auto fire time and day(s) of week of the currently selected playlist (if set).
Playlist details
The grid shows the full list of the video tracks contained in the selected playlist. The first
column shows the item type (clip, commercial, programme, etc.); the second column
shows details such as programme title or clip’s filename, the third column shows the item
length, the 4th one the scheduled start time.
Meaning of the icons in the 5th column (Force Mode)
Normal sequence, force mode disabled: the item will be fired when the previous one in
the playlist ends. Of course, should the playlist accumulates delay, the scheduled time for
the item will be delayed as well.
Forced mode: when the scheduled time for the item will be reached, all previous items
in the playlist (if any) will be skipped, the clip on the air now will be faded out and this one
will be played on the air immediately. This way, should the playlist accumulates delay, the
scheduled time for the item will be fully observed.
You may navigate the list with the arrows on the right, and choose the starting point of the
playlist highlighting the desidered item before pressing OK.
Page 25
Cancel button
Cancels operations and closes the playlists selection window.
OK button
Confirms operations, loads the selected playlist in the play queue and
closes the selection window.
Page 26
The external feeds selection window
Moviejay can drive an external video switcher in order to automatically switch external
feeds together with clips played from the Hard Disk. This is the external feeds selection
window, which is recalled from the main selection window to load an external feed event
into the play queue. The grid shows a list of channels according to the end user setup,
while the box in the bottom left allows to set the desired event length.
Quickstart (loading an external feed into the play queue):
1.
2.
3.
4.
Follow items 1-4 for “loading a track in the play queue” in the selection window
Highlight the desired channel in the grid
Set the desired length for the external feed event
To confirm, press the OK button or double click on the selected item in the grid.
Page 27
Detailed description
Channel list
The grid shows the list of user set channels according to the video switcher in use. From
left to right, channel name, Input, Output.
Event length
Insert here the desired length to be assigned to the external feed event.
Cancel button
Cancels operations and closes the external feeds selection window.
OK button
Confirms selection, loads the external feed event into the play queue and
closes the selection window.
Page 28
Chapter 2: the archive management features
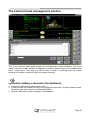
The programmes management window
This is the programmes setup window for managing the related database. This turns
useful to file your clips into a database for better managing. You must also file a clip into
the programmes database if you wish to schedule an automatic logo overlay each time
that clip will be played on the air.
Quickstart (adding a programme to the database):
1. Press the New button to enter insert mode.
2. Browse your hard disk for the desired clip using the “open” icon to the right of the
filename box.
3. If needed, edit programme name and type
4. If you wish to set Fade-In and Fade-Out markers, or watch the clip, press the preview
button.
Page 29
5. If you wish to automatically schedule a logo overlay each time this programme will be
played on the air, click on the button on the right of the logo filename box to select your
bitmap. The selected logo will appear into the preview window. Then use the vertical
and horizontal position slider to move your logo on the screen
6. Press the OK button to confirm when done.
Detailed description
Filename edit box
Contains the filename of the current programme, with full path info. Click on the “open”
icon on the right of the edit box: a standard “file open” dialog window will appear to let you
browse your disk for the desired clip. The name for the programme is automatically filled
from the clip filename, but of course, you can always edit field contents if necessary.
Programme name box
The box contains the name assigned to the programme. This is automatically filled from
the clip filename, but of course, you can always edit field contents if necessary.
Category edit box
Sets the category to assign to the current programme. Click on the arrow icon on the right
of the edit box and choose one of the available items from the drop-down list. This
information turns very useful for easier filtering during live assist. To edit categories, click
the button on the left of this same box to show the related edit buttons.
Adding a new category
Clicl the button with the + symbol, type the new denomination into the box, then click the
button with the check symbol to confirm or the button with the X symbol to cancel.
Editing an existing category
Select the category that you wish to edit, click the button with the up arrow sign, type the
new denomination into the box, then click the button with the check symbol to confirm or
the button with the X symbol to cancel.
Deleting an existing category
Select the category that you wish to delete, then click the button with the minus symbol to
confirm.
Page 30
Length edit box
Contains current programme length in hh:mm:ss:1/10 sec. This value is automatically filled
in as soon as you select the clip from the Hard Disk.
Fade In box
Contains current programme Fade In marker in hh:mm:ss:1/10 sec. This value is set to
00:00:00.0 when you select the clip from the Hard Disk but it is automatically updated once
you set the start marker in the preview window and confirm changes. If you don’t set the
Fade In value, the programme will be played from the very beginning of the file (this is
normal unless you want to cut unwanted segments).
Fade Out box
Contains current programme Fade Out marker in hh:mm:ss:1/10 sec. This value is set to
the programme length when you select the clip from the Hard Disk, but it is automatically
updated once you set the Fade-Out value in the preview window and confirm changes. If
you don’t set the Fade Out value, the programme will be played until the very end of the
file.
Create Index File checkbox
If MoviejayLP is working with a Stradis card, should you wish to start playing the clip from
any desired marker, the card itself needs to generate an index for the current clip. If so,
you should check this box before posting your changes to the database.
Logo filename edit box
Contains the filename for a logo which will be automatically scheduled overlayed each
time this programme will be played on the air. Click on the button on the right of the logo
filename box to select your bitmap. The selected logo will appear into the preview window.
Then use the vertical and horizontal position slider to move your logo on the screen.
Logo start box
Contains the start overlay marker for the selected logo. This value is initially set to
00:00:00.0 and can be updated from the preview window. If the start overlay marker is not
set, the logo is overlayed from the very start of the clip.
Logo end box
Contains the end overlay marker for the selected logo. This value is initially set to the
same length of the clip, and can be updated from the preview window. If the end overlay
marker is not set, the logo is overlayed until the end of the clip.
Reports button
Shows the programmes report print preview window.
Page 31
Preview button
Open the preview window for the current programme, from which you can
preview the clip and edit its fade-in and fade-out markers and start/end
overlay markers.
New button
Switches the database to insert mode to add a new programme.
Edit button
Switches the database to edit mode, to edit fields for the current
programme.
Delete button
Deletes the currently selected programme. You’ll see two dialog boxes: the
first one will ask you to confirm database record deletion, the second one
will ask you to confirm the clip deletion from the hard disk. When you
delete a programme, it will be also automatically removed from any playlist where it is
contained.
Cancel button
Cancels updates to the current record and switches back to browse mode.
OK button
Confirms updates and returns to browse mode. If you are already in
browse mode, closes the programmes setup window.
Hint:
Programme categories are internally handled as numeric autoincrement codes so, if
you make a mistake when editing an existing type, don’t delete it but just make your
changes in the box. If you delete the type and add a new instance of the same type,
the record will be assigned a new numeric code, so it will be treated as it was a
compeletely different type: any programme with the old category will just have a blank
type field and would need to be reassigned.
Page 32
The external feeds management window
This is the external feeds setup window for managing the related database. This turns
useful to set your matrix switcher configuration, namely channel name and corresponding
input / output pairs. That way, you will be able to recall a switching event by simply
referring to its name, instead of input and output channels.
Quickstart (adding a channel to the database):
1. Press the New button to enter insert mode.
2. A new item will be created into the grid. Highlight the new item, and type channel name
as well as input and output in corresponding fields.
3. Click the OK button to post changes to the database.
Page 33
Detailed description
Channel list
The grid shows the list of user set channels according to the video switcher in use. From
left to right, channel name, Input, Output.
New button
Switches the database to insert mode to add a new channel.
Edit button
Switches the database to edit mode, to edit fields for the current channel.
Delete button
Deletes the currently selected channel. A dialog box will ask you to confirm
database record deletion. When you delete a channel, it will be also
automatically removed from any playlist where it was contained.
Cancel button
Cancels operations and closes the external feeds setup window.
OK button
Confirms changes and closes the selection window.
Page 34
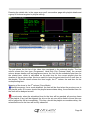
The playlists scheduling window
This is the playlists scheduling window, which is recalled from the main setup window to
manage the playlists database. Each playlist can hold a virtually unlimited number of clips,
programmes, external feeds or any combination of the above. Playlists can be fired
manually in live-assist operations, or automatically on the scheduled time and day of week.
Playlists may also be played in loop mode, so you’ll never risk to rest without anything on
the air just because your schedule was too short.
The “playlist selection” window contains a group of boxes with the relevant data
concerning the current playlists such as denomination, auto fire time and days, auto-fire
switches, etc. Pressing the details tab, a grid with the list of items contained in the current
playlist is shown, as well as a group of controls allowing to edit the contents of the current
playlist.
Page 35
Quickstart (setting up a playlist):
In the following example we’ll add to the database a quite comprehensive playlist which
will be automatically fired on Sunday and Tuesday at 10.00.00 AM. You’ll find here a
bunch of examples to satisfy any possible requirement. Of course, you cannot add/remove
items when database is in browse mode, but you must first enter insert or edit mode.
1. Press the New button to enter insert mode.
2. Enter the playlist name in the edit box, enter 10.00.00 as start time and check Sun and
Tue boxes in the start days group.
3. Click on the “details” tab to see the playlist contents grid, which will be of course empty.
4. We are now going to add a programme: click the Add Program button to open the
programmes database management window. Browse the database for the desired
programme, then click on the “OK” button to confirm. You’ll see your programme in the
upper grid, meaning it has been added to the playlist.
5. We are now going to add a clip directly from the Hard Disk. Click the Add from Hard
Disk button to open the related window. Browse your hard disk for the desired item,
then click on the “OK” button to confirm. You’ll see your file in the upper grid, just after
the programme added before, meaning it has been added to the playlist.
6. Finally let’s add an external feed: Click on the Add switching button to open the
External Feeds selection window. Select your desired channel, enter the desired length
for your external event, then click on “OK” to confirm. You’ll see your external feed in
the upper grid at the end of the playlist.
7. Now we have a playlist with 1) a programme 2) a clip from Hard Disk 3) an external
feed. This playlist automatically starts on Sunday and Tuesday at 10.00.00 AM, or can
be manually started at will.
8. Repeat the above steps at will to add more items, then switch back on the playlist
selection tab and press the OK button to confirm changes.
Detailed description
Playlist name edit box
Contains the name of the current playlist.
Start time edit box
It is possible to manually load a playlist in the on air queue quite the same way as
programmes, clips from Hard Disk, etc., but a playlist can also be loaded in full automation
on a scheduled time and day of week. This box contains the auto-start time for the current
playlist in hh.mm.ss.
Page 36
Length edit box
Contains current playlist length in hh:mm:ss:1/10 sec. This value is automatically
calculated when you add/remove items.
Start days check boxes
Since a playlist can be loaded in a fully automatic way (see before), this boxes contain the
start days (if any) of the current playlist: just check the box(es) corresponding to the
desired auto-start days, and uncheck the others.
Enable auto loading checkbox
If checked, this playlist will be automatically fired according to the scheduled start time and
days of week. Otherwise, you can only load it manually from the on-air module.
Instant fire checkbox
If checked, this playlist will be fired as soon as it is been loaded in the play queue.
Otherwise, it will wait for the end of the clip currently on the air.
Loop mode checkbox
If unchecked, the playlist will play only once, then the on-air queue will empty, unless
another playlist is loaded.
If checked, the playlist, when loaded on the on-air queue, will replace the old one (if any)
and will be looped i.e. will start again from beginning when the last item has been played
on the air.
Search box
This is the search box which you can find on many of the
selection/setup windows. The group of 4 buttons on the
top allows to browse the database step by step. From left
to right, the first button moves the pointer to the beginning
of the database, the 2nd button to the previous record, the
3rd button to the next record, and the last button to the end
of the database. The text box on the bottom allows to quick search for the desired record:
just type the first letters of the desired playlist to locate the first record which matches your
criteria.
Page 37
Reports button
Shows the playlists report print preview window. This is useful to printe a
list of filed playlists complete with auto-fire data (days, time).
New button
Switches the database to insert mode to add a new playlist.
Edit button
Switches the database to edit mode, to edit fields for the current playlist.
Delete button
Deletes the currently selected playlist. A dialog box will appear asking you
to confirm playlist deletion. Of course, any item included in the current
playlist (programmes, hard disk clips, etc.) will be left intact!
Cancel button
Cancels changes to the current playlist.
OK button
Confirms changes and switches back to browse mode. If you are already in
browse mode, closes the playlist setup window.
Page 38
Pressing the details tab, in the upper area you’ll see another page with playlist details and
a group of buttons targeted to playlist editing:
The grid shows the full list of the video clips contained in the selected playlist. The first
column shows the item type (Programme, Hard Disk Clip, External feed); the second
column shows details such as programme name, the 3rd one the scheduled start time for
the related item, which is calculated on the start time for the current playlist plus the
duration of the previous clips: this turns useful to know the exact start time of each item in
the playlist. The 4th column shows the item length, the 5th column the end time for the
corresponding item.
Meaning of the icons in the 6th column (Force Mode)
Normal sequence, force mode disabled: the item will be fired when the previous one in
the playlist ends. Of course, should the playlist accumulates delay, the scheduled time for
the item will be delayed as well.
Forced mode: when the scheduled time for the item will be reached, all previous items
in the playlist (if any) will be skipped, the clip on the air now will be faded out and this one
will be played on the air immediately. This way, should the playlist accumulates delay, the
scheduled time for the item will be fully observed.
Page 39
Should you wish to force an event at your favourite time:
1. Click on the blue arrow to change the force mode to Forced
2. Move to the Start Time column and change the start time according to your
requirements
3. Click on any other column (for example Details) so that the start time for the items in
the playlist will be updated according to the forced event.
Preview button
Opens the preview window for the current programme or Hard Disk Clip,
allowing you to preview the selected clip off the air.
Print button
Shows the playlist report print preview window. This will print a list of the
items which constitutes the current playlist.
Up/Down buttons
Press one of these buttons to shift one step up or down the selected item in
the playlist.
Copy from playlist
This box allows to copy and paste items from another
playlist already filed. Select the playlist from the
combobox, then click on the button on the right; all items
from the selected playlist will be copied and pasted into the playlist you are currently
editing.
Delete button
This button allows to remove from the playlist the currently selected item
Empty button
This button allows to empty the playlist. A dialog box will appear asking
you to confirm operation.
Page 40
Update schedule button
Click on this button should need arises to update start time for items into
the current playlist.
Troubleshooting:
The on-air module searches for the following scheduled playlist in 1 minute interval: for
such a reason, start time of playlists programmed for the same day of the week must
be distanced at least 1 minute, otherwise the next playlist may not be loaded in the
queue.
If the queue contains tracks belonging to other playlists, these are automatically
removed from the queue when a new playlist is loaded in loop mode.
You can also add items into the playlist with with a simple drag-and-drop, drag a clip
from Windows’ Explorer (or other applications) into the playlist grid, into the desired
position. The new clip will be treated as “Hard Disk Clip”. When you finish editing, just
press the OK button to confirm edits.
Page 41
The setup window
This is the hardware setup window, which is recalled from the main selection window to
set various hardware and basic settings.
Detailed description
Tab 1: Audio/video devices
Switcher type
Sets the kind of video switcher in use:
- Disabled: No video switcher in use
- GPI: the switcher is driven in GPI mode via the parallel port
- ELCA: drives the Elca SR8P - SR16 - MC2424 - MC 3225 video switchers via RS232
- Elca MX3232 - MX3224 - MX2424 - MX1616 - MX88, for the Elca MX series
- CEM Ibrida: drives the CEM Elettronica Ibrida controller via RS232
- BTS MS16: drives the BTS MS16 via RS232
Page 42
- Elpro SAVIS204: drives the Elpro SAVIS204 via RS232
- Kramer Protocol2000: as above, for any Protocol2000 compatible Kramer switcher.
- Knox Video RS16x16HB, for the indicated Knox switcher
- Pesa Bobcat, for the indicated Pesa series
- Inday RGB4X-RS - DA4X-RS - AV4X-RS, for the indicated Inday switchers
Switcher COM Port
You must specify here the COM Port to use for driving your video switcher.
Playout card box
Allows to specify the playout card in use:
- VGA window: implements multiformat, seamless back-to-back DirectX support for inwindow video (video output is only available on the on-screen window).
- VGA TV Out: implements multiformat, seamless back-to-back DirectX support for DualHead VGA cards (video output is directed to the in-window VGA as well as in full-screen
mode on the TV output
- Stradis (STC mode) for Stradis cards, in compatible mode using the System Time Clock
as time base. This is intended for use should your video clips clip contains erratic
timecodes
- Stradis (Timecode mode) for Stradis cards, using the clip built-in timecode for time
reference
- Stradis (DirectX mode) for Stradis cards, in DirectX mode. Does not require an MPEG2
index to be generated for each new clip, but currently does not allow titling features.
- XCard implements support of Sigma Designs RealMagic XCard via Microsoft DirectX
(MPEG1/2 / DivX clips) as well as Vela Cineview II (MPEG1/2)
- Focus Harmony 4ES implements support for Focus Enhancements Harmony 4ES cards
(video output is always directed to channel 1)
- Blackmagic Decklink implements multiformat, seamless back-to-back DirectX support for
Decklink cards (video output is directed to the in-window VGA as well as in full-screen
mode on the card’s video output).
- Vela Cineview Pro LT implements support for Vela Cineview Pro LT hardware based
MPEG2 decoders
Page 43
Video standard
For Stradis and Vela Cineview Pro LT cards only, allows to set the analog video standard
(PAL, NTSC, etc.). Please note that not all standards may be available depending on the
specific card in use.
Decoder ID
For a multichannel playout, sets the card’s ID for the current channel. When Stradis cards
are used, from 1st to 4th card. With Harmony 4ES, from 1 to 16, for example: 1 = Harmony
4ES 1st card, 1st channel – 5 = Harmony 4ES 2nd card, 1st channel - 12 = Harmony 4ES
3rd card, 4th channel. With Blackmagic cards, in this box all the available cards and related
video mode are directly listed (for example Decklink Pro SDI & NTSC/PAL).
Digital input
If a video switcher is used, this box allows to specify the video input to switch when
Moviejay plays a clip from the Hard Disk. This is of course, the channel where the output
from the playout card is connected.
Cue sound card
Allows to select the soundcard for the preview audio output. Click on the icon on the
combo box and choose one of the available cards from the drop-down list.
Tab 2: Triggers
Triggers are contact or relay closures on the joystick port found on PC’s sound card.
Thanks to triggers, you’ll be able to fire playlists or simply make the play queue advance
like when you press a play button or hit the space bar.
Since playlists can contain virtually any kind of event (including external feeds), you’ll be
able to open or close external feeds by relay closure and so you may broadcast news or
other stuff from satellite feeds in a totally automatic way.
The four green LEDs on the main screen will be lit when the corresponding trigger is
closed; this will allow you to test your triggers setup on the joystick port.
To assign a playlist or a Play event to a trigger:
Press the “Edit” button to enter edit mode
Use the drop down menus to select the desired action (Disabled, Play of next event, or
Load Playlist)
Press the “OK” button to confirm.
Page 44
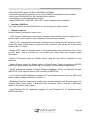
For the trigger feature to work correctly,
first of all you should connect to the
joystick port using the diagram on the left
(for the preliminary checks you may also
wish to use an ordinary joystick). You also
have to add some 100 K-Ohm resistors
between pins 1-3, 1-6, 9-11, 9-13:
otherwise Window will report the joystick
as “not connected” and triggers won’t
work. You should also jump together pin
12 with pin 4 (or 5).
In order to complete your setup, you should install joystick drivers:
From Windows control panel, double click on the “joysticks” icon.
For Windows2000/XP, click on “Add”, select “2 Joysticks 2-axys 2-buttons on the
same port”, then click “OK”.
In the “Joysticks” window you should now see the list of the ones you’ve just added. If
they’re working fine, in the “Status” column you should see “OK”.
Tab 3: On Air capture
MoviejayLP features a live video capture feature which turns useful to monitor any
incoming video (like your own live broadcast) using any DirectX compatible TV or video
capture card.
Enable video capture
Enables the on-air video capture feature with the associated capture card.
Video capture card
Click on the icon on the right of the edit box and select the capture card to use from the
drop-down list.
Analog standard
Allows to set the analog video standard (PAL, NTSC, etc.) for the video capture card.
Video Input
Sets the video input channel for the capture card (for example composite or S-Video).
Page 45
Video Size
Sets the video size for the live video capture window. Usually, hal screen resolution values
around 320x240 have proven appropriate. Click on the icon on the right of the edit box and
choose one of the available sizes from the drop-down list.
Tab 4: Station logo
Here you may set a bitmap logo which will be automatically overlayed to all clips on the air,
and which you can switch on and off from the clip palette. Click on the button on the right
of the logo filename box to select your bitmap. The selected logo will appear into the
preview window. Then use the vertical and horizontal position slider to move your logo on
the screen, and click OK to confirm changes.
Tab 5: Streaming
MoviejayLP multiformat playout engine allows realtime streaming to the Internet in
Windows Media Video format at the same time as clips are playing into the queue and
without requiring a dedicated streaming server. In this panel it is possible to specify related
settings.
Streaming mode
Sets the streaming mode:
- Disabled: streaming is disabled (this way you save CPU power).
- HTTP: performs direct streaming to the Internet (it is possible to watch the stream with
Windows Media Player, connecting to the playout server’s IP address.
- MMS/RTSP: performs streaming to a Windows Media Publishing point (that you need
to specify into the related box).
Streaming server
Sets the Windows Media Publishing Point address, to which the streaming will be sent.
Streaming profile
Allows to select the streaming profile (.prx file) created by Windows Media Encoder. This
file contains all the encoding settings.
HTTP port
Sets the HTTP port to be used in streaming mode.
Tab 6: Various
Language
Moviejay is multilinguage and any caption used in the software is read from a text file you
can easily tailor to your needs, or copy-and-paste to create new languages. The software
comes with English and Italian LNG language files. To edit your default language, just
select your favourite one from the available languages in the drop-down box.
Page 46
Always check clips length
If checked, clips’ length will be automatically verified and updated each time a clip will be
loaded in the play queue and will be positioned on Play 1. This little slows down the
software, but turns useful when you wish to overwrite clips with the same filename, without
having to edit your playlists.
Edit button
Switches to edit mode to edit fields in the setup window.
Cancel button
Cancels changes and closes the setup window.
OK button
Confirms changes and closes the setup window.
Page 47
The station log window
During program execution, all events (tracks broadcasted, playlist loading and unloading,
system messages, etc.) are logged and timestamped to monthly log files. Any time you
need to have a look at MoviejayLP activity, you just have to open this window.
Detailed description
Filter feature
Since every event is logged, the log itself soon becomes very wide! That’s why is is often
required to filter the database for a specific section according to user defined criteria: just
use the comprehensive filter group box in the middle of the screen, just under the log grid:
- On the left you see a group of check boxes, each one corresponding to a well defined
log item. They can filter out the corresponding kind of event if unchecked. For example,
if you want to list just songs events, check the songs checkbox and uncheck all the
others. Any combination of checked/unchecked boxes is allowed.
Page 48
-
“Start date” and “end date” check boxes: selecting dates, you can restrict the list to a
well defined date interval. When you open the log window, the database containing the
log for the current month is automatically recalled.
The item type combo allows to even restrict filter to a specific programme. Just select the
desired programme from the drop-down box, and press the “Filter” button to activate filter.
Reports button
Shows the log report print preview window. The printed report fully reflects
browsing options (filtering, etc.): if you apply a filter, only items that satisfy
your criteria will be printed. For example, you can print only occurrences of
the selected programme for your customer.
Edit button
Switches the database to edit mode, to edit or add items (for example, you
can add a programme played from a videotape to get a complete log).
OK button
Closes the station log window.
System messages:
The station log will also report some system-generated messages. Here is a short list and
explanation:
1. “Moviejay start" – shows date and time of program startup.
2. "Moviejay shutdown" – shows date and time of program shutdown.
3. “Warning! File not found: <file details>” – during playlist execution Moviejay has
attemped to load an item but the corresponding video file has not been found on
disk and so the playlist has jumped to the next item.
4. “Warning! Wrong video track length: <video track details>" – Points out that the
track length is different from the value stored in the database (please note that in
such case Moviejay updates the mix-out marker so that the video track plays
entirely).
5. "Warning! Invalid playlist " – You’ve tried to load (manually or from scheduling) an
invalid playlist (empty playlist or without any valid item).
6. "Live Assist operation" – From the on-air module, somebody has switched from
automation mode to live assist mode (i.e. removed the playlist in the queue).
7. Messages about playlist loading also indicate the loading mode: Replace = playlist
loads in replace mode, Insert = playlist loads in insert mode, Manual = playlist has
been loaded manually, Scheduled = playlist has been loaded from schedule,
Triggered = playlist has been loaded by external trigger, Startup = playlist has been
loaded at program startup.
Page 49
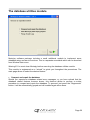
The database utilities module
Moviejay software package includes a small additional module to implement some
database setup and service routines. This is a separate executable which can be launched
from Window Start menu.
Warning!!! You must close Moviejay before executing the database utilities module.
This module is engineered as a “wizard” to guide you throughout the procedures. The
main page allows to select the desired feature.
Compact and repair the database
Should you experience database related error messages, or you have noticed that the
database related features become slower, this features allows to perform a routine
procedure to compact and repair the database. To proceed, just press the “Regenerate”
button: it will be automatically grayed and will enabled again when done.
Page 50
Start Moviejay with empty playlist
When a playlist is loaded into Moviejay on-air screen in loop mode, the same playlist will
be automatically resumed each time Moviejay is started. This works fine provided that clips
included in the playlist can be found on Hard Disk, otherwise Moviejay will loop forever
attempting to load not existing files (in the event that somebody deleted or moved such
clips). If this is the case, you can use this feature to start Moviejay with an empty playlist,
and then proceed to edit your databases according to the new file paths.
Purge event logs
During program execution, all events (tracks broadcasting, playlist loading and unloading,
system messages, etc.) are logged and timestamped to monthly log files. Log tables will
appear into a dedicated box as log2007_5 for May, 2007 – and so on. Should you wish to
delete old logs which you don’t need anymore, select one or more items from the list (click
while holding down Ctrl or Shift), then press the Delete button.
Page 51
Notes on safety
We sure know how much important is the reliability of an automation system. Therefore,
it’s both your and our interest that the minor problems that may arise in the normal use will
be solved in the better way and in the shortest possible time. To such purpose, it is of
fundamental importance that users pay attention to some small details:
Periodically backup all your data (database and video tracks):
Moviejay database is located into an MDB (Microsoft Access dabatase) located in the
software setup folder c:\program files\moviejay\moviejay1.mdb. The database contains all
the informations related to playlists, programmes, scheduling, logs, etc. Being subjected to
thousands and thousands of transactions (and users’ mistakes) during normal use, it is
possible that after sometime files may be damaged with loss of data, or you may have
simply deleted your programmes database by accident.
The time needed to perform a backup is ridiculous if compared to the time you wold need
to insert again all your data in the database: thus, periodically and/or when you’ve
added/modified a good bunch of data:
Close Moviejay
Backup the whole c:\program files\moviejay folder (preferably on another Hard Disk or
on CD-ROM) and timestamp your backup.
Likewise, we suggest to maintain an updated backup of your video clips on a secondary
Hard Disk or off-line storage (DVDs).
In such way, also in case of total breakdown of the on-air workstation (i.e. Hard Disk
failure), restoring back your system into business is as simple as:
Reinstall Windows
Reinstall Moviejay
Restore video files and Moviejay installation folder from your backup copies.
Have a secondary workstation ready to replace the main one:
The purpose is to have a secondary identical workstation ready to replace the main one in
case of failure until the problem on the latter is fixed. In such way, it is enough to
periodically effect the copies of the data from the main workstation to the backup one. In
case of need, you’ll just have to move the dongle (hardware key) and perform some basic
changes to the setup to return on the air within a few minutes. Of course, it is also possible
to use the production workstation for this purpose.
When a problem arises:
Always take note of the error messages that appear in the dialog box at the center of
the screen and/or in the place of your station logo.
Try to remember the last performed tasks that may have have triggered the error. Is the
error repeatable?
Don't panic: once you’ve taken the above precautions and you can rely on a backup
system, you have really nothing to fear.
Remember, also the most meaningless details could be decisive to point out the
problem.
Page 52
End user licence agreement
NOTICE TO USER: THIS IS A CONTRACT. PLEASE READ THIS DOCUMENT
CAREFULLY BEFORE INSTALLING THIS SOFTWARE. THE INDIVIDUAL OR ENTITY
INSTALLING THIS SOFTWARE (THE "END USER") AGREES TO BE BOUND BY THE
TERMS OF THIS LICENSE. IF YOU DO NOT AGREE TO THE TERMS OF THIS
LICENSE, YOU WILL NOT BE ABLE TO USE THE SOFTWARE.
MOVIEJAY SOFTWARE END USER LICENCE AGREEMENT
FOR 1 (ONE) COMPUTER
WINJAY S.R.L.
End user licence agreement
The enclosed computer program(s) and the accompanying documentation are provided to
the End-User by Winjay S.R.L. ("Licensor") for use only under the following terms.
Licensor reserves any right not expressly granted to the End-user. The End-User owns
the disk on which the Software is recorded, but Licensor retains ownership of all copies of
the Software itself. The End-User assumes sole responsibility for the installation, use and
results obtained from use of the Software.
This Winjay S.R.L. End User License Agreement (the "Agreement") accompanies software
("Software") and related explanatory written materials ("Documentation"). The term
"Software" shall also include any upgrades, modified versions, updates, additions, and
copies of the Software licensed to you by Winjay S.R.L. - Winjay S.R.L. grants to you a
nonexclusive license to use the Software and Documentation, provided that you agree to
the following:
1.
Use of the Software. You may:
- Install the Software in a single location on a hard disk or other storage device of up to the
number of computers indicated in the the header at the beginning of this Agreement.
- Provided the Software is configured for network use, install and use the Software on a
single file server for use on a single local area network for either (but not both) of the
following purposes:
(a) permanent installation onto a hard disk or other storage device of up to the Permitted
Number of Computers; or
(b) use of the Software over such network, provided the number of different computers on
which the Software is used does not exceed the Permitted Number of Computers. For
example, if there are 100 computers connected to the server, with no more than 15
computers ever using the Software concurrently, but the Software will be used on 25
different computers at various times, the Permitted Number of Computers for which you
need a license is 25.
- Display, modify, reproduce and distribute any photographs, clip art or other artistic works,
in whole or in part, that are included with the Software (unless a specific notice to the
contrary is indicated), provided such photographs, clip art or artistic works are not
distributed on a stand-alone basis. Such photographs, clip art and artistic works may not
be used in the production of lewd, obscene or pornographic material.
Page 53
-
Make one backup copy of the Software, provided your backup copy is not installed or
used on any computer.
HOME USE. The primary user of each computer on which the Software is installed or
used may also install the Software on one home or portable computer. However, the
Software may not be used on the secondary computer by another person at the same time
the Software on the primary computer is being used.
2. Copyright. The Software is owned by Winjay S.R.L. and its structure, organization and
code are the valuable trade secrets of Winjay S.R.L.. The Software is also protected by
United States Copyright Law and International Treaty provisions. You must treat the
Software just as you would any other copyrighted material, such as a book. You may not
copy the Software or the Documentation, except as set forth in the "Use of the Software"
section. Any copies that you are permitted to make pursuant to this Agreement must
contain the same copyright and other proprietary notices that appear on or in the Software.
Except for font software converted to other formats as permitted in the "Use of the
Software" section, you agree not to modify, adapt or translate the Software. You also
agree not to reverse engineer, decompile, disassemble or otherwise attempt to discover
the source code of the Software. Trademarks shall be used in accordance with accepted
trademark practice, including identification of trademark owner's name. Trademarks can
only be used to identify printed output produced by the Software. Such use of any
trademark does not give you any rights of ownership in that trademark. Except as stated
above, this Agreement does not grant you any intellectual property rights in the Software.
3.
Transfer.
You may not rent, lease, sublicense or lend the Software or
Documentation. You may, however, transfer all your rights to use the Software to another
person or legal entity provided (1) that you transfer this Agreement, the Software, including
all copies, updates and prior versions and all copies of font software converted into other
formats, and all Documentation to such person or entity, (2) that you retain no copies,
including copies stored on a computer, and (3) that the receiving party accept the terms
and conditions of this Agreement.
4.
Multiple Environment Software/Multiple Language Software/Dual Media
Software/Multiple Copies/Upgrades. If the Software includes, or, in connection with the
acquisition of the Software you receive, two or more operating environment versions of the
Software (e.g., Macintosh and Windows® ), two or more language translation versions of
the Software, the same Software on two or more media (e.g., diskettes and a CD-ROM),
and/or you otherwise receive two or more copies of the Software, the total aggregate
number of computers on which all versions of the Software are used may not exceed the
Permitted Number of Computers. You may make one back-up copy, in accordance with
the terms of this Agreement, for each version of the Software you use. You may not rent,
lease, sublicense, lend or transfer versions or copies of the Software you do not use, or
Software contained on any unused media, except as part of the permanent transfer of all
Software and Documentation as described above. If you acquire an upgrade or update for
Software, you may use the previous version for ninety (90) days after you receive the new
version in order to assist you in the transition to the new version, after which time you no
longer have a license to use the previous version.
Page 54
5.
Limited Warranty. Winjay S.R.L. warrants to you that the Software will perform
substantially in accordance with the Documentation for the ninety (90) day period following
your receipt of the Software. To make a warranty claim, you must return the Software to
the location where you obtained it along with a copy of your sales receipt within such
ninety (90) day period. If the Software does not perform substantially in accordance with
the Documentation, the entire and exclusive liability and remedy shall be limited to either,
at Winjay S.R.L.'s option, the replacement of the Software or the refund of the license fee
you paid for the Software. Winjay S.R.L. AND ITS SUPPLIERS DO NOT AND CANNOT
WARRANT THE PERFORMANCE OR RESULTS YOU MAY OBTAIN BY USING THE
SOFTWARE OR DOCUMENTATION. THE FOREGOING STATES THE SOLE AND
EXCLUSIVE REMEDIES FOR Winjay S.R.L.'S OR ITS SUPPLIERS' BREACH OF
WARRANTY. EXCEPT FOR THE FOREGOING LIMITED WARRANTY, Winjay S.R.L.
AND ITS SUPPLIERS MAKE NO WARRANTIES, EXPRESS OR IMPLIED, AS TO
NONINFRINGEMENT OF THIRD PARTY RIGHTS, MERCHANTABILITY, OR FITNESS
FOR ANY PARTICULAR PURPOSE. Some states or jurisdictions do not allow the
exclusion of implied warranties or limitations on how long an implied warranty may last, so
the above limitations may not apply to you. To the extent permissible, any implied
warranties are limited to ninety (90) days. This warranty gives you specific legal rights. You
may have other rights which vary from state to state or jurisdiction to jurisdiction.
Should the end user experiences failure of his customized hardware key, Winjay S.R.L.
sole responsibility will be the repair or replacement of the "hardware key" which should be
returned to Winjay S.R.L. together with a copy of the receipt invoice received when you
purchased the software. This warranty is not valid if the malfunction has raised from
accident or improper use. In no event the end user may pretend a second "hardware key".
6.
Limitation of Liability. IN NO EVENT WILL Winjay S.R.L. OR ITS SUPPLIERS BE
LIABLE TO YOU FOR ANY CONSEQUENTIAL, INCIDENTAL OR SPECIAL DAMAGES,
INCLUDING ANY LOST PROFITS OR LOST SAVINGS, EVEN IF A Winjay S.R.L.
REPRESENTATIVE HAS BEEN ADVISED OF THE POSSIBILITY OF SUCH DAMAGES,
OR FOR ANY CLAIM BY ANY THIRD PARTY. SOME STATES OR JURISDICTIONS DO
NOT ALLOW THE EXCLUSION OR LIMITATION OF INCIDENTAL, CONSEQUENTIAL
OR SPECIAL DAMAGES, SO THE ABOVE LIMITATIONS MAY NOT APPLY TO YOU.
7.
Governing Law and General Provisions. This Agreement will be governed by the
laws in force in Italy excluding the application of its conflicts of law rules. This Agreement
will not be governed by the United Nations Convention on Contracts for the International
Sale of Goods, the application of which is expressly excluded. If any part of this
Agreement is found void and unenforceable, it will not affect the validity of the balance of
the Agreement, which shall remain valid and enforceable according to its terms. You agree
that the Software will not be shipped, transferred or exported into any country or used in
any manner prohibited by the United States Export Administration Act or any other export
laws, restrictions or regulations. This Agreement shall automatically terminate upon failure
by you to comply with its terms. This Agreement may only be modified in writing signed by
an authorized officer of Winjay S.R.L.
Page 55
Macintosh is a trademark of Apple Computer, Inc. registered in the U.S. and other
countries. Windows is either a registered trademark or a trademark of Microsoft
Corporation. Any other trademark belongs to the respective owner.
Page 56