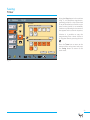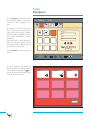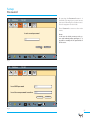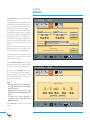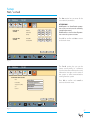
1
User’s manual 24800240 - 01_2009 2 Index Premise Pag. 4 Features overview Pag. 5 Comfort Pag. 9 Lights . . . . . . . . . . . . . . . . . . . . . . . . . . . . . . . . . . . . . . . . . . . . . . . . . . . . . . . . . . . . . . . . . . . . . . 9 Climate . . . . . . . . . . . . . . . . . . . . . . . . . . . . . . . . . . . . . . . . . . . . . . . . . . . . . . . . . . . . . . . . . . . . . 12 Openings . . . . . . . . . . . . . . . . . . . . . . . . . . . . . . . . . . . . . . . . . . . . . . . . . . . . . . . . . . . . . . . . . . . 19 Audio/Video . . . . . . . . . . . . . . . . . . . . . . . . . . . . . . . . . . . . . . . . . . . . . . . . . . . . . . . . . . . . . . . . 20 Saving Pag. 22 Irrigation . . . . . . . . . . . . . . . . . . . . . . . . . . . . . . . . . . . . . . . . . . . . . . . . . . . . . . . . . . . . . . . . . . . 22 Loads . . . . . . . . . . . . . . . . . . . . . . . . . . . . . . . . . . . . . . . . . . . . . . . . . . . . . . . . . . . . . . . . . . . . . . . 25 Timer . . . . . . . . . . . . . . . . . . . . . . . . . . . . . . . . . . . . . . . . . . . . . . . . . . . . . . . . . . . . . . . . . . . . . . . 27 Consumption . . . . . . . . . . . . . . . . . . . . . . . . . . . . . . . . . . . . . . . . . . . . . . . . . . . . . . . . . . . . . . 30 Security Pag. 31 Burglar Alarm . . . . . . . . . . . . . . . . . . . . . . . . . . . . . . . . . . . . . . . . . . . . . . . . . . . . . . . . . . . . . . 32 Alarms . . . . . . . . . . . . . . . . . . . . . . . . . . . . . . . . . . . . . . . . . . . . . . . . . . . . . . . . . . . . . . . . . . . . . . 34 Cameras . . . . . . . . . . . . . . . . . . . . . . . . . . . . . . . . . . . . . . . . . . . . . . . . . . . . . . . . . . . . . . . . . . . . 36 Scenarios Pag. 37 Enable . . . . . . . . . . . . . . . . . . . . . . . . . . . . . . . . . . . . . . . . . . . . . . . . . . . . . . . . . . . . . . . . . . . . . . 37 Plan . . . . . . . . . . . . . . . . . . . . . . . . . . . . . . . . . . . . . . . . . . . . . . . . . . . . . . . . . . . . . . . . . . . . . . . . 38 Modify . . . . . . . . . . . . . . . . . . . . . . . . . . . . . . . . . . . . . . . . . . . . . . . . . . . . . . . . . . . . . . . . . . . . . 39 Secretary Pag. 41 Telephone . . . . . . . . . . . . . . . . . . . . . . . . . . . . . . . . . . . . . . . . . . . . . . . . . . . . . . . . . . . . . . . . . . 41 Videohomephone . . . . . . . . . . . . . . . . . . . . . . . . . . . . . . . . . . . . . . . . . . . . . . . . . . . . . . . . . . 43 Other functions Pag. 45 Videohomephone . . . . . . . . . . . . . . . . . . . . . . . . . . . . . . . . . . . . . . . . . . . . . . . . . . . . . . . . . . 45 Telephone . . . . . . . . . . . . . . . . . . . . . . . . . . . . . . . . . . . . . . . . . . . . . . . . . . . . . . . . . . . . . . . . . . 46 Nehos Theater . . . . . . . . . . . . . . . . . . . . . . . . . . . . . . . . . . . . . . . . . . . . . . . . . . . . . . . . . . . . . . 47 Notes . . . . . . . . . . . . . . . . . . . . . . . . . . . . . . . . . . . . . . . . . . . . . . . . . . . . . . . . . . . . . . . . . . . . . . . 50 Events . . . . . . . . . . . . . . . . . . . . . . . . . . . . . . . . . . . . . . . . . . . . . . . . . . . . . . . . . . . . . . . . . . . . . . 51 Login . . . . . . . . . . . . . . . . . . . . . . . . . . . . . . . . . . . . . . . . . . . . . . . . . . . . . . . . . . . . . . . . . . . . . . . 52 Setup Pag. 53 Date and Time . . . . . . . . . . . . . . . . . . . . . . . . . . . . . . . . . . . . . . . . . . . . . . . . . . . . . . . . . . . . . . 53 Emergency . . . . . . . . . . . . . . . . . . . . . . . . . . . . . . . . . . . . . . . . . . . . . . . . . . . . . . . . . . . . . . . . . 54 Password . . . . . . . . . . . . . . . . . . . . . . . . . . . . . . . . . . . . . . . . . . . . . . . . . . . . . . . . . . . . . . . . . . . 55 Remote . . . . . . . . . . . . . . . . . . . . . . . . . . . . . . . . . . . . . . . . . . . . . . . . . . . . . . . . . . . . . . . . . . . . . 56 Net / e-mail . . . . . . . . . . . . . . . . . . . . . . . . . . . . . . . . . . . . . . . . . . . . . . . . . . . . . . . . . . . . . . . . 57 3 Premise This manual describes an example of a system installed in a home. The icons in the screens are the graphical representation of the functions programmed in the installation phase. If, for example, your system does not provide the possibility of receiving a television signal, the relevant icon/function and the associated menus will not be displayed. 13 October - To close the programme press and hold the pen for a few seconds on the upper bar of the window (area shown in the figure) and confirm your choice on the appearing popup. Off Lights Saving Bedroom 1 Climate 12 24 Bathroom 20.0°C 1 12 24 Living-room 20.0°C 20.0°C Security Openings Audio/Video Secretary videohomephone Fig. 1 - The disappearance of the screen in fig. 2 indicates that there is no connection between the core unit (NHBC) and the terminal. Fig. 2 4 Winter Summer Advance OFF Comfort Scenarios - To minimise the programme to an icon double click with the pen on the upper bar of the window (area shown in fig.1). 15:30 telephone telephone nehos nehos theater theater notes notes internet events events login login keyboard keyboard Setup ? setup help Emergency Features overview The home automation terminal allows to control and monitor all the devices and functions of the system. In fact, with a simple touch of the display's touch screen, it is possible to switch on or off lights, adjust the temperature of the various rooms, open and close the shutters, check the activation status of all these devices, etc. On the terminal's large display it is also possible to view the images coming from the different video cameras and thus keep the crucial points of your home under control. With the terminal, hands-free communication is possible. You can also make calls (PSTN), answer videohomephone calls and communicate with other terminals in the home. There is also a secretary function for leaving messages. Comfort (fig. 1) 13 October Lights - Hourly weekly programming on 3 temperature levels for each zone. - Independent control of each thermal zone of the home. 15:30 Comfort Climate - Weekly temperature control for each zone with 3 different levels - Free manual control of any thermal zone in the home. Lights Saving Climate Security Audio/Video Secretary videohomephone Openings - Control of automation by type (shutters, windows, curtains), by zone and by single opening. Openings Scenarios telephone telephone nehos nehos theater theater notes notes events internet login events keyboard login keyboard Setup ? setup Emergency help Audio/Video - Audio and video source management, possibility to control the playback parameters such as volume, tone, balancing or distribution within the rooms of the home. Fig. 1 5 Features overview Saving (fig. 2) Irrigation - Activation of the irrigation system at preset times any day of the week. Loads - Selection of power supply priorities for each load connected to a socket controlled by the system. Timer - Timed activation of the devices connected to the system at preset hours or days of the week. Consumption - Possibility to check the total power absorbed by the equipment in operation and connected downstream of the measuring device. 13 October Comfort 15:30 Irrigation Saving Loads Security Timers Scenarios 001200 Comsumption Secretary videohomephone telephone telephone nehos theater theater nehos notes notes ? events internet login events keyboard login Setup keyboard setup Emergency help internet events events login login keyboard keyboard Setup setup help Emergency Fig. 2 Security (fig. 3) Burglar Alarm - Possibility to interface with some Brahms burglar systems to allow the display or the activation of the Alarm areas, or the individual Zones installed in the home by the terminal. Alarms - Management of alarm events and sending of signals to a predefined recipient (if the system is enabled to remote control using WEBNEHOS). Cameras - Direct display and activation of up to maximum of 64 video cameras. - Command management: zoom, slewing and focusing. 13 October Comfort Burglar Alarm Saving Alarm Security Cameras Scenarios Secretary videohomephone Fig. 3 6 15:30 telephone telephone nehos nehos theater theater notes notes ? Features overview 13 October Scenarios (fig. 4) 15:30 On - Lets you activate the programmed scenarios. Comfort Plan - Possibility to programme the activation of one of the scenarios available at the time or in the day desired. Saving Modify - Lets you make changes to the scenarios available thus meeting your needs better. Security On Scenarios Planning Secretary Modify videohomephone videohomephone telephone telephone nehostheater theater nehos notes notes internet events events login login keyboard keyboard Setup setup ? help Emergency Fig. 4 13 October Secretary (fig. 5) 15:30 Telephone - Possibility of managing a secretary, consult an archive of messages and missed calls. Comfort Videohomephone - Lets you consult a videohomephone secretary. The videohomephone “message” consists of a frame taken by the video camera of the entry panel in case of unanswered calls. Saving Security Telephone Scenarios Videohomeph Secretary videohomephone telephone telephone nehostheater theater nehos notes notes events internet login events keyboard login Setup keyboard setup ? Emergency help Fig. 5 7 Features overview videohomephone -The terminal can be used to answer videohomephone calls, control the door lock release, turn on the stairwell lights and use other electrical services. -The self-insertion and cyclical selection of the videohomephone entry panels. -Intercommunication is possible with other videohomephone extensions. telephone - From the terminal, it is possible to make and receive phone calls via the traditional PSTN phone lines. - Using a normal PABX, the terminal is also able to intercommunicate with traditional telephones located in the home. nehos theater - From the terminal you can watch TV, change channels, and adjust the volume, brightness, etc. notes - Should you desire to leave a message, the terminal may be used as an electronic whiteboard, directly writing on the screen with the pen provided. 8 events - It is possible to consult a detailed list of the events that concern the system, such as, for example: remote access, technical alarms, faults on the line, etc... login - It is possible to assign special “privileges” to various users who access the system, who identify themselves by using a password. keyboard - Useful to surf the net or type your password, telephone numbers etc... setup - Section dedicated to the general system operating preferences. Comfort Lights 13 October Press the Comfort icon. 15:30 This section of the programme lets you manage the following functions in the home (fig. 2): Comfort Lights - Hourly weekly programming on 3 temperature levels for each zone. - Independent control of each thermal zone of the home. Saving Security Scenarios Climate - Weekly temperature control for each zone with 3 different levels - Free manual control of any thermal zone in the home. Secretary videohomephone telephone telephone nehos theater theater nehos notes notes events internet login events keyboard login Setup keyboard ? setup Emergency help Fig. 1 13 October Openings - Control of automation by type (shutters, windows, curtains), by zone and by single opening. Audio/Video - Audio and video source management, possibility to control the playback parameters such as volume, tone, balancing or distribution within the rooms of the home. 15:30 Comfort Lights Saving Climate Security Openings Scenarios Audio/Video Secretary videohomephone telephone telephone nehostheater theater nehos notes notes events internet login events keyboard login Setup keyboard ? setup Emergency help Fig. 2 9 Comfort Lights When you press the Lights icon, the menu in fig. 3 is displayed, which represents the zones in which the home was divided in the programming phase. In the specific case the subdivision zones are called after the floors, but (during programming) the various zones could be given a suggestive name such as, for example, “day zone”, “night zone”, “garden”, etc... The All ON and All OFF buttons let you switch on or off all the lights of all the zones grouped together in the window containing them, at the same time. 13 October All ON The buttons located on the lower part of the window (specifically Ground floor), let you move between the various zones available; to return to the window of fig. 3 just press the lights icon. The All ON and All OFF buttons let you switch on or off all the lights of all the rooms grouped together in the window containing them, at the same time. Note: The yellow icons indicate that inside the zone or the space shown at least one light is on. Lights Saving Ground floor First Floor Climate Security Openings Scenarios Audio/Video Secretary telephone telephone nehos theater theater nehos notes notes events internet login events keyboard login Setup keyboard ? Emergency help setup Fig. 3 13 October 15:30 All ON All OFF Comfort First Floor Lights Saving Bathroom Master Bedroom Bedroom Climate Security Openings Scenarios Audio/Video Secretary Ground floor videohomephone Fig. 4 10 All OFF Comfort videohomephone By pressing (for example) on First floor, the rooms contained in the zone selected (fig. 4) are displayed. 15:30 telephone telephone nehos theater theater nehos notes notes events internet login events keyboard login Setup keyboard ? setup Emergency help Comfort Lights 13 October Now by pressing (for example) the Bathroom button it will be possible to command the lighting installed in that compartment (fig. 5). In this case the All ON and All OFF buttons act on all the lights of the compartment selected. 15:30 All ON All OFF Comfort First Floor/Bathroom Lights Saving Mirror Camera Bathroom Centers Climate Press OK to return to the window of fig. 4. Security Openings Scenarios All Audio/Video Secretary OK Ground floor videohomephone telephone telephone nehos nehostheater theater notes notes events internet events login login keyboard ? keyboard Setup Emergency help setup Fig. 5 13 October 15:30 If the lighting selected is commanded by special dimmer modules, an ON/OFF button and a cursor that lets you adjust the lighting intensity to your taste will be displayed (fig. 6). All OFF All ON Comfort Ground Floor/Living-room Lights Saving Income Living-room Main light Cucina Press OK to return to the window of fig. 4, and then the Lights icon to exit from the lights control section. Sofa lamp Climate Security Garden Openings Scenarios All Audio/Video Secretary OK First floor videohomephone telephone telephone nehos nehos theater theater notes notes internet events events login login keyboard keyboard Setup setup ? help Emergency Note: The yellow buttons indicate that the lighting is on. Fig. 6 11 Comfort Climate By pressing the Climate icon (fig. 7) you access the air conditioning system management menu. The window lists the thermal zones in which the home is divided, inside which a temperature control module is present (OH/Z.02). 13 October 15:30 By selecting one of the thermal zones available, the window in fig. 8 will be displayed, which describes the operating modes of the zone module (manual, automatic, jolly, vacancy, off) and the temperature detected locally. It is possible to adjust the temperature of each zone in two main modes: - Manual mode, - Automatic mode. Off Lights Saving Bedroom 1 Climate This window also displays the various programming possibilities for the climate control system. - Advance OFF (Advance ON) lets you switch on or off the system in advance compared to the time set, in a way to have the desired temperature exactly at the programmed time. - Summer, activates the cooling mode function of the system - Winter, activates the heating mode function of the system - Off deactivates all the climate control zones. Winter Summer Advance OFF Comfort 12 Bathroom 20.0°C 24 1 12 24 Living-room 20.0°C 20.0°C Security Openings Scenarios Audio/Video Secretary videohomephone telephone telephone nehos nehos theater theater notes notes events internet login events keyboard login ? keyboard Setup Emergency help setup Fig. 7 13 October 15:30 Master Bedroom Comfort AUTOMATIC Lights 20.0 °C Saving Climate Security Openings Scenarios 1 manual 12 24 automatic jolly vacancy off lock Audio/Video Secretary Bathroom videohomephone Fig. 8 12 telephone telephone nehos theater theater nehos notes notes events internet login events keyboard login Setup keyboard ? setup Emergency help Comfort Climate 13 October MANUAL MODE 15:30 Once one of the climate control zones is selected (for example the Living room), by pressing the manual icon the manual control of the zone is enabled, starting from a default temperature of 20 °C for heating and 24 °C for cooling. Press + o – to change the value of the set temperature to your taste. Press OK to confirm the choices made and return to the menu in fig. 8. Living room Comfort MANUAL Lights Saving 20.2 °C Temperature setting Climate Security Openings Scenarios 1 manual Audio/Video Secretary 12 24 automatic jolly vacancy off OK Cancel Bathroom videohomephone telephone telephone nehos nehos theater theater internet events notes notes events login keyboard Setup login keyboard ? help Emergency setup Fig. 9 13 October AUTOMATIC MODE 15:30 Pre-saved heating and cooling programmes. Select one of the zones available (from the window in fig. 7 or scrolling through them using the buttons at the bottom fig. 9) and press the automatic icon (fig. 10). Master Bedroom Comfort AUTOMATIC Lights Saving 20.0 18.0 16.0 Climate Security 0 6 12 18 23 Openings Scenarios 1 manual 12 1 24 automatic jolly vacancy 12 24 change off Audio/Video Secretary Bathroom videohomephone telephone telephone nehos nehos theater theater notes notes events internet events login login keyboard keyboard Setup setup ? Emergency help If the Winter option is selected in the window in fig. 7, a scale (thermal trend) will be displayed where the fixed temperature levels are: T1 16 °C T2 18 °C T3 20 °C furthermore the symbol in the top right hand corner will remind you that the system is in heating mode (fig. 10). Fig. 10 13 Comfort Climate If the Summer option is selected in the window in fig. 7, a scale (thermal trend) will be displayed where the fixed temperature levels are: T1 24 °C T2 26 °C T3 28 °C furthermore the symbol in the top right hand corner will remind you that the system is in cooling mode (fig. 11). 13 October 15:30 Master Bedroom Comfort AUTOMATIC Lights Saving 28.0 26.0 24.0 Climate Security 0 6 12 18 23 Openings Scenarios 1 manual 12 1 24 automatic jolly vacancy 12 24 change off Audio/Video Secretary Bathroom videohomephone telephone telephone nehos theater theater nehos notes notes events internet login events keyboard login ? Setup keyboard Emergency help setup Fig. 11 Modifying the daily programmes By pressing the change icon a list of the days of the week is displayed with the current day shown in orange (fig. 12). 13 October 15:30 Master Bedroom Comfort AUTOMATIC Lights Select the day in which you want to do the daily programming of the temperatures. Saving MON TUE WED THU FRI SAT Climate Security T1 T2 T3 SUN Openings Scenarios 1 manual 12 24 automatic jolly vacancy off Audio/Video Secretary Bathroom videohomephone Fig. 12 14 telephone telephone nehos nehos theater theater notes notes internet events events login login keyboard keyboard Setup setup ? Emergency help Comfort Climate 13 October The bar chart displayed in the window in fig. 13, represents the daily profile of the temperature: Along the horizontal axis is a scale showing the 24 hours divided into quarters of an hour and displayed in groups of 6; the current hour is shown in orange. Along the horizontal axis the three preset temperature levels are displayed (modifiable). 15:30 Master Bedroom Comfort AUTOMATIC Lights Saving Climate 14 Security 15 16,0 16 18,0 17 18 19 20,0 Openings Scenarios 1 manual Audio/Video Secretary 12 24 automatic jolly vacancy off OK Cancel Bathroom videohomephone telephone telephone nehos nehos theater theater notes notes internet events events login login keyboard ? keyboard Setup help Emergency setup Fig. 13 13 October Scroll through the profile by pressing or , until reaching the hour desired. Press one of the three squares for the temperature level to set the desired value in correspondence to the quarter of an hour selected. Scroll along the bar chart to extend the selected programming. NOTE. Programming is carried out in intervals of 15 minutes. Press OK to confirm the choices made and return to the window in fig. 8. 15:30 Master Bedroom Comfort Temperature level setting To modify the 3 preset temperature levels in the window in fig. 12, select the level icon . The menu fig. 14 will appear on the display Select one of the 3 temperature levels and press + or – to change the value. Press OK to confirm the choices made and return to the window in fig. 8. AUTOMATIC Lights Saving 17.5 °C Temperature setting Climate Security 17,5 18,0 20,0 Openings Scenarios 1 manual Audio/Video Secretary 12 24 automatic jolly vacancy OK off Cancel Bathroom videohomephone telephone telephone nehos theater theater nehos notes notes events internet login events keyboard login Setup keyboard ? setup Emergency help Fig. 14 15 Comfort Climate JOLLY PROGRAMME The jolly programme lets you introduce a temporary variation to the programming of the thermal zone (in case, for example, that a dinner goes on until late or you have a day off during the week). Once started it remains active until midnight of the current day (unless manually deactivated); when this time elapses the thermal zone returns to automatic operation. The jolly programme may be freely programmed; a standard programme is set by the factory. 13 October 15:30 Living room Comfort JOLLY Lights Saving 20.0 18.0 16.0 Climate Security 0 6 12 18 23 Openings Scenarios 1 manual 12 1 24 automatic jolly vacancy 12 24 change off Audio/Video Secretary Bathroom videohomephone telephone telephone nehos theater theater nehos events internet notes notes login events ? Setup keyboard keyboard login Emergency help setup Fig. 15 To activate the jolly programme, press the icon, the icon becomes orange to indicate that the programme has been activated. Should you desire to modify the programme, press the change icon fig. 15. The display will show the menu as in fig. 16. Press or until reaching the desired hour. Press one of the three squares for the temperature level to set the desired value. Press OK to confirm the choices made. After confirmation, you return to the menu in fig. 8. 13 October Living room Comfort JOLLY Lights Saving Climate 12 Security 13 14 16 15 18 16 17 18 20 Openings Scenarios 1 manual Audio/Video Secretary 12 24 automatic jolly vacancy off Cancel OK Bathroom videohomephone Fig. 16 16 15:30 telephone telephone nehos nehos theater theater notes notes internet events events login login keyboard keyboard Setup setup ? Emergency help Comfort Climate 13 October VACANCY PROGRAMME 15:30 The vacancy programme lets you set a fixed temperature for a few days or hours, and may be useful in case of extended absence, to keep the temperature at home at the level desired. Master Bedroom Comfort VACANCY Lights Saving 20.0 °C Temperature setting Climate Security Temp. Day Hours manual automatic Openings Scenarios 1 Audio/Video Secretary 12 24 jolly vacancy off OK Cancel Bathroom videohomephone telephone telephone nehos nehos theater theater notes notes events internet events login login keyboard keyboard Setup ? Emergency help setup Fig. 17 13 October 15:30 Master Bedroom Comfort ANTI-FREEZE OFF Lights Should one or more thermal zones be switched off using the off button, the ANTI-FREEZE programme is activated (fig. 18), which maintains the temperature at a minimum safety level to avoid damaging the system due to excessively low temperatures. 20.0 °C Saving Climate Security Openings Scenarios 1 manual 12 24 automatic To activate this programme, proceed as follows: - From the menu in figure 17 press the vacancy icon . - Press the Temp. icon to set the value of the temperature. - Press the Day and Hours icons to set the time during which the temperature must be maintained. - Press + or – to change the value of the temperature, days or hours. Press OK to confirm the choices made; from this moment a count down of the set time begins, during which the zone will be maintained at the desired temperature; at the end of the count down the thermal zone returns to automatic operation. jolly vacancy off lock Audio/Video Secretary Bathroom videohomephone telephone telephone nehos nehos theater theater notes notes events internet events login login keyboard keyboard Setup ? setup Emergency help Fig. 18 17 Comfort Climate LOCKING COMMANDS FOR ZONE TEMPERATURE CONTROL The zone temperature is controllable from the terminal as well as from the zone thermostats (OH/Z.02); by pressing the lock icon the controls that can be given from the OH/Z .02 local control module are deactivated and the thermal management is only possible from the terminal. Press the Climate icon to return to the main menu and then on the comfort icon to return to the main screen. 13 October 15:30 Master Bedroom Comfort AUTOMATICO Lights 20.0 °C Saving Climate Security Openings Scenarios 1 manual 12 24 automatic jolly vacancy off lock Audio/Video Secretary Bathroom videohomephone Fig. 19 18 telephone telephone nehos nehos theater theater notes notes internet events events login login keyboard keyboard Setup ? setup help Emergency Comfort Openings 13 October Within the section called Comfort, by pressing the Openings icon, the screen in fig. 20 is displayed. In the upper part the icons are displayed representing the openings controllable through the terminal in the home (the image in fig. 20 is only a guideline). The lower part of the window shows the zones in which the type of opening selected in the upper list is present. 15:30 Shutters Comfort Windows Curtains Sunshades Doors Gates STOP OPEN All CLOSE All Lights Saving Living room Kitchen Master Bedroom Bedroom Bathroom Climate Security Scenarios Audio/Video Secretary videohomephone By pressing (for example) the button depicting the Living room space; the menu in fig. 21 appears, from which it is possible to command the opening or closing of the shutters (in the case shown) present in the space selected by using the or buttons. Openings telephone telephone nehos nehos theater theater events internet notes notes events login keyboard Setup login keyboard ? setup Emergency help Fig. 20 13 October 15:30 Shutters Comfort Windows Curtains Lights Saving Living room Master Bedroom Gates CLOSE All DX SX Press openings and then Comfort to return to the main menu. SX Openings Audio/Video Secretary videohomephone Doors STOP DX Climate Security Scenarios Sunshades OPEN All Living room OK telephone telephone nehos nehos theater theater notes notes events internet events login Note: The prolonged pressing of the button corresponds to a direct command on the motor; upon its release the motor stops. Short pressing activates the motor in the direction selected for a preset time. To interrupt the action, press the same button again or the STOP button. Press STOP if you want to stop the automation in progress. With the command All OPEN or All CLOSED it is possible to open or close the automations in the area of the menu where you are. Press OK to exit the menu. login keyboard keyboard Setup setup ? Emergency help Note: The interface (graphic appearance and programme window arrangement) is freely programmable by the installer, hence the appearance of the screens could differ from the one shown in this manual. Fig. 21 19 Comfort Audio/Video Within the section called Comfort, pressing the Audio/Video icon, a screen is displayed similar to the one in fig. 22. In the central part, the “audio zones” are shown in which the home has been subdivided during the programming of the audio control unit. The “audio zones” may not correspond to the zones of the home created to manage the automations using Nehos since their programming can be customised through the multiroom control unit. The Sources ON/OFF button lets you switch on/off the audio system and the related connected sources. The STAND-BY button places all the audio zones, and the related local command keypad, in stand-by. The POWER OFF button places all the audio zones, and the related local command keypad, in off By pressing the “STAND-BY” or “POWER OFF” buttons, the squares concerning the zones turn from yellow (active zones) to white (deactive zones). 13 October 15:30 SELECT SOURCES Sources ON/OFF POWER OFF Lights Saving Stereo room Game room Bedroom Kitchen Master Bedroom Climate Security Openings Scenarios Audio/Video Secretary videohomephone videohomephone telephone telephone nehos theater nehos theater notes notes events internet events login keyboard Setup login keyboard setup ? Emergency help Fig. 22 13 October By pressing the SELECT SOURCES button it is possible to choose for each zone which audio sources may be commanded and listened to (fig. 23). Comfort By clicking on “All” each source in the audio system is enabled to control each of the zones in the system; the green tick confirms the programming; by pressing “Save” the same are made effective; by clicking on “Close” you return to the menu in fig. 22. Security 15:30 Tuner 1 CD DVD Sat Tuner 2 Lights Stereo room Saving Game room Climate Master Bedroom Bedroom Openings Scenarios Kitchen Audio/Video Secretary All Save videohomephone videohomephone Fig. 23 20 STAND-BY Comfort telephone telephone nehos theater theater nehos notes notes internet events events login Close login keyboard keyboard Setup setup ? help Emergency Comfort Audio/Video 13 October Tuner 1 Comfort CD DVD Sat Tuner 2 Game room Lights Tuner 1: ON Saving Climate Security TREBLE – + BASS – + BALANCE L R Openings Scenarios VOLUME – SLEEP Close Controls Stereo room telephone telephone nehos theater nehos theater + MUTE Audio/Video Secretary videohomephone videohomephone From the screen in figure 22, by selecting one of the zones available, the window in figure 24 will appear from which it is possible to access the audio controls of the source assigned to the zone. 15:30 notes notes internet events events login login keyboard Master Bedroom keyboard Setup setup ? help Emergency Fig. 24 21 Saving Irrigation The section called Saving lets you manage or keep under control the following automation devices in the home (fig. 1): 13 October Comfort Irrigation - Activation of the irrigation system at preset times of any day of the week. 15:30 Irrigation Saving Loads Loads - Selection of power supply priorities of each load connected to a socket controlled by the system. Security Timer - Timed activation of the devices connected to the system at preset hours or days of the week. Secretary Timers Scenarios 001200 Comsumption Consumption - Possibility to check the total power absorbed by the equipment in operation and connected downstream of the measuring device. Irrigation Press the Irrigation icon (fig. 1). The irrigation zones that can be controlled from the terminal are displayed. Select one of the zones available, for example Pool side, the menu in fig. 3 appears. videohomephone telephone telephone nehos theater theater nehos notes notes events internet login events keyboard login ? Setup keyboard setup Emergency help Setup keyboard setup Emergency help Fig. 1 13 October Comfort 15:30 Irrigation Saving Pool side Loads Back Security Timers Scenarios 001200 Comsumption Secretary videohomephone Fig. 2 22 telephone telephone nehos theater theater nehos notes notes events internet login events keyboard login ? Saving Irrigation 13 October The status of the system is indicated on this menu. By pressing the ACTIONS button, irrigation starts immediately, ignoring any daily programming; when the irrigation sector is on the ACTIONS button turns yellow. 15:30 Pool side Comfort Irrigation Saving Lato piscina Loads Retro ACTIONS Note: Irrigation started through the ENABLE button takes effect for a time set during installation, upon the expiry of which the system will return to the previous activation state. Select working mode Security Timers Scenarios OFF Automatic 001200 PLANNING Comsumption Secretary Back videohomephone telephone telephone nehos theater theater nehos notes notes events internet login events ? Setup keyboard keyboard login Emergency help setup The Automatic operating mode includes the execution of the weekly irrigation planning programmable by pressing the Planning button. Fig. 3 13 October 15:30 Each day of the week may be freely programmed to activate the irrigation at preset times. To access the programming window click in correspondence to the hourly scale next to the desired day. Pool side Comfort Automatic working mode planning Irrigation monday Saving 0 tuesday Lato piscina Loads wednesday Security thursday Scenarios Timers friday 001200 saturday sunday Comsumption Secretary 0 3 3 Retro 6 9 12 15 18 21 24 6 9 12 15 18 21 24 0 3 6 9 12 15 18 21 24 0 3 6 9 12 15 18 21 24 0 3 6 9 12 15 18 21 24 0 3 6 9 12 15 18 21 24 0 3 6 9 12 15 18 21 24 Copy By pressing a day of the week the programming assigned to the selected day is activated/deactivated. Note: The programming carried out will only be performed in the days highlighted in yellow (fig.4). Exit Back videohomephone telephone telephone nehos theater theater nehos notes notes By pressing the OFF button the active devices are immediately deactivated; if no device is activated the programming is in any case deactivated until otherwise commanded. events internet login events keyboard login Setup keyboard setup ? Emergency help Fig. 4 23 Saving Irrigation Use the side arrows to scroll through the hourly scale and press the square in correspondence to the time bands during which irrigation is desired. Should a more precise programming be necessary press the Zoom button, to have the possibility of programming the irrigation with 5 minute intervals. Once the programming has ended (by pressing the OK button), this is displayed in the related daily graph in (fig. 4). 13 October 15:30 Pool side Comfort Automatic working mode planning monday Irrigation Saving Lato piscina Loads Security Retro 15 15 30 45 16 15 30 45 17 15 30 45 18 Timers Scenarios Zoom 001200 Press Zoom to display minute Comsumption Secretary OK Cancel Back videohomephone Using the Copy button in the window in fig. 4, it is possible to copy the programming made for a day of the week to any of the irrigation zones and match it to your taste to other days of the week of the same or other irrigation zones in an extremely intuitive way, following the instructions that appear on the screen in sequence. telephone telephone nehos theater theater nehos notes notes events internet keyboard login Setup keyboard ? Emergency help setup Fig. 5 13 October 15:30 COPY FROM Ground floor> Garden> Pool side Comfort Irrigation SUN MON FRI SAT TUE WED THU Saving Loads Press the Irrigation button to return to the bottom of the saving menu and press the Saving button to return to the main menu. login events Security TO Timers All Ground floor> Garden> Back Scenarios 001200 Comsumption SUN MON FRI SAT TUE WED THU Secretary COPY videohomephone Fig. 6 24 telephone telephone nehos theater theater nehos notes notes events internet login events keyboard login Setup keyboard EXIT setup ? Emergency help Saving Loads 13 October Priority OFF Comfort From the Saving menu, by pressing the Loads icon, you access the part of the programme dedicated to the load control; i.e. the possibility of switching off appliances, lights or generic loads placed under the control of the terminal according set priorities (high, medium, low). This function is necessary so that the current requested does not exceed the maximum power that can be supplied by the system, thus causing a block. 15:30 Priority ON Irrigation Saving Oven Loads Dishwasher Air cooler Security Timers Scenarios 001200 Comsumption Secretary videohomephone telephone telephone nehos theater theater nehos events internet notes notes login events Setup keyboard keyboard login setup ? Emergency help Fig. 7 13 October 15:30 To access the specific controls of the load, press the icon that represents it; the menu in fig. 8 appears. By pressing the Always ON icon the load control is deactivated until it is given a different command. By pressing the Timer ON icon the load control is deactivated for a time set during the programming by the installer, upon the expiry of which the load will return to being controlled by the programme. By pressing the Load control icon the load management settings are activated. Oven Comfort Switch the load ON/OFF or set automatic control ON Irrigation Always ON Saving Timer ON Loads Load Control Security Timers Scenarios 001200 0 Comsumption 3 6 HIGH 9 12 NORMAL Secretary 15 LOW 18 21 24 OFF Copy Dishwasher videohomephone telephone telephone nehos theater theater nehos notes notes events internet login events keyboard login Setup keyboard ? setup The menu in fig. 7 shows a list of “loads” that may be controlled by the terminal and the type of control they are subject to. By pressing the Priority OFF button all the devices in the list will no longer be subject to the load control; in this mode the icon will be . By pressing the Priority ON button the loads in the list are controlled according to the trend of the programmed profile; in this mode the icon will be . Emergency help To programme the load management press the hourly scale below (fig. 8). Fig. 8 25 Saving Loads From the menu in fig. 9, it is possible to assign the selected load different priority levels during the hours of the day. In this specific example the load controlled is an oven; in the control settings it is necessary to make sure that, in case of overload, the oven is not switched off in the hours prior to lunch or dinner time; in these hours it will then be necessary to apply a high priority to the load. In case of overloading the system will deactivate the loads programmed with lower priorities until the overload state is cancelled It is possible to assign three priority levels to the loads: high, normal, low; by assigning the option off to the load, the load can not be activated in any case in the set hour. Press OK to confirm the selection. Press Loads to return to the menu in fig. 1, and then the Saving button to return to the main menu. 26 13 October 15:30 Oven Comfort Switch the load ON/OFF or set automatic control ON Irrigation Saving Loads 6 Security Timers Scenarios 7 HIGH 8 9 NORMAL 10 LOW 11 12 OFF 001200 Comsumption Secretary OK Cancel Dishwasher videohomephone Fig. 9 telephone telephone nehos theater theater nehos notes notes events internet login events keyboard login Setup keyboard setup ? Emergency help Saving Timer 13 October Comfort From the Saving section by pressing the Timers icon, the menu in fig. 10 is displayed, from which it is possible to manage all the devices of the system with timed operation. 15:30 Irrigation Saving Alley lights Loads By pressing one of the buttons showing the devices, the window in fig. 11 is displayed, which represents the state of the selected device. Pool lights Security Timers Scenarios The ON button lets you immediately activate the device selected, ignoring the settings of the timer; when the device is on the ON button is yellow. 001200 Comsumption Secretary videohomephone telephone telephone nehos nehos theater theater notes notes internet events events login login keyboard keyboard Setup setup ? help Emergency Fig. 10 13 October By pressing the OFF, button the active devices are immediately deactivated; if no device is activated the programming is in any case deactivated until otherwise commanded. The Automatic button activates the execution of the set programming. To programme the timed operation of the selected device, press the Planning icon. 15:30 Alley lights Comfort Note: The timer could be daily, in this case in the window in fig.11 in addition to the PLANNING button the time graph appears together with the Copy button. Irrigation Saving Lato piscina Loads Retro ON Select working mode Security Timers Scenarios OFF Automatic 001200 PLANNING Comsumption Secretary Pool lights videohomephone telephone telephone nehos theater theater nehos notes notes events internet login events keyboard login Setup keyboard setup ? Emergency help Fig. 11 27 Saving Timer The menu in fig. 12 appears, from which you can perform the daily programming. Each day of the week may be freely programmed to activate the device at preset times. To access the programming window click in correspondence to the hourly scale next to the desired day. 13 October 15:30 Alley lights Comfort Pianifica il funzionamento automatico Irrigation monday Saving Loads wednsday Security By pressing a day of the week the programming assigned to the selected day is activated/deactivated . thursday Scenarios Timers friday 001200 saturday sunday Comsumption Note: The programming carried out will only be performed in the days highlighted in yellow (fig.12). 0 tuesday Lato piscina Secretary 0 3 3 Retro 6 9 12 15 18 21 24 6 9 12 15 18 21 24 0 3 6 9 12 15 18 21 24 0 3 6 9 12 15 18 21 24 0 3 6 9 12 15 18 21 24 0 3 6 9 12 15 18 21 24 0 3 6 9 12 15 18 21 24 Copy Exit Pool Lights videohomephone telephone telephone nehos theater theater nehos notes notes events internet login events keyboard login Setup keyboard setup ? Emergency help Fig. 12 Use the side arrows to scroll through the hourly scale and press the square in correspondence to the time bands during which device is desired. 13 October 15:30 Alley lights Should a more precise programme be necessary press the Zoom button, to have the possibility of programming the activation with 5 minute intervals. Comfort Once the programming has ended (by pressing the OK) button, this is displayed in the related daily graph in (fig. 11). Security Automatic working mode planning monday Irrigation Saving Lato piscina Loads Retro 20 15 30 45 21 15 30 45 22 15 30 45 23 Timers Scenarios Zoom 001200 Click ZOOM to show minutes Comsumption Secretary OK Cancel Pool lights videohomephone Fig. 13 28 telephone telephone nehos theater theater nehos notes notes events internet login events keyboard login Setup keyboard setup ? Emergency help Saving Timer 13 October Using the Copy button in the window in fig. 12, it is possible to copy the programming made for a day of the week to any of the other days match it to your taste to other devices in an extremely intuitive way, following the instructions that appear on the screen in sequence. 15:30 COPY FROM Ground floor> Garden> Alley lights Comfort Irrigation SUN MON FRI SAT TUE WED THU Saving Loads Security TO Timers Likewise it is possible to copy the programming from a timer device to an irrigation zone by pressing the icon . All Ground floor> Garden> Pool lights Scenarios 001200 Comsumption SUN MON FRI SAT TUE WED THU Press the Timer icon to return to the bottom of the saving menu and press the Saving button to return to the main menu. Secretary COPY videohomephone telephone telephone nehos theater theater nehos notes notes events internet login events keyboard login Setup keyboard EXIT setup ? Emergency help Fig. 14 29 Saving Consumption From the Saving section, by pressing the Consumption icon, the total power absorbed by the devices operating, connected after the measuring device, is displayed in real time. Press the Saving button to return to the main menu 13 October Comfort 15:30 Irrigation Power consumption Saving Loads Security 2.3 kW Timers Scenarios 001200 Comsumption Secretary videohomephone Fig. 15 30 telephone telephone nehos theater theater nehos notes notes events internet login events keyboard login Setup keyboard setup ? Emergency help Security 13 October Comfort Inside the Security section it is possible to manage various security equipment (if installed). 15:30 Burglar Alarm - Possibility to interface with some Brahms burglar systems to allow the display or the activation of the Alarm areas, or the individual Zones installed in the home by the terminal. Burglar Alarm Saving Alarm Security Cameras Alarms - Management of alarms and sending of signals to a predefined recipient (if the system is enabled to remote control using WEBNEHOS). Scenarios Secretary videohomephone Fig. 1 telephone telephone nehos theater theater nehos notes notes events internet login events keyboard login Setup keyboard setup ? Emergency help Cameras - Direct activation and display of up to maximum of 64 video cameras. - Command management: zoom, slewing and focusing. 31 Security Burglar Alarm By pressing the Burglar Alarm icon (fig. 2) and then the Sensors icon, the Areas are displayed in which the home has been subdivided when the burglar alarm system is programmed. Area means a grouping of zones (sensors) protecting a certain area of the home (for example the external perimeter). 13 October 15:30 Sensors Comfort Potenza assorbita Saving Alarm Area 1 Security Area 2 2.3 kW Cameras Unarmed area Scenarios Unarmed area, one of the zones in the Area has been activated (for example an open door). Enable Burglar Alarm Secretary Armed area Armed area on alarm, one of the zones in the Area has been activated. videohomephone telephone telephone nehos theater theater nehos notes notes events internet login events keyboard login Setup keyboard setup ? Emergency help Fig. 2 By clicking on one of the areas available, the state of the Zones present appears (fig. 3). 13 October Bathroom Window Zone not alarmed or not active Bathroom Window Alarmed zone with unarmed area Saving Alarmed zone with armed area Security Bathroom Window 15:30 Sensors Sensori Comfort Enable Attiva Burglar Alarm Area 1 Alarm Bathroom window Area 1 Living Area 2 window Studio window Cameras Kitchen window Terrace door Incoming door Scenarios Should you be in any of the system management windows, the occurrence of an alarm is signalled by an acoustic warning and a flashing icon that appears in the place of the date and time. When the Burglar Alarm menu is opened the acoustic signal disappears. 32 Secretary Area 2 videohomephone Fig. 3 telephone telephone nehos theater theater nehos notes notes events internet login events keyboard login Setup keyboard setup ? Emergency help Security Burglar Alarm 13 October Sensors Comfort By pressing the Enable icon (fig. 4), it is possible to activate the burglar alarm system in all the areas (pressing All ON) or only in some of the areas available. Press in correspondence to the area to activate and enter the activation code in the keypad that appears (fig. 5). 15:30 Enable Burglar Alarm All ON Saving Alarm Area 1 Area 2 Unarmed area Security Cameras Area during arming. “Exit Time” Scenarios Secretary videohomephone telephone telephone nehos theater theater nehos notes notes events internet login events keyboard login Setup keyboard setup ? Emergency help The programming of the burglar alarm system may provide for a period of time prior to the actual activation of the control unit called “exit time”, which is necessary to give the user time to leave the premises in which the burglar alarm system is activated. Armed area Fig. 4 13 October 15:30 Note: For security purposes the unarming of the control unit will only be possible using the keypad or the keys of the burglar alarm system. Insert security code Comfort Burglar Alarm Saving Alarm Security Cameras Scenarios 1 2 3 4 5 6 7 8 9 0 C Secretary Press the Burglar Alarm button to return to the security menu and then the Security button to return to the main menu. Confirm videohomephone telephone telephone nehos theater theater nehos notes notes events internet login events keyboard login Setup keyboard setup ? Emergency help Fig. 5 33 Security Alarms From the menu dedicated to the management of the security devices, by pressing the Alarm icon, you access the window in figure 6, enabling you to make sure that, upon an alarm occurring, the system sends a warning text message or an email to a preset number or email address. 13 October Alarm On the upper part of the window, four different alarm categories are shown. Secretary Nets A category that groups the alarms that concern the electrical line or the data transmission line. Burglar Alarm Alarms that concern the burglary alarm system. Technical Nets Burglar Burglar Alarm Saving Security Technical Groups the alarms that do not constitute a serious danger for the house or its occupants (e.g.: water pump fault, boilers, air conditioning...). Emergency Comfort Note: Sending a text message, calls or emails in case of alarms is only possible when subscribing to the WEBNEHOS service. Emergency Groups the alarms that may constitute a serious danger for the house or its occupants (e.g.: fire, flooding, gas...). 15:30 Fire alarm Flooding Alarm Gas Alarm Cameras Scenarios videohomephone telephone telephone nehos theater theater nehos notes notes events internet login events keyboard login Setup keyboard ? Emergency help setup Fig. 6 13 October 15:30 Emergency Comfort Burglar Alarm Technical ACTIVE Nets Burglar INACTIVE DELAY Fire alarm Saving Fire Emergency Alarm Select the row to modify the call Emergency call Security By pressing in correspondence to one of the alarms available (fig. 6) the window in figure 7 will be displayed, which shows the state of the signal via SMS and/or e-mail (ACTIVE - INACTIVE) and the list of those who will receive a message upon the occurrence of the alarm in question. Cameras Scenarios Secretary Fooding alarm videohomephone Fig. 7 34 Delete telephone telephone nehos theater theater nehos notes notes events internet login events keyboard login Setup keyboard setup ? Emergency help Security Alarms 13 October Emergency Comfort By pressing in correspondence to one of the six white spaces available to enter the receivers of the messages, (fig. 7) the window in figure 8 will be displayed. Choose the type of message to send to the receiver (telephone, text, email); enter the name, number or address and message to deliver to the receiver, using the virtual keyboard that appears by pressing the keyboard icon. 15:30 Technical Nets Burglar Burglar Alarm Fire alarm Saving Fire emergency Alarm SMS Message type Security Cameras Scenarios @ Name Mario Rossi Number/Adress 3478888888 Message Fire alarm activate Confirm the entered data by pressing OK. The name and the number of the user will be displayed in the list in fig. 9. It is possible to send messages associated to the event selected to a maximum of six users. Secretary OK videohomephone telephone telephone nehos theater theater nehos notes notes events internet login events Fooding alarm Cancel keyboard login Setup keyboard ? Emergency help setup Fig. 8 13 October 15:30 Emergency Comfort Burglar Alarm Technical ACTIVE Nets It is also possible to delay the sending of the message with respect to the occurrence of the event; to do so, just press the DELAY button and enter the time period desired in the appropriate window; if the DELAY button is orange, this means a delay has been programmed. Burglar INACTIVE DELAY Fire alarm Saving Fire emergency Alarm Should it be necessary to remove or replace one of the saved addresses, press the Delete button and follow the instructions that appear on the screen in sequence. Select the row to modify the call Emergency calls Security SMS Mario Rossi Cameras Note: All the types of alarm listed on the upper part of the window can be managed with the criteria explained above. 3478888888 Scenarios Secretary Press the Alarm button to return to the security menu and then on Security button to return to the main menu. Delete Fooding alarm videohomephone telephone telephone nehos nehos theater theater notes notes events internet events login login keyboard keyboard Setup setup ? Emergency help Fig. 9 35 Security Cameras From the Security menu, by pressing the Cameras icon, you access the window in figure 10 which shows a list of the zones of the home within which the video cameras are installed. Just click in correspondence to one of the zones available to receive the images captured by the video camera on your terminal (fig. 11). If the video camera that captures the image is of the “Dome” type, a series of command options are available. 13 October Comfort 15:30 Burglar Alarm Saving Alarm Badroom Living room Garden Security Cameras Income room Scenarios Secretary To the left of the frame, in the PRESET section there are buttons that let you display predefined frames in 4 different choices. The AUTOPAN button shows the four frames in cyclical sequence. To the right of the frame there are the following commands: A -Zoom control keys B -Manual focus keys C -Manual luminosity adjustment keys D -Manual framing adjustment keys telephone telephone videohomephone nehos nehos theater theater notes notes internet events events login login keyboard keyboard Setup ? help Emergency setup Fig. 10 13 October 15:30 Bedroom ZOOM – Cameras Press the Cameras icon to return to the window of figure 10 and then the Security button to return to the main menu. PRESET B IRIS C – 2 A FOCUS – 1 Note: The commands located to the side of the image depend on the type of video camera installed, in case of video cameras with fixed or manually adjusted lens, the commands will not be active. + + + AUTO 3 D 4 AUTOPAN Living room videohomephone Fig. 11 36 telephone telephone nehos theater theater nehos notes notes events internet login events keyboard login Setup keyboard setup ? Emergency help Scenarios Enable 13 October The scenario is a set of programmed actions to be carried out following a command. 15:30 By selecting the Scenarios icon and then the On icon, the window in fig. 1 will be displayed, which contains the scenarios programmed by the installer of the system. By pressing the icon of the scenario desired, the actions associated to it will be immediately carried out. Comfort Saving Enter Exit Cinema Security On Scenarios Press Scenarios to return to the main menu. Planning Secretary Modify videohomephone telephone telephone nehos nehos theater theater notes notes internet events events login login keyboard keyboard Setup setup ? help Emergency Fig. 1 13 October By pressing the Planning icon, it is possible to make sure that the scenarios available are “carried out” at a preset time in the various days of the week. 15:30 Comfort Saving Enter Exit To plan the activation of a scenario, press the icon that represents it to access the window in figure 3. Cinema Unplanned scenario Security On Scenarios Planned scenario Planning Secretary Modify videohomephone telephone telephone nehos theater theater nehos notes notes events internet login events keyboard login Setup keyboard setup ? Emergency help Fig. 2 37 Scenarios Plan To activate the planning of the scenario, press the day desired, the box will turn yellow to indicate that the planning is activated for that day. 13 October 15:30 Enter Comfort The scenario is activated every Monday at 18:30. Hours Saving Security The scenario is not activated at the planned time but only with direct control. monday Rientro 19:00 tuesday 00:00 wednsday 00:00 thursday 00:00 friday 00:00 saturday 00:00 sunday 00:00 On Scenarios Planning Uscita Cinema Secretary Exit Modify videohomephone telephone telephone nehos nehos theater theater notes notes internet events events login login keyboard keyboard Setup ? help Emergency setup Fig. 3 By selecting the time box next to the day desired; the window in figure 4 will appear, from which it is possible to plan the activation time of the scenario. 13 October 15:30 Enter Comfort Confirm the settings entered by pressing OK and check the weekly planning again in the window in fig. 3 before leaving the planning section. Hours Saving Security Press the Planning button and then the Security button to return to the main menu. monday Rientro 19:00 tuesday 00:00 wednsday 00:00 thursday 00:00 friday 00:00 saturday 00:00 sunday 00:00 On Scenarios Planning Uscita Cinema 19 : 00 OK Cancel Secretary Exit Modify videohomephone Fig. 4 38 telephone telephone nehos theater theater nehos notes notes events internet login events keyboard login Setup keyboard setup ? Emergency help Scenarios Modify 13 October By selecting the Scenarios icon and then the Modify icon, the window in fig. 5 will be displayed. By selecting one of the icons available the complete list of the actions associated to the scenario (fig. 6) will be displayed. 15:30 Comfort Saving Enter Exit Cinema Security On Scenarios Planning Secretary Modify videohomephone telephone telephone nehos nehos theater theater notes notes internet events events login login keyboard keyboard Setup ? help Emergency setup Fig. 5 13 October By clicking on the bar that describes the controlled device and its positioning, it will be possible to activate or deactivate the action associated to it in the scenario. 15:30 Enter Comfort First floor / Bathroom / Mirror Ground floor / Living-room / Central lamp Description with white background = Action deactivated Ground floor / Living-room / Safa lamp Saving Ground floor / Living / Living-room thermostat Description with yellow background = Action activated Security On Scenarios Planning Secretary Exit Modify videohomephone telephone telephone nehos theater theater nehos notes notes events internet login events keyboard login Setup keyboard setup ? Emergency help Some actions associated to the scenario in addition to being able to be activated or deactivated, may be modified with respect to the programming originally made by the installer, these actions are highlighted by the icon , by pressing it you access the window in figure 7. Fig. 6 39 Scenarios Modify In the example in fig. 7, by pressing the Force settings button, it is possible to modify the switching on options of the light point called “Sofa lamp”. 13 October 15:30 Enter Comfort Press OK to confirm the choices made and return to the window in fig. 8. Ground floor / Living-room / Sofa Lamp Force settings Saving Rientro Uscita Cinema Intensity (%) – 50 + Ramp time (sec) – 10 + Security On Scenarios Planning OK Secretary Cancel Exit Modify videohomephone telephone telephone nehos nehos theater theater notes notes internet events events login login keyboard keyboard Setup ? help Emergency setup Fig. 7 The original settings have not been modified The original settings have been modified 13 October 15:30 Comfort Press the Modify button to return to the security menu and then the Scenarios button to return to the main menu. First floor / Bathroom / Mirror Ground floor / Living-room / Central lamp Ground floor / Living-room / Safa lamp Saving Ground floor / Living / Living-room thermostat Security On Scenarios Planning Secretary Exit Modify videohomephone Fig. 8 40 telephone telephone nehos theater theater nehos notes notes events internet login events keyboard login Setup keyboard setup ? Emergency help Secretary Telephone 13 October By pressing the Secretary button it is possible to manage two types of secretary: telephone and videohomephone. 15:30 Record Voice mail Comfort Saving Security 1 08/11/2007 19:30 003904212091507 2 07/11/2007 20:41 003904212091507 3 11/10/2007 08:22 003904221234567 4 10/10/2007 09:22 003904221234567 Set By pressing the Telephone icon you access the window in fig. 1, that shows a list of messages currently saved in the telephone secretary. The messages are stored in the order they are recorded. Messages that have not been listened to are highlighted in bold. To listen to the content of a message, select it and press PLAY. Telephone Scenarios Videohomeph Secretary PLAY videohomephone telephone telephone nehos nehos theater theater notes notes internet events Call Delete – Vol + Delete all events login login keyboard The list, in addition to showing the secretary messages (shown by the symbol ), shows the missed calls. Exit keyboard Setup setup ? help Emergency Fig. 1 13 October 15:30 Record The automatic answering message may be customized by pressing the Rec button; the window in fig. 2 will appear from which, following the instructions that appear on the display, it will be possible to record your automatic answering message. Once your message is recorded press the Save button and then the Exit button to return to the window in fig. 1. Voice mail Comfort Answering message Saving Duration: Security 0’ 00” Telephone Scenarios PLAY STOP REC Save Exit Note: The maximum number of messages/ calls that can be saved is 150, once this limit is exceeded new messages will overwrite the oldest ones. Videohomeph Secretary – Vol + videohomephone telephone telephone nehos theater theater nehos notes notes events internet login events keyboard login Setup keyboard setup ? Note: with the PLAY button you can listen to the saved message or the one just recorded, which however is lost unless saved before leaving the menu. Emergency help Fig. 2 41 Secretary Telephone Set The activation options of the telephone secretary may be chosen by clicking on the Set button (fig. 1); the window in fig. 3 will appear from which it is possible activate/deactivate the secretary and set the number of rings prior to which the previously recorded automatic answering message is played. Once you have chosen your settings press the Exit button to return to the window in fig. 1. Note: The icon in the upper part of the screen shows that the telephone secretary is active. Press the Telephone button and then the Secretary button to return to the main menu. 13 October 15:30 Voice mail Comfort automatic answer Saving Inactive Security Telephone Active – Scenarios 5 + Number of ring before voice mail activation Videohomeph Secretary Exit videohomephone telephone telephone nehos nehos theater theater internet events notes notes events login login keyboard keyboard Setup setup ? help Emergency Fig. 3 Telephone or videohomephone calls logged during a period of inactivity of the terminal will be displayed as shown in fig. 4. 13 October 15:30 By clicking on the Telephone icon you move to the menu in figure 1. SECRETARY By clicking on the Close button you return to the main menu. There are new logged phone calls There are new logged videoentry calls Close videohomephone Fig. 4 42 telephone telephone nehos theater theater nehos notes notes events internet login events keyboard login Setup keyboard setup ? Emergency help Secretary Videohomephone 13 October By pressing the Videohomephone icon you access the window in fig. 5, that shows a list of messages currently saved in the videohomephone secretary. The videohomephone “message” consists of a frame taken by the video camera of the entry panel. 15:30 Set Videohomephone recorder Comfort 1 2 3 4 Saving Security 08/11/2007 19:30 07/11/2007 20:41 05/10/2007 21:41 04/10/2007 22:41 The messages are stored in the order they are recorded; unviewed messages are shown in bold. To view the content of a message, select it and press Open. Telephone Scenarios Videohomeph Secretary Open videohomephone telephone telephone nehos nehos theater theater notes notes internet events Delete events login Delete all login keyboard keyboard Setup Exit ? Note: The maximum number of images that can be saved is 150, once this limit is exceeded new images will overwrite the oldest ones. Emergency help setup Fig. 5 13 October The window in figure 6 is displayed; by pressing the arrow it is possible to see the other recorded secretary messages, the day and time of recording are reported in the lower part. 15:30 Videohomephone recorder Comfort Saving Security Telephone Scenarios Videohomeph 07 / 11 / 2007 20:41 Secretary Exit videohomephone telephone telephone nehos theater theater nehos notes notes events internet login events keyboard login Setup keyboard setup ? Emergency help Fig. 6 43 Secretary Videohomephone Set The activation options of the videohomephone secretary may be chosen by clicking on the Set button; the window in fig. 7 will appear from which it is possible activate/deactivate the secretary and set the waiting time prior to the video “frame” being captured. Once you have chosen your settings press the Exit button to return to the window in fig. 5. 13 October 15:30 Videohomephone recorder Comfort Save Image Saving Inactive Security Telephone – Scenarios 5 + Duration in seconds before storing image Videohomeph Note: The icon in the upper part of the screen shows that the videohomephone secretary is active. Active Secretary Exit videohomephone telephone telephone nehos nehos theater theater internet events notes notes events login login keyboard keyboard Setup setup ? help Emergency Fig. 7 Telephone or videohomephone calls logged during a period of inactivity of the terminal will be displayed as shown in fig. 8 when the same is turned back on. 13 October 15:30 SECRETARY By clicking on the Videohomephone icon you move to the menu in figure 5. There are new logged phone calls By clicking on the Close you return to the main menu. There are new logged videoentry calls Close videohomephone Fig. 8 44 telephone telephone nehos theater theater nehos notes notes events internet login events keyboard login Setup keyboard setup ? Emergency help Other functions Videohomephone 13 October A videohomephone call is signalled by the appearance of the icon in the space normally occupied by the date and time, together with an acoustic signal. 15:30 Comfort By pressing the Videohomephone icon (fig. 1) in the lower left hand corner, you access the window that groups together all the commands to manage the videohomephone calls (fig. 2). Saving Security Scenarios Secretary videohomephone telephone telephone nehos nehos theater theater notes notes internet events events login login keyboard keyboard Setup ? help Emergency setup Fig. 1 In addition to the commands to answer or end a call, there are other buttons with the following functions: Mute the acoustic call signal 13 October 15:30 Stairway lights activation (Aux 1) Internal 1 Answer Comfort Internal 2 Call the porter (Aux 2) Close Door lock release command Internal 3 Risparmio vol Internal 4 Sicurezza Internal 5 Internal 6 Privacy Scenari Internal 7 Internal 8 Segreterie Light Port Open Ains setup Emergency help Internal 9 Internal 10 videohomephone telephone telephone nehos theater theater nehos notes notes events internet login events keyboard login Setup keyboard ? Pressed in sequence lets you view the images originating from the entry panels In the left part of the window are the call buttons towards the internals (if present). To call one of the internals, press the Answer key and select the internal desired. Press the Videohomephone icon to return to the main window. Fig. 2 45 Other functions Telephone A telephone call is signalled by the appearance of the icon in the space normally occupied by the date and time together with an acoustic signal. 13 October 15:30 Comfort By pressing the Telephone icon (fig. 3) in the bottom left hand corner, you access the window that groups together all the commands to manage the telephone calls (fig. 4). By pressing the Open button you accept the call, with the Close button you end the call. Saving Security Scenarios Secretary videohomephone telephone telephone nehos nehos theater theater notes notes internet events events login keyboard Setup login keyboard ? help Emergency setup Fig. 3 Other commands of the screen RP Repeat last number called. R Call forwarding. Privacy Mute the acoustic call signal. C Delete while dialling the number. Press the Telephone icon to return to the main window. 13 October 15:30 Comfort Risparmio Sicurezza Scenari 1 2 3 RP 4 5 6 R 7 8 9 Privacy * 0 # C Segreterie Open close vol videohomephone Fig. 4 46 telephone telephone nehos theater theater nehos notes notes events internet login events keyboard login Setup keyboard ? setup Emergency help Other functions Nehos Theater 13 October By pressing the nehos theater icon (fig. 5), and then the TV icon (fig. 6), it will be possible to change your terminal into a television (fig. 7). 15:30 Comfort Note: Function available with the television signal from analogue terrestrial TV. Saving Security Scenarios Secretary videohomephone telephone telephone nehos nehos theater theater notes notes ? internet events events login login keyboard keyboard Setup setup help Emergency events internet login events keyboard login Setup keyboard setup Emergency help Fig. 5 13 October 15:30 TV videohomephone telephone telephone nehos theater theater nehos notes notes ? Fig. 6 47 Other functions Nehos Theater Press the thumbnail of the screen to make it full screen; press the dark area to make the TV management commands appear. Fig. 7 On the lower part of the screen a series of commands is available that reproduce the normal functions usually available in a television. By selecting the Programs icon (fig. 8), a list of the saved programs will be displayed. 1 RAI 1 2 RAI 2 3 RAI 3 4 RETE 4 5 CANALE 5 6 ITALIA 1 7 LA7 8 MTV 9 CH21 7 LA7 10 LA9 Frequency + Exit Fig. 8 48 + Programs Volume Keyboard ? Help Other functions Nehos Theater 1 RAI 1 Channel 2 RAI 2 21 3 RAI 3 4 RETE 4 By pressing the Channel setup icon (fig. 8), the window in fig. 9 will appear from which it will be possible to scroll through the programs available, save them on the channels desired and assign them a name using the virtual keyboard. Once the desired channels are set, press the Programs icon again to return to the window in fig. 8; now to hide the setup window press the Programs icon again. Program 1 5 CANALE 5 6 ITALIA 1 Name 7 LA7 8 MTV RAI # 1 9 CH21 7 LA7 Press Exit to return to the window of figure 6 and then the nehos theater button to return to the main menu. MEMO DELETE 10 LA9 Cancel Sintonia + Exit + Programs Volume Keyboard ? Help Fig. 9 49 Other functions Notes By pressing the Notes icon (fig. 10) the screen changes into a white space which you can write on (like a note book) using the pen provided. The message may be deleted by clicking on the Clear icon or it will be deleted automatically when you leave this screen. To return to the main screen, click on the Notes icon again. 13 October 15:30 Comfort Saving Security Scenarios Secretary videohomephone telephone telephone nehos nehos theater theater notes notes internet events events login ? login keyboard keyboard Setup setup help Emergency keyboard login Setup keyboard setup Emergency help Fig. 10 13 October 15:30 Clear videohomephone Fig. 11 50 telephone telephone nehos theater theater nehos notes notes events internet login events ? Other functions Events 13 October By pressing the events icon (fig. 12), it will be possible to consult a detailed list of the events that concerned the system (fig. 13). 15:30 Comfort Saving Security Scenarios Secretary videohomephone telephone telephone nehos nehos theater theater notes notes internet events events login login keyboard keyboard Setup setup ? help Emergency Fig. 12 13 October With the buttons on the right part of the screen (fig. 13) it is possible to select the category of events to be viewed. The events are reported in a list and ordered in an inverted sequence starting from the last one in chronological order. 15:30 System events Comfort 1 13/10/2007 10:38 Gas alarm stopped 2 13/10/2007 10:30 Gas alarm detected 3 11/10/2007 19:32 Remote connection stopped 4 11/10/2007 17:36 Remote connection started Risparmio All Technical alarms Press Exit to return to the main menu. Burglar Alarm Sicurezza SMS controls Scenari Remote accesses Other events Segreterie Exit videohomephone telephone telephone nehos nehos theater theater notes notes events internet events login login keyboard keyboard Setup setup ? Emergency help Fig. 13 51 Other functions Login The system may be programmed to manage multiple users. Multiusers means the possibility that the system is used by various users, who may or may not be allowed to manage some functions of the system. Note: The users and functions associated to them are created during programming by the installer. Upon turning on the system no password is required since access is granted as a default user. 13 October 15:30 Comfort Saving Security Scenarios Secretary Should you wish to gain access as a user other than the default user, it will be necessary to enter a password. videohomephone telephone telephone nehos nehos theater theater notes notes internet events events login ? login keyboard keyboard Setup setup help Emergency keyboard login Setup keyboard setup Emergency help Fig. 14 By clicking on the login button (fig. 14), the window in fig. 15 will appear, from which (using the virtual keyboard) it will be possible to enter your user name and password. By clicking on Confirm, you access the main screen with the user functions assigned to the profile. 13 October 15:30 Comfort NEHOS ACCESS Saving User Security Password Scenarios CONFIRM CANCEL Segreterie videohomephone Fig. 15 52 telephone telephone nehos theater theater nehos notes notes events internet login events ? Setup Date and Time 13 October The setup button lets you access the window in fig. 2, which groups a series of general settings concerning the terminal and more generally the system. 15:30 Comfort Saving Security Scenarios Secretary videohomephone telephone telephone nehos nehos theater theater internet events notes notes events login login keyboard keyboard Setup setup ? help Emergency Fig. 1 13 October Date & Hour Emergency Net Year 10 / 2007 Press Date and Hour to return to the main menu. Minutes 15 : 30 telephone telephone nehos theater theater nehos Note: The data entered in this window will become the system's date and time thus also the core unit will synchronise with the set time. e-mail Month Hours Segreterie videohomephone Remote 13 / Sicurezza Scenari Password Day Risparmio In the Date and Hour section, by pressing the arrows, it is possible to adjust the data and time of the terminal. 15:30 notes notes events internet Set login events keyboard login Reset Setup keyboard setup ? Emergency help Fig. 2 53 Setup Emergency In the Emergency section nine boxes are available to which it is possible to associate as many emergency numbers. Ottobre 13 October Data&e Hour Ora Date Comfort By clicking on one of the free boxes (fig. 3), you activate the right part of the window, which may be compiled with the name and telephone number to be dialled automatically in case of emergency. Using the arrows, it will be possible to associate a name and number to one of the numerous icons available; press OK to confirm the choices made. Emergenza Emergency 15:30 Password Remoto Remote Rete Net Risparmio e-mail Nominativo Carabinieri Police Pronto First AidSoccorso VigiliDepartment del fuoco Fire Sicurezza Telefono 118 Scenari Segreterie OK Annulla Cancel Elimina Delete Press Emergency to return to the main menu. Videocitofono Videocitofono videohomephone telefono telefono telephone telephone nehos theater theater nehos nehos theater appunti appunti notes notes eventi internet events internet login eventi events tastiera login keyboard login Setup tastiera keyboard Emergency Setup setup Fig. 3 In case of emergency, the speed dial buttons created as so, will be immediately available by pressing the button (fig. 3) present in the bottom right hand corner of every screen. Police Firefighters First aid Exit Fig. 4 54 ? help Emergency help Setup Password 13 October Date & Hour Emergency By pressing the Password button it is possible to change your system access password following the simple instructions that appear on the video. 15:30 Password Remote Net e-mail Press Password to return to the main menu. Risparmio Insert current password Note: In the case in which you access the system with administrator privileges, it is possible to modify all the passwords of all the users. Sicurezza *** Scenari Segreterie videohomephone OK telephone telephone nehos nehos theater theater notes notes internet events events login Net e-mail login keyboard Cancel keyboard Setup setup ? help Emergency Fig. 5 13 October Date & Hour Emergency 15:30 Password Remote Risparmio Sicurezza Insert NEW password **** Scenari Insert the new password to confirm Segreterie **** OK videohomephone telephone telephone nehos theater theater nehos notes notes events internet login events keyboard login Cancel Setup keyboard setup ? Emergency help Fig. 6 55 Setup Remote The Remote section is divided into two parts (fig. 8). The upper part groups together all the information concerning the daily sending of an informative mail and/or text message on the state of the system. In addition to a series of information concerning: technical alarms, state of the network, alarms originating from the burglar alarm etc... normally contained in the message, it is possible to choose to receive information on the state of max 2 thermal zones of the house. Using the arrows and buttons, set the parameters desired and confirm your choices by pressing the Save button. The lower part of the window is dedicated to the control of the remote accesses to the system. With the Active/Inactive button it is possible to be warned of an acoustic signal in case remote access is established. By pressing the Change button (fig. 8), in the window that will appear it will be possible to set the day and the time until which remote access to the system is denied (fig. 9). 13 October Date & Hour Emergency Remote SMS recipient Net e-mail E-mail recipient 3331234567 [email protected] 10 : 00 Inactivation 15 : 30 Daily Twice daily First attempt Second attempt Thermal Zone 1 Ground floor/Living/Living-room Thermal Zone 2 First floor/Night zone/Bedroom Save Remote access option for TCP/IP videohomephone Access allowed Change Audible toneindicating remote WEB user is active Inactive telephone telephone nehos nehos theater theater notes notes internet events events login Net e-mail keyboard Setup login keyboard ? setup help Emergency setup Emergency help Fig. 8 13 October Date & Hour Emergency 15:30 Password Remote Deny access until Day Month Year Hour 15 / 11 / 2007 Ok videohomephone Fig. 9 56 Password Daily system status reporting Note: • With the remote access disabled the icon will be present on the upper part of the screen. • During remote access the icon will be present on the upper part of the screen. • To access the system remotely it is necessary to be subscribed to the WebNehos service Press Remote to return to the main menu. 15:30 telephone telephone nehos theater theater nehos notes notes 18 Minutes : 09 Cancel events internet login events keyboard login Setup keyboard ? Setup Net / e-mail 13 October Date & Hour The Net section lets you enter all the core network parameters. 15:30 Emergency Password Remote CORE UNIT IP SETTINGS Net IP Address Subnet Mask Gateway Primary DNS CORE UNIT DNS SETTINGS 192 255 192 168 255 168 0 0 0 212 0 1 ATTENTION!!: Modifications to identification parameters of the core unit must be carried by specialised personnel. Modifications to the first three IP parameters cause the system to restart. 0 0 0 0 0 0 0 0 Press OK to confirm and Net to return to the main menu. e-mail Secondary DNS Ok videohomephone telephone telephone nehos nehos theater theater notes notes internet events events login login keyboard keyboard Setup Cancel setup ? help Emergency Fig. 10 13 October Date & Hour The E-mail section lets you set the system e-mail profile, i.e. a reference e-mail address that will be used to send informative messages on the state of the system or other communications coming from the system. 15:30 Emergency Password Remote Net e-mail SYSTEM E-MAIL PROFILE SETTINGS Press OK to confirm and e-mail to return to the main menu. Mario Rossi [email protected] out.provider.it Mario Rossi ********** Name E-mail Address Outgoing server (SMTP) User Password Ok videohomephone telephone telephone nehos theater theater nehos notes notes events internet login events keyboard login Setup keyboard Cancel setup ? Emergency help Fig. 11 57 58 59 BPT S.p.A. Via Cornia, 1 33079 Sesto al Reghena-PN-Italy www.bpt.it [email protected]