1
.NET Micro Framework for Beginners
November 12, 2015
Getting Started
*** Draft, in-progress document ***
GHI Electronics, LLC
www.GHIElectronics.com
Licensed under Creative Commons Share Alike 4.0
www.creativecommons.org/licenses/by-sa/4.0/
G H I
E l e c t r o n i c s
GHI Electronics,LLC
.NET Micro Framework for
Beginners
Table of Contents
Table of Contents
1.About the Manual.....................................................................3
1.1.Intended Audience..........................................................3
2..NET Micro Framework............................................................4
2.1.Advantages.....................................................................4
2.2.What is .NET? ................................................................4
3..NET Gadgeteer ......................................................................6
4.Getting Started ........................................................................7
4.1.System Setup.................................................................7
4.2.The Emulator .................................................................7
4.3.Debugging......................................................................9
4.4.Using the Hardware .....................................................11
5.FEZ Config.............................................................................12
6.The Basics of C#....................................................................13
6.1.What is C#?..................................................................13
6.2.Methods .......................................................................13
6.3.Comments ...................................................................13
6.4.while-loop .....................................................................14
6.5.Variables ......................................................................15
6.6.String ...........................................................................17
6.7.Assemblies ..................................................................19
6.8.Namespaces.................................................................20
6.9.if-statement .................................................................20
6.10.Classes ......................................................................21
6.11.Static vs. non-static ....................................................22
6.12.For-Loop ....................................................................23
6.13.Switch-Statement ......................................................23
6.14.Array ..........................................................................25
6.15.Threading ...................................................................26
7.Digital Input & Output ............................................................28
7.1.Digital Inputs ................................................................28
7.2.Interrupt Port ................................................................31
7.3.Digital Outputs .............................................................34
7.4.Tristate Port..................................................................35
8.Analog Pins............................................................................36
8.1.Analog Inputs................................................................36
8.2.Analog Outputs.............................................................36
9.PWM.......................................................................................38
9.1.Dimming LEDs and Lights............................................38
9.2.Controlling DC Motors..................................................39
9.3.Servo Motors................................................................40
Do Not Use Info 2
9.4.Generating Tones.........................................................41
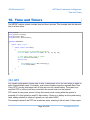
10.Time and Timers..................................................................43
10.1.RTC.............................................................................43
10.2.Timer...........................................................................45
11.Graphics...............................................................................46
11.1.Simple Shapes............................................................46
11.2.Fonts...........................................................................49
11.3.Images........................................................................50
11.4.Configuring Displays...................................................52
Parallel TFT Displays...................................................52
SPI Displays.................................................................54
12.Resource Constrains...........................................................56
12.1.Memory Contraints.....................................................56
12.2.Object Allocation.........................................................56
12.3.Data Bandwidth..........................................................57
13.Vanilla NETMF.....................................................................59
13.1.Button mapping..........................................................59
13.2.Graphics.....................................................................59
13.3.File System.................................................................59
13.4.Networking..................................................................60
14.Garbage Collector ...............................................................62
14.1.Losing Resources ......................................................63
14.2.Dispose ......................................................................64
15.Topics not Covered..............................................................65
15.1.Serial Buses................................................................65
15.2.Networking..................................................................65
15.3.Accessing files and Folders........................................66
15.4.Register Access..........................................................66
15.5.Runtime Loadable Procedures (RLP)........................66
15.6.XML............................................................................66
15.7.Crypto and Security....................................................66
15.8.Database....................................................................66
15.9.Signal Capture and Generate.....................................66
15.10.Pulse Feedback........................................................67
15.11.Playing WAV Audio...................................................67
15.12.Glide.........................................................................67
15.13.Touch........................................................................67
15.14.Large Memory Objects.............................................67
15.15.In-Field Update.........................................................68
15.16.Working with the Bootloader.....................................68
Page 2 of 68
www.ghielectronics.com
GHI Electronics,LLC
.NET Micro Framework for Beginners
About the Manual
1. About the Manual
1.1. Intended Audience
This manual is for beginners wanting to get started using the .NET Micro Framework. No prior
knowledge is necessary. The book covers the basics of the .NET Micro Framework, Visual
Studio, and C#. If you are a hobbyist or an engineer, you will find a great deal of information in
this book.
Page 3 of 68
www.GHIElectronics.com
GHI Electronics,LLC
.NET Micro Framework for Beginners
.NET Micro Framework
2. .NET Micro Framework
Have you ever thought of a great idea for a product but you could not bring it to life because
technology was not on your side? Or maybe you thought, “there's got to be an easier way!”
Maybe you are a programmer that wanted to make a security system but then thought using a
PC is too expensive to run a simple system? The answer is Microsoft's .NET Micro
Framework (NETMF).
Here is a scenario, we want to make a pocket-GPS-data-logger; that saves positions,
acceleration, and temperatures on an SD memory card. A PC is too large for the task, so it
has to be done using a microcontroller. But then, microcontrollers will need some
development tools, typically expensive or buggy. We also need to understand the
microcontroller to write drivers for the interfaces to access the sensors. We then we also need
FAT file system and SD card libraries added. .NET Micro Framework encapsulates all the low
level drivers allowing the developer to concentrate on their own application.
Throughout this document, we will refer to .NET Micro Framework as NETMF.
2.1. Advantages
Using .NET Micro Framework has many advantages:
1. It is programmed using Microsoft's Visual Studio IDE, even the free version.
2. .NET Micro Framework is open-source and free.
3. Your same code will run any NETMF device with almost no changes.
4. Full debugging capabilities (breakpoints, stepping in code, variables...etc.)
5. Has been tested in many commercial products, with assured quality.
6. Includes many bus drivers (SPI, UART , I2C...etc.)
7. Eliminates the need to use the complicated and long processors' datasheets.
8. If you are already a PC .NET programmer then you already know NETMF.
2.2. What is .NET?
The .NET Framework was developed to standardize programming. (Note how we are talking
about the full .NET Framework and not the Micro Framework.) Programming in .NET
abstracts the underlying operating system. It offers a set of libraries that developers can use
from many programming languages.
The .NET Framework is very large and runs on PCs and not on microcontrollers. Also, the
Page 4 of 68
www.GHIElectronics.com
GHI Electronics,LLC
.NET Micro Framework for Beginners
.NET Micro Framework
.NET framework has many things (methods) that wouldn't be very useful on microcontrollers.
This is how .NET Micro Framework was born. The micro framework removed the unneeded
libraries to shrink down the size of the framework. It also added few microcontroller specific
features, for accessing pins for example. Due to similarities among these frameworks, similar
code can run on PCs and on microcontrollers.
Page 5 of 68
www.GHIElectronics.com
GHI Electronics,LLC
.NET Micro Framework for Beginners
.NET Gadgeteer
3. .NET Gadgeteer
The .NET Gadgeteer platform definitions take NETMF's flexibility to the next level. It uses a
standard socket to connect sensors and control modules to the a processor's mainboard. It is
a framework running on top of NETMF that simplifies how sense and control modules interact
with mainboards. The complete specifications and software are open-source. More details are
found at http://www.ghielectronics.com/technologies/netmf#gadgeteer
.NET Gadgeteer users will find this book useful to understand the underlying .NET Micro
Framework, the heart and soul of .NET Gadgeteer.
Tip: Pure NETMF code can run on any .NET Gadgeteer device. Instead of using the .NET
Gadgeteer framework, the schematics can be reviewed to determine socket's connections.
Page 6 of 68
www.GHIElectronics.com
GHI Electronics,LLC
.NET Micro Framework for Beginners
Getting Started
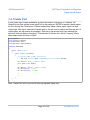
4. Getting Started
4.1. System Setup
Before any programming, we need a PC setup with needed development tools. Follow the
steps listed at the following link.
https://www.ghielectronics.com/support/netmf
By the way, you may want to bookmark this page as it has about everything you need to use
NETMF.
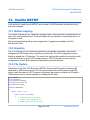
4.2. The Emulator
NETMF includes an emulator that allows NETMF applications to run right on the PC. We will
create a project and run it on the emulator.
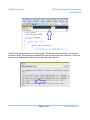
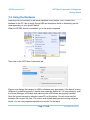
Open visual Studio and from the top menu select File -> New Project. If the installation and
setup was done properly a Micro Framework option should show under Visual C# and also
under Visual Basic. We will need a console project from the available options.
IMPORTANT: Make sure to name the project exactly NETMFBook, case sensitive. We will
explain why later when we talk about namespaces.
Tip: We will use C# throughout this book but Visual Basic can be used very similarly.
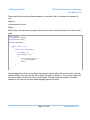
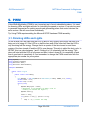
The code will look like this. Note the namespace, NETMFBook.
using System;
using Microsoft.SPOT;
namespace NETMFBook
{
public class Program
{
public static void Main()
{
Debug.Print(Resources.GetString(Resources.StringResources.String1));
}
}
}
If the code is not visible, double-click Program.cs file found under the Solution Explorer
window.
Go ahead and run the program, by clicking on the start button or pressing the F5 key.
Page 7 of 68
www.GHIElectronics.com
GHI Electronics,LLC
.NET Micro Framework for Beginners
Getting Started
Visual Studio will compile and run the program. This program prints a string from resource
and then it ends. This means the emulator will open up and close back real quick. It will look
like not much happened but take a look inside the output window.
Page 8 of 68
www.GHIElectronics.com
GHI Electronics,LLC
.NET Micro Framework for Beginners
Getting Started
The text “Hello World!” was actually printed from the program we just ran. However, the text is
from a resource, which is why it is not very clear. Modify the code slightly.
using System;
using Microsoft.SPOT;
namespace NETMFBook
{
public class Program
{
public static void Main()
{
Debug.Print("Amazing!");
}
}
}
This is the output window.
4.3. Debugging
Debugging is used to find issues in programs. This includes adding a breakpoint, which stops
the program execution when it reaches this point. To set a breakpoint, set the cursor on the
debug print line and press the F9 key.
Page 9 of 68
www.GHIElectronics.com
GHI Electronics,LLC
.NET Micro Framework for Beginners
Getting Started
We will run the program, just like before. Everything will start the same except the program
will pause at that line. The word “Amazing!” won't be in the output window as it hasn't
executed yet.
Another useful debugging feature is stepping in code. Press F10 and watch the output
window at the same time.
Note how the yellow arrow now points to the next line, and how the output window shows the
text.
We can now press F5 to let the program continue, or press shift+F5 to terminate.
Page 10 of 68
www.GHIElectronics.com
GHI Electronics,LLC
.NET Micro Framework for Beginners
Getting Started
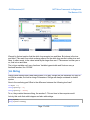
4.4. Using the Hardware
Switching from the emulator to the actual hardware is very simple. First, connect your
hardware to the PC, this is mostly though USB but sometimes serial or Networking can be
used depending on your specific device.
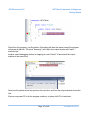
When the NETMF device is connected, go to the project properties
Then click on the .NET Micro Framework tab
We can now change the transport to USB or whatever may appropriate. If the device is using
USB and is connected properly, it should show under the device list. If it is not showing, open
the Device Manager in Windows and make sure the USB drivers are properly installed.
Once the correct transport is selected, press F5 just like before. You will notice that the
emulator did not open this time. The code is now actually deployed and running inside the
device. You are now programming electronic circuits; it's that easy!
Page 11 of 68
www.GHIElectronics.com
GHI Electronics,LLC
.NET Micro Framework for Beginners
FEZ Config
5. FEZ Config
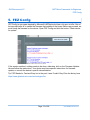
FEZ Config is a program inspired by Microsoft's MFDeploy but has a lot more to offer. One of
its important tasks is to update the firmware that resides on the board. Before we proceed, we
must check the firmware on the device. Open FEZ Config and click the button “Check device
for update”
If the version matched, nothing needs to be done; otherwise, click on the Firmware Updater
tab and follow the instructions. Your device may have specific instructions for firmware
update, so consult the device's specific documentation.
Tip: FEZ Stands for Fast and Easy but in the past, it was Freakin' Easy! See the history here
https://www.ghielectronics.com/technologies/fez
Page 12 of 68
www.GHIElectronics.com
GHI Electronics,LLC
.NET Micro Framework for Beginners
The Basics of C#
6. The Basics of C#
This section is not meant to cover C# in details, only the basics. If you are familiar with C#
and how to add assemblies to a project, you can completely skip this chapter.
6.1. What is C#?
C # includes everything expected from a modern language, like a garbage collector and runtime validation. It is object-oriented, making programs more portable and easier to debug and
port.
6.2. Methods
A method is a little chunk of code that handles a task. Methods start and finish with
open/close curly brackets. In our first program, there was only a single line of code between
the curly brackets.
The line was Debug.Print("Amazing!");
Lines (commands) always end with a semicolon. In this example, the line calls the Print
method that exists in the Debug object. It calls it while also passing the string “Amazing!” to it.
Confused? Let's try to clear it out a bit. Let's say a dog is an object. There are multiple
methods to control this dog, the object. One method can be “Sit” and another can be “Run”.
Methods sometimes take arguments. For example, the “Run”method can accept how many
steps to run. This hypothetical code will make a dog run for 100 steps!
Dog.Run(100);
One special method in C# is Main. Programs always start at the beginning of this method.
6.3. Comments
It is important to add comments/notes/warnings in code. Those comments will help in
understanding what the code does. Comments (Ignored text) are shown in green by default in
Visual Studio. C# completely ignores these comments.
There are two ways to create comments: line comments and block comments. To comment a
line, or part of a line, add // before the comment text. The color of the text will change to green
indicating that the text is now comment and is ignored by C#.
using System;
using Microsoft.SPOT;
Page 13 of 68
www.GHIElectronics.com
GHI Electronics,LLC
.NET Micro Framework for Beginners
The Basics of C#
namespace NETMFBook
{
public class Program
{
public static void Main()
{
Debug.Print("Amazing!");// A comment!
}
// Another comments!
}
}
Whole blocks can also be commented. Start the comment with /* and then end it with */
symbols.
using System;
using Microsoft.SPOT;
namespace NETMFBook
{
public class Program
{
public static void Main()
{
Debug.Print("Amazing!");// A comment!
}
/* Another comments!
This can be multi line comment!
*/
}
}
Run the above program and step through the code. The compiler will completely ignore the
comment lines.
6.4. while-loop
The most basic and most important keyword is “while”. The while-loop starts and ends with
curly brackets to contain some looping code. Everything inside will repeatedly run while a
statement is true. For example, the reader can keep reading this manual “while” awake! In
this case, awake can be true if the reader is up or false if asleep. The true or false here is the
variable. Before we dig into variables, lets just run the loop while true! Meaning it will run
infinitely.
Page 14 of 68
www.GHIElectronics.com
GHI Electronics,LLC
.NET Micro Framework for Beginners
The Basics of C#
using System;
using System.Threading;
using Microsoft.SPOT;
namespace NETMFBook
{
public class Program
{
public static void Main()
{
while (true)
{
Debug.Print("Amazing!");
Thread.Sleep(1000);
}
}
}
}
Run the Program, press F5, then pause/break it using ctrl+alt+break. You can also add a
breakpoint in the loop and step in the code. Note the yellow arrow and how the program
progresses when pressing F10.
Tip: We added a sleep for 1000 milliseconds so we are not printing the text too fast and
flooding the system with messages.
Note that this program will never end so you will need to force stop using shift+F5.
6.5. Variables
Variables are places in memory reserved for the developer's use. The amount of memory
reserved depends on the type of the variable. We will be using an int variable. This type of
variable is used to hold integer numbers, no fractions.
Simply saying:
int MyVar;
will tell the system that we need some memory. This memory will be referenced to as MyVar.
It can given any name, as long as the name doesn't contain spaces or symbols or start with a
number.
Now, any integer number can be stored in that memory/variable.
MyVar = 1234;
You can also use mathematical operations to calculate numbers:
MyVar = 123 + 456;
Page 15 of 68
www.GHIElectronics.com
GHI Electronics,LLC
.NET Micro Framework for Beginners
The Basics of C#
There are other unusual possible operations on variables, like to increment the number by
one:
MyVar++;
or decrement it by one:
MyVar- -;
With all that, can we make a program that prints the word 'Amazing!' three times? Here is the
code.
using System;
using System.Threading;
using Microsoft.SPOT;
namespace NETMFBook
{
public class Program
{
public static void Main()
{
int MyVar = 3;
while (MyVar > 0)
{
Debug.Print("Amazing!");
Thread.Sleep(1000);
MyVar--;
}
}
}
}
Add a breakpoint in the loop and when the program pauses place the mouse cursor over the
variable MyVar. This will show the value that is currently in stored in it. You can also right-click
the mouse and from the menu click on Add Watch. This will place the variable in a watch
window so you can see its value while stepping through the code.
Page 16 of 68
www.GHIElectronics.com
GHI Electronics,LLC
.NET Micro Framework for Beginners
The Basics of C#
We said in the last section that the while loop accepts true and false. But where is the true
and false? The result from what we have entered for the while loop results in either true and
false. In other words, is the value inside MyVar larger than zero? The answer is either yes or
no, that is true and false.
The int type variable can't carry fractions. Variable types double and float can carry a
fractional number, like 123.964.
6.6. String
Strings have already been used many places. In a way, strings are just variables, but they do
not hold a number, but hold a string of characters. Strings are always contained in double
quotes.
Now to the confusing part! What is the difference between the following two lines?
int MyVar = 3;
string MyString = "3";
string MyString = "Three";
To us, they contain the same thing, the number 3. This not true in the computer world.
Lets try this code that adds integers and also adds strings.
using System;
using System.Threading;
Page 17 of 68
www.GHIElectronics.com
GHI Electronics,LLC
.NET Micro Framework for Beginners
The Basics of C#
using Microsoft.SPOT;
namespace NETMFBook
{
public class Program
{
public static void Main()
{
int MyVar1 = 3;
int MyVar2 = 3;
string MyString1 = "3";
string MyString2 = "3";
Debug.Print("Using int =>" + (MyVar1 + MyVar2).ToString());
Debug.Print("Using strings =>" + MyString1 + MyString2);
}
}
}
Integer 3 plus integer 3 results in 6 as we know, but string 3 plus string 3 is not 6, but it is 33.
Since strings are very useful, almost everything has a built in ToString method. For an integer
variable, this converts the mathematical value of the variable to a string with matching
symbols. So when using something that requires a string, like the debug print method, just
remember to convert whatever you are trying to print to a string.
Can you guess what this program does?
using System;
using System.Threading;
using Microsoft.SPOT;
namespace NETMFBook
{
public class Program
{
public static void Main()
{
int MyVar = 1;
while (MyVar <= 10)
{
Debug.Print(MyVar.ToString());
MyVar++;// or use MyVar = MyVar + 1;
Page 18 of 68
www.GHIElectronics.com
GHI Electronics,LLC
.NET Micro Framework for Beginners
The Basics of C#
}
}
}
}
6.7. Assemblies
Assemblies are files containing compiled (assembled) code. This allows developers to use
the compiled code without seeing source code. We have already used Debug.Print. Who
made the Debug class/object and who made the Print method that is in it? Those are made
by the NETMF team at Microsoft. They compile the code and give us an assembly to use.
Going back to the last piece of code from the previous section, go under References in the
project's Solution Explorer and delete Microsoft.SPOT.Native. Also, comment out the line
“using Microsoft.SPOT”. Try to compile/build the code, by pressing F7.
The compiler no longer recognizes the debug library. Now, right click on References and add
back the Microsoft.SPOT.Native assembly. Make sure the code compiles and runs before
proceeding. We will be adding assemblies in the coming chapters.
Tip: SPOT is the old name of NETMF. It was never changed in code for backward
compatibility reasons.
Page 19 of 68
www.GHIElectronics.com
GHI Electronics,LLC
.NET Micro Framework for Beginners
The Basics of C#
6.8. Namespaces
Namespaces are a way to group things together. For example, Microsoft.SPOT.Native is
added to the earlier project. The namespace Microsoft.SPOT is needed from that library,
“using Microsoft.SPOT”.
IMPORTANT: Earlier in this manual we explained how when you a create a project, to follow
along with this book, always name it NETMFBook. This is because the project itself has a
namespace. Since you will copy examples from this manual, we need the examples and your
project to have the same namespace.
6.9. if-statement
An important part of programming is checking some state and taking action accordingly. For
example, “if” the temperature is over 80, turn on the fan.
The following code will use the center button on the emulator, also called the select button.
This core needs the Microsoft.SPOT.Hardware assembly added to References.
using
using
using
using
System;
System.Threading;
Microsoft.SPOT;
Microsoft.SPOT.Hardware;
namespace NETMFBook
{
public class Program
{
public static void Main()
{
InputPort SelectButton = new InputPort(
Cpu.Pin.GPIO_Pin3, false, Port.ResistorMode.PullUp);
while (true)
{
if(SelectButton.Read() == false)
{
Debug.Print("Pressed");
}
Thread.Sleep(100);
}
}
}
}
The code will simply check a pin 10 times every second. If the button is pressed, it will print
pressed in every loop. Note from the code that the button is false when it is pressed. This
maybe the opposite from logic but there is a reason for this. More on InputPorts later.
Page 20 of 68
www.GHIElectronics.com
GHI Electronics,LLC
.NET Micro Framework for Beginners
The Basics of C#
To run this code on a real hardware, just change the pin number GPIO_Pin3 to the pin used
on the hardware. The pin number is typically printed on the circuit board next to the button.
For starter, add GHI.Pins assembly to the project. This assembly includes pin mapping for all
GHI Electronics' NETMF products. This is pin D13 on FEZ Panda III for example:
GHI.Pins.FEZPandaIII.Gpio.D13
If-statements can optionally have an else-statement. The else is the code that will run if the
event was false instead of true. This code will show the button state, pressed or not pressed.
using
using
using
using
System;
System.Threading;
Microsoft.SPOT;
Microsoft.SPOT.Hardware;
namespace NETMFBook
{
public class Program
{
public static void Main()
{
InputPort SelectButton = new InputPort(
Cpu.Pin.GPIO_Pin3, false, Port.ResistorMode.PullUp);
while (true)
{
if (SelectButton.Read() == false)
{
Debug.Print("Pressed");
}
else
{
Debug.Print("Unpressed");
}
Thread.Sleep(100);
}
}
}
}
6.10. Classes
All objects we talked about so far are actually called “classes” in C#. In modern object
oriented programming languages, everything is an object and methods always belong to one
object. This allows for having methods of the same name belonging to a complete different
objects. A “human” can “walk” and a “cat” can also “walk” but do they walk the same way?
When calling the “walk” method, C# it is not clear if the cat or the human will walk, but using
human.walk or cat.walk makes clear.
Page 21 of 68
www.GHIElectronics.com
GHI Electronics,LLC
.NET Micro Framework for Beginners
The Basics of C#
Creating classes is beyond the scope of this book. Here is a very simple class to get you
started
class MyClass
{
public int Add(int a, int b)
{
return a + b;
}
}
6.11. Static vs. non-static
Some objects in life have multiple instances but others only exist once. The objects with
multiple instances are non-static. For example, an object representing a human doesn't mean
much. You will need an “instance” of this object to represent a one human. So this will be
something like
Human Mike;
We now have a “reference” called Mike of type Human. It is important to note this reference at
this point is not referencing any object (no instance assigned) just yet, so it is referencing
NULL.
To create the “new” object instance and reference it from Mike
Mike = new Human();
For short, also use
Human Mike = new Human();
We now can use any of the Human methods on our “instance” of Mike
Mike.Run(distance);
Mike.Eat();
bool hungry = Mike.IsHungry();
We have used those non-static methods already when we were reading an input pin, the
select button on the emulator.
Static methods are easier to handle because there is only one object, that is used directly.
The easiest example is our Debug object. There is only one debug object in the NETMF
system so using one of its methods, like Print, is used directly. Debug.Print(“string”);
We may not have used the exact definitions of static and instances for simplicity.
Page 22 of 68
www.GHIElectronics.com
GHI Electronics,LLC
.NET Micro Framework for Beginners
The Basics of C#
6.12. For-Loop
Using the while-loop is enough to serve all our loop needs but for-loop can be clearer in some
cases. We had a program using a while loop that counted 1 to 10. Here is the equivalent
program but using a for loop.
using System;
using Microsoft.SPOT;
namespace NETMFBook
{
public class Program
{
public static void Main()
{
for (int MyVar = 1; MyVar <= 10; MyVar++)
{
Debug.Print(MyVar.ToString());
}
}
}
}
The easiest way to understand for loops is by actually stepping in the code and seeing how
the code flows and how the variable changes. Try to step in the code and observe the
variable value and the program flows.
6.13. Switch-Statement
A switch-statement will compare a variable to a list of constants (only constants) and make an
appropriate jump accordingly. In this example, we will read the current “DayOfWeek” value
and then from its value we will print the day as a string. We can do all this using few ifstatements but, in this case, it is much easier and cleaner to use a switch-statement.
using System;
using Microsoft.SPOT;
namespace NETMFBook
{
public class Program
{
public static void Main()
{
Page 23 of 68
www.GHIElectronics.com
GHI Electronics,LLC
.NET Micro Framework for Beginners
The Basics of C#
DateTime currentTime = DateTime.Now;
int day = (int)currentTime.DayOfWeek;
}
}
switch (day)
{
case 0: Debug.Print("Sunday"); break;
case 1: Debug.Print("Monday"); break;
case 2: Debug.Print("Tuesday"); break;
case 3: Debug.Print("Wednsday"); break;
case 4: Debug.Print("Thursday"); break;
case 5: Debug.Print("Friday"); break;
case 6: Debug.Print("Saturday"); break;
default: Debug.Print("We should never see this"); break;
}
}
For simplicity, we used numbers in the previous example but this is the proper way of writing
the earlier code
using System;
using Microsoft.SPOT;
namespace NETMFBook
{
public class Program
{
public static void Main()
{
DateTime currentTime = DateTime.Now;
switch (currentTime.DayOfWeek)
{
case DayOfWeek.Sunday: Debug.Print("Sunday"); break;
case DayOfWeek.Monday: Debug.Print("Monday"); break;
case DayOfWeek.Tuesday: Debug.Print("Tuesday"); break;
case DayOfWeek.Wednesday: Debug.Print("Wednsday"); break;
case DayOfWeek.Thursday: Debug.Print("Thursday"); break;
case DayOfWeek.Friday: Debug.Print("Friday"); break;
case DayOfWeek.Saturday: Debug.Print("Saturday"); break;
default: Debug.Print("We should never see this"); break;
}
}
}
}
Page 24 of 68
www.GHIElectronics.com
GHI Electronics,LLC
.NET Micro Framework for Beginners
The Basics of C#
6.14. Array
If we are reading an analog input 100 times and we want to pass all 100 values to a method,
it would not be practical to pass 100 variables in 100 arguments. Instead, we create an “array”
of our variable type. Arrays can be create of any object; however, we will mainly be using byte
arrays.
Arrays are declared similar to objects.
byte[] MyArray;
The code above creates a “reference” of an object of type “byte array”. This is a reference but
it doesn't have an object yet, it is null.
To create the object we use the “new” keyword and then we need to tell it the size of our
array. This size is the count of how many elements will have in the array.
byte[] MyArray; MyArray = new byte[10];
We have created a byte array with 10 elements in it. The array object is referenced from
“MyArray”.
We now can store/read any of the 10 values in the array by indicating which “index“ we want
to access.
byte[] MyArray;
MyArray = new byte[10];
MyArray[0] = 123;// first index
MyArray[9] = 99;// last index
MyArray[10] = 1;// This is BAD...ERROR!!
A very important note here is that indexes start from zero. So, if we have an array of size 10,
then we have indexes from 0 to 9. Accessing index 10 will NOT work, raising an exception.
We can assign values to elements in an array at the time of initialization. This example will
store the numbers 1 to 10 in indexes 0 to 9.
byte[] MyArray = new byte[10] { 1, 2, 3, 4, 5, 6, 7, 8, 9, 10 };
To copy an array, use the Array class as follows
byte[] MyArray1 = new byte[10] { 1, 2, 3, 4, 5, 6, 7, 8, 9, 10 };
byte[] MyArray2 = new byte[10];
Array.Copy(MyArray1, MyArray2, 5);//copy 5 elements only
Page 25 of 68
www.GHIElectronics.com
GHI Electronics,LLC
.NET Micro Framework for Beginners
The Basics of C#
One important and useful property of an array is the Length property. We can use it to
determine the how many items are in an array.
byte[] MyArray1 = new byte[10] { 1, 2, 3, 4, 5, 6, 7, 8, 9, 10 };
byte[] MyArray2 = new byte[10];
Array.Copy(MyArray1, MyArray2, MyArray1.Length);//copy the whole array.
6.15. Threading
This can be a very advanced topic; thanks to NETMF, beginners can enjoy this advanced
features. Processors/programs only run one instruction at a time. Remember how we stepped
in the code? Only one instruction got executed and then the flow went on to the next
instruction. Then how is it possible that a PC can run multiple programs at the same time?
Actually, the PC is never running them a once! What it is doing is running every program for a
short time, stops it and goes on to run the next program.
The main program, even if you didn't add any threads, is a thread itself. Does Thread.Sleep
look familiar?
There are things that can be done much easier using threads. For example, we want to blink
an LED while the rest of the program is doing something else. Ideally, the LED is handled in a
separate thread. LED stands for Light Emitting Diodes.
To use threading, add “using System.Threading” to the top of your code. Done! That is all you
need. This program will print NETMF once every two seconds in the the main loop, which is a
thread that is automatically created. We are also printing Hello once a second from a thread
we created.
using System;
using System.Threading;
using Microsoft.SPOT;
namespace NETMFBook
{
public class Program
{
public static void Main()
{
Thread MyThread = new Thread(HelloThreadLoop);
MyThread.Start();
while(true)
{
Debug.Print("NETMF");
Thread.Sleep(2000);// Wait 2 seonds
}
}
Page 26 of 68
www.GHIElectronics.com
GHI Electronics,LLC
.NET Micro Framework for Beginners
The Basics of C#
}
static void HelloThreadLoop()
{
while (true)
{
Debug.Print("Hello");
Thread.Sleep(1000);// Wait a second
}
}
}
Congratulations, you now know enough about C# to create some amazing projects with .NET
Micro Framework.
Page 27 of 68
www.GHIElectronics.com
GHI Electronics,LLC
.NET Micro Framework for Beginners
Digital Input & Output
7. Digital Input & Output
Microcontrollers (tiny processors) always have many “digital” pins that can be used as inputs
or outputs. By “digital” pins we mean the pin can be “one” or “zero”, that is voltage high for
one, and voltage low for zero. The low state has a near zero volts, where the high state has
voltage that is near the processor's IO's voltage. The IO's voltage was 5V in the 8-bit days but
modern microcontrollers run on 3.3V typically.
NETMF supports digital input and output pins through the “Microsoft.SPOT.Hardware”
assembly and namespace. Go ahead and add the assembly and namespace like we learned
before.
Note: Static discharge from a human body may damage the processor. Professionals use
special equipment and take precautions handling the static charges in their body. You may not
have such equipment so just try to stay away from touching the circuit if you don't have to.
7.1. Digital Inputs
Digital inputs sense if the state of a pin is high or low. There is a voltage limitation on these
input pins. For example, the minimum voltage on the pin is 0 volts. A negative voltage may
damage the microcontroller. Also, the maximum voltage you can apply to a pin must not
exceed the the processor's power source voltage, typically 3.3V. Since 5V is still commonly
used from the old days, many microcontrollers running at 3.3V have digital input pins that
tolerate 5V. Check the product's manual to determine if some or all pins are 5V tolerant.
IMPORTANT: 5V-tolerant doesn't mean the processor can be powered off of 5V. Always
power it with 3.3V.
Unconnected input pins are special. They are not high nor low, they are floating. Any
surrounding electrical noise in the environment will push the pin one way or another, or even
worse, toggle the pin at a high rate. Input pins should never be left floating. Thankfully, most
microcontrollers have a built in weak pull up or pull down resistors on the pins. Think of these
resistors as rubber bands that are pulling the pin high (or low). This pull will make the pin high
but then an external low state will force the pin low, like if the pin is connected to ground
through a button. When the button is not pressed, no connection to ground, and the pin is
pulled high by the internal resistor, the rubber band!
As for programming, the InputPort object is used to handle digital input pins. Typically, any
GPIO (General Purpose Input Output) pin on the microcontroller can be be switched between
input or an output.
There are many uses for input ports but the most common is to connect it to a button or a
switch. This example runs on the emulator and checks if the center button is pressed.
Page 28 of 68
www.GHIElectronics.com
GHI Electronics,LLC
.NET Micro Framework for Beginners
Digital Input & Output
using
using
using
using
System;
System.Threading;
Microsoft.SPOT;
Microsoft.SPOT.Hardware;
namespace NETMFBook
{
public class Program
{
public static void Main()
{
InputPort SelectButton = new InputPort(
Cpu.Pin.GPIO_Pin3, false, Port.ResistorMode.PullUp);
while (true)
{
if(SelectButton.Read() == false)
{
Debug.Print("Pressed");
}
Thread.Sleep(100);
}
}
}
}
The code can run on hardware as well but you will need to change the GPIO pin number.
Typically, boards come with a class that lists all of the board/chip pin numbers. For example,
all of pins on boards made by GHI Electronics's are grouped into one assembly called
GHI.Pins. Lets assume a board is designed with the G80 SoC at its core. And also assume
there is a button connected between pin PE3 and ground. The code will now looks like this.
using
using
using
using
System;
System.Threading;
Microsoft.SPOT;
Microsoft.SPOT.Hardware;
namespace NETMFBook
{
public class Program
{
public static void Main()
{
InputPort SelectButton = new InputPort(
GHI.Pins.G80.Gpio.PE3, true, Port.ResistorMode.PullUp);
int count = 0;
while (true)
{
Page 29 of 68
www.GHIElectronics.com
GHI Electronics,LLC
.NET Micro Framework for Beginners
Digital Input & Output
if (SelectButton.Read() == false)
{
Debug.Print("Pressed " + count++);
}
Thread.Sleep(100);
}
}
}
}
There is also another argument that we did not cover, the glitch filter. We have set that to true
when constructing the input pin. When a button is pressed, two metal contacts close on each
other quickly. This will cause the contacts to bounce once or more. This bounce is very small
and short in time but computers are very fast and they will see the one button press as
multiple presses! The glitch filter is used to eliminate these unneeded glitches.
Page 30 of 68
www.GHIElectronics.com
GHI Electronics,LLC
.NET Micro Framework for Beginners
Digital Input & Output
7.2. Interrupt Port
In the previous example, we had to loop infinitely checking if the button was pressed. This
wastes the microcontroller's energy. It will be checking the pin repeatedly, maybe a million
times, before it is pressed! Interrupt ports solve this problem by executing a method (event
handler) automatically when a button is pressed, when pin's state changes to low for
example.
using
using
using
using
System;
System.Threading;
Microsoft.SPOT;
Microsoft.SPOT.Hardware;
namespace NETMFBook
{
public class Program
{
public static void Main()
{
InterruptPort SelectButton = new InterruptPort(
GHI.Pins.G80.Gpio.PE3, true, Port.ResistorMode.PullUp,
Port.InterruptMode.InterruptEdgeLow);
SelectButton.OnInterrupt += SelectButton_OnInterrupt;
// Do other things ...
// or just sleep!
Thread.Sleep(Timeout.Infinite);
}
}
static void SelectButton_OnInterrupt(uint pin, uint state, DateTime time)
{
Debug.Print("Pressed");
}
}
Note that event handlers can be assigned to more than one source. This is where the first
argument “Pin” come in handy, to check which pin actually fired the event.
Another important useful feature is the “time” argument. NETMF is not real time, meaning the
event will fire up after the button is pressed but when the system is free. If the system is busy,
this can take some time. For the button example this is not a problem, as a human will not
notice if actions triggered by the button happened immediately or after 50 milliseconds.
However, in cases when we need to know when did the trigger actually fire, the time is saved
aside and when the event is fired the time is passed to the handler.
This code measures the time between when the event fired and when the event was
Page 31 of 68
www.GHIElectronics.com
GHI Electronics,LLC
.NET Micro Framework for Beginners
Digital Input & Output
executed.
using
using
using
using
System;
System.Threading;
Microsoft.SPOT;
Microsoft.SPOT.Hardware;
namespace NETMFBook
{
public class Program
{
public static void Main()
{
InterruptPort SelectButton = new InterruptPort(
Cpu.Pin.GPIO_Pin3, false,
Port.ResistorMode.PullUp,Port.InterruptMode.InterruptEdgeLow);
SelectButton.OnInterrupt += SelectButton_OnInterrupt;
// Do other things ...
// or just sleep!
Thread.Sleep(Timeout.Infinite);
}
static void SelectButton_OnInterrupt(uint Pin, uint State, DateTime time)
{
TimeSpan LapsedTime = (DateTime.Now - time);
Debug.Print("Time passed = " + LapsedTime.Milliseconds);
}
}
}
The time passed is going to be zero since the system is not busy at all. Let us make the
system very busy by replace the sleep with an infinite loop. This loop is not doing much but it
will greatly stress the system making it loop there constantly.
while (true){ }
//Thread.Sleep(Timeout.Infinite);
On the system we have tested this code on, it took about 12 milliseconds to respond. Still,
that is only 0.012 seconds delay on an very busy system.
Page 32 of 68
www.GHIElectronics.com
GHI Electronics,LLC
.NET Micro Framework for Beginners
Digital Input & Output
Tip: Most but not all pins on all microcontrollers support interrupts.
Page 33 of 68
www.GHIElectronics.com
GHI Electronics,LLC
.NET Micro Framework for Beginners
Digital Input & Output
7.3. Digital Outputs
Digital output pin can be set to true or false, one or zero. Note that one doesn't mean it is 1
Volt but it means that the pin is supplying voltage. If the processor is powered off of 3.3V
source then state 1 on a pin means that there is near 3.3V on the output pin. When the pin is
set to zero then it's voltage is very close to zero volts. Digital pins are very weak. They can't
be used to drive devices. For example, a motor may run on 3.3V but it can't be connected
directly to the processor's digital pin. That is because the processor's output is 3.3V but can
supply very little current. The most the pin can do is drive a small LED, or “signal” 1 or 0 to
another circuit. The circuit can be a motor controller for example.
This example will not run on the emulator since there are no output pins there. The example
is a simple blink LED demo.
using
using
using
using
System;
System.Threading;
Microsoft.SPOT;
Microsoft.SPOT.Hardware;
namespace NETMFBook
{
public class Program
{
public static void Main()
{
OutputPort LED = new OutputPort(
GHI.Pins.G80.Gpio.PE14, true);
while (true)
{
LED.Write(!LED.Read()); // Invert the LED
Thread.Sleep(200); // Wait a bit!
}
}
}
}
Try to change the code to make the LED blink faster or slower, maybe on for a short time and
off for a longer time, for a strobe effect.
Important note: Never connect two output pins together. If they are connected and one is set
to high and the other is set to low, you will damage the processor. Always connect an output
pin to an input, or to a simple load, like a LED.
Page 34 of 68
www.GHIElectronics.com
GHI Electronics,LLC
.NET Micro Framework for Beginners
Digital Input & Output
7.4. Tristate Port
In rare cases a pin maybe needed as an input and output. One way is to “Dispose” the
OutputPort pin then create a new InputPort on the same pin. NETMF supports a better option
for this, through the Tristate port. Tristate means three states; that is input, output low and
output high. One minor issue about tristate pins is; if a pin is set to output and then we set it to
output again, we will receive an exception. One way to get around this is by checking the
direction of the pin before changing it. The direction is found in the “Active” property, where
false means input and true is output.
using
using
using
using
System;
System.Threading;
Microsoft.SPOT;
Microsoft.SPOT.Hardware;
namespace NETMFBook
{
public class Program
{
public static void Main()
{
TristatePort Pin = new TristatePort(
GHI.Pins.G80.Gpio.PE14, true,true,Port.ResistorMode.PullUp);
Pin.Active = true; // Make it Input
bool state = Pin.Read();
Pin.Active = false; // Make it Output
Pin.Write(true); // Set
Pin.Write(false); // Clear
// ...
// ...
}
}
}
Note: TristatePort will only work with interrupt capable digital pins.
Page 35 of 68
www.GHIElectronics.com
GHI Electronics,LLC
.NET Micro Framework for Beginners
Analog Pins
8. Analog Pins
8.1. Analog Inputs
Where digital pins only read a state of true and false, analog inputs can read the voltage on a
pin.
using
using
using
using
System;
System.Threading;
Microsoft.SPOT;
Microsoft.SPOT.Hardware;
namespace NETMFBook
{
public class Program
{
public static void Main()
{
AnalogInput Ain = new AnalogInput(GHI.Pins.G80.AnalogInput.PB1);
}
}
while (true)
{
Debug.Print("Ain = " + Ain.Read().ToString("F3"));
Thread.Sleep(500);
}
}
The channel number and the digital pin number are not related. A pin maybe P0.25 but then it
is Analog channel 6. The GHI.Pins assembly simplifies this but if needed, the user manual will
reveal the actual channel number. For example, the following 2 lines do the exact same thing
on G80 because pin PB1 is also Analog channel 9.
AnalogInput Ain = new AnalogInput(GHI.Pins.G80.AnalogInput.PB1);
AnalogInput Ain = new AnalogInput((Cpu.AnalogChannel) 9);
8.2. Analog Outputs
Analog outputs allow a pin's voltage level to be controlled by software. While the first thing
that may come to mind is to dim an LED or slow down a motor, this is not what Analog
Outputs are used for. Analog outputs are rarely used but here is an example on how to set an
analog output. This example generates a sign wave.
Page 36 of 68
www.GHIElectronics.com
GHI Electronics,LLC
.NET Micro Framework for Beginners
Analog Pins
using
using
using
using
System;
System.Threading;
Microsoft.SPOT;
Microsoft.SPOT.Hardware;
namespace NETMFBook
{
public class Program
{
public static void Main()
{
AnalogOutput Ain = new AnalogOutput(GHI.Pins.G80.AnalogOutput.PA4);
double i = 0;
while (true)
{
// Sin returns -1 to 1 but analog out needs 0 to 1
// Scale by slashing in half and moving up 0.5
Ain.Write((System.Math.Sin(i) / 2) + 0.5);
i = i + 0.1;
Thread.Sleep(5);
}
}
}
}
Page 37 of 68
www.GHIElectronics.com
GHI Electronics,LLC
.NET Micro Framework for Beginners
PWM
9. PWM
Pulse Width Modulation (PWM) is very important part of most embedded systems. It is used
for dimming LEDs and lights and also in controlling the speed on motors. It can also be used
to generate frequencies for making sounds and generating pulses that control devices like
servo motors. We will cover these individually.
Tip: Using PWM requires adding the Microsoft.SPOT.Hardware.PWM assembly.
9.1. Dimming LEDs and Lights
To dim a small LED we need turn the LED on and off very quickly and control the ratio of its
being on to its being off. If the LED is on half the time and off the other half then the LED is
only receiving half the energy. Change that to a quarter of the time turned on and three
quarter of the time turned off and the LED is now dimmer. This ratio is called the duty cycle. In
NETMF, this is a value between 1 and 0. Setting it to 0.5 is basically half the energy. This
demo will start with the LED at full power and then it dims it down till it is completely off and
then it goes back to completely lit. Just remember to change the PWM constructor with the
appropriate pin number on your system.
using
using
using
using
System;
System.Threading;
Microsoft.SPOT;
Microsoft.SPOT.Hardware;
namespace NETMFBook
{
public class Program
{
public static void Main()
{
PWM MyFader = new PWM(GHI.Pins.G80.PwmOutput.PE13, 10000, 0.1, false);
double level = 0.5;
double step = 0.01;
while (true)
{
MyFader.DutyCycle = level;
/* DutyCycle is not dynamic so make a call to
* Start() to refresh the object */
MyFader.Start();
level += step;
if ((level >= 0.9) || (level <= 0.1))
{
step *= -1; // Invert the step
Page 38 of 68
www.GHIElectronics.com
GHI Electronics,LLC
.NET Micro Framework for Beginners
PWM
}
Thread.Sleep(10);
}
}
}
}
Dimming a light work exactly the same way, except the pin on the processor is not capable of
driving a light. An external circuit must be added to control the light.
Tip: The GPIO pin number and the PWM channel number are two different things, similar to
analog channels.
9.2. Controlling DC Motors
This works very similar to controlling lights, where a circuit is needed. However, the motors
are picky to what frequency is being used to control them. The easiest way would be in
experimenting with different frequencies to see what works best, or consult the motor's
manufacture.
To change the direction of a DC motor, a circuit called H-bridge is used. The web is full of Hbridge circuits that can be wired to DC motors.
Page 39 of 68
www.GHIElectronics.com
GHI Electronics,LLC
.NET Micro Framework for Beginners
PWM
9.3. Servo Motors
Servo motors turns sets its position (typically an an arm) between 0 degrees and 180
degrees. A repeated pulse coming into the servo every 20 ms is used to set the position. The
pulse width is between 1ms and 2ms. To be safe and not push the servo beyond its limits, a
value between 1.25ms and 1.75ms is used.
In earlier examples, we used the frequency and duty cycles. But with servos, we need a
better control over the pulses so we will use the the period and the duration instead. The code
below will move the position of the servo every one second.
using
using
using
using
System;
System.Threading;
Microsoft.SPOT;
Microsoft.SPOT.Hardware;
namespace NETMFBook
{
public class Program
{
public static void Main()
{
PWM MyServo = new PWM(Cpu.PWMChannel.PWM_3, 2175, 175,
PWM.ScaleFactor.Microseconds, false);
while (true)
{
// 0 degrees. 20ms period and 1.25ms high pulse
MyServo.Duration = 1250;
MyServo.Period = 20000;
MyServo.Start();
Thread.Sleep(1000);
// 90 degrees. 20ms period and 1.50ms high pulse
MyServo.Duration = 1500;
MyServo.Period = 20000;
MyServo.Start();
Thread.Sleep(1000);
}
}
// 180 degrees. 20ms period and 1.75ms high pulse
MyServo.Duration = 1750;
MyServo.Period = 20000;
MyServo.Start();
Thread.Sleep(1000);
}
}
Page 40 of 68
www.GHIElectronics.com
GHI Electronics,LLC
.NET Micro Framework for Beginners
PWM
9.4. Generating Tones
Music notes have specific frequencies. The C note is about 261Hz. Plugging these numbers
into an array and knowing the length of each tone is all that is needed to play some simple
melodies. You can connect a simple peizo to a pin but we recommend adding a transistor for
better results.
using
using
using
using
System;
System.Threading;
Microsoft.SPOT;
Microsoft.SPOT.Hardware;
namespace NETMFBook
{
public class Program
{
const int NOTE_C
const int NOTE_D
const int NOTE_E
const int NOTE_F
const int NOTE_G
const
const
const
const
const
const
int
int
int
int
int
int
=
=
=
=
=
261;
294;
330;
349;
392;
WHOLE_DURATION = 1000;
EIGHTH = WHOLE_DURATION / 8;
QUARTER = WHOLE_DURATION / 4;
QUARTERDOT = WHOLE_DURATION / 3;
HALF = WHOLE_DURATION / 2;
WHOLE = WHOLE_DURATION;
public static void Main()
{
// Make sure the two below arrays match in length.
// Each duration element corresponds to one note element.
int[] note = {
NOTE_E, NOTE_E, NOTE_F, NOTE_G, NOTE_G,
NOTE_F, NOTE_E, NOTE_D, NOTE_C, NOTE_C,
NOTE_D, NOTE_E, NOTE_E, NOTE_D, NOTE_D,
NOTE_E, NOTE_E, NOTE_F, NOTE_G, NOTE_G,
NOTE_F, NOTE_E, NOTE_D, NOTE_C, NOTE_C,
NOTE_D, NOTE_E, NOTE_D, NOTE_C, NOTE_C};
int[] duration = {
QUARTER, QUARTER, QUARTER, QUARTER, QUARTER,
QUARTER, QUARTER, QUARTER, QUARTER, QUARTER,
QUARTER, QUARTER, QUARTERDOT, EIGHTH, HALF,
QUARTER, QUARTER, QUARTER, QUARTER, QUARTER,
QUARTER, QUARTER, QUARTER, QUARTER, QUARTER,
QUARTER, QUARTER, QUARTERDOT, EIGHTH, WHOLE};
PWM MyPWM = new PWM(GHI.Pins.G80.PwmOutput.PA15, 261, 0.50, false);
while (true)
{
Page 41 of 68
www.GHIElectronics.com
GHI Electronics,LLC
.NET Micro Framework for Beginners
PWM
}
}
for (int i = 0; i < note.Length; i++)
{
MyPWM.Stop();
MyPWM.Frequency = note[i];
MyPWM.Start();
Thread.Sleep(duration[i]);
}
Thread.Sleep(100);
}
}
Page 42 of 68
www.GHIElectronics.com
GHI Electronics,LLC
.NET Micro Framework for Beginners
Time and Timers
10. Time and Timers
The NETMF runtime system includes time and timer services. This example sets the date and
time to a fixed value.
using
using
using
using
System;
System.Threading;
Microsoft.SPOT;
Microsoft.SPOT.Hardware;
namespace NETMFBook
{
public class Program
{
public static void Main()
{
//Set the time to 07/25/2012 at 11:46:11
DateTime time = new DateTime(2012, 07, 25, 11, 46, 11);
// lost after power cycle or reset:
Utility.SetLocalTime(time);
while (true)
{
Debug.Print(DateTime.Now.ToString());
Thread.Sleep(1000);
}
}
}
}
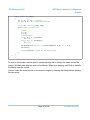
10.1. RTC
Any system needs power to keep track of time. When power is lost, the time stops or resets to
some internal default value. Fortunately, most microcontrollers include a separate Real Time
Clock (RTC) circuitry that keeps track of time and runs off a small battery. The system can
read this RTC to set the local time or can fetch the correct time over the network.
RTC needs its own power source to keep the internal clock running while the system is
powered off. Is this typically a small 3V disc battery. If there is no battery on the system being
used, adding a battery is required, typically on a pin called VBAT.
This example checks if the RTC has a resonate value, meaning it did not reset. It then copies
Page 43 of 68
www.GHIElectronics.com
GHI Electronics,LLC
.NET Micro Framework for Beginners
Time and Timers
that value to the NETMF's internal clock. Note how we use try-catch when reading the time as
the time maybe corrupt and would cause an exception.
The example also prints both, the RTC time and the system time. They will match at the
beginning but run this for a while and the time will drift apart eventually.
using
using
using
using
using
System;
System.Threading;
Microsoft.SPOT;
Microsoft.SPOT.Hardware;
GHI.Processor;
namespace NETMFBook
{
public class Program
{
public static void Main()
{
DateTime DT;
try
{
// Read the RTC
DT = RealTimeClock.GetDateTime();
Debug.Print("Current Real-time Clock " + DT.ToString());
}
catch // If the time is not invalid, like day of the month is 40!
{
Debug.Print("Bad time exception");
// Set to something!
DT = new DateTime(2000, 1, 1, 1, 1, 1);
}
if (DT.Year < 2015)
{
Debug.Print("Bad time value");
// Date is wrong! We need to set
// .. get time from user or network ands set RTC
// Set the time to 07/25/2015 at 11:46:11 in this example
DT = new DateTime(2015, 07, 25, 11, 46, 11);
RealTimeClock.SetDateTime(DT);
}
// lost after power cycle or reset:
Utility.SetLocalTime(DT);
while (true)
{
Debug.Print("System Time: " + DateTime.Now.ToString());
Debug.Print("
RTC Time: " + RealTimeClock.GetDateTime());
Thread.Sleep(1000);
}
}
Page 44 of 68
www.GHIElectronics.com
GHI Electronics,LLC
.NET Micro Framework for Beginners
Time and Timers
}
}
Tip: It is useful to set the time when creating files as the files created will carry the current
time and date.
10.2. Timer
Timers are used to let the system know that we need something to happen at a certain time.
NETMF includes two timer classes, Timer and ExtendedTimer. The Timer class is the same
one included in full framework where ExtendedTimer is specific to NETMF with extra
functionality.
This example creates a timer that will run after five seconds and then it will keep firing every
second.
Tip: the time parameters expect milliseconds.
using System;
using System.Threading;
using Microsoft.SPOT;
namespace NETMFBook
{
public class Program
{
static void RunMe(object o)
{
Debug.Print("It is time!");
}
public static void Main()
{
Timer MyTimer =
new Timer(new TimerCallback(RunMe), null, 5000, 1000);
Debug.Print(
"The timer will fire in 5 seconds and then " +
"fire periodically every 1 second");
Thread.Sleep(Timeout.Infinite);
}
}
}
Page 45 of 68
www.GHIElectronics.com
GHI Electronics,LLC
.NET Micro Framework for Beginners
Graphics
11. Graphics
NETMF shines when it comes to its graphics. It is simple for small systems, yet powerful
when compared to other embedded system graphics options. We will start by using the
emulator for a start and then explain how to configure the system to use an actual display.
Tip: The assembly Microsoft.SPOT.Graphics is required to be added to list of references.
11.1. Simple Shapes
This example will bounce a circle on the screen.
using
using
using
using
using
System;
System.Threading;
Microsoft.SPOT;
Microsoft.SPOT.Presentation;
Microsoft.SPOT.Presentation.Media;
namespace NETMFBook
{
public class Program
{
Page 46 of 68
www.GHIElectronics.com
GHI Electronics,LLC
.NET Micro Framework for Beginners
Graphics
public static void Main()
{
int x = 55, y = 55; // position
int dx = 4, dy = 6; // speed and direction
Bitmap LCD = new Bitmap(320, 240);
while (true)// Infinite loop
{
// Move
x += dx;
y += dy;
// Bounce back!
if (x < 0 || x > LCD.Width)
dx *= -1;
if (y < 0 || y > LCD.Height)
dy *= -1;
LCD.DrawEllipse(ColorUtility.ColorFromRGB(250, 0, 0), x, y, 8, 8);
LCD.Flush();
Thread.Sleep(30);// Sleep for few milliseconds
}
}
}
}
To draw on the screen, we first need to create a bitmap that is exactly the same size as the
screen. We then draw what we wish on the bitmap. When done drawing, call Flush to transfer
the bitmap onto the screen.
We can make the circle bounce on the screen's edges by clearing the bitmap before drawing
the new circle.
Page 47 of 68
www.GHIElectronics.com
GHI Electronics,LLC
.NET Micro Framework for Beginners
Graphics
using
using
using
using
using
System;
System.Threading;
Microsoft.SPOT;
Microsoft.SPOT.Presentation;
Microsoft.SPOT.Presentation.Media;
namespace NETMFBook
{
public class Program
{
public static void Main()
{
int x = 55, y = 55; // position
int dx = 4, dy = 6; // speed and direction
Bitmap LCD = new Bitmap(320, 240);
while (true)// Infinite loop
{
// Move
x += dx;
y += dy;
// Bounce back!
if (x < 0 || x > LCD.Width)
dx *= -1;
if (y < 0 || y > LCD.Height)
dy *= -1;
Page 48 of 68
www.GHIElectronics.com
GHI Electronics,LLC
.NET Micro Framework for Beginners
Graphics
LCD.Clear();
LCD.DrawEllipse(ColorUtility.ColorFromRGB(250, 0, 0), x, y, 8, 8);
LCD.Flush();
Thread.Sleep(30);// Sleep for few milliseconds
}
}
}
}
There are other methods for drawing simple shapes, like lines.
11.2. Fonts
Fonts are something typically very difficult to handle on an embedded system. Thanks to
NETMF, we can convert any true type font to the TinyFont format used by NETMF.
This is a useful tool for converting fonts
http://informatix.miloush.net/microframework/Utilities/TinyFontTool.aspx
Once you have a font file, include it in the system as a resource. There are font files that are
included in the NETMF installation
C:\Program Files (x86)\Microsoft .NET Micro Framework\v4.3\Fonts
To add a font to a resource, double click Resources.resx in the Solution Explorer to open the
resource manager. Now drag NinaB.tinyfnt file to the resource window.
Page 49 of 68
www.GHIElectronics.com
GHI Electronics,LLC
.NET Micro Framework for Beginners
Graphics
We can now use this font. If the code below did not compile right, you have accidentally
changed the namespace. Create a project called exactly NETMFBook and you should be
okay. We will use the same code as before but this time we are bouncing the text.
using
using
using
using
using
System;
System.Threading;
Microsoft.SPOT;
Microsoft.SPOT.Presentation;
Microsoft.SPOT.Presentation.Media;
namespace NETMFBook
{
public class Program
{
public static void Main()
{
int x = 55, y = 55; // position
int dx = 4, dy = 6; // speed and direction
Bitmap LCD = new Bitmap(320, 240);
Font MyFont = Resources.GetFont(Resources.FontResources.NinaB);
while (true)// Infinite loop
{
// Move
x += dx; y += dy;
// Bounce back!
if (x < 0 || x > LCD.Width)
dx *= -1;
if (y < 0 || y > LCD.Height)
dy *= -1;
LCD.Clear();
LCD.DrawText("Hello!", MyFont, ColorUtility.ColorFromRGB(250, 0, 0), x, y);
LCD.Flush();
}
}
Thread.Sleep(30);// Sleep for few milliseconds
}
}
11.3. Images
NETMF supports BMP, JPG and GIF image types. However, some devices with small
memory may support some or none of these image formats. Also, devices with smaller
available memory may have support for BMP for example but the limited memory will limit the
Page 50 of 68
www.GHIElectronics.com
GHI Electronics,LLC
.NET Micro Framework for Beginners
Graphics
size of images. In this case, an out of memory exception will be raised.
Draw and save a small BMP file, or download one from the web. Lets try something under
50x50 pixels. This may seem too small on a PC but the emulator is 320x240 only. Here is
what we are showing on the screen.
Using the exact same code as before but now bouncing the drawing. The image is added to
resources, similar to how we added fonts.
using
using
using
using
using
System;
System.Threading;
Microsoft.SPOT;
Microsoft.SPOT.Presentation;
Microsoft.SPOT.Presentation.Media;
namespace NETMFBook
{
public class Program
{
public static void Main()
{
int x = 55, y = 55; // position
int dx = 4, dy = 6; // speed and direction
Bitmap LCD = new Bitmap(320, 240);
Bitmap Bunny = new Bitmap(Resources.GetBytes(Resources.BinaryResources.bunny),
Bitmap.BitmapImageType.Bmp);
while (true)// Infinite loop
{
// Move
x += dx; y += dy;
// Bounce back!
if (x < 0 || x > LCD.Width)
dx *= -1;
if (y < 0 || y > LCD.Height)
dy *= -1;
Page 51 of 68
www.GHIElectronics.com
GHI Electronics,LLC
.NET Micro Framework for Beginners
Graphics
LCD.Clear();
LCD.DrawImage(x, y, Bunny, 0, 0, Bunny.Width, Bunny.Height);
LCD.Flush();
}
}
Thread.Sleep(30);// Sleep for few milliseconds
}
}
11.4. Configuring Displays
GHI Electronics extends the NETMF framework with ways to configure the system to accept
many type of displays. There are two different display types that can be used, a parallel TFT
displays and SPI displays. The parallel-connected displays use a 16-bit color bus, horizontal
and vertical sync signals, and a pixel clock. Internally, this display is mapped to the memory
directly. The system can update these displays very efficiently as they are memory mapped.
The down side is that about 20 wires need to be connected to the display.
Parallel TFT Displays
If the display used is one of the displays modules offered by GHI Electronics then the default
settings are included in the libraries and also in FEZ Config.
We will first set the display configuration using FEZ Config. The steps are simple, open Fez
Config, click the Display Configuration and then select the appropriate display, then click
Apply to device.
Page 52 of 68
www.GHIElectronics.com
GHI Electronics,LLC
.NET Micro Framework for Beginners
Graphics
The board will reset and you should see some boot up messages on the screen. Go back to
one of the examples we used earlier and deploy to the device instead of the emulator. Please
note that the size of the LCD Bitmap in the code must match the display size.
The display can be configured using code as well. The display configuration are saved
internally and only take effect after a reboot.
using
using
using
using
using
using
using
System;
System.Threading;
Microsoft.SPOT;
Microsoft.SPOT.Hardware;
Microsoft.SPOT.Presentation;
Microsoft.SPOT.Presentation.Media;
GHI.Processor;
namespace NETMFBook
{
public class Program
{
public static void Main()
{
Display.Populate(Display.GHIDisplay.DisplayTE35);
if (Display.Save())
{
Page 53 of 68
www.GHIElectronics.com
GHI Electronics,LLC
.NET Micro Framework for Beginners
Graphics
Debug.Print("Reboot...");
// New config was saved, reset to take efect
PowerState.RebootDevice(false);
}
Bitmap LCD = new Bitmap(320, 240);
LCD.DrawEllipse(ColorUtility.ColorFromRGB(250, 250, 0), 50, 50, 30, 30);
LCD.Flush();
}
}
Thread.Sleep(Timeout.Infinite);
}
The user has full control over the settings as well.
Display.HorizontalFrontPorch = 40;
Display.HorizontalSyncPolarity = false;
Display.HorizontalBackPorch = 20;
// ...
// ...
if (Display.Save())
{
Debug.Print("Reboot...");
// New config was saved, reset to take effect
PowerState.RebootDevice(false);
}
SPI Displays
This is an extension by GHI Electronics that allow SPI displays to be flushed directly. A typical
standard NETMF alternative is to get the bitmap data, then convert the data to a format that
matches the display and then finally send the data over SPI. This process uses a lot of
memory and is extremely slow. It will take few seconds to render the display just once. Having
this handled internally saves memory and greatly speeds up the refresh speed.
Additionally, the 1.8” display used by GHI Electronics is initialized internally. If the display
configuration included the RS pin, the core will automatically initialize the display. Using other
SPI displays is possible by initializing the display from the application first and then the flush
will handle the data conversion internally.
This code will initialize and draw a circle on the G80 Development Board.
Tip: Do not forget to add the Microsoft.SPOT.Graphics, GHI.Pins and GHI.Hardware.
assemblies.
Page 54 of 68
www.GHIElectronics.com
GHI Electronics,LLC
.NET Micro Framework for Beginners
Graphics
using
using
using
using
using
using
using
using
System;
System.Threading;
Microsoft.SPOT;
Microsoft.SPOT.Hardware;
Microsoft.SPOT.Presentation;
Microsoft.SPOT.Presentation.Media;
GHI.Processor;
GHI.Pins;
namespace NETMFBook
{
public class Program
{
public static void Main()
{
Display.Populate(Display.GHIDisplay.DisplayN18);
Display.ControlPin = G80.Gpio.PE10;
Display.BacklightPin = G80.Gpio.PC7;
Display.ResetPin = G80.Gpio.PE12;
Display.ChipSelectPin = G80.Gpio.PD10;
Display.SpiModule = G80.SpiBus.Spi2;
Display.Bpp = GHI.Utilities.Bitmaps.BitsPerPixel.BPP16_RGB_BE;
Display.CurrentRotation = Display.Rotation.CounterClockwise90;
Display.Save();
}
}
var bmp = new Bitmap(160, 128);
bmp.DrawEllipse(ColorUtility.ColorFromRGB(250,0,0), 5, 5, 5, 5);
bmp.Flush();
}
Page 55 of 68
www.GHIElectronics.com
GHI Electronics,LLC
.NET Micro Framework for Beginners
Resource Constrains
12. Resource Constrains
12.1. Memory Contraints
Systems running NETMF are very powerful small embedded systems. They can handle
plenty of tasks but they are not as powerful as a PC for example. This consideration is
particularly important to .NET developers coming to NETMF from a PC development
background. For example, when creating a local array on software developed for PCs a 1KB
array or larger is used. On a PC with 4GB or more of ram, this is very minimal. But, on a
system with 30KB. 1KB is a lot of RAM. However, the PC has many running applications but
there is only one single app running on a NETMF system. Having a single app gives the
developer the advantage of deciding how to share the system resources.
This is not usually a concern on NETMF devices with a few megabytes of RAM.
12.2. Object Allocation
Another consideration is object allocation and freeing. Things that need to repeatedly use the
same object should keep the object alive. This is a simple example of a bad programming
practice. The Random and the Bitmap objects are allocated in every loop, used once and
then lost.
using
using
using
using
using
System;
System.Threading;
Microsoft.SPOT;
Microsoft.SPOT.Presentation;
Microsoft.SPOT.Presentation.Media;
namespace NETMFBook
{
public class Program
{
public static void Main()
{
while(true)
{
Random Rnd = new Random();
Bitmap LCD = new Bitmap(320, 240);
LCD.Clear();
LCD.DrawEllipse(ColorUtility.ColorFromRGB(100, 100, 0),
Rnd.Next(320), Rnd.Next(240), 30, 30);
LCD.Flush();
Thread.Sleep(100);
}
Page 56 of 68
www.GHIElectronics.com
GHI Electronics,LLC
.NET Micro Framework for Beginners
Resource Constrains
}
}
}
A better example would be in taking the allocation outside the loop.
using
using
using
using
using
System;
System.Threading;
Microsoft.SPOT;
Microsoft.SPOT.Presentation;
Microsoft.SPOT.Presentation.Media;
namespace NETMFBook
{
public class Program
{
public static void Main()
{
Random Rnd = new Random();
Bitmap LCD = new Bitmap(320, 240);
while(true)
{
LCD.Clear();
LCD.DrawEllipse(ColorUtility.ColorFromRGB(100, 100, 0),
Rnd.Next(320), Rnd.Next(240), 30, 30);
LCD.Flush();
Thread.Sleep(100);
}
}
}
}
The last example would have been fine either way. Imagine a method that transfers a few
thousand pixels to a screen and it allocated a pixel object for every pixel instead of reusing
the same pixel object repeatedly. The performance difference would be very noticeable.
12.3. Data Bandwidth
A NETMF system is a cross between a low level native programming and a PC. The provided
libraries and the managed system makes it run slower than a system programmed completely
naively. Development and debugging will be lightning faster however. From the other
perspective, it is similar to full .NET running on a powerful PC, but a lot slower. It is very
difficult to determine how much data can be moved around a NETMF system. Through
experimentation, data flows around 50KB/sec to 100KB/sec are common. For example, when
Page 57 of 68
www.GHIElectronics.com
GHI Electronics,LLC
.NET Micro Framework for Beginners
Resource Constrains
reading data from an SD card or sending data on the network, 50KB/sec to 100KB/sec is a
good starting estimate.
Page 58 of 68
www.GHIElectronics.com
GHI Electronics,LLC
.NET Micro Framework for Beginners
Vanilla NETMF
13. Vanilla NETMF
Code written for vanilla (pure) NETMF can be used on GHI Electronics devices with only a
few minor changes.
13.1. Button mapping
The Default Window NETMF application template uses a button provider to determine the up,
down, left, and right button pins. These will need to be set manually to match the buttons on
the system in use.
We recommend starting with a console application. If graphics are needed, use GHI
Electronics's Glide.
13.2. Graphics
The LCD interface on GHI Electronics products is configurable. By default, the pins are
configured as GPIOs and can be used like any other pins. The LCD configuration can be
loaded to enable the LCD interface. The code to be used can be modified to include the calls
to the GHI libraries to set the LCD configurations or FEZ Config can be used to set the
configurations as well. Both options are explained in previous sections.
13.3. File System
Depending on the offer, GHI Electronics NETMF offers provide file system access on SD
cards and on USB memory drives. The file system methods are still the same as NETMF,
which is also the same as .NET. However, the system first needs to initialize the SD card or
USB memory. Here is a quick example on initialing the SD card.
using
using
using
using
using
System;
System.IO;
System.Threading;
Microsoft.SPOT.IO;
GHI.IO.Storage;
namespace NETMFBook
{
public class Program
{
public static void Main()
{
// assume SD Card is inserted
// Create a new storage device
// NETMF only allows one SD card
Page 59 of 68
www.GHIElectronics.com
GHI Electronics,LLC
.NET Micro Framework for Beginners
Vanilla NETMF
// to be supported at the same time.
SDCard sd_card = new SDCard();
// this is a non-blocking call
// it fires the RemovableMedia.Insert event after
// the mount is finished.
sd_card.Mount();
// for some cases, a simple sleep might suffice
// This example just waits on the event before proceeding
// (After first time firing of the event, you may want
// to disable the handler or re-assign it
bool fs_ready = false;
RemovableMedia.Insert += (a, b) =>
{
fs_ready = true;
};
while (!fs_ready)
{
System.Threading.Thread.Sleep(50);
}
// file operations can now be used, just like any other NETMF device
}
}
}
13.4. Networking
Networking is extended on GHI Electronic devices to include WiFi and PPP. Ethernet is also
extended to be available as an internal resource, or added over SPI using the ENC28J60
Ethernet controller. Examples running on simple NETMF devices and on the emulator do not
need any initialization as the interface is just the one default interface.
This example initializes the ENC28J60. It sets the system with the appropriate pins, set the
interface, and from there the network interface can be used normally.
using
using
using
using
GHI.Networking;
GHI.Pins;
Microsoft.SPOT;
System.Threading;
namespace NETMFBook {
public class Program {
public static void Main() {
var netif = new EthernetENC28J60(G80.SpiBus.Spi2, G80.Gpio.PE2,
Page 60 of 68
www.GHIElectronics.com
GHI Electronics,LLC
.NET Micro Framework for Beginners
Vanilla NETMF
G80.Gpio.PE1, G80.Gpio.PC13);
netif.Open();
netif.EnableDhcp();
netif.EnableDynamicDns();
while (netif.IPAddress == "0.0.0.0") {
Debug.Print("Waiting for DHCP");
Thread.Sleep(250);
}
//The network is now ready to use.
}
}
}
Page 61 of 68
www.GHIElectronics.com
GHI Electronics,LLC
.NET Micro Framework for Beginners
Garbage Collector
14. Garbage Collector
When programming in older languages like C or C++, programmers had to keep track of
objects/memory and release them when necessary. If an object/memory is allocated and not
released then this object is using resources from the system that will never be freed. This is
called memory leak, which is the common problem in non-managed system. A program that is
leaking memory will contentiously use more memory till the system runs out of memory and
crashes.
Modern languages have garbage collectors that keeps track of the used objects. When the
system runs low on memory resources, the garbage collector jumps in and searches through
all objects and frees the ones with no references. Do you remember how we created objects
before using the “new” keyword and then we assigned the object to a reference? An object
can have multiple references and the garbage collector will not remove the object untill it has
zero references.
// A new object
OutputPort Ref1 = new OutputPort(Cpu.Pin.GPIO_Pin3, true);
// second reference for same object
OutputPort Ref2 = Ref1;
// lose the first reference
Ref1 = null;
// Our object is still referenced
// it will not be removed yet
// now remove the second reference
Ref2 = null;
// from this point on, the object is ready to be
// removed by the garbage collector
Tip: Object are not removed immediately. When needed, the Garbage collector will run and
remove the unused objects. This can be an issue in some rare cases because the garbage
collector needs some time to search and remove objects. It will only be few milliseconds but
what if your application can't afford that? In this case, the garbage collector can be forced to
run at a desired anytime.
//force the garbage collector
uint FreeMemory = Debug.GC(true);
The returned value from Debug.GC is the free memory size.
Page 62 of 68
www.GHIElectronics.com
GHI Electronics,LLC
.NET Micro Framework for Beginners
Garbage Collector
14.1. Losing Resources
The garbage collector ease's object allocation but it can also cause problems if we are not
careful. Here is a good example. Let's say we need a pin to be high. We create an OutputPort
object and set the pin high. Later on we lose the reference for that object. The pin will still be
high when the reference is lost so all seem to be good. After a few minutes or hours the
garbage collector kicks in and it finds this unreferenced object and remove it. Freeing an
OutputPort will cause the pin to change its state to input. Now, the pin is not high any longer!
using
using
using
using
System;
System.Threading;
Microsoft.SPOT;
Microsoft.SPOT.Hardware;
namespace NETMFBook
{
public class Program
{
static void Foo()
{
// Turn the LED on
OutputPort LED = new OutputPort(GHI.Pins.G80.Gpio.PE13, true);
// Set the pin high
LED.Write(true);
}
public static void Main()
{
// Call Foo, which turns the LED on
Foo();
// All seem okay but it is not!
Debug.Print("Before GC");
Thread.Sleep(10000); // Wait Ten seconds
Debug.GC(true);
Debug.Print("After GC");
}
}
Thread.Sleep(Timeout.Infinite);
}
The fix is easy, keep the LED reference alive!
using
using
using
using
System;
System.Threading;
Microsoft.SPOT;
Microsoft.SPOT.Hardware;
Page 63 of 68
www.GHIElectronics.com
GHI Electronics,LLC
.NET Micro Framework for Beginners
Garbage Collector
namespace NETMFBook
{
public class Program
{
static OutputPort LED;
static void Foo()
{
// Turn the LED on
LED = new OutputPort(GHI.Pins.G80.Gpio.PE13, true);
// Set the pin high
LED.Write(true);
}
public static void Main()
{
// Call Foo, which turns the LED on
Foo();
// All sem okay but it is not!
Debug.Print("Before GC");
Thread.Sleep(10000); // Wait Ten seconds
Debug.GC(true);
Debug.Print("After GC");
}
}
Thread.Sleep(Timeout.Infinite);
}
In the first example, the LED reference was local to the method. So when the method
finished, the reference is lost.
Here is a hint: if a program worked properly but then it stopped after the GC ran, the problem
is most likely what was described above.
IMPORTANT: When debugging applications, it is useful to enable the GC messages. These
messages show in the output window.
Debug.EnableGCMessages(true);
14.2. Dispose
The garbage collector will free objects at some point but a resource can be released
immediately. Most objects have a Dispose method. If an object needs to be freed at anytime,
we can “dispose” of it. Disposing an object is very important in NETMF. When we create a
new InputPort object, the assigned pin is reserved. That pin is locked until its disposed.
Page 64 of 68
www.GHIElectronics.com
GHI Electronics,LLC
.NET Micro Framework for Beginners
Topics not Covered
15. Topics not Covered
This section will briefly mention important topics not covered by this manual.
15.1. Serial Buses
NETMF includes support for many common serial buses.
UART Serial port, the most common use in in the RS232 serial ports on PCs.
https://www.ghielectronics.com/docs/15/uart-serial
SPI, a fast four wire serial protocol with one master and slave(s).
https://www.ghielectronics.com/docs/14/spi
I2C, an addressable two wire interface with a master and slave(s).
https://www.ghielectronics.com/docs/12/i2c
CAN, a noise immune high speed bus, common in automotive and industrial control.
https://www.ghielectronics.com/docs/110/can
OneWire, a low speed single wire bus. Most commonly used with temperature sensors.
https://www.ghielectronics.com/docs/16/onewire
15.2. Networking
This is a very large topic and deserves its own book. NETMF supports .NET Sockets, very
similar to the PC and the full .NET. It also supports HTTP and DPWS. For security it supports
SSL and SHTTP.
The built in support is available for Ethernet and GHI extend this support with WiFi and PPP.
This is a tutorial to get started
https://www.ghielectronics.com/docs/30/networking
Page 65 of 68
www.GHIElectronics.com
GHI Electronics,LLC
.NET Micro Framework for Beginners
Topics not Covered
15.3. Accessing files and Folders
NETMF supports FAT16 and FAT32 files, with complete support for folder, files and long file
name. The standard support includes SD card support and GHI extends that with support for
USB memory drives.
https://www.ghielectronics.com/docs/51/accessing-folders-and-files
15.4. Register Access
Register access provides the system with a way to access the processor internal regiters
directly from C#.
https://www.ghielectronics.com/docs/108/register-access
15.5. Runtime Loadable Procedures (RLP)
https://www.ghielectronics.com/docs/50/rlp
15.6. XML
Full XML support is part of NETMF, for reading (parsing) and writing XML files/streams.
https://www.ghielectronics.com/docs/32/xml
15.7. Crypto and Security
NETMF includes full cryptography libraries along with SSL for networking. GHI Electronics
also extends that with a simple, yet very fast XTEA method. Small devices that do not have
SSL and cryptography support still include XTEA.
https://www.ghielectronics.com/docs/49/xtea
15.8. Database
SQLite databse is NETMF extension aded by GHIElectronics. Databases can be created in
memory or on files.
https://www.ghielectronics.com/docs/135/sqlite-database
15.9. Signal Capture and Generate
GHI Electronics adds an extension to read the state transitions on a pin and record the time of
the transition in an array. A good example is in capturing the signal coming from a IR remote
control.
Page 66 of 68
www.GHIElectronics.com
GHI Electronics,LLC
.NET Micro Framework for Beginners
Topics not Covered
https://www.ghielectronics.com/docs/106/signal-capture
Another extension is also added by GHI Electronics to generate signals. This can be used to
generate signals, like to simulate an IR remote control, or even generate PWM in software.
https://www.ghielectronics.com/docs/24/signal-generator
15.10. Pulse Feedback
The Pulse feedback feature is used with ultrasonic distance modules, where a pulse is
reflected and read in real time. This feature is also ideal for capacities sensing inputs.
https://www.ghielectronics.com/docs/326/pulse-feedback
15.11. Playing WAV Audio
GHI Electronics extensions to NETMF include a PCM audio player. WAV audio files can be
used to generate audio on an analog output pin.
https://www.ghielectronics.com/docs/342/wav-audio-playback
15.12. Glide
For advanced graphical application with beautiful user interfaces, GHI Electronics offer a free
and open source library, called Glide. Each screen, called a window, is constructed and
rendered from a simple XML text. It supports many components, like buttons and lists.
The website also hosts a window designer for glide. Drag and drop what you need and the
website will generate the XML text.
https://www.ghielectronics.com/glide
15.13. Touch
Touch screen support is part of what NETMF offers.
https://www.ghielectronics.com/docs/162/touch
15.14. Large Memory Objects
There is an upper limit for allocated objects of about 700KB. Using larger objects, including
large bitmaps, is possible in a separate heap, called custom heap.
https://www.ghielectronics.com/docs/58/large-memory-objects-and-bitmaps
Page 67 of 68
www.GHIElectronics.com
GHI Electronics,LLC
.NET Micro Framework for Beginners
Topics not Covered
15.15. In-Field Update
NETMF systems can pull updates automatically from the network or from a memory card.
Thanks to this GHI Electronics extension, the update is seamless and easily automated.
https://www.ghielectronics.com/docs/147/in-field-update
15.16. Working with the Bootloader
Thanks to this GHI Electronics bootloader, boards can be easily updated using a simple
terminal program or FEZ Config.
https://www.ghielectronics.com/docs/344/ghi-bootloader
Page 68 of 68
www.GHIElectronics.com