1
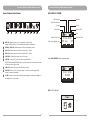
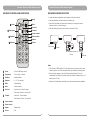
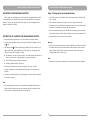
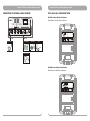
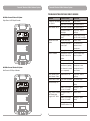
Portability Simplicity Flexibility MA-303 Personal Wireless Public Address System User Guide MIPRO Electronics Co., Ltd. Headquarters: 814 Pei-Kang Road, Chiayi, 60096, Taiwan. Web: www.mipro.com.tw E-mail: [email protected] Design and specifications are subject to change without prior notice 2 CE4 5 1 A AS120315 ! IMPORTANT SAFETY INSTRUCTIONS ! 1. Read these instructions. 2. Keep these instructions. 3. Heed all warnings. 4. Follow all instructions. 5. Do not use this apparatus near water. 6. Clean only with a dry cloth. 7. Do not block any ventilation openings. Install in accordance with the manufacturer's instructions. 8. Do not install near any heat sources such as radiators, heat registers, stoves, or other apparatus (including amplifiers) that produce heat. 9. Do not defeat the safety purpose of the polarised or ground plug: A polarised plug has two blades with one wider than the other. The wide blade is provided for your safety. When the provided plug does not fit into your outlet, consult an electrician for replacement of the obsolete outlet. WARNING 1. FOR OUTDOOR USE: To reduce the risk of fire or electric shock, do not expose this apparatus to rain or moisture. 2. UNDER WET LOCATION: Apparatus should not be exposed to dripping or splashing and no objects filled with liquids, such as vases should be placed on the apparatus. 3. SERVICE INSTRUCTIONS: CAUTION - These servicing instructions are for use by qualified service personnel only. To reduce the risk of electric shock, do not perform any servicing other than that contained in the operating instructions unless you are qualified to do so. This symbol indicates that dangerous voltage constituting a risk of electric shock is present within this unit. 10. Protect the power cord from being walked on or pinched particularly at plug, convenience receptacles, and the point where they exit from the apparatus. This symbol indicates that there are important operating and maintenance instructions in the literature accompanying this unit. 11. Only use attachments/accessories specified by the manufacturer. 12. Use only with a cart, stand, tripod, bracket, or table specified by the manufacturer, or sold with the apparatus. When a cart is used, use caution when moving the cart/apparatus combination to avoid injury from tip-over. 13. Unplug this apparatus during lightning storms or when unused for long periods of time. 14. Refer all servicing to qualified service personnel. Servicing is required when the apparatus has been damaged in any way, such as power-supply cord or plug is damaged, liquid has been spilled or objects have fallen into the apparatus, the apparatus has been exposed to rain or moisture, does not operate normally, or has been dropped. & IC - ID THIS DEVICE COMPLIES WITH PART 15 OF THE FCC RULES AND RSS-123 ISSUE2 OF CANADA. OPERATION IS SUBJECT TO THE FOLLOWING TWO CONDITIONS: (1) This device may not cause interference. (2) This device must accept any interference, including interference that may cause undesired operation of the device. This equipment complies with FCC RF radiation exposure limits set forth for an uncontrolled environment. Disposal 15. To reduce the risk of fire or electric shock, do not expose this apparatus to rain or moisture. Disposing of used batteries with domestic waste is to be avoided! 16. Apparatus should not be exposed to dripping or splashing and no objects filled with liquids, should be placed on the apparatus. 17. Use only with the battery which specified by manufacturer. 18. The power supply cord set is to be the main disconnected device. Dispose of any unusable devices or batteries responsibly and in accordance with any applicable regulations. 2005-08-13 Batteries / NiCad cells often contain heavy metals such as cadmium(Cd), mercury(Hg) and lead(Pb) that makes them unsuitable for disposal with domestic waste. You may return spent batteries/ accumulators free of charge to recycling centres or anywhere else batteries/accumulators are sold. By doing so, you contribute to the conservation of our environment! Personal Wireless Public Address System Personal Wireless Public Address System CONTENTS 1 Accessories 2 Key Features and Benefits 3 Controls and Indicators 5 Control Panel and Displays 7 USB Display Screen 10 USB Remote Controls and Indicators 11 Replacing USB Remote Battery 12 Replacing the Rechargeable Battery ACCESSORIES The following accessories are included: User Guide x 1 AC Power Cord x 1 Rechargeable Lithium Battery x 1 (MB-10) USB remote control x 1 (2MD007 included in MA-303su & MA-303du only) Mode 15 18 System Channel Set-Up ACT Synchronization (sync) Between Receiver and Transmitter Channels 19 Operating Instructions 21 USB Drive Operation 22 Connection to External Audio Sources 23 Four Available Configurations 25 Troubleshooting-Portable Public Address 26 Troubleshooting-Wireless Microphone Systems 29 Rechargeable Battery Guide 30 Optional MA-303 Accessories 30 MIPRO Wireless Microphone Systems for MA-303 31 Technical Specifications Optional storage & carrying bag 0 1 EQ VOL- VOL+ 0 RPT U/SD 1 2 3 4 5 6 7 8 9 Switching Power Adapter x 1 Personal Wireless Public Address System Personal Wireless Public Address System KEY FEATURES AND BENEFITS CONTROLS AND INDICATORS 1 ! It is ultra light, ultra compact, powerful and perfect multi-function Portable Wireless PA System in the market. ! Built-in 1 or 2 wireless receivers with 16 preset channels. ! User-friendly control panel with one-touch Scan & ACT sync button for simple channel set-up. ! Built-in antenna prevents from breakage and increases reception range. ! Accepts wired & wireless microphone. Optional USB music player & recorder with LCD screen. ! Built-in alarm siren provides emergency warnings. ! High efficiency class-D amplifier drives two-way loudspeaker with level limiter. ! 2 power modes: AC and lithium rechargeable battery. ! 10~16 hours of stand-by time per 4-hour full charge. ! 4 LEDs array indicator for battery levels and charging status. ! 3.5 mm line-in accepts external MP3, iPod & CD player. ! Available in four configurations. 2 3 4 5 2 1 Fixed Carry Handle 2 Treble Speaker: 1-inch. 3 Bass Speaker: 5-inch full range high efficiency. 4 Speaker Grille: To protect the loudspeakers. 5 Mic Stand Adapter: For mounting onto a microphone stand (15.8mm/ 3/8”). 3 Personal Wireless Public Address System Personal Wireless Public Address System CONTROLS AND INDICATORS CONTROL PANEL AND DISPLAYS 12 22 13 RECEIVER USB 23 0003 ROCK 160 A 0015 CH1 RECEIVER 14 USB 0003 ROCK 160 CH1 6 A 0015 CH2 RF 15 REC ALARM SCAN / ACT PLAY / PAUSE SCAN / ACT RF WAV 01:42 / 03:40 zIYt .wav zIYt RF CH2 PRV / TEN 01:42 / 03:40 zIYt .wav zIYt RF 24 REC 25 ALARM 16 STOP WAV SCAN / A CT NEXT / TEN SCAN / A CT PLAY / PAUSE STOP PRV / TEN NEXT / TEN POWER 17 POWER 26 8 7 OFF MIC IN POWER/ MIC VOL OFF OFF CH1 VOL OFF CH2 VOL LINE VOL LINE IN USB VOL LINE OUT 18 27 19 28 20 29 DC IN 21 9 10 11 Model Shown: MA-303du 6 Display Panels and Screens 7 Power/Volume Control Panel 8 Battery Meter: Displays current & charging battery level. Blinking (charging in progress); Illuminated (battery is fully charged) 9 USB 2.0 Port 10 Rechargeable Battery & Compartment 12 CH2 Channel Screen 13 CH1 Channel Screen 14 CH1 RF indicator: Glows green indicates a RF link from transmitter to receiver. 15 Alarm Siren Button: Provide warning of approaching or presence of threats or situations requiring immediate attention. 16 CH2 RF indicator: Glows green indicates a RF link from transmitter to receiver. 17 Power indicator: Glows red when master power is on and ready for operation 18 CH1 Sync Port: Uploads infrared signal to transmitter. 19 SCAN / ACT CH1: Scans for an interference-free frequency & Synchronizes the receiver and transmitter frequencies. 20 SCAN / ACT CH2: Scans for an interference-free frequency & Synchronizes the receiver and transmitter frequencies. 21 CH2 Sync port: Uploads infrared signal to transmitter. 22 USB Remote Port 23 USB Display Screen 24 REC indicator 25 REC button 26 NEXT / TEN button: Skips to next track & fast forward 10 tracks. 27 PRV / TEN button: Skip to previous track & fast rewind 10 tracks. 28 STOP button: Stops the track. PLAY / PAUSE button: Plays or pauses the track. 29 11 Battery Cover: Protects the rechargeable battery. 4 5 Personal Wireless Public Address System Personal Wireless Public Address System USB DISPLAY SCREEN Power/Volume Control Panel Track Number Total Track Number Equalizer Repeat OFF OFF OFF Format OFF MIC IN POWER/ MIC VOL CH1 VOL CH2 VOL LINE VOL LINE IN USB VOL LINE OUT DC IN 30 31 32 33 34 35 36 37 38 Source (USB) Music mode 0003 ROCK 160 A 0015 Elapsed Track Time 30 MIC IN: Standard 6.3mm (1/4”) microphone level input jack. Accepts a MIPRO MM-107 (not included) wired dynamic microphone. 31 POWER / MIC VOL: Master power on/off and microphone volume. Track Name (English only) 32 CH1 VOL: Powers receiver on/off and wireless CH 1 volume. 33 CH2 VOL: Powers receiver on/off and wireless CH 2 volume. 34 LINE VOL: Controls the volume level of line-input. 35 LINE IN: 3.5mm (1/8”) mini-jack input. Accepts external CD/MP3/iPod/cassette/VCR/DVD player, musical instruments, computer sound card or other line-level signal source. 36 USB VOL: Powers USB on/off and USB player volume. 37 LINE OUT: 3.5mm (1/8”) mini-jack output. Connects to another powered PA system or external recordings. DC IN: Connects the supplied switching power adaptor to recharge the battery or to supply power to the system. 38 WAV 01:42 / 03:40 zIYt .wav zIYt Press PLAY/PAUSE button to pause track 0003 ROCK 160 A 0015 WAV 01:42 / 03:40 PAUSE USB is not inserted Music 6 7 Mute Total Track Time Personal Wireless Public Address System Personal Wireless Public Address System Change “Repeat” Parameter Change “Time” Parameter Repeat Normal Repeat All System Time Equalizer Replay Enter Main Repeat One Folder Repeat Folder Random Backlight Contrast Firmware versi Intro Change “Equalizer” Parameter Natural Soft System Time Equalizer Replay Enter Main Rock Pop Classic Jazz Backlight Contrast Firmware versi Replay “A B” Tracks Equalizer Replay Enter Main 15 Adjust LCD “Contrast” lighter or darker A A B ROCK 160 WAV 01:42 / 03:40 zIYt .wav zIYt A A B ROCK 160 WAV System Time 01:42 / 03:40 zIYt .wav zIYt Music 05 Backlight Contrast Firmware versi Display Music and System Set-up modes Repeat 2011-11-30 10:21:08 Adjust “Backlight” dimmer or brighter Repeat Repeat System Time Display “Firmware” Version Sys Set System Time Equalizer Replay Enter Main Backlight Contrast Firmware versi Leave “Exit” Mode Leave “Exit” Mode Exit Exit 8 9 ? 2009/08/19 9 . 6 . 55. 1014 S250A-V0.7 Personal Wireless Public Address System Personal Wireless Public Address System USB REMOTE CONTROLS AND INDICATORS 1 2 Mode Power Play/Pause 3 4 Equalizer Numbers EQ 0 VOLRPT VOL+ U/SD 1 2 3 4 5 6 7 8 9 REPLACING USB REMOTE BATTERY 5 Mode 6 Mute 7 Previous 8 Forward 9 Lowers volume 10 10 Raises volume 11 Repeat 12 Source ! Locate the battery compartment on the bottom of the remote control. ! Press and hold tenon and then slide out the battery tray. ! Remove the old battery and insert the new battery in, making sure that the battery's positive (+) side is facing up. ! Slide the battery tray back into the remote control until it clicks. (1) Press & hold (2) Slide out CR 2025 CR 2025 (3) battery positive (+) side up CR 2025 CR 2025 (4) Slide back Notes: 1 Power : Turns the USB player on/off Play/Pause : Turns on play or Pauses 3 Equalizer : Equalizer effects 4 Numbers : 0 ~ 9 ( 10 numbers) 5 Mode : Mode selection 6 Mute : Mutes the audio 7 Previous : Previous track - Press & release 8 Forward : Next track - Press & release 2 ! MA-100 uses a CR2032 lithium 3.0V coin battery that is commonly used in small electronic devices. You'll find these batteries at most electronics and drug stores. ! Remote control operates on an infrared (IR)-based technology. If it has an unobstructed line-of-sight, the remote control can function at distances of up to 5 meters (about 17 feet). ! Dispose of the used battery according to local environmental laws and guidelines. Fast rewind 10 tracks - Press & hold Fast forward 10 tracks - Press & hold 9 Lowers volume 10 Raises volume 11 Repeat : Repeat mode 12 Source : N/A 10 11 Personal Wireless Public Address System Personal Wireless Public Address System REPLACING THE RECHARGEABLE BATTERY Steps of Changing the Rechargeable Battery With a proper care and charging, it is unlikely that the rechargeable battery needs to be replaced by a new battery for some time. You may consider to have a backup battery in case you need to use MA-303 for a longer time. The rechargeable lithium battery is available from MIPRO. ! Lay the PA system on a flat surface. Power off and gently remove USB from USB port, if needed. ! Remove the two screws so the battery cover can be opened and removed. ! The battery pack is stored inside the compartment slot. Pull out the battery gently and remove it completely by detaching the connecting pins. ! Insert the replacement battery pack. Ascertain the connecting pins are connected firmly before inserting. Carefully slide the battery back into the compartment slot. ! Insert back the two screws back in place securely. INSTRUCTION OF CHARGING THE RECHARGEABLE BATTERY ! Charge the battery completely in its first use to obtain its maximum capacity. ! Connect to any available AC power outlet using the included DC adapter to the DC 38 IN jack . ! 8 LED blinks while charging. Blinking LED may start later if the The battery meter battery suffers from excessive battery drain. The battery may be damaged if the LED does not blink after charging for a while. Warning: ! + The battery is low when only the red LED is on. Please recharge the batter for at least 4 hours (the time of charging depends on the type of battery). + All LED blinking means the battery is charging. + Charging completes when all LED are on. Note: ! ! Fully charge the battery after each use or minimum once every 3 months. ! Improper maintenance or over discharge the battery will not be covered by the warranty. ! The battery stops charging when it is fully charged. It is safe to leave it connected to the power overnight. Note: ! The rechargeable battery pack is user replaceable. Rechargeable batteries have a limited number of charge cycles and may eventually need to be replaced. Battery life and number of charge cycles vary by use and settings. 12 Never short-circuit the battery pack by either accidentally or intentionally bringing the battery terminals in contact with another conductive object. Never expose a battery pack to abnormal shock, vibration or pressure. Failure to observe the foregoing could result in serious injury. 13 Dispose of the used battery according to local environmental laws and guidelines. Personal Wireless Public Address System Personal Wireless Public Address System SYSTEM CHANNEL SET-UP Wireless Mic System ! 31 Power indicator 17 glows red. Ready Turn on master Power/MIC VOL switch . for operation. ! 32 or CH 2 VOL 33 VOL switch. Turn on CH 1 VOL ! Turn transmitter power on. Ensure fresh alkaline or lithium batteries (not included) are installed. ! 16 glows green after the transmitter is turned on to denote a 14 or RF indicator successful RF link. ! 32 or CH 2 VOL 33 to desired volume. Adjust CH 1 VOL ! Ensure receiver and transmitter have the same matching operating channels. (see page 17: Corresponding Channel Display: MA-303 Receiver and Transmitter) If not, perform ACT Synchronization (Sync) between Receiver and Transmitter Channels (see page 18 ). Notes: 14 ! Same wireless microphone can transmit to multiple MA-303 systems on the same channel for a wider and expanded coverage. ! It is not possible to transmit two wireless microphones on the same channel to MA303 system. Only one transmitter can be used at a time on that channel. Be sure to turn off one of the two transmitters to avoid interference. 15 Personal Wireless Public Address System Personal Wireless Public Address System Corresponding Channel Display: MA-303 Receiver and Transmitter Scanning Receiver Channels ! There are 16 channels available. The receiver will scan through the channels in the following order and shown on the LED screen: MA-303 1 2 3 4 5 6 7 8 1 2 3 4 5 6 7 8 9 0 A B C D E F 1 2 ... Transmitter LCD 01 01 01 02 01 03 01 04 01 05 01 06 01 07 01 08 To Scan for a Clear Receiver Channel ! MA-303 Press & release the SCAN/ACT button until current channel blinks. ! During blinking, press & release the SCAN/ACT button a second time. ! The receiver scans and sets at a clear channel automatically. press & release press & release channel blinks RECEIVER RECEIVER CH1 CH2 CH1 CH2 RECEIVER CH1 CH2 CH1 CH2 RF RF RF RF RF RF RF RF SCAN / ACT SCAN / ACT SCAN / ACT SCAN / ACT SCAN / ACT SCAN / ACT SCAN / ACT SCAN / ACT Manually Forcing a Channel Change ! Press & hold the SCAN/ACT button until current channel blinks. ! Release the SCAN/ACT button until a desired channel is reached. ! This will force the receiver to change to the next available clear channel. press & hold channel blinks RECEIVER release until desired channel RECEIVER CH1 CH2 new channel is stored RECEIVER CH1 CH2 RECEIVER CH1 CH2 0 A B C D E F Transmitter LCD 01 09 01 10 01 11 01 12 01 13 01 14 01 15 01 16 new channel is stored RECEIVER 9 CH1 CH2 RF RF RF RF RF RF RF RF SCAN / ACT SCAN / ACT SCAN / ACT SCAN / ACT SCAN / ACT SCAN / ACT SCAN / ACT SCAN / ACT When to Change Channel ! Interference occurs during performance. ! When two or more MA-303s need to be used at the same venue. ! Do not select a new channel while another system is operating as it may interference. ! If “_” is displayed during channel scaning this indicates the current channel in this frequency band is experiencing interference. If problem persists, it is recommended to change and use a different frequency band. 16 17 Personal Wireless Public Address System Personal Wireless Public Address System OPERATING INSTRUCTIONS ACT Synchronization (Sync) between Receiver and Transmitter Channels: Wired Microphone ! Power on handheld or bodypack transmitter. Ensure fresh batteries are properly installed with correct polarity. ! Plug optional MIPRO MM-107 wired dynamic microphone with a 6.3mm (1/4”) 30 connector to MIC IN . ! Locate and bring the transmitter sync port (red indicator) within 30cm (12-inch) of 21 18 or . CH 1 or CH 2 receiver sync port ! 31 and adjust to desired volume. Turn on master POWER / MIC VOL ! Press and release SCAN/ACT button to synchronize receiver and transmitter channels (See diagram 1) ! 13 or CH 2 12 will blink and LCD on During syncing, the channel indicator in CH 1 the transmitter will display corresponding four digital numbers (see Corresponding Channel Display: MA-303 Receiver and Transmitter on page 17) Line Input ! When the channels are synchronized the channel indicator in channel screen stops 16 glows green to indicate a successful RF link. 14 or blinking and RF indicator ! The transmitter is now set to the new channel and ready for operation. ! Repeat steps if channel indicator remains flashing and no glowing green RF indicator. ! Available to connect an external CD, MP3, iPod or cassette player. ! 35 jack . Connect a 3.5mm-to-3.5mm audio cable (not included) to the LINE-IN ! 31 Turn on master POWER / MIC VOL . ! 34 to desired volume. Adjust LINE VOL Play USB Drive ! Insert USB drive into USB 2.0 port. ! 31 power on. Turn master POWER/MIC VOL ! 36 power on. Display screen will light when USB player is turned on. Turn USB VOL ! 26 for next track. Press & hold NEXT / TEN Press & release NEXT / TEN button 26 skips forward next 10 tracks. button ! 27 for previous track. Press & hold PRV / TEN Press & release PRV / TEN button 27 skips backward previous 10 tracks. button RECEIVER RECEIVER CH1 USB 0003 ROCK 160 A 0015 CH1 CH2 RF WAV 01:42 / 03:40 zIYt .wav zIYt RF CH2 REC ALARM SCAN / ACT PLAY / PAUSE SCAN / ACT STOP PRV / TEN NEXT / TEN POWER OFF MIC IN POWER/ MIC VOL OFF OFF CH1 VOL RF RF SCAN / ACT SCAN / ACT OFF CH2 VOL LINE VOL LINE IN USB VOL LINE OUT DC IN < or ) i n. cm 2 (1 30 Record USB Drive cm 30 < 2 (1 .) in (Figure 1) or 18 ! Insert USB drive into USB 2.0 port. ! 31 power on. Turn master POWER/MIC VOL ! 36 power on. Display screen will light when USB player is turned on. Turn USB VOL ! 28 for WAV recording format. Press & release STOP button ! 25 for recording mode. Press the button second time Press & release REC button starts recording. REC button glows during recording. ! 28 to stop recording. Press STOP button ! 29 for playback recording. Press PLAY/PAUSE button 19 Personal Wireless Public Address System Personal Wireless Public Address System USB DRIVE OPERATION Repeat Play ! ! 26 to repeat. 27 or NEXT / TEN button Press PRV / TEN button Normal Repeat one Folder Repeat Folder Repeat All Random Intro Standard USB port storage position Pull out the USB port to a 90 degree angle Alarm Siren ! 15 for warnings of approaching or presence of threats or Press Alarm button situations requiring immediate attention. ! 27 is powered on and one Alarm will sound only when master Power / Mic Volume of below function is powered on. Remove the protective cap A. wireless transmitter and CH 1 or CH 2 are powered on. B. wired microphone is plugged into the Mic input and powered on. C. USB player is powered on & music is playing. Insert a Type-A USB disk (USB 2.0 interface) Ensure USB disk is plugged firmly and securely. Push back the USB port into the standard position to prevent accidental issues. 20 21 Personal Wireless Public Address System Personal Wireless Public Address System CONNECTION TO EXTERNAL AUDIO SOURCES RECEIVER FOUR AVAILABLE CONFIGURATIONS MA-303s Personal Wireless PA System USB 0003 ROCK 160 A 0015 CH1 CH2 RF RF SCAN / ACT SCAN / ACT WAV Single-Channel. No USB Player & Recorder 01:42 / 03:40 zIYt .wav zIYt REC ALARM PLAY / PAUSE STOP PRV / TEN NEXT / TEN POWER RECEIVER OFF MIC IN POWER/ MIC VOL OFF OFF CH1 VOL OFF CH2 VOL LINE VOL LINE IN CH1 USB VOL LINE OUT DC IN RF ALARM SCAN / ACT POWER MIC IN LINE IN OFF MIC IN Wired Mic: MM-107 MP3 PLAYER CD PLAYER OFF POWER/ MIC VOL CH1 VOL LINE VOL LINE IN LINE OUT DC IN LINE VOL LINE IN LINE OUT DC IN I-POD Cable: 2FA034 Audio Cable: 2FA071 3.5φ 3.5φ MA-303d Personal Wireless PA System Dual-Channel. No USB Player & Recorder RECEIVER CH1 CH2 RF RF SCAN / ACT SCAN / ACT ALARM POWER OFF MIC IN 22 23 POWER/ MIC VOL OFF OFF CH1 VOL CH2 VOL Personal Wireless Public Address System Personal Wireless Public Address System TROUBLESHOOTING-PORTABLE PUBLIC ADDRESS MA-303su Personal Wireless PA System Single-Channel +USB Player & Recorder RECEIVER PROBLEM POSSIBLE CAUSE SOLUTION No Sound or Faint Sound From Speaker Volume turned down Adjust volume Power switch is turned off Turn power switch on Power Indicator Not On Power switch is turned off Turn power switch on Rechargeable Battery is discharged Plug into AC outlet to recharge Rechargeable Battery is “dead” Replace battery and plug into AC outlet to recharge Volume set too high Reduce volume Excessive wind noise or breath “pops” Use windscreen on wireless & wired microphones. Input signal too strong Adjust input signals Microphone too close or directly in front of the speaker Move microphone away from the speaker Volume set too high Reduce volume Microphone too far from sound source (requiring the volume to be turned up to compensate) Speak closer to the microphone or move microphone closer to sound source Weak, Distorted Sound. Power Indicator Flickers Batteries level is low Plug into AC outlet to recharge Excessive Hum or Noise Input Cable not shielded Use shielded cable Shortened Battery Life Old or overused battery Recharge or replace battery Battery is not charged for over 3~4 months Recharge or replace battery Rechargeable Battery is “dead” Replace battery Battery is not charged for over 3~4 months Recharge or replace battery Battery is fully charged (CHARGE indicator is lit) N/A USB 0003 ROCK 160 A 0015 CH1 WAV 01:42 / 03:40 zIYt .wav zIYt RF REC ALARM PLAY / PAUSE SCAN / ACT STOP PRV / TEN NEXT / TEN POWER OFF MIC IN OFF POWER/ MIC VOL OFF CH1 VOL LINE VOL USB VOL LINE IN DC IN LINE OUT Distorted Sound From Speaker Excessive Feedback MA-303du Personal Wireless PA System Dual-Channel +USB Player & Recorder RECEIVER USB 0003 ROCK 160 WAV A 0015 CH1 CH2 RF RF SCAN / ACT SCAN / ACT 01:42 / 03:40 zIYt .wav zIYt REC ALARM PLAY / PAUSE STOP PRV / TEN NEXT / TEN POWER OFF MIC IN POWER/ MIC VOL OFF OFF CH1 VOL OFF CH2 VOL LINE VOL LINE IN USB VOL LINE OUT DC IN Battery CHARGE Indicator Not Flickering when plugged into AC Outlet 24 25 Personal Wireless Public Address System Personal Wireless Public Address System FAQ - PORTABLE PA TROUBLESHOOTING-WIRELESS MICROPHONE SYSTEMS PROBLEM No Sound From Speaker Distortion or Unwanted Noise Bursts POSSIBLE CAUSE SOLUTION Master or receiver volume turned down Adjust volumes Transmitter or receiver switch is turned off Turn transmitter or receiver switch on Receiver and transmitter have different frequencies See “Set-up Receiver & Transmitter Frequencies” section Transmitter battery is low or no battery inside Replace or insert new battery Headset or lavalier microphone is not plugged into bodypack transmitter Plug headset or lavalier microphone into bodypack transmitter Interference Noise Indicator is lit Q: How to adjust for optimal sound volume? A: If the portable system has both Master & Microphone volumes, we recommend turning the Master volume to about 3pm (clockwise) first and about 1~2pm (clockwise) for Microphone or other volumes. Q: How to prevent and minimize the annoying feedback? A1: Do not stand directly in front of the speakers; keep mics away from speakers. A2: Avoid pointing microphone towards the speakers. A3: The microphones should be behind the speakers wherever possible. A4: Locate the portable PA between the crowd and the presenters and facing the crowd. A5: Turn down the sound level coming out of the portable PA / speakers if necessary. A6: Place the speakers above the head of the crowd. Remove nearby sources of RF interference (computers, amplifiers, karaoke machines, digital effects, CD players, etc) Q: What if I need more power to cover a larger crowd? A: Two or more portables can be used with one wireless microphone transmitter. Ascertain that the receiver frequency in each portable coincides with the wireless microphone. Q: Can I play music through the systems? A: Yes. All MIPRO portables have auxiliary inputs (3.5mm min-jack, RCA or 1/4”phone), which will accept input from an external iPod, MP3, CD, cassette, VCR, DVD players. As well, modular CD players can be inserted into most models. Adjust “Sensitivity” on receiver. If problem persists, change Receiver & Transmitter frequencies. See “Set-up Receiver & Transmitter Frequencies” section Sound Dropouts Out of operating range Move transmitter closer to receiver Obstructions between the receiver and transmitter Remove obstructions or reposition Line-of-sight between receiver & transmitter Weak Transmitter Battery Replace Transmitter Battery Interference Change Receiver & Transmitter frequencies See “Set-up Receiver & Transmitter Frequencies” section 26 27 Personal Wireless Public Address System Personal Wireless Public Address System RECHARGEABLE BATTERY GUIDE FAQ - RECHARGEABLE BATTERY Q: How to Charge the Battery? A: Simply plug into a power outlet using the included power cable and adapter. “Flashing” LED indicates it is charging. The main power switch can be on or off position during charging. Microphones or music can be used during charging & power is on. Tips - To Prolong the Life of Rechargeable Batteries Power off the portable system and transmitter/mic when NOT in use. Store portable system with batteries in a fully charged condition. Q: How to Spot System Low Battery? A: When Power LED is lit (MA-705 & MA-707) or Charge LED is lit (MA-101& MA101a) or one indicator remaining in battery meter (MA-100, MA-202, MA-303, MA708, MA-808). Plug into a power outlet to re-charge ASAP. Q: Average Life Span of Rechargeable Lithium or Sealed Lead-Acid Battery? A: The batteries should have a life of up to 2 years if used and maintained properly. Battery life is determined by temperature, depth and rate of discharge, and the number of charges and discharges (called cycles). Q: Most lithium-ion polymer batteries use a fast charge to charge your device to 80% battery capacity, then switch to trickle charging. That's about two hours of charge time to power up to 80% capacity, then another two hours to fully charge it, if you are not using the portable PA system while charging. The battery prefers a partial rather than a full discharge. A partial discharge reduces stress and prolongs battery life. Avoid frequent full discharges because this puts additional strain on the battery. Several partial discharges with frequent recharges are better for lithium-ion than one deep one. Avoid keeping the battery at full charge and high temperature. It is OK to leave the system plugged into a power outlet when not being used for a long time. The built-in automatic protection circuitry will auto shut-off when fully charged. It will not harm the system or the battery. When to Replace the Battery? A1: Power LED indicator is not “lit” when power on. (No battery voltage). Fully charge the system at least once every 3~6 months. Battery may not charge if not charged for a prolonged periods of time. A2: LED indicator or meter is not “flashing” when plugged-in. A3: Getting 1~2 hours operating time per charge. Do not freeze the battery. Store in dry, cool place away from heat. Elevated temperature reduces battery lifespan. A4: When battery has been used extensively for 2 years or more. Rechargeable batteries have a limited number of charge cycles and may eventually need to be replaced. Battery life and number of charge cycles vary by use and settings. CAUTION: DO NOT recharge other types of batteries and connect a battery's negative terminal to another batteries positive terminal. An explosion and/or a fire could occur as a result. Use only authorized rechargeable lithium batteries. 28 29 Personal Wireless Public Address System Personal Wireless Public Address System TECHNICAL SPECIFICATIONS OPTIONAL MA-303 ACCESSORIES MB-10: 14.8V/2.6AH Rechargeable Lithium Battery MA-303 requires 1 MB-10 batteries Model MA-303s MA-303d Power Output 55W RMS / 60W Max Amplifier Class D T.H.D. <1% MA-303su MA-303du Portable PA MS-30: Microphone Tripod Stand Adjustable stand for MA-303 portable PA system SC-30: Carrying Case Carrying case and storage. Storage for wireless & wired microphones cable, battery Frequency Response 50Hz~18KHz Loudspeaker 1 " Tweeter & 5 " Woofer MM-107: Handheld Wired Microphone MIPRO's Hypercardioid Dynamic Microphone with cable. Audio Input Wired 6.3mm (1/4”) Line-Input 3.5mm (1/8”) ASP-10: Aerobic Sports Pouch Sweat-resistant transmitter pouch belts for MIPRO bodypack transmitters. Audio Output 3.5mm (1/8”) Installation Microphone stand, table mounted, handle Power Supply AC External 100-240V AC switching power supply DC & Battery 14.8V/2.6AH rechargeable lithium battery Charge Time Up to 4 hours (automatic charging management) MIPRO WIRELESS MICROPHONE SYSTEMS FOR MA-303 Stand-by Time Up to 12 hours Up to 11 hours Up to 10 hours Up to 9 hours ACT-30H - Handheld Transmitter Microphone (2 AA : not included) Charge Indicator 4-level Battery Meter ACT-30T - Body Pack Transmitter (2 AA : not included) Color Black (microphone not included - see below) Dimensions MU-53HN (black) ; MU-53HNS (beige) - Premium Headworn Microphone Uni-directional, Premium 10mm, Ideal for speech and singing. Works with all MIPRO bodypack transmitters 210(W)x 276(H)x 165(D) mm 8.3 (W)x 11(H)x 6.5(D) inches Weight (battery included) Approx. 2.7 kg Approx. 2.8 kg Approx. 2.7 kg Approx. 2.8 kg (6.2 lbs) (6 lbs) (6.2 lbs) (6 lbs) Omni-directional, 4.5mm, Sweat-proof, Ideal for speech. Works with all MIPRO bodypack transmitters Receiver Channel Single Frequency Range UHF 620 ~ 934 MHz MU-13 (beige) - Premium Single-sided Earworn Microphone Omni-directional, ultra small & lightweight 3mm, Ideal for speech. Works with all MIPRO bodypack transmitters Frequency Band 24 MHz Preset Channel 16 Channel Set-up Scan & ACT sync Transmitter ACT-30H Handheld / ACT-30T Bodypack Antenna Built-in MU-55HN (black) ; MU-55HNS (beige) - Subminiature Headworn Microphone Wireless System MU-23 (beige) - Premium Dual-sided Headworn Microphone Omni-directional, ultra small & lightweight 3mm, Ideal for speech. Works with all MIPRO bodypack transmitters MU-53L (black) ; MU-53LS (beige) - Premium Lavaliere Microphone Uni-directional, 10mm, High-gain-before-feedback, warm, clear sound. Works with all MIPRO bodypack transmitters MU-55L (black) ; MU-55LS (beige) - Subminiature Lavaliere Microphone Omni-directional, 4.5mm, Low visibility, Works with all MIPRO bodypack transmitters 30 31 Dual Single Dual Personal Wireless Public Address System Model MA-303s MA-303d MA-303su Personal Wireless Public Address System MA-303du Audio Player Built-in 2.0 USB Port N/A Yes Yes Play & Record N/A Patents & Approvals Patented. Telecom and safety regulations approved Notes ! Refer to actual product in the event of product discrepancy ! Frequency range and maximum deviation comply with regulations of different 32 33


![catalogue_pdf [1.82] Mo - Enseirb](http://vs1.manualzilla.com/store/data/006360324_1-6d38883db81245c16ae9c413a1d8cfa1-150x150.png)