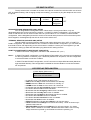
1
ISDN
TELEPHONE
AN EXCELLENT PHONE FOR
OFFICES AND HOMES
USER’S MANUAL
CONTENTS
INTRODUCTION
3
GENERAL FUNCTIONS
SUPPLEMENTARY SERVICES
SPECIFICATIONS (EURO ISDN)
3
3
3
CONTENTS OF THE PACKAGE
4
TOP FRONT VIEW OF THE PHONE
4
BOTTOM VIEW OF THE PHONE
5
INSTALLATION
5
DIP SWITCH SETUP
6
DESIGNATED/NON-DESIGNATED (SW1) SETUP
TERMINAL RESISTOR (SW2 AND SW3) SETUP
POINT-TO-POINT/POINT-TO-MULTIPOINT (SW4) SETUP
6
6
6
LCD DISPLAY EXPLANATION
6
PROGRAM (FUNCTION SETUPS)
7
GENERAL FUNCTION SETUP
1. SPEED DIAL SETUP
2. BABY CALL SETUP
3. CHARGE RATE SETUP (AOC)
4. EMERGENCY CALL SETUP
5. RING TYPE SETUP
6. TIME AND DATE SETUP
7. NEW CALL INDICATOR SETUP
8. CALL WAITING SETUP
PROTECTED FUNCTION SETUP
1. PHONE NUMBER (MSN) SETUP
2. SUBADDRESS SETUP
3. PASSWORD SETUP
4. OUTGOING CALL BLOCK SETUP
5. CALL FILTER SETUP
MAKING OUTGOING CALL
7
7
8
9
9
10
10
11
11
12
12
12
13
13
14
15
OVERLAP SENDING
EN-BLOC SENDING
LAST NUMBER REDIAL
SPEED DIALING
15
15
15
16
1
RECEIVING INCOMING CALL
16
RECEIVING SECOND CALL
17
LOCKING THE PHONE
17
INQUIRING CALL HISTORY
18
SUPPLEMENTARY SERVICES
19
1. CLIP (Calling Line Identification Presentation)
2. CLIR (Calling Line Identification Restriction)
3. COLP (Connected Line Presentation)
4. COLR (Connected Line Restriction)
5. HOLD
6. SUSPEND
7. RESUME
8. MCI (Malicious Call Identification)
9. CFB (Call Forwarding Busy)
10. CFNR (Call Forwarding No Reply)
11. CFU (Call Forwarding Unconditional)
12. KEYPAD FACILITY
FEATURES
19
19
19
19
19
20
20
21
21
22
22
23
23
POWER FAILURE INFORMING AND FUNCTIONING
CONSULTATION HOLD
MULTIPLE CALLS HANDLING
OFF-HOOK AND HANDSFREE CONVERSATION SWITCHING
BUZZER
VOLUME CONTROL FOR RING AND RECEIVED VOICE
MUTE
DND (DO NOT DISTURB)
HEARING AID CAPABILITY
COLD START
23
23
24
24
24
24
24
24
24
24
PROBLEM AND REMEDY
25
INDEX
26
While reasonable efforts were made to ensure that the information in this document was complete
and accurate at the time of printing. It is not possible to ensure that this user’s manual is absolutely
“free of errors”. Changes or corrections will not inform you but will be incorporated into future
reissues.
Issue No: ST-668-19-E01 Issue Date: 30-09-’98
2
INTRODUCTION
You have selected an ISDN (Integrated Services Digital Network) telephone that provides more
features than the traditional analog telephone. The features include:
GENERAL FUNCTIONS
• Multiple calls handling
• Call appearance
• Last number redial
• Speed dialing: 12 numbers in memory and 8 numbers in direct access keys
• Date and time display
• Call elapsed time display
• On-hook dialing
• Handsfree speaking and dialing
• Mute
• Volume control for ring and received voice
• A choice of ring patterns: 4 patterns
• Password protection for programmed data
• Support DTMF (Dual Tone Multiple Frequency) generator
• Last ten outgoing call numbers with date/time display and dialing
• Last ten incoming call numbers with date/time display and dialing
• Power failure informing and functioning
• Support POINT-TO-POINT configuration and POINT-TO-MULTIPOINT configuration
• New call indicator and call back
• Do not disturb
• Lock
• Baby call (Room monitor)
• Emergency call (Direct call)
• Call Waiting On/Off and Reject
• Incoming call block (Call filter): 5 numbers
• Outgoing call block (Toll restriction, allow, and partial block): 10 numbers
• Consultation hold
• Hearing aid capability
SUPPLEMENTARY SERVICES
• MSN (Multiple Subscriber Number): 3 numbers
• SUB (Sub-addressing): 3 numbers
• COLP (Connected Line Presentation)
• COLR (Connected Line Restriction)
• CLIP (Calling Line Identification Presentation)
• CLIR (Calling Line Identification Restriction)
• CFB (Call Forwarding Busy)
• CFNR (Call Forwarding No Reply)
• CFU (Call Forwarding Unconditional)
• CW (Call Waiting)
• CH (Call Hold)
• TP (Terminal portability): Call suspend and suspended call resuming
• MCI (Malicious Call Identification)
• AOC (Advise Of Charge)
• KEYPAD FACILITY
SPECIFICATIONS (EURO ISDN)
The following telecommunication standards are supported:
• ISDN BRA So Interface
• I-CTR3
• BAPT 223 ZV25
• CTR8
• CE : EMC
3
CONTENTS OF THE PACKAGE
Before installing, please check the contents of the package which includes:
• The ISDN phone unit
• Telephone line cord
• Handset
• Handset line cord
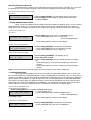
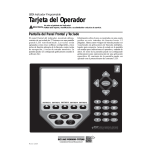
TOP FRONT VIEW OF THE PHONE
Figure 1
4
• User’s manual
BOTTOM VIEW OF THE PHONE
STEP 1
Figure 2
INSTALLATION
STEP 1: Connect handset to the phone unit by using handset line cord (see Figure 2).
STEP 2: Connect the phone to the ISDN wall socket by using telephone line cord (see Figure 3).
STEP 3: With the handset on-hook, keep pressing hardkey [MUTE] and plugging another end of
telephone line cord of step 2 to the phone (see Figure 3).
Note: It is recommended to do STEP3 in case of malfunction, first installation or replacing new
software.
STEP 2
STEP 3
STEP 3
MUTE
Figure 3
5
DIP SWITCH SETUP
The dip switch which is located on the back of the phone contains four switches which are all set to
OFF as a default setting. After changing the dip switch setting, you need to re-plug the telephone line cord to
the phone.
designated
terminal
resistor
terminal
resistor
non-designated
SW1
SW2
SW3
point-topoint
point-tomultipoint
SW4
ON
OFF
DESIGNATED/NON-DESIGNATED (SW1) SETUP
SW1 is designated/non-designated switch. When there is a local power failure, only one
designated telephone can be used from the network. In POINT-TO-POINT configuration, you can set SW1
switch to ON so that it can be used no matter there is a power failure or not. In POINT-TO-MULTIPOINT
configuration, set the designated phone SW1 switch to ON and all other phones to OFF so that when power
failure happens, the designated phone still can work but the others can’t.
TERMINAL RESISTOR (SW2 AND SW3) SETUP
SW2 and SW3 are terminal resistor switches and need to both set to ON or OFF. In POINT-TOPOINT configuration, set SW2 and SW3 to ON. In POINT-TO-MULTIPOINT configuration, you can either set
them both to ON or OFF depending on the call connection condition. Contact your local supplier if you still
have trouble in setting up SW2 and SW3 after trying ON and OFF setting for them.
POINT-TO-POINT/POINT-TO-MULTIPOINT (SW4) SETUP
In POINT-TO POINT configuration, set SW4 to ON otherwise OFF (Note 1).
Note 1:
In POINT-TO-POINT configuration, one NT (Network Termination) only connects to one telephone.
For the long distance connection (up to 1 kilometer) between NT and phone, use this configuration
to receive the better connection condition.
In POINT-TO-MULTIPOINT configuration, one NT connects to multiple ISDN terminals (Maximum
eight terminals allowed). This configuration is suitable for the short distance connection between
NT and phones.
LCD DISPLAY EXPLANATION
(1) Main display (Main menu 1)
DDD MM/.DD HH:MM C L E B D F T A
PROG LOCK RECORD SPEED
•
•
•
•
•
•
•
•
•
•
•
•
•
•
In standby mode, LCD displays as above (Note 1).
DDD shows the day of week such as MON is for Monday.
MM/DD shows the date such as 01/04 is for January 4th.
HH:MM shows the time such as 10:30 is for 10:30 A.M.
C indicates that the call forwarding function is enabled (Note 2).
L indicates that the lock function is enabled.
E indicates that the emergency call function is enabled.
B indicates that the baby call function is enabled.
D indicates that the DND (Do Not Disturb) function is enabled.
F indicates that call filter function is enabled.
T indicates that toll restriction function is enabled.
A indicates that allow function is enabled.
PROG (PROGram) indicates that softkey1 is for function setup.
LOCK indicates that softkey2 is for lock function setup. ‘LOCK’ is shown only if
password has been set.
• RECORD/NEWx indicates that softkey3 is for call record inquiry. If it shows
NEWx, where x stands for a number, indicates that there is/are x new incoming
call(s) was/were not picked up and has/have not been inquired by you.
6
• SPEED indicates that softkey4 is for speed dialing.
Note 1:
Note 2:
When the phone has not been used for a period of time, instead of showing date and time, main
display shows ‘ISDN PHONE’ to shut down the power. It will automatically resume the power after
any key is pressed or incoming call comes.
If the returned string from network is not ‘SUCCESS’ of ‘OK’ after call forwarding is activated
successfully, icon ‘C’ will not be shown on LCD main display.
PROGRAM (FUNCTION SETUPS)
You can do the function setups by pressing the softkey1 [PROG] from main display. Once you
have a password, the four-digit password is required before entering protected function setup.
GENERAL FUNCTION SETUP
General function setup allows you to set up general information or data in the phone.
Main menu 2
EXIT
GENERAL
FUNCTION
PROTECTED
FUNCTION
1 Press softkey1 [PROG] from main display. LCD displays as left,
main menu 2.
2 Press softkey2 to start setting up the first general function.
1. SPEED DIAL SETUP
You can store your frequently dial phone number in the memory or a direct access key to use for
speed dialing. Up to twelve speed dial phone numbers can be stored in memory and eight in direct access
keys. Each number stored can have subaddress associating with it.
(1) After pressing softkey2 from main menu 2
1. SPEED DIAL
EXIT BACK
NEXT
ENTER
1 Press softkey2 from main menu 2. LCD displays as (1).
∗ Press softkey2 [BACK] to NEW CALL INDICATOR setup.
∗ Press softkey3 [NEXT] to BABY CALL setup.
∗ Press softkey1 [EXIT] to return to main display.
(2) After pressing softkey4[ENTER]
SPEED
EXIT
TYPE
SELECT
MEMORY KEY
2 Press softkey4 [ENTER]. LCD will display as (2).
∗ Press softkey2 [MEMORY] to set up phone number in
memory list.
∗ Press softkey3 [KEY] to set up phone number in direct
access key.
∗ Press softkey1 [EXIT] to return to display (1).
A. SETTING UP PHONE NUMBER IN THE MEMORY LIST
You can program up to 12 phone numbers in the memory list (Note1).
(A3) After pressing softkey2[MEMORY]
1.
EXIT
NEXT
SUBA
CHANGE
A3 Press softkey2 [MEMORY]. LCD will display as (A3).
∗ Press softkey2 [NEXT] to set up next phone number.
∗ Press softkey3 [SUBA] to enter subaddress of current
phone number.
∗ Press softkey1 [EXIT] to return to display (1).
(A4) After pressing softkey4[CHANGE]
1.
EXIT
Å
SUBA
SAVE
A4 Press softkey4 [CHANGE]. LCD displays as (A4).
∗ Press softkey2 [Å ] to move cursor backward for one digit
and re-enter the number.
∗ Press softkey3 [SUBA] to enter subaddress of the current
phone number.
∗ Press softkey1 [EXIT] to return to display (A3).
A5 Enter the phone number.
7
A6 Press softkey4 [SAVE] to save the setting and return to
display (A3)
Note 1:
Refer to METHOD A:USE SOFTKEY of SPEED DIALING in MAKING OUTGOING CALL
section to actually implement the phone number stored in the memory.
B. SETTING UP PHONE NUMBER IN DIRECT ACCESS KEY
You can store phone number in the direct access key. There are eight direct access keys available
(Note 1)
(B3) After pressing softkey3[KEY]
SELECT PROGRAMMABLE KEY
EXIT
B3 Press softkey3 [KEY]. LCD will display as (B3).
(B4) After pressing direct access key
XXXXXXX
EXIT SUBA CHANGE
B4 Press one desired direct access key, if there is phone number
stored in this direct access key, LCD displays as (B4) where
xxxxxxx represents the phone number (Note 2).
* Press softkey2[SUBA] to inquire subaddress associated with
current displayed phone number.
* Press softkey1[EXIT] to return to display (2).
B5 Press softkey3[CHANGE]. LCD displays as (B5).
(B5) After pressing softkey3[CHANGE]
_
EXIT Å
SUBA
SAVE
B6 Enter the phone number to store in the direct access key.
* Press softkey2[Å] to move cursor backward for one digit
and re-enter the number.
* Press softkey3[SUBA] to re-enter subaddress.
B7 Press softkey4[SAVE] to save the setting and return to display
(B4).
Note 1: Refer to METHOD B: USE DIRECT ACCESS KEY of SPEED DIALING in MAKING OUTGOING
CALL section to actually implement the phone number stored in the direct access key.
Note 2: If there is no phone number stored in this direct access key, LCD displays as following:
(B4-1) After pressing direct access key
* Press softkey2[CHANGE] to enter phone number.
* Press softkey1[EXIT] to return to display (2).
RECORD EMPTY
EXIT CHANGE
2. BABY CALL SETUP
This is the room monitoring function which allows you to listen into the room where the phone is
located. In order to do so, dial the MSN which was stored in this phone (Refer to PHONE NUMBER SETUP
to set the MSN).
(1) After pressing softkey3[NEXT] from
SPEED DIAL SETUP display (1)
2. BABY CALL
EXIT BACK NEXT ENTER
1 Press softkey3[NEXT] from SPEED DIAL setup display (1),
LCD displays as (1).
* Press softkey2[BACK] to return to SPEED DIAL setup.
* Press softkey3[NEXT] to CHARGE RATE setup.
* Press softkey1[EXIT] to return to main display.
(2) After pressing softkey4[ENTER]
BABY CALL
EXIT ON/OFF
OFF
2 Press softkey4[ENTER]. LCD displays as (2).
3 Press softkey2[[ON/OFF] to switch ON/OFF where ON
to enable baby call function and OFF to disable.
8
4 Press softkey1[EXIT] to save the setting and return to display
(1).
3. CHARGE RATE SETUP(AOC)
Depend on the network option, the network may send charge information to user side during
conversation.
There are three options provided by network:
a)
No charge information sending
b)
Total Charge with Currency sending
c)
Charge Units sending
In option (a), no charge information displays on the LCD display.
In option (b), total charge with currency will display on the LCD display without entering the charge rate.
In option (c), user have to ask the charge rate from network provider and enter it into this setup. The total
charge with “$xxxxxxx.xxxx” is the product of charge rate by charge units sent from network.
If the charge rate doesn’t set up or total charge is overflow, charge units with “@xxxxxxx” is
displayed only.
(1) After pressing softkey3[NEXT] from BABY CALL SETUP display (1)
3. CHARGE RATE
EXIT BACK NEXT
ENTER
1 Press softkey3[NEXT] from BABY CALL setup display (1).
LCD displays as (1).
* Press softkey2[BACK] to return to BABY CALL setup.
* Press softkey3[NEXT] to EMERGENCY CALL setup.
* Press softkey1[EXIT] to return to main display.
(2) After pressing softkey4[ENTER]
CHARGE RATE: aa.bbb
EXIT CHANGE
2 Press softkey4[ENTER]. LCD displays as (2).
* Press softkey2[CHANGE] to change the charge rate setup as
display(3).
* Press softkey1[EXIT] to return to display (1).
(3) After pressing softkey2[CHANGE]
CHARGE RATE: **.***
EXIT Å SAVE
3 Press softkey2[CHANGE]. LCD displays as (3).
* Press number digit (0-9). (5 digits is required)
for example: if the charge rate is 2.31, 02.310 is required to
input.
* Press softkey2[Å] to erase the last digit.
* Press softkey3[SAVE] to save the charge rate.
* Press softkey1[EXIT] to return to display (1).
4. EMERGENCY CALL SETUP
This function allows you to directly dial the number stored in the emergency call function by just
pressing any dialing pads.
(1) After pressing softkey3[NEXT] from
CHARGE RATE setup display (1)
4. EMERGENCY CALL
EXIT BACK NEXT ENTER
1 Press softkey3[NEXT] from CHARGE RATE SETUP display
(1). LCD displays as (1).
* Press softkey2[BACK] to CHARGE RATE setup.
9
* Press softkey3[NEXT] to RING TYPE setup.
* Press softkey1[EXIT] to return to main display.
(2) After pressing softkey4[ENTER]
NO:XXXXXX
EXIT CHANGE ON/OFF
ON
2 Press softkey4[ENTER]. LCD displays as (2).
* Press softkey2[CHANGE] to enter the phone number.
* Press softkey3[ON/OFF] to enable/disable the emergency
call function. ‘ON/OFF’ will be shown only if there is a phone
number stored.
* Press softkey1[EXIT] to a return to display (1).
(3) After pressing softkey2[CHANGE]
NO:_
EXIT Å SAVE
3 Press softkey2[CHANGE]. LCD displays as (3). You can
enter the phone number now by pressing dialing pads.
* Press softkey2[Å] to move cursor backward and re-enter
the number.
* Press softkey1[EXIT] to return to display (2) without saving
the phone number.
4 Press softkey3[SAVE] to save the phone number and return
to display (2).
5. RING TYPE SETUP
You can choose one of the four ring patterns available. The default setting is 2.
(1) After pressing softkey3[NEXT] from
EMERGENCY CALL setup display (1)
5. RING TYPE
EXIT BACK NEXT ENTER
1 Press softkey3[NEXT] from EMERGENCY CALL setup
display (1). LCD displays as (1).
* Press softkey2[BACK] to EMERGENCY CALL setup.
* Press softkey3[NEXT] to TIME AND DATE setup.
* Press softkey1[EXIT] to return to main display.
(2) After pressing softkey4[ENTER]
RING TYPE
EXIT ↓
↑
2
SAVE
2 Press softkey4[ENTER]. LCD displays as (2).
* Press softkey2[↓] to choose the lower lever ring pattern.
The corresponding new pattern will sound.
* Press softkey3[↑] to choose the higher level ring pattern.
The corresponding new pattern will sound.
* Press softkey1[EXIT] to return to display (1) without saving
the change.
3 Press softkey4[SAVE] to save the setting and return to
display (1).
6. TIME AND DATE SETUP
The default setting of time and date setup is AUTO which allows you to get the time and date
automatically from network after making the first connected outgoing call if the network provides time and
date. Otherwise, you can set up time and date by yourself after entering time and date setup.
(1) After pressing softkey3[NEXT] from
RING TYPE setup display (1)
6. TIME AND DATE
EXIT BACK NEXT ENTER
1 Press softkey3[NEXT] from RING TYPE setup display (1).
LCD displays as (1).
* Press softkey2[BACK] to RING TYPE setup.
* Press softkey3[NEXT] to NEW CALL INDICATOR setup.
* Press softkey1[EXIT] to return to main display.
(2) After pressing softkey4[ENTER]
98’ 01/01 00:01
EXIT CHANGE
2 Press softkey4[ENTER]. LCD displays as (2).
98’ 01/01 00:01 is Year Month/Day Hour: minute format.
10
* Press softkey2[CHANGE] to setup time and date
* Press softkey1[EXIT] to return to display (1) without saving
the change.
(3) After pressing softkey2[CHANGE]
3 Press softkey2[CHANGE]. LCD displays as (3).
* Press number key (0-9) directly to setup time/date
YYMMDDHHmm
EXIT Å
SAVE
YY: year
MM: Month
DD: Day
mm: Minute
9910252035 is 25th Oct. 1999 20:35
HH: Hour
* Press softkey2[Å] to erase the last digit.
* Press softkey3[SAVE] to save the time/date entered.
* Press softkey1[EXIT] to return to display (1).
7. NEW CALL INDICATOR SETUP
With this function set to on, softkey3 shows ‘NEWx’ in main display, where x stands for a number,
as well as speaker LED flashes(normal mode) or ON (deactivation mode) to inform you that there is/are x
incoming call(s) was/were not picked up by you (Note1). Refer to INQUIRING CALL HISTORY to confirm
new incoming call.
(1) After pressing softkey3[NEXT] from
TIME AND DATE setup display (1)
7. NEW CALL INDICATOR
EXIT BACK NEXT ENTER
1 Press softkey3[NEXT] from TIME AND DATE setup display
(1). LCD displays as (1).
* Press softkey2[BACK] to TIME AND DATE setup.
* Press softkey3[NEXT] to SPEED DIAL setup.
* Press softkey1[EXIT] to return to main display.
(2) After pressing softkey4[ENTER]
NEW CALL INDICATOR ON
EXIT
ON/OFF
2 Press softkey4[ENTER]. LCD displays as (2).
3 Press softkey2[ON/OFF] to enable/disable new call indicator.
Note 1: It is recommended to set only one phone to enable NEW CALL INDICATOR in the POINT-TOMULTIPOINT configuration.
8. CALL WAITING SETUP
Second call will ring and wait for answer in case CALL WAITING set to ON.
Second call will not ring and the caller will hear busy tone in case CALL WAITING set OFF.
Default: ON
(1) After pressing softkey3[NEXT] from NEW
CALL INDICATOR setup display(1)
8. CALL WAITING
EXIT BACK NEXT ENTER
1 Press softkey3[NEXT] from NEW CALL INDICATOR setup
display(1). LCD display as (1).
* Press softkey2[BACK] to NEW CALL INDICATOR setup display
* Press softkey3[NEXT] to SPEED DIAL setup
* Press softkey1[EXIT] to return to main display.
(2) After pressing softkey4(ENTER)
CALL WAITING
EXIT ON/OFF
ON
2 Press softkey4[ENTER]. LCD display as (2).
3 Press softkey2[ON/OFF] to turn CALL WAITING on or off.
11
PROTECTED FUNCTION SETUP
Protected function contains more private data than the general function. Therefore, once you have
the password set, the four-digit password is required before entering protected function setup menu.
After pressing softkey1[PROG] from main display
Main menu 2
GENERAL PROTECTED
EXIT FUNCTION FUNCTION
1 Press softkey1[PROG]. LCD will display as left, main menu 2.
2 Press softkey4 to start setting up the first protected function,
PHONE NUMBER.
1. PHONE NUMBER (MSN) SETUP
When you have an ISDN line with multiple subscriber numbers (or MSN for short), you may want to
assign the phone number to your phone so that it rings only if one of the programmed phone numbers is
being called. You can assign up to three phone numbers. Each phone number can have up to twenty digits.
(1) After pressing softkey4 from
main menu 2
1. PHONE NUMBER
EXIT BACK NEXT ENTER
1 Press softkey4 from main menu 2. LCD displays as (1).
* Press softkey2[BACK] to CALL FILTER menu.
* Press softkey3[NEXT] to
SUBADDRESS setup.
* Press softkey1[EXIT] to return to main display.
(2) After pressing softkey4[ENTER]
1.
EXIT
NEXT CHANGE
2 Press softkey4[ENTER]. LCD displays as (2) (Note1).
* Press softkey2[NEXT] to set up next phone number.
* Press softkey1[EXIT] to return to display (1).
(3) After pressing softkey3[CHANGE]
1. _
EXIT
3 Press softkey3[CHANGE]. LCD displays as (3).
4 Enter the phone number.
5 Press softkey3[SAVE] to save the setting and return to display
(2).
* Press softkey2[Å] to move cursor backward and re-enter the
number.
* Press softkey1[EXIT] to return to display (1) without saving the
change.
Note 1: If there is a phone number assigned, this phone number can be seen in display (2).
Å
SAVE
2. SUBADDRESS SETUP
Up to eight separate telephones can be connected to a single ISDN telephone line. You can give
each of these telephones a separate telephone number (subaddresses) to distinguish them. For each phone
number (or call MSN), you can set up to three subaddresses to associate with it. If the calling party dialed the
phone number with subaddress, the phone rings only if one of the assigned phone number with subaddress
was dialed. If the calling party only dialled the phone number without subaddress, the phone with the same
assigned phone number rings regardless the subaddress. The subaddress assigned to the first entry will be
sent to network in incoming or outgoing call. Each subaddress can have up to nineteen digits.
(1) After pressing softkey3[NEXT] from
PHONE NUMBER setup display (1)
1 Press softkey3[NEXT] from PHONE NUMBER setup display
(1). LCD displays as (1).
* Press softkey2[BACK] to PHONE NUMBER setup.
* Press softkey3[NEXT] to
PASSWORD setup.
* Press softkey1[EXIT] to return to main display.
2. SUBADDRESS
EXIT
BACK NEXT ENTER
(2) After pressing softkey4[ENTER]
1.
EXIT
NEXT
CHANGE
2 Press softkey4[ENTER]. LCD displays as (2) (Note1).
*Press softkey2[NEXT] to set up next subaddress.
12
* Press softkey1[EXIT] to return to display(1).
(3) After pressing softkey3[CHANGE]
1.
EXIT Å
3 Press softkey3[CHANGE]. LCD displays as (3).
4 Enter the subaddress number.
SAVE
5 Press softkey3[SAVE] to save the setting and return to display
(2).
*Press softkey2[Å] to move cursor backward and re-enter the
number.
* Press softkey1[EXIT] to return to display (1) without saving the
change.
Note1: If there is a subaddress assigned, this subaddress number can be seen in display (2).
3. PASSWORD SETUP
The password is provided to protect you from unauthorized change of the protected function data
in the phone. It requires four digits for the password. You must remember your password very well. However,
if you forget it, please contact the local supplier to get it serviced.
(1) After pressing softkey3[NEXT] from
SUBADDRESS setup display (1).
3. PASSWORD
EXIT BACK NEXT ENTER
1 Press softkey3[NEXT] from SUBADDRESS setup display (1).
LCD displays as (1).
* Press softkey2[BACK] to SUBADDRESS setup.
* Press softkey3[NEXT] to BLOCK setup.
* Press softkey1[EXIT] to return to main display
(2) After pressing softkey4[ENTER]
PASSWORD
EXIT Å SAVE
CHANGE
2 Press softkey4[ENTER]. LCD displays as (2).
3 Press softkey4[CHANGE] then enter 4-digit password.
4 Press softkey3[SAVE] to save the setting and return to
display (1).
* Press softkey2[Å] to move cursor backward and re-enter the
number.
* Press softkey1[EXIT] to return to display (1).
4. OUTGOING CALL BLOCK SETUP
The outgoing call block function includes three sub functions: toll restriction, allow and partial block.
Toll restriction:
You can program up to 10 numbers, each number can have up to 3 digits, in the toll restriction list.
If the toll restriction is enable and the allow is disabled then whenever a phone number is dialled that starts
with or is identical to one of the 10 programmed numbers, no connection is made. With this feature, certain
phone numbers and toll numbers can not be dialed.
Allow:
You can program up to 10 numbers, each number can have up 20 digits, in the allow list. When the
allow function is enabled and toll restriction is disabled, the outgoing call can be made only if the number you
dialled that starts with or is identical to one the 10 programmed numbers in the allow list. It will reject to make
the call that is not listed in the allow phone number list.
Partial block:
When enable both toll restriction and allow functions, you activate the partial block function. With
partial block function, the outgoing call can be made only if:
1) The phone number you dialled starts with or is identical to one of the programmed numbers in both toll
restriction phone list and allow phone list; or
2) The phone number you dialed does not start with or is not identical to one of the 10 programmed numbers
in the toll restriction phone list.
With partial block feature, you can set the certain toll number can not be dialed but, in the mean
time, allow the certain phone number starts with the number in both toll restriction and allow lists can be
dialed.
13
(1) After pressing softkey3[NEXT] from
PASSWORD setup display (1)
4. BLOCK
EXIT BACK NEXT ENTER
1 Press softkey3[NEXT] from PASSWORD setup display (1).
LCD displays as (1).
* Press softkey2[BACK] to PASSWORD setup.
* Press softkey3[NEXT] to CALL FILTER setup.
* Press softkey1[EXIT] to return to main display.
(2) After pressing softkey4[ENTER]
TOLL RESTRICTION
OFF
EXIT ALLOW ON/OFF ENTER
2 Press softkey4[ENTER]. LCD displays as (2).
* Press softkey2[ALLOW] to set up allow phone number list.
* Press softkey3[ON/OFF] to switch ON or OFF of toll restriction
function. To enable the function, set to ON otherwise set to
OFF. Softkey3[ON/OFF] will be disabled if there is no phone
number stored in the toll restriction list.
* Press softkey1[EXIT] to return to display (1).
(3) After pressing softkey4[ENTER]
0.
EXIT
3 Press softkey4[ENTER]. LCD displays as (3).
* Press softkey2[NEXT] to set up next number.
* Press softkey1[EXIT] to return to display (1).
NEXT CHANGE
(4) After pressing softkey3[CHANGE]
0._
EXIT Å
4 Press softkey3[CHANGE]. LCD displays as (4).
5 Enter the number up to 3 digits.
6 Press softkey3[SAVE] to save the setting and return to display
(3).
* Press softkey2[Å] to move cursor backward and re-enter the
number.
* Press softkey1[EXIT] to return to display (3) without saving the
change.
SAVE
5. CALL FILTER SETUP
Once you have certain phone number stored in the CALL FILTER, the phone will not activate or ring of this
incoming call. Up to five phone numbers can be stored in the CALL FILTER.
(1) After pressing softkey3[NEXT] from
BLOCK setup display (1)
5. CALL FILTER
EXIT BACK NEXT ENTER
1 Press softkey3[NEXT] from BLOCK setup display (1). LCD
displays as (1).
* Press softkey2[BACK] to BLOCK setup.
* Press softkey3[NEXT] to PHONE NUMBER menu.
* Press softkey1[EXIT] to return to main display.
(2) After pressing softkey4[ENTER]
CALL FILTER
EXIT ON/OFF
OFF
ENTER
2 Press softkey4[ENTER]. LCD displays as (2).
* Press softkey2[ON/OFF] to enable/disable the function.
* Press softkey1[EXIT] to return to display (1).
(3) After pressing softkey3[ENTER]
1.
EXIT NEXT
CHANGE
3 Press softkey3[ENTER]. LCD displays as (3).
* Press softkey2[NEXT] to set next number.
* Press softkey1[EXIT] to return to display (2).
(4) After pressing softkey4[CHANGE]
1.
EXIT Å
SAVE
4 Press softkey3[CHANGE]. LCD displays as (4).
5 Enter the number.
6 Press softkey3[SAVE] to save the setting and return to display
(3).
* Press softkey2[Å] to move cursor backward and re-enter
the number.
* Press softkey1[EXIT] to return to display (3) without saving
the change.
14
MAKING OUTGOING CALL
OVERLAP SENDING
With overlap sending, each digit is sent to the network as soon as the dialing pad is pressed. There
is no chance to make corrections (Note 1).
METHOD A: OFF-HOOK (BY LIFTING THE HANDSET)
(A1) After lifting handset
CA1:
DIAL NUMBER
A1 Lift handset in standby mode. LCD displays as (aA1).
A2 Wait until you get the dialing tone then start to enter the
telephone number via the dialing pad.
A3 Start the conversation via the handset when the line is connected
A4 Hang up the handset to end a call.
METHOD B: ON-HOOK (BY PRESSING HARDKEY[SPK])
(B1) After pressing hardkey[SPK]
B1 Press hardkey[SPK] in standby mode (Note 2).
LCD displays as (B2).
CA1:_
B2 Wait until you get the dialing tone then start to enter the
DIAL NUMBER
telephone number via the
dialing pad
B3 Start the conversation via the microphone when the line is
connected.
B4 Press hardkey[SPK] to end a call.
Note 1: Subaddressing is not available in overlap sending.
Note 2: Hardkey[SPK] will be deactivated in the restriction mode (power failure).
EN-BLOC SENDING
With en-bloc sending, the entire number was dialled before sending to the network (Note 1).
METHOD A: OFF-HOOK (BY LIFTING THE HANDSET)
(A1) While dialing
CA1: XXXXXXX
EXIT Å
SUBADDRESS
A1 Enter the telephone number via the dialing pad in standby
mode. LCD will display (A1).
* Press softkey2[Å] to correct the number.
* Press softkey3[SUBADDRESS] to enter subaddress.
A2 Lift handset after finishing dialing the phone number.
A3 Start the conversation via the handset when the line is
connected.
A4 Hang up the handset to end a call.
METHOD B: ON-HOOK (BY PRESSING HARDKEY[SPK])
(B1) While dialing
B1 Enter the telephone number via the dialing pad in standby
mode. LCD will display as (B1).
* Press softkey2[Å] to correct the number
* Press softkey3[SUBADDRESS] to enter subaddress.
B2 Press hardkey[SPK] after finishing dialing the phone number.
B3 Start the conversation via the microphone when the line is
connected.
B4 Press hardkey[SPK] to end a call.
Note 1: When you want to make a phone call with subaddress, use en-bloc sending instead of overlap
sending since overlap sending will discard the subaddress.
CA1: XXXXXXX
EXIT Å
SUBADDRESS
LAST NUMBER REDIAL
If the line was busy when you called someone, or you want to call someone you just called, there is
no need to dial the number again manually. The REDIAL button automatically redials the most recently dialed
number for you (Note 1).
15
OVERLAP SENDING:
METHOD A: OFF-HOOK (BY LIFTING THE HANDSET)
(A1) After lifting handset
A1 Lift handset. LCD will display as (A1).
A2 Press hardkey[REDIAL] when you hear the dialing tone.
A3 Start the conversation via the handset when the line is
connected.
A4 Hang up the handset to end a call.
CA1:
DIAL NUMBER
METHOD B: ON-HOOK (BY PRESSING HARDKEY[SPK])
(B1) After pressing hardkey[SPK]
B1 Press hardkey[SPK] (Note2) LCD will display as (B1).
B2 Press hardkey[REDIAL] when you hear the dialing tone.
B3 Start the conversation via the microphone when the line is
connected.
B4 Press hardkey[SPK] to end a call.
CA1:
DIAL NUMBER
EN-BLOC SENDING:
Press hardkey[REDIAL] directly in standby mode.
Note 1: If you need to redial the number which has the subaddress associating with it, use en-bloc
sending.
Note 2: Hardkey[SPK] will be deactivated in the restriction mode (power failure).
SPEED DIALING
There are two ways to use speed dialing.
METHOD A: USE SOFTKEY (Note 1)
(A1) After pressing softkey4[SPEED]
A1 Press softkey4[SPEED] from main display. LCD displays as
(A1) if there is phone number stored in memory.
* Press softkey3[SUBA] to inquire the subaddress of
this phone number.
A2 Press softkey4[CALL] to make the line connection of the
displayed phone number.
A3 Start the conversation via microphone or handset when the
line is connected.
Note 1: The phone number used for speed dialing in this feature was stored in memory. Refer to ‘SPEED
DIAL SETUP’ and choose storing in MEMORY in SPEED TYPE SELECT display to set up
speed dial in memory.
1. XXXXXX
EXIT NEXT SUBA CALL
METHOD B: USE DIRECT ACCESS KEY (Note 1)
(1) When the line is connected (Note 2)
B1 Press Direct Access key x (where x stands for a number, it
can be number 1 to 8). The [SPK] LED will be ON after
connection.
B2 Start the conversation via the microphone or lift the handset
to talk when the line is connected. The LCD will display as (1).
B3 Press hardkey[SPK] if you use microphone otherwise hang
up handset to end a call (Note 3).
Note 1: The phone number used for speed dialing in this option was stored in direct access key. Refer to
‘SPEED DIAL SETUP’ and choose storing in KEY in SPEED TYPE SELECT display to set up
speed dial in direct access key.
Note 2: When the line is connected, the last five columns of the first row on the LCD display will show the
elapsed time in MM:SS format where MM stands for minutes and SS for seconds.
Note 3: Hardkey[SPK] will be deactivated in the restriction mode (power failure).
CAx:XXXXXXX
CONNECT
MM:SS
16
RECEIVING INCOMING CALL
When ringer starts ringing
When you hear ring, LCD displays as left where “XXXXXXX”
represents the calling party number.
CAx:XXXXXXX
CALL RINGING
METHOD A: OFF-HOOK (BY LIFTING THE HANDSET)
(A1) After lifting handset
CAx:
CONNECT
MM:SS
A1 Lift handset then start the conversation via the handset. LCD
will display as (A1).
A2 Hang up the handset to end a call.
METHOD B: ON-HOOK (BY PRESSING HARDKEY[SPK])
(B1) After pressing hardkey[SPK] (Note1)
CAx:
CONNECT
MM:SS
B1 Press hardkey[SPK] to start the conversation via the
microphone (Note 2). LCD will display as (B1).
B2 Press hardkey[SPK] to end a call.
Note 1: When the line is connected, the last five columns of the first row on the LCD display shows the
elapsed time in MM:SS format where MM stands for minutes and SS for seconds.
Note 2: Hardkey[SPK] will be deactivated in the restriction mode (power failure)
RECEIVING SECOND CALL
When second call is ringing, there are three methods to handle the second call.
Method 1: Press hardkey [HOLD] to hold the current call and press CA key (associated LED is
flashing), or press CA key directly to answer the waiting call.
Method 2: Press softkey2[REJ] to reject the second call.
Method 3: Press hardkey[DND] to mute buzzer and then answer the second call later.
LOCKING THE PHONE
When lock function is enabled, no outgoing call can be made. But, the phone rings for the incoming
call. This feature prevents the phone from unauthorized use. Prior to entering lock function setup, you have
to have password set (Refer to PASSWORD SETUP to set password).
(A1) After setting up the password
FRI 01/04 10:13
PROG LOCK RECORD SPEED
After setting up the password, LCD displays as (1) in main
display.
(2) After pressing softkey2[LOCK]
1 Press softkey2[LOCK] in main display. LCD displays as (2).
2 Enter four-digit password.
PASSWORD:_
EXIT
(3) After entering password
LOCK
EXIT ON/OFF
OFF
3 Press softkey2[ON/OFF] to switch ON/OFF of lock function.
4 Press softkey1[EXIT] to accept the setting and return to display
(1).
17
INQUIRING CALL HISTORY
You can inquire the most recently ten incoming and outgoing call numbers along with time stamps
by pressing softkey3[RECORD] in main display. If NEW CALL INDICATOR in enabled, the softkey3 shows
‘NEWx’, where x stands for a number, in main display instead of ‘RECORD’ as well as speaker LED flashes
(normal mode) of ON (deactivation mode) when there is/are x new incoming call(s) was/were not picked up
and has/have not been inquired by you yet. When you are inquiring the incoming call history with new call
indicator set to on, the asterisk ‘*’ included at the end of the phone number indicates that this is a new
incoming call. Refer to ‘NEW CALL INDICATOR’ to activate this function. When inquiring call history, the
most recently call will be displayed first.
(1) After pressing softkey3[RECORD]
CALL HISTORY
EXIT INCOMING
OUTGOING
1 Press softkey3[RECORD]/[NEWx] in main display. LCD
displays as (1).
A. COMFIRM THE MOST RECENTLY TEN INCOMING CALLS (Note 1):
When displaying incoming call record, the following (A2) and (A2-1) displays will switch every
second. In display(A2-1), it shows Date in MM/DD format, where MM stands for month and DD stands for
day, and TIME in HH:MM format, where HH stands for hours and MM stands for minutes. They are date and
time when the call was made.
(A2) After pressing softkey2[INCOMING]
9:XXXXXXX
EXIT BACK CALL EDIT
A2 Pressing softkey2[INCOMING]. LCD interchanges as
(A2) or (A2-1).
(A2-1) After pressing softkey2[INCOMING]
9:XXXXXXX
MM/DD BACK CALL HH:MM
*Press softkey2[BACK] to inquire preceding call.
* Press softkey3[CALL] to dial this phone number for you.
* Press softkey4[EDIT], which switches to time stamp in HH:MM
format every second, to edit the phone number.
(A3) After pressing softkey4[EDIT]
A3 Press softkey4[EDIT]. LCD displays as (A3).
* Press softkey2[DELETE] to delete the underscored digit
CALL
* Press softkey3[ADD] or just directly enter the number to input
number from the underscored digit.
* Press softkey4[CALL] to automatically dial the phone number.
Note 1: The number assigned in the CALL FILTER will not be shown in the incoming call record.
9:XXXXXXX
EXIT DELETE ADD
B. CONFIRM THE MOST RECENTLY TEN OUTGOING CALLS:
When displaying outgoing call record, the following (B2) and (B2-1) displays switch at every
second. In display(B2-1), it shows DATE in MM/DD format, where MM stands for month and DD stands for
day, and TIME in HH:MM stands for hours and MM stands for minutes. They are the DATE and TIME when
the call was made.
(B2) After pressing softkey4[OUTGOING] (Note 1)
9:XXXXXXX
EXIT BACK CALL HH:MM
B2 Press softkey4[OUTGOING]. LCD interchanges as (B2) or
(B2-1).
* Press softkey2[BACK] to inquire preceding call.
* Press softkey3[CALL] to dial this phone number for you.
18
(B2-1) After pressing softkey4[OUTGOING] (Note 1)
9:XXXXXXX
MM/DD BACK CALL HH:MM
B3 Press softkey1[EXIT] to return to main display.
SUPPLEMENTARY SERVICES
Most parts of supplementary services of ETSI recommendation are installed in the phone.
However, they are available on a subscription basis from your local telecommunication company. Depending
on your subscription, some or all of the supplementary services described below may be available.
For further information, contact your ISDN supplier.
1. CLIP (CALLING LINE IDENTFICATION PRESENTATION)
The calling party’s phone number of incoming call will be shown on LCD if the calling party allows
the phone number to be presented.
2. CLIR (CALLING LINE IDENTIFICATION RESTRICTION)
With CLIR set to ON, your phone number will not be shown on the LCD of the called party. The
default setting of CLIR is OFF which allows your phone to be displayed on the called party’s LCD.
(1) After pressing hardkey[SERVICE]
SUPPLEMENTARY SERVICE
EXIT CLIR COLR CD
1 Press hardkey[SERVICE] in standby mode. LCD display as (1).
* Press softkey1[EXIT] to return to the main display.
2 Press softkey2[CLIR] to set up CLIR. LCD displays as (2).
(2) After pressing softkey2[CLIR]
CLIR OFF
EXIT OFF ON
3 Press softkey3[ON] to enable CLIR.
* Press softkey4[OFF] to disable CLIR.
4 Press softkey1[EXIT] to return to display (1).
3. COLP(CONNECTED LINE PRESENTATION)
The called party’s phone number of outgoing call will be shown on LCD if the called party allows
the phone number to be presented.
4. COLR(CONNECTED LINE RESTRICTION)
The COLR set to ON, your phone number will not be displayed on the calling party’s LCD of
incoming call. The default setting of COLR is OFF which allows your phone number to be display on the
calling party’s LCD of incoming call.
(1) After pressing hardkey[SERVICE]
SUPPLEMENTARY SERVICE
EXIT CLIR COLR CD
1 Press hardkey[SERVICE] in standby mode. LCD display
as (1).
* Press softkey1[EXIT] to return to the main display.
2 Press softkey3[COLR] to set up COLR. LCD displays as (2).
3 Press softkey3[ON] to enable COLR.
(2) After pressing softkey3[COLR]
COLR OFF
EXIT OFF ON
4 Press softkey4[EXIT] to return to display (1).
5. HOLD
When you have an ongoing call assigned to CAx (Where x represents a number which can be number 1 to
4) key, the CAx indicator will be on. You can hold the CAx for later retrieval by pressing hardkey[HOLD]. The
maximum number of lines can be held is two (Note 1).
19
(1) After pressing hardkey[HOLD]
CAx:XXXXXX
HOLD SUCCESS
MM:SS
1 Press hardkey[HOLD]. CAx indicator flashes if CAx is held
successfully. LCD will display as (1) (Note2).
Note 1: When you are talking to the third party while putting the other two lines on-hold, the phone rings as
well as CAx key flashes for the next incoming call. In order to take this new incoming call, you have
to disconnect one call since maximum number of lines can be held is two.
Note 2: If network does not allow CAx call to be held, LCD displays as below. The CAx is still in connection.
(1-1) After pressing hardkey[HOLD]
CAx:XXXXXX
HOLD REJECTS
MM:SS
6. SUSPEND
The suspending allows you to move your telephone from one wall jack to another within the same
interface while a call is in progress.
(1) After pressing hardkey[RESUME/SUSPEND]
CALL_ID:_
EXIT
Å
ENTER
1 Press hardkey[RESUME/SUSPEND] to enter resume/suspend
function. LCD will display as (1).
2 Enter 1-digit, 2-digit number,
or don’t’t enter any numbers
(Default=0).
* Press softkey2[Å] to move cursor backward and re-enter the
number.
* Press softkey1[EXIT] to leave this menu then return to its
talking state.
(2) After pressing softkey[ENTER]
CAx:XXXXXX
SUSPEND SUCCESS
3 Press softkey3[ENTER] to accept the entered CALL_ID.
LCD will display as (2) if suspending is successful (Note 1).
Note 1: If the suspending has been rejected by the network, LCD displays as below. The call will be back
to its talking state.
(2-1) After pressing softkey[ENTER]
CAx:XXXXXXX
SUSPEND REJECT
7. RESUME
Once you have suspend the call, you can resume it by using hardkey[RESUME/SUSPEND].
(1) After pressing hardkey{[RESUME/SUSPEND]
CALL_ID:_
EXIT
Å
ENTER
1 Press hardkey[RESUME/SUSPEND] to enter resume/suspend
function. LCD will display as (1).
2 ENTER CALL_ID which you entered in suspend state.
* Press softkey2[Å] to move cursor backward and re-enter the
number.
* Press softkey1[EXIT] to leave this menu then return to main
display.
(2) After pressing softkey3[ENTER] (Note 1)
CAx:XXXXXXX
RESUME SUCCESS
3 Press softkey3[ENTER] to accept the entered CALL_ID.
LCD will display as (2) if resuming is successful. The call will
back to its talking state.
Note 1:
■ If the incorrect CALL_ID has been entered, LCD will display as below then return to the main display.
20
(2-1) After pressing softkey3[ENTER]
RESUME REJECT
CALL_ID DOES NOT EXIST
■ If there is no call suspended by the network, LCD will display as below then return to the main display.
(2-2) After pressing softkey3[ENTER]
RESUME REJECT
NO CALL SUSPENDED
■ If the network does not allow this call to be resumed, LCD will display as below then return to the main
display.
(2-3) After pressing softkey3[ENTER]
CALL_ID:XX
RESUME REJECT
8. MCI (MALICIOUS CALL IDENTIFICATION)
The MCI supplementary service enables you to request the call information of an incoming call
which is identified and registered in network side. MCI is only active in talking state or disconnection state
(terminated by remote user) within 30 seconds.
(1) After pressing hardkey[MCI]
ARE YOU SURE
YES NO
1 Press hardkey[MCI]. LCD will display as (1).
2 Press softkey1[YES] to activate MCI function. You will see the
message from network on LCD display.
* Press softkey2[NO] to return to normal talking state or standby
state without activating the MCI function.
9. CFB (CALL FORWARDING BUSY)
The CFB service allows you to divert your incoming call to another number while the line is busy.
At least one phone number (MSN) must be entered first.
(1) After pressing hardkey[SERVICE]
SUPPLEMENTARY SERVICE
EXIT CLIR COLR CD
1 Press hardkey[SERVICE]. LCD displays as (1).
(2) After pressing softkey4[CD]
CALL FORWARD
EXIT MSN1 MSN2 MSN3
2 Press softkey4[CD]. LCD will display as (2) (Note 1) (Note 2).
* Press softkey2[MSN1] to activate CALL FORWARDING for
MSN1.
* Press softkey3[MSN2] to activate CALL FORWARDING for
MSN2.
* Press softkey4[MSN3] to activate CALL FORWARDING for
MSN3.
(3) After pressing softkeyx[MSNx]
CALL FORWARD
EXIT CFB CFU CFNR
3 Press softkeyx[MSNx], x represent 1,2 or 3. LCD will display
as (3).
(4) After pressing softkey2[CFB]
CALL FORWARD ON BUSY
EXIT OFF ON INQUIRY
4 Press softkey2[CFB]. LCD displays as (4).
* Press softkey2[OFF] to disable CFB.
* Press softkey4[INQUIRY] to inquire the CFB information.
* Press softkey1[EXIT] to return to display (1).
21
(5) After pressing softkey3[ON]
NO:_
EXIT
Å
ENTER
5 Press softkey3[ON]. LCD displays as (5).
6 Enter the number it will forward to.
7 Press softkey3[ENTER] to enable the call forwarding request
(Note 2)
10. CFNR (CALL FORWARDING NO REPLY)
The CFNR service allows you to divert your incoming call to another number if no one replies the
call for 30 seconds (This timer is network option)). At least one phone number (MSN) must be entered first.
(1) After pressing hardkey[SERVICE]
1 Press hardkey[SERVICE]. LCD will display as (1).
SUPPLEMENTARY SERVICE
EXIT CLIR COLR CD
(2) After pressing softkey4[CD]
2 Press softkey4[CD]. LCD will display as (2) (Note 1) (Note 2).
* Press softkey2[MSN1] to activate CALL FORWARDING for
MSN1.
* Press softkey3[MSN2] to
activate CALL FORWARDING for
MSN2.
* Press softkey4[MSN3] to activate CALL FORWARDING for
MSN3.
CALL FORWARD
EXIT MSN1 MSN2 MSN3
(3) After pressing softkeyx[MSNx]
CALL FORWARD
EXIT CFB CFU CFNR
3 Press softkey[MSNx], x represents 1, 2 or 3. LCD will
display as (3).
(4) After pressing softkey4[CFNR]
CALL FORWARD NO REPLY
EXIT OFF ON INQUIRY
4 Press softkey4[CFNR]. LCD displays as (4).
* Press softkey2[OFF] to disable CFNR.
* Press softkey4[INQUIRY] to inquiry the CFNR information.
* Press softkey1[EXIT] to return to display (1).
(5) After pressing softkey3[ON]
NO:_
EXIT
Å
ENTER
5 Press softkey3[ON]. LCD displays as (5).
6 Enter the number it will forward to.
7 Press softkey3[ENTER] to enable the call forwarding request
(Note 2).
11. CFU (CALL FORWARDING UNCONDITIONAL)
The CFU service allows you to divert the incoming call to the number you programmed
unconditionally. At least one phone number (MSN) must be entered first.
(1) After pressing hardkey[SERVICE]
SUPPLEMENTARY SERVICE
EXIT CLIR COLR CD
1 Press hardkey[SERVICE]. LCD displays as (1).
(2) After pressing softkey4[CD]
CALL FORWARD
EXIT MSN1 MSN2 MSN3
2 Press softkey4[CD]. LCD will display as (2) (Note 1) (Note 2).
* Press softkey2[MSN1] to activate CALL FORWARDING for
MSN1.
* Press softkey3[MSN2] to activate CALL FORWARDING for
MSN2.
* Press softkey4[MSN3] to activate CALL FORWARDING
for MSN3.
22
(3) After pressing softkeyx[MSNx]
3 Press softkeyx[MSNx], x represents 1, 2 or 3. LCD will display
as (3).
CALL FORWARD
EXIT CFB CFU CFNR
(4) After pressing softkey3[CFU]
CALL FORWARD UNCONDITION
EXIT OFF ON INQUIRY
4 Press softkey3[CFU]. LCD displays as (4).
* Press softkey2[OFF] to disable CFU.
* Press softkey4[INQUIRY] to inquire the CFU information.
* Press softkey1[EXIT] to return to display (1).
(5) After pressing softkey3[ON]
NO:_
EXIT
Å
5 Press softkey3[ON]. LCD displays as (5).
6 Enter the number it will forward to.
7 Press softkey3[ENTER] to enable the call forwarding request
(Note 2).
ENTER
Note 1: You must have at least one phone number (MSN) set to activate CALL FORWARDING.
Softkey2, softkey3 or softkey4 is disabled if MSN1, MSN2 or MSN3 has not been set yet.
Note 2: In POINT-TO-MULTIPOINT configuration, if one phone, say phone A has been set to enable
CALL FORWARDING function, it will enable CALL FORWARDING of the other phones
connected to the same line as well since they are using the same ISDN line but only the phone A
has ‘C’ on the main display.
12. KEYPAD FACILITY
The activation and deactivation for some supplementary services is supported by entering keypad
signalling directly. Following is an example of activating CALL FORWARDING UNCONDITIONAL (CFU), if
the sequence of code for activating CFU is “*21*7213291#”. There are two methods to use keypad signalling
for activating CFU:
Method 1: OVERLAP SENDING
(a) Lift handset
(b) Press hardkey[SERVICE]
(c) Dial “*21*7213291#”
Method 2: ENBLOC SENDING
(a) Dial “*21*7213291#”
(b) Press hardkey[SERVICE]
(c) Lift handset
FEATURES
POWER FAILURE INFORMING AND FUNCTIONING
When there is a local power failure, the phone becomes in restriction mode instead of normal
mode. The LCD will inform you that it is in restriction mode by flashing the display. Handsfree will be disabled
in restriction mode. If you are on the line using handsfree while restriction mode happens, you need to switch
to handset to continue the conversation.
CONSULTATION HOLD
When you have two connections and want to speak to two parties alternatively. You can put one
party on hold then talk to another one. The flashing CAx (Where x represents a number which can be
number 1 to 4) key indicates that CAx is on hold. The following is an example of switching between CA1 and
CA2 where CA1 is the one on-line and CA2 is the next incoming/outgoing call (Note 1).
(1)After pressing hardkey[HOLD]
CA1:XXXXXXX
HOLD
SUCCESS
MM:SS
1 Press hardkey[HOLD]. CA1 indicator flashes if CA1 is held
successfully. LCD will display as (1).
23
(2)After pressing CA2 key
CA1:XXXXXXX
CONNECT
MS:SS
2 Press CA2 key. CA2 indicator will be on instead of flashing.
[SPK] LED will also be on indicating that you can use handsfree
to speak. If you prefer using handset, lift handset to speak now.
LCD will display as (2).
3 Press CA1 key to retrieve the held call and put the CA2 on
hold.
4 Repeat step 2 to 3 to speak to these two parties alternatively.
5 To end the current on-line call, press hardkey[SPK] if you use
handsfree to speak otherwise hang up the handset.
Note 1:
■ When there is a new incoming call, the corresponding CA indicator flashes as well as ringer rings to inform
you.
■ When there are multiple incoming calls, the less numbered CA key has the priority to be received by you.
MULTIPLE CALLS HANDLING
There are four CA (Call Appearance) keys to handle multiple calls. You can talk to one party and
put the others on-hold. The CAx key flashes for the corresponding held call. Refer to HOLD and
CONSULTATION HOLD to implement hold function.
OFF-HOOK AND HANDSFREE CONVERSATION SWITCHING
You can switch off-hook conversation to handsfree conversation by pressing hardkey[SPK] and
handsfree conversation to off-hook conversation by lifting handset.
BUZZER
Normally, the ring you hear comes from speaker. Sometimes, the ring comes from buzzer instead
of speaker when:
1) Speaker is currently working (For example, handsfree is used),
2) There is an ongoing call in progress (For example, you are talking to one party and hear phone rings for
another incoming call), or
3) Power failure happens.
VOLUME CONTROL FOR RING AND RECEIVED VOICE
In standby mode, press [VOLUME+]/[VOLUME-] to increase/decrease the ringer volume. The
corresponding ringer ring will sound during adjusting. In talking mode, press [VOLUME+]/[VOLUME-] to
increase/decrease the received voice volume of the handset or speaker.
MUTE
Press hardkey[MUTE]. The MUTE LED will be ON. With MUTE function, you can hear another
party but another party can not hear you. Press hardkey[MUTE] again to return to talk.
DND (DO NOT DISTURB)
By pressing hardkey[DND], the phone works normally only does not ring for the incoming call. If
you press hardkey[DND] in standby mode, the phone does not ring for all incoming calls. Letter icon “D” will
be shown on main display.
If you press hardkey[DND] during the ringer is ringing for the incoming call, the ringer stops ringing
for this call but will ring for next incoming call.
Press hardkey[DND] again to disable DND function.
HEARING AID CAPABILITY
Off hook conversation can be used for those people who are wearing hearing aid equipment.
COLD START
To keep pressing hardkey[MUTE] with handset hang up and then re-plugging line cord in case of
malfunction, first installation or replacing new software.
WARNING: 1. To do cold start if the problem still exists after re-plugged line cord.
2. All programmed data will be erased after cold start executed.
3. COLD START does not do the termination of CALL FORWARDING. When
24
CALL FORWARDING is enabled, the letter ‘C’ does not appear on the main
display after resetting (cold start) the phone while CALL FORWARDING is still
enabled. To let the ‘C’ appear again, you need to reset the CALL FORWARDING
function.
PROBLEM AND REMEDY
Problem
Possible cause
Remedy
Handset lifted: no Phone is not connected to the Use the enclosed 8p4c telephone line cord
dial tone.
ISDN 8p4c cable or wall socket. to connect to ISDN wall socket and phone
and make sure they are properly plugged.
You need to apply the ISDN line from your
local telecommunication company to let the
phone to work.
LCD does
have display.
not Plug does not properly plugged. Re-plug the telephone line cord between
the wall socket and phone.
LCD shows ‘NO Both B-channels are occupied Wait until B-channel becomes available.
CHANNEL’, when by other calls or devices.
try to make a call
or shows ‘CALL
RELEASE’ after
dialing
the
number.
No outgoing call Phone is locked.
Disable lock function.
can be made.
Phone is blocked.
Check your block setting.
No incoming call. Wrong MSN set.
Baby call is enabled.
Call forwarding is enabled.
Check MSN setting.
Disable baby call.
Disable call forwarding.
Certain
Your local telecommunication Contact your ISDN supplier or local
supplementary
company does not support this telecommunication company.
service does not service.
work such as MCI,
CFB, COLR, etc..
The
phone The overlap sending was used. Use en-bloc sending to make the call.
number
with
subaddress was
dialed. But is only
connects to the
phone
number
regarding
the
subaddress.
Note:
● In some extra-ordinary cases, it is recommended to re-plugging the telephone line cord to the phone.
● To do cold start if the problem still exists after re-plugging the line cord.
26
INDEX
8p4c cable, 26
Advise of Charge, 3
baby call setup, 8
bottom view of the phone, 5
buzzer, 24
CA, 24
call appearance, 24
call filter setup, 14
call forwarding busy, 21
call forwarding no reply, 22
call forwarding unconditional, 22
call hold, 3
call release, 26
Call Waiting, 3
CALL WAITING, 11
calling line identification presentation, 19
calling line identification restriction, 19
CFB, 3, 21
CFNR, 3, 22
CFU, 3, 22
charge rate setup, 9
CLIP, 3, 19
CLIR, 3, 19
cold start, 24
COLP, 3, 19
COLR, 3, 19
confirm the most recently ten incoming calls, 18
confirm the most recently ten outgoing calls, 18
connected line presentation, 19
connected line restriction, 19
consultation hold, 23
contents of the package, 4
deactivation, 7
designed/non-designed (SW1) setup, 6
dip switch, 6
dip switch setup, 6
direct access key, 7, 16
DND, 24
do not disturb, 24
emergency call setup, 9
en-bloc sending, 15
ETSI, 19
features, 23
function setups, 7
general function setup, 7
general functions, 3
hearing aid capability, 24
hold, 19
iniquiring call history, 18
installation, 5
introduction, 3
ISDN, 3
KEYPAD FACILITY, 23
last number redial, 15
lcd display explanation, 6
lock, 17
allow, 13
AOC, 3
locking the phone, 17
main display, 6
main menu 1, 6
making outgoing call, 15
malicious call identification, 21
mci, 3
MCI, 21
msn, 3
multiple calls handling, 24
multiple subscriber numbers, 12
mute, 24
new call indicator, 11, 18
no channel, 26
normal mode, 23
NT, 6
off-hook, 15
off-hook and handsfree conversation switching, 24
on-hook, 15
outgoing call block setup, 13
overlap sending, 15
partial block, 13
password setup, 13
phone number setup, 12
POINT-TO-MULTIPOINT, 6
POINT-TO-POINT, 6
point-to-point/point-to-multipoint (SW4) setup, 6
power failure informing and functioning, 23
problem and remedy, 26
program, 7
protected function setup, 12
receiving incoming call, 17
RECEIVING SECOND CALL, 17
restriction mode, 23
resume, 20
ring type setup, 10
room monitoring, 8
setting up phone number in direct access key, 8
setting up phone number in the memory list, 7
speaker, 24
specifications (euro isdn), 3
speed dial setup, 7
speed dialing, 16
standby mode, 6
subaddress, 12
subaddress setup, 12
supplementary services, 3, 19
suspend, 20
terminal portability, 3
terminal resistor (SW2 and SW3) setup, 6
time and date setup, 10
toll restriction, 13
top front view of the phone, 4
volume control for ring and received voice, 24