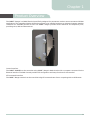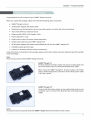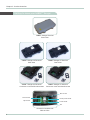
1
Copyright
© Copyright 2009 Addvalue Communications Pte Ltd.
All rights reserved. This publication and its contents are proprietary to Addvalue Communications Pte Ltd. No part
of this publication may be reproduced in any form or by any means without the written permission of Addvalue
Communications Pte Ltd., 190, Changi Road, #02-02, MDIS Building, Singapore 419974.
Warranty
Addvalue Communications Pte Ltd has made every effort to ensure the correctness and completeness of the material
in this document. Addvalue Communications Pte Ltd shall not be liable for errors contained herein. The information
in this document is subject to change without notice. Addvalue Communications Pte Ltd makes no warranty of
any kind with regard to this material, including, but not limited to, the implied warranties of merchantability and
fitness for a particular purpose.
Trademarks
All trademarks, marks, names, or product names referenced in this publication are the property of their respective
owners, and Addvalue Communications Pte Ltd neither endorses nor otherwise sponsors any such products or
services referred to herein.
SABRE™ and IOTA™ are trademarks of Addvalue Communications Pte Ltd.
Microsoft, Windows, Windows NT, Windows 2000, and Windows XP are registered trademarks of Microsoft
Corporation in the U.S.A. and/or other countries.
INMARSAT is a trademark of the International Mobile Satellite Organization. The Inmarsat LOGO and the trademark
BGAN are trademarks of Inmarsat (IP) Company Limited. All trademarks are licensed to Inmarsat Limited.
All other company and product names may be the registered trademarks or trademarks of their respective owners.
SABRE™ Ranger User’s Guide [May 2009]
i
Safety Information
Safety Information
For your safety and protection; and to reduce the risk of hazards, read this entire user’s manual before you attempt
to use the SABRE™ Ranger satellite terminal. In particular, read this safety section carefully. Keep this safety
information where you can refer to it if necessary.
The following general safety precautions must be observed during all phases of operation, service and repair of
this equipment.
Failure to comply with these precautions or with specific warnings elsewhere in this manual violates safety standards
of design, manufacture and intended use of the equipment.
Addvalue Communications Pte Ltd assumes no liability for the customer’s failure to comply with these requirements.
General
Handle your satellite terminal with care. The enclosure is weather resistant (IP65); however, do not submerge the
unit or expose it to severe rainstorms.
Avoid placing the satellite terminal close to cigarettes, open flames or any source of heat.
Changes or modifications to the satellite terminal not expressly approved by Addvalue Communications Pte Ltd
could void your authority to operate this equipment.
Only use a soft cloth moisten with water to clean the satellite terminal. Do not use any detergents or cleaning
agents on the satellite terminal.
To avoid impaired satellite terminal performance, please ensure the unit’s antenna is not damaged or covered with
foreign material like paint or labeling. When inserting the SIM card, do not bend it or damage the contacts in any
way. When connecting the interface cables, do not use excessive force.
WARNING
Please follow strictly the warning instructions listed below to avoid personal injury.
Use Approved Accessories Only
Use only the AC/DC power adapters and accessories provided with the satellite terminal. Use of non-approved
adapters and accessories may result in loss of performance, damage to the satellite terminal, fire, electric shock or
injury. The AC/DC power adapters are for indoor use only.
Do Not Operate in an Explosive Atmosphere and Hazardous Locations
Do not operate the equipment in the presence of flammable gases or fumes.
Operation of any electrical equipment in such an environment constitutes a definite safety hazard.
Keep Away from Live Circuits
Do not remove the terminal covers. Only qualified maintenance personnel are allowed to perform component
replacement and internal adjustment. Do not replace components with the power cable connected. Under certain
conditions, dangerous voltages may exist even with the power cable removed. To avoid injuries, always disconnect
power and discharge circuits before touching them.
Qualified Installation
The satellite terminal must be installed by a qualified personnel in accordance with applicable local and national
regulations (e.g. CEC, NEC, FCC, SCC, etc).
iv
Safety Information
Lightning Protection During Installation
Ensure lightning protection devices are installed prior to the installation of the satellite terminal. Do not disconnect
and reconnect cables during a lightening storm.
Do Not Service Alone
Do not attempt internal service or adjustments unless another person, capable of rendering first aid resuscitation,
is present.
Connecting Devices
Never connect incompatible devices to the satellite terminal. When connecting the satellite terminal to any other
device, read the device’s User Manual for detailed safety instructions.
Connecting Phone Devices
This satellite terminal is not intended to be connected to any North American (U.S., Canada) TNV circuit or PSTN
(Public Switch Telephone Network).
Do Not Substitute Parts or Modify Equipment
Because of the danger of introducing additional hazards, do not substitute parts or perform any unauthorized
modification to the satellite terminal.
Do Not Stand In Front Of The Antenna
This satellite terminal emits radio frequency energy. To avoid injury, do not place head or other body parts in front
of the satellite antenna when system is operational. Maintain a distance of one meter or more from the front of the
satellite terminal antenna.
FCC RF Hazard Warning
High levels of radio frequency radiation are considered health hazardous. Although no single value of
“safe radiation level” has been agreed upon by all countries, the American National Standards Institute
(ANSI/LEEE C 95.1-1992) recommends that people should not exposed to radiation stronger than
1 milliwatt per square centimeter at the frequencies used in the Addvalue’s Wideye SABRE Ranger
terminal. Accordingly, the operator of the terminal should ensure that the area extending 1 meter from
the Front of the antenna be kept clear of personnel when the terminal is transmitting.
The antenna is built-in within SABRE™ Ranger. You, as the qualified end-user of this radio device must
control the exposure conditions of bystanders to ensure the minimum separation distance (above)
is maintained between the antenna and nearby persons for satisfying RF Exposure compliance. The
operation of this transmitter must satisfy the requirements of Occupational/Controlled Exposure
Environment, for work-related use. Transmit only when person(s) are at least the minimum distance
from the front face of the antenna.
WARNING:
Maintain a separation distance from the antenna to a person(s) of at least 1 meter.
v
Safety Information
OBTAINING LICENSING FOR INMARSAT TERMINALS
Under rights given under ITU Radio Regulations, local telecommunications administrations establish and enforce
national rules and regulations governing types of emissions, power levels, and other parameters that affect the
purity of signal, which may be radiated in the various frequency bands of the radio spectrum.
To legally operate Inmarsat equipment, it is necessary to obtain permission from the local telecommunications
regulatory authorities of the country you are operating from. Using your equipment in any country without
permission causes you to run the risk of confiscation of the equipment by the local authorities. The normal
procedure to bring such equipment into another country is to apply for a license before travel. If a license has not
been obtained before travel, the equipment may be put in to storage by local authorities until such time license is
obtained.
Release date: 28th May 2009
Information in this document is subject to change without notice and does not represent a commitment on the
part of Addvalue Communications Pte Ltd.
Copyright © 2009 Addvalue Communications Pte Ltd. All rights reserved.
Addvalue Communications Pte Ltd.
190, Changi Road.
#02-02, MDIS Building.
Singapore 419974
T: +65 63425425
F: +65 63425426
www.wideye.com.sg
vi
Table of Contents
Table of Contents
Copyright..........................................................................................................................................i
Warranty...........................................................................................................................................i
Trademarks......................................................................................................................................i
Regulatory Information...............................................................................................................ii
Safety Information.......................................................................................................................iv
Table of Contents........................................................................................................................vii
About the User’s Guide...............................................................................................................ix
Chapter 1 — Product Overview
Key Features.........................................................................................2
System Requirements........................................................................2
Unpacking the SABRETM Ranger......................................................3
Getting to Know the SABRETM Ranger...........................................4
Chapter 2 — Setting Up the SABRETM Ranger
Installing the SIM card......................................................................7
Connecting the Multi-function
and Heater Power Cables..................................................................8
Setting Up the Mounting Frame.................................................. 10
Installing Mounting Frame............................................................ 10
Mounting the SABRETM Ranger......................................................11
Positioning the SABRETM Ranger...................................................11
Powering up the SABRETM Ranger (V1 Variant).........................12
Powering up the SABRETM Ranger (V2 Variant).........................13
Connecting to your Computer using Ethernet..........................14
Connecting to your Phone..............................................................15
vii
Table of Contents
Chapter 3 — Using SABRETM Ranger Web Console
Activating SABRETM Ranger Web Console.................................. 16
Registering with the BGAN Network...........................................18
Menu Overview................................................................................ 21
Status Indicators.............................................................................. 21
Viewing Terminal Information..................................................... 22
Phone Menu...................................................................................... 23
SMS Menu.......................................................................................... 28
Data Menu......................................................................................... 34
Settings Menu................................................................................... 39
Chapter 4 — Using SABRETM Ranger for Remote
Unmanned SCADA Applications
Connecting to a M2M Application Enabler.............................. 47
Remote SMS Command and Control.......................................... 48
Appendices
GPS Satellite
Inmarsat I-4
Satellite
SABRETM Ranger
Earth
Station
BGAN
RAN/CN
Internet
Backbone
SCADA Sensors
& Equipment
IOTATM
[M2M Application Enabler]
SP Gateway
Remote SCADA Location
Addvalue’s BGAN for SCADA Solution
viii
Monitoring and
Control Centre
Troubleshooting............................................................................... 49
Temperature Warnings................................................................... 51
Error Messages................................................................................. 52
Firmware Upgrade........................................................................... 53
Voice Mail Access............................................................................. 54
The BGAN System............................................................................. 55
BGAN for SCADA Solution.............................................................. 56
Wideye™ IOTA™............................................................................... 57
AT Commands List........................................................................... 59
Technical Specifications................................................................. 62
Chapter 1
Chapter 1 - Product Overview
Product Overview
The SABRE™ Ranger is a BGAN Terminal specifically designed for permanent outdoor remote unmanned SCADA
applications. The ruggedized design allows the terminal to be installed outdoors to withstand extreme weather
conditions for extended periods of time. The SABRE™ Ranger provides built-in Ethernet and telephone ports,
providing voice, SMS and data services.
Control Interface
The SABRE™ RANGER can be controlled using SABRE™ Ranger’s Web-Console with a computer connected via the
Ethernet interface. The Web-Console provides full configuration and setup functions for the terminal.
AT Commands Interface
The SABRE™ Ranger terminal can be controlled using AT commands sent from a computing device via Ethernet.
1
Chapter 1 - Product Overview
Getting to know your SABRETM Ranger
SABRE™ Ranger Terminal
Front View
SABRE™ Ranger V1 Terminal
Rear View
SABRE™ Ranger V2 Terminal
Rear View
SABRE™ Ranger V1 Terminal
Connector cover and thumb-screws
SABRE™ Ranger V2 Terminal
Connector cover and thumb-screws
SIM card slot
Power header
Heater power header
RJ11 header
Power header
Tab
Connection headers and
SIM card slot
4
Chapter 1 - Product Overview
Power
plug
Ethernet
port
Phone
port
Phone
plug
DC power
input
socket
Ethernet
plug
Multi-function Cable
AC/DC Power Adapter
3-Pin Power Cord (UK-Type)
2-Pin Power Cord (Euro-Type)
2-Pin Power Cord (US-Type)
Note:
The SABRETM Ranger-V2 terminal package is equipped with two units of AC/DC power adapters with power cables.
5
Chapter 1 - Product Overview
Cat. 5 Network/Ethernet Cable
IP54-Compliant 8P4C RJ45 (1.5m)
Telephone Cable
IP54-Compliant 6P4C RJ11 (1.8m)
Mounting Frame
(with four allen screws and
washers, and four bolts
with nuts and washers)
U-Bolts
(with four washers and nuts)
Heater Power Cable
(only for SABRE™ Ranger-V2)
Product CD
(software utilities and
documentations)
6
Installation Guide
(printed)
Chapter 2
Chapter 2 - Setting Up the SABRETM Ranger
Setting Up the SABRE™ Ranger
Installing the SIM Card
Follow these steps to install the SIM card:
1. Remove the eight thumb-head screws securing the connector cover.
2. Remove and keep the connector cover and the eight thumb-head screws in a safe location.
3. Push tab and lift up the SIM card slot.
SIM card slot
Tab
Location of the SIM card slot.
7
Chapter 2 - Setting Up the SABRETM Ranger
4. With the gold-contacts facing down, position the SIM card as indicated and slide the SIM card into the slot.
5. Push the SIM cardholder down until it clicks and lock in place.
Connecting the Multi-function and Heater Power Cables
Follow these steps to connect the Multi-function and Heater cables:
1. Remove the running couplers from the cable glands attached to the Multi-function and Heater power cables.
Multi-function
cable
Heater power cable
2. Thread the three connectors of the Multi-function cable and the connector of the Heater power cable through
the connector cover.
Cable gland
Running coupler
8
Cable gland
Running coupler
Chapter 2 - Setting Up the SABRETM Ranger
3. Install running couplers to secure the Multi-function and Heater power cables to the connector cover.
Phone plug
Ethernet plug
Power plug
Heater power plug
4. Install the Multi-function and Heater cable plugs to the respective headers on the SABRE™ Ranger terminal.
Ethernet header
Heater header
Phone header
Power header
5. Install and secure the connector cover with the eight thumb-head screws.
9
Chapter 2 - Setting Up the SABRETM Ranger
Setting Up the Mounting Frame
Follow these steps to setup the mounting frame:
1.
Align the mounting frame as shown below.
2.
Install four bolts with washers to secure the mounting frame together.
Installing the Mounting Frame
Follow these steps to install the mounting frame:
1.
Place mounting frame on the back end of the SABRE™ Ranger terminal.
2.
Orientate the mounting frame to desired position as shown.
3.
Install four allen-screws with washers to secure mounting frame to the SABRE™ Ranger terminal.
10
Chapter 2 - Setting Up the SABRETM Ranger
Mounting the SABRETM Ranger
Follow these steps to mount the SABRE™ Ranger terminal:
1. Locate a vertical pole or column to mount the SABRE™ Ranger terminal.
Secure the U-Bolt
to vertical pipe or pole
Lock bolt for elevation
SABRETM Ranger terminal
2. Mount the SABRE™ Ranger terminal to the vertical pole or column using two U-bolts, four nuts and washers.
3. Tighten the four nuts evenly to secure the SABRE™ Ranger terminal to the vertical pole or column.
Positioning the SABRETM Ranger
Follow these steps to position the SABRE™ Ranger terminal:
1. Remove two lock bolts and nuts on either side of the mounting frame.
2. Adjust the elevation of the SABRE™ Ranger terminal and secure its position using the two lock bolts and nuts on
either side of the mounting frame.
11
Chapter 2 - Setting Up the SABRETM Ranger
3. Secure the length of the Multi-function and Heater power cables to the pole or column using cable ties.
Note:
Ensure there is some slack at both ends of the Multi-function and Heater power cables to avoid stress build-up,
which may damage the cable glands.
Powering Up the SABRETM Ranger (V1 Variant)
Follow these steps to power up the SABRE™ Ranger (V1 variant) terminal:
1. Insert the power adapter output connector into the DC power input socket on the Multi-function cable.
Phone
port
Ethernet
port
DC power
input
socket
2. Insert the plug end of the power adapter into an AC outlet.
Multi-function cable
DC power
input cable
3. Turn on the power to power up the SABRE™ Ranger terminal.
12
Chapter 2 - Setting Up the SABRETM Ranger
Powering Up the SABRETM Ranger (V2 Variant)
Note:
This following steps are applicable only if you are using the SABRE™ Ranger (V2 variant) terminal:
Follow these steps to power up the SABRE™ Ranger (V2 variant):
1. Insert the power adapter output connector into the DC power input socket on the Heater power cable.
Heater power cable
DC power
input cable
2. Insert the plug end of the power adapter into an AC outlet.
3. Insert the power adapter output connector into the DC power input socket on the Multi-function cable.
Multi-Function cable
DC power
input cable
4. Insert the plug end of the power adapter into an AC outlet.
5. Turn on the power to power up the heater and SABRE™ Ranger terminal.
6. Allow 30 minutes for the heater to warm up the SABRE™ Ranger terminal.
7. Check to see if the SABRE™ Ranger terminal is working normally.
8. If the SABRE™ Ranger terminal is not working properly, proceed to power cycle the terminal.
After this process, the SABRE™ Ranger terminal should be working normally.
13
Chapter 2 - Setting Up the SABRETM Ranger
Connecting to your Computer using Ethernet
Follow these steps to connect the SABRE™ Ranger terminal to your computer using Ethernet:
1. Insert one connector end of the Ethernet cable to the Multi-function cable’s Ethernet port.
Ethernet cable
DC power
input cable
Phone cable
2. Insert the other connector end of the Ethernet cable to your computer’s Ethernet port.
A message confirming connection is displayed on your computer.
14
Chapter 2 - Setting Up the SABRETM Ranger
Connecting to your Phone
Note:
This SABRE™ Ranger terminal is not intended to be connected to any North American (U.S., Canada) TNV circuit or
PSTN (Public Switch Telephone Network).
Follow these steps to connect the SABRE™ Ranger terminal to your analog (corded) phone:
1. Insert one connector end of the Phone cable to the Multi-function cable’s Phone port.
Ethernet cable
DC power
input cable
Phone cable
2. Insert the other connector end of the Phone cable to your analog (corded) phone.
3. To make phone calls, dial the other party’s number using the following format:
00 <country code> <phone number> followed by # key.
15
Chapter 3
Chapter 3 - Using SABRETM Ranger Web Console
Using SABRE™ Ranger Web Console
Activating SABRETM Ranger Web Console
1. When the Ethernet connection between the SABRE™ Ranger terminal and your computer has been setup, start
your Internet browser.
2. Type http://192.168.1.35 in the Address field and press Enter.
The Connect to 192.168.1.35 login screen appears.
3. At the login screen, type in admin in the Username field and wideye in the Password field. Click OK.
4. The SABRE™ Ranger Web Console will appear on your screen.
16
Chapter 3 - Using SABRETM Ranger Web Console
5. Allow the terminal a few minutes to acquire the GPS co-ordinates.
Once the GPS co-ordinates is acquired, the New GPS acquired message is displayed.
Note:
The GPS co-ordinates will not be displayed until you click Register Network to register to Inmarsat’s BGAN
network. The GPS display prohibited message will be displayed if the GPS coordinates are prohibited by the
BGAN network.
It is recommended to register to the BGAN network after acquiring new GPS co-ordinates before powering down
the terminal. This will ensure the GPS co-ordinates are stored in the terminal’s memory.
17
Chapter 3 - Using SABRETM Ranger Web Console
Registering with the BGAN Network
Establishing a connection with the BGAN network requires the careful orientation of the SABRETM Ranger terminal
towards the satellite, a process called antenna pointing.
To perform antenna pointing, you will need a compass and the following information from the Web Console:
• Pointing Angle (Azimuth and Elevation)
• Signal stength indicator bar
With the SABRE™ Ranger Web Console launched, follow these steps to register with the network:
1. Select the satellite you want the SABRETM Ranger terminal to point to.
2. Rotate the terminal left or right until it points in the correct horizontal direction as indicated in the Azimuth
reading with the aid of a compass.
3. Tilt the terminal slowly up or down until it points in the correct vertical direction as indicated in the Elevation
reading.
4. With the aid of the Signal indicator bar on the Web Console, fine tune the pointing direction to obtain the
maximum signal strength.
18
Chapter 3 - Using SABRETM Ranger Web Console
5. Secure the mounting after obtaining maximum signal strength.
Note:
For any service to commence, minimum 45dBHz signal strength is required.
6. Click Register Network to register to the BGAN network.
Once network registration is completed, the Registered to network. You are now able to make phone call or
send SMS and data transfer message is displayed.
Note:
The GPS co-ordinates will not be displayed until you click Register Network to register to Inmarsat’s BGAN
network. The GPS display prohibited message will be displayed if the GPS coordinates are prohibited by the
BGAN network.
19
Chapter 3 - Using SABRETM Ranger Web Console
When you power up the SABRE™ Ranger terminal the next time, the previous acquired GPS co-ordinates will be
displayed.
When you click Register Network you will be prompted to:
• To acquire new GPS fix and then auto register to network
• Use existing GPS fix
Note:
It is recommended to register to the BGAN network after acquiring new GPS co-ordinates before powering down
the terminal. This will ensure the GPS co-ordinates are stored in the terminal’s memory.
20
Chapter 3 - Using SABRETM Ranger Web Console
Viewing Terminal Information
Click
to view the SABRE™ Ranger terminal information.
The terminal information is displayed according to the Antenna Pointing mode (before registering to the Inmarsat
BGAN network).
Signal
Temperature
GPS
Pointing Angle
22
Indicates the signal strength during antenna pointing.
(Adjust the antenna to ensure that the signal strength is at least 45dBHz.)
Indicates the Terminal’s current operating temperature.
Indicates the latitude, longitude, type and time of the GPS acquisition.
Indicates the azimuth and elevation angle, which the Terminal should be
positioned.
Chapter 3 - Using SABRETM Ranger Web Console
Phonebook
• View option
The View option allows you to view the Phonebook entries from the different storage locations.
From the drop-down menu, select:
All
SIM only
Terminal only
To view the entries stored in the SIM card and SABRE™ Ranger terminal.
To view the entries stored in the SIM card.
To view the entries stored in the SABRE™ Ranger terminal.
• Storage Usage
Shows the number for Phonebook entries used in the SIM card and Terminal locations.
For example: (SIM – 5/150) indicates:
Storage location – SIM card
Total number of entries used = 5
Total number of entries available = 150
To Add a New Phonebook Entry
Follow these steps to add a new Phonebook entry:
1. Click Add.
2. Enter the Name and Phone number.
3. Select the storage location and click Save.
24
Chapter 3 - Using SABRETM Ranger Web Console
Inbox
Shows the details (Sender information, Message, Date and Time stamp) of all SMS received.
To Reply a SMS
Follow these steps to reply a SMS:
1. Click on a SMS to select it.
The selected SMS will be highlighted in light blue.
2. Click Reply.
3. Click OK to reply with the original contents or Cancel to reply without the original content.
The Inbox console switches over to the Compose console.
4. Enter your reply in the text editor.
5. Click Send to send your reply SMS.
29
Chapter 3 - Using SABRETM Ranger Web Console
Sent
Shows the details (Receiver information, Message, Date and Time stamp) of all SMS sent.
To Resend a Sent SMS
Follow these steps to resend a sent SMS (sending the same SMS to the same receiver):
1. Click on a SMS to select it.
The selected SMS will be highlighted in light blue.
2. Click Resend.
The SMS will be sent to the receiver immediately.
To Forward a Sent SMS
Follow these steps to forward a sent SMS to another recipient:
1. Click on a SMS to select it.
The selected SMS will be highlighted in light blue.
2. Click Forward.
The Sent console switches over to the Compose console.
3. Enter the receiver’s number in the Phone No. field.
4. Click Send.
The SMS will be sent to the receiver immediately.
To Make a Call to the SMS Sender
Follow these steps to make a call to the SMS sender:
1. Click on a SMS to select it.
The selected SMS will be highlighted in light blue.
2. Click Call.
The Sent console switches over to the Dialler console.
Note:
Ensure the analog (corded) phone is connected to the Multi-function cable Phone port before making a
voice call.
3. Press the Offhook button on the analog (corded) phone, and click Dial.
31
Chapter 3 - Using SABRETM Ranger Web Console
2. Click Send.
The SMS will be sent to the receiver immediately.
To Forward a Draft SMS to Another Recipient
Follow these steps to forward a draft SMS to another recipient:
1. Click on a SMS to select it.
The selected SMS will be highlighted in light blue.
2. Click Forward.
The Draft console switches over to the Compose console.
3. Enter the receiver’s number in the Phone No. field.
4. Click Send to forward the SMS.
To Make a Call to the SMS Receiver
Follow these steps to make a call to the SMS receiver:
1. Click on a SMS to select it.
The selected SMS will be highlighted in light blue.
2. Click Call.
The Draft console switches over to the Dialler console.
Note:
Ensure the analog (corded) phone is connected to the Multi-function cable Phone port before making a
voice call.
3. Press the Offhook button on the analog (corded) phone, and click Dial.
To Delete a SMS from the Draft Lisr
Follow these steps to delete a SMS from the Draft list:
1. Click on a SMS to select it.
The selected SMS will be highlighted in light blue.
2. Click Delete.
3. Click OK to confirm or click Cancel to abort deleting the SMS.
33
Chapter 3 - Using SABRETM Ranger Web Console
Ethernet
• Click Ethernet to view and edit the Ethernet settings.
• Click Update to allow the settings to take effect.
• Click DHCP to view and edit the DHCP settings.
• Click Update to allow the settings to take effect.
Telephony
• Select Enabled to use the Telephone Interface.
• Select Disabled if you do not need to use the Telephone Interface.
• Select European Caller Line ID Phone Connected or US Caller Line ID Phone Connected from the
Telephone Interface Configuration drop-down menu.
• Click Update to allow the settings to take effect.
41
Chapter 3 - Using SABRETM Ranger Web Console
PIN
• Terminal PIN
• Click Terminal PIN to configure the Terminal PIN settings.
• Select Disabled if you do not need to set the Terminal PIN.
• Select Enabled to set the terminal PIN.
• Enter the PIN number in the Enter PIN field and click Update PIN.
SIM PIN
• Click SIM PIN to configure the SIM PIN settings.
• Select Disabled if you do not need to set the SIM PIN.
• Select Enabled to set the SIM PIN.
• Enter the PIN number in the space provided and click Update PIN.
42
Chapter 3 - Using SABRETM Ranger Web Console
Support
Display information of the support telephone number, support email address, Support URL and Services URL.
(The information shown are for sample purpose only.)
About
Displays the wideye web address and copyright information.
46
Chapter 4
Chapter 4 - Using SABRE™ Ranger for Remote Unmanned SCADA Applications
Using SABRE™ Ranger for Remote
Unmanned SCADA Applications
Connecting to a M2M Application Enabler
The illustration below depicts a generic SCADA application setup involving the SABRE™ Ranger. In a remote
unmanned SCADA application, the SABRE™ Ranger will be connected to a machine to machine (M2M) device.
The Addvalue’s Wideye IOTA™ is one such device that can be used in conjunction with the SABRE™ Ranger for
SCADA applications. Clients may incorporate their M2M device with the SABRE™ Ranger. The M2M device would be
controlling some equipment, for example sensors or controllers and be periodically collecting data. When the data
needs to be transferred to the monitoring and control centre, it will then be sent via the SABRE™ Ranger.
As BGAN is a dual channel network providing Circuit Switch (CS) for voice and Packet Switch (PS) for IP network data,
upon registering to the BGAN network, CS is available by default. However, PS is not connected unless activated
by M2M device or by user via web console. As each PS connection comes with a minimum charge, it should be
activated where necessary to save cost. The SABRE™ Ranger offers another option of activating the PS connection
and it is via SMS. The sms commands to activate the SABRE™ Ranger’s PS connection to the BGAN network is
provided in this section.
GPS Satellite
Inmarsat I-4
Satellite
SABRETM Ranger
Earth
Station
BGAN
RAN/CN
Internet
Backbone
SCADA Sensors
& Equipment
IOTATM
[M2M Application Enabler]
SP Gateway
Remote SCADA Location
Monitoring and
Control Centre
Remote Unmanned SCADA Applications For SABRETM Ranger
47
Chapter 4 - Using SABRE™ Ranger for Remote Unmanned SCADA Applications
Remote SMS IP Activation and Deactivation
Remote SMS Activation of IP Connection
To use Remote SMS Activation of IP Connection, use the CONNECT command with the following syntax:
SABRE,CONNECT,<APN>,<Username>,<Password>
For example:
SABRE, CONNECT, “bgan.inmarsat.com”, “SNGT125”, “bedru8huty”
Note:
If there is no username and password, then the syntax will be:
SABRE, CONNECT, “bgan.inmarsat.com”, “”, “”
Remote SMS De-activation of IP Connection
To use Remote SMS De-activation of IP Connection, use the DISCONNECT command with the following syntax:
SABRE,DISCONNECT
Note:
SMS activation/deactivation commands are case sensitive.
The activation/deactivation SMS will not be stored in the Inbox.
48
Appendices
Appendices
Troubleshooting
Problem
SABRE™ RANGER
terminal fails to turn
on, or functions
intermittently.
Probable Cause
Multi-function cable not connected
properly to the SABRE™ RANGER
terminal.
Solution
Turn on SABRE™ RANGER terminal using the
power from the mains via the power adapter.
Power adapter output connector on Check that the adapter output connector on the
the multi-function cable has come
multi-function cable is properly connected.
loose.
The power adapter (AC adapter) is
not plugged in properly.
Check that the power adapter is plugged in
properly.
The power adapter (AC adapter) has Move the AC cord to a different outlet, check for
no power from the AC outlet.
a line switch or tripped circuit breaker for the AC
outlet.
The power adapter (AC adapter) is
faulty.
SABRE™ RANGER
terminal fails to obtain
a GPS co-ordinates.
Try using a different power adapter.
Extend GPS co-ordinates acquisition Re-orientate the position and adjust the
time. (Up to 10 minutes.)
elevation of the SABRE™ RANGER terminal to the
appropriate direction with a clear view to the
open sky.
If the SABRE™ RANGER terminal is placed at an
obstructed open area, it is recommended to
level the SABRE™ RANGER terminal horizontally
with an unobstructed view of the sky.
SABRE™ RANGER
The SABRE™ RANGER terminal is
terminal is unable to
not aligned in the direction of the
receive a signal or the BGAN satellite.
signal that is received
from the BGAN satellite
is weak.
Presence of obstructions between
SABRE™ RANGER terminal and the
BGAN satellite.
With the help of a compass and using Web
Console, ensure that the SABRE™ RANGER
terminal is pointing towards the direction of
the BGAN satellite. Re-orientate the position
and adjust the elevation of the SABRE™ RANGER
terminal to receive maximum signal strength.
Ensure that there are no obstructions between
SABRE™ RANGER terminal and the BGAN
satellite.
49
Appendices
Problem
Probable Cause
Unable to start
The Ethernet cable has come loose.
firmware upgrade with
the SABRE™ RANGER
terminal.
Solution
Ensure the Ethernet cable is securely connected.
Perform firmware upgrade after restarting the
SABRE™ RANGER terminal.
Time out when
transferring file to
SABRE™ RANGER
terminal during
firmware upgrade.
Fail to transfer file to
the SABRE™ RANGER
terminal during
firmware upgrade.
Incorrect upgrade package/file is
selected.
Ensure the correct upgrade package/file is
selected. Perform firmware upgrade after
restarting the SABRE™ RANGER terminal.
The SABRE™ RANGER
terminal is registered
to the network but fails
to make any voice call
or data connection.
The stored GPS co-ordinates is
outdated if the SABRE™ RANGER
terminal is not used for a few days
or the GPS position is not matching
with the current geographic
location (this is true especially if
the terminal was moved from one
location to another location.
Turn on SABRE™ RANGER terminal and select
New GPS to obtain new GPS co-ordinates. Point
SABRE™ RANGER terminal to the appropriate
direction with a clear view to the open sky.
50
If the SABRE™ RANGER terminal is placed at an
obstructed open area, it is recommended to
level the SABRE™ RANGER terminal horizontally
with an unobstructed view of the sky.
Appendices
Firmware Upgrade
Firmware upgrade is to update your SABRE™ Ranger terminal with the latest firmware. Please refer to your respective
distributor for your firmware download.
Warning:
DO NOT abort the upgrading process or unplug the power of the SABRE™ Ranger terminal during the firmware
upgrade process at any time. Doing so will corrupt the existing firmware loaded onto the SABRE™ Ranger terminal.
Note:
Before upgrading the SABRE™ Ranger terminal with the new firmware, please read through the release notes that
is provided with the new firmware.
Follow these steps to upgrade the firmware for your SABRE™ Ranger terminal:
1. Download or acquire the new firmware from your respective distributor and save it in your computer’s
hard drive.
Note:
Make sure the SABRE™ Ranger terminal is switched on and connected to the desktop/laptop computer
via the Ethernet cable.
2. Insert the SABRE™ Ranger Product CD into your computer’s CD-ROM drive.
3. From the SABRE™ Ranger Main Setup menu, select Software Utilities.
4. Select Firmware Upgrade and click Run.
5. Select the downloaded new firmware (with the file name extension “.sb1”, e.g., RNG070.0.4.sb1) and
click Start.
Firmware upgrade will take approximately 10 to 12 minutes to complete.
Note:
If you encounter any errors (such as timeout errors) during the firmware upgrade process, do not select
the Retry option.
Power down the SABRE™ Ranger terminal and unplug the power supply. Close the Firmware Upgrade
utility.
Next, connect the power supply and power up the SABRE™ Ranger terminal. Start the Firmware Upgrade
utility and attempt the firmware upgrade process from the beginning.
53
Appendices
Voice Mail Access
When a caller leaves a Voice Mail in the user’s Voice Mail account, the network will send a SMS message prompting
the user about the presence of a Voice Mail in his/her account.
Note:
For users accessing the mailbox for the first time, follow these steps to access the Voice Mail:
1. Dial the Voice Mail Number: 00870772001899.
2. Follow the guided instructions and prompting from the system to activate the Voicemail.
Listed below is the procedure for Voice Mail activation:
i. Enter a four digit PIN code followed by # key.
ii. Press 1 key to confirm the PIN code.
iii. Enter your name or a generic name: Please say “Test Voice Mail” (again, for consistency).
iv. Press 1 key to confirm the name.
v. Enter a Greeting: Please say “Test Voice Mail” (again, for consistency).
vi. Press 1 key to confirm the greeting.
You will be able to use the Voice mail features after the activation.
54
Appendices
The BGAN System
Inmarsat’s Broadband Global Area Network (BGAN) is the world’s first mobile communications service of any kind
to provide both voice and broadband data simultaneously through a single, truly portable device on a global basis.
It is also the first mobile communication service to offer guaranteed data rates on demand.
Delivered via the world’s most sophisticated commercial communication satellites, BGAN provides affordable,
mobile broadband services at speeds up to half a megabit in a highly portable, easy to use form.
Delivering the global broadband mobile office
BGAN extends the boundaries of the broadband mobile office that 3G services are beginning to deliver.
Data
With the Standard IP service you can access your corporate network via a secure VPN connection at speeds up to
492 kbps, to use e-mail and other office applications, browse the Internet and send large file attachments.
Streaming IP
For applications where quality of service is paramount, such as live video or video-conferencing, BGAN offers a
Streaming IP service up to 256 kbps on demand. You have the flexibility to choose the data rate on a case-by-case
basis, depending on your application.
Phone
With BGAN, you can make a phone call at the same time as accessing your data applications. You can use a standard
desktop phone or custom handset. Voicemail and other standard 3G mobile supplementary services are also
available.
Text
BGAN enables you to send and receive text messages via your laptop - up to the standard 160 characters - to or from
any mobile phone.
BGAN coverage
BGAN delivers seamless network coverage across most of the world’s landmass. It enables you to get broadband
connectivity wherever you go - not just in major cities or at the airport. The BGAN service is accessible throughout
Europe, Africa, the Middle East, Asia, North, South and Central America.
55
Appendices
BGAN for SCADA Solution
Addvalue has an intelligent and programmable “Machine to Machine” (M2M) application enabler device called the
IOTA™.
The IOTA™ together with the SABRE™ Ranger terminal forms a unique equipment suite suitable for SCADA
applications. This suite combination supports unmanned SCADA applications in remote, hard-to-access or hazardous
locations. The IOTA™ is specially designed to control both the SABRE™ Ranger and to interface with various types
of SCADA equipment.
Addvalue’s Wideye™ IOTA™ supports WinCE programming. Clients can development their software applications on
this platform. These applications can be tailored for command and control of their particular SCADA equipment
and the SABRE™ Ranger. The entire equipment suite – SABRE™ Ranger, IOTA™ and the SCADA equipment - can then
be remotely accessed from the user’s headquarter via the Inmarsat BGAN network.
In the setup depicted below, the SABRE™ Ranger is used as a BGAN communication terminal for transmitting SCADA
data to the Monitoring and Control Centre (MCC) that typically is located far away from the remote SCADA location.
In this application, the IOTA™ is acting as a controller to manage between the SCADA equipment and the SABRE™
Ranger. It controls the SCADA equipment for data collection and at the same time manages the transmission,
whether periodically or continuously, over BGAN via the SABRE™ Ranger terminal. The IOTA™ can host applications
to run regular diagnostic tests on the SCADA equipment where necessary or act as a gateway for remote access to
perform diagnostic checks.
In a typical SCADA application scenario, the IOTA™ will collect and compress data from the SCADA sensors and send
them to the MCC. Likewise, the MCC can draw data from the remote SCADA site when necessary. In instances where
the MCC needs to perform diagnostic checks on the SCADA sensors, it can do so via the IOTA™.
The IOTA™ also functions as a health-screener on the SABRE™ Ranger terminal. It will periodically poll the health
of the SABRE™ Ranger terminal and perform necessary self recovery routine if required. In severe situations where
the self recovery routine fails, the IOTA™ can power cycle the SABRE™ Ranger terminal via its internal power relay
circuit.
For more information about the IOTA™, please refer to our website www.wideye.com.sg.
GPS Satellite
Inmarsat I-4
Satellite
SABRETM Ranger
Earth
Station
BGAN
RAN/CN
Internet
Backbone
SCADA Sensors
& Equipment
IOTATM
[M2M Application Enabler]
SP Gateway
Remote SCADA Location
Addvalue’s BGAN for SCADA Solution
56
Monitoring and
Control Centre
Appendices
WideyeTM IOTATM
Addvalue’s Wideye™ IOTA™ is a small portable M2M applications enabler designed to replace the laptop/PC for
use with the SABRE™ Ranger terminal. IOTA™ is developed to manage unmanned operations in a remote, hard-toaccess or hazardous location.
Features
Hardware
The hardware platform is an embedded ARM-9 microprocessor based system.
Operating System
WinCE
Interface
1. IOTA™ and SABRE™ Ranger terminal: Ethernet.
2. IOTA™ and monitoring equipment: RS232, USB or GPIO.
3. User interface
The IOTA™ has a VGA port for the connection to a standard display monitor. A four port (host) USB
hub is ready for a USB keyboard and a USB mouse for the technician to perform tasks such as system
configuration, diagnosis and firmware upgrade.
57
Appendices
Wideye™ IOTA™ Technical Specifications:
Feature
Description
Processor
200MHz ARM9 processor
Memory
64MB SDRAM, 64MB NAND FLASH
Network Support
10/100baseT Ethernet MAC (RJ45)
USB
x4 USB v1.1 host ports (four USB type A connectors).
Supports Full Speed (12 Mbit/s) and Low Speed (1.5Mbit/s) devices.
Each port can source up to 100mA.
USB v1.1 Client port (mini USB connector)
Serial ports
x3 RS232 (D-SUB 9)
– up to 230.4Kbits/s
– (16 byte Tx/Rx FIFO)
– Tx, Rx only via RS232
General purpose I/O
x4 Optically isolated digital inputs (Terminal Blocks)
x4 Optically isolated digital outputs (Terminal Blocks)
LED
X2 User programmable LED
Video
VGA Connector (D-SUB15)
Input voltage
15V DC ± 10%
Power Consumption(Max)
5W
Operating Temperature
-20°C to +60°C
Humidity
10% to 90% (non-condensing)
Weight
420g
Size
187mm x 156mm x 42mm
For more information about the IOTA™, please refer to our website www.wideye.com.sg.
58
Appendices
Compliance Approvals
FCC IDENTIFIER
QY9-SBRANGER
FCC Rules
Parts 2, 15 and 25: 2008
Industry Canada
RSS – 170 Issue 1, Revision 1: Nov. 1999
IC IDENTIFIER
IC: 5023A-SBRANGER
CE Marked
Notified body number 1177
Statement of Opinion number – TCF-471SC9
IEC CB Certification
IEC 60950 – 1 AND EN 60950-1
R&TTE Directive 1999/5/EC
ETSI EN 301 489-1 , ETSI EN 301 489-20, ETSI EN 301 681, ETSI EN
300 328 , EN 50385 , EN 50371, ITU-R M.1480
CSA Safety
cCSAus , CAN/CSA C22.2 No.60950-1 , ANSI/UL 60950-1 and CAN/
CSA C22.2 No.60950-22 , ANSI/UL 60950-22
Inmarsat Type Approved
B3AD01
RoHS-EU Directive 2002/95/EC
Tested to IEC 62321 Ed1 – Part 6.
Ingress Protection
IP 65 (IEC 60529: 2001)
Electrical Characteristics
SABRETM Ranger-V1:
DC Input
15V DC (Power adapter)
Power Consumption:
Standby
Operating
6 watts
22 watts
SABRETM Ranger-V2 (with Heater option):
DC Input
15V DC (Power adapter)
Power Consumption (Terminal):
Standby
Operating
Power Consumption
(Heater Element):
6 watts
22 watts
20 watts (maximum)
Power Adapters:
Model
DSA-0421S-1 42
AC Input
100 - 240 V, 50/60 Hz, 1.2 A
DC Output
15V DC, 2.8 A
Physical Characteristics
Weight
1.5 kg
3.3 lbs
Dimensions
305 x 186 x 49 mm
12 x 7.32 x 1.93 in.
64