1
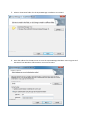
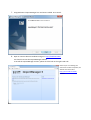
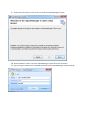
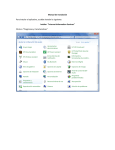
ImportManager 5 Installation Manual
Note! Before you begin, please make sure that .NET Framework 4.0 is installed.
Please follow the below steps to install ImportManager.
1. Open ImportManager 5.msi. Press Next.
2. After reading the License Agreement, accept and press Next.
3. Select a destination folder for the ImportManager installation. Press Next.
4. Enter the address for the SQL server to store the ImportManager database. Enter Login ID and
Password if not Windows Authentication is used. Press Next.
5. ImportManager is now ready to be installed. Press Next.
6. Wait while installation is completed.
7. Congratulations! ImportManager has now been installed. Press Finish.
8. Open an internet browser windows and go to: http://localhost:5544/
You should now see the ImportManager website.
To install the ImportManager 5 Client, please click the link on the right hand side.
Note! If you are installing the
client from another computer, the
website can be found at
http://serveraddress:5544/
instead.
9. Follow the instructions on the screen to install the ImportManager 5 Client.
10. Once installation is done, start the ImportManager 5 Client from the startmenu.
11. Log in using the address and credentials provided on the ImportManager website (step 8).
12. You are now ready to start using ImportManager 5!
Troubleshooter
- During installation, an error occurs when trying to create SQL Database on "master".
Reason: The user provided for SQL authentication does not have sufficient privileges to create databases.
Solution: Give user suffient privileges or provide another user during installation
- When logging on through ImportManager Client, an error occurs stating that the SQL server could not be
found.
Reason: A bug in the installation can cause that the provided SQL servername/IP is not saved correctly.
Solution: Please find "c:\program files (x86)\crm extensions\ImportManager 5\web.config". Open in
notepad or similartext/xml reader.
About 19 lines down you'll see a line similar to this:
<add name="CrmExtensions.ImportManager.Server.Properties.Settings.ImportManagerConnectionString"
connectionString="Data Source=YOUR_SERVERNAME_OR_IP;Initial
Catalog=ImportManager;Uid=ImportUser;Pwd=Password#1" providerName="System.Data.SqlClient"/>
Please verify that YOUR_SERVERNAME_OR_IP is set to your SQL server. A user has reported that only a “.” was
present, and he had to fill in the SQL server IP.