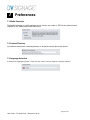
1
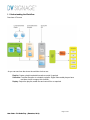
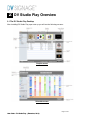
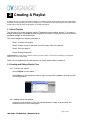
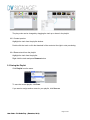
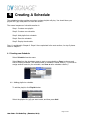
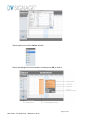
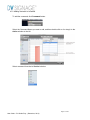
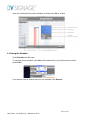
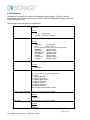
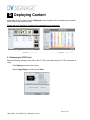
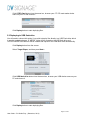
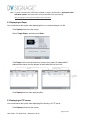
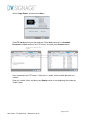
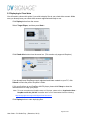
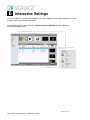
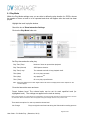
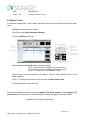
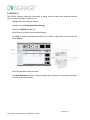
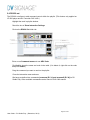
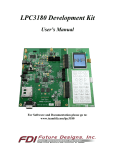
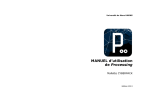
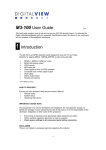
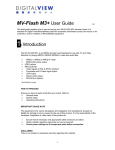
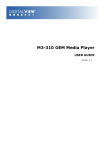
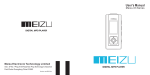
User Guide
DV Studio Play Software
Version 1.0
Revision History
Amendment Date
December, 2012
Document Version
V1.0
Software Version
V1.11
Page 2 of 29
User Guide – DV Studio Play (December, 2012)
Table of Contents
1 Introduction ............................................................................................................ 4
1.1 Understanding the Workflow ........................................................................... 5
2 DV Studio Play Overview ...................................................................................... 6
2.1 The DV Studio Play Desktop ........................................................................... 6
3 Creating A Playlist ................................................................................................. 7
3.1 About Playlists................................................................................................. 7
3.2 Creating and Editing Playlist Files................................................................... 7
3.2.1 Create a new playlist ................................................................................ 7
3.2.2 Adding content into playlist ....................................................................... 7
3.2.3 Content preview ........................................................................................ 8
3.2.4 Remove track from the playlist ................................................................. 8
3.3 Saving the Playlist ........................................................................................... 8
4 Creating A Schedule ............................................................................................ 9
4.1 Creating new Schedule ................................................................................... 9
4.1.1 Adding playlist to schedule ....................................................................... 9
4.1.2 Adding command to schedule ................................................................ 11
4.2 Saving the Schedule ..................................................................................... 12
4.3 Schedule.ini ................................................................................................... 13
5 Deploying Content............................................................................................... 16
5.1 Deploying to CF/SD Card .............................................................................. 16
5.2 Deploying to USB flash drive ........................................................................ 17
5.3 Deploying to Player ....................................................................................... 18
5.4 Deploying to FTP server ............................................................................... 18
5.5 Deploying to Cloud drive ............................................................................... 20
6 Interactive Settings ............................................................................................ 21
6.1 Play Mode ..................................................................................................... 22
6.2 Button / Touch ............................................................................................... 23
6.3 RS-232 in ...................................................................................................... 26
6.4 RS-232 out .................................................................................................... 27
7 Preferences ......................................................................................................... 28
7.1 Media Converter ............................................................................................ 28
7.2 Content Directory .......................................................................................... 28
7.3 Language Selection ...................................................................................... 28
Page 3 of 29
User Guide – DV Studio Play (December, 2012)
1
Introduction
DV Studio Play software provides important and useful content management functions for use
with Digital View media players, this includes all ViewStream, PopStyle and VideoFlyer models.
Features and functions include:
Playlist creation
o Preview content
o Play mode setting
Scheduling of playlists
Interactivity
o Button settings
o RS-232 serial functions including barcode
Four methods to deploy content
Audio volume setting per track
RS-232 settings for screen control
System requirements and compatibility
Max OS X (up to 10.7)
Microsoft® Windows® XP with Service Pack 2 (Service Pack 3 is recommended)
Microsoft Windows Vista® with Service Pack 1.
Microsoft Windows 7
Page 4 of 29
User Guide – DV Studio Play (December, 2012)
1.1 Understanding the Workflow
Overview of Process
As you can see from the above the workflow choices are:
Playlist: Create a playlist and add interactive control if required.
Schedule: Provides the option to schedule a playlist. Digital View media-players have
real-time clocks to support this function.
Deploy: Output the playlist, media files and control files as required.
Page 5 of 29
User Guide – DV Studio Play (December, 2012)
2
DV Studio Play Overview
2.1 The DV Studio Play Desktop
After installing DV Studio Play upon start up you will see the following screens:
Playlist screen
Schedule screen
Page 6 of 29
User Guide – DV Studio Play (December, 2012)
3
Creating A Playlist
A playlist file (.PLL) contains at least one track or a number of tracks which will play onto the media player
according to the order they are set in DV Studio Play. DV Studio Play also uses playlists to tell the media
player how to play the track using buttons or RS-232 commands.
3.1 About Playlists
The first step is to create or open a playlist. (The default name is called “new.pll”. If you want to
assign another name, use Save as after the playlist is created.) The playlist holds all control and
operation settings for the media player.
The normal sequence of playlist generation is:
Step 1: Create a new playlist.
Step 2: Assign content to the track and set the play order in the playlist.
Step 3: Save the playlist.
Step 4: Deploy the playlist.
Important Note: You will need to save the playlist if you wish to edit it at a later date. Use deploy to package the
playlist to use on the media player.
Steps 1-3 are explained in the next sections, for step 4 please refers to chapter 5.
3.2 Creating and Editing Playlist Files
3.2.1 Create a new playlist
Select Playlist from the menu.
Select New from the drop down menu to start a new playlist or Open to choose and edit
an existing playlist..
3.2.2 Adding content into playlist
Using the in-built browser or your own system windows, simply ‘drag and drop’ the
content you want to use in the playlist.
Page 7 of 29
User Guide – DV Studio Play (December, 2012)
The play order can be changed by dragging the track up or down in the playlist.
3.2.3 Content preview
Highlight the track from the playlist window.
Double-click the track or click the thumbnail of the content at the right to start previewing.
3.2.4 Remove track from the playlist
Highlight the track from the playlist.
Right click the track and press Remove button.
3.3 Saving the Playlist
Click Playlist from the menu.
To save the current playlist, click Save.
If you want to assign another name for your playlist, click Save as.
Page 8 of 29
User Guide – DV Studio Play (December, 2012)
4
Creating A Schedule
The schedule function provides control as to when playlists will play. You should have your
playlist files (.pll) ready before to start this section.
The normal sequence of schedule creation is:
Step 1: Create a new playlist.
Step 2: Create a new schedule.
Step 3: Add playlist into schedule.
Step 4: Save the schedule.
Step 5: Deploy the schedule.
Step 1 is explained in Chapter 3. Steps 2-4 are explained in the next sections, for step 5 please
refers to chapter 5.
4.1 Creating new Schedule
Select Schedule from the menu.
Select New from the drop down menu to start a new schedule or Open to choose and
edit an existing schedule. (The default name of schedule is called “new.prj”. If you want to
assign another name for your schedule, use Save as after schedule creation.)
4.1.1 Adding playlist to schedule
To add the playlist, click Playlist button.
Select the playlist file (.pll) you want to add, and then press Add.
Page 9 of 29
User Guide – DV Studio Play (December, 2012)
Select playlist from the left ‘Action’ window.
Select and highlight the time schedule, and then press OK to confirm.
Page 10 of 29
User Guide – DV Studio Play (December, 2012)
4.1.2 Adding command to schedule
To add the command, click Command button.
Select the Command Name you want to add, and then double-click on it or drag it to the
Action window at the left.
Select command from the left ‘Action’ window.
Page 11 of 29
User Guide – DV Studio Play (December, 2012)
Insert the command into the time schedule, and then press OK to confirm.
4.2 Saving the Schedule
Click Schedule from the menu.
To save the current schedule, click Save. (All schedule files (.prj) will be saved in a folder
called ‘PRJ’.)
If you want to save as another name for your schedule, click Save as.
Page 12 of 29
User Guide – DV Studio Play (December, 2012)
4.3 Schedule.ini
Schedule.ini is a control file contains all scheduled playlist settings. This file is created
automatically by DV Studio program and should be saved in Media folder together with other
content and playlist files.
The following is the description of Schedule.ini:
ACTION=
There are two actions can be scheduled: Playlist file or RS-232
command
Format
xxx.pll
xxx.cmd
START_DATE=
(Playlist file)
(RS-232 command)
Start date
Format
YYMMDD
(Once mode)
DLY
(Daily mode)
MLYxx (Monthly mode, where xx=day of month)
MONDAY
(Weekly mode)
TUESDAY
(Weekly mode)
WEDNESDAY
(Weekly mode)
THURDAY
(Weekly mode)
FRIDAY
(Weekly mode)
SATURDAY
(Weekly mode)
SUNDAY
(Weekly mode)
START_TIME=
Start time
Format
HHMMSS
PARAMETER=
Repeat mode
O = Once – play on a specific date & time
D = Daily
1 = Weekly (Monday)
2 = Weekly (Tuesday)
3 = Weekly (Wednesday)
4 = Weekly (Thursday)
5 = Weekly (Friday)
6 = Weekly (Saturday)
0 = Weekly (Sunday)
Mx = Monthly, where x=day of month
START_DATE_YYMMDD
Start date (for new version of player)
Format
YYMMDD
END_TIME
End time (for new version of player)
Format
HHMMSS
Page 13 of 29
User Guide – DV Studio Play (December, 2012)
END_DATE
End date (for new version of player)
Format
YYMMDD
Page 14 of 29
User Guide – DV Studio Play (December, 2012)
“Schedule.ini” Example
[TASK1]
ACTION=new.pll
START_DATE=121216
START_TIME=080000
PARAMETER=O
START_DATE_YYMMDD=121216
END_TIME=123000
END_DATE=121216
[TASK2]
ACTION=new1.pll
START_DATE=DLY
START_TIME=090000
PARAMETER=D
START_DATE_YYMMDD=121217
END_TIME=133000
END_DATE=121217
[TASK3]
ACTION=new2.pll
START_DATE=WEDNESDAY
START_TIME=183000
PARAMETER=3
START_DATE_YYMMDD=121218
END_TIME=193000
END_DATE=121218
[TASK4]
ACTION=new3.pll
START_DATE=MLY20
START_TIME=133000
PARAMETER=M20
START_DATE_YYMMDD=121220
END_TIME=193000
END_DATE=121220
How they work:
Task 1: Play a playlist “new.pll” once from 2012/12/16 (8am) to 2012/12/16(12:30pm)
Task 2: Play a playlist “new1.pll” daily starting at 2012/12/17 from (9am) to (1:30pm)
Task 3: Play a playlist “new2.pll” at 2012/12/18 on every Wednesday from (6:30pm) to (7:30pm)
th
Task 4: Play a playlist “new3.pll” at 2012/12/20 on every 20 day from (1:30pm) to (7:30pm)
Note: The maximum number of schedules you can use is 40 (i.e. From [Task1] to [Task 40] can be used in
Schedule.ini)
Page 15 of 29
User Guide – DV Studio Play (December, 2012)
5
Deploying Content
Note: Make sure you always use the Deployed format of playlist file or schedule on your media
player and not the “saved” version.
Please get your playlist or schedule files opened prior to deploying.
5.1 Deploying to CF/SD Card
Before attempting to deploy video files to the CF / SD card, make sure the CF /SD card reader is
ready.
Click Deploy button from the screen.
Select Target Player, and then press Next…
Page 16 of 29
User Guide – DV Studio Play (December, 2012)
Click CF/SD Card button from the menu bar, browser your CF / SD card reader device
name on your PC and choose it.
Click Deploy button to start deploying files.
5.2 Deploying to USB flash drive
You will need to choose this option if you wish to deploy files directly to a USB Flash drive which
is used for updating players. A “MEDIA” folder will be created on the USB flash drive and
UPDATE.INI/GETLOG.INI files will be created and copied on the USB flash drive automatically.
Click Deploy button from the screen.
Select Target Player, and then press Next…
Click USB flash drive button from the menu bar, browser your USB device name on your
PC and choose it.
Click Deploy button to start deploying files.
Page 17 of 29
User Guide – DV Studio Play (December, 2012)
Note: To know more about the USB Content update on player, please refer to “Application Note –
USB Host update” document which can be downloaded from the following:
http://dvsignage.com/support/all-digital-view-documents
5.3 Deploying to Player
You would choose this option when deploying files to a connected player on LAN.
Click Deploy button from the screen.
Select Target Player, and then press Next…
Click Player button from the menu bar, browser your player (IP address/MAC
address/Host name) from the players list and check the box at the left.
Click Deploy button to start deploying files.
5.4 Deploying to FTP server
You would choose this option when deploying files directly to a FTP server.
Click Deploy button from the screen.
Page 18 of 29
User Guide – DV Studio Play (December, 2012)
Select Target Player, and then press Next…
Click FTP server button from the menu bar. Enter Host name (ftp://), Username,
Password and Port number of the FTP server. And then press Connect button.
After connected to the FTP server, if there are no “media” folder created right-click and
create it.
Enter into “media” folder, and then press Deploy button to start deploying files inside the
“media” folder.
Page 19 of 29
User Guide – DV Studio Play (December, 2012)
5.5 Deploying to Cloud drive
You will need to choose this option if you wish to deploy files to your cloud drive account. Make
sure you already have your cloud drive account registered and ready to use.
Click Deploy button from the screen.
Select Target Player, and then press Next…
Click Cloud drive button from the menu bar. (This version only supports Dropbox.)
If you already have DropBox account registered and folder created on your PC, click
Search to locate the path of DropBox’s folder.
If it is your first time to use DropBox with DV player, please click Setup to show the
instruction how to setup your player.
Note: To know more about the DropBox setup on DV player, please refer to “Application Note –
DropBox on VS-500_VS-700” document which can be downloaded from the following:
http://dvsignage.com/support/all-digital-view-documents
Click Deploy button to start deploying files.
Page 20 of 29
User Guide – DV Studio Play (December, 2012)
6
Interactive Settings
You have additional control within a playlist over video playback, from simple sequences to touch
screens, buttons and RS-232 interaction.
In the playlist window, check the box of Show Interactive Settings to hide / unhide the
Interactive Settings menu.
Page 21 of 29
User Guide – DV Studio Play (December, 2012)
6.1 Play Mode
Within the Play Mode settings area, you are able to define the play duration for JPEGs, choose
the number of times a track is to be repeated and what will happen after the track has been
played.
Highlight the track in playlist window
Check the box of Show Interactive Settings
Click on the Play Mode folder tab.
Set Play time and action after play.
Play Time (Time)
Number of times to repeat video playback.
Play Time (Second)
JPEG picture duration.
Play Time (Loop)
The selected track will do loop playback itself.
Then (Next)
Go on to play next track.
Then (Stop)
stop playback
Then (Track)
Go on to play a specific track.
Note
Note: when stop playback, the screen might hold the last frame or display blank screen depends on the
model of player.
Close the Interactive menu and save.
Preset Volume Level. The volume levels can be set for each specified track (i.e.
highlighted track). The settings are applied on the track at start up.
Note: During playback, the volume levels can be adjusted by user using keypad, IR remote or button/touch screen. The track
can resume its “Preset volume level” when the playback is stopped and play resumed or the power is reset.
There are three options for user to preset the volume level.
No Change
Plays at original sound level set during the Video/audio encoding process.
Page 22 of 29
User Guide – DV Studio Play (December, 2012)
Mute
Mute the audio.
Level (1-32)
Pre-set level from 1 to 32.
6.2 Button / Touch
In the Button settings area, you are able to define the action events of each push button for each
track.
Highlight the track in playlist window
Check the box of Show Interactive Settings
Click on the Button folder tab.
Select default button Profile: None (no button assign)
For 8 button, choose “8 segment ITO touch screen”
For 16 button, choose “16 segment ITO touch screen”
(Press “-“ to remove the user-defined Profile.)
Drag the track from the thumbnail at the right or from the player function box in to the
button segment.
Press “+” to add your new button profile and type the New Profile name.
Close the Interactive menu and save.
We have pre-defined two button profiles (8 segment ITO touch screen and 16 segment ITO
touch screen) in DV Studio Play. The following is the default settings in these two profiles.
8 segment ITO touch screen (8-Button)
Page 23 of 29
User Guide – DV Studio Play (December, 2012)
Button
Push button # 1
Push button # 2
Push button # 3
Push button # 4
Push button # 5
Push button # 6
Push button # 7
Push button # 8
Function
Play
Stop
Pause
Repeat/Continue toggle
Next track
Volume Down
Volume Up
Mute
Page 24 of 29
User Guide – DV Studio Play (December, 2012)
16 segment ITO touch screen (16-Button)
Button
Push button # 1
Push button # 2
Push button # 3
Push button # 4
Push button # 5
Push button # 6
Push button # 7
Push button # 8
Push button # 9
Push button # 10
Push button # 11
Push button # 12
Push button # 13
Push button # 14
Push button # 15
Push button # 16
Function
Play
Stop
Pause
Repeat/Continue toggle
Next track
Volume Down
Volume Up
Mute
No Function
No Function
No Function
No Function
No Function
No Function
No Function
No Function
Page 25 of 29
User Guide – DV Studio Play (December, 2012)
6.3 RS-232 in
The RS-232 settings contain the information of which track will show after receiving barcode
input or Direct track input on RS-232 port.
Highlight the track in playlist window
Check the box of Show Interactive Settings
Click on the RS232 In folder tab.
Enter Barcode or Direct track command strings.
Click Add to insert the barcode in the table. (If to delete it, right-click on the barcode and
press Delete.)
Close the Interactive menu and save.
The Auto Generate provides an option to generate a sequence of consecutive barcodes
or direct track string numbers.
Page 26 of 29
User Guide – DV Studio Play (December, 2012)
6.4 RS-232 out
The RS-232 out allows to add command control within the playlist. (This feature only applied on
VS-500 player and DV Controller SVX-1920.)
Highlight the track in playlist window.
Check the box of Show Interactive Settings
Click on the RS232 Out folder tab.
Enter a new Command name and new HEX Code.
Click Add to insert the name and code in the table. (If to delete it, right-click on the code
and press Delete.)
Drag the command you want to use into the playlist.
Close the Interactive menu and save.
We have pre-defined two commands (screenon (E1 31) and screenoff (E1 30)) in DV
Studio Play. Other available commands can be found in SVX-1920 manual.
Page 27 of 29
User Guide – DV Studio Play (December, 2012)
7
Preferences
7.1 Media Converter
The Media Converter is a quick and easy tool to convert your video or JPEG to the optimal format
required for DV media players and VideoFlyers.
7.2 Content Directory
It provides a default path of working directory of where the content have been stored
7.3 Language Selection
It contains five languages (English / Trad. Chinese / Simp. Chinese / Spanish / German) selection.
Page 28 of 29
User Guide – DV Studio Play (December, 2012)
CONTACT DETAILS
USA:
18440 Technology Drive
Building 130
Morgan Hill, CA 95037
Tel: (1) 408-782 7773
Fax: (1) 408-782 7883
Sales: [email protected]
EUROPE:
The Lake House,
Knebworth Park,
Hertfordshire, SG3 6PY
UK
Tel: +44 (0)20 7631 2150
Fax: +44 (0)20 7631 2156
Sales: [email protected]
ASIA:
16th floor Millennium City 3
370 Kwun Tong Road
Kwun Tong
Hong Kong
Tel: (852) 2861 3615
Sales: [email protected]
Fax: (852) 2520 2987
Page 29 of 29
User Guide – DV Studio Play (December, 2012)