1
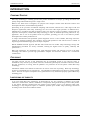
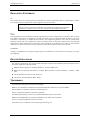
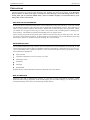
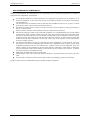
Ultima X
4U Industrial PC
User Manual
Document Reference
Document Issue Level
Blue Chip Technology Ltd.
Chowley Oak
Tattenhall
Chester
CH3 9EX
U.K.
Telephone:
Facsimile:
+44 (0)1829 772000
+44 (0)1829 772001
www.bluechiptechnology.co.uk
Ultima4U Manual
3.0
ULTIMA INDUSTRIAL PC
CONTENTS
CONTENTS
CONTENTS .................................................................................................................2
INTRODUCTION .........................................................................................................4
COMPANY PROFILE ......................................................................................................................... 4
COPYRIGHT ...................................................................................................................................... 4
LIMITATIONS OF LIABILITY ............................................................................................................. 4
REGULATORY STATEMENTS ......................................................................................................... 5
RELATED PUBLICATIONS................................................................................................................ 5
TRADEMARKS ................................................................................................................................... 5
PRECAUTIONS .................................................................................................................................. 6
Electro-Static Discharges .............................................................................................................................6
On-Board Battery..........................................................................................................................................6
BIOS & CMOS RAM .....................................................................................................................................6
Electromagnetic Compatibility .....................................................................................................................7
GETTING STARTED ...................................................................................................8
MANUAL ORGANISATION ................................................................................................................ 8
OVERVIEW ........................................................................................................................................ 9
INTRODUCTION ................................................................................................................................ 9
FEATURES ........................................................................................................................................ 9
ULTIMA X INDUSTRIAL PC............................................................................................................. 10
CHASSIS FEATURES...................................................................................................................... 11
CHASSIS .......................................................................................................................................... 11
SPECIFICATION .............................................................................................................................. 11
CHASSIS LAYOUT .......................................................................................................................... 13
Rack Mount .................................................................................................................................................13
Desktop .......................................................................................................................................................15
Front panel .................................................................................................................................................16
Rear Panel ..................................................................................................................................................16
Power Supply & BBU .................................................................................................................................17
INSTALLATION .........................................................................................................18
ELECTRICAL ................................................................................................................................... 18
RACK MOUNTING ........................................................................................................................... 18
MAINTENANCE.........................................................................................................24
PRECAUTIONS ................................................................................................................................ 24
TOOLS.............................................................................................................................................. 24
REPLACING THE FILTER ............................................................................................................... 24
REMOVING THE TOP COVER........................................................................................................ 25
REMOVING THE DRIVE CAGE ...................................................................................................... 25
Blue Chip Technology Limited
Page 2
ULTIMA INDUSTRIAL PC
CONTENTS
FITTING THE CARD RETAINING CLAMP ...................................................................................... 26
ADDING NEW BOARDS .................................................................................................................. 27
REMOVING AN EXPANSION BOARD ............................................................................................ 27
REPLACING THE SINGLE BOARD COMPUTER ........................................................................... 28
REPLACING A SYSTEM FAN ......................................................................................................... 28
REPLACING THE PSU .................................................................................................................... 29
TROUBLESHOOTING GUIDE ..................................................................................31
AMENDMENT HISTORY ...........................................................................................32
Blue Chip Technology Limited
Page 3
ULTIMA INDUSTRIAL PC
INTRODUCTION
INTRODUCTION
COMPANY PROFILE
Blue Chip Technology is a leading specialist PC product manufacturer in Europe, providing innovation with
quality design and manufacturing from a single source.
Based in the North West of England, our purpose built complex contains both advanced research and
development facilities, and manufacturing facilities.
Specialising in the provision of industrial computing and electronic solutions for a wide range of UK and
European organisations, Blue Chip Technology has one of the UK's largest portfolios of industrial PCs,
Industrial PCs, peripherals and data acquisition cards. This extensive range of products, coupled with our
experience and expertise, enables Blue Chip Technology to offer an industrial processing solution for any
application. This is one of the products from our portfolio, providing you with a cost effective product
development and volume production tool.
A unique customisation and specialised system integration service is also available, delivering innovative
solutions to customers problems. The company's success and reputation in this area has led to a number of
large design and manufacturing projects for major companies.
British Standards Institute approval (BS EN 9001) means that all of Blue Chip Technology's design and
manufacturing procedures are strictly controlled, ensuring the highest levels of quality, reliability and
performance.
Blue Chip Technology are committed to the single European market, and continue to invest in the latest
technology and skills to provide high performance computer and electronic solutions for a world-wide
customer base.
COPYRIGHT
All rights reserved. No part of this publication may be reproduced, stored in any retrieval system, or
transmitted, in any form or by any means, electronic, mechanical, photocopied, recorded or otherwise, without
the prior permission, in writing, from the publisher. For permission in the UK please contact Blue Chip
Technology.
Information offered in this manual is believed to be correct at the time of printing. Blue Chip Technology
accepts no responsibility for any inaccuracies. The information contained herein is subject to change without
notice. There are no express or implied licences granted herein to any intellectual property rights of Blue Chip
Technology Ltd.
LIMITATIONS OF LIABILITY
In no event shall Blue Chip Technology be held liable for any loss, expenses or damages of any kind
whatsoever, whether direct, indirect, incidental or consequential, arising from the design or use of this product
or the support materials supplied with this product. If this product proves to be defective, Blue Chip
Technology is only obliged to replace or refund the purchase price at Blue Chip Technology's discretion
according to their Terms and Conditions of Sale.
Blue Chip Technology Limited
Page 4
ULTIMA INDUSTRIAL PC
INTRODUCTION
REGULATORY STATEMENTS
CE
This product meets the essential protection requirements of the European EMC Directive (2004/108/EC) and the
Low Voltage Directive (2006/95/EC), and is eligible to bear the CE mark.
Warning
This is a Class A product. In a domestic environment this product may cause radio
interference in which case the user may be required to take adequate measures.
FCC
NOTE:
This equipment has been designed to meet the requirements of a Class A digital device, pursuant to Part 15 of the
FCC Rules. These limits are designed to provide reasonable protection against harmful interference when the
equipment is operated in a commercial environment. This equipment generates, uses, and can radiate radio
frequency energy and if not installed and used in accordance with the instruction manual, may cause harmful
interference to radio communications. Operation of this equipment in a residential area is likely to cause harmful
interference in which case the user will be required to correct the interference at their own expense.
WARNING:
Changes or modifications not expressly approved by the manufacturer could void the user's authority to operate
the equipment.
RELATED PUBLICATIONS
The following publications will provide useful information related to the Standard Personal Computer and can
be used in conjunction with this manual.
IBM Personal Computer AT Technical Reference, 1502494, IBM, 1984.
IBM Personal System/2 and Personal Computer BIOS Interface Technical Reference, 15F0306, IBM,
1987.
The Programmers PC Sourcebook, Microsoft
The Winn L. Rosch Hardware Bible, Brady
TRADEMARKS
All trademarks and registered names acknowledged.
IBM, PC, AT and PS/2 are trademarks of International Business Machines Corporation (IBM).
Phoenix BIOS is a trademark of Phoenix Technologies Inc
Intel is a registered trademark of the Intel Corporation.
All 80x86 and Pentium processors are registered trademarks of Intel Corporation.
MS-DOS and WINDOWS are registered trademarks of the Microsoft Corporation.
Linux is a registered trademark of Linus Torvalds.
ATA-Disk Chip is a trademark of Silicon Storage Technology Inc.
Blue Chip Technology Limited
Page 5
ULTIMA INDUSTRIAL PC
INTRODUCTION
PRECAUTIONS
Certain precautions are necessary when designing with, handling, and using circuit boards. It is imperative
that precautions are taken at all stages to avoid electro-static discharges, which will damage boards. Those
boards fitted with an on-board lithium battery must be handled carefully to avoid maltreatment of the
battery that could create a hazard.
ELECTRO-STATIC DISCHARGES
Some of the devices within the Industrial PC can be totally destroyed by static electricity. Also bear in mind
that the damage caused by static electricity may be partial and not immediately obvious. This could have an
effect on your product's reliability and warranty. Ensure that you take necessary static precautions, ideally
you should wear an approved wrist strap or if that is not possible, touch a suitable ground to discharge any
static build up. This should be repeated if the handling is for any length of time.
When carrying any boards around, please place them into the anti-static bag in which they came. This will
prevent any static electricity build up. If the board has an on-board battery, do not use black anti-static bags
because these tend to be conductive and will discharge any on-board battery.
ON-BOARD BATTERY
The ULTIMA Industrial PC may contain a Processor board with an on-board lithium cell connected. To that
end the following precautions apply and should be observed. If the battery is mistreated in any way there is a
very real possibility of fire, explosion, and harm. Great care should be taken with this type of battery. Under
NO circumstances should it be:
short-circuited
exposed to temperatures in excess of 100 ºC or burnt
immersed in water
unsoldered
recharged
disassembled
Expired batteries remain hazardous and must be disposed of in a safe manner.
BIOS & CMOS RAM
Please be aware that on Industrial PC products, it is possible to create configurations within the CMOS
RAM that make booting impossible. If this should happen, clear the CMOS settings, (see the description of
the Jumper Settings on the Processor board being used for details).
Blue Chip Technology Limited
Page 6
ULTIMA INDUSTRIAL PC
INTRODUCTION
ELECTROMAGNETIC COMPATIBILITY
This product has been assessed operating in representative, standard configurations. As with any PC product,
however, final installation & configuration can vary significantly, and so the following guidelines are offered to
help ensure that compatibility is maintained.
All components added to a system should either carry appropriate equivalent levels of compliance, or be
tested for compliance as part of the final system, and should be installed in accordance with supplier
recommendations.
The external enclosure should be securely fastened (with standard lids and covers in place) to ensure
good metal-to-metal contact around the internal electronics
Any metal back plate must be securely screwed to the chassis of the computer to ensure good metal-tometal (i.e. earth) contact.
Metal, screened, connector bodies should be securely connected to the enclosure.
The external cabling to boards causes most EMC problems. It is recommended that any external cabling
to the board be totally screened, and that the screen of the cable connects to the metal end bracket of the
board or the enclosure and hence to earth. Round, screened cables with a braided wire screen are used in
preference to those with a foil screen and drain wire. Wherever possible, use metal connector shells that
connect around the full circumference of the cable screen: they are far superior to those that earth the
screen by a simple “pig-tail”.
The keyboard and mouse will play an important part in the compatibility of the processor card since
they are ports into the board. Similarly, they will affect the compatibility of the complete system. Fully
compatible peripherals must be used otherwise the complete system could be degraded. They may
radiate or behave as if keys/buttons are pressed when subject to interference. Under these circumstances
it may be beneficial to add a ferrite clamp on the leads as close as possible to the connector. A suitable
type is the Chomerics type H8FE-1004-AS.
USB cables should be high quality screened types.
Ensure that the screens of any external cables are bonded to a good RF earth at the remote end of the
cable.
An earth stud is available on the back of the unit to improve grounding in extreme environments
Failure to observe these recommendations may invalidate the EMC compliance.
Blue Chip Technology Limited
Page 7
ULTIMA INDUSTRIAL PC
GETTING STARTED
GETTING STARTED
MANUAL ORGANISATION
This manual describes in detail the Blue Chip Technology ULTIMA Industrial PC.
We have tried to include as much information as possible but we have not duplicated information that is
provided in the standard IBM Technical References, unless it proved to be necessary to aid in the
understanding of the ULTIMA Industrial PC.
The manual is sectioned as follows:
Overview, listing the Chassis’s features and specification;
Layout, and dimensional details;
Installation, and associated issues;
Troubleshooting guide;
We strongly recommend that you study this manual carefully before attempting to interface with the ULTIMA
Industrial PC or change the standard configurations. Whilst all the necessary information is available in this
manual we would recommend that unless you are confident, you contact your supplier for guidance. IT IS
PARTICULARLY IMPORTANT THAT YOU READ THE SECTION 'PRECAUTIONS' BEFORE
HANDLING ANY BOARDS.
If you have any suggestions or find any errors concerning this manual and want to inform us of these, please
contact our Technical Services department with the relevant details.
Blue Chip Technology Limited
Page 8
ULTIMA INDUSTRIAL PC
GETTING STARTED
OVERVIEW
INTRODUCTION
The ULTIMA is a ruggedised PC compatible microcomputer designed for reliable operation in adverse
environments. The unit can take a variety of PC-compatible ISA and PCI cards with both passive and active
motherboard. It is available as a 19" rack mountable unit, and as a desktop unit. Both units use a common chassis
and layout. System controls and disk drives are protected behind a sealed lockable steel door. The machine is
cooled internally by filtered air, which enters through a removable filter at the front panel and exits at the rear.
Access to boards is by a removable top cover. Connections to the boards are made at the rear of the chassis and
behind the front door.
FEATURES
Robust polished stainless steel chassis using recognised electromagnetic compatible (EMC) emission and
immunity design techniques.
Front panel with lockable door security for system controls.
ATX, PICMG & ISA compliant.
Various switch mode power supply unit
Shock and vibration protected drive cage
Filtered air through two 92 x 25 mm, 12V DC fans mounted behind the filter panel.
Quick access to the air filter. The filter is a coated polyester material of 30 PPI porosity having a
flammability rating to UL94 Class V0.
Optional card retention mechanism.
Optional telescopic slide rail fittings.
Optional removable fans.
Each system is supplied configured to order. The System Release Documentation details each particular
system's configuration
Blue Chip Technology Limited
Page 9
ULTIMA INDUSTRIAL PC
GETTING STARTED
ULTIMA X INDUSTRIAL PC
Ultima X 2015 Model
Blue Chip Technology Limited
Page 10
ULTIMA INDUSTRIAL PC
GETTING STARTED
CHASSIS FEATURES
CHASSIS
The basic chassis is common to both types of assembly (rack mounting and desktop), and comprises several subassemblies:
Chassis body including the cooling fan assembly
Chassis front panel
Chassis cover
Internal drive cage assembly
Power supply unit and associated battery pack
The common metalwork is of stainless steel construction with riveted fitments. Removable items are fixed by
screws.
Fitted internally are two cooling fans, the chosen passive/active back plane and drives.
The front panel has two hinged doors. The left hand one has a slotted front to allow air through to the filter. The
right hand door, which is lockable, gives access to the drive bays, the power on/off switch and two USB ports.
SPECIFICATION
Chassis
19" Rack mountable polished stainless steel chassis
Optional Card restraining system
Shock mounting for drives
Front panel handles
Optional fully extending heavy-duty slide rails
High capacity fans
Air filter approved to UL94 V-0
Locking door covering disk drives, power and reset switch.
Nitrile/PVC seals - Approved to FMVSS302
Temperature
Non-Operating
Operating
-20 ºC to +70 ºC
+0 ºC to +50 ºC
(Note1: Unit should not be started at temperatures less than 5ºC as items
with mechanical parts, such as the HDD, may not operate correctly at such low
temperatures resulting in damage
Note2: Max Temperature changes are restricted to 20ºC per hour
as damage to HDD’s resulting in data loss may occur above this
rate of change
Humidity
0-90 %RH non-condensing
Blue Chip Technology Limited
Page 11
ULTIMA INDUSTRIAL PC
GETTING STARTED
Shock:
(IEC 68-2-27)
Operating 5G 11 ms, ½ sine wave
Non-operating 15G 11ms, ½ sine wave
Vibration:
(IEC 68-2-6)
Operating 5 to 500 Hz, 0.5G
Non-operating 5 to 500 Hz, 2.0G
Safety
Designed to meet EN 60950
Blue Chip Technology Limited
Page 12
ULTIMA INDUSTRIAL PC
GETTING STARTED
CHASSIS LAYOUT
RACK MOUNT
The rack mounting chassis is made of polished stainless steel and is shown in Figure 1. It comprises the same
chassis as the bench mount, but has mounting ears. The chassis is completed by a polished stainless steel lid held
in place by eight screws.
The front panel is a 4U high, full 19” racking width panel. The front panel secures the unit to the rack ladder by
four fixing screws. To permit withdrawal from the racking, handles are fitted to the front panel.
The rack mount unit has tapped holes along each side to facilitate the mounting of the slide rails. Take care not to
insert longer screws than those provided in the side (M4 x 6 maximum). Overly long screws may cause internal
damage.
Figure 1 Rack Mount Dimensions
Blue Chip Technology Limited
Page 13
ULTIMA INDUSTRIAL PC
Blue Chip Technology Limited
GETTING STARTED
Page 14
ULTIMA INDUSTRIAL PC
GETTING STARTED
DESKTOP
The desktop unit is shown in Figure 2. It comprises the same chassis as the rack unit, but without the mounting
ears.
Figure 2
Desktop Dimensions
Blue Chip Technology Limited
Page 15
ULTIMA INDUSTRIAL PC
GETTING STARTED
FRONT PANEL
Operator controls and the air filter are located on the front panel behind sealed doors. The operator controls are
behind a key-lockable door, on the right hand side. The filter is held in place behind the left-hand door. A ¾ turn
fastener allows access to the filter.
REAR PANEL
All electrical connections to the ULTIMA are made at the rear of the unit. Units are configured individually to
requirements. Refer to the System Release Documentation for details of a particular PC configuration.
To ensure the integrity of the system EMC, it is important that the chassis earth stud is connected direct to the
best available cabinet earth in rack mounted installations, because of the proximity of other electrical equipment.
Blue Chip Technology Limited
Page 16
ULTIMA INDUSTRIAL PC
GETTING STARTED
POWER SUPPLY & BBU
The chassis can be fitted with a variety of ATX style PSUs including Dual Redundant. Some PSUs may have
switchable input voltage range. In these cases the following warning should be observed.
WARNING
Selection of the wrong voltage may cause permanent damage to the unit. Ensure that the switch is
correctly set for the installation supply before connecting to the supply. If the wrong voltage is
applied to the unit the internal fuse may protect the ULTIMA. However, this cannot be
guaranteed. Blue Chip Technology accepts no responsibility for the consequences of operating
the unit on the wrong supply.
Some Power Supply variants do not offer –5Volts. If this voltage rail is required, or if other specific voltage rails
and power needs are required, then please contact Blue Chip Technology in order to identify a suitable power
supply option to match your requirements.
If a DC/DC power supply is being used, in order to maintain full Electro-Magnetic Compatibility under all
conditions, the cable connecting the DC source to the Ultima power supply should be well-screened. The braid
should be connected to the earthing stud on the Ultima and a good earth at the power source end. The exposed
cable and the braid ends should be kept as short as possible.
Where this is not possible, a clip-on Ferrite suppressor (supplied) should be fitted to the DC cable as close as
possible to the Ultima power supply terminal block. The cable should loop through the Ferrite clamp twice, as
shown below
For DC powered units which are not provided with a physical 'on/off' switch at the power supply inlet, it
is recommended that a suitable isolation switch be provided in the DC feed to the unit to enable isolation
from power during maintenance activities
Blue Chip Technology Limited
Page 17
ULTIMA INDUSTRIAL PC
INSTALLATION
INSTALLATION
ELECTRICAL
This item must be connected to an earthed socket. To improve EMC performance a stud is fitted to the rear
panel of the chassis to enable the chassis to be connected directly to a good earth within the racking system.
Cutting washers must be used in order to maintain a good connection.
The plug on the power supply cord is intended to serve as the power disconnect device. The socket outlet into
which this is plugged should be near the equipment, and should remain readily accessible when all items are
mounted in the racking enclosure. It is good practice to identify the socket.
If the plug fitted to the power supply cord is removed, the cord should be connected to a suitably installed power
disconnect device, by qualified personnel.
RACK MOUNTING
If the ULTIMA is to be installed in a 19" rack unit, it is recommended that telescopic slide rails are used. A slide
rail kit is available from Blue Chip Technology Ltd. Both Ultima models have the same mounting arrangements
WARNING
Under no circumstances must the ULTIMA be mounted in a 19” rack solely by its front panel
fixings. Slide rails or a rear support must be used.
Before installation carefully assess the space available. Figure 1 gives outline dimensions of the chassis. Ensure
there is enough room at the rear of the unit for cables. DO NOT mount the unit in such a way that air inlet or
outlet vents are covered or blocked.
The slide rail kit will accommodate cabinets with front to rear ladder depths from 540mm to 790mm. The slide
rail kit comprises:
M6 cage nut
M6 x 10 Pan Head screw
10/32 UNF Fillister Head Screw
Bar Nut
Large extension bracket (Rear)
Small extension bracket (Front)
Telescopic slide rail
M4 Screw & washers
12
4
8
4
2
2
2
8
The following procedure describes the installation for one slide rail. Both sets of slides will need to be installed
to mount the ULTIMA within a cabinet.
CAGE NUT INSTALLATION
Refer to Figure 5 to identify the pattern of the ladder holes. Holes A, hold cage nuts to which the front panel will
eventually be secured. Holes B hold cage nuts and clamp the front and rear ends of the fixed section of the slide
rails.
Clip M6 cage nuts into front ladder sections in positions A and B. Repeat on the right hand side. A total of 8 cage
nuts will be fitted to the front of the 19in cabinet.
Clip M6 cage nuts into rear ladder sections in positions B only. Repeat on the right hand side. A total of 4 cage
nuts will be fitted to the rear of the 19in cabinet.
Blue Chip Technology Limited
Page 18
ULTIMA INDUSTRIAL PC
INSTALLATION
A
B
A
B
A
Figure 5 4U Ladder Holes (left hand side)
SLIDE RAIL AND BRACKET ASSEMBLY
Referring to Figure 6.1, withdraw the inner slide section and disconnect by depressing the spring catch. Figure
6.2 shows outer and inner slide rail sections disconnected, top and bottom respectively.
Figure 6.1
Blue Chip Technology Limited
Figure 6.2
Page 19
ULTIMA INDUSTRIAL PC
INSTALLATION
Figure 6.3, shows the relationship between the brackets and slide rail outer section. The small bracket fits to the
front of the cabinet, the larger to the rear. Note the rail orientation, with middle slide visible at the front.
Figure 6.3
Referring to Figure 6.4 and 6.5, attach the front bracket to the slide rail outer section. For most installations the
first attachment hole on both the slide and bracket is recommended. For assembly an access hole on the middle
slide is provided. In this position the slide rail outer will sit flush to the front of the bracket slot face.
Figure 6.4
Figure 6.5
Referring to Figure 6.6 and 6.7, loosely attach the rear bracket to the slide rail outer section. The bracket position
indicated is typically suitable for a 600mm deep cabinet. It is recommended that at least two screws, per bracket
be used. The screws will be tightened once the slides are installed in the 19in cabinet.
Figure 6.6
Blue Chip Technology Limited
Figure 6.7
Page 20
ULTIMA INDUSTRIAL PC
INSTALLATION
SLIDE RAIL INSTALLATION
Referring to Figure 6.8, insert fillister head screws through cage nut B at front and rear.
B
B
Figure 6.8
Figure 6.9
Referring to Figure 6.9, carefully position slide rail and bracket assembly on to fillister screws B at front and
rear.
Referring to Figure 6.10, carefully slide bar nut behind front bracket and turn fillister screw to engage thread and
loosely clamp the bracket. Insert fillister screw into lower cage nut B position (Figure 5) and loosely tighten. The
installation will look like Figure 6.11.
Figure 6.10
Figure 6.11
Repeat this procedure at the rear.
Blue Chip Technology Limited
Page 21
ULTIMA INDUSTRIAL PC
INSTALLATION
Referring to 6.12, withdraw the middle slide until it locks into the extended position.
Figure 6.12
UTLIMA INSTALLATION
Referring to Figure 7.1 and 7.2, attach the inner slide rails to ULTIMA sides using 4 off M4 x 6 screws.
WARNING
Do not use longer screws (M4 x 6 maximum). Longer screws may damage
the electronics within the unit.
Figure 7.1
Figure 7.2
Referring to Figure 7.2, note the second hole position on the inner slide.
WARNING: depending on the configuration and equipping levels the
Ultima chassis may exceed 20Kg in weight. Assistance may be required
in installing the unit into a rack/cabinet.
Blue Chip Technology Limited
Page 22
ULTIMA INDUSTRIAL PC
INSTALLATION
Referring to Figure 7.3 and 7.4, slide unit on to extended middle sections until spring catches lock. Press the
catches again and slide unit home. Tighten rear fillister screws. Adjust unit until front panel is central and does
not foul equipment panels above and below. This is best achieved by adjusting each side and tightening front
fillister screws separately. Tighten rear extension bracket screws.
Figure 7.3
Figure 7.4
When the unit is satisfactorily adjusted, secure ULTIMA to the cabinet with 4 off M6 screws in cage nut
positions A (see Figure 5).
Blue Chip Technology Limited
Page 23
ULTIMA INDUSTRIAL PC
MAINTENANCE
MAINTENANCE
PRECAUTIONS
It is recommended that the unit is switched off and any mains cables disconnected before removing any
cover. Some systems may incorporate battery-backed power supplies, in which case a failure to switch off
the supply may result in internal electronics still receiving power. Note that some components may become
hot during operation, and so it is generally good practice to allow the unit to cool before starting any
significant internal maintenance work'
WARNING
The electronic assemblies within the unit are susceptible to electrostatic discharge
(ESD). Take anti-static precautions before handling, otherwise damage will occur.
TOOLS
The following readily available standard tools are required to maintain and upgrade the ULTIMA:
Pozidrive/Supadrive screwdriver size 1
M5 Hex spanner.
REPLACING THE FILTER
Depending upon environmental conditions, from time to time the inlet filter will need to be cleaned. The air filter
is accessible from the front of the chassis, and is located behind the left hand door. Routinely examine the filter
for dust build up. It may be cleaned or replaced..
Referring to Figure 8.1 turn the catch on the left door through 180° and the door will open. The filter can be
removed by pulling away from its locating frame. On the right hand door turn the lock to open
Wash the filter in warm water to which has been added a low foam domestic detergent, rinse and drip dry.
Replace filter into the recess in the front panel and close and lock the door by turning the door catch A back to its
original position.
New Picture
Figure 8.1
Blue Chip Technology Limited
Page 24
ULTIMA INDUSTRIAL PC
MAINTENANCE
REMOVING THE TOP COVER
It is not necessary to remove all the cover screws to remove the Top Cover.
First loosen the three top cover screws and remove the three rear cover screws. Slide the top cover back slightly
and lift to remove.
Replacing the unit cover is the reverse of the above.
REMOVING THE DRIVE CAGE
The Drive cage is removable as a single unit to allow for easier upgrade and replacement. The assembly is held
in place by 8 screws, two behind the front door and 6 on the top of the cage assembly.
Referring to Figure 9.1, first remove the two front screws, indicated A. Next remove the 6 screws shown as B in
Figure 9.2.
Disconnect the all power and signal cables to the drives in the cage. By moving slightly back then upwards, the
drive cage can easily be removed.
Figure 9.1
Figure 9.2
Figure 9.4
Figure 9.3
With the drive cage fully removed as indicated in Figure 9.3, there is access to all bays. From Figure 9.4, the
HDD is fitted to the bottom 3.5” bay by sliding in from the rear, while for the 5.25” bays, the device is fitted
from the front.
Blue Chip Technology Limited
Page 25
ULTIMA INDUSTRIAL PC
MAINTENANCE
FITTING THE CARD RETAINING CLAMP
The ULTIMA system can be fitted with an optional card retaining clamp.
Before fitting the clamp, insert all the required expansion cards.
The clamp is held in place by two brackets. The Swivel mount of the Retaining arm is inserted into bracket as
shown in Fig 10.2 and the opposite end screwed into Bracket as shown in Fig 10.3
Figure 10.1
Figure 10.3
Figure 10.2
Figure 10.4
Once the retention arm is secured in place, fit a clamp onto the arm as shown in Fig 10.4. Position the clamp
directly over the expansion card to be secured, aligning the small notch on the edge of the clamp with the top
edge of the expansion board.
Once aligned, fit the screw and screw tightly to ensure no movement of the clamp.
Repeat procedure for other expansion cards
Note. The retaining arm is not suitable for low profile or some short length expansion cards
Blue Chip Technology Limited
Page 26
ULTIMA INDUSTRIAL PC
MAINTENANCE
IMPORTANT: PLEASE REMOVE POWER BEFORE ATTEMPTING ANY OF THE ACTIONS
BELOW.
ADDING NEW BOARDS
Remove the system cover, observing anti-static precautions.
Remove the expansion board clamp assembly.
Check the expansion card documentation to ensure it is correctly configured. Pay particular attention to the
selection of the link settings if any.
Identify the back plane connector slot to be used. Remove the corresponding blanking plate in the back panel of
the chassis by pushing in the ‘Break-out’ panel until it breaks away from the rear panel.
If a full-length board is to be installed, locate the board end (nearest the front of the unit) into the plastic guide
corresponding to the chosen slot as shown in Fig 11.1.
REMOVING AN EFigure
XPANSION
BOARD
11.1
Figure 11.2
Slide the board down the guide until the edge connect contacts the back plane connector. Press the board firmly
into place. Note that the lower end of the metal bracket has to be pushed into a spring clip just below the level of
the back plane. This is designed to improve the EMC performance of the system.
Fasten the metal bracket into place using an M3 screw.
Re fit the card clamp assembly into position.
Blue Chip Technology Limited
Page 27
ULTIMA INDUSTRIAL PC
MAINTENANCE
REPLACING THE SINGLE BOARD COMPUTER
The Single Board Computer can be removed and replaced as shown in the previous section.
Figure 12.1
Figure 12.2
In addition to the retaining screw on the rear panel, the Single Board Computer is held in place with another
screw as shown in Figure 12.2.
REPLACING A SYSTEM FAN
The latest Ultima Chassis design incorporates easier access to the System fans for either upgrade or replacement.
Although the new design is such that it is possible to now replace a system fan without shutting down the OS, it
is recommended that for safety the unit is powered off first.
Figure 13.1
Figure 13.2
Remove the two retaining screws and pull the fan assembly upwards to remove. Each fan is held in place by 4
screws as show in Fig 13.3 below
Figure 13.3
Blue Chip Technology Limited
Page 28
ULTIMA INDUSTRIAL PC
MAINTENANCE
REPLACING THE PSU
The Ultima can be configured with either Dual Redundant Supply (Fig 14.1) or a standard ATX type supply (Fig
14.2).
Figure 14.1
Figure 14.2
To remove the power supply unit, first ensure that the power supply is switched off and then disconnect the AC
supply to the unit.
Remove the top cover as described previously.
Disconnect all the DC output leads from the drives, the Single Board Computer and the back plane.
On the ATX PSU model there are retaining screws on the inside of the chassis.
Figure 14.3b
Figure 14.3a
For the ATX model an adapter plate is required which attaches to the rear panel. The PSU is connected to the
panel by four retaining screws. For the Dual Redundant model, there are eight retaining screws which hold the
PSU assembly including brackets to the rear panel. The ATX model is removed via the top of the chassis
however for the Dual Redundant, this is removed via the back as shown in Fig 14.4
Figure 14.4
Blue Chip Technology Limited
Page 29
ULTIMA INDUSTRIAL PC
MAINTENANCE
Note that the dual modules are removed first and then the upper bracket is unscrewed from the inside before
unscrewing the remaining 6 screws holding the remaining brackets to the chassis
Figure 14.5
Figure 14.6
Figure 14.7
Blue Chip Technology Limited
Page 30
ULTIMA INDUSTRIAL PC
TROUBLE SHOOTING GUIDE
TROUBLESHOOTING GUIDE
This is not intended as an extensive faultfinding procedure, rather it is intended to indicate the more likely causes
of failure with this product. Ensure that the power is switched off before making any hardware changes. Bear in
mind that it is possible to set combinations of parameters within the BIOS that will prevent proper operation of
the board. See the BIOS section for details. If in doubt, set default values or clear the CMOS memory and start
again. Default values will generally provide a working but limited system.
SYMPTOM
Possible Cause
Action
Fail to boot
Power supply incorrect
Check correct voltage is being applied to Power Supply
Possible Cause
Action
CMOS memory corrupt/invalid.
Power off, set CMOS clear jumper to 'Clear' on Processor board, then return jumper to
operational position, following instructions in the User Manual for the Processor board
Possible Cause
Action
CMOS Clear jumper in wrong position
Set to operational position, NOT 'Clear'
Possible Cause
Action
Extended System Configuration Data (ESCD) memory corrupt/invalid
Use BIOS Setup to clear and re-write the ESCD memory
Possible Cause
Action
Memory not fully seated in socket
Remove and refit memory
Possible Cause
Action
Add-in board requires other voltage rails
Check power requirements of expansion board, and power supplies
Possible Cause
Action
Processor or add-in board has become loose
Remove the board from the system and reseat
SYMPTOM
Possible Cause
Action
No display on monitor
Incorrect BIOS setting, LCD display selected rather than Monitor or Both
Clear CMOS memory, reset correct values
Possible Cause
Action
Screen Resolution set to high for Display.
Boot OS in Safe mode and reset Resolution to lower value
Possible Cause
Action
System has more than one Video Output
Check each video output in turn in case display attached to the wrong one
SYMPTOM
Possible Cause
Action
System crashes during intensive operation or after prolonged use
Inadequate cooling allowing CPU/chipset to overheat
reposition cables and obstructions to ensure good airflow
Possible Cause
Action
Air Filter Blocked with dust
Remove Air Filter and clean
Possible Cause
Action
Cooling Fan not working
Check power connections and replace Fan if required
Blue Chip Technology Limited
Page 31
ULTIMA INDUSTRIAL PC
AMENDMENT HISTORY
AMENDMENT HISTORY
Issue Level
2.0
2.1
3.0
Issue Date
May 2012
Aug 2014
March 2015
Blue Chip Technology Limited
Author
T MCK
T Mck
T Mck
Amendment Details
Release of Ultima X doors configuration
Updated chassis
Release of 2015 model
Page 32