1
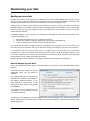
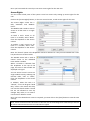
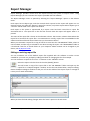
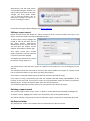
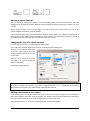
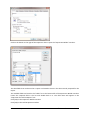
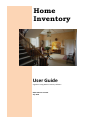
Home Inventory User Guide A guide to using Home Inventory software EZPZ Software Limited July 2014 Contents The Inventory Page ................................................................................................................................. 4 The Rooms List .................................................................................................................................... 6 Inventory item record ......................................................................................................................... 7 Categories ............................................................................................................................................. 10 Insurance Policies.................................................................................................................................. 11 Dataset defaults .................................................................................................................................... 12 My Settings ........................................................................................................................................... 13 Managing Pictures ................................................................................................................................ 14 Contacts ................................................................................................................................................ 16 Contact types .................................................................................................................................... 16 Reminders ............................................................................................................................................. 18 The Reminders page ......................................................................................................................... 18 Reminder Types ................................................................................................................................ 19 Utilities .................................................................................................................................................. 21 Rebuild Data...................................................................................................................................... 21 View error log ................................................................................................................................... 21 Maintaining your data........................................................................................................................... 22 Backing up your data ........................................................................................................................ 22 Restoring your data........................................................................................................................... 23 Renaming a dataset .......................................................................................................................... 23 User access and security ....................................................................................................................... 25 Printing reports ..................................................................................................................................... 28 Report Manager .................................................................................................................................... 29 Report Designer .................................................................................................................................... 32 Managing multiple datasets ................................................................................................................. 38 Adding a new dataset ....................................................................................................................... 38 Removing a dataset .......................................................................................................................... 38 Home Inventory User Guide 3 © EZPZ Software Limited 2014 The Inventory Page The Inventory page is where you manage and view the items in your inventory. To activate the Inventory page, click on the Inventory tab of the main toolbar. The Rooms list The rooms in your household are listed down the left-hand side of the Inventory window in an area called the Rooms list. Clicking on any of the rooms in the Rooms List will display a list of only those inventory items that are in the room you selected. Adding an item to the inventory Select the room that the new item is being added to from the Rooms list; an item cannot be added if the Summary page is being displayed. Click on the [Add item] button, on the Inventory tab of the main toolbar, or right-click on the Inventory list and select the "Add item" option from the menu. The Inventory item window will open with a new record, for the currently selected room, ready for completion. For details see Inventory item record. Editing an item in the inventory Select the room that the item is currently in from the Rooms list. Locate the item in the inventory list and double-click on it or right-click on it and select the "Edit item" option from the menu. The Inventory item window will open with the record displayed for editing. For details see Inventory item record. Deleting an item from the inventory Select the room that the item is currently in from the Rooms list. Locate the item in the inventory list and click once on it to select it then click the [Delete item] button on the Inventory tab of the main toolbar. Alternatively, right-click on the item in the inventory list and select the "Delete item" option from the menu. Confirm that you wish to delete the item and it will be permanently removed. Filtering the inventory list The inventory list can be filtered to show only those items that meet the criteria you enter. This option can be used to find specific items in the inventory. Home Inventory User Guide 4 © EZPZ Software Limited 2014 Click on the [Set/Clear filter] button, at the right of the Inventory tool strip, to set or clear the filter. When the filter window opens, enter the criteria as required. Click on [Set] to apply the filter criteria. Click on [Clear] to remove any filtering. When filters have been set the software will store them and will reapply them the next time you view the Inventory page. Printing You can print a copy of the inventory list, as it currently appears, using the [Print] button. Finding an item in the inventory You can search through the list of inventory items for those that contain particular details, using the [Find] button located on the Inventory tool strip. When you click on the button, a window will appear in which you can enter the detail you want to find. You can enter text, numbers or dates. Tick the "case-sensitive" option to find exact matches for the detail you enter. The search is carried out across all items in the inventory. If the found item is not in the currently displayed room the room will automatically be selected in the Rooms list to display the correct inventory list. Click on the [Find next] button to move to the next item that contains the detail. If you click on the [Find all] button the window will expand to display all the entries found. Click on any of the entries listed to go to that item. Tip: you will only be able to go to an item, listed in the results, if the item meets the current filtering criteria such that it is displayed in the inventory list. Home Inventory User Guide 5 © EZPZ Software Limited 2014 Resizing the Rooms List/Inventory List The relative widths of the Rooms list and the Inventory list can be changed to suit your personal preference. Click on the [Configure] button, located on the Inventory tool strip, to open the "Configure Inventory page" window. Enter the required width of the Rooms list as a percentage of the whole page. For example, if you want the Rooms list and the Inventory list to be the same width enter 50%. Any value between 30% and 50% inclusive can be used. Click [Save] to apply the change. The Rooms List Each item in your inventory belongs to a room in the household. The rooms in your household are listed alphabetically in the Rooms list down the left-hand side of the Inventory window. Each room is listed with the number of inventory items it contains in brackets. In addition to the rooms there are two further entries at the top of the Rooms list: "Summary" and "All rooms". When you click on a room in the list the items belonging to that room are listed on the right-hand side of the Inventory window. When you click on "All rooms" all items in the inventory are listed. When you click on "Summary" the rooms, along with details of the number and value of items the room contains, are listed on the right-hand side of the Inventory window. Rooms can be added, edited and deleted using the controls located at the right of the Rooms tool strip. Adding a room Click on the [Add] button on the Rooms tool strip. In the dialogue window that appears enter a name for the new room. The name must be different from the other rooms in the household. Click [OK] to add the new room to the Rooms list. Renaming a room You can change the name of a room in the Rooms list. Click on the room in the Rooms list to select it then click on the [Edit] button on the Rooms tool strip. Home Inventory User Guide 6 © EZPZ Software Limited 2014 In the dialogue window that appears edit the room name as required. The new name must be different from the other rooms in the household. Click [OK] to save the change. Deleting a room Click on the room in the Rooms list to select it then click on the [Delete] button on the Rooms tool strip. If the selected room contains items you will be asked to select the room that you want to move those items into. Choose a room from the list then click [OK] to move the items to their new room and to permanently remove the room you selected from the list. Inventory item record The items in your inventory are represented by records in a database table; we refer to each of these records as an inventory item record. The Inventory item window is used for adding and editing inventory item records. This window appears when you click on the [Add item] button on the Inventory tab of the main toolbar, to add a new item to the inventory, or when you double-click on an existing item in the inventory, or click the [Edit item] button, to edit it. The details in the Inventory item window are spread over multiple tabs. Click on a tab to bring it to the front. When adding an item to the inventory the software gives it a unique Item Code to distinguish it from the other items in the inventory. Details tab This tab contains the principal information about the inventory item. Item Name The name of the item as displayed in the list on the Inventory window. Mandatory Make The Make of the item. Optional Model The Model of the item. Optional Serial No. The serial number of the item, if applicable, for identification. Optional Quantity The number of individual units that constitute this item. Quantity must be 1 or more. Mandatory Category The category an item belongs to. Categories can be used to analyse or group the items in the inventory. Optional Home Inventory User Guide 7 © EZPZ Software Limited 2014 Room Notes The room an item is located in. Tip: to cater for items that are physically located outside of the building create rooms with names such as "Garden", "Driveway" and "Street". Mandatory Notes about the item. Optional Purchase details tab This tab contains information about the purchase of the item. Purchased The date the item was purchased. Optional Cost each The price paid for unit. For example, if the Quantity for this item was 3 and the cost each was 10.00 then the total price paid would have been 30.00. Optional From Where the item was purchased from. Optional Paid by How you paid for the item. Optional Receipt No. The identification number from the receipt, if applicable, for reference. Optional Valuation / Insurance tab This tab contains information about the current value of the item. The details on this tab should be completed if you want the item to show a different value to the price paid for it. Date valued The date the valuation was made. Optional Value each The current value of each unit. For example, if the Quantity for this item was 3 and the value each was 10.00 then the total value would be 30.00. Optional By Who the valuation was carried out by, if an external valuer. Optional Policy No. Where the item is included on a different insurance policy to the main policy for the household select the policy it is included on. Optional Dimensions / Pictures tab This tab can be used to store the dimensions and weight of the item and to add one or more pictures of the item. Home Inventory User Guide 8 © EZPZ Software Limited 2014 Dimensions The length, width and height of the item. The units of measurement are set in the Dataset defaults screen. Optional Weight The weight of the item. The units of weight are set in the Dataset defaults screen. Optional Pictures You can add one or more pictures of the item using the picture viewer at the right of the screen. The picture viewer has its own controls for moving through the pictures for the item and for adding, removing and sorting them. For more details see Managing pictures. Optional Documents tab This tab can be used to link files, stored on your computer, to the item. For example, you may have scanned a copy of the receipt for the purchase of the item as a PDF file. Creating a link to a file Click on the [Link] button to display the "Link to file" window. Locate and select the file you want to link to then click on the [Add] button. A document link record will be created and the list on the Documents tab updated. Viewing a linked file Highlight the file you want to view in the list and click on the [View] button or double-click on the item in the list. The file will be opened using whatever software is currently registered on your computer to open files of that type. Deleting a link to a file Highlight the file link you want to delete in the list and click on the [Delete] button. The document link record will be removed. The file, that the document link record referred to, will not be affected. Click on [Save] to save the new inventory item or to save any changes you have made to an existing item. Home Inventory User Guide 9 © EZPZ Software Limited 2014 Categories Categories are used in inventory items as a means of grouping and sorting items. The software comes with a list of predefined categories for you to use and you can create your own. The Categories list is displayed by clicking the [Categories] button on the Inventory tab of the main toolbar. Adding a Category Click on the [New] button to create a new category record. Enter a description for the new category in the Category field. Click on [Save] to save the new record. Editing an existing Category Highlight the category in the Categories list and then click on the [Edit] button. Alternatively, doubleclick on the entry in the Categories list. Linked to tab The Linked to tab shows a list of the inventory items that belong to this category. Where a category is linked to one or more inventory items it cannot be deleted. Deleting a Category Highlight the record in the Categories list and then click on the [Delete] button. If the category is not used by any inventory items it will be permanently deleted. Home Inventory User Guide 10 © EZPZ Software Limited 2014 Insurance Policies You can use the software to store details of your insurance policies. The Insurance Policies list is displayed by clicking the [Insurance Policies] button on the Inventory tab of the main toolbar. Adding an Insurance Policy Click on the [New] button to add a new insurance policy record. Enter the Policy No. for the new policy. Click on the [Pick Insurer] button to select the insurer for the policy. If the required insurance company is not in the list you can add it using the [New] button. Enter the rest of the details as required. Click on [Save] to save the new record. Editing an existing Policy Highlight the entry in the Insurance Policies list and then click on the [Edit] button. Alternatively, double-click on the entry in the Insurance Policies list. Items covered tab The Items covered tab shows a list of the inventory items that are listed on this policy. Where a policy is linked to one or more inventory items it cannot be deleted. Deleting a Policy Highlight the entry in the Insurance Policies list and then click on the [Delete] button. If the policy is not linked to any inventory items, and is not the main/only policy for the household, it will be permanently deleted. Home Inventory User Guide 11 © EZPZ Software Limited 2014 Dataset defaults The Dataset defaults window lets you edit the address details of the property your inventory relates to and change settings for weight, measures and currency units. To open the Dataset defaults window select the "Dataset defaults" option from the Settings menu. Dataset name The Dataset name is displayed on the title bar of the main window. The dataset name is also displayed in the "Select Dataset" window to help you identify a dataset when multiple datasets have been created. Address tab The address details for the household; these can be edited as required. Backups tab You can create a backup of your current dataset at any time using the "Backup data files" option on the File menu. A default filename for the backup file will be suggested for you, based on the filename stem. For example, you might have "SMITH" as your filename stem and then, when creating your backup, a filename of "SMITH.ZIP" would be suggested. If you continued with this as the filename for the backup and a file with the same name already existed in the backup location, you will be prompted to confirm that you wish to overwrite it. A better idea is to select the "add date" option; this will suggest a filename using the current date as part of it. For example, if we were creating a backup on 5th April 2013 the suggested filename "SMITH20130405.zip" would appear. Enter the filename stem and select the add date option as required. Preferences tab The units for weight, dimensions and currency used throughout the system. Click on [Save] to save any changes you have made. Home Inventory User Guide 12 © EZPZ Software Limited 2014 My Settings The "My Settings" window lets you set local settings for the computer you are working on. This option is available from the Settings menu. Variables tab Computer ID Used to identify the workstation when the software is used on a LAN (local area network). Date format Determines how dates are displayed on screen and in reports. The default setting is BRITISH or DD/MM/YYYY format. Screen Layout tab Screen font The font and font size used for displaying data and on controls, such as buttons, can be changed as required. Care should be taken not to select a font size that is too large as it may make some controls unreadable or even unusable. We recommend a font size no greater than 14 points, depending on the font used. The default font is Arial 10 point. Grid lines on screens A grid is similar in appearance to a spreadsheet. It has rows and columns that are separated by grid lines. This setting dictates which grid lines (if any) are displayed in the grids used in the software. Start-up tab Check for reminders Where this option is ticked, the system will check if there are any reminders that have reached their due date and advise you if there are. Shutdown tab Prompt me to create a backup When closing the program you can be prompted to create a backup file of your data. You can change the number of days that must elapse before this prompt appears using the control provided. By default, this value is set to 0 and you will be reminded each time you exit the software. Increase this value if you do not want to be reminded every day but say once a week. Once a backup has been created the message will not appear again until the number of set days have passed. You can, of course, create a backup at any time using the "Backup data files" option on the File menu. Tip: set the number of days to -1 if you want the prompt message never to appear. Home Inventory User Guide 13 © EZPZ Software Limited 2014 Managing Pictures You can add one or more pictures for an object using the Picture Control. Pictures are scaled down to fit on a report at the time of printing and so, to avoid distortion, the picture dimensions should be in the standard ratio of 12:9 in either portrait or landscape format. You may get an error message when printing a report with one or more pictures if the file size is too large; try and keep picture files to around one megabyte in size. The Picture Control Adding a picture Click on the [Add picture] button, to add a picture. The Add Picture window will open. Home Inventory User Guide 14 © EZPZ Software Limited 2014 Click on the [Pick file] button to select the picture you want to add. You can enter an optional Caption for the picture to help you identify what the picture is of. Click on [OK] to add the picture. Sorting pictures When printing a report that contains a single picture and there are multiple pictures stored for the object, the first picture in the display order will be printed. If the report supports multiple pictures the pictures are printed in order of their display order. To change the order in which pictures are printed click on the [Set picture order] button. In the screen that appears, you can change the order of the items in the list using the grey buttons at the left-hand side. Click and hold down your left mouse button whilst the mouse pointer is over a button then drag the button up or down. Once you have finished ordering the list click on [Save] to save the new order. Removing a picture To remove the link to the currently displayed picture, click on the [Remove picture] button. Note: Deleting a link to a picture file will not delete the actual picture file itself. Home Inventory User Guide 15 © EZPZ Software Limited 2014 Contacts You can record details of your contacts using Contact records. Contact records are not involved in any of the accounting functions of the software, they are provided purely for personal information management. Examples of contacts are banks, plumbers and solicitors although you are not limited to recording details of just these types of contacts. A list of contact records currently held on file can be displayed by selecting the Contacts tab on the main toolbar. Adding a new contact Click on the [Add contact] button, or right-click on the Contacts list and select “Add contact” from the shortcut menu, to start the New contact wizard. Enter the contact details as required. The “Display as” text is how the contact will appear in the Contacts list. You can change this by using the dropdown or by typing text into the field. Select the Contact type to categorise this contact. You can store up to 4 telephone numbers on the Contact details page. Click on the [Finish] button and confirm that you want to save the new record. Deleting a contact Highlight the entry you want to delete in the Contacts list and click on the [Delete contact] button on the Contacts tab. You can also right-click on the entry and select the “Delete contact” option from the shortcut menu that appears. Confirm that you want to delete the contact and it will be permanently removed. Contact types Contact types are used to categorise contact records. Contact types are managed via the "Contact types" window. Click on the Contacts tab of the main toolbar. Click on the [Contact types] button to open the "Contact types" window. Adding a contact type Click on the [Add] button to add a new contact type. In the window that appears type in the new contact type. Home Inventory User Guide 16 © EZPZ Software Limited 2014 Click on [OK] to create the new contact type. Deleting a contact type Highlight the entry in the list and then click on the [Delete] button. Tip: contact types cannot be edited as they are simply values that are used in the completion of other records. Home Inventory User Guide 17 © EZPZ Software Limited 2014 Reminders Reminders are used to remind you of something that needs doing in the future. When you create a reminder it has a due date set by you. Each time you start the program a check is carried out for any reminders whose due date is on or before today's date. If any are found, they are displayed in the "Things To Do List". This option can be disabled in the My Settings screen. Once a reminder's due date has been reached, it will keep displaying until such time as you delete it or change its status to "completed". The Reminders page Reminders are managed via the Reminders page; click on the Reminders tab, of the main toolbar, to bring the Reminders page to the front. The reminders that are displayed in the list can be filtered using the [Filter] button and date box at the top of the list. When the list is first viewed, today's date is used by default and reminders whose due date is on or before this date are displayed. To view reminders set for a date in the future, change this date to a suitable future date. Adding a new reminder Click on the [Add reminder] button to add a new reminder. Enter the date on which you want to be reminded of the event in the due date field. Enter the date on which the action needs to be taken in the action date field; this is an optional user value and is not used by the software. If user records have been created, and the reminder is to be allocated to a particular user, select the user from the dropdown. Select the type of reminder from the reminder type dropdown; if the required reminder type does not already exist you can add a new one by selecting the "Add new" option at the very top of the dropdown list. Optional notes can be entered on the Notes tab as required. Click on the [Save] button to save the new reminder. Repeating reminders There may be occasions when you want to be reminded to do something every year, or every month. You can set a reminder to repeat itself so that you don't have to remember to create a reminder each time. On the Repeat tab choose how often you want the reminder by selecting the frequency. Fill in a date in the last date field if you want reminders to stop after that date, otherwise leave the field blank. Stopping a repeating reminder You can stop a reminder from repeating by editing the root reminder record. If you are unsure which is the root record, open one of the reminders in the chain and click on the Repeat tab. If this is not Home Inventory User Guide 18 © EZPZ Software Limited 2014 the root reminder record you will see a button labelled "Go to root"; click on this button to open the root record in this reminder window. Edit the frequency and/or last date as required. Click [Save] to save your changes. Tip: editing the root reminder will affect all other reminder records based upon it. If you clear the frequency in the root record all the reminder records that were created from the root reminder will be removed. Deleting a reminder To delete a reminder, highlight the entry in the list and click on the [Delete reminder] button. Pending reminder records are automatically deleted by the system when a specified number of days after their due date has passed. See “Reminder defaults” below. Tip: if you delete the root reminder record in a chain of repeating reminders the remaining reminders in the chain will no longer point to a root reminder record and will act as independent reminders. Keeping reminders after acting on them You may want to keep a reminder, after you have acted on it, as a record that a task has been carried out. This can be achieved by changing the status of the reminder from "pending" to "completed". Reminders whose status is "completed" will not be removed by the system and you will not be notified of them. Disabling reminders If you want the system to stop notifying you of due reminders at start-up, un-tick the option on the My Settings screen. Reminder defaults The Reminder defaults window is accessed by clicking the [Reminder defaults] button on the Reminders tab. In the window that appears, change the values as required and click [Save] to save the new values. The new values will be applied next time you start the program. Number of days to keep pending reminders Pending reminder records are retained by the system for a set number of days after their due date. Reminders that are older than this number of days, and whose status is "pending", will be deleted at start-up. Number of days’ worth of repeat reminders to create When a repeating reminder is created further reminders are created based on the frequency of the root reminder. Reminders are created until the date is reached that is calculated from today's date plus this number of days. Reminder Types When you create a reminder you select a reminder type for it. The reminder type can be used when viewing, or printing, a list of reminders so that only those of a selected reminder type are displayed. Home Inventory User Guide 19 © EZPZ Software Limited 2014 Adding a reminder type Click on the [Reminder types] button, on the Reminders tab of the main toolbar, to open the “Reminder types” window. Click on the [Add] button. Enter a description for the new reminder type in the window that appears. Click on [OK] to save the new reminder type. If the reminder type does not already exist, it will be added to the list and will be available when you next create a reminder. Deleting a reminder type Click on the [Reminder types] button on the Reminders tab to open the “Reminder types” window. Highlight the reminder type in the list and then click on the [Delete] button. Home Inventory User Guide 20 © EZPZ Software Limited 2014 Utilities Rebuild Data This option on the Utilities menu is used to rebuild your data files after, for example, you have suffered a power cut and your data has become damaged. You can also run this utility on a regular basis to compact your data files, so that they take up less space on your hard drive. View error log In the event that an error occurs in the program, a screen will usually appear showing details of the error and asking if you want to log it. Click on the [Yes] button on this screen to record details of the error in a log file that can be emailed to us. Reporting errors in this way helps us to correct them and improve on the software. Clicking on [No] will not log the error. In the next screen that appears, click on [OK] to continue with the program. Note: depending on what stage the program is at, further error messages may occur. Keep repeating the process until the program is able to continue normally. The error log can be inspected by selecting the “View error log” option from the Utilities menu. You will be viewing one log entry at a time. The date/time value at the top right of the screen shows when the error was logged. The up/down arrows to the right of this box let you scroll through the logged errors. Clicking on the User Notes on Errors tab lets you enter your own comments about a particular error. Click on the email button to send a copy of the log file to us as an email attachment. This information can then be put to good use in correcting the error. Home Inventory User Guide 21 © EZPZ Software Limited 2014 Maintaining your data Backing up your data Changes you make to your data and new data that you create when adding new records is saved when you click on the [Save] button on the relevant screen. Although this should be sufficient, we strongly recommend that you also create a backup of your data on a regular basis. A backup file, as created by the software, is a zip file that contains a copy of your data, from all the individual tables in the dataset, compressed into a single portable file. If needed, you can restore the contents of this file using the software and put your data back to the position it was in when the backup file was created. If anything happens to your computer, for example it is damaged or stolen, all you need to do to be up and running again is to: download the software from our website and install it register the software using the registration code you were provided with create a new dataset and restore from a backup file into it It is a good idea to create your backup files on a USB flash drive or memory stick. You can then store this away from your computer and not run the risk of losing your backups if you lose your computer. It is important that you back up your data on a regular basis. This will help you to overcome problems that result, for example, from entering incorrect data or accidentally deleting data. If you have made a backup of your data, you can restore from the backup, which will place your data back at the position it was in when the backup was made. Backups should also be made before carrying out important procedures in the software. How to backup up your data Select the "Backup Data Files" option from the software's File menu to open the Backup Data Files window. A filename for the backup file will be suggested, which can be edited as required. The suggested filename is based on the filename stem which can be changed in the Dataset defaults window. If you have elected to add the date to the filename the date will be in filing order (YYYYMMDD). The backup file will automatically be saved with a ".ZIP" extension, so there is no need to add one. A location for the backup file will be suggested but can be changed using the [Pick file] button. Where backups have previously been carried out from this computer the location previously used will be suggested. Home Inventory User Guide 22 © EZPZ Software Limited 2014 The location must start with a drive letter such as "C:\". Backups cannot be created to network locations that begin with two backslashes such as "\\SERVER". Attempting to backup to such a location will generate an "Invalid path or filename" error. Mapped network drives are allowed. If you wish to password-protect your backup file enter a password in the field provided. The password can be any word or phrase up to 65 characters in length and is case-sensitive. If a password is entered the backup file will be encrypted and cannot be decrypted without entering a matching password. Note: if you forget the password that you used to encrypt a backup file we are unable to extract the password for you. You may also see a message reminding you to create a backup when you exit the program. Whether this message appears or not depends on the setting in the My Settings (Shutdown tab) window. Backing up to CD Backups can be made to any location on your computer, such as the hard drive or floppy disk. If you wish to store a backup file onto a writeable CD ROM you should first create the backup file onto your hard drive. You can then use your CD burning software (part of the operating system in modern versions of Windows) to drag the file onto the CD to burn it. Restoring your data Restoring data from a backup file will overwrite your existing data with the data stored in the backup file, effectively putting your system back to the state it was in when the backup was created. Tip: if you want to return to your current data position you should make a backup of it before restoring the data contained in another backup file. To restore the data contained in a backup file, select the "Restore Data Files" option from the software's File menu. The dialogue window that appears will advise you that restoring from a backup file will overwrite your current data. Click [Yes] if you want to continue. This will open the Restore Data Files window. Click on [Browse] to locate the backup file on your system and select it. If the backup you want to restore from is listed on the "Previous backups" tab you can click on it and the location and filename will be copied into the fields on the "Backup details" tab. If the backup file was password-protected when created enter the password in the field provided. Passwords are case-sensitive. Click on [OK] to continue with the restore or on [Cancel] to abort the process. Once your files have been restored, the system will check the integrity of the restored data before continuing. Renaming a dataset Each dataset you create has a name, which appears on the Title bar and Status bar and in the list of datasets on the “Select dataset” window. You can change the name of the currently open dataset if required. Home Inventory User Guide 23 © EZPZ Software Limited 2014 Select the “Dataset defaults” option from the Settings menu. When the Dataset defaults window opens, select the Name tab. Edit the dataset name as required. Click on [Save] to save your changes. Note: the dataset name is stored in the backup file when you create a backup file. When restoring from a backup file the current dataset contents, including the dataset name, will be overwritten by the contents of the backup file. Home Inventory User Guide 24 © EZPZ Software Limited 2014 User access and security The software allows you to create and maintain a list of users that have access to your data. Each user has a User ID, a user name and a password which they use to log onto the system. You can control which parts of the system a user has access to by setting up access rights for the user. The User List User records are managed via the User List. The User List is displayed by selecting the option on the Settings menu. Adding a User To add a new user to the system, open the User List and click on the [New] button to create a new record. Enter a User ID for the new user. This can be up to 10 characters long and can be any mixture of letters and numbers. The User ID must be entered by the user, along with his password, when logging on to the system. Enter the User name and a suitable Password. The password can be up to 10 characters long and can be any mixture of letters and numbers. Passwords are case sensitive. Blank passwords are allowed. Click on the [Save] button to save the record. Home Inventory User Guide 25 © EZPZ Software Limited 2014 Once you have saved the record you can enter access rights for the new user. Access Rights You can control which parts of the system a user has access to by setting up access rights for the user. Click on the [Access Rights] button, on the user record screen, to edit access rights for the user. The Access Rights screen has 2 tabs, "Modules" and "Module Items". The Modules tab is used to control access to all the items in a single module. To block a user's access to all items in a module, select "None" from the dropdown in the Access column. To enable a user's access to all items in a module, select "Full" from the dropdown in the Access column. Note: the "Partial" option in the dropdown cannot be selected. It is only used to indicate that a user has partial access to the module. The Module Items tab is used to control access to the individual items within a module. When a module is selected from the dropdown at the top of the page, the items in that module are displayed in the grid. You can control a user's access to a single module item by selecting the relevant value, "Full" or "None", from the dropdown in the Access column. In addition, where the item is a "Record", a user can be given "Read Only" access. This means that they can view the details within a record but are not allowed to save any changes they make, or to create a new record or delete a record. Once you have selected user access as required, you must click on the [Save] button to save the new settings. Note: ensure at least one user has access to the User List on the Settings menu otherwise you will not be able to add and remove users or control access rights! Home Inventory User Guide 26 © EZPZ Software Limited 2014 Copying User Access Rights Where there are several users on the system that have the same access rights, you can save time by copying access rights from another user into the current user record using the [Copy from] button. Deleting a User To delete a user, highlight the user in the User List and click the [Delete] button. Home Inventory User Guide 27 © EZPZ Software Limited 2014 Printing reports The [Print] button is used to print a report or document. When you see this button on a list screen it will enable you to print the current list. The [Reports] button opens the reports screen with the reports pertinent to the area of the software you are currently in. When printing a report you have multiple output options: Preview Shows you on screen what the printed results will look like. The toolbar that appears with the preview allows you to move through the pages of the report, zoom in and out of the display, and send a single copy of the whole report to the printer using the current printer settings. Print Sends the report to the printer. When this option is selected you will be presented with a screen where you can select the page range and number of copies and can set printer options. File Converts the report to the selected file type and saves it as a file. When the report is run, and this option has been selected, a 'Save as' window will appear enabling you to select the location and file name for the output file. If the 'open file' checkbox is ticked the relevant software application will be opened when the output file has been created. The following file types are supported: PDF - Adobe Acrobat Document XLS - Microsoft Excel spreadsheet HTML - standard HTML file The above file formats are generated by converting the native report output to the chosen file format. Not all reports are suitable for conversion and the resulting file, when displayed, may not always match the look of the native report file. Tip: if you are printing to a file we recommend you use the PDF file type; it is most accurate and the file cannot be edited by the recipient whereas the other file formats can. Home Inventory User Guide 28 © EZPZ Software Limited 2014 Report Manager Report Manager provides control over the reports used by the system to output results. Using Report Manager you can customise the reports provided with the software. The Report Manager screen is opened by selecting the "Report Manager" option on the Utilities menu. Each report has an Object type, and this controls which reports list the report will appear on. For example, when you select the "Reports" option for Contacts, only those reports whose object type is "Contact" will be listed in the reports list window. Each report in the system is represented by a report record and each record has a report file associated with it. The report file is the file that controls how the report will appear when it is printed. The name of the report file is shown in the Filename column. The Location column shows where the report file is located if the report file is a customised one. Initially, report files are embedded in the software and these files will have a blank entry in the Location column. When you customise a report file a copy of the file is saved into the "MY REPORTS" folder, where it can be edited, and this copy is selected for use when running the report. The "MY REPORTS" folder is a shorthand name for an actual folder on your computer whose location can be changed as you desire; see My Reports folder. Editing an existing report file You can customise one of the default report files supplied with the software to make it more suitable for your own use, perhaps by adding text labels or changing the font for example. You can customise a report file if it has a 'Y' character in the "Editable" column. Select the report in the list then click on the [Modify] button. This will create a copy of the report file in the "MY REPORTS" folder and open up the report file in a "Report Designer" window, such as the one shown below, ready for editing. Resize the Report Designer window so that you can see the whole of the report layout or enough of it that you can work comfortably. When you have finished making changes select the "Save" option on the File menu. Home Inventory User Guide 29 © EZPZ Software Limited 2014 Alternatively, click the close button of the Report Designer window. You will be asked if you want to save the changes you have made. Select "Yes" to save the changes, "No" to discard the changes or "Cancel" to return to editing the report. For details on using the Report Designer see Report Designer. Editing a report record Report records control the details of a report and the file that is used to produce that report. The report records are listed in the Report Manager window. To edit a report record, highlight the record in the list and then click on the [Edit] button. Alternatively, double-click on the record in the list. This will open the "Report record" window. An example is shown right. Each report record has a unique Report Code that is used to reference it and that cannot be changed. The Object type indicates the reports list that this report appears on. The Display name is the title of the report as it appears in the reports list. You can change this if you want to. The Filename field shows the name of the report file used to produce this report. If a report record has no report file linked to it, the report just won't do anything. If this report is using the default report file then the Location field will be empty. If this report is using a customised report file, the Location field will display "MY REPORTS" as the location of the report file. If you want to revert to using the default report file click on the [Restore default] button, to clear the Location field, then click the [Save] button. The Comments field can be used to enter your own optional notes about the report. Deleting a report record Only custom reports, those of type "User" or "Query", can be deleted from the Report Manager list. To delete a record, highlight the record in the list and then click on the [Delete] button. You will be asked to confirm that you wish to delete the report record and the associated report file. My Reports folder The "My Reports" folder is the location where customised report files are stored. Home Inventory User Guide 30 © EZPZ Software Limited 2014 The system stores the location to this folder in a variable referred to as the "MY REPORTS" shorthand folder. When you customise a report, a copy of the report file is placed in the folder stored in "MY REPORTS" and the location of the report is changed to "MY REPORTS". When running a customised report, or editing a report file, the path stored in the "MY REPORTS" variable is substituted by the program to get the full path to the file. The location of "MY REPORTS" can be changed by the user. This is best done before any reports are customised, however it can be done later as long as you remember to copy the actual report files to the new location using Windows Explorer. To change the location of "MY REPORTS" open Report Manager using the option on the Utilities menu. Click on the [Configure] button. This will open the "Configure reports" window. Click on the [Select path] button and select the folder you want to use for "MY REPORTS". You must select a folder with suitable Windows User Account privileges to enable you to edit the files it contains. Click on [Save] to save the new path. Home Inventory User Guide 31 © EZPZ Software Limited 2014 Report Designer The program comes with a set of standard reports ready for use. Some of these reports can be modified to customise them for your own use. See Report Manager for recommendations regarding customising reports. Modification of reports is carried out using Report Designer, a built-in function of the Visual FoxPro system. There are many things that can be done to a report using Report Designer; the descriptions below only touch the surface and are not meant as a comprehensive guide. Tip: the Report Designer is not easy to use! You should only try to use it if you are reasonably competent using computers and design software. When the Report Designer window is active, Visual FoxPro adds the "Report" and "Format" menus to the Menu bar. Bands By default, a report has three bands; Page Header, Detail, and Page Footer. A separator bar is located at the bottom of each band. The name of the band type appears on the bar next to an arrowhead, which indicates that the band is above, not below, the bar. The arrowhead on the Detail band is blue in colour. Home Inventory User Guide 32 © EZPZ Software Limited 2014 You can add the following bands to your report. Band Printed Typical contents Column Header Once per column Column title Column Footer Once per column Summary, totals Group Header Once per group Preface to following data Group Footer Once per group Calculated values for group data Title Once per report Title Date or page number Company logo Box around the title Summary Once per report Grand totals Text such as Grand Totals Relating a report file to the output it produces The two graphics below what the output from a report looks like when the report is run. The Title band appears once at the beginning of the report. In this example, the Title band contains three fields and two lines, one above and one below the three fields. The field containing "gRepohead" is in a different font to the other two. The field containing "gReposub2" does not print because it is empty and the field's "Print when" property has been set to "remove line if blank". The Title band is an optional band; not every report will have one. The Page Header band appears at the top of every page. In this example, the Page Header band contains several text labels including "Date" and "Reference” that act as column headings, and a line element that runs under the labels. The Detail band is the most important band in the report as it displays your data. In this example, the Detail band contains a single row of field elements such as "trandate", which displays the transaction date value from the field with the same name in the transactions table. The row repeats once for each row of data that is sent to the report. The Page Footer band appears once at the bottom of every page and will often include things like the name of the report and the page number. The Summary band appears once at the end of the report. It is often used to display totals and other calculations. The Summary band is an optional band; not every report will have one. Home Inventory User Guide 33 © EZPZ Software Limited 2014 The graphic on the left shows a report open in Report Designer. The graphic on the right shows the output that is produced by this report. Ruler The Report Designer has a vertical and horizontal ruler you use to more precisely position objects in the bands. The scale for the ruler is determined by your system measurement settings. You can change from the system default scale (inches or centimetres) to pixels. To change the ruler scale to pixels From the Format menu, choose "Set Grid Scale". The Report Properties window is displayed. From the Units dropdown select "Pixels". If the box "Show position in status bar" is ticked the position of a selected report element appears as a series of numbers on the status bar and can be very useful for precise positioning. Click on an area of white space on the report layout to deselect an element. Click [OK] to save the new setting. Selecting a report element In order to make a change to an element on the report layout you must first select it by left clicking on it. A selected element will have a box around it with resizing handles. You can select/deselect multiple elements by holding down the <Shift> key on your keyboard whilst you make the selection. In the graphic below the three elements at the left are a text label, a data field and a shape (rectangle). The three elements at the right show what those same elements look like when selected. Home Inventory User Guide 34 © EZPZ Software Limited 2014 Moving a report element You can move an element by clicking on it and holding down your left mouse button and then dragging it to the desired position. Release the mouse button when the element is where you want it to be. When moving a shape, such as a rectangle, you need to place the mouse pointer on one of the shape's edges but avoid the resizing handles. Care should be taken when moving elements between report bands. For example, remember that the elements in the Detail band will repeat for each record in the data being printed, so placing a text label in this band will print the text label once for each record. Changing the font of a report element You can change the font of a report element quite easily. First, select the element whose font you want to change by left clicking on it. Then go to the Format menu and select the "Font" option. This will display a window similar to the one on the right. Select the font, font style, font size and effects as required using the controls provided. Click [OK] to apply the font. Tip: if you change the font used for a data field to a larger font size you may also need to widen the data field to display the contents. If you see a string of asterisks "******" displayed for a numeric data field then that field is not wide enough to display the contents. Adding a new element to a report To add a field, go to the Report menu and move to the "Insert control" option then, from the submenu that appears, select the control required. The chosen control will be placed at the top left of the report layout from where it can be dragged into the required position. If the selected control is "Field" the "Field Properties" window will appear: Home Inventory User Guide 35 © EZPZ Software Limited 2014 Click on the button to the right of the Expression box to open the "Expression Builder" window: The data fields that can be used in a report are limited to those in the data records prepared for the report. The available fields are listed in the "Fields" list at the bottom left of the Expression Builder window. Locate the required field in the list and double-click on it. The field name will appear in the "Expression for Field on Report" box. Click [OK] on the Expression Builder window. Click [OK] on the Field Properties window. Home Inventory User Guide 36 © EZPZ Software Limited 2014 The selected field will be added to the report at the top left from where it can be dragged into the desired position. When you have finished modifying the report select the "Save" option, from the File menu, to save the changes you have made. Home Inventory User Guide 37 © EZPZ Software Limited 2014 Managing multiple datasets Home Inventory lets you have multiple sets of data called datasets. Each dataset is stored in its own folder and has its own set of database tables that are maintained independently of any other dataset on your computer. When you start Home Inventory the Select Dataset window appears containing a list of the datasets you have created. You can add further datasets, or remove datasets that you no longer use, using the controls provided in the Select Dataset window. To open a dataset from the list, click on it to select it and then click the [Open] button. Alternatively, double-click on the dataset in the list. The selected dataset will be opened and will become the current dataset. Adding a new dataset To add a new dataset to the system, select "New dataset" from the software's File menu. If the Select Dataset window is currently open you can add a new dataset by clicking on the [New] button in that window. In the New dataset window that opens, select/enter a location on your system where you want your new dataset to be created. Your new dataset will be created in its own folder at the location you selected. Enter the name for the new folder that will be created, for example "My Data". The folder name cannot contain the characters \ / * ? or a full stop. Click on [Proceed] to continue. In the next screen that appears enter the address details for the household you are creating the inventory for. Each dataset has a Reference Code that is used by the software to refer to it. A Reference Code will be suggested by the software but you can change this if you wish. Click on [OK] to continue. Selecting a location for your new dataset It is very important that you select a location on your system that has full access rights for all users in order that your data can be updated. If you are running the software on a single PC the suggested locations are as follows: Windows XP C:\Documents and Settings\All Users\Documents\EZPZ Software\EZPZ program name\Datasets Windows Vista C:\Users\Public\Documents\EZPZ Software\EZPZ program name\Datasets Windows 7 C:\Users\Public\EZPZ Software\EZPZ program name\Datasets Removing a dataset If you have multiple datasets and there is one that you no longer wish to keep, a dataset can be removed in the following way. Home Inventory User Guide 38 © EZPZ Software Limited 2014 Start the software in the usual way. When the Select Dataset window appears, highlight the dataset you wish to remove from the list and click the [Delete] button. You will be asked to choose whether to: Remove the entry from the list but without deleting any data files. If you choose this option, the data files will be left intact on your system and can be added back to the list at a later date if required. Delete the dataset from your system including all the data files that make up the dataset. Note: if you choose to delete the data files, you cannot recover them! Use with extreme care! Adding a dataset back to the list If a dataset has previously been removed from the list but the data files have not been deleted (see above) you can add the dataset back to the list using the [Browse] button in the Select Dataset window. In the Locate dataset window, which then opens, select/enter the location of the dataset and click [Proceed] (Note: this is the folder containing the BUSDATA.DBC file). The dataset will be added back to the list. Home Inventory User Guide 39 © EZPZ Software Limited 2014 Index inventory list, printing ..................................................... 5 Inventory Page ................................................................ 4 A access rights .................................................................. 26 address ......................................................................... 12 M My Reports folder ......................................................... 31 My Settings ................................................................... 23 B backup .............................................................. 12, 13, 22 P C password ....................................................................... 25 password-protect .......................................................... 23 picture ........................................................................... 14 printing.......................................................................... 28 category ........................................................................ 10 contact .......................................................................... 16 contact type .................................................................. 16 currency ........................................................................ 12 R error log ........................................................................ 21 rebuild data ................................................................... 21 reminder ....................................................................... 18 reminder type ............................................................... 20 repeating reminder ....................................................... 18 report band ................................................................... 32 Report Designer ............................................................ 32 Report Manager ............................................................ 29 resize ............................................................................... 6 restore .......................................................................... 23 room, adding ................................................................... 6 room, deleting ................................................................ 7 room, renaming .............................................................. 6 Rooms List ....................................................................... 6 F U filter ................................................................................ 4 font ......................................................................... 13, 35 User ID .......................................................................... 25 User List ........................................................................ 25 I W insurance policy ............................................................ 11 inventory item ................................................................ 7 inventory item, delete .................................................... 4 inventory item, finding ................................................... 5 weight ........................................................................... 12 D dataset .......................................................................... 38 dataset name ................................................................ 12 dataset, renaming ......................................................... 23 defaults ................................................................... 12, 19 dimensions .................................................................... 12 E Home Inventory User Guide 40 © EZPZ Software Limited 2014