1
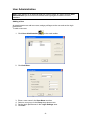
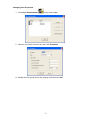
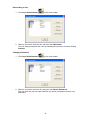
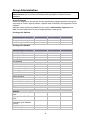
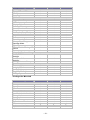
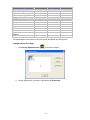
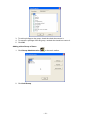
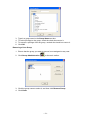
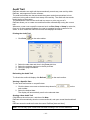
DatPass v1.1 User
Guide
FDA 21 CFR Part 11
Compliant
Supporting DataNet and MicroLab
Software
June 2009
© Fourier Systems 2009
Contents
Introduction ..................................................................................................................... 2
Associated Documentation ............................................................................................. 2
Installing DatPass ........................................................................................................... 2
First Time Running DatPass........................................................................................... 3
Login to DatPass ............................................................................................................ 4
User Administration ........................................................................................................ 6
Group Administration ...................................................................................................... 9
Audit Trail...................................................................................................................... 14
Moving the Current Database....................................................................................... 16
-1-
Introduction
DatPass is administration software compatible with FDA 21 CFR Part 11 and
supporting the assignment of passwords and operating privileges for Fourier industry
application software.
DatPass works with the following Fourier Systems software:
• DataNet – supporting DataNet data loggers, Receiver and Repeater
• MicroLab – supporting MicroLog and MicroLog PRO data loggers
DatPass defines the users that can log onto DatPass, their passwords, digital
signatures and the action they are permitted to take.
DatPass also maintains an audit trail that keeps track of all users’ activities.
Together with DataNet, MicroLab, and MicroLab Lite, DatPass forms a dual program
software package that complies with FDA Title 21 CFR Part 11.
Associated Documentation
•
•
•
•
DataNet v1.2 for CFR User Guide
MicroLab for CFR User Guide
DatPass and DataNet CFR Validation Manuals
DatPass and MicroLab CFR Validation Manuals
Installing DatPass
System requirements
To work with DatPass, and support Fourier software, your system should be equipped
with the following:
Software
• Windows 95, 98, 2000, XP or Vista (Windows 95 will not support USB)
• Internet Explorer 4.0, or later
Hardware
• Pentium 300 MHz or higher
• 32 MB RAM (64 MB recommended)
• 5 MB available disk space
Installing the software
Note: Do not connect the USB Security dongle to the PC until the installation is
complete
1. Insert the DatPass CD into your CD drive.
2. Enter the DatPass folder on the CD and click the setup.exe file.
3. The DatPass software installation process will begin. The USB Security dongle
HASP device drivers will first be installed. Upon completion, the message The
operation was successfully completely will be displayed. Click OK to continue to
the next stage of the DatPass installation.
4. Follow the on-screen instructions to complete the DatPass installation.
5. Once the installation is complete, you may then connect the USB Security
dongle to the PC. The dongle will be automatically recognized as new hardware
by the PC.
-2-
First Time Running DatPass
Note: DatPass will not run unless the USB Security dongle is connected to the PC
The first user that opens DatPass is automatically assigned as an Administrator and is
given the user name Admin. To start working with DatPass the administrator needs to
define his own user ID and password:
1. Double click the DatPass icon
dialog box:
on your desktop to display the User Login
2. Click New User.
3. Enter a user ID in the New User ID text box.
4. Confirm the user ID in the Confirm User ID text box.
5. Enter a password in the New Password text box.
Note: The password is case sensitive
6. Confirm the password in the Confirm Password text box.
7. Click OK.
The User ID and Password created here can also be used to access the supported
Fourier software.
-3-
Login to DatPass
Old User
1. Double click the DatPass icon
dialog box:
on your desktop to display the User Login
2. Enter your user ID and password, and then click OK.
New User
You can only login as a new user to DatPass and supported Fourier software if the
Admin has created a new user in DatPass. Refer to the Adding a New User section on
page 6.
1. Double click the DatPass icon
dialog box:
on your desktop to display the User Login
2. Click New User.
3. Select your user name in the New User text box.
4. Enter a user ID in the New User ID text box.
-4-
5. Confirm the user ID in the Confirm User ID text box.
6. Enter a password in the New Password text box.
Note: The password is case sensitive
7. Confirm the password in the Confirm Password text box.
8. Click OK.
-5-
User Administration
Note: If are working in an archived audit trail (refer to page 14), then to access User
Administration you must first exit DatPass and login again to load the Current
database.
Adding a User
An administrator can add new users, assign privileges to the user and set the login
preferences.
To add a new user:
1. Click User Administration
on the main toolbar.
2. Click Add User.
3.
4.
5.
6.
Enter a user name in the User Name text box.
Select a user group in the Group drop-down menu.
Set the login preferences in the Login Settings area.
Click OK.
-6-
Changing User Properties
1. Click User Administration
on the main toolbar.
2. Select a user name from the list, then click Properties.
3. Modify the user group and/or the settings, and then click OK.
-7-
Deactivating a User
1. Click User Administration
on the main toolbar.
2. Select a user name from the list, and then click Deactivate.
You can always reactivate the user by repeating the process, and then clicking
Activate.
Changing Password
1. Click User Administration
on the main toolbar.
2. Select a user name from the list, and then click Renew Password.
The next time the user will open DatPass, he will be prompted to enter a new
password.
-8-
Group Administration
Note: If are working in an archived audit trail (refer to page 14), then to access Group
Administration you must first exit DatPass and login again to load the Current
database.
Group Privileges
Users are assigned to user groups and are granted the privileges granted to the group.
A privilege is a user’s right to perform a specific task in DatPass, and supported Fourier
software.
DatPass comes with three predefined user groups: Administrator, Approver and
User. See the table below for the privileges granted to each group.
Privileges for DatPass
Privilege
User Admin
Group Admin
View/Manage Audit Trail
Administrator
Approver
User
Administrator
Approver
User
9
9
9
9
9
9
9
9
9
9
9
9
9
9
9
9
9
9
9
9
9
9
9
9
9
9
9
9
9
9
9
9
9
9
9
9
9
9
9
9
9
9
9
9
9
9
9
9
9
9
9
9
9
9
Privileges for DataNet
Privilege
File
Open Data File
Open Project File
Save Project
Save Project As
Exit DataNet
Network
Lock Network
Form New Network
Refresh Network Paths
Show Network Paths
Device Filter
Tools
Define Sensors
Switch Sensor View Mode
Edit Map View
Alarm Notifications Setup
Firmware Update Center
Reports
Edit report properties
Add electronic signature
Options
Change DataNet Data File
Path
Change ‘Save Text File’
Path
Enable Automatic
Download upon DataNet
Launch
Email Settings
SMS Settings
9
9
9
9
9
-9-
Privilege
Data Export
Export to Excel/CSV
Print Data
Copy Graph
Device Menu
Setup
Logger Alarm Setup
Calibration
Display Online Data
Download Data
Cancel Download Data
Reset Alarm
Call Device (Beep/Flash)
Leave Network
Stop
Run
Show Network Path
Change Short Range
Repeater Mode
Signal Test
Enable/Disable Turning Off
Device
Remove
Alarm Notifications Setup
Modify SMS Alarm
Settings
Modify email Alarm
Settings
Manage Contacts/Groups
General
Firmware Update
Analysis Functions
Modify Wallpaper
Toggle Software Alarm
Change System Password
Administrator
Approver
User
9
9
9
9
9
9
9
9
9
9
9
9
9
9
9
9
9
9
9
9
9
9
9
9
9
9
9
9
9
9
9
9
9
9
9
9
9
9
9
9
9
9
9
9
9
9
9
9
9
9
9
9
9
9
9
9
9
9
9
9
9
9
9
9
9
Administrator
Approver
User
9
9
9
9
9
9
9
9
9
9
9
9
9
9
9
9
9
9
9
9
9
9
9
9
9
9
9
9
9
9
9
9
9
9
9
Privileges for MicroLab
Privilege
Data
New
Open files
Save files
Save as
User administration
View/Maintain Audit trail
Exit application
Copy graph
Crop data
Export data to Excel
Printout
Update email settings
Update store data folder
- 10 -
Privilege
Administrator
Approver
User
9
9
9
9
9
9
9
9
9
9
9
9
9
9
9
9
9
9
9
9
9
9
9
9
9
9
9
9
9
9
9
9
9
Data
Edit cradle map
Set active cradle range
Add electronic signature
Logger Controls
Communication setup
Download
Setup
Run
Stop
Calibrate
Temp units
Daily download software
settings
Define sensors
The administrator can create a new user group and delete unused groups.
Changing Group Privileges
1. Click Group Administration
on the main toolbar.
2. Click a group name to select it, and then click Properties.
- 11 -
3. To add a privilege to the group, check the check box next to it.
4. To remove a privilege from the group, uncheck the check box next to it.
5. Click OK.
Adding a New Group of Users
1. Click Group Administration
on the main toolbar.
2. Click Add Group.
- 12 -
3.
4.
5.
6.
Type in a group name in the Group Name text box.
To add a privilege to the group, check the check box next to it.
To remove a privilege from the group, uncheck the check box next to it.
Click OK.
Removing a User Group
1. Ensure that the group you want to remove is not assigned to any user.
2. Click Group Administration
on the main toolbar.
3. Click the group name to select it, and then click Remove Group.
4. Click Close.
- 13 -
Audit Trail
DatPass maintains an audit trail that automatically records any user activity within
DatPass, and supported Fourier software.
The audit trail shows who has accessed the system and what operations he has
performed, along with a date & time stamp of the activity. The audit trail also tracks
invalid logins to the system.
The administrator can view the audit trail on screen or print any part of it.
DatPass allows you to create new audit trails while automatically saving the current
trail.
Whenever a user uses a specific command such as Run, Stop or Setup for a device,
from any of the supported software, the user is prompted to type a reason for his
action. In such cases the audit trail records and displays the reason.
Printing the Audit Trail
1. Click Print
2.
3.
4.
5.
on the main toolbar.
Select the start date and time in the From pick lists.
Select the end date and time in the To pick lists.
Select the page orientation.
Click OK.
Refreshing the Audit Trail
To refresh the audit trail display click Refresh
on the main toolbar.
Viewing a Specific Date
To view audit trail entries on a specific date:
1. Click the down arrow next to the date drop-down list
main toolbar.
2. Select the desired date.
The display will automatically scroll to the selected date.
on the
Starting a New Audit Trail
Click File on the main menu, and then click New.
DatPass will automatically save the current audit trail, and open a new blank audit trail
log.
DatPass saves the audit trail under the name: DatPass [date and time].
Note: You can only open a new audit trail when working in the Current database
- 14 -
Opening an Old Audit Trail
on the main toolbar.
1. Click Open
2. Navigate to the folder: My Documents\Fourier Systems\DatPass
3. Double click the desired file name.
Note: DatPass saves the audit trail under the name: DatPass [date and time]
To return to the current audit trail, repeat steps 1 and 2, then double click the file:
Current
- 15 -
Moving the Current Database
The Current.mdb file is by default located in the DatPass directory on your local
computer. This file contains the current audit trail of user activity in the DatPass and
support Fourier software systems.
When the Current database is located locally, it only tracks user activity on your
computer. In order to maintain an audit trail of user activity over a network, rather than
locally, you must store the DatPass Current.mdb file in a directory on the main network
server to which the DataNet and MicroLab users are connected.
To move the database file in DatPass:
1. Click Move Database on the File menu.
2. In the Set Database Path dialog box, click Browse and browse to the new
location of the database file.
3. Ensure that all supported software is closed and exit DatPass, then re-enter
DatPass.
4. You should receive a system message confirming the database move, and you
should also be able to view the action in the Audit Trail.
Note: You will only be able to move the database if you have the Group privilege to do
so. The Move Database check box must be checked in the Group Properties dialog
box.
When the Current.mdb file has been moved using DatPass, the database path must
also be updated for all supported software users on the network.
To correct the database file path in DataNet and MicroLab:
1. When logging into the software for the first time following a database move, you
will see a system message stating that the database file was not found.
In the next dialog box, enter the default system password (refer to the
Move Database Password section below) and click Browse.
2. Browse to the new path of the database file, as defined in DatPass, and click
OK.
3. Login in to the software as you normally would.
The DatPass Admin will now be able to view the audit trail of all users of the DataNet
and MicroLab software on the network.
Move Database Password
The default password allowing users of DataNet and MicroLab to correct the database
file path once it has been moved is:
fouriersystems
This password is case sensitive and cannot be changed.
- 16 -