1
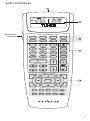
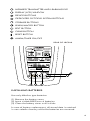
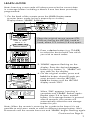
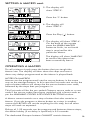
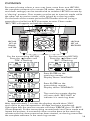
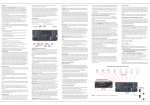
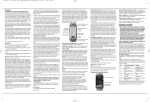
by Opus Technologies
LRC300
Learning Remote Control
User Guide
For use with the Octopus Multi-Room System
Editable device names
Clock and Alarm features
Backlit display and keys
Hard coded dedicated Octopus buttons
Learning storage buttons compatible
with nearly all source equipment
High power IR output for extended transmission range
Local banks for control of bedroom TV etc
Macro facility
Cloning feature
INTRODUCTION
The LRC300 is a learning remote control designed to
work either with a full Octopus A-BUS Multi-Room system
or an Octopus A-BUS keypad when used with compatible
A-BUS Ready™ outputs on receivers or amplifiers.
The LRC300 has 8 device banks (Tuner, DVD etc.),
6 of which are related to the 6 inputs on the Octopus
system plus 2 further Local banks which can be used
to control sources local to the room in which the remote
is being used. The 8 device bank buttons have been
pre-coded to send the correct Octopus codes to change
sources on our hubs but these buttons can also be
taught new codes if required.
There are 6 dedicated hard-coded buttons that control
the features of the Octopus A-BUS keypads: Standby, CCTV
(only used when an Octopus video switcher is installed),
Select, Mute, Vol/Function Up and Vol/Function Down.
In addition there are 38 buttons per device bank that
can be taught any IR code from the source equipment's
own remote controls (e.g. a CD player remote). This allows
the LRC300 to control all functions of the source equipment
in addition to controlling the Octopus system itself.
The 8 device banks and all storage button names can
be renamed so that any desired text can appear in the
LCD display window.
A Macro function allows the LRC300 to send out a chain
of IR commands actioned by a single button-press.
All 38 storage buttons and even the device bank
buttons can contain a Macro of up to 20 steps.
A clock is provided which together with a Timer feature
allows the LRC300 to wake the user up to the Tuner
input at any desired time.
2
UNIT DIAGRAM
BACKLIGHT
BUTTON
TUNER
CD
DVD
LOCAL 1
INPUT 4
INPUT 5
INPUT 6
LOCAL 2
1
2
3
4
5
6
CCTV
7
8
9
SELECT
0
CLEAR
MUTE
STATION / TRACK
VOL
+10
PLAY
BAND / DISC
PAUSE
STOP
TITLE
MENU
ENTER
EXIT
GUIDE
REC
TIME
SLEEP
VID+
RAND
INFO
ON
OFF
3
INFRARED TRANSMITTER AND LEARNING EYE
DISPLAY (LCD) WINDOW
DEVICE BUTTONS
DEDICATED OCTOPUS SYSTEM BUTTONS
STORAGE BUTTONS
LEARN/MACRO BUTTON
EDIT BUTTON
CLEAR BUTTON
RESET BUTTON
ALARM/TIMER ON/OFF
REAR OF LRC300
1
:
:
:
ENTER
INSTALLING BATTERIES
Use only Alkaline type batteries.
(1) Remove the battery cover.
(2) Insert 4 AAA/LR03/sum-4 batteries.
(3) Close the battery cover until it clicks.
In case of battery replacement, all stored data is retained
in non-volatile memory whilst the batteries are removed.
4
SETTING UP THE REMOTE CONTROL
REAL TIME CLOCK / DATE / MONTH / YEAR / WEEKDAY SETTING
1. On the back of the remote press EDIT once (using a paperclip or
similar), to enter Real Time Clock mode. Display shows "CLOCK?"
flashing. Press the or buttons to start editing.
2. Follow the steps below to set the desired values:
Keep holding or
buttons to go through
the 12/24 hour time format
TITLE
MENU
ENTER
EXIT
GUIDE
For all settings pressing
or scrolls through
the desired values
TITLE
MENU
ENTER
EXIT
GUIDE
TITL
MENU
ENTER
TITLE
MENU
ENTER
EXIT
GUIDE
EXIT
GUIDE
TITLE
MENU
ENTER
EXIT
GUIDE
Pressing
or
steps forwards or
backwards through
the Setting steps
TITLE
MENU
ENTER
GUIDE
EXIT
Holding a cursor key
will fast advance
the function
3. When finished press the EDIT button or wait 15 seconds
to exit Real Time Clock mode.
5
TIMER / ALARM
The LRC300 has a timer function which allows the user to program a
time to activate the tuner (e.g. to wake up to). When the programmed
time is reached the remote automatically sends out the Tuner device
code, a special wake-up code and any code programmed into the "1"
button in the tuner device bank. For instance, this allows the remote to
activate an Octopus keypad in that room, select Tuner and preset 1
(which can be set to the preferred radio station). The "1" button can
also contain a Macro if desired (e.g. starting a CD player).
1. The remote needs to be positioned so that it has a clear
line of sight to the Octopus keypad.
Clear line of sight
up to 4 metres
(12 feet)
OCTOPUS WCU310
OCTOPUS LRC300
2. On the back of the remote press EDIT twice (using a paperclip
or similar), to enter Timer set mode. Display shows "TIMER?"
flashing. Press the or buttons to start editing.
3. Follow the steps below to set the desired values:
Press or
buttons to scroll
through characters.
TITLE
MENU
TITLE
MENU
ENTER
EXIT
GUIDE
ENTER
GUIDE
TITLE
MENU
ENTER
GUIDE
EXIT
EXIT
Press to move forward,
to move back a character.
Days can be set to
weekdays, weekends
or every day of the week
4. Once the timer has been set
a small alarm clock symbol
appears on the display to
indicate the timer is active.
5. When finished press the EDIT button or wait 15 seconds
to exit Timer set mode.
Note: The Alarm On/Off button can be used at any time to turn
on or off the timer/alarm without affecting the set time or days.
6
LEARN MODE
Note: Learning a new code will always overwrite the current data
in a storage button including a Macro if one has been previously
programmed.
1. On the back of the remote press the LEARN button once
to enter Learn mode (using a paperclip or similar).
Display shows "LEARN" flashing.
LRC300
HEAD TO HEAD
ABOUT 2"- 3"
Place the original source remote (CD,
DVD etc) facing the LRC300, head to
head, about 2-3 inches (5-8 cm) apart.
ORIGINAL REMOTE
2. Press a device button (e.g. TUNER)
to select the device bank into which
you wish to teach codes.
LRC300
TUNER
CD
DVD
LOCAL 1
INPUT 4
INPUT 5
INPUT 6
LOCAL 2
1
2
3
4
5
6
CCTV
LRC300
HEAD TO HEAD ABOUT 2"- 3"
3. "LEARN" appears flashing on the
display. Press the desired storage
button (e.g. button 1). "LEARN" will
stay static on the display.
4. On the original remote, press and
hold the button whose IR code you
want to teach into the LRC300.
Hold the button until the LRC300
display reads "OK!".
ORIGINAL REMOTE
When "OK!" appears, learning is
complete and "LEARN" flashes again.
Repeat steps 3-4 to learn another
button. If no storage button is pressed
after 8 seconds, the remote will
automatically select the next storage
button for you.
Note: When the remote is scanning for a code to be learnt it is not
possible to exit Learn mode or select a different storage button. Wait
8 seconds until the remote times out and "LEARN" begins flashing again.
Continued on Page 8.
7
LEARN MODE cont.
If the display shows "ERROR",
please ensure the correct steps
are followed and repeat.
If the display shows "NO DATA", there
was no signal from the original remote.
Check the remotes are aligned, the
original remote's batteries are good
and repeat the process.
INPUT 6
5. When finished press the LEARN button
to exit Learn mode.
LOCAL 2
3
Note: It is NOT possible to
teach new codes (or Macros) into the
6 dedicated Octopus System buttons,
as they are always needed to
control the Octopus keypads.
6
CCTV
9
SELECT
CLEAR
MUTE
STATION / TRACK
VOL
A-BUS READY™ AND LEARNING CODES
INTO DEVICE BUTTONS
By default the Octopus LRC300 device buttons have been precoded to send the correct Octopus codes to change sources.
However these buttons can be taught new codes if required.
EXAMPLE:
A-BUS Ready AV receivers and amplifiers which can connect to
Octopus A-BUS keypads without an Octopus hub being required.
SPEAKERS
OCTOPUS
WCU310
OCTOPUS
LRC300
Vid Out 1
Multi-Room
IR3
IR1
Keypad 1
Vid Out 2
IR2
Cr
AV RECEIVER
Emitter In
CAB/SAT or VID1
Keypad 2
PSU In
Manufactured
in an
ISO9002
approved
facility
PSU
Cb
In this example, the receiver provides source selection, so the
Cb
Cr
Y
device buttons should be reprogrammed with
the receiver's
Y
source/device codes.
DVD
Mon Out Continued on Page 9.
HD/DVD-R or HD2/CD-R
8
A-BUS READY™ AND LEARNING CODES INTO
DEVICE BUTTONS cont.
1. On the back of the remote press the LEARN button once
to enter Learn mode (using a paperclip or similar).
Display shows "LEARN" flashing.
TUNER
CD
DVD
LOCAL 1
INPUT 4
INPUT 5
INPUT 6
LOCAL 2
LRC300
HEAD TO HEAD ABOUT 2"- 3"
2. Press and hold for 5 seconds
the device button (e.g. TUNER)
into which you want to teach
the new code (and replace the
pre-code). "LEARN" will stay
static on the display.
3. Press the appropriate
source/device button on
the AV Receiver remote,
and hold until the
display reads "OK!".
TUNER
A-BUS READY RECEIVER REMOTE
4. When "OK!" appears learning is
complete and "LEARN" flashes
again. Repeat steps 2-3 to learn
the other source/device buttons.
Note: Learning new codes into the source/device buttons replaces
the Octopus codes that have been pre-coded into them.
To recover the original codes, perform a Clear Key or Clear
Device on each device button in turn. This will reset its code to
the dedicated Octopus source codes. Alternatively a Clear All
operation will reset the whole remote to its default factory
settings including all pre-codes. See the CLEARING
STORED DATA section for more information.
9
BUTTON LABEL EDITING
When device or storage buttons are pressed, the display shows a
default label. The LRC300 however also allows users to change
these labels (up to 8 characters). Please see AVAILABLE
CHARACTER TABLE for the available character set.
1. On the back of the remote press
the EDIT button 3 times (using a
paperclip or similar) to enter
Label editing mode. "LABEL?"
will appear on the display.
2. Press the button whose display name you want to change.
TUNER
CD
DVD
LOCAL 1
INPUT 4
INPUT 5
INPUT 6
LOCAL 2
3. The display shows the name with the first character flashing.
Press or
buttons to scroll
through characters.
TITLE
MENU
ENTER
EXIT
GUIDE
Next
character
TITLE
MENU
ENTER
EXIT
GUIDE
TITLE
MENU
ENTER
EXIT
GUIDE
Press to move forward,
to move back a character.
Next
character
7
8
9
SELECT
+10
0
CLEAR
MUTE
4. Press the CLEAR button on the front of the remote to clear
a character or insert a space. The name will be automatically
centered when editing is complete.
5. When finished press the EDIT button or wait 15 seconds
to exit Edit mode.
10
SETTING A MACRO
A Macro is a chain of commands actioned by a single button press.
Any storage button on the LRC300 can contain a Macro of up to
20 steps. Delays of 1-99 seconds can be programmed between
steps if desired.
EXAMPLE:
Creating a Macro called from the " " button in the CD device
page that turns on the CD player, waits 10 seconds, selects
Track One and then Play.
TUNER
CD
DVD
LOCAL 1
INPUT 4
INPUT 5
INPUT 6
LOCAL 2
1. Select the device bank that
contains the button to hold the
Macro (CD for this example).
2. On the back of the remote
press LEARN/MACRO (using a
paperclip or similar) twice to
enter Macro mode.
The display shows "MACRO?".
REC
TIME
SLEEP
VID+
RAND
INFO
ON
OFF
3. Press the button to contain the
Macro ( for this example).
The display will show
"M.POWER" to confirm that
the Macro will be entered
into the
button.
The display will then show
"STEP 1" to confirm that the
first Macro step is required.
Note: If a button is not pressed within approximately
15 seconds the LRC300 will exit Macro mode.
REC
TIME
SLEEP
VID+
RAND
INFO
ON
OFF
Press and hold any Macro
step to select a delay of
1-99 seconds before the
next step is performed.
4. For this example, by pressing
and holding the ON button for
10 seconds a 10 second delay
is selected before the next step is
performed. A counter in the top
right of the display counts up
from 1-99 seconds. Letting go of
the ON button when the counter
reaches 10 selects the 10 second
delay. If no delay is required,
press and release the ON button
immediately.
Continued on Page 12.
11
SETTING A MACRO cont.
5. The display will
show "STEP 2".
11
2
3
4
5
6
Press the "1" button
CCTV
6. The display will
show "STEP 3".
Press the Play ( ) button.
PLAY
BAND / DISC
STATION / TRACK
PAUSE
VOL
STOP
7. The display will show "STEP 4".
On the back of the remote
press the LEARN/MACRO
button to finish, as no fourth
step is required for this
particular Macro.
The display will show "MAR.OK!"
to confirm the Macro has
been successfully learnt
OPERATING A MACRO
To call a Macro simply press the button that you taught the
Macro into. The display will then show the steps and count
down any delays programmed as the Macro is played back.
NOTES ON MACROS
Macros can be programmed into the source buttons in the same
way as the storage buttons. In this case the first code sent out by the
source button Macro will always be the source buttons own code,
followed by the steps that you program in.
This first code will be the pre-coded Octopus source code or a new
code if the source codes have been replaced with a learnt code as
per the LEARNING CODES INTO DEVICE BUTTONS section.
A Macro cannot contain as a step a button that also contains a
Macro. If you do program a Macro button as a step in another
macro the LRC300 will not do anything for this step, but all other
steps will work as expected.
Delays of 1-99 seconds can be programmed between Macro steps,
the default delay (if no delay is specified) is 0.5 seconds.
The dedicated Octopus buttons CANNOT contain Macros.
12
CLONING
For ease of setup where a user may have more than one LRC300,
the complete contents of a remote (IR codes, Macros, button names
and clock settings) can be transferred to another LRC300 remote by
a "cloning" process. One remote must be set to transmit mode whilst
the other set to receive mode, while joined by a cloning cable.
On the back of the remote press the EDIT button 4 times (using a
paperclip or similar) on BOTH remotes to enter Clone mode.
"REC/TRX" will appear on both the displays.
TITLE
MENU
LRC300
SET AS
TRANSMITTER
LRC300
SET AS
RECEIVER
ENTER
EXIT
GUIDE
CLONING CABLE
For the transmitting LRC300,
Press the
button until
"TRX" is flashing.
For the receiving LRC300,
Press the
button until
"REC" is flashing.
Press ENTER on the
receiving remote.
Display shows "WAITING".
Press ENTER on the
transmitting remote.
Display shows "SENDING".
The receiving remote display
will now show "REC-ING" to
indicate it is receiving data.
After approximately 7 minutes the displays should show "OK!"
and return to normal operation. All data has been transferred.
If the clone fails the receiver remote will show "ERROR" then "CL-REPT"
(Clone Repeat). Put the transmitting remote back into Clone mode and
repeat the process. A successful clone must be done to the receiving
remote once the clone process has been started, as cloning overwrites
the complete software in the receiving remote.
13
CLEARING STORED DATA
1. To clear the IR code data in a single button, first select the device
bank (TUNER, CD etc) that contains that button then press the CLEAR
button on the back of the remote once (using a paperclip or similar).
When the display shows
"CLR KEY?" press the button
to be cleared.
Note: Clearing a button does not affect the buttons name if
it has been edited. Clearing a device button resets the code to
the Octopus pre-code.
2. To clear the IR code data in a whole device bank press the
CLEAR button twice.
When the display shows "CLR DEV?"
press the device button for the device
bank (TUNER, CD etc) to be cleared.
All buttons in that device bank will be
cleared.
Note: Clearing a device button does not affect the device name or any
button names if they have been edited, but does clear all codes and
Macros, and recovers the Octopus pre-code for the device bank button.
3. To clear ALL the IR code data and Macros in the remote including
all device, button and pre-code names and all button names,
press the CLEAR button 3 times.
When the display shows
"CLR ALL?" press and
hold the ENTER button
for approx 4 seconds.
TITLE
MENU
ENTER
GUIDE
EXIT
The display will show
"CLEARING", and may
take a minute or so
to complete.
4. After each clearing operation (Clear Key, Clear Device or
Clear All) the LRC300 will automatically exit Clearing mode.
Note: When clearing, all source/device button codes will be
returned to their factory default Octopus codes.
14
OPERATING THE REMOTE CONTROL
NORMAL OPERATION
1. Press a device button.
2. Press the desired storage button. If no IR code data is stored,
the display shows EMPTY. If an IR code is present in the button
the
symbol will appear whilst the code is sent.
BUTTON AND DISPLAY BACKLIGHTING
Press the light button to turn on the remote's backlight function.
All the buttons and the LCD display will light up for night time viewing.
LOW BATTERY INDICATOR
When the battery is low, a battery symbol appears on the display.
When the battery symbol starts
flashing, all remote functions are
locked until fresh batteries are
installed.
RESET
Press the RESET button to restart the LRC300. After reset, all data
remains, but the real time clock and date have to be set again.
Reset is used in the unlikely event that the LRC300 locks up due
to static discharge or other unforeseen events.
AVAILABLE CHARACTER TABLE
SPACE
15
COMPLIANCE WITH FCC RULES:
THIS DEVICE COMPLIES WITH PART 15 OF THE FCC RULES.
OPERATION IS SUBJECT TO THE FOLLOWING TWO
CONDITIONS: (1) THIS DEVICE MAY NOT CAUSE HARMFUL
INTERFERENCE, AND (2) THIS DEVICE MUST ACCEPT ANY
INTERFERENCE RECEIVED, INCLUDING INTERFERENCE
THAT MAY CAUSE UNDESIRED OPERATION.
Note: The manufacturer is not responsible for any radio or TV
interference caused by unauthorised modifications to this
equipment. Such modifications could void the user's
authority to operate the equipment.
The Octopus LRC300 Learning Remote Control
complies with the Electromagnetic Compatibility
(89/336/EEC) Directives when used according
to this user guide.
A-BUS and A-BUS Ready are
registered trademarks of LeisureTech Electronics
Pty Ltd Australia
Opus Technologies is a member of the
Custom Electronic Design & Installation
Association
Opus is committed to providing the highest levels of service and support.
For full details of this product see its dedicated website page at:
www.opus.eu/octopus
Octopus is a trademark of Opus Technologies UK LLP.
All rights reserved.
Opus Technologies UK LLP
Gallery Court, Pilgrimage Street, London SE1 4LL England
Tel: +44 (0)20 7940 2205 Email: [email protected]
Made from recyclable material
AP16470/1