1
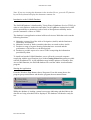
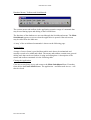
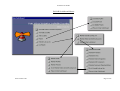
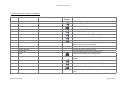
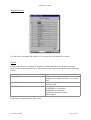
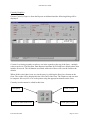
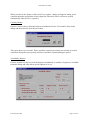
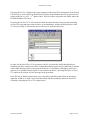
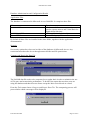
Trinity House Lighthouse Service
Ports Aids To Navigation Availability Reporting
Database
PANAR User Guide
Issue October 2001
Trinity House Lighthouse Service
Tower Hill
London EC3N 4DH
Tel: 020-7481-6918
PANAR User Guide
Note: If you are viewing this document in the Acrobat Viewer, press the F5 function
key on the keyboard to display the document contents list.
Introduction to the PANAR Database
The PANAR Database is distributed by Trinity House Lighthouse Service (THLS) in
order to assist Harbour Authorities and Other Local Lighthouse Authorities to fulfil
their responsibility to maintain records of Aids to Navigation availability and to
provide summaries of these to THLS.
The database is an application written in Microsoft Access 2000 that carries out the
following functions:
a) Maintains a master list of the Aids to Navigation (AtoNs) and the Stations to
which they are attached
b) Maintains records of faults (casualties) that have occurred to these AtoNs
c) Produces a range of reports showing faults that have occurred and the
performance of all AtoNs over defined periods.
d) Produces a periodic report to be sent to THLS comprising the information
prescribed by them
To install and run the PANAR database, users will need a personal computer
complying with the specifications given in the Getting Started document provided
with the installation CD. A full installation may include updates to Windows files,
Access 2000 Runtime, the PANAR database files and the Adobe Acrobat Reader
program.
Starting the Application
From the Windows Start Button choose Programs. From this menu choose the
program group named Panar and then the program shortcut named Panar.
Whilst the database is loading a status bar message indicating and that links to the
data file are being refreshed will be displayed. The database will then be ready for
use.
Issue October 2001
PANAR User Guide
Database Menus, Toolbars and Switchboards
The custom menus and toolbars in the application contain a range of commands that
may be used during input and editing of the PANAR data.
The functions of the database are accessed through the Switchboard menus. The Main
Switchboard appears on screen when the application is opened. Other sub-menus
may be called from the Main one.
A ‘map’ of the switchboard commands is shown on the following page.
Screen Forms
A range of screen forms is provided that enable static data to be maintained and
casualty records to be added and edited. The menus and toolbars contain some general
editing tools that can be used when viewing and editing data. A description of the
menus and toolbar commands is in the following table.
Closing the Application
Close any screen forms in use and return to the Main Switchboard form. From that
form choose the Exit PANAR button. The application – and Microsoft Access – will
then be closed.
Issue October 2001
PANAR User Guide
PANAR Switchboard Menus
Issue October 2001
Page 4 of 23
PANAR User Guide
PANAR Menu and Toolbar Commands
Menu
Command
File
Page Set-up
Print Preview
Allows Page Set-up for printed out put to be adjusted
Preview printing of the current window
Print
Windows Print dialog
Exit
Undo
Closes the PANAR Database
Undoes the last editing change
Cut
Cuts selected data to the Windows Clipboard
Copy
Copies selected data to the Windows Clipboard
Paste
Pastes the data from the Windows Clipboard
Paste Append
Pastes copied data from the Windows clipboard to the
table viewed by the current form.
Deletes the selected item of data
Selects the entire current record
Select all the records in the current form
Finds an item data in the current field
Edit
Sub-Command
Delete
Select Record
Select All
Find
Replace
Record
Toolbar
Button
Function
Sort Ascending
Replaces an item of data in fields meeting the Find
criteria
Sort in ascending order in the current field
Sort Descending
Sort in descending order in the current field
Filter
Issue October 2001
Filter by Selection
Apply filter by selecting on the current field value
Filter Excluding Selection
Apply filter by inversely selecting on the current field
value
Page 5 of 23
PANAR User Guide
Menu
Command
Sub-Command
Filter by Form
Toolbar
Button
Function
Toggle Filter
Opens the Filter by Form controls on the form or
datasheet
Toggles on or off defined filters on the current form
Filter
Remove Filter/Sort
Removes existing filter or sort on the current form
Go to
First
Previous
Next
Last
New Record
Go to first record on the current form
Go to previous record on the current form
Go to next record on the current form
Go to last record on the current form
Create a new record on the current form
Save Record
Save changes to the current record
Delete Record
Delete the current record
Tools
Compact & Repair Data
Window
Tile Horizontally
Tile Vertically
Cascade
About this Database
Compact and repair data in the data file
(PANAR_be.MDB)
Tile horizontally all windows currently open
Tile vertically all windows currently open
Cascade arrange all windows currently open
Display About box for PANAR Database
Records
Help
Issue October 2001
Page 6 of 23
PANAR User Guide
Entering and Editing Data for Stations, AtoN Components and Casualties
Stations and Components
On the Main Switchboard, click the button named View/Edit Stations and Components.
This form is used for adding and maintaining all details about navigation stations and the
AtoN components attached to them. Enter data in each field by typing directly or choosing
from the lists in the Combo-boxes. Fields for P Number, N Number and Designation are
mandatory.
To locate records for a Station using the Find Station, Find Other Number or Find Other
Identity combo boxes at the bottom of the form. The details about the Station are shown in the
top half of the form. In the lower part of the form are two tabs.
The tab titled AtoN Components shows all the components attached to this station and this
information can be edited. The Start Date and End Date mark the dates when a component
was put into service or removed from it. Use these fields rather than deleting a Component
that is no longer in use so that its performance continues to be included in three year rolling
reports.
Issue October 2001
Page 7 of 23
PANAR User Guide
Both the Station and each Component have fields titled Active. If the Station is not active all
component and casualty records for that station will be ignored by the database reports. If a
component is marked not active then that component and any casualty records associated with
it will be ignored by reports.
To add a new Station: Click into the Station field at the top of the form and then
click one of the New Record buttons at the bottom of the form or on the toolbar.
Enter the details for Station name, Designation and the other fields.
To delete a Station: You cannot delete a station – mark it as not Active instead.
Editing a Station: All fields can be changed. All Station names must be unique. If a Station
name, N Number or P Number is changed all attached components and associated casualties
will follow that change. If a station is to be replaced with a completely new set of equipment
the best approach is to set end dates on all the original components, but leave them and the
station active (so they continue to be used in calculations in the current three year period).
Then create a new Station (with a different name, N Number etc.) and add to it the new set of
components with their start dates entered.
To add a new AtoN Component: Click into the AtoN Components sub-form then click one of
the New Record buttons: Enter values for Component, Category, Start Date. The Component
and Category fields are mandatory.
To Delete an AtoN Component: Click the Component record to be deleted, then click the
Delete Record button on the toolbar. You may not delete a Component if casualty records
have been added for it.
To Edit an AtoN Component: You may change the Component or Category only if no
casualties have been entered for the component. Setting the Start Date or End Date will mean
the component is only included in report calculation from and/or to these dates.
The Casualty tab shows any casualty records associated with the AtoN components. Click on
Issue October 2001
Page 8 of 23
PANAR User Guide
the Component in the list on the left hand side of the tab, and any associated casualties will be
displayed in the list. Casualties cannot be edited in this view, but you can ‘jump’ to the
Casualty editing screen using the buttons on the form.
Refreshes the casualty list after any editing
changes whilst this form is open.
Jumps to editing the selected casualty
record
Jumps to creating a new casualty record for
the current Station and Component.
Editing Casualty Records
This is the form where you enter records of faults that have occurred to AtoN Components.
The data must be entered accurately because it is used to calculate availability that is shown
on the database reports.
Click the View/Edit Casualties button on the Main Switchboard. This is the form through
which casualty records are added or edited.
Issue October 2001
Page 9 of 23
PANAR User Guide
These are some notes on the fields:
a) The Casualty Number must be unique. By default, the next numeric value will be offered,
but this can overwritten.
b) The Station and N Number fields are alternative means of identifying the Station, selecting
a value in one will cause a value to be entered automatically in the other.
c) Once the Station or N Number has been selected, the Designation field will be
automatically displayed (they cannot be edited) and the AtoN ID/Category combo box will
be filled with a list of the components available at this station. New Stations and
Components must be added through the View/Edit Stations forms before casualties can be
added through this form.
d) The Date NCR and Time NCR cannot be entered if the Date Reported has not been
entered.
e) The Duration field is calculated automatically – it cannot be edited.
To add new Casualties: Click one of the New Record buttons and complete the fields.
To delete a Casualty: Click the Delete Record button on the toolbar.
Entering New Casualty Data
Click the Add Casualties button on the Main Switchboard form.
This form is identical to the View/Edit Casualties form except the form is empty of records
and ready for new records to be added.
Maintaining Database Lookup Lists
There are a range of Lookup tables in the PANAR database that are essential for proper
functioning and some maintenance of these is required. The Maintain Lookup Lists command
on the Main Switchboard leads to two sub menus as shown in the diagram above.
The following tables may be edited:
Form
Maintain Faults
Maintain Priorities
Maintain Reasons
Maintain P Numbers
Maintain Owners
Maintain Port Details
Maintain Station Designations
Maintain AtoN Components
Maintain Component Reporting
Options
Issue October 2001
Contents
Fill Lookup lists in the Casualty editing screens.
Fill Lookup lists in Station & Component editing forms
Lists Designation groups, IALA Targets and determines
use in Annual reports
Page 10 of 23
PANAR User Guide
Maintain Port Details
Use this form to enter and update Port details which are used in database reports. The THLS
contact details are pre-filled but may need updating from time to time
Maintain P Numbers
Use this form to enter and maintain the list of P Numbers managed by your Authority. One of
the P Numbers in the list should be marked as Default for New Station. It will be this value
that appears automatically in the P Number field for new Stations and Casualties.
Issue October 2001
Page 11 of 23
PANAR User Guide
Maintain Owners
Use this form to maintain the list of owners of AtoN Stations. The default value is Port
Owned, but others may be added.
Maintain Station Designations
Use this add entries to the list of Station Designations. These designations are used to provide
groupings and sub-total headings on availability reports. Because this table is used to
determine the structure and headings of data reported to THLS existing records cannot be
deleted or edited.
Issue October 2001
Page 12 of 23
PANAR User Guide
Maintain AtoN Components
Use this form to add new component types to the AtoN list as directed by THLS. Because this
table is used to determine the structure and headings of data reported to THLS, existing
records cannot be deleted or edited.
Maintain Component Reporting Options
Issue October 2001
Page 13 of 23
PANAR User Guide
Use this form to add new component reporting options as directed by THLS. This table is
used to determine the structure and sub-total headings of data reported to THLS and records
cannot be deleted or edited.
Maintain Faults
Use this form to maintain the list of possible faults and descriptions that could be attributed to
AtoN Casualties.
Maintain Priorities
This form allows you to edit the Priority designations for casualties reported in your database.
Issue October 2001
Page 14 of 23
PANAR User Guide
Maintain Reasons
Use this form to maintain and edit the list of reasons for faults that have occurred.
Reports
Choosing the Reports command on the Main Switchboard leads to the Reports sub menu
shown on the menus diagram above. This menu has three options which lead to the following
reports
Report Option
Casualty Enquiries
Casualty Return
Availability Statistics Reports
Report
Screen enquiries in casualty records, with
output to screen, Microsoft Excel, or printed
lists.
Lists casualties repaired or reported in a
defined period.
A range of statistics reports:
Availability by Component
Reliability by Component
Availability Summary Report
THLS Report
Each report is explained more fully below:
Issue October 2001
Page 15 of 23
PANAR User Guide
Casualty Enquiries
Choose Casualty Enquiries from the Reports switchboard and the following dialog will be
displayed.
Criteria for selecting casualty records are set in the controls at the top of the form – multiple
criteria can be set. The Duration, Date Reported and Date NCR fields have default values that
include all records. The All buttons associated with each of these will reset the fields to the
default.
When all the criteria have been set, run the query by clicking the Run Query button on the
form. The results will be displayed in the lower half of the form. The output records can also
be output to Microsoft Excel or to the printer using the appropriate buttons on the form.
Casualty records cannot be edited in this form.
Run query
Output to Microsoft Excel
Issue October 2001
Clear Criteria
Print query results
Page 16 of 23
PANAR User Guide
When you choose the Output to Microsoft Excel option, a dialog will appear asking you to
complete the name and location of the output file. Microsoft Excel will not be opened
automatically after the file is exported.
Casualty Return
Choose Casualty Return from the Reports switchboard. Set the From and To dates in the
dialog and then click the Print Report button.
The report shows two sections: Those casualties reported previously but restored to normal
conditions during the report period, and those casualties reported during the period.
Availability Reports
Choose Availability Reports from the Reports switchboard. A number of reports are available
from this dialog and some allow special options to be set.
Issue October 2001
Page 17 of 23
PANAR User Guide
Choose the report from the list and set an End Date. This defaults to today’s date for all
reports for except the THLS Report where the default is the end of the last quarter within this
calendar year.
At the bottom of the dialog form choose whether to Preview the report (default) or print it.
If you have already run a report from the dialog, the option Use Last Summary will be
selected. This allows you to view or print a report without re-running all the queries that
arrange and summarise the statistical information, which may take a few minutes on slower
computers.
Availability by Component/Reliability by Component
These reports report performance for individual AtoN Components. The Availability report
shows the calculated availability whilst the Reliability report shows MTTR and MTBF
statistics. Both reports may be filtered for P Number, Availability, Category, Designation
Group and AtoN Component using the controls in the middle of the dialog. The previewed or
printed reports show the filters applied in the title lines.
If the All Components option is chosen in the Components option group then the reports will
show sub totals and overall totals for availability, MTTR and MTBF. These are suppressed
when Less than 100% or Less than Target are selected.
Availability Summary Report
This report shows three year rolling availability summaries by AtoN Component Type for the
selected End Date. The report may be filtered by P Number.
THLS Report
This report provides the quarterly summary of availability data in the format prescribed by
THLS. No filters may be set on the report. Selecting the THLS Report from the report list will
automatically trigger the setting of an End Date for the report to the end of the last quarter in
the calendar year i.e. 31st March, 30th June, 30th September, or 31st December. The End Date
is editable but the report may only be run for one of these quarter dates.
The output options are extended to include Excel File and Email Excel File in the Print to
combo-box.
Issue October 2001
Page 18 of 23
PANAR User Guide
Choosing Excel File will direct the report output as a Microsoft File with a name in the format
P9999YYQ.xls, where P9999 is the default P Number in the database and YYQ represents the
quarter and year, e.g. 023 = 3rd quarter 2002. This file will be exported to the folder where the
PANAR database is located.
Choosing Email Excel File will result an Email document window being opened containing
an Excel file with the same name as above as an attachment, and the document Subject and
To: lines pre-filled. It will remain only for the user to Send the mail item.
In order for the Email Excel File to function, the PC on which the PANAR application is
installed must have a Microsoft Office compatible Email program and a connection to internet
email either through a direct connection from the PC via a modem or through a mail server
gateway. If a suitable Email program is not available on the PC, choosing the Email to Excel
File option will result in an error message being generated.
If the PC has an Email program that is not compatible with Microsoft Office an alternative
approach would be to open a new email document and then manually attach the Excel file
created by choosing the Excel File option above.
Issue October 2001
Page 19 of 23
PANAR User Guide
Record Selection Criteria and Calculations for Reports and Enquiries
All Reports and Queries
1.
2.
3.
4.
[Duration] = (([Date Reported]+[Time Reported])-([Date NCR]+[Time NCR]))
[MTBF] = ([Time Available]-[Down Time])/[Number Casualties]
[MTTR] = [Total Downtime]/[Number Casualties]
[Availability] = ([Time Available]-[Down Time])/[Time Available]
All Reports
1. Station and Component [Active] Fields = True
2. All Availability, MTBF and MTTR values are calculated for 3 year period prior to
specified end date
3. Component [Start Date] or [End Date] lie within the specified period. Where functional
for only part period, values are calculated for that part period.
4. Exclude casualties with ‘Erroneous’ contained in [Reason Field] (except Casualty Return
Report).
Casualty Return Report
1. For brought forward section include records where [Reported date] is prior to [From date]
and [NCR date] is between [From] and [To] dates specified in dialog
2. For Occurred section include all records where [Reported date] is between [From] and
[To] dates specified in dialog.
Station/Component Availability Reports
1. Casualties are included where all or part of the downtime occurs within the report period.
Where only part of the downtime occurs in the report only this fraction of the downtime is
included in the calculations.
2. The [End Date] for the report is 12:00 AM (midnight) on the date input (so a casualty
corrected later that day will not have the total Duration used in calculations).
Availability Summary Report & THLS Report
The number of units reported is a total of all components in service, including any that have
been in service for only part of the three year period as unit fractions. The number is summed
then rounded to the nearest whole number.
THLS Report
[End Date] may be only ends of quarters.
Issue October 2001
Page 20 of 23
PANAR User Guide
Database Administration and Configuration Details
Application Files
The database is constructed in Microsoft Access 2000 SR1. It comprises three files:
File
PANAR.MDB
PANAR_be.MDB
System.MDW
Function
All ‘front-end’ functions – screen forms,
queries, reports, macros and Visual Basic for
Applications functions.
All data tables and relationships
Access Workgroup File
By default all these files are installed in the same folder, together with the application
documentation.
Security
No security options have been set in either of the databases in Microsoft Access. Any
restrictions must therefore be set through network folder and file permissions.
Compact and Repair the Data File
The PANAR data file needs to be compacted on a regular basis in order to minimise the use
of file space and to maximise performance. To do this first ensure that no other users are
using the database and that all screen forms except the Main Switchboard are closed.
From the Tools menu choose Compact and Repair Data File. The compacting process will
proceed after which a message will be displayed.
Issue October 2001
Page 21 of 23
PANAR User Guide
Application Back-up
The back-end file, PANAR_be.MDB should be backed up regularly to protect the data. If the
PC or system crashes whilst the application is in use, the files may be left in an ‘open’ state
and may appear corrupt when next opened. A solution to this is to open both files directly
from Microsoft Access 2000 (full version, not Runtime) and then follow the prompts to
Repair the files. If this fails to overcome the problem, the files will need to be restored from
back-ups.
Relocating the Back-end file to a Network Folder
By default, the files PANAR.mdb and PANAR_be.mdb are installed in the same folder. It is
possible to re-locate the data file, PANAR_be.mdb, to another folder after installation. To do
this close the application and, using Windows Explorer, move (not copy) the file to the new
location.
Now, using the Program Menu shortcuts, start the database in the normal manner. As it starts
up, automatic routines will look for the data file and when they cannot locate it in its previous
location a message will be displayed.
This will be followed by a File Open type dialog asking you to locate the linked data file. Use
this dialog to locate the file PANAR_be.MDB.
When the file is selected, click Open and the database will open as normal. You will not have
repeat this operation unless you move the data file again.
Issue October 2001
Page 22 of 23
PANAR User Guide
Configuring PANAR for Multiple Users
The PANAR database will allow multiple users to use the application concurrently. To
configure this arrangement follow these steps.
Carry out a first installation and then follow the instructions above to relocate the data file,
PANAR_be.MDB, to a shared network folder.
For each subsequent user, carry out the installation, then using Windows Explorer, delete the
data file, PANAR_be.mdb from the local folder. Start the application and follow the
instructions above to locate the copy of the data file in the shared folder.
Note that the database is not secured and has no provisions configured for record locking
should two or more users attempt to edit the same record concurrently. Such circumstances
may give rise to error messages.
Support
The PANAR database is distributed by
Trinity House Lighthouse Service
Tower Hill
London EC3N 4DH
Help Desk: 020-7481-6918
Email: [email protected]
Issue October 2001
Page 23 of 23