1
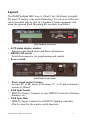
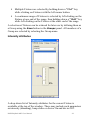
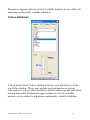
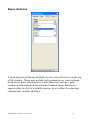
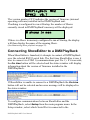
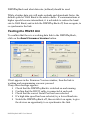
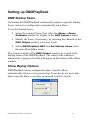
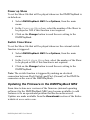
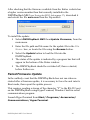
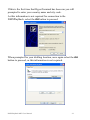
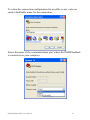
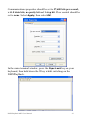
DMXPlayBack mk2 User Manual www.enttec.com Firmware V0.7 DMXPlayBack MK2 User Manual Software V2.0.5 August 2006 1 Package Contents Your DMXPlayBack package should contain these items: • DMXPlayBack MK2 (Part No. 70014) • DB9 to DB9 1.8m cable (Part No. 79103) • 2 x mounting brackets (Part No. 79105) • ShowEditor for Windows™ software on the Enttec CD-ROM (Part No. 79106) • DC power pack (Part No. 79104) • This user manual (Part No. 79107) If any item is missing or damaged, please contact your supplier immediately. To be sure that you are using the latest revision of ShowEditor software with your DMXPlayBack MK2, please visit the Downloads section of the Enttec website at www.enttec.com to get the current version. DMXPlayBack MK2 User Manual 2 DMXPlayBack mk2 User Manual Firmware V0.7 Software V2.0.5 Table of Contents User Manual ...........................................................................................1 Package Contents....................................................................................2 Table of Contents....................................................................................3 Warranty .................................................................................................6 Contacting ENTTEC ..............................................................................6 Getting Support.......................................................................................6 Glossary of DMXPlayBack Terms.........................................................7 Typographic conventions used in this manual .......................................7 Getting to know your DMXPlayBack MK2...........................................8 Features...............................................................................................8 Layout.................................................................................................9 Fast track guide to the DMXPlayBack MK2........................................10 Capturing a Scene.................................................................................11 Storing a Scene .................................................................................11 Renaming a Scene ............................................................................12 Modifying an existing Scene ............................................................12 Modifying channel levels .................................................................12 Saving the Scene list.........................................................................13 Loading a Scene list..........................................................................14 Creating a new Scene list..................................................................14 Creating a Show....................................................................................15 Adding Scenes to a Show .................................................................16 Setting Fade and Delay times ...........................................................16 Show Options .......................................................................................16 Show run times .................................................................................16 DMX Channels Used........................................................................17 Compressing the Show .....................................................................17 Memory Usage .................................................................................17 Saving the Show ...............................................................................18 DMXPlayBack MK2 User Manual 3 Loading a Show into ShowEditor.....................................................18 Loading Shows into the DMXPlayBack ..............................................19 Loading the current Show.................................................................19 Loading multiple shows....................................................................20 Erasing All Shows from the DMXPlayBack........................................21 Starting a Show.....................................................................................22 Starting a Show from ShowEditor....................................................22 Starting a Show on DMXPlayBack Power Up.................................22 Starting a Show on Switch Closure ..................................................22 Starting a Show with the DMXPlayBackRemote.............................22 Starting a Show via RS232 commands.............................................23 Monitoring Show playback ..................................................................23 Stopping a Show...................................................................................24 Stopping a Show from ShowEditor ..................................................24 Stopping a Show via RS232 commands...........................................24 Creating a new Scene with ShowEditor ...............................................25 Defining the Patch ............................................................................25 Saving the Patch ...............................................................................27 Loading a Patch into ShowEditor.....................................................27 Building a Scene using the ICBF Inspector .....................................27 Fixture selection ...........................................................................27 Intensity attributes ........................................................................28 Colour attributes ...........................................................................29 Beam attributes .............................................................................30 Focus attributes.............................................................................31 Storing a Scene .................................................................................32 Renaming a Scene ............................................................................32 Modifying an existing Scene ............................................................32 Saving the Scene list.........................................................................33 Loading a Scene list..........................................................................33 Creating a new Scene list..................................................................33 Installing ShowEditor and DMXPlayBack...........................................34 Installing ShowEditor .......................................................................34 Connecting the DMXPlayBack MK2...............................................34 Power supply ................................................................................34 RS232 ...........................................................................................34 DMX Out ......................................................................................35 DMXPlayBack MK2 User Manual 4 DMX In.........................................................................................35 Powering up the DMXPlayBack MK2.............................................35 Connecting ShowEditor to a DMXPlayBack .......................................36 Testing the RS232 link .....................................................................37 Setting up DMXPlayBack ....................................................................38 DMX Startup frame ..........................................................................38 Show Replay Options .......................................................................38 Power up Show.............................................................................39 Switch Close Show.......................................................................39 Updating the Firmware in the DMXPlayBack MK2........................39 Failed Firmware Update ...................................................................40 Self Test............................................................................................44 Appendix 1 - RS232 Commands ........................................................46 RS232 Commands supported by the DMXPlayBack MK2 ............46 Appendix 2 - Connector Pinouts ........................................................47 DMX OUT........................................................................................47 DMX IN............................................................................................47 Using the remote switch ...............................................................47 RS232 ...............................................................................................47 Appendix 3 - FCC Declaration...........................................................48 Appendix 4 - EEC Declaration...........................................................50 DMXPlayBack MK2 User Manual 5 Warranty ENTTEC warrants that the product that it manufactures will be free from defects in materials and workmanship for a period of one year from the date of shipment from an authorised ENTTEC wholesaler. If the device proves defective within the warranty period, ENTTEC will repair or replace at its sole discretion, the defective hardware. If the failure is due to an operator error, the user accepts the responsibility to pay any costs incurred in the diagnosis of the hardware, parts or shipping from our service facility. ENTTEC makes no warranty of any kind, express or implied, including without limitation the implied warranties of merchantability and fitness for a particular purpose. In no event shall ENTTEC be liable for indirect, special or consequential damages. Opening the case of the unit voids the warranty as described above. Contacting ENTTEC Email: [email protected] Telephone: Facsimile: Postal Address: +61 3 9819 2433 GMT+10 +61 3 9819 2733 ENTTEC Pty Ltd PO Box 282 Kew Vic 3101 Australia Getting Support If you require support for the DMXPlayBack MK2 or the ShowEditor software, please visit the Support area of our website at www.enttec.com. There you can fill out a support request ticket for prompt assistance with your enquiry. DMXPlayBack MK2 User Manual 6 Glossary of DMXPlayBack Terms Fixture: A DMX512-controlled device connected to the DMXPlayBack. In ShowEditor a fixture can be either a multi-channel luminaire or effects device, or it can be a single dimmer channel. In ShowEditor a 12 channel dimmer rack is considered to be 12 singlechannel fixtures. Patch: The allocation of DMX512 channels to the fixtures installed on the DMX512 network. Scene: A recording or snapshot of the DMX512 levels in a lighting state. Show: A sequence of scenes that form a lighting presentation. Fade time: The time taken for an incoming scene to reach its recorded levels. Delay time: The time for which the current scene remains static before the fade to the next scene begins. Typographic conventions used in this manual Buttons: Software button names and menu command options appear in a special typeface. Eg. The name of the Windows™ "Start" button is printed as Start. Data boxes: The names of the boxes where data is entered appear in a different typeface. Eg. The name of the "Delay" entry box is printed as Delay. DMXPlayBack MK2 User Manual 7 Getting to know your DMXPlayBack MK2 Thank you for purchasing the DMXPlayBack MK2. At Enttec we are proud of our products and we hope you will enjoy using them as much as we enjoy designing and building them. The DMXPlayBack MK2 is a DMX512 recording and playback tool that captures snapshots of the lighting scenes produced by a control system. The DMXPlayBack then plays the captured scenes back in any desired sequence or combination, with selected scene fade in/out times and pauses between each scene. The accompanying ShowEditor software controls and configures the DMXPlayback. It can be used to modify the recorded scenes or to build entire new lighting scenes. In addition to setting up and loading show sequences, ShowEditor can configure DMXPlayback for either remote control or stand-alone operation. ShowEditor allows you to store a library of shows in a database on your computer or on removable media. These can be loaded into the DMXPlayBack unit and played when required. Features The DMXPlayBack MK2 provides: • Full 512 channel universe of input and output • Scene capture from the DMX512 input • Up to 12 Shows • Up to 65,535 Scenes • Up to 65,535 Scenes per Show • Fade times and delay times (0 to 100 minutes in 0.1sec steps) • DMX512 data compression to optimise memory usage • Data stored indefinitely in non-volatile flash memory • Show replay can be triggered on: power up external switch closure DMXPlayBackRemote remote serial command DMXPlayBack MK2 User Manual 8 Layout The DMXPlayBack MK2 case is 1 Rack Unit (44.45mm) in height, 241mm (9.5 inches) wide and 105mm deep. Two devices of this size can be mounted side-by-side in a standard 19 inch equipment rack using the optional Rack Mounting Kit available from Enttec. DMXPlayBack front panel 1 2 3 LCD status display window Indicates operational status and Show information. DB9 RS-232 socket Serial data connector for programming and control. Power switch DMXPlayBack back panel 4 5 6 Power input socket (2.1mm) Accepts AC or DC inputs in the range 7V – 16V and a minimum current of 200mA. XLR 5pin Female DMX512 Output. Connects to your DMX512 network of fixtures, dimmers, etc. XLR 5pin Male DMX512 Input. Connects to a DMX512 lighting controller. (Pin 4 is used for the remote switch function) DMXPlayBack MK2 User Manual 9 Fast track guide to the DMXPlayBack MK2 To record and replay a show on a DMXPlayBack MK2: Install and configure the ShowEditor software on your Windows™ computer. (see Installing ShowEditor on page 34) Connect the DMXPlayBack to your computer, a power supply and the DMX512 control network. (see Connecting the DMXPlayBack MK2 on page 34) Capture and edit the lighting scenes from your presentation. (see Capturing a Scene on page 11) Build a show from the scenes. (see Creating a Show on page 15) Download the show to the DMXPlayBack (see Loading Shows into the DMXPlayBack on page 19) Configure the triggering options on the DMXPlayBack (see Show Replay Options on page 38) Trigger your show. (see Starting a Show on page 22) Watch it run. (see Monitoring Show playback on page 23) DMXPlayBack MK2 User Manual 10 Capturing a Scene The data appearing at the DMX In port may be captured and saved by opening the Scene DataBase window and clicking on the Capture DMX Input button. The text on the button will flash momentarily whilst the DMX512 snapshot is being processed. The message "DMX captured" will be displayed in the status window near the top of the screen and the DMX Output window will display the levels in the captured Scene. The Scene will also be transmitted from the DMX Out port on the DMXPlayBack. Scenes can also be created directly in ShowEditor without the need for an external lighting controller. (See Creating a new Scene on page 25) Storing a Scene The Store Scene button writes the Scene currently displayed in the DMX Output window, to the Scenes database. Each Scene is assigned a sequential number by ShowEditor as it is created. DMXPlayBack MK2 User Manual 11 The name assigned to the Scene is the text currently in the Name box. If that name has already been used, a prompt will appear asking if you want to overwrite the current Scene with that name. By selecting YES the contents of the DMX Output window will replace the existing Scene of that name. Selecting NO will create a new scene with a different number, but the same name. Although a Scene name may contain up to 48 characters, only the first 16 characters are displayed in the LCD status window of the DMXPlayBack. Renaming a Scene To rename a Scene, right-click on the Scene name in the Scene DataBase list and enter the new name into the text box. Modifying an existing Scene Select the Scene to edit from the Scene DataBase list. The contents of the Scene will be displayed in the DMX Output window and transmitted from the DMX Out port on the DMXPlayBack. This enables live scene editing. Modify the channel levels of the Scene (see below). Select Store Scene, then YES when prompted for permission to overwrite the existing scene. The modified version of the Scene will automatically replace all instances of that Scene in the current Show. Modifying channel levels The level of any DMX channel can be changed at any time by doubleclicking on the current level in the DMX Output window. When the Fader window appears, the level may be set by either moving the slider to the required level or entering a new decimal DMX level (0255) into the Level box. DMXPlayBack MK2 User Manual 12 As the level setting in the Fader window is retained between appearances, several channels can be set to the same level, by doubleclicking on each channel in turn, then clicking on the level slider to move the channel to the indicated level. Note: Although changed levels are both displayed in the DMX Output window and transmitted from the DMXPlayBack, they are not actually stored in the Scenes database or the Show unless the Store Scene button has been pressed. Saving the Scene list To retain the Scene list for later use, select Scene then Save Scene Database from the top level ShowEditor menu. The default location for the Scene database file is the folder containing the ShowEditor program, but it can be any valid folder, including a network file server or a removable storage device such as a flash memory device or a portable media player. DMXPlayBack MK2 User Manual 13 The name of the file can be any valid Windows file name ending in ".db", but at start-up ShowEditor automatically attempts to load the file "scene.db" from the ShowEditor folder. Loading a Scene list To use an existing Scenes list, select Scene then Open Scene Database from the top level ShowEditor menu. The default location for the Scene database file is the folder containing the ShowEditor program, but it can be any valid folder, including a network file server or a removable storage device such as a flash memory device or a portable media player. When it is launched, ShowEditor automatically attempts to load the file "scene.db" from the ShowEditor folder. Creating a new Scene list To create a new, blank Scene list, select Scene then Open Scene Database from the top level ShowEditor menu. When prompted for the name of the Scene database to open, enter a name not previously used. A new empty database will be created, as will a database file in which to store it. DMXPlayBack MK2 User Manual 14 Creating a Show A DMXPlayBack Show is a sequence of Scenes separated by Delay times. The transition between successive Scenes is a timed Fade. To create a new blank Show, select Show then New Show from the top level ShowEditor menu. The Show window will be opened and a Show ID number will be allocated automatically by ShowEditor. A name for the Show (up to 10 characters in length) may be entered into the Name box. This will be used as the default Show file name and will be displayed in the LCD status window of the DMXPlayBack. DMXPlayBack MK2 User Manual 15 Adding Scenes to a Show Scenes are added to a Show by clicking on them in the Scene DataBase window, then dragging them into the Show window and dropping them on the required point in the Show sequence. The levels in the Scene will be shown in the DMX Output window and transmitted by the DMXPlayBack. Any Scene may be added to a Show any number of times. A Show may contain up to 65,535 Scenes. Setting Fade and Delay times Delay and Fade times are set by selecting a Scene in the Show window, then entering the required times into the Fade In and Delay boxes. Times may be any duration from 0 seconds to 6000 seconds (100 minutes) in steps of 0.1 seconds. Longer Delay (or Fade) times can be achieved through repetitions of a Scene. Show Options The Show Options window defines how the DMXPlayBack handles replaying a Show. Show run times The number entered in the Show run times box sets the number of times the Show will be repeated each time it is triggered. The value entered may be any number between zero and 255. An entry of zero will cause the show to repeat continuously. DMXPlayBack MK2 User Manual 16 DMX Channels Used ShowEditor stores DMX values only for channels between 1 and the number entered into the DMX Channels Used in Show box. It is strongly recommended to set this value to the maximum of 512. If the Auto box is ticked, ShowEditor will store either: All 512 DMX values if the Capture DMX Input function is used, or Only DMX values for the channel range covered in the current system Patch. To conserve memory in DMXPlayBack, Channels Used in Show value may be set to the highest DMX channel number allocated in a system. Entering an incorrect value may result in some DMX values not being stored. The number selected has no effect on the number of DMX slots generated by the DMXPlayBack, as it always outputs a full packet of 512 slots. Compressing the Show To reduce the amount of memory required to store a Show in the DMXPlayBack, the data can be compressed using a process similar to the one used in GIF and TIFF images. It is beneficial in almost all circumstances to enable Show compression by ticking the Compress box. Note: If the J (jump scene) or L (load scene) serial commands are being used for RS232 control in a custom installation, compression should be disabled. Memory Usage The Memory Usage window shows how much memory in the DMXPlayBack is occupied by the Shows currently loaded. DMXPlayBack MK2 User Manual 17 Selecting Update interrogates the DMXPlayBack to check the current level of memory usage. Saving the Show To retain the Show for later use, select Show then Save Show from the top level ShowEditor menu. The default location for the Show file is the folder containing the ShowEditor program, but it can be any valid folder, including a network file server or a removable storage device such as a flash memory device or a portable media player. The name of the file can be any valid Windows file name ending in ".shw", but at start-up ShowEditor automatically attempts to load the file "show.shw" from the ShowEditor folder. Loading a Show into ShowEditor To use an existing Show, select Scene then Open Show from the top level ShowEditor menu. The default location for the Show file is the folder containing the ShowEditor program (normally C:\Program Files\ShowEditor MK2\), but it can be any valid folder, including a network file server or a removable storage device such as a flash memory device or a portable media player. When it is launched, ShowEditor automatically attempts to load the file "show.shw" from the ShowEditor folder. DMXPlayBack MK2 User Manual 18 Loading Shows into the DMXPlayBack Loading the current Show The DMXPlayBack has storage slots for up to 12 Shows. To load the current Show, select the Download Show button in the main ShowEditor window or Show then Download Show from the top level menu. After downloading the current status from the DMXPlayBack (this may take up to one minute), the Download window will open. A list of the currently loaded Shows is displayed, together with a row of 12 slot allocation buttons. (Slots in use have a red button.) Selecting one of these buttons allocates the memory slot into which the current Show will be loaded. The colour of the selected slot allocation button changes to yellow, and if the slot is already in use, a confirmation window will open. Selecting Yes allows the existing Show in that slot to be overwritten. DMXPlayBack MK2 User Manual 19 After selecting the OK button, the current Show is then downloaded into DMXPlayBack. The status of the transfer is indicated by a progress bar that will appear in the bottom of the Status window. On the DMXPlayBack, the LCD status screen will display the number of Shows stored in its memory. Loading multiple shows To load up to 12 Shows simultaneously, select Show then Download Multiple Shows from the top level ShowEditor menu. In the Download window, Shows are allocated to slots by selecting the slot number, then double-clicking on it to bring up a the Show file selection window. The default location for selecting Show files is the folder containing the ShowEditor program (normally C:\Program Files\ShowEditor MK2\), but it can be any valid folder, including a network file server or a removable storage device such as a flash memory device or a portable media player. All slot allocations may be cleared at once with the Clear button. Individual slot allocations may be cleared with the Del key or modified by double-clicking on the slot number and selecting a different Show file. After selecting the OK button, the selected Show files are successively DMXPlayBack MK2 User Manual 20 downloaded into DMXPlayBack. The status of each Show transfer is indicated by a progress bar that will appear in the bottom of the Status window. On the DMXPlayBack, the LCD status window will display the number of Shows stored in its memory. Erasing All Shows from the DMXPlayBack To erase all Shows from the DMXPlayBack, select Show then Erase DMXPlayBack from the top level ShowEditor menu. When erasure is complete, the LCD status window on the DMXPlayBack will display: Memory empty DMXPlayBack MK2 User Manual 21 Starting a Show Starting a Show from ShowEditor Select the slot number of the required Show from the drop-down list in the ShowEditor main window, then select the Start Show button from either the main window or the Show option in the main menu. Starting a Show on DMXPlayBack Power Up If a Power Up Show has been configured, the DMXPlayBack will start the show immediately after being powered up. (See Power up Show on page 39). Starting a Show on Switch Closure If a Switch Close Show has been configured, the DMXPlayBack will start that show whenever the switch function is triggered by making an electrical connection between Pin4 (Switch) and Pin1 (Ground) of the DMX In connector on the rear of the DMXPlayBack. (See Switch Close Show on page 39). Starting a Show with the DMXPlayBackRemote Using Enttec's DMXPlayBackRemote unit, Shows loaded in a DMXPlayBack may be triggered by: Pressing a button combination on the front panel (all 12 Shows) Pressing a button combination on an infrared remote control (all DMXPlayBack MK2 User Manual 22 12 Shows) Closing a switch between terminals on the remote triggering connector (Shows 1-6 only) Visit the Enttec website www.enttec.com or contact your Enttec dealer for more information about the DMXPlayBackRemote. Starting a Show via RS232 commands Every function on the DMXPlayBack, including starting and stopping Shows, capturing Scene snapshots and loading Show files, can be controlled via the RS232 serial port. The complete RS232 protocol definition document is available from the Download section of the Enttec website at www.enttec.com. Monitoring Show playback The LCD status screen on the DMXPlayBack displays full details of the Show currently being played. ABBAonIce Fde: 11.5s 75% The top line of the window displays the name of the Show, alternating every two seconds with the name of the current Scene. House + Stage Pr Fde: 11.5s 91% During a Fade, the bottom line displays "Fde", the Fade Time in seconds and the progress of the fade as a percentage. DMXPlayBack MK2 User Manual 23 House + Stage Pr Dly:120.0s 18% During a Delay the bottom line displays "Dly", the Delay Time in seconds and the progress of the delay as a percentage. Stopping a Show Stopping a Show from ShowEditor To stop the running Show select the Stop Show button from either the main window or the Show option in the main menu. Stopping a Show via RS232 commands Every function on the DMXPlayBack, including starting and stopping Shows, capturing Scene snapshots and loading Show files, can be controlled via the RS232 serial port. (See Appendix 1 - RS232 Commands on page 46) The complete RS232 protocol definition document is available from the Download section of the Enttec website at www.enttec.com. DMXPlayBack MK2 User Manual 24 Creating a new Scene with ShowEditor A new Scene can be created by directly setting levels in the DMX Output window (see Modifying an existing Scene on page 12 ) or by defining a system Patch from the Patch window then building the Scene with the ICBF Inspector. Defining the Patch The Patch window displays the current list of DMX slots assigned to Fixtures in ShowEditor. DMXPlayBack MK2 User Manual 25 In ShowEditor a Fixture can be either a multi-channel luminaire or effects device, or it can be a single dimmer channel. A 12 channel dimmer rack should be treated as 12 separate single-channel Fixtures. Fixtures are added to the Patch using the Add button which opens the Fixture Library window to allow selection of Fixtures from ShowEditor's library. Unless the DMX Address box is changed manually, each new Fixture is automatically added to the Patch list, immediately after the last slot allocated to the previous Fixture. Multiple fixtures can be added by repeatedly selecting the Add to Patch button. The Patch can be cleared completely by selecting Patch, then New from the main ShowEditor menu. Additional Fixtures are regularly added to the library, which can be updated using the Update Software options available under Setup in the main ShowEditor menu. Should you need to build a custom fixture library, instructions are available from the support knowledgebase on the Enttec website. DMXPlayBack MK2 User Manual 26 Saving the Patch To retain the Patch for later use, select Patch then Save from the top level ShowEditor menu. The default location for the Patch file is the folder containing the ShowEditor program (normally C:\Program Files\ShowEditor MK2\), but it can be any valid folder, including a network file server or a removable storage device such as a flash memory device or a portable media player. The name of the file can be any valid Windows file name ending in ".ini". At start-up ShowEditor attempts to load the default patch file "patch.ini" from the ShowEditor folder. Loading a Patch into ShowEditor To use an existing patch, select Patch then Load from the top level ShowEditor menu. The default location for the Patch file is the folder containing the ShowEditor program (normally C:\Program Files\ShowEditor MK2\), but it can be any valid folder, including a network file server or a removable storage device such as a flash memory device or a portable media player. Building a Scene using the ICBF Inspector The ICBF Inspector enables the setting of Intensity, Colour, Beam and Focus attributes of a fixture, although not every fixture has attributes in all categories. Fixture selection The ICBF Inspector controls the attributes of all currently selected Fixtures. Fixtures may be selected either singly or in groups. All Fixtures are selected by clicking on the All button. All Fixtures are de-selected by clicking on the None button. When the Invert button is clicked, all Fixtures currently selected are de-selected, while all previously de-selected Fixtures become selected. DMXPlayBack MK2 User Manual 27 Multiple Fixtures are selected by holding down a "Ctrl" key while clicking on Fixtures with the left mouse button. A continuous range of Fixtures is selected by left-clicking on the Fixture at one end of the range, then holding down a "Shift" key while left-clicking on the Fixture at the other end of the range. A selection of fixtures can be retained for later use by defining them as a Group using the Save button in the Groups panel. All members of a Group are selected by selecting the Group name. Intensity attributes A drop-down list of Intensity attributes for the current Fixture is available at the top of the window. These may include such parameters as intensity (dimming), lamp strike or device On and device Off. DMXPlayBack MK2 User Manual 28 Parameters appear either as a list of available options, or as a slider for adjusting continuously variable attributes. Colour attributes A drop-down list of Colour attributes for the current Fixture is at the top of the window. These may include such parameters as colour selection lists, colour wheel positions, wheel rotation speeds and colour mixing intensities. Parameters appear either as a list of available options, or as a slider for adjusting continuously variable attributes. DMXPlayBack MK2 User Manual 29 Beam attributes A drop-down list of Beam attributes for the current Fixture is at the top of the window. These may include such parameters as, zoom settings, beam focus, gobo selection lists, strobe functions and rates, gobo rotation speeds and prism selection and rotation speed. Parameters appear either as a list of available options, or as a slider for adjusting continuously variable attributes. DMXPlayBack MK2 User Manual 30 Focus attributes If the current Fixture has pan and tilt capabilities, the Pan Tilt Control window will appear. Adjustments are made by controlling the position of the white cursor dot in the target window. Control of the cursor is taken by a single left-click on the white dot. The cursor will then track the mouse on the control screen, until control is relinquished with a further single left-click. The Fine box in the ICBF Inspector window selects between coarse and fine adjustment modes. DMXPlayBack MK2 User Manual 31 Storing a Scene The Store Scene button in the Scene Database window writes the Scene currently displayed in the DMX Output window, to the Scenes database. Each Scene is assigned a sequential number by ShowEditor as it is created. The name assigned to the Scene is the text currently in the Name box. If that name has already been used, a prompt will appear asking if you want to overwrite the current Scene with that name. By selecting YES the contents of the DMX Output window will replace the existing Scene of that name. Selecting NO will create a new scene with a different number, but the same name. Although a Scene name may contain up to 48 characters, only the first 16 characters are displayed in the LCD status window of the DMXPlayBack. Renaming a Scene To rename a Scene, right-click on the Scene name in the Scene DataBase list and enter the new name into the text box. Modifying an existing Scene Select the Scene to edit from the Scene DataBase list. The contents of the Scene will be displayed in the DMX Output window and transmitted from the DMX Out port on the DMXPlayBack. This enables live scene editing. Modify the channel levels of the Scene. Select Store Scene, then YES when prompted for permission to overwrite the existing scene. The modified version of the Scene will automatically replace all instances of that Scene in the current Show. DMXPlayBack MK2 User Manual 32 Saving the Scene list To retain the Scene list for later use, select Scene then Save Scene Database from the top level ShowEditor menu. The default location for the Scene database file is the folder containing the ShowEditor program, but it can be any valid folder, including a network file server or a removable storage device such as a flash memory device or a portable media player. The name of the file can be any valid Windows file name ending in ".db", but at start-up ShowEditor automatically attempts to load the file "scene.db" from the ShowEditor folder. Loading a Scene list To use an existing Scenes list, select Scene then Open Scene Database from the top level ShowEditor menu. The default location for the Scene database file is the folder containing the ShowEditor program, but it can be any valid folder, including a network file server or a removable storage device such as a flash memory device or a portable media player. When it is launched, ShowEditor automatically attempts to load the file "scene.db" from the ShowEditor folder. Creating a new Scene list To create a new, blank Scene list, select Scene then Open Scene Database from the top level ShowEditor menu. When prompted for the name of the Scene database to open, enter a name not previously used. A new empty database will be created, as will a database file in which to store it. DMXPlayBack MK2 User Manual 33 Installing ShowEditor and DMXPlayBack Installing ShowEditor To install ShowEditor for Windows™, double-click on the supplied installer file and accept the default program folder "C:\Program Files\ShowEditor MK2" or enter the location of your preferred folder. A ShowEditor folder will now be found in the Programs list available from the Windows Start button. In that folder there will now be a ShowEditor icon. By right-clicking on this icon and selecting Send to, then Desktop, a shortcut for ShowEditor will be created on your Windows desktop. It is preferable to have the DMXPlayBack linked to the computer before launching ShowEditor. Connecting the DMXPlayBack MK2 Power supply The DMXPlayBack requires a low voltage supply (nominally 9V DC) from the included power pack unit. This should be plugged in to an appropriate mains outlet and the Power Supply socket on the back of the DMXPlayBack. The DMXPlayBack must be connected to the power supply and switched on before attempting to establish DMX512 or Serial Data links. RS232 The DMXPlayBack is controlled and configured through an RS232 serial link to a computer running the ShowEditor software. DMXPlayBack MK2 User Manual 34 The supplied serial data cable can be used to connect the RS232 socket on the DMXPlayBack to the serial port on the ShowEditor computer. It is advisable to keep a record of which serial port has been used. If there are no serial ports on the ShowEditor computer, it is possible to use a USB to RS232 adaptor to make the connection. Most varieties of adaptor work reliably, most of the time. Those based on FTDI's USB chip have proven to be the most stable. Be sure to install the adaptor and its driver software exactly as described in the product documentation. Due to the wide variety of USB to RS232 adaptors available, Enttec are unable to offer technical support for these devices when used with DMXPlayBack MK2. DMX Out The DMX Out socket is connected to the network of DMX512 devices that are to be controlled by the DMXPlayBack MK2. It is not necessary to have any connection to the DMX Out socket while programming the DMXPlayBack. DMX In The DMX In socket is connected to the DMX512 controller whose output is to be captured by the DMXPlayBack. It is not necessary to have any connection to the DMX In socket while playing back Shows from the DMXPlayBack. Powering up the DMXPlayBack MK2 When the DMXPlayBack is switched on, the backlight on the LCD status display illuminates, and after a short pause for an internal system test, the Startup Frame will be output, and the LCD window will briefly display a message similar to: DMXPlayBack MK2 User Manual 35 DMXPlayBack DPMK2 V0.7 MK2 The version number VX.X indicates the version of firmware (internal operating software) installed in the DMXPlayBack unit. If nothing is configured to run at Startup, the number of Shows currently stored in DMXPlayBack's memory will be displayed. 0 shows in mem If there is a Show in memory configured to run at Startup, the display will then display the name of the running Show. (See Monitoring Show playback on page 23) Connecting ShowEditor to a DMXPlayBack When ShowEditor is launched, it attempts to contact a DMXPlayBack over the selected RS232 serial link. The first time ShowEditor is run, it tries to connect via COM 1 (communications port No. 1). If it succeeds, the On Line button will be selected and the status window will display information about the version of firmware installed in the DMXPlayBack. If ShowEditor is unable to connect to a DMXPlayBack the On Line button will not be selected and an error message will be displayed in the status window. To configure communications between ShowEditor and the DMXPlayBack, select Setup from the main program menu. In the Setup window, select which Serial Port is connected to the DMXPlayBack MK2 User Manual 36 DMXPlayBack and what data rate (in Baud) should be used. While a higher data rate will make uploads and downloads faster, the default speed of 9600 Baud is the most reliable. If communications at higher speeds become intermittent, it is advisable to reduce the baud rate to 9600 Baud, and switch the DMXPlayBack off, then on again, to re-synchronize the link. Testing the RS232 link To confirm that there is a working data link to the DMXPlayBack, click on the Read Firmware Version button. If text appears in the Firmware Version window, then the link is working and programming can now proceed. If any other message appears: Check that the DMXPlayBack is switched on and running. Confirm that the RS232 cable is connected at each end. Check that the correct Serial Port has been selected. If a high data speed has been selected, try a lower Baud rate. Switch the DMXPlayBack off, then switch it on again, to give the devices an opportunity to re-synchronize the link. DMXPlayBack MK2 User Manual 37 Setting up DMXPlayBack DMX Startup frame On Startup the DMXPlayBack continuously outputs a specific Startup Scene, unless it is configured to automatically run a Show. To set the Startup Scene: Select the required Scene from either the Show or Scene Database window for display in the DMX Output window. Modify the Scene, if necessary, by selecting the channels in the DMX Output window to set new levels. Select DMXPlayBack MK2 then Set Startup frame, from the main ShowEditor menu. The current contents of the DMX Output window are copied to the Startup frame of the DMXPlayBack. The status of the transfer is indicated by a progress bar that will appear in the bottom of the Status window. Show Replay Options DMXPlayBack can be configured to play a specific Show automatically whenever it is powered up. It can also be set up to play back a specific Show every time an external switch is closed. DMXPlayBack MK2 User Manual 38 Power up Show To set the Show file that will be played whenever the DMXPlayBack is switched on: Select DMXPlayBack MK2 then Options, from the main menu. In the Power up Show box, select the number of the Show to be played or NIL if this function is not required. Click on the Change button to send the new setting to the DMXPlayBack. Switch Close Show To set the Show file that will be played whenever the external switch function is triggered: Select DMXPlayBack MK2 then Options, from the main menu. In the Switch close Show box, select the number of the Show to be played or NIL if this function is not required. Click on the Change button to send the new setting to the DMXPlayBack. Note: The switch function is triggered by making an electrical connection between Pin4 (Switch) and Pin1 (Ground) of the DMX In connector on the rear of the DMXPlayBack. Updating the Firmware in the DMXPlayBack MK2 From time to time new versions of the firmware (internal operating software) for the DMXPlayBack MK2 may become available, to add features or fix an operational problem that has been discovered. Updates are made available from the Downloads section of the Enttec website at www.enttec.com. DMXPlayBack MK2 User Manual 39 After checking that the firmware available from the Enttec website has a higher version number than that currently installed in the DMXPlayBack MK2 (see Testing the RS232 link on page 37), download it and extract the file main.rom from the Zip archive. To install the update: Select DMXPlayBack MK2 then Update Firmware, from the main menu. Enter the file path and file name for the update file in the File Name box, or locate the file using the Browse button. Select the Update button to load the file into the DMXPlayBack. The status of the update is indicated by a progress bar that will appear in the bottom of the Status window. The DMXPlayBack should be switched off, then re-started, before further use. Failed Firmware Update In the unlikely event that the DMXPlayBack does not run when restarted after a firmware update, it is necessary to force the unit into its Boot mode, then repeat the update process. This requires sending a stream of the character "Y" to the RS-232 port on the DMXPlayBack using HyperTerminal, Windows' built-in serial communications program. Launch HyperTerminal from Start/ Programs/ Accessories/ Communications/ HyperTerminal. DMXPlayBack MK2 User Manual 40 If this is the first time that HyperTerminal has been run you will prompted to enter your country name and city code. As this information is not required for connection to the DMXPlayBack, select the OK button to proceed. When prompted for your dialling location, once again select the OK button to proceed, as this information is not required. DMXPlayBack MK2 User Manual 41 To retain the connection configuration for possible re-use, enter an easily identifiable name for the connection. Select the name of the communications port where the DMXPlayBack is connected on your computer. DMXPlayBack MK2 User Manual 42 Communications properties should be set to 57,600 bits per second, with 8 data bits, no parity bit and 1 stop bit. Flow control should be set to none. Select Apply, then select OK. In the main terminal window, press the Caps Lock key on your keyboard, then hold down the Y key whilst switching on the DMXPlayBack. DMXPlayBack MK2 User Manual 43 The DMXPlayBack comes up in Boot mode and LCD screen displays. DMX Boot V X.X Return to ShowEditor and repeat the procedure described in Updating the Firmware in the DMXPlayBack MK2 on page 39. Self Test The DMXPlayBack has an extensive internal system test routine that can be initiated from ShowEditor. Running the full test set requires a loopback cable, which is just a standard DMX512 XLR 5 pin male to female lead. To start the process: Stop any running Show. Remove any DMX connections. Select DMXPlayBack MK2 then Self Test, from the main menu. The LCD screen will then display DMX Boot V X.X Followed by a series of alternating blocks in changing patterns. © © © © © © © © © © © © © © © © © © © The screen will then prompt for the loopback cable to be connected between the DMX In and DMX Out ports. Insert loopback Once the DMX ports have been tested, the screen then prompts for the DMXPlayBack MK2 User Manual 44 loopback cable to be removed, to allow the test cycle to continue. Remove loopback When the test process has been successfully completed, the screen will read. TEST DONE The DMXPlayBack should be switched off, then re-started, before further use. Should any other screen messages be displayed, please visit the Support area of our website at www.enttec.com and fill out a support request ticket detailing the error message. DMXPlayBack MK2 User Manual 45 Appendix 1 - RS232 Commands RS232 Commands supported by the DMXPlayBack MK2 Command Description Read RAM Command Write RAM Command Version Command DMXBuff Command Fade Command EEProm Command Show Command Reset Command DMX Read Command Jump Scene Command Set Speed Command Load Scene Command (V2.22) Command Letter D W V X F E H Z C J R L Every function on the DMXPlayBack, including starting and stopping Shows, capturing Scene snapshots and loading Show files can be controlled via the RS232 serial port. The complete RS232 protocol definition document is available from the Download section of the Enttec website at www.enttec.com. DMXPlayBack MK2 User Manual 46 Appendix 2 - Connector Pinouts DMX OUT Pin 1 Pin 2 Pin 3 Pin 4 Pin 5 Ground Data Data + NC NC DMX IN Pin 1 Pin 2 Pin 3 Pin 4 Ground Data Data + Switch* Using the remote switch * The switch function is activated by making an electrical connection between Pin 4 (Switch) and Pin 1 (Ground) of the DMX Input. RS232 Pin 2 Pin 3 Pin 5 TX RX Ground DMXPlayBack MK2 User Manual 47 Appendix 3 - FCC Declaration Federal Communications Commission (FCC) Declaration of Conformity Responsible Party: ENTTEC Pty Ltd PO Box 282, Kew, Vic, 3101 Australia declares that the products DMXPlayBack MK2, DMXPlayBackRemote, comply with Part 15 of the FCC Rules. Operation is subject to the following two conditions: (1) This device may not cause harmful interference, and (2) this device must accept any interference received, including interference that may cause undesired operation. This equipment has been tested and found to comply with the limits for a Class B digital device, pursuant to Part 15 of the FCC rules. These limits are designed to provide reasonable protection against harmful interference in a residential installation. This equipment generates, uses and can radiate radio frequency energy and, if not installed and used in accordance with the instructions, may cause harmful interference to radio communications. However, there is no guarantee that interference will not occur in a particular installation. If this equipment does cause harmful interference to radio or television reception, which can be determined by turning the equipment off and on, the user is encouraged to try to correct the interference by one or more of the following measures: - Reorient or relocate the receiving antenna. - Increase the separation between the equipment and the receiver. - Connect the equipment into an outlet on a circuit different from that to which the receiver is connected. DMXPlayBack MK2 User Manual 48 - Consult the dealer or an experienced radio/TV technician for help. * In order to maintain compliance with FCC regulations shielded cables must be used with this equipment. Operation with non-approved equipment or unshielded cables is likely to result in interference to radio and television reception. DMXPlayBack MK2 User Manual 49 Appendix 4 - EEC Declaration We ENTTEC Pty Ltd PO Box 282, Kew, Vic, 3101 Australia declare under our sole responsibility that out product DMXPlayBack MK2 conforms to the requirements of Council Directives 89/336/EEC and 73/23/EEC and therefore complies with the requirements of Council Directive 73/23/EEC, (The Low Voltage Directive) on the harmonisation of the laws of Member States relating to electrical equipment designed for use within certain voltage limits as amended by Article 13 of Council Directive 93/68/EEC • • • EN 55103-1 EN 50103-2 EN 60065/AS 3650 Signed Nicolas Moreau Date: 10/10/2000 Position: Technical Director DMXPlayBack MK2 User Manual 50