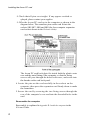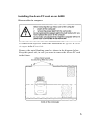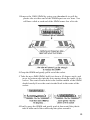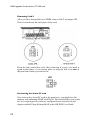
1
Acorn PC Card
User Guide
Acorn PC Card
User Guide
Copyright © Acorn Computers Limited 1993.
Published by Acorn Computers Technical Publications Department.
Neither the whole nor any part of the information contained in, nor the product described
in, this manual may be adapted or reproduced in any material form except with the
prior written approval of Acorn Computers Limited.
The product described in this manual and products for use with it are subject to continuous
development and improvement. All information of a technical nature and particulars of
the product and its use (including the information and particulars in this manual) are
given by Acorn Computers Limited in good faith. However. Acorn Computers Limited
cannot accept any liability for any loss or damage arising from the use of any
information or particulars in this manual.
This product is not intended for use as a critical component in life support devices or
any system in which failure could be expected to result in personal injury.
Acorn supplies its products through an international dealer network. These outlets
are trained in the use and support of Acorn products and are available to help resolve
any queries you may have.
The Acorn PC cards are designed and manufactured by Aleph One Limited on behalf
of Acorn Computers Limited.
ACORN, ARCHIMEDES and ECONET are trademarks of Acorn Computers Limited
MS-DOS and Windows are trademarks of Microsoft Corporation
DR DOS is a trademark of Digital Research
All other trademarks are acknowledged.
Published by Acorn Computers Limited
Part number 0491.203
Issue I May 1993
Acorn PC Card
User Guide
Contents
Page number
Important configuration information
Applicable models
2
Packing List
3
Installing the Acorn PC card
Installing the Acorn PC card on an A3020
Installing the Acorn PC card on an A4000
Checking that the Acorn PC card is correctly installed
3
3
5
7
Installing the software
Copying the Acorn PC card software
Setting up a DOS partition
Installing DR DOS
7
7
8
10
Using your Acorn PC card
Starting the Acorn PC card
Using the Acorn PC card
Closing down the Acorn PC card
Resetting the Acorn PC card
Configuring your Acorn PC card
Using the keyboard with the Acorn PC card
Using the mouse with the Acorn PC card
Using Microsoft Windows with the Acorn PC card
Using the Windows 3.0/3.1 Driver
Using extended/expanded memory from DOS
12
12
13
14
14
14
15
15
16
17
17
Configuring the !PC application
RAM upgrade for the Acorn PC 386 card
18
18
III
Contents
iv
Important configuration information
Both A3020 and A4000 series machines are fitted with two different
types of expansion facility: an Acorn minipodule expansion slot and
an Acorn network interface slot. These slots can consume a total of
1050mA current, and dissipate 650mA of this current as heat
externally and 400mA of this heat internally.
The Acorn specifications state that the following limits apply to
each type of slot:
Minipodule
Network slot
Inside
Outside
100mA
500mA
150mA
300mA
In order to allow hardware card developers more freedom in new
hardware design, Acorn allows cards to draw more current than
their individual ratings, as long as the total for all cards is equal to
or less than the maximum shown
Most combinations of cards will not exceed Acorn specifications,
however, there are certain known combinations that will exceed Acorn
total loading recommendations. These combinations include fitting an
Acorn PC card into a machine already fitted with a network card, or
vice versa
At this time, the restrictions on fitting Acorn PC cards and network
cards into the same machine are:
•
Acorn PC cards with 4MB of memory must NOT be fitted into any
A3020 or A4000 series machine which has any internal
network card fitted.
•
Acorn PC cards with I MB of memory can ONLY be fitted into a
A3020 or A4000 series machine which has an internal network
card fitted that draws LESS than 325mA.
For more information on specific combinations, or in case of doubt,
please consult your supplier of cards, or in the event of an Acorn
supplied product, please contact your Acorn supplying dealer.
1
Applicable models
Applicable models
The Acorn PC card is a mini-expansion card which fits the A3020 and
A4000 series machines. It allows you to run standard DOS applications
on a RISC OS computer.
Please take the time to fill in and return the Owner registration card.
The information this provides is used to improve the quality of our
products and services.
If you are new to using DR DOS or Windows, we recommend that you
buy one of the many books available on the subject, in addition to
the manuals supplied with those products.
Packing List
You should have two boxes containing the following items:
Box 1
•
this User Guide
•
Acorn PC card software disc
•
Acorn PC card Windows Driver (only supplied with the Acorn
PC 486 card)
•
•
Registration card
DR DOS comprising:
•
•
DR DOS User Guide
three floppy discs – Startup, Utilities I and Utilities 2
•
Quick Reference Card
•
•
Optimization and Configuration Tips
Release Notes.
Box 2
•
2
Acorn PC 386 or Acorn PC 486 Card (in anti-static foam)
You should keep the box containing the card in case you need
to return it for any future upgrades.
If any of these items are missing or damaged, please contact your
Acorn Computers authorised dealer immediately.
Installing the Acorn PC card
If you are in any way unhappy about performing this task yourself
then please contact your Acorn dealer for assistance.
Acorn Computers Limited cannot accept any liability for damage
done to the product during installation of internal upgrades, whether
or not carried out in accordance with the instructions in this
document.
Installing the Acorn PC card on an A3020
Disassemble the computer
To remove the top cover and locate the internal expansion card
connector, follow the instructions in Appendix E: Inside the computer in
the Welcome Guide.
Remove the plastic and metal blanking panels shown in the Welcome
Guide. Keep these safe, in case you want to remove the upgrade in
the future.
Fit
the Acorn PC card
I Remove the Acorn PC card from its packaging. Be careful to
avoid touching the pins.
3
Installing the Acorn PC card
2 Check that all pins are straight. If any appear crooked or
splayed, please contact your supplier.
3 Offer the Acorn PC card up to the computer as shown in the
diagram below. The connector pins on the card fit into the
sockets SK5 SK7, SK8 and SK9 (the four computer expansion
card sockets shown in the Welcome Guide).
The Acorn PC card back plate fits inside both the plastic outer
case and the metal lining of the computer, so that the fixing
screws will pass through the holes in the case, and screw into
the threads on the card back panel.
4 Locate the pins on the card carefully in the sockets on the
computer, then press the expansion card firmly down to make
the connection.
5 Secure the card by screwing the two fixing screws through the
rear of the computer's case and into the threaded holes in the
card
Reassemble the computer
Reassembly is explained in Appendix E: Inside the computer in the
Welcome Guide.
4
Installing the Acorn PC card on an A4000
Disassemble the computer
To remove the top cover follow the instructions in Appendix E: Inside
the computer in the Welcome Guide.
Remove the metal blanking panel as shown in the diagram below.
Keep this panel safe, in case you want to remove the Acorn PC card
in the future.
5
Installing the Acorn PC card
Fit the Acorn PC card
I Remove the Acorn PC card from its packaging. Be careful to
avoid touching the pins.
2 Check that all pins are straight. If any appear crooked or
splayed, please contact your supplier.
3 Offer the card up to the computer as shown in the diagram
below. The connector pins on the card fit into the sockets SK5
SK7, SK8 and SK9.
The Acorn PC card back plate fits inside the metal lining of the
computer, so that the fixing screws will pass through the holes
in the case, and screw into the threads on the card back panel.
4 Locate the pins on the card carefully in the sockets, then press
the PC card firmly down to make the connection.
5 Screw the two fixing screws through the rear of the computer's
case and into the threaded holes in the card.
Reassemble the computer
Reassembly is explained in Appendix E: Inside the computer in the
Welcome Guide.
6
Checking that the Acorn PC card is correctly installed
Check that your Acorn PC Card is correctly installed with the
following procedure:
I Switch to the command line by pressing function key F12.
2 Type PODULES at the Supervisor * prompt
3 You should see the message Podule 1: Acorn PC Card
If this message does not appear then try fitting the card again before
consulting your dealer for further instructions.
Installing the software
Before you can use your Acorn PC card you must
•
•
•
copy the Acorn PC card software onto your computer
set up a DOS partition
install DR DOS.
Copying the Acorn PC card software
1 Insert the Acorn PC card software disc into the floppy drive and
click on the floppy disc icon. This displays the contents of the
disc.
2 Make a new directory in your root directory. It is recommended
that you name this directory PC. Copy into it the contents of the PC
software disc.
7
Installing the software
Setting up a DOS partition
You must now set up a DOS partition on your hard disc. This
involves allocating space on the hard disc to make it look like a
blank, unformatted PC hard disc.
Double-click on the !PCConfig application. A configuration window
will appear. This allows you to set up a DOS partition:
There are three settings you can configure in this window. All three
have pre-set defaults.
Start-up to ...
This allows you to specify how the Acorn PC card will behave when
you click on the !PC icon:
8
•
Icon bar– the PC icon will appear on the icon bar.
•
Full-screen – the entire screen will be used. This mode is singletasking only, which means that the PC card will run more quickly,
but you will not have the RISC OS desktop available
Once in this mode, you can return to the RISC OS desktop by
clicking on Menu (the middle mouse button).
•
Window — a window will appear. This mode is multi-tasking,
which means that the PC card will run more slowly, but you will
have the RISC OS desktop available.
Enable VGA mode support
You should enable this option if you have a monitor capable of
displaying VGA screen modes.
Hard disk 0
This allows you to specify the name of the DOS partition and its size
in megabytes.
•
File name
By default adf s : :4 : $ .drive_c is suggested as the name for
the DOS partition.
Note: If you have an existing DOS partition on your machine (e.
g. set up using the PC Emulator) you should drag its icon into this
box or type in its name.
•
Create
If you are setting up a DOS partition for the first time you must
now click on Create. The PCFormat window will appear:
Use the arrows to specify the size of the DOS partition you wish
to create. As a guide you should specify at least 20MB if you
want to run Windows.
9
Installing the software
Note: Although the Acorn PC card can support partition files up
to 512 MB, in practice the largest size you can specify is 32MB (
any larger size than this will prevent you copying AMOUSE.COM
into the partition under RISC OS).
When you have specified the size of the partition you want, click
on Create. The DOS partition file will be created and the PC
Format window will close.
If you want to create a second partition file, scroll to the bottom of
the configuration window and fill in Hard disk I as appropriate.
Saving the configuration
When you have finished specifying the options in the configuration
window, scroll to the bottom of the window and click on OK:
The settings you specified will then be saved into a configuration
file (inside the PC card application itself).
Installing DR DOS
Once you have created a DOS partition you can then install
DR DOS:
I Put the DR DOS Startup disc into the floppy drive.
2 Double-click on !PC Card. You should then see its icon appear
on the icon bar.
3 Click on the PC card icon on the icon bar. A window will appear
and DR DOS will be booted up from the floppy disc. When this
is completed the DR DOS INSTALL program will be displayed
10
4 Follow the guidelines for installing DR DOS in the section
entitled How to install DR DOS in the DR DOS User Guide.
Note:
A set of reasonable defaults for installing DR DOS have been
provided so that you can press Return (or Enter) for all of the
questions in the Install program. Before you do this you must
read the following three points:
•
When you reach the relevant part of the install procedure you
will be asked to specify the keyboard setting. Leave the
keyboard setting as per the default:
Country: United Kingdom
(044)
Keyboard: United States English (US)
this ensures that the keyboard gives the correct symbols —
see the section entitled Using the keyboard with the Acorn PC
card on page 15 for more details.
•
About halfway through the Install procedure you will be
asked the following:
YES - Save old Operating System
NO - do not save old Operating System
By default the YES option is enabled, but this is only correct if
you have previously installed DOS (e.g. using the PC
Emulator). If you are installing DOS for the first time you
must choose the No option and then press Return (or Enter).
•
Towards the end of the Install procedure you will be asked to
insert the two Utilities discs supplied with your Acorn PC
card — have these discs ready.
11
Using your Acorn PC card
Using your Acorn PC card
Starting the Acorn PC card
Make sure there are no floppies in the disc drive. Click on the PC
card icon or choose Single Task from its icon bar menu to start up
the PC card. You will see the Acorn PC card start-up message followed
by a memory test on the card. This is followed by the message Boot
ing from ... and the floppy disc light will be illuminated briefly even
if you are booting from a hard disc:
If your DOS hard disc partition is not bootable or you have inserted
a non-system DOS disc an error message to this effect will appear.
Insert a system disc or change your Config file and try again. Once
DOS has started up you will see the DOS prompt as usual – your Acorn
PC card is now ready for use.
Tidying up
Once you have installed DR DOS you must delete two files that are
not relevant, and one file that requires replacing:
I
Go to the DRDOS directory by typing CD DRDOS
Delete the following files:
DEL GETFILE.EXE
DEL PUTFILE.EXE
DEL AMOUSE.COM
12
2
Using the Acorn PC card
The Acorn PC card can be configured to operate in either single- or
multi-tasking modes.
•
In single-tasking mode the full speed of the PC is available but
the RISC OS Desktop is suspended whilst using the PC.
•
In multi-tasking mode the PC runs in a window whilst other RISC
OS applications are also running; this means the PC must share the
Archimedes and consequently runs more slowly, but extra
features are available. See the section entitled Configuring the !PC
application on page 18 for more information.
When running in a window the PC must be selected (as indicated by
its title bar turning yellow) before it can be used. Click once on the
window to select it. When the window is already selected a double
click will cause the PC to switch to single-tasking mode; you may
return to the Desktop by pressing Menu (the middle mouse button).
If you close the window whilst the PC is in multi-tasking mode you
can restore the window by either clicking Select on the PC card icon
on the icon bar or choosing Single Task from the icon bar menu.
Saving and printing the screen
Multi-tasking mode provides a menu within the window (selected by
pressing Menu) which allows the screen to be saved in sprite (i.e. !Paint)
and text (i.e. !Edit) formats. Note that some PC applications use textonly or graphics-only display modes which will prevent data saving in
one or other format; in this case the menu options will be grey and
cannot be selected. You must use this menu to grab screens; the Print
key will not work.
Acorn PC card sound output
The standard PC beep is passed over to the Archimedes in software
so that error beeps are heard on the speaker.
13
Using your Acorn PC card
Closing down the Acorn PC card
Make sure that you have saved any PC files you are working on before
quitting. If you are running Windows you should close the Program
Manager window before quitting the PC card application. It is
important to exit Windows completely before quitting (by
quitting any programs open and then quitting Windows).
•
To exit from the PC press Menu. This suspends the PC and returns
control to RISC OS. A single click on the PC icon returns to the
PC display again.
•
To quit the PC application completely choose Quit from the
icon bar menu.
Resetting the Acorn PC card
Reset the Acorn PC card using the key combination Ctrl+Alt+Del
This is particularly important if you have altered your CONFIG.SYS or
AUTOEXEC.BAT files and wish the alterations to come into effect.
Configuring your Acorn PC card
When the PC starts up two important files affect its configuration.
These are CONFIG.SYS and AUTOEXEC.BAT. These must be in the
root directory for DOS to be able to work.
CONFIG.SYS sets up the DOS operating system, by defining the data
structures which determine how many files can be open, what languages
can be displayed, and what device drivers are installed to access
memory, CD-ROMs, etc. It is consulted by DOS when the system (in
this case the Acorn PC card) starts up.
AUTOEXEC.BAT is a standard batch file (see your DR DOS User
Guide) which contains executable DOS commands. It is read by the
system after CONFIG.SYS, once DOS is running. It is here that any
standard programs which you always want to be run are started (e.g.
mouse drivers, disk recovery utilities). Environment variables are
also specified here.
14
Using the keyboard with the Acorn PC card
To get the keyboard to give the correct symbols it must be configured as
a United States keyboard, not as a UK/English keyboard. In practice
almost all software that needs to know (DOS, Windows) will assume a
US keyboard by default, so usually there is nothing specific that must be
done. This means that neither your AUTOEXEC.BAT nor your CONFIG.
SYS file needs a KEYB command/device.
Using the mouse with the Acorn PC card
In order to use the Archimedes mouse with the Acorn PC card you
will need an appropriate mouse driver. The mouse is emulated as a
bus mouse so any driver must understand this option, and you
should specify this sort of mouse if asked by applications.
AMOUSE/COM is a basic DOS driver supplied on the installation disc.
MOUSE.COM supplied with Windows is more comprehensive but
uses more memory.
Note: If you are asked by PC application software what sort of
mouse your system uses, you should specify a BUS mouse.
The interrupt used by the mouse is specified in the Config file; do not
change this from its default setting of 3 unless you have device conflict.
If it is installed on your system you must remove the PC Emulator's
mouse driver AMOUSE to guarantee that the DOS mouse driver will
work — see the section entitled Tidying up on page 12.
To use the AMOUSE/COM driver supplied with the Acorn PC card:
1 If you have been using the AMOUSE.COM supplied with the PC
Emulator you should delete or rename it.
2 Leave DOS, go into RISC OS, and copy the file AMOUSE/COM
supplied on the Acorn PC card software disc into the DR DOS
directory in your DOS partition. Its name will become
AMOUSE.COM.
3 Invoke the mouse driver by typing AMOUSE at the DOS prompt.
You may wish to include this command in your AUTOEXEC.BAT
file.
15
Using your Acorn PC card
Using Microsoft Windows with the Acorn PC card
In order to use the Acorn PC card with Windows 3.1 you must:
1 Select Custom Setup in the Windows Setup window. The
window will then change to allow you to set various options:
2 Go to the Display option and select VGA (Version 3.0) for the
display driver.
We recommend that you also select the following options:
Mouse:
Microsoft, or IBM PS/2
Keyboard: Enhanced 101 or 102 key US and Non US keyboards
Your final set of selections should then appear as follows:
After making these selections you can proceed with the installation.
16
Windows may be used with the Acorn PC card in any of its modes
supported by your hardware combination. Note that only Acorn PC
cards with 4MB RAM can run Windows in Enhanced Mode. No special
setup is required to run Windows 3.0 — simply follow the Windows
installation procedure (you will need to have about 4MB of disc
space free).
It is possible to run DOS applications in DOS boxes within
Windows, using the Acorn PC Card, although this is not
recommended. If you do pursue this option, set the execution
options in the PIF file to exclusive, and not background, if you
encounter any problems.
Using the Windows 3.0/3.1 Driver
The Windows Driver (to accelerate Windows on the Acorn PC card)
is supplied as part of the 486PC package and is optional with the 386
package. If you have the Windows Driver you will need to spend a
few minutes copying the files and altering the Windows setup.
To install the enhanced Windows driver:
1 Copy the file ARMVGA.DRV from your Acorn PC card Windows
Driver disc into your \WINDOWS\SYSTEM directory.
2
3
Edit the file \WINDOWS\SYSTEM.INI (using a text editor such as
Edit) as follows. Change the line that reads
display . drv=vga dry
to read
display . drv=armvga dry
Now save the file again. The new driver will be loaded the next
time you restart Windows, and a different hourglass shape is
used to indicate its presence.
After installing Windows and before rebooting your PC card you may
need to alter your CONFIG.SYS and AUTOEXEC.BAT files. Refer to
the appendix on installing windows in the DR DOS User Guide.
Using extended/expanded memory from DOS
To understand how to maximise the memory available to your
applications you should see the chapter entitled Using MemoryMAX
in the DR DOS User Guide.
17
Configuring the !PC application
Configuring the !PC application
You can customise your system by editing a configuration file. This
file contains a series of one-line options that allow you to modify
the way your system behaves. For a full description of all the commands
available in this file see the section entitled
Config.sys commands in the DR DOS User Guide.
RAM upgrade for the Acorn PC 386 card
Recommended SIMM Modules
The Acorn PC card has been designed to accommodate commodity
SIMMs and use 4MB Modules (organised as I MB x 32). These must
have an access time of 70ns or faster. The Acorn PC card does not
require parity memory and therefore X32 types are suitable. The user
may install X36 parts if they choose as these are more frequently
stocked by dealers. Recommended parts are:
IM x 32
Hitachi HB56D132BR-7A ( HB56DI36BR-7A parity part)
Other manufacturers SIMM's meeting this description may also be
used.
Upgrading to 4MB
If you purchased your Acorn PC 386 card with I MB RAM you may
wish later to upgrade it to 4MB RAM. This upgrade must be performed
in a static-free environment and involves some skill – ask your dealer to
do this for you if you have never done it before. If you perform the
upgrade yourself you must do the following:
I Upgrade the card to 4MB
2 Remove Link 2
3 Re-start the Acorn PC card
There will be some instructions accompanying your RAM upgrade
kit on how to perform the upgrade, however, the following description
may help clarify how to fit the new SIMM into the PC card (the
physical appearance of the SIMM itself may differ depending on the
supplier).
18
1 Remove the I MB SIMM by using your thumbnails to pull the
plastic tabs at either end of the SIMM apart one at a time. You
will hear a click as each end of the SIMM comes free of its tab:
2 Grasp the SIMM and gently pull it out of the socket.
3 Take the new 4MB SIMM, hold it at about a 45-degree angle, and
press its bottom edge into the slot running down the centre of the
socket. The semi-circular hole in the bottom middle of the SIMM
should exactly fit over the semi-circular block in the centre of the
socket:
4 Finally grasp the SIMM and gently push it down until the plastic
tabs at either end of the socket snap into place around it.
19
RAM upgrade for the Acorn PC 386 card
Removing Link 2
After you have inserted the new SIMM, remove link 2 on jumper JP6.
This is located near the back plate of the card:
Keep the link somewhere safe after removing it in case you need it
again in the future. A convenient place to keep the link is on one of
the pins from which you removed it:
Re-starting the Acorn PC card
Now start up the Acorn PC card in the usual way; you should see the
memory test indicating 4096K total RAM. The extra RAM is now ready
for use, requiring extra software configuration as described in the
chapter entitled Using MemoryMAX in the DR DOS User Guide.
20