1
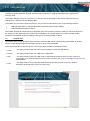
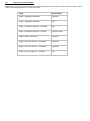
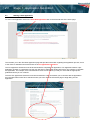
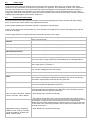
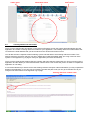
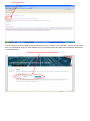
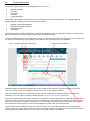
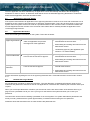
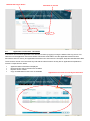
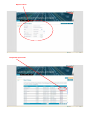
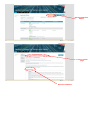
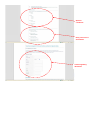
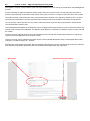
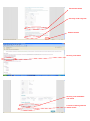
Landlord’s Consent Website
User Guide
Updated: May 2015
Contents
Introduction
1.0
1.1
1.2
Home Screen
Application Process Stages
Stage 1 – Application Submitted
2.0
2.1
2.2
2.3
2.4
2.5
2.6
2.7
2.8
2.9
2.10
2.11
2.12
2.13
Starting a New Application
Traffic Lights
General Information Page
Tracking Numbers & Passcodes
Answering Questions
Certification
Attachments – Applicant
Submitting an Application
Application List Screens – Applicants
Copying an Application
Withdrawing an Application
Application Status Screens – Applicants
Network Rail Approving Reviewers and Technical Reviewers
Stage 2 – Application Reviewed
3.0
3.1
3.2
3.3
3.4
3.5
3.6
3.7
3.8
3.9
3.10
3.11
3.12
3.13
‘No Reviewer Assigned’ Status
Application Reviewers
Network Rail Log In Details
Application List Screens – Reviewers
Reports
Application Status Screens – Reviewers
Adding a Technical Reviewer
Reviewing an Application
Attachments – Reviewers
Unlocking an Application
External Comments (Request for Information)
Internal Comments
Rejecting an Application
Stage 3 – Conditional Approval – Prepared
4.0
4.1
Conditionally Approving an Application
Stage 4 – Conditional Approval – Granted
5.0
5.1
5.2
5.3
5.4
5.5
Licence to Alter – Electronic Acknowledgment Process
Licence to Alter – Applicant Signatory Security Code
Licence to Alter – Work Dates
Licence to Alter – PDF
Licence to Alter – General Points
6.0
Stage 5 – Works Take Place
7.0
Stage 6 – Entry Into Service – Requested
8.0
Stage 7 – Entry Into Service – Completed
9.0
Stage 8 – Entry Into Service – Accepted
9.1
9.2
Entry Into Service – Approving Reviewer Acceptance
Entry Into Service – Request More Information
1.0. Introduction
This guide is for both external Applicants and internal Network Rail (NR) application Reviewers who are using the NR
nd
Landlords Consent application website. It should cover all aspects of using the site following an upgrade on 2
February 2015.
The website address is http//lc.networkrail.co.uk it can also be accessed via any internet search browser by
searching for ‘Landlords Consent Network Rail’.
The website is to be used by tenants wishing to carry out works or alterations at one of the following locations:
•
•
a NR managed station or Independent leased Light Maintenance Depot (depot)
a franchised/leased station or depot
The website provides an online electronic application form that consists of questions relating to the works that are to
be carried out. This application form needs to be completed by an external Applicant. It is then reviewed by NR
Reviewers from several disciplines relating to the type of work at the station or depot.
1.1.
Home Screen
The website home screen provides some information regarding NR and the Landlords Consent website. It will also
show any important messages for example if the site is going to be unavailable.
There are several tabs across the top of the home page these provide information as follows:
• T&Cs
- this page provides a link to the terms and conditions of using this NR website
• Privacy
- this page provides a link to the NR Privacy Statement
• Help
- this page provides a link to the NR Guide to Alterations document and a link to the Contact Us
enquiry form. Any enquiries submitted via this form are sent to the [email protected]
email address
• FAQ
- this page shows a list of frequently asked questions and also provide a link to the Guide to
Alterations document and Contact Us enquiry form
1.2.
Application Process Stages
There are 8 stages during the application process. These stages and the users involved are outlined below. These
stages must be passed through in consecutive order.
Stage
Responsibility
Stage 1: Application Submitted
- Applicant
Stage 2: Application Reviewed
- NR
Stage 3: Conditional Approval – Prepared
- NR
Stage 4: Conditional Approval – Granted
- Applicant & NR
Stage 5: Works Take Place
- Applicant
Stage 6: Entry Into Service – Requested
- Applicant
Stage 7: Entry Into Service – Completed
- Applicant
Stage 8: Entry Into Service – Accepted
- NR
2.0.
Starting anStage
Application1: Application Submitted
2.1.
Starting a New Application
To start a new application click on the Start New Application link on the left hand side of the home page.
This will take you to the Start New Application page that provides information regarding the application process, a link
to the Guide to Alterations document and a set of Pre-Application Questions.
The Pre-Application Questions must be answered before completing an application. If an Applicant answers a preapplication question in a particular way this may ask them to take further action before they can continue to complete
the application. For example, if Q1 is answered ‘No’ then the site will tell you that you must read the appropriate
guidelines before you can continue.
Once the Pre-Application Questions have been answered in a way that allows you to continue with the application
then the Next button needs to be selected to take you to the General Information page to begin filling out the
application.
2.2.
Traffic Lights
Along the top of the page are coloured circles, these are known as ‘traffic lights’. Each one of these traffic lights
represents a set of information that needs to be provided by an Applicant. This information is either a set of questions
that need to be answered or a set of documents that need to be uploaded. The traffic lights all need to be green in
order for the application to be submitted. If a circle is red this shows there is some information missing, if a circle is
orange with a red dot this shows that a request for further information has been left by a Reviewer. Further information
regarding these traffic lights can be found in section 2.9.
2.3.
General Information Page
The General Information page requires information to be entered regarding the location that the work will be taking
place, as well as the contact details of the Applicant and Tenant.
Further details regarding the information required on this page is outlined below.
If there are any issues with the information you have entered on this page then the system will display this in red text
at the top of the page.
Once this page has been completed select the Next button at the top of the page.
Address
- this information needs to be manually entered partially, then selected
from a drop down box.
- this field will auto populate when the property name is selected.
Postcode
- this field will auto populate when the property name is selected.
Train Operating Company (TOC)
- this field will auto populate when the property name is selected.
NR Property Reference
- this field will auto populate when the property name is selected.
Lease Reference
- this field will auto populate when the property name is selected.
Unit Reference
- this is not required for every application. If the information is available please
enter it but this is usually relevant for retail installations at managed stations.
Specific work location
- this box is for an Applicant to enter the specific work location where the works
are to take place e.g. ‘Platform 1’.
Description of work
- this box is for an Applicant to describe the works that are due to take place
e.g. ‘We are installing ten new CIS screens’.
Target Project Start Date
- this is to be entered using the calendar drop down box.
Email
- this needs to be entered manually. It is vital that this is entered correctly as
this is where all messages regarding the application are sent to including any
information requests from Reviewers and any approvals.
Confirm Email
- this is used to re-confirm the email. The system will enter this automatically if
you have completed an application previously.
Applicant Information
- this is the information of the person completing the application, who will be
contacted regarding the application and will receive any information requests
from Reviewers and any approval information.
Property Name
Title, First Name, Surname, Address, - these details are to be entered manually
County, Postcode, Phone, Mobile
Tenant Information
- this needs to be the name of the company/organisation who holds the lease
at the station or depot. If this work is being carried out at a NR Managed
Station then this name will either be the TOC/FOC who is carrying out the work
or the name of the company/organisation who is leasing the retail unit the work
is being carried out in.
Registration Number, Registered
Address, Town, County, Postcode,
Contact First Name, Contact Last
Name, Contact Email
- these details are to be entered manually
Traffic lights
2.4.
Information boxes
‘Next’ button
Tracking Numbers & Passcodes
Once you have selected the Next button on the General Information screen the system will automatically save the
application and create a tracking reference number for your application. This tracking reference number will be sent
via email to the email address that you have entered on the General Information screen.
You will also be sent a separate email containing a pass code that links to this tracking reference number. This
tracking reference and pass code are your log in details and combined together allow you to log in and out of the
system on the Applicant Log In page to view your application (see below screenshot).
Once you have received the tracking reference number and pass code this means that you can log in and out of the
application and the details you have entered within it will be saved. This means that you do not have to complete the
application in one sitting.
It is recommended that you wait to receive the tracking reference and pass code emails before you fully complete the
details in the application. If you have lost your tracking number and pass code you can get a reminder sent to you
using the link at the bottom of the Applicant Log In page.
Tracking reference number email
Pass code email
You will receive a tracking number and pass code each time you complete a new application, however as the system
links your applications using your email address using one tracking number and pass code combination will show all
of your applications.
Tracking number and passcode entry boxes
2.5.
Answering Questions
There are 5 question sections on the application form. These are:
•
•
•
•
•
Building Alteration
Telecoms
Fire Safety
Planning
Legal/ Operations
Within each of the question sections there are sub-sections which hold further questions. For example within the
Building Alteration section there is the following sub-sections:
•
•
•
•
Building & Structural Alterations
Drainage and Water Catchment
Building Services
Certification
Each of these sections must be completed in order for the application form to be submitted. Please be aware that the
titles and subsections of these question sections may be subject to change.
The section traffic lights at the top of the page are shown as red when that section is incomplete. The sub-section tabs
are shown as red when they are incomplete. These will both turn green when they are completed.
Green completed tab and traffic light
Question answer options
Questions need to be answered by selecting from the multiple choice answers. These answer choices are either
‘Yes’, ‘No’ or ‘N/A’. Some of the questions will only have ‘Yes’ or ‘No’ answers available.
When you answer a question in a particular way this may open up further sub-questions below it. For example
answering A1.1 ‘Yes’ opens up further questions below it e.g. A1.1.1, A1.1.2, A1.1.3 and so on.
There are comment boxes next to each question. This allows for free text to be entered to provide further information
about an answer. On certain questions comments are mandatory in these boxes this is shown by the writing ‘Please
note that a comment is required’ in the text box. If comments are not left in this text box when they are mandatory
then the tab will not turn green and a red box will highlight the question that is causing the issue.
There are three action buttons at the top of the question page. The Close button will return you to the application
summary page, the Save button will keep you on the same page and save the details you have entered and the Next
button will save the details and move you on to the next question section or sub-section.
2.6.
Certification
The Certification sub-section should be completed with the details of the relevant qualified/competent person that has
the appropriate knowledge/experience to provide the answers to the questions within that particular question section.
There is a Certification section at the end of each question section. The details from the first Certification section will
be automatically saved by the system and made available as an option from the drop down menu on the other four
Certification sections to save them being re-typed. These details should only be re-used if it is the same
qualified/competent person who is providing the answers for that section.
Original ‘Certification’ entry
Saved ‘Certification’ drop down box option
2.7.
Attachments – Applicant
The attachments section allows for documents to be uploaded in support of an application. This provides further
information for the NR Reviewers to be able to understand the detail of the works.
Examples of documents that can be uploaded include architect drawings, plans, certificates, pictures, planning
consent details etc.
To upload a document to the Initial Submission Documents section simply click on the Add link and use the pop up
browser windows to search for the appropriate file on your computer.
The files types that can be uploaded are:
•
•
•
•
Pdf
Word documents (both .doc and .docx formats)
Visio drawings (both .vsd and .vsdx formats)
Jpegs
There is a size restriction of 15mb for each file. There is no limit to the total number of files added to an application.
There are two types of file that can be uploaded at this stage of the application: these are the Mandatory and
Supporting documents.
As the name suggests the mandatory documents are required in order for the application to be submitted. There is
one mandatory document required on all applications: this is called the ‘general outline drawing’. This can be used for
any attachment to be uploaded if a general outline drawing is not available to support the application.
Any other mandatory documents listed are linked to the way that questions are answered. For example when
answering question B1.4, B1.5 or B1.6 as ‘Yes’, a new mandatory document is requested called ‘Fire alarm and
detection system; BS5839 part 1’.
The supporting documents that are listed are simply a guide of further attachments that can be uploaded to an
application.
There is a function allowing you to replace a document that you have attached. The Replace link becomes available
once you have uploaded a document. If you click on this link you can then upload a replacement document and enter
a reason why you are replacing it.
Once a replacement has been uploaded two more links will become visible. The Notes link shows you the reason why
the replacement file was uploaded and the History link shows you the list of historic documents that have been
uploaded and replaced. There is no limit to the amount of times that a document can be replaced at this stage.
After submitting an application for review, the application will need to be unlocked in order for further documents to be
uploaded. An Applicant should contact one of the application Reviewers in the first instance for them to unlock the
application. If all of the Approving Reviewers are unavailable then a member of the Consents Team can be contacted
to unlock the application. Only an Approving Reviewer or a member of the Consents Team can unlock an application.
Unlocking an application allows an Applicant to upload further documents within the Attachments section after they
have submitted their application for review.
The length of time that the application is unlocked for is set by the Consents Team. This is set at 120 hours (5 days)
as standard; after this time has passed the application will be automatically locked again.
There are two scenarios when an application can be unlocked:
•
when an Unlock button is manually pressed by the Approving Reviewer or a member of the Consents Team
•
when an external comment (request for information) is submitted to an Applicant by an Approving or
Technical Reviewer. Each time an external comment is submitted this will re-start the 120 hour timer on the
unlock function.
‘Mandatory’ and ‘Supporting’ documents
Replace upload comments box
Replacing uploads buttons
2.8.
Submitting an Application
In order for an application to be ready for submission all of the traffic lights must be green across the top of the page.
If any traffic lights are showing red this means that there is some information missing. If this is the case, there will be a
message shown on the Submit page stating ‘Application Incomplete’.
Once all the required information is completed and the attachments uploaded then the application can be submitted
for review.
Please note that once an application is submitted you are unable to change any of the details within the General
Information or question sections. The only way to alter these answers is by withdrawing the application and resubmitting a new one. Further information regarding withdrawing an application can be found in section 2.11 below.
Pressing the Confirm button on the Submit page allocates the application to the NR Reviewers to review.
2.9.
Application List Screens - Applicants
You can check the status of your application by logging in using your tracking number and pass code via the Applicant
Log In page. This will take you to the application lists where you can view your In-Progress, Accepted, Rejected and
Withdrawn applications. You can use the filters at the top of each list to search for a specific application.
The application list screens provide information and functions as detailed below:
Tracking No
•
shows the individual tracking number of your application. Selecting this will take you to the
Application Status screen. Information regarding this Application Status screen can be found further
on in this document.
Location
•
shows the name of the station or depot property where the works are taking place. Stations that are
highlighted in bold green text are managed directly by NR and are known as the ‘Managed’ Stations.
NR is the Station Facility Operator (SFO) at these Managed Stations and is classed as the Train
Operating Company (TOC) on the system for these applications. Stations and depots that are in
normal black text are franchised and leased out to TOCs. This means that the SFO is a TOC or in
some cases a depot maintenance company, for example Alstom Trains.
Description
•
shows a snapshot of the description of the work that is taking place.
•
shows the date that the application was submitted.
•
shows the current status of the application from one of the following:
Date
Submitted
Status
Application Incomplete
•
something needs completing in order for the application to
be submitted for review.
BE, FE, SPS,
SM, FS, TE
In Progress
•
the application is currently under review.
Conditional Approval - Prepared
•
the Reviewers have completed their review of the application
and have prepared their conditional approval and this needs
to be electronically acknowledged by the Applicant.
Conditional Approval - Granted
•
the Applicant has acknowledged the conditions of approval
and a legally binding Licence to Alter has been created.
Entry Into Service - Requested
•
the Applicant has confirmed that they have completed their
work and are ready to complete the Entry Into Service
process (e.g. hand the completed project work back to the
Landlord).
Entry Into Service - Completed
•
the Applicant has uploaded all required documents and
information on the Entry Into Service section of the
application.
Entry Into Service - Accepted
•
the NR Reviewers have accepted the documents and
information uploaded to the entry into service section and the
application will automatically be closed and filed under the
Accepted application list.
•
these abbreviations are used to show the following NR Reviewers:
BE
FE
SPS
SM
FS
TE
= Building Engineer
= Fire Engineer
= Station Portfolio Surveyor
= Station Manager
= Facility Surveyor
= Telecoms
•
underneath each Reviewer abbreviation there are individual status circles (traffic lights) that represent
the status of their review. Below is a list of what each of the different colours of these status circles
represents.
•
there are no coloured traffic lights for the Entry Into Service – Requested or Entry Into Service –
Completed stages as these actions are completed by an Applicant and not the NR Reviewer.
Colour
Image Approving Reviewer Status
Details
Grey
N/A
- application is not allocated to a
Reviewer due to it being incomplete or no
Reviewer is required.
Red with
a
white dot
No Reviewer Assigned
- Reviewer is required but hasn’t been assigned by
the system. This is due to an error in the system
data and will be corrected by the NR Consents
Team.
Orange
In Progress
- application has been allocated to Reviewer and is
currently under review.
Orange
with
a red dot
Light
green
Awaiting Information
- Reviewer has submitted a request for information
to be uploaded by the Applicant.
Conditional Approval Prepared
- status circle initially turns light green when an
individual Reviewer prepares their conditional
approval for the Applicant.
or
Conditional Approval Granted
Dark
green
Entry Into Service Accepted
After all the Reviewers have prepared their
conditional approval and the Applicant
electronically acknowledges it then the light green
status circle for all the Reviewers change to show
that the conditional approval has been granted.
- the NR Reviewer has accepted the documents
and information uploaded to the entry into service
section.
C
Selecting this means an Applicant wants to create a copy of an application (see 2.10.)
W
Selecting this means an Applicant wants to withdraw an application from the process (see 2.11)
2.10.
Copying an Application
It is possible to copy an application that has already been created. This can be done by selecting the C icon next to
the application that is to be copied. An application can be copied from any of the application lists i.e. In Progress,
Accepted, Rejected and Withdrawn.
When an application is copied it will create a duplicate of the original application. The duplicate application will have a
new unique tracking number and the question answers will be identically copied across. However, the information on
the General Information screen will need to be re-entered and the documents in the Attachments section will need to
be re-attached.
A new pass code will be sent out via email when an application is created using the Copy function.
2.11.
Withdrawing an Application
An application can be withdrawn by an Applicant by selecting the W icon next to an application on the Application in
Progress screen.
This will remove the application from the review process and will list it under the Withdrawn application list. An email
will be sent to all of the Reviewers to confirm that the application has been withdrawn. This withdrawn application can
be copied if required in the future.
Application list screen as seen by an Applicant
2.12.
Application Status Screens - Applicants
Selecting a tracking number link on an application list screen will take you to the Application Status screen for that
application.
The application status screen provides information and functions as detailed below:
Tracking No.
•
shows the individual tracking number of your application.
Location
•
shows the location of the works.
Application Status
•
shows the status of the application.
•
shows the description of work that has been entered on the General Information screen.
Department
•
shows the NR department that is reviewing and needs to provide their approval of the
application.
Status
•
shows different coloured status circles as described in section 2.8 above.
Allocated To
•
shows the name of the NR Approving Reviewer.
Work Description
(under Location)
Technical Reviewers •
shows the name of any NR Technical Reviewer that may be allocated to the application.
View button
•
selecting this takes you into the detail of the application.
Close button
•
selecting this will take you back to the In-Progress application list.
2.13.
Network Rail Approving Reviewers and Technical Reviewers
The difference between an Approving Reviewer and a Technical Reviewer is that an Approving Reviewer provides the
final approval on the application whereas a Technical Reviewer does not. A Technical Reviewer is simply added to an
application to provide further technical knowledge or support to the Approving Reviewer if required.
3.0.
Stage 2: Application Reviewed
Once an application has been submitted by an Applicant it is then automatically allocated to the NR Approving
Reviewers for them to review. An automatic email will be sent to the individual Approving Reviewers to make them
aware that the application has been allocated to them.
3.1.
‘No Reviewer Assigned’ Status
If the system cannot allocate an application to an Approving Reviewer it will show a red circle with a white dot in it as
detailed in section 2.8 above and will show a No Reviewer Assigned status. This is due to there being an error in the
system data. The system will send an email to a specified member of the Consents Team to make them aware that
this has happened and the member of the Consents Team will be able to manually allocate the application to the
correct Approving Reviewer.
3.2.
Application Reviewers
There are several types of Reviewer on the system. These are as follows:
Role
Purpose
Approving Reviewer • to review the information contained
within an application and provide
their approval of the application.
Technical Reviewer
Managerial
Reviewer
•
•
to support the Approving Reviewer
but not have the function to approve.
to have a view of applications but not
have the function to approve.
Functions Available
• sending requests for information using the
external/internal comment links.
•
downloading and viewing documents from the
attachments section.
•
conditionally approving the application (see
section 4.1 for further details).
•
sending requests for information using the
external/internal comment links.
•
downloading and viewing documents from the
attachments section.
•
sending requests for information using the
internal comment links.
•
downloading and viewing documents from the
attachments section.
Further information regarding the role of an Approving Reviewer and a Technical Reviewer can be found in section
2.13.
3.3.
Network Rail Log In Details
Any NR Reviewer (including an Approving Reviewer, Technical Reviewer or Managerial Reviewer) needs a log in
username and password in order to be able to view applications. Usernames are created by the Consents Team upon
request.
When you are first provided with a username you will need to use the link at the bottom of the Network Rail Log In
page to have a password sent to you. Once you log in for the first time the system will allow you to reset your
password.
This same link can be used for resetting a password if it is ever forgotten. The system will submit a password to the
email you enter, please allow the system approximately 15 minutes before entering the new password.
Please be aware that usernames are not case sensitive but passwords are.
Network Rail Log In boxes
3.4.
Password re-set link
Application List Screens - Reviewers
A Reviewer can see which applications are allocated to them by logging in using the Network Rail Log In link. This
takes them to the application list screens where a Reviewer will be able to see the applications that have been
allocated to them for review, plus applications that have been archived in the Accepted, Rejected and Withdrawn tabs.
These screens are set out in the same way and with the same functions as they are for Applicants as explained in
section 2.9 apart from the below:
•
•
•
•
Applicant Name information is displayed
Route and TOC search functions are available
Reports can be created
Copy and Withdraw functions are not available
Application list screen as seen by all Reviewers
3.5.
Reports
Reports can be created by any Reviewer. They are accessed by selecting the Reports link on the left hand side of the
page after logging in with a NR username and password.
The reports that are available are shown in the below list:
Report Name
Description
Applications Approved
List of approved applications
Applications in Progress
List of applications in progress
Applications outstanding
List of applications outstanding
Applications rejected
List of applications rejected
Applications withdrawn
List of applications withdrawn
Data Dump
Data dump extract report
Data Dump - Report
Data dump extract report (New - Jan ’13)
Email Notification
Reminder emails report
Service Level Agreement
Service Level Agreement for Landlords Consent
Use Of LC System
Internal staff report
To create a new report all a Reviewer has to do is click the Select link next to the report they wish to see, enter the
appropriate report criteria and then select the Generate Report button.
Once a report is created it is placed in a queue under the Report Queue tab and can be viewed once they have been
completed. You will see a View XLS link show when the report is ready to view.
Click on View XLS to display the report, which can be viewed or saved as a Microsoft Excel worksheet. Select
Remove to delete it.
If a report is taking a while to load click the Refresh button to reload the page. If the report contains a large amount of
data it will take longer to load.
Report list
Report criteria
Completed report links
3.6.
Application Status Screens - Reviewers
These screens are set out in the same way and with the same functions as they are for Applicants, as explained in
section 2.12 apart from the below:
•
•
3.7.
Approving Reviewers can add Technical Reviewers
Approving Reviewers can unlock an application
Adding a Technical Reviewer
Only an Approving Reviewer or a member of the Consents Team can add a Technical Reviewer to an application.
A Technical Reviewer can be added to an application to provide further technical knowledge or support to the
Approving Reviewer if required. They have no ability to approve an application. They can however submit requests for
information using the external comments function (see section 3.11 for further information) and can also submit
internal comments (see section 3.12 for further information).
An Approving Reviewer can only add a Technical Reviewer that is set up for their specific department, for example a
Building Engineer can only add a Technical Reviewer that is set up for the Building Engineer department. The
Consents Team can add a Technical Reviewer to any department.
A Technical Reviewer can be added by selecting the Edit Technical Reviewers link on the Application Status screen
and ticking the box next to the Technical Reviewer that needs to be added. Un-ticking this box will remove the
Technical Reviewer.
Edit Technical Reviewers
selection screen
3.8.
Reviewing an Application
As well as being able to navigate an application and view the information that has been submitted there are four main
functions available to Approving Reviewers when initially reviewing an application, these are:
•
downloading and viewing documents from the attachments section
•
sending requests for information using the Add External Comment and Add Internal Comment links
•
conditionally approving the application (see section 4.1 for further details)
If the application does not contain sufficient information then the Approving Reviewer can do several things;
•
request information from the Applicant using the external comments process described in section
3.11
•
reject the application (see section 3.13 for further details)
•
ask the Applicant to withdraw the application
There are several action buttons at the top of each question page for an Approving Reviewer to select from, these
buttons include:
Close
•
will return you to the application summary page
Next
•
will move you on to the next question section or sub
section and send any internal comments that may have
been entered
Send External Comments
•
will send the comments entered in the text box that is
opened by selecting the Add External Comment link
Conditionally Approve
•
will allow the Approving Reviewer to complete the
conditional approval process as detailed in section 4.1
This button is only available for an Approving Reviewer
on the question section that relates to their department, so
for example it will only be available for a Building Engineer
on the Building Alteration question section.
Reject
•
will remove the application from the Application In
Progress list and move it to the Rejected tab. Pressing
this button will send the Applicant an email confirming
this rejection along with the Approving Reviewers and
Technical Reviewers that are allocated to the application.
3.9.
Attachments – Reviewers
The documents that have been uploaded to the Initial Submission Documents section by an Applicant can be
downloaded and viewed by an Approving Reviewer, a Technical Reviewer, a Managerial Reviewer and a member of
the Consents Team.
To download the documents simply tick the boxes next to the documents you wish to download and click on the
Download Selected button. This will open up the option to save the documents within a.zip file onto your computer
and automatically saves the file name as the tracking number of the application.
There are two types of file type that can be uploaded by an Applicant when first completing an application these are
the Mandatory and Supporting documents.
As the name suggests the mandatory documents are required in order for the application to be submitted. There is
one mandatory document required on all applications this is called the General Outline Drawing. This can be used for
any attachment to be uploaded if a General Outline Drawing is not available to support the application.
Any other mandatory documents listed are linked to the way that questions are answered. For example when
answering question B1.4, B1.5 or B1.6 as ‘Yes’ a new mandatory document is requested called ‘Fire alarm and
detection system; BS5839 part 1’.
The supporting documents that are listed are simply a guide of further attachments that can be uploaded to an
application.
There is a function allowing an Applicant to replace a document that has been attached. If they have replaced a
document in the Initial Submission Document section two more links will become visible. The Notes link shows the
reason why the replacement file was uploaded, the History link shows the list of historic documents that have been
uploaded and replaced.
If any Reviewer or an Applicant requests to upload further documents to the application after it has been submitted
then the application needs to be unlocked as described in section 3.10. These documents will be uploaded to the
Additional Documents (1) tab.
Download buttons
Replaced document links
3.10.
Unlocking an Application
Only an Approving Reviewer or a member of the Consents Team can unlock an application. Unlocking an application
allows an Applicant to upload further documents within the Attachments section after they have submitted their
application for review.
The length of time that the application is unlocked for is set by the Consents Team. This is set at 120 hours (5 days);
after this time has passed the application will be automatically locked again.
There are two scenarios when an application can be unlocked:
•
when an Unlock button is manually pressed (the Unlock button can be found on the Application Status
screen and the question pages)
•
when a request for information is sent to an Applicant. This unlocking happens when the Send
External Comments button is pressed by a Reviewer. If the Send External Comments
button is selected by different Reviewers this will re-start the 120 hour timer on the unlock function
‘Unlock’ button
‘Unlock’ button
3.11.
External Comments (Request for Information)
A request for information can be created by an Approving Reviewer or Technical Reviewer only. This is done by the
Approving Reviewer entering comments next to a specific question in the application form.
Entering an external comment is carried out by selecting the Add External Comment link and entering text in the box
that appears. Please note that the Send External Comments button at the top of the page must be selected to save
this text. If you press the Add External Comment link again it will close the text box and the text will be lost.
These comments are then submitted externally to the Applicant, via email, to inform them of this. The following things
happen to the application when an external comment is sent to an Applicant:
•
•
•
•
The status of the application changes to Awaiting Information
The question section that contains the question with the comment shows as orange with a red dot (as
shown in section 2.9)
The question sub-section tab that contains the question with the comment is highlighted as red
The question with the comment is highlighted with a red box
The application cannot be progressed any further until this request for information is closed by the Approving
Reviewer. The Approving Reviewer will only close the request once they have received an appropriate response from
the Applicant to the request for information.
Once the Applicant is aware of the request for information they simply need to log back into the application form, find
the comments that have been left for their attention and submit a response using the comments box that is available.
When an Applicant submits a response the Approving Reviewer will be alerted by an email.
Once the Approving Reviewer has viewed the Applicant’s response they can continue to send external comments to
the Applicant using the comments box and the Applicant can continue to respond, like a text message conversation
on a mobile phone. Each time a comment is submitted by either party the system will send an email to alert the
opposite party of a response that has been made.
External comments can be left by any Approving Reviewer on any question. To show an Applicant which Approving
Reviewer has left the comment, the system records the name of the Approving Reviewer along with the time and date
that the comment was left. The system also records the time and date of the response from the Applicant.
If the request for information requires the Applicant to upload further documents to the application then the application
will need to be unlocked. Further details regarding the unlocking of an application are detailed below in section 3.10.
External comments link and text box
Submitted external comment
3.12.
Internal Comments
As well as external comments being sent between Reviewers and an Applicant, internal comments can be shared
between an Approving Reviewer, Technical Reviewer and System Administrator (Consents Team).
These internal comments are only visible to NR users and the Applicant will not be able to view what is written here.
Therefore any comment that needs to be sent to an Applicant must be sent using the external comments function.
Entering an internal comment is carried out by selecting the Add Internal Comment link and entering text in the box
that appears. Please note that the Next button must be selected to save this text. If you press the Add Internal
Comment again it will close the text box and the text will be lost.
When an internal comment has been left on a question a small red IC icon is added to the relevant question tab to
show other Reviewers where the comment has been left.
Internal comments link and text box
3.13.
Rejecting an Application
An application can be rejected by a member of the Consents Team or an Approving Reviewer. An application is
rejected by selecting the Reject button that is found at the top of the Application Status screen or at the top of the
application question sections.
Please note that the Reject button will only show in the question section that corresponds to the role of an Approving
Reviewer, for example it will show in the Building Alteration question section for Building Engineers and the Fire
Safety section for Fire Engineers.
When the Reject button is pressed a text box window is opened. The user rejecting the application needs to enter why
the application has been rejected. This information will be sent to the Applicant via an automated email and will also
show them who has rejected the application and how to re-submit the application for review.
Reject button on Application Status screen
Reject button on application question screen
Text box where rejection comments are entered
Rejection email that is sent to applicant and reviewers
4.0.
4.1.
Stage 3: Conditional Approval - Prepared
Conditionally Approving an Application
Once an Approving Reviewer is satisfied that they are happy for the works in the application to go ahead they can
then conditionally approve the application.
All applications are conditionally approved as every application is subject to the Network Rail General Terms and
Conditions of Consent. These terms and conditions are provided to an Applicant via email when the Conditional
Approval – Prepared stage is completed. They are also detailed on the Licence to Alter that is created once an
Applicant has ‘acknowledged’ the conditional approval of the Approving Reviewers using the electronic
acknowledgement process. Further details regarding this process can be found in section 5.0.
An Approving Reviewer can conditionally approve an application by pressing the Conditionally Approve button that
can be found next to the Send External Comments button. This Conditionally Approve button is only available on the
question section that is applicable to the Reviewer, for example, a Fire Safety Engineer will only have the button
available on the Fire Safety section.
The Conditionally Approve button will not be available for selection if there are still open external comments.
Internal comments do not have an impact.
When the Conditionally Approve button is selected a new window titled Conditional Approval Summary will open up.
There is a box at the top of this window that allows an Approving Reviewer to enter any Specific Conditions they may
wish to add to the Applicant’s application. Similar to the Network Rail General Terms and Conditions of Consent these
Specific Conditions are provided to an Applicant via email when the Conditional Approval – Prepared stage is
completed. They are also detailed on the Licence to Alter.
The Conditional Approval Summary box automatically has the text ‘No conditions stated’ within it, this text is to be left
in the box if the Approving Reviewer has no specific conditions to add. Otherwise it can be deleted and the specific
conditions can be added by an Approving Reviewer.
At this stage there is also a check list of entry into service documents that the Approving Reviewer/s can choose from.
Selecting from this list will add the documents to the entry into service attachments section. These documents need to
be uploaded to the application by an Applicant during the Entry Into Service – Requested stage. Further details
regarding this stage can be found in section 7.0.
This entry into service documents list is centrally stored and maintained by the Consents Team, if there is a
requirement for any further documents to be added to this list please contact [email protected] to
have these documents added to the list.
Once the Approving Reviewer has completed the details in the Conditional Approval Summary box these need to be
saved by clicking on the Ok button. This changes the status of this individual Approving Reviewer to Conditional
Approval – Prepared and turns their status light to light green.
Once all the Approving Reviewers have completed their review and each individual status is Conditional Approval –
Prepared the overall application status will change to Conditional Approval – Prepared.
‘Conditional Approval Summary’
box
Specific conditions entered by
Approving Reviewer
Individual Approving Reviewer status showing
‘Conditional Approval – Prepared’
Entry into service documents
selected
Application status showing as ‘In Progress’
All Approving Reviewers showing
‘Conditional Approval – Prepared’ status
Application status showing as ‘Conditional
Approval – Prepared’
5.0.
Stage 4: Conditional Approval - Granted
Once the application status changes to Conditional Approval - Prepared an email is sent to the Applicant informing
them that they must agree to i.e. ‘acknowledge’ the application’s conditions by completing the electronic
acknowledgement process. Completing this process will change the application to Conditional Approval – Granted, will
create a legally binding Licence to Alter document and the Applicant is then able to start their works.
5.1.
Licence to Alter - Electronic Acknowledgement Process
The electronic acknowledgement process allows an Applicant to ‘sign’ the Licence to Alter electronically.
There are two ways in which an Applicant is able to complete this process:
•
•
by clicking on the link that is sent to them in the ‘Application Pre-Approval’ email
by logging in using a tracking number and passcode combination and selecting the Acknowledgement
button on the Application Status screen of the application they wish to acknowledge
Either of the above will take the Applicant to the Network Rail Landlords Consent Licence to Alter screen. This shows
the details contained in the Licence to Alter in electronic format.
The three tabs on the left hand side of the screen (General Conditions, Specific Conditions and Acknowledge
Conditions) are a quicker way of taking you to that particular part of the licence.
The information shown/requested on the Licence to Alter is as follows:
General Conditions
•
shows the NR generic set of conditions that are the same for
every application in the system.
Specific Conditions
•
shows an individual set of conditions that are specific to the
individual application. Each Approving Reviewer has the option
to leave specific conditions on an application.
Entry Into Service Documents
•
shows the list of documents that the Approving Reviewers have
specified need to be uploaded to an application using the entry
into service stages of the process.
•
this is where the authorised signatory of the Tenant enters their
information in order to electronically ‘sign’ the Licence to Alter.
Work Dates
•
this is where the project work dates are to be entered by the
Applicant.
Signatory Security Code
•
this is a unique code that needs to be entered by the signatory
to complete the acknowledgement process.
Tenant Acknowledgement of Terms and
Conditions and Electronic Signatory
Details
‘Acknowledgement’
button
Licence to Alter
page
General conditions
Specific
conditions
Entry into service
documents
Tenant signatory
document
5.2.
Licence to Alter – Applicant Signatory Security Code
The signatory security code provides a quick and simple additional level of security in the electronic acknowledgement
process.
The first time that an Applicant views the Network Rail Landlord's Consent Licence to Alter page they will need to
press the Send Security Code button at the bottom of the page in order for a unique security code to be sent to them.
The unique security code will be sent to the email address that is entered in the Signatory Details section. Once the
Send Security Code button has been pressed and the email has been sent the button will change to read Submit.
If a new security code is required, for any reason, leave the security code box empty and select the Submit button.
This will resend the security code.
The email address and details of the Signatory can be changed at this stage if required. This must be done before any
security code is entered and submitted. If a different email address is entered then a different unique security code will
be created.
Once the security code has been received and entered into the box then the Submit button needs to be selected to
confirm the acknowledgement of the Licence to Alter.
Once the security code is submitted the status of each of the individual Reviewers and the overall Application status
changes to Conditional Approval – Granted.
Selecting the Acknowledgement button after successfully submitting the security code will show the security code that
was used when signing the agreement and also the date that the agreement was signed into.
Work dates
‘Send Security Code’ button
Saved work dates
Security code entry box
‘Submit’ button
Security code email
Security code submitted
and saved
Licence to Alter agreement
details saved
5.3.
Licence to Alter - Work Dates
These dates are requested when the Licence to Alter is acknowledged, as the Applicant should have a
better idea of when the project will be able to start and end after having visibility of all the terms and
conditions and the entry into service documents that are required by the Approving Reviewers.
The dates are selected using a calendar drop down box and the end date cannot be longer than 6 months
after the start date.
After the security code has been submitted during the acknowledgment process the original work dates
are saved in the system. There is however an option to update the work dates at this point if required.
This can be done by simply updating the dates using the calendar boxes. If these dates are updated then
the Submit button needs to be pressed to save these dates in the system. This generates an email that is
sent to the Approving Reviewers for their information.
Old and new saved work
dates
Work dates entry boxes
Works dates changed
email
5.4.
Licence to Alter – PDF
Once the security code has been submitted during the acknowledgement process a PDF document of the
Licence to Alter is saved on the application. This PDF can be viewed by clicking on the Acknowledgement
button and then selecting the Download PDF button. This PDF can then be viewed or saved as required.
Licence to Alter ‘Download
PDF’ button
Example of downloaded PDF
5.5.
Licence to Alter – General Points
General points to note regarding this acknowledgement sign off process are:
•
Only authorised signatories of the tenants are able to electronically sign the consent for alterations
•
NR Infrastructure Limited (NRIL) is seeking to consistently improve the way in which it
grants consent for alterations to its tenants. The process used by the previous landlords consent
system was that the terms and conditions for carrying out works were emailed to a representative
of the Station Facility Operator or retail tenant. No reply or signature was required. This new
process is a significant improvement on the old process
•
The Licence to Alter will be ancillary to a lease, under the lease NRIL tenants must obtain NRIL
consent prior to any works
•
If the tenant is in breach of a term of the Licence to Alter and when challenged by NRIL raises a
presumption that the consent to alter is invalid they, at the same time, are arguing that they are
carrying out alterations without consent (unless consent has been granted by other means) and
will therefore put them in breach of their lease which NRIL will have the option take action under
6.0.
Stage 5: Works Take Place
Following the completion of the works an Applicant is then required to confirm the entry into service of their works by
signing back into the system and completing the process outlined in Stages 6-8 of this document.
7.0.
Stage 6: Entry Into Service - Requested
This stage consists of the Applicant signing into the application using their tracking reference and pass code
combination and selecting the Entry Into Service – Request button on the Application Summary page of the
application they wish to enter into service.
This takes the Applicant to the Entry Into Service - Request screen. This page requires the Applicant to confirm the
date of the entry into service of the works (this allows up to two weeks backdating of the entry into service) and also
provides them with a text box where they can provide further information to the Approving Reviewers with regards to
any changes that may have been made to the works compared to the details provided during their original
submission.
After completing this information and selecting the Save button the application status will change to Entry Into Service
– Requested.
The Applicant then has 30 days from this point to upload the required entry into service documents and confirm the
entry into service has been completed. There is a count down timer showing the Applicant how many days they have
left to upload these documents. This can be seen in the Entry Into Service tab on the Attachments page. The
Applicant will receive automated email reminders making them aware of the number of days they have left to upload
this information.
If the 30 days passes then NR can decide whether or not to take further action against the Applicant and/or the
Tenant as they have not complied by the terms of the Licence to Alter agreement.
‘Save’ button
Entry into service
confirmation date
Project changes
text entry box
‘Entry Into Service –
Requested’ status
change
8.0.
Stage 7: Entry Into Service - Completed
In order for an Applicant to be able to confirm that they have completed the entry into service process they must
upload the requested attachments that are listed on the Licence to Alter.
These attachments are also listed in the Attachments section of the application under the Entry Into Service tab. This
is where the attachments need to be uploaded.
This attachments section works in the same way as the Initial Submission Documents attachments section. An
Applicant needs to click on the Add link in order to upload the appropriate file to the application. The replace function
is also available at this stage.
Once all the attachments are uploaded the Applicant can confirm that the have completed this stage by selecting the
Entry Into Service Complete button.
If no attachments have been requested by any of the Approving Reviewers the Applicant simply needs to click on the
Entry Into Service Complete button without uploading any documents.
This changes the status of the application to Entry Into Service – Completed and also sends an email to all of the
Approving Reviewers alerting them that the requested entry into service documents have been uploaded.
At this point the Approving Reviewers will log in and check that they are content with the documents that have been
uploaded by the Applicant. If they are happy then they can click the Accept Entry Into Service button which changes
their individual Reviewer status to Entry Into Service – Accepted and their status light turns dark green. Further details
regarding this process are detailed in section 9.0.
Entry into service
tab in attachments
section
Requested entry
into service
documents
‘Add’ link
‘Entry Into
Service
Complete’ button
9.0
9.1.
Stage 8: Entry Into Service - Accepted
Entry Into Service – Approving Reviewer Acceptance
When an Applicant has uploaded the documents that have been requested by the Approving Reviewers it is the
responsibility of the Approving Reviewers to log in and check that they are happy with the documents that have been
uploaded.
If an Approving Reviewer is happy with the documents that have been uploaded then they can click the Accept Entry
Into Service button which changes their individual Reviewer status to Entry Into Service – Accepted and their status
light turns dark green.
Once all of the Approving Reviewers accept the entry into service this will change the overall application status to
Entry Into Service – Accepted and the application will move from the In-Progress application list and will be stored in
the Accepted application list.
‘Accept Entry
Into Service’
button
‘Entry Into Service –
Accepted’ status
Accepted tab
showing all
applications that
have an ‘Entry
Into Service –
Accepted’ status
9.2.
Entry Into Service – Request More Information
If an Approving Reviewer is not happy with any of the documents that have been uploaded during the entry into
service stage they are able to submit a Request for More Information to the Applicant. This works in a similar way to
the Request for Information process during the initial review of the application (Stage 2 of the process). See section
3.11 for more details.
In order to request more information the Applicant clicks on the Request More Info button under the attachments
section of the application.
Selecting this button will open up a Request Information box where details regarding the request can be entered by
the Approving Reviewer. Once the details are entered the Approving Reviewer should click Ok in order to submit the
request to the Applicant.
Request
information box
Once a request has been submitted the entry into service section of the application shows a message of ‘More
Information Requested’.
This further information message is then saved in red at the top of the Entry Into Service page. This will also open an
Additional Documents (2) tab which works in the same way as the original Additional Documents (1) tab.
An email will be sent to the Applicant to inform them that further information has been requested during this entry into
service stage.
Further information
text in entry into
service section of
application left by Fire
Engineer (Approving
Reviewer)
Further
information email
Further information
text in entry into
service section of
application left by
Facility Surveyor
Applicant ‘Additional
Documents (2)’
upload box
Document uploaded
successfully to
‘Additional
Documents (2)’ tab
Replace
document
function available
in entry into
service tab
There is no function for the Applicant to be able to respond to this request other than to upload the documents that
have been requested. The Applicant can either replace the original document they uploaded during the entry into
service or they can attach an additional document in the Additional Documents (2) tab.
An email will be sent to inform the Approving Reviewers if a document has been replaced in the entry into service
section of the attachments.
Once all of the Approving Reviewers accept the entry into service this will change the overall application status to
Entry Into Service – Accepted and the application will move from the In-Progress application list and will be stored in
the Accepted application list. This completes the application process.