1
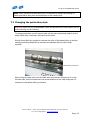
Shown with optional mobile table
User Guide
User Manual
CreaseStream Junior
Contents
Introduction to CreaseStream Junior ............................................................................... 3
1 Safety precautions .................................................................................................. 4
1.1
In case of emergency ....................................................................................... 4
2 Specifications ......................................................................................................... 4
3 Supplied with your CreaseStream Junior ................................................................... 5
4 Assembly ............................................................................................................... 6
4.1
Fitting the delivery tray .................................................................................... 6
4.2
Fitting the delivery stop plate ............................................................................ 6
4.3
Fitting the delivery side guides .......................................................................... 7
4.4
Feeder side guides ........................................................................................... 8
4.5
Adjusting feeder side guide for out-of-square paper ............................................ 9
4.6
Using the feeder supports for wide sheets.......................................................... 9
5 Adjusting shaft pressure for different weights of stock ............................................... 9
6 Creasing ...............................................................................................................10
6.1
Setting the crease for different weights of stock ................................................10
6.2
Adjusting the crease position on your sheet ......................................................14
7 Perforating ............................................................................................................14
7.1
Changing the perforation style .........................................................................15
7.2
Changing the nylon sleeve ...............................................................................16
7.3
Adjusting the perforation position on your sheet ................................................17
7.4
Using the perforation stripping tool to prevent sheets wrapping around shaft .......18
8 Resetting machine to crease or perforate the reverse side of the sheet ......................18
8.1
Removing the top shaft ...................................................................................18
8.2
Removing tools and guides from shaft ..............................................................19
8.3
Removing the bottom shaft..............................................................................19
8.4
Reassembly and refitting shafts ........................................................................20
9 Operating the CreaseStream Junior .........................................................................21
9.1
Switching the machine on and off.....................................................................21
9.2
Feeding the machine .......................................................................................21
10
Troubleshooting .................................................................................................23
11
Maintenance ......................................................................................................24
Appendix A — Crease style sample guide .......................................................................25
Appendix B — Micro-Perforation Guide ...........................................................................26
Tech-ni-Fold Ltd — Unit 2, St John’s Business Park, Lutterworth, Leics LE17 4HB, UK
Tel: +44 (0) 1455 554491 — www.technifold.com
Page | 2
User Manual
CreaseStream Junior
Introduction to CreaseStream Junior
Your CreaseStream Junior is a stand alone, hand fed creasing and
micro-perforating machine. Ideal for small to medium digital and litho
production runs, you can use your machine either on a table top or on
the optional mobile table.
It is now possible to successfully hand feed up to 4,000 sheets per hour
through the CreaseStream Junior. This rate easily out performs a
number of the automatically fed creasing machines that are currently on
the market.
Tech-ni-Fold’s innovative creasing technology used in the CreaseStream
Junior will produce excellent quality creasing that prevents cracking. It
does this by making use of softer and patented creasing devices that
gently manipulate and prepare the area of stock so that cracking does
not occur during the folding stage.
Up to six crease settings are available to match any imaginable stock
and print combination.
You can micro-perforate to produce flat, nearly invisible micro
perforations that allow sheets from 65 to 350gsm to run smoothly
through any laser printer or copier.
Easy to set up and simple to adjust, CreaseStream Junior will
revolutionise your creasing and micro-perforating production.
The CreaseStream Junior can be supplied with or without the optional
mobile table unit.
Tech-ni-Fold Ltd — Unit 2, St John’s Business Park, Lutterworth, Leics LE17 4HB, UK
Tel: +44 (0) 1455 554491 — www.technifold.com
Page | 3
User Manual
CreaseStream Junior
1 Safety precautions
Your CreaseStream Junior creasing and perforating machine should be operated only by
professional and well trained personnel.
Electrical cables and any other machine connections must be laid in such a way as not
to represent a tripping hazard.
A trained customer services technician is to be called in whenever important
adjustments or repairs become necessary, particularly when these relate to electrical
parts of the equipment.
For safety reasons the main power plug must always be removed from the power
source during all repair and maintenance work.
For functional reasons some moveable parts may be touched while the machine is
running.
Warning: Due to the risk of getting hair and clothing caught in moving parts we
suggest that long hair is worn in a protective net and any ties, rings and loose clothing
are removed.
1.1 In case of emergency
In case of emergency, switch off machine by pressing the red ‘Emergency
stop’ button.
2 Specifications
CreaseStream Junior
Single speed: 33 metres per min
Minimum sheet size: 80mm x 120mm
Maximum sheet size: 520mm x 520mm
Stock range: 65-350gsm
Machine weight: 50kg
Dimensions: Length 1050mm, Width 670mm, Height 305mm
Supply voltage: 230V, 50Hz single phase
Fuse: 6.3 amps
Optional mobile table
Dimensions: Length 645mm, Width 530mm, Height 705mm
Weight, with packaging: 36kg
Tech-ni-Fold Ltd — Unit 2, St John’s Business Park, Lutterworth, Leics LE17 4HB, UK
Tel: +44 (0) 1455 554491 — www.technifold.com
Page | 4
User Manual
CreaseStream Junior
3 Supplied with your CreaseStream Junior
Before assembling your creasing machine please take care to check all of the following
parts have been supplied:
CreaseStream Junior
Power lead
Delivery tray
2 x delivery side guides
Delivery stop plate
2 x knurled bolts
2 x square M4 nuts
Feeder side guide
Feeder side stop
4mm Allen key
2 x perforation stripping tools
6 coloured creasing ribs
2 x side lay feeder guides
Creasing rib holder (supplied
pre-fitted to shaft)
Female creasing tool (supplied
pre-fitted to shaft)
2 micro perforating blades
Perforating blade holder
(supplied pre-fitted to shaft)
Nylon sleeve holder (supplied
pre-fitted to shaft)
Crease style sample guide
Perforating setting chart
If any of these parts are missing, please contact Tech-ni-fold:
Tel: +44 (0) 1455 554491
E-mail: [email protected]
Tech-ni-Fold Ltd — Unit 2, St John’s Business Park, Lutterworth, Leics LE17 4HB, UK
Tel: +44 (0) 1455 554491 — www.technifold.com
Page | 5
User Manual
CreaseStream Junior
4 Assembly
After unpacking your CreaseStream Junior and confirming all parts are present,
assembly is as follows:
4.1 Fitting the delivery tray
Working at the delivery end of the machine, use two hands to hold the delivery plate
in a horizontal position, with the single edge raised lip towards the machine and facing
upward.
Introduce the raised lip into the receiving channel on the machine just below the row
of four screws. Lower the delivery tray slightly to secure in position.
Receiving channel
Slot
Single raised lip
4.2 Fitting the delivery stop plate
Insert a knurled bolt through the hole in the delivery stop plate, then through the
delivery tray slot as shown below. Fix underneath with one square M4 nut. Note that
the lugs on the nut should face upward and into the delivery tray slot.
To adjust position of the stop plate for different sheet sizes, loosen the knurled nut,
slide stop plate to position and tighten.
Tech-ni-Fold Ltd — Unit 2, St John’s Business Park, Lutterworth, Leics LE17 4HB, UK
Tel: +44 (0) 1455 554491 — www.technifold.com
Page | 6
User Manual
CreaseStream Junior
4.3 Fitting the delivery side guides
4.3.1 Guide 1
Use a knurled bolt to fix side guide 1 in position. Place bolt through the guide and
through the slot on the edge of the delivery tray. Tighten with a square M4 nut. Note
that the lugs on the nut should face outward and into the delivery tray slot.
To adjust the position of the side guide for different paper sizes, loosen the knurled
nut, slide to position and tighten.
4.3.2 Guide 2
Position the magnetic side guide 2 according to the sheet size you are using.
Tech-ni-Fold Ltd — Unit 2, St John’s Business Park, Lutterworth, Leics LE17 4HB, UK
Tel: +44 (0) 1455 554491 — www.technifold.com
Page | 7
User Manual
CreaseStream Junior
4.4 Feeder side guides
The feeder side of the machine has one fixed, adjustable, guide and one magnetic
guide. An extra feeder side stop is also provided for use with heavy stock.
4.4.1 Fitting feeder side guide 1
Place magnetic guide 1 in position according to the width of sheet you are using.
Adjust as necessary. For heavier stock, add support with the feeder side stop.
Feeder side guide 1
Feeder side stop
Tech-ni-Fold Ltd — Unit 2, St John’s Business Park, Lutterworth, Leics LE17 4HB, UK
Tel: +44 (0) 1455 554491 — www.technifold.com
Page | 8
User Manual
CreaseStream Junior
4.5 Adjusting feeder side guide for out-of-square paper
If the sheets you wish to crease or perforate are poorly trimmed, adjust the angle of
the fixed side guide to compensate by turning the skew adjustment thumbwheel.
Move this until the sheet sits cleanly between the feeder guides.
Feeder supports
Skew adjustment
thumbwheel
4.6 Using the feeder supports for wide sheets
Add extra support to stop wide sheets from bending with the removable feeder
supports (see picture, Section 4.5). The feeder supports can be repositioned when
dealing with narrow sheets.
5 Adjusting shaft pressure for different weights of
stock
To adjust shaft pressure according to the thickness of material you are processing you
will need two small samples of the same stock (minimum sample size 2cm x 1cm).
Carry out the adjustment by first lifting the caliper plate at each end of the shaft, using
a finger or thumb, and inserting your stock sample under the plate. Lower the caliper
plate onto it. Leave this stock sample in position for your creasing or perforating job.
The shaft pressure for that stock weight is then set.
Tech-ni-Fold Ltd — Unit 2, St John’s Business Park, Lutterworth, Leics LE17 4HB, UK
Tel: +44 (0) 1455 554491 — www.technifold.com
Page | 9
User Manual
CreaseStream Junior
Stock sample
Calliper plate
Note: Do not adjust the calliper adjustment screws. These have been factory set to
provide the correct shaft pressure needed for the stock placed under the calliper plate.
6 Creasing
Your CreaseStream Junior is supplied with creasing devices suitable for a range of styles
and stock weights. Three colour coded creasing ribs allow you to choose from up to six
settings. See the sample guide (Appendix A) for the crease settings available.
Each colour coded creasing rib is designed to work with a range of stock weights,
according to the alignment settings you use.
The coloured creasing ribs have a unique profile to produce the relevant depth of
crease required for the weight of stock that is processed.
To achieve the desired crease width simply study the sample guide (Appendix A) and
select the correct coloured creasing rib and corresponding coloured dot setting on the
female creasing tool.
This simple colour code matching usually gives perfect results. Start by matching the
creasing rib with the single dot on the female and move on to the next if your results
are less than satisfactory.
Remember to set the shaft pressure for the stock weight you are using (see Section 5).
6.1 Setting the crease for different weights of stock
6.1.1 Reset creasing rib to another stock weight setting
Tech-ni-Fold Ltd — Unit 2, St John’s Business Park, Lutterworth, Leics LE17 4HB, UK
Tel: +44 (0) 1455 554491 — www.technifold.com
Page | 10
User Manual
CreaseStream Junior
Warning: Switch off your CreaseStream Junior and disconnect the mains power source
before carrying out the following.
To change from one stock weight setting to another using the same creasing rib, lift
open the shaft cover and use the 4mm Allen key to loosen the locking ring screw on
the creasing rib holder.
Rib release screw
Locking ring screw
Creasing rib holder
Top shaft
Nylon sleeve holder
Bottom shaft
Perforating blade
holder
Female creasing tool
Then move and hold the top shaft away from the bottom shaft by lifting one of the
two caliper plates slightly (see picture, Section 5), using a finger or thumb. The
creasing rib holder will now slide freely on the top shaft.
Slide the creasing rib holder along until the coloured rib aligns with another groove
on the female creasing tool, corresponding to another stock weight setting. Note that
it may be necessary to adjust the crease position to align with your sheet (see
Section 6.2).
Creasing rib
Female creasing tool
Tech-ni-Fold Ltd — Unit 2, St John’s Business Park, Lutterworth, Leics LE17 4HB, UK
Tel: +44 (0) 1455 554491 — www.technifold.com
Page | 11
User Manual
CreaseStream Junior
6.1.2 Changing the creasing rib
Warning: Switch off your CreaseStream Junior and disconnect the mains power
source before carrying out the following.
When changing from one stock weight to another you may need to change to
another creasing rib according to the chart in Appendix A. The split design of the rib
makes it quick and easy to do this.
Firstly lift open the shaft cover and use the 4mm Allen key to loosen the locking ring
screw on the creasing rib holder (see picture, Section 6.1.1).
Move and hold the top shaft away from the bottom shaft by lifting one of the two
caliper plates slightly (see picture, Section 5), using a finger or thumb. The creasing
rib holder will now slide freely on the top shaft.
Slide the creasing rib holder to the left or right, away from the female creasing tool.
Using the 4mm Allen key supplied, first loosen the rib release screw.
Then pull the rib away from the creasing rib holder.
Tech-ni-Fold Ltd — Unit 2, St John’s Business Park, Lutterworth, Leics LE17 4HB, UK
Tel: +44 (0) 1455 554491 — www.technifold.com
Page | 12
User Manual
CreaseStream Junior
Push the new creasing rib over the creasing rib holder, squeeze the rib together and
tighten the rib release screw. The new rib is now secured on the creasing rib holder.
Next slide the creasing rib holder back towards the female creasing tool and slot the
rib into the correct channel, according to Appendix A. Tighten the locking ring. Note
that the creasing rib can be used to help align the crease position on your sheet.
When this is done, align the new rib (see Section 6.1.3) and tighten the locking ring.
6.1.3 Aligning the creasing rib
Once your crease position has been identified, loosen the female creasing tool on the
bottom shaft.
Then feed a sample sheet of your stock through the machine. Insert it from the
feeder side and rotate the top shaft by hand. Do this until the female creasing tool
has rotated at least 360 degrees and the locking ring screw is visible.
Tech-ni-Fold Ltd — Unit 2, St John’s Business Park, Lutterworth, Leics LE17 4HB, UK
Tel: +44 (0) 1455 554491 — www.technifold.com
Page | 13
User Manual
CreaseStream Junior
The female creasing tool has now self-aligned exactly centrally to the creasing rib.
Tighten the female creasing tool.
Note: For maximum crease quality ensure that all fixing screws of components on
one shaft are all in a line and facing the operator. Once secured tightly, rotate the
shaft 180 degrees so the fixing screws all face towards the opposite direction. Then
secure components on the second shaft with fixing screws facing operator. Tighten
according to the set up required.
This simple procedure of aligning components so that fixing screws are 180 degrees
apart helps avoid high pressure points during rotation of the shafts. The tightening
up of circular components causes them to pull tight to one side of the shaft which
forms an oval shape. This defect is minimal, however if this procedure is not adhered
to a slight increase in crease pressure may be detected at certain points along the
processed sheet.
6.2 Adjusting the crease position on your sheet
Warning: Switch off your CreaseStream Junior and disconnect the mains power source
before carrying out the following.
To adjust the position of the crease, use the 4mm Allen key supplied to loosen the
locking ring on the creasing rib holder. Then loosen the screw on the female creasing
tool (see picture, Section 6.1.1).
The creasing rib holder and female creasing tool will now slide, as one, along their
respective shafts and can be positioned according to the crease position you need.
When in position tighten both Allen screws.
7 Perforating
Your CreaseStream Junior is supplied with perforating tools suitable for a range of styles
and stock weights. Two micro-perforating blades allow you a choice of settings. See
Appendix B for the perforation settings available.
Use of the correct micro-perforating blade is essential to obtain a high quality
perforation.
Remember to set the shaft pressure for the stock weight you are using (see Section 5).
Tech-ni-Fold Ltd — Unit 2, St John’s Business Park, Lutterworth, Leics LE17 4HB, UK
Tel: +44 (0) 1455 554491 — www.technifold.com
Page | 14
User Manual
CreaseStream Junior
Note: When carrying out perforating only it is important to loosen the creasing rib
holder and slide it away from the female part of the creasing tool.
7.1 Changing the perforation style
Warning: Switch off your CreaseStream Junior and disconnect the mains power source
before carrying out the following.
To change perforation you will need to take out the micro-perforating blade from the
blade holder after it has been removed from the shaft.
Use the 4mm Allen key supplied to unscrew the collar of the blade holder so that the
existing perforating blade can be removed and replaced with the other blade,
supplied.
Perforation blade holder
When fixing the collar back onto the shaft make sure that the fixing screw is on the
left hand side, as this complies with the thread direction of the collar and gives it a
tendency to self tighten during production.
Tech-ni-Fold Ltd — Unit 2, St John’s Business Park, Lutterworth, Leics LE17 4HB, UK
Tel: +44 (0) 1455 554491 — www.technifold.com
Page | 15
User Manual
CreaseStream Junior
Note: For maximum perforation quality ensure that all fixing screws of components
on one shaft are all in a line and facing the operator. Once secured tightly, rotate the
shaft 180 degrees so the fixing screws all face towards the opposite direction. Then
secure components on the second shaft with fixing screws facing operator. Tighten
according to the set up required.
This simple procedure of aligning components so that fixing screws are 180 degrees
apart helps avoid high pressure points during rotation of the shafts. The tightening up
of circular components causes them to pull tight to one side of the shaft which forms
an oval shape. This defect is minimal, however if this procedure is not followed a
slight increase in perforation pressure may be detected at certain points along the
processed sheet.
7.2 Changing the nylon sleeve
The nylon sleeve fits into the nylon sleeve holder (this is the same component as the
creasing rib holder). Once secured into position it runs on top of the micro-perforation
blade to produce the desired application according to stock weight.
To replace one nylon sleeve for another, completely undo locking ring screw and
offset the nylon rib holder as shown below.
Pull out the old sleeve and replace with the new one as shown. The split in the nylon
sleeve allows quick and easy replacement.
Tech-ni-Fold Ltd — Unit 2, St John’s Business Park, Lutterworth, Leics LE17 4HB, UK
Tel: +44 (0) 1455 554491 — www.technifold.com
Page | 16
User Manual
CreaseStream Junior
Then replace the nylon rib holder and tighten screw.
7.3 Adjusting the perforation position on your sheet
Warning: Switch off your CreaseStream Junior and disconnect the mains power source
before carrying out the following.
To adjust position of the perforation, use the 4mm Allen key supplied to loosen the
screw on the perforating blade holder and on the nylon sleeve holder.
The perforating blade holder and nylon sleeve holder will now slide, as one, along
their respective shafts and can be positioned according to the perforating position you
need.
When in position tighten both Allen screws.
Tech-ni-Fold Ltd — Unit 2, St John’s Business Park, Lutterworth, Leics LE17 4HB, UK
Tel: +44 (0) 1455 554491 — www.technifold.com
Page | 17
User Manual
CreaseStream Junior
7.4 Using the perforation stripping tool to prevent sheets
wrapping around shaft
In some cases the teeth on the micro-perforating blade may pull the sheet around the
shaft. Use the magnetic perforating stripping tool, positioned as shown below, to
prevent this.
Perforation stripping
tool
8 Resetting machine to crease or perforate the reverse
side of the sheet
To change the crease or perforation to the other side of the sheet you need to remove
the shafts and swap tools from one shaft to another.
Removing shafts on the CreaseStream Junior is a fast and easy process.
8.1 Removing the top shaft
Warning: Switch off your CreaseStream Junior and disconnect the mains power source
before carrying out the following.
Working from the delivery end of the machine, use the 4mm Allen key supplied to
loosen the screw securing the holding collar at the end of the shaft.
Tech-ni-Fold Ltd — Unit 2, St John’s Business Park, Lutterworth, Leics LE17 4HB, UK
Tel: +44 (0) 1455 554491 — www.technifold.com
Page | 18
User Manual
CreaseStream Junior
Holding collar
Slide the collar along the shaft slightly then move the shaft to the right in order to
disengage the left end from the drive pin, thereby freeing the shaft from the machine.
8.2 Removing tools and guides from shaft
Use the 4mm Allen key supplied to loosen all necessary tools and guides and slide
them off the end of the shaft.
8.3 Removing the bottom shaft
Warning: Switch off your CreaseStream Junior and disconnect the mains power source
before carrying out the following.
To remove the bottom shaft you will first need to remove the top shaft, as described
in Section 8.1. Removal of the bottom shaft then follows the same process.
Tech-ni-Fold Ltd — Unit 2, St John’s Business Park, Lutterworth, Leics LE17 4HB, UK
Tel: +44 (0) 1455 554491 — www.technifold.com
Page | 19
User Manual
CreaseStream Junior
8.4 Reassembly and refitting shafts
Position all tools and guides on their respective shafts and tighten, using the 4mm
Allen key.
Refit bottom shaft to the CreaseStream Junior first. Insert it into the locating hole at
the right, then slide it to the left to engage the notch on the shaft with the drive pin.
Notch
Top shaft
While holding the shaft against the pin, work at the other end of the shaft to slide the
holding collar to the right, tightening it with the Allen key.
Tech-ni-Fold Ltd — Unit 2, St John’s Business Park, Lutterworth, Leics LE17 4HB, UK
Tel: +44 (0) 1455 554491 — www.technifold.com
Page | 20
User Manual
CreaseStream Junior
9 Operating the CreaseStream Junior
9.1 Switching the machine on and off
9.1.1 To switch on
Stop
Start
Connect your machine to a mains power outlet (230V 50Hz) using the power lead
supplied.
To switch on the machine, make sure the red stop button is unlocked by turning it
anticlockwise. Then press the green start button.
9.1.2 To switch off
To stop the machine press the red stop button.
Note: The stop button is designed to lock in the stop position. Before the machine
can be started again you will need to turn it anticlockwise to unlock.
9.2 Feeding the machine
Once the machine is correctly set up for the job in hand, take a number of sheets and
place them in the feed area. Switch on your CreaseStream Junior and feed the sheets
in to the machine by hand, with the aid of a ‘rubber finger’ if necessary.
Tech-ni-Fold Ltd — Unit 2, St John’s Business Park, Lutterworth, Leics LE17 4HB, UK
Tel: +44 (0) 1455 554491 — www.technifold.com
Page | 21
User Manual
CreaseStream Junior
Tech-ni-Fold Ltd — Unit 2, St John’s Business Park, Lutterworth, Leics LE17 4HB, UK
Tel: +44 (0) 1455 554491 — www.technifold.com
Page | 22
User Manual
CreaseStream Junior
10 Troubleshooting
Problem
Machine does not
work
Paper is not
creased accurately
Cause
Emergency stop has been
activated
There is no power at the
power outlet
Check power supply and
fuses of the building
Cable disconnected
Check wire connections
Bearings have not been
put into place correctly,
shaft can move
horizontally
Check the bearings and
move them into place if
necessary
Infeed is incorrectly set
Paper is still
cracking after
being creased
once
Check the paper infeed and
apply adjustments, if
necessary
Guide wheels are
incorrectly positioned
Infeed a sheet manually
and check the positions of
the guide wheels. Alter if
necessary
Wrong creasing ribs
applied to the tools
Use the correct creasing
ribs according to the paper
stock
Not enough pressure on
the shafts
Adjust the pressure of the
shafts, to increase pressure
Paper or card is very thick
Perforation is too
strong, it cuts the
sheet
Remedy
Deactivate emergency stop
by turning anticlockwise
Wrong PVC-sleeve applied
Too much pressure on the
shaft
Wrong perforating blade
applied
We recommend double
creasing on the same line
in 2 runs. Use less pressure
on the first, more or
maximum pressure on the
second run to treat the
paper grain smoothly
Change PVC-sleeve (black
for 25 & 52 TPI, blue for 17
TPI perforating blades)
Reduce pressure on the
shaft
Change perforating blade
(17, 25 or 52 TPI)
Tech-ni-Fold Ltd — Unit 2, St John’s Business Park, Lutterworth, Leics LE17 4HB, UK
Tel: +44 (0) 1455 554491 — www.technifold.com
Page | 23
User Manual
CreaseStream Junior
11 Maintenance
From time to time remove all residues of paper, powder or colour from the creasing shafts
and guide shafts, using regenerator item no. 210.000.272.
In line with the use of the machine, from time to time apply oil to the bearings. Occasional
lubrication of the gearwheels of the creasing shaft bushing will not only increase the life of
these precision gearwheels but it will also ensure quiet operation of the machine.
We recommend that any other repair or maintenance work be carried out only by a trained
Customer Service Technician.
Tech-ni-Fold Ltd — Unit 2, St John’s Business Park, Lutterworth, Leics LE17 4HB, UK
Tel: +44 (0) 1455 554491 — www.technifold.com
Page | 24
Produce Cylinder Quality
creasing with the
Crease Style Sample Guide
85 – 150gsm
130 – 180gsm
170 – 250gsm
200 – 280gsm
270 – 330gsm
300 – 330gsm
Tech-ni-fold Unit 2, St John’s Business Park, Lutterworth, Leicester LE17 4HB
Tel: +44 (0) 1455 554491 Fax: +44 (0) 1455 554526 Email: [email protected] www.technifold.com
User Manual
CreaseStream Junior
Appendix B — Micro-Perforation Guide
The Micro-Perforator has been designed to produce maximum quality results on light,
medium and heavy weight materials.
You need to choose the relevant micro-perforation blade and nylon sleeve for the material
you are processing through the machine.
12TPI Heavy material
25TPI Medium/Light material
170-350gsm
60-250gsm
Blue Nylon Sleeve
Black Nylon Sleeve
Other TPI sizes are available on request. Blades and Nylons can be purchased as
consumable items.
Tech-ni-Fold Ltd — Unit 2, St John’s Business Park, Lutterworth, Leics LE17 4HB, UK
Tel: +44 (0) 1455 554491 — www.technifold.com
Page | 26