1
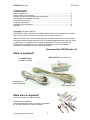
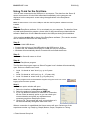
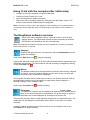
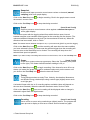
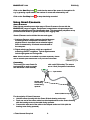
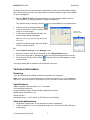
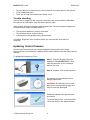
EASYSENSE 1Link
DO228 (2)
EASYSENSE
1 Link
user manual
© Data Harvest Group Ltd
1
EASYSENSE 1Link
DO228 (2)
CONTENTS
What is supplied?.............................................................................................. 2
Using 1Link for the first time.............................................................................. 3
Using 1Link with the computer after initial setup............................................... 4
The EasySense software overview ................................................................... 4
Using Smart Q sensors ..................................................................................... 6
Technical information ........................................................................................ 7
Updating 1Link’s firmware................................................................................. 8
Warranty............................................................................................................ 9
Copyright: all rights reserved.
This manual may be copied for use within the premises of the Licensee on condition
that it is not loaned, sold or used outside the Licensee's premises.
Data Harvest's policy is to continually improve products and services, so we reserve
the right to make changes without notice. It is acknowledged that there may be errors
or omissions in this publication for which responsibility cannot be assumed. No
liability will be accepted for loss or damage resulting from use of information
contained in this manual or from uses as described.
Document No: DO228 (Issue 2)
What is supplied?
EASYSENSE 1Link interface
The EASYSENSE
software CD ROM
A standard A to
mini B USB cable
A long sensor lead
What else is required?
A Smart Q sensor for capturing data.
Please visit our website
(www.data-harvest.co.uk) or contact your supplier
for an up-to-date list of Smart Q sensors.
© Data Harvest Group Ltd
2
EASYSENSE 1Link
DO228 (2)
Using 1Link for the first time
1Link is used connected to the USB port on a computer. The data from the Smart Q
sensor connected to 1Link will be transmitted immediately to the computer and
displayed on the computer’s screen using the applications in the EasySense
software.
Note: Do not connect 1Link to the USB port until after the EasySense software has been
installed.
Step 1:
Install the EasySense software, if it is not already on your computer. For details of how
to install and operate this program, please refer to the instructions provided with the
software. Make sure 1Link is not connected to the USB port during this installation.
1Link requires version 2.8 or above of the EasySense software. (The version number
can be verified in About from the Help menu).
Step 2:
Install the 1Link USB drivers.
• Connect the mini plug of the USB cable to the USB input on 1Link.
• Connect the ‘flat’ standard USB plug to a USB port on your computer.
• Windows will automatically detect a new device and install the drivers.
Step 3:
Connect the Smart Q sensor to 1Link.
Step 4:
Open the EasySense program.
The first time the program opens a ‘Select Program Level’ window will automatically
open. Select a suitable user’s level.
•
•
•
Level 1 is aimed at ‘start’ level (e.g. up to 9 years
old).
Level 2 is aimed at ‘mid’ level (e.g. 9 – 15 years old).
Level 3 is aimed at ‘exam’ level (e.g.15 years plus).
Note: The program level can be altered at anytime using the Level icon once a
logging option has been opened.
Step 5:
An Interface option window will open.
1. Select the Interface as EasySense Range.
2. Select the method of connection as USB Port.
3. If you use different interfaces or methods of connection,
tick the ‘Show at startup’ option so you can check your
current selection and make any adjustments as
necessary each time EasySense opens.
4. Click on OK. The program will save your selection so it
will be automatically configured when next used.
When a connection is established the Home screen will open. Select one of the
experiment modes e.g. EasyLog, Graph, Meters, Scope, Snapshot or Timing.
© Data Harvest Group Ltd
3
EASYSENSE 1Link
DO228 (2)
Using 1Link with the computer after initial setup
•
•
•
•
Connect 1Link to the computer using the USB cable.
Connect a Smart Q sensor to 1Link.
Open the EasySense software program.
Select one of the recording modes e.g. EasyLog from the Home screen. The
sensor connected will automatically be recognised.
Note: It is best to connect 1Link to the USB port on the computer (so it is powered) before
connecting a sensor (especially when connecting high current sensors such as Motion or
CO2).
The EasySense software overview
Home is the main navigation screen; it has the icons for all of 1Link’s
logging options. The experiment options and the complexity of toolbars
and functions are altered by the user level selected.
Note: Setup Remote and Retrieve Remote will not be available as 1Link will only operate
while connected to the computer.
EasyLog
EasyLog will open pre-set to record sensor values continuously as a line
graph until stopped.
Click on the Start/Stop icon
to begin recording.
Logging will start with a time span of 30 seconds and when this has elapsed the time
will double automatically. This will continue until the recording is stopped by clicking
on the Start/Stop icon.
Meters
The Meters window gives an introduction to sensors and how they respond
to change. Up to four section displays can be open at any one time and
they can be any combination of displays.
The program will open with live data from the sensor in a Numeric window. Click on
the appropriate picture icon on the tool bar to open other section displays i.e.
Numeric, Gauge, Colour Change or Bar.
Click on the Start/Stop icon
to stop recording.
Pictogram
(Level 1 only)
The value from a sensor can be displayed as pictures or an abstract colour
block or bar chart. Each picture represents a 10th of the range (or span) of
the sensor and is also displayed as a number from zero to ten.
The program will open with live data displayed as pictures on a horizontal chart. The
graph type can be changed to an abstract colour blocks, a bar chart or oriented
vertically.
A sensor reading is captured every time the Store icon is selected. Click on the
Start/Stop icon to stop recording.
© Data Harvest Group Ltd
4
EASYSENSE 1Link
DO228 (2)
Snapshot
Snapshot will open pre-set to record sensor values on demand (manual
sampling) with a bar graph display.
Click on the Start/Stop icon
the sensor’s current value.
to begin recording. Click in the graph area to record
Click on the Start/Stop icon
to stop data being recorded.
Graph
(Level 2 and 3 only)
Graph is pre-set to record sensor values against a chosen time span as
a line graph display.
The window opens with the logging wizard from which the time span, interval
between samples, start condition and triggers for the recording can be chosen. (The
options available will depend on the level you have selected to work at). When the
selection has been made, click on Finish.
Note: The fastest interval between samples is 20 μs (microseconds) [FAST log and Pre-trigger].
Click on the Start/Stop icon
and the recording will start when the start condition
you have selected is met e.g. if None was the selected trigger then the recording will
start as soon as the Start/Stop icon is clicked. The recording will stop when the
selected time span has passed.
Note: If you want to stop a recording before it has run the full term, click on the Start/Stop icon.
Scope
(Level 3 only)
Scope has a simple oscilloscope type display. Select the Timebase (from panel
on the right). The fastest interval between readings is 20 μs.
Click on the Start/Stop icon
to begin recording. If the interval is set to 20 ms or
slower (roll mode) the graph trace will be redrawn continuously on the screen until
you click on the Start/Stop icon
when the trace will ‘freeze’.
Timing
Timing allows students to study Time, Velocity, Acceleration, Momentum
and Kinetic Energy relationships using a switch-type (digital) sensor such
as a Light gate.
A wizard will open with the ‘at A’ recording options available (these will depend on
the user level selected). When the selection has been made, click on Finish.
Click on the Start/Stop
icon and a reading will be displayed when a change is
detected in signal from the digital sensor.
Click on the Start/Stop icon
to stop data being recorded.
Counting
(Level 1 and 2 only)
Use to count an event using a switch-type (digital) sensor. The program will
open pre-set to display a count as a number and horizontal bar graph.
© Data Harvest Group Ltd
5
EASYSENSE 1Link
DO228 (2)
Click on the Start/Stop icon
, each time the state of the sensor is changed to On
e.g. by pressing a push switch, the number of counts will advanced by one.
Click on the Start/Stop icon
to stop data being recorded.
Using Smart Q sensors
Smart Q sensors
Data Harvest manufactures a wide range of Smart Q sensors for use with the
EASYSENSE range of loggers. Each sensor incorporates a microprocessor that
stores the calibration and auto-identification data. This dramatically simplifies set up
procedures and allows for greater flexibility when logging data.
Smart Q Sensors can be divided into two main types:
1. Analogue Sensors, which measure physical changes
such as light level, temperature and sound. This
physical value is converted into an electrical signal,
which is measured by 1Link and communicated to
the computer.
Smart Q Sound sensor
2. Digital switch-type Sensors, which are capable of
measuring ON/OFF conditions. Typical digital sensors
include Light gates and Timing mats.
Note: Smart Q sensors are available to purchase separately. Please
visit our website (www.data-harvest.co.uk) for further information.
Smart Q Light gate
Connecting
The housing for most Smart Q sensors is fitted with a mini DIN socket. The sensor
lead supplied is used to connect a Smart Q sensor to 1Link (for specific instructions
see the sensor’s user manual).
Input socket
Sensor cable
with locating
arrows facing
upwards
DA
TA
HA
RV
t
ar
Sm
ES
T
TE
CH
NO
LO
Q
GY
Smart Q label on top
For the majority of Smart Q sensors:
• Hold the sensor housing with the Smart Q label showing on the top.
• Push one end of the sensor cable into the shaped socket on the sensor housing
with the locating arrow on the cable facing upwards.
• Connect the other end of the cable to the shaped socket on 1Link (with the
locating arrow facing upwards).
© Data Harvest Group Ltd
6
EASYSENSE 1Link
DO228 (2)
All Smart Q sensors are automatically calibrated but some also have multiple ranges.
If the sensor has more than one range and the currently selected range is not suitable
for your investigation:
•
Start the EASYSENSE program and select one of the logging modes from the
Home screen e.g. EasyLog, Meters, Graph or SnapShot.
The simplest way to change a sensor’s range to one suitable for an experiment is:
•
•
•
Select the New recording wizard icon
.
Click on the sensor’s name (it will be listed
using its current range).
A set sensor range window will open; the
current range will be highlighted.
Click on the
Sensor’s name
Note: If the sensor only has one range this window
won’t open.
•
Select the required range, then OK. Select
Finish to exit the wizard.
Or
• Select Sensor Config from the Settings menu.
•
Select the sensor from the list and click on the Change Range button.
•
The current range will be highlighted. Select the required range and click on OK.
•
Close Sensor Config. Click on New
to be detected.
and then Finish for the change in range
The range setting will be retained until changed by the user.
Technical information
Powering
1Link is powered by the USB port whilst connected to the computer.
Note: 1Link can only be connected directly to a computer’s USB port or by using a powered
USB hub. It will not work with an unpowered hub (1Link requires an output current of 500 mA).
Specifications
USB compatible communication V1.1 – full speed
12 bit sampling resolution
Fastest sampling speed: 20 μs (50,000 samples per second)
Digital timing: accurate to 4 μs
Sensor inputs: 1
Operating range: 0 - 40°C and 0 to 95% RH (non-condensing).
Care and maintenance
•
•
Clean with a damp cloth, do not immerse in water or detergent.
1Link is suitable for use in an operating range of 0 - 40°C and 0 to 95% RH (noncondensing).
© Data Harvest Group Ltd
7
EASYSENSE 1Link
•
•
•
DO228 (2)
Do not subject to extreme heat or cold or leave in a location where it will get wet.
1Link is not waterproof.
There are no user serviceable parts inside 1Link.
Trouble shooting
If 1Link fails to respond to the computer, disconnect the sensor and the USB cable.
Re-connect the USB cable, then the sensor and try again.
If the product still fails to respond, please contact the Technical Support department
at Data Harvest. Please provide details of:
•
•
•
The computer platform it is being used with
The software and its version number
A description of the problem being encountered
If possible, telephone from a location where you can operate 1Link with the
computer.
Updating 1Link’s firmware
Occasionally Data Harvest may release updated firmware which will contain
improvements or new features. Updates will be made available from the Data Harvest
website.
To update the firmware of 1Link:
Step 1. Copy the English Firmware
Update for 5530 EASYSENSE 1Link
onto the hard disc of your computer
and run the .exe.
Step 2. Connect 1Link to the computer.
A progress bar will indicate 1Link is
being programmed.
WARNING: Do not disconnect 1Link
during this re-programming stage or it
may be seriously damaged.
A tick will indicate if the process was
successful.
To repeat the process, connect another
1Link and click on the update window.
© Data Harvest Group Ltd
8
EASYSENSE 1Link
DO228 (2)
A cross will indicate that an error
occurred. Click in the update window to
try again.
Step 3. Disconnect 1Link and exit the
program.
Warranty
EASYSENSE 1Link is warranted to be free from defects in materials and
workmanship for a period of 12 months from the date of purchase provided it has
been used in accordance with any instructions, under normal laboratory conditions.
This warranty does not apply if 1Link has been damaged by accident or misuse.
In the event of a fault developing within the 12 month period, EASYSENSE 1Link
must be returned to Data Harvest for repair or replacement at no expense to the user
other than postal charges.
Note: Data Harvest products are designed for educational use and are not
intended for use in industrial, medical or commercial applications.
WEEE (Waste Electrical and Electronic Equipment) Legislation
Data Harvest Group Ltd is fully compliant with WEEE legislation and is
pleased to provide a disposal service for any of our products when
their life expires. Simply return them to us clearly identified as ‘life
expired’ and we will dispose of them for you.
Data Harvest Group Ltd., 1 Eden Court, Leighton Buzzard, Bedfordshire LU7 4FY
Tel: +44 (0)1525 373666, Fax: +44 (0)1525 851638
e-mail: [email protected], [email protected]
Website: www.data-harvest.co.uk
© Data Harvest Group Ltd
9