1
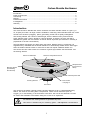
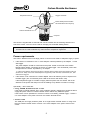
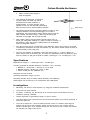
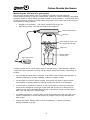
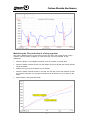
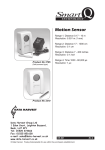
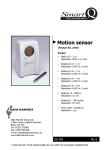
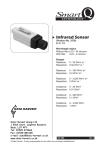
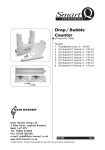
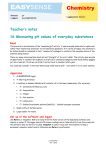
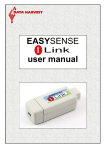
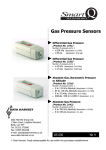
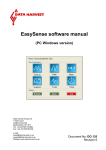
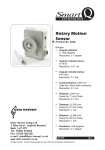
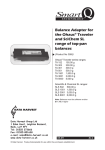
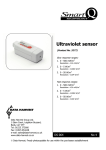
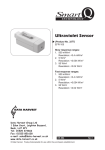
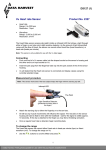
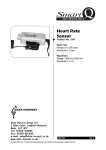
Carbon Dioxide Gas sensor (Product No. 3152) Range 1: 0 to 10,000 ppm Range 2: 0 to 100,000 ppm Data Harvest Group Ltd. 1 Eden Court, Leighton Buzzard, Beds, LU7 4FY Tel: 01525 373666 Fax: 01525 851638 e-mail: [email protected] www.data-harvest.co.uk DS 078 Data Harvest. Freely photocopiable for use within the purchasers establishment No 4 Carbon Dioxide Gas Sensor Introduction ...................................................................................................................... 1 Power requirements .......................................................................................................... 2 Connecting ....................................................................................................................... 3 Ranges ............................................................................................................................ 3 Practical information ......................................................................................................... 4 Investigations ................................................................................................................... 5 Warranty .......................................................................................................................... 8 Introduction The Smart Q Carbon Dioxide Gas sensor measures the carbon dioxide content of a gas e.g. in air, as parts per million. Its range makes it suitable for measuring carbon dioxide levels from small animals such as larvae (maggots), plants, germinating seeds and air quality investigations. The sensing element has a beam of infrared light, which is reflected many times around a highly polished cavity. Carbon dioxide is a strong absorber of infrared, the more the light is absorbed the greater the concentration of carbon dioxide is present (the reduction in intensity is proportional to the CO2 concentration). The EasySense data logger can detect when the Carbon Dioxide sensor is connected. It is supplied factory calibrated and the stored calibration is automatically loaded into the data logger when the Carbon Dioxide sensor is connected. It does not require calibration before use. The sensor has vent holes to allow for circulation of gases (air) between the environment and the sensing element. Hole for an Electrode Hole for a Temperature sensor Shaped socket (for the sensor cable) Mounting thread (for attaching the steel rod) External power LED Sensing element Power socket – see page 2 Vent holes The casing for the Carbon Dioxide sensor has been designed to sit on a standard laboratory beaker. The holes in the casing allow a Temperature sensor and an Electrode (such as Oxygen, pH, or Conductivity) to be used at the same time. The hole for the electrode can also be used to add materials to the beaker during the course of an experiment. Do not allow the sensing element to get wet at any time. This sensor is intended only for measuring gases – not liquid CO2 concentrations. 1 Carbon Dioxide Gas Sensor Temperature sensor Oxygen electrode Elastic band (used to hold the electrode above the compost) Carbon Dioxide sensor Compost The sensor is supplied with a steel rod that can be screwed into the mounting thread on the side of the sensor. The rod can be used for clamping into a suitable holding device. The Carbon Dioxide Gas sensor has been designed for educational purposes only. It should not be used to indicate any environmental compliance regulations. Power requirements The Carbon Dioxide sensor uses large pulses of current so will need an adequate supply of power. If the sensor is connected to a 5 V* mains adapter it will be powered by the adapter - not the data logger. The power adapter should be connected to the power socket on the side of the Carbon Dioxide sensor before connecting the sensor to a data logger. The red external power LED will light when the sensor is powered by an adapter. * 5 V DC mains adaptor, ab le to supply 500 to 1000 mA with a positive centre and negative outer pin (Product No. 5009). This is the same adapter as supplied to power VISION, Q Advanced, Q3+, Q5+ and Qt Timer loggers. If the Sensor is not connected to a mains adapter then it will take the power it requires from the data logger. (The red external power LED on the sensor will remain unlit). If the EasySense logger is not able to supply sufficient power then the Sensor will not be detected. If the power level drops too low the readings may default to maximum of range Specifically – when used with: V-Log, VISION, Q Advanced, Q3+ or Q5+ If the logger’s internal batteries are in good condition and fully charged they should be able to supply the power needs of a Carbon Dioxide sensor without any additional power. If the sensor is to be operated for more than 8 hours on a battery powered logger, connect a 5 V mains adapter to the power socket on the Carbon Dioxide sensor. 3Link or 1Link The USB port can supply sufficient power for a single Carbon Dioxide Sensor. If using more than one Carbon Dioxide sensor connect a 5 V mains adapter to the power socket on the sensor. 2 Carbon Dioxide Gas Sensor Legacy information: EASYSENSE Advanced or Logger – if the logger’s internal batteries are in good condition and fully charged they should be able to supply the power needs of a Carbon Dioxide sensor without any additional power. If logging for more than 8 hours connect the logger to its mains power supply. EASYSENSE Fast or Realtime – these loggers are connected to mains power during use, so a Carbon Dioxide sensor will work without any additional power needs. EASYSENSE Link, Q Link or Q3, Q5 - V1.2 or lower (purchased pre March 2007). The USB port alone cannot supply sufficient power for use with a Carbon Dioxide sensor. Connect a 5 V power supply to the power socket on the Carbon Dioxide sensor. EASYSENSE Q3 or Q5 - V1.3 or higher units . If the logger’s internal batteries are in good condition and fully charged they should be able to supply the power needs of a Carbon Dioxide sensor without any additional power. If the Sensor is to be operated for more than 8 hours on a battery powered unit, connect a 5 V power supply to the power socket on the Carbon Dioxide sensor. EASYSENSE Flash Logger. The Pocket PC cannot supply sufficient power to the Flash Logger for use with a Carbon Dioxide Sens or. It must be used with a 5 V DC mains adaptor connected to the power socket on the side of Carbon Dioxide sensor. Connecting If necessary, connect a 5 V DC mains adapter to the power socket on the side of the Carbon Dioxide sensor or the EasySense logger (see ‘power requirements’). Push one end of the sensor cable (supplied with the EasySense logger) into the shaped socket on the Carbon Dioxide sensor. Connect the other end of the sensor cable to the input socket on the data logger. The logger will detect that the Carbon Dioxide sensor is connected. Allow about 90 seconds for the Carbon Dioxide sensor to ‘warm up’ before starting to collect data. Ranges With some EasySense loggers it is possible to set the range from the logger. Please refer to the logger’s user manual. To alter the range in the EasySense software: 1. Select EasyLog from the Home screen. 2. Select the New recording wizard icon. 3. Click on the sensor’s name. 4. A set sensor range window will open. Select the required range, then OK. 5. Select Finish to exit the wizard. Or 1. From the Home screen select Sensor Config from the Settings menu. 2. Select the Carbon Dioxide sensor from the list and click on the Change Range button. 3. The current range will be highlighted. Select the required range and click on OK. 4. Close Sensor Config. The range setting will be retained until changed by the user. 3 Carbon Dioxide Gas Sensor Practical information Allow at least 90 seconds for the Carbon Dioxide sensor to warm up before starting to collect data. Note: This ‘warm up’ time will b e required each time power to the Sensor is interrupted. Allow a few minutes for the Sensor to settle into a new environment after set up so the readings can stabilise before starting to record data. This allows the gas being sampled time to percolate/diffuse into the infrared detector and for the Sensor to adjust to any change in air pressure or temperature. Avoid disturbing the Sensor during an experiment as sudden air movement, or CO2 from breathing, can influence the results. The Carbon Dioxide sensor updates its reading every 0.25 of a second (250 milliseconds). The fastest speed that data can be captured is 50 Hz (20 ms). If an inter sample time of less than 20 milliseconds is selected, then the values obtained will either default to the lowest reading or the set up will be rejected by the logger/software. Liquid will permanently damage the Carbon Dioxide sensor. If the sensor is to be used in an environment where there is a risk of condensation e.g. with a plant in a sealed environment (e.g. a plastic bag), position the sensor so that any liquid that does condense will not come into contact with the sensing element e.g. use the steel rod to clamp the sensor above the plant. Avoid using the sensor in dusty or windy environments. CO2 is a gas that is heavier than air so it will therefore tend to sink to the bottom of the container. Use as small a container as possible for an experiment; this will have the effect of ‘concentrating’ the CO2 and give better results. As CO2 sinks to the bottom of a container there should be no need to make the junction between the sensor and the container airtight; the sensor will act as a lid and prevent air movement across the opening of the container. If a better seal is required, cover the container opening with plastic film, e.g. cling film and cut a hole for the sensing element to pass through. The film will tend to cling to the sensor. A rubber bung with a diameter of between 11 – 13 mm can be used to block the electrode hole. A non-staining modelling material e.g. Blu Tack or similar can be used to provide a seal. CO2 gas has to diffuse through the vent holes to the infrared detector before any changes in concentration can be detected. Since diffusion of gases is a fairly slow process there will be a resulting delay in change of readings. If the level of CO2 exceeds the maximum in its range (e.g. by breathing directly at the sensing element) then the Sensor will continue to show the maximum value until it detects a lower level. It may take a minute or more for the high concentration of CO2 in the sensing element to be replaced with the lower concentration in its surroundings. Fan the air surrounding the sensor to speed up this process. The sensor is designed to be used: 1. Resting on a bench surface or similar. The sensing element of the Carbon Dioxide sensor should be pointing upwards so it can detect the CO2 content in the circulating gas. 2. As a lid on a container. The sensor should be placed with the sensing element pointing downwards into the container. Sensing element upw ard Sensing element dow nw ard 4 Carbon Dioxide Gas Sensor 3. Held in a retort stand using the steel rod supplied. CO2 readings are averaged to achieve a smoother graph but there may still be fluctuations that create variations in measurements. A moving average can be applied to ‘even out’ the data using Smoothing from the Tools menu in the EasySense software. Steel rod Retort stand The Carbon Dioxide sensor uses large pulses of current. If ‘fully charged’ batteries in the EasySense logger are in need of replacement they will lose their charge quickly and no longer be able to deliver the stored energy. If this is so, the battery life indicated on the logger will no longer be valid. After several years of use the Carbon Dioxide sensor may no longer give reasonable readings e.g. high or maximum of range. If this happens, return the sensor to Data Harvest for recalibration (this is a chargeable service). CO2 gas is formed from the combination of two elements: carbon and oxygen. It is present in the Earth’s atmosphere at a low concentration e.g. the carbon dioxide content in fresh air is approximately 0.04% (400 ppm). The CO2 concentration is measured in parts per million (ppm) i.e. 1 part by volume in 1 million volume units of the whole gas. To convert to a percentage value (%) divide the ppm value by 10,000 i.e. 380 ppm is equal to 0.038%, 10,000 ppm = 1%, 100,000 ppm = 10%. Specifications Measurement ranges: 0 – 10,000 ppm and 0 – 100,000 ppm Accuracy (specified at standard laboratory conditions - 25˚C, 103 kPa): Between 0 – 20,000 ppm = 100 ppm or 10% of value Between 20,000 – 50,000 ppm = 20% of value Above 50,000 ppm are qualitative only Response time: 20 seconds Operating temperature range: 5 to 40˚C Operating humidity range: 5 to 95% relative humidity; noncondensing Steel support rod: 80 mm long x 10 mm diameter with a M6 thread Investigations Monitoring CO2 levels in small animals (e.g. maggots) at different temperatures CO2 levels from plant material. Air quality - monitoring CO2 with people in an enclosed space and the effects of room ventilation (opening a window). Cellular respiration of germinating seeds e.g. peas or beans . The rate at which CO2 is removed from an enclosed atmosphere using sodium hydroxide or potassium hydroxide. CO2 level of expired air – place the Carbon Dioxide sensor in a medium sized bag and breathe into the bag to tak e a sample. Human breath can have a CO 2 content of about 35,000 to 50,000 ppm. If you breathe directly onto the sensor the CO2 content may exceed the 100,000 ppm range of the sensor. 5 Carbon Dioxide Gas Sensor Monitoring the CO2 level of a green plant The process of photosynthesis works in co-ordination with that of internal respiration. Photosynthesis produces oxygen and carbohydrates (needed for internal respiration) and internal respiration produces carbon dioxide and water (needed for photosynthesis). At most times one of the two processes is occurring at a faster rate than the other, which means that excess amounts of its product are being produced. Daylight hours (sunshine) = net carbon dioxide in and oxygen out Night time (no light) = net carbon dioxide out and oxygen in Carbon Dioxide sensor Blu-Tack Plastic bottle cut across and then sealed with sellotape Plant stem Beaker covered with cling film Light Level sensor A Carbon Dioxide sensor can be used to monitor changes in CO 2 in dark and light conditions. A Light level sensor (100,000 Lux range) can be used to monitor the intensity of light falling on the plant. Try to exclude gas production by microbes in the soil by either enclosing the plant pot in a separate plastic bag or by using a freshly cut stem in a beaker of water. An ideal plant is one that is actively growing and requires high levels of light to flourish (the slowdown of photosynthesis by reducing the light level will be more achievable). You will need to log data for a minimum of one hour to produce convincing results (the length of time will depend on the type of plant used and its size). Use a bench lamp to provide enough light to stimulate photosynthesis for at least 30 minutes, and then place a dark cover over the plant to simulate night. If possible log data over a 24 hour period to match the plants normal day and night cycle. Place the experiment in an area that is well lit by sunlight during the day and becomes dark at night. Position the Carbon Dioxide sensor to avoid condensation – it will be permanently damage if allowed to get wet. 6 Carbon Dioxide Gas Sensor Monitoring the CO2 production of a living organism The Carbon Dioxide sensor can be used to monitor the rise in CO 2 levels around a living organism. Blow fly larvae (maggots) or meal worm larva are recommended for this experiment. Place the larvae in a small glass container such as a beaker or conical flask Place the Carbon Dioxide sensor over the beaker (to form a lid) with the sensor element inside the beaker. Monitor the CO2 level in the beaker for 10 minutes. Place the Carbon Dioxide sensor to one side. Fan the open end of the container to refill the container with fresh air. Change the heat around the beaker to cool or warm up the larvae. Select Overlay and repeat the above. 7 Carbon Dioxide Gas Sensor Warranty All Data Harvest Sensors are warranted to be free from defects in materials and workmanship for a period of 12 months from the date of purchase provided they have been used in accordance with any instructions, under normal laboratory conditions. This warranty does not apply if the Sensor has been damaged by accident or misuse. In the event of a fault developing within the 12 month period, the Sensor must be returned to Data Harvest for repair or replacement at no expense to the user other than postal charges. Note: Data Harvest products are designed for educational use and are not intended for use in industrial, medical or commercial applications. WEEE (Waste Electrical and Electronic Equipment) Legislation Data Harvest Group Ltd is fully compliant with WEEE legislation and is pleased to provide a disposal service for any of our products when their life expires. Simply return them to us clearly identified as ‘life expired’ and we will dispose of them for you. 8