1
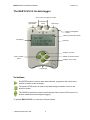
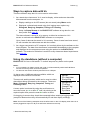
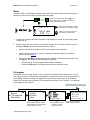
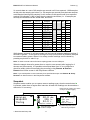
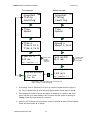
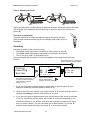
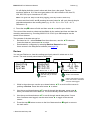
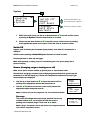
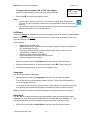
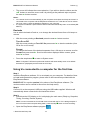
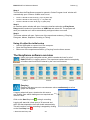
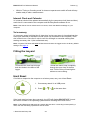
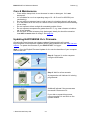
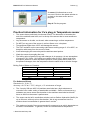
EASYSENSE Vu Reference Manual EASYSENSE Vu Reference Manual DO241 (1) CONTENTS What’s supplied?............................................................................................... 3 Getting to know your Vu data logger................................................................. 3 Charging........................................................................................................ 3 The EASYSENSE Vu data logger..................................................................... 4 Vu buttons ..................................................................................................... 4 Sensors ............................................................................................................. 5 The built-in sensors....................................................................................... 5 The plug-in sensors....................................................................................... 6 Changing a sensor’s range or turning a sensor on or off .................................. 6 Ways to capture data with Vu ........................................................................... 7 Using Vu standalone (without a computer) ....................................................... 7 Meter ............................................................................................................. 8 Pictogram ...................................................................................................... 8 EasyLog ...................................................................................................... 10 Snapshot ..................................................................................................... 11 Timing ......................................................................................................... 12 Counting...................................................................................................... 15 Review ........................................................................................................ 16 System ........................................................................................................ 17 Switch Off............................................................................................... 17 Sensor (changing range or turning on or off) ......................................... 17 Full Reset............................................................................................... 18 Language ............................................................................................... 18 Date Style .............................................................................................. 18 Decimals ................................................................................................ 19 Using Vu connected to a computer for the first time ....................................... 19 Using Vu after the initial setup .................................................................... 20 The EasySense software overview ................................................................. 20 Technical information ...................................................................................... 23 Selecting the sensor range ......................................................................... 23 Powering Vu................................................................................................ 23 Batteries................................................................................................. 24 Auto switch off........................................................................................ 24 Internal Clock and Calender........................................................................ 25 Vu’s memory ............................................................................................... 25 Fitting the lanyard............................................................................................ 25 Hard Reset ...................................................................................................... 25 Specifications .................................................................................................. 26 Care & Maintenance ....................................................................................... 27 Updating EASYSENSE Vu’s Firmware ........................................................... 27 Practical information for Vu’s plug-in Temperature sensor ............................. 28 Warranty.......................................................................................................... 29 Copyright: all rights reserved. This manual may be copied for use within the premises of the Licensee on condition that it is not loaned, sold or used outside the Licensee's premises. Data Harvest's policy is to continually improve products and services, so we reserve the right to make changes without notice. It is acknowledged that there may be errors or omissions in this publication for which responsibility cannot be assumed. No liability will be accepted for loss or damage resulting from use of information contained in this manual or from uses as described. Document No: DO241 (1) © Data Harvest Group Ltd. 2 EASYSENSE Vu Reference Manual DO241 (1) What’s supplied? A mini USB connection cable Plastic storage box The EASYSENSE Vu data logger and lanyard CD ROM that contains the EASYSENSE software (V3.1 or above) plus documents, including the Vu eBook with over 40 activities Plug-in Vu Temperature sensor Getting to know your Vu data logger Charging Charge EASYSENSE Vu fully before first use Connect Vu directly to a USB port on your computer* (or a powered USB hub) using the USB cable supplied with it. A full charge can take up to 8 hours. A battery charging symbol will be displayed on Vu’s screen while the logger is charging. *Your computer must be turned on and not in sleep or standby mode; otherwise, the battery may drain instead of charge. Note: Vu can also charge from a USB mains charger that outputs 5 V at 500 mA or more. © Data Harvest Group Ltd. 3 EASYSENSE Vu Reference Manual DO241 (1) The EASYSENSE Vu data logger Inputs A and B for plug-in sensors Sound sensor (grid visible) Temperature sensor Light sensor Built-in rechargeable battery Battery power level indicator LCD display USB input SCROLL up button ENTER or SELECT button STOP or BACK button SCROLL down button Lanyard slot Vu buttons The ENTER button is used to start data collection, progress to the next screen, confirm a choice or take a sample. The square STOP button is used to stop data being recorded or return to the previous screen The SCROLL buttons are used to scroll through menus on the LCD screen or to browse measurements during data logging. To operate EASYSENSE Vu, press any of these buttons. © Data Harvest Group Ltd. 4 EASYSENSE Vu Reference Manual DO241 (1) Sensors The built-in sensors Vu is a fully self-contained portable data logger with 3 built-in sensors – Sound, Light and Temperature. It is supplied with the default range for its sensors selected and the built-in Temperature sensor switched off. Ranges ( *default range) Built-in Sensors Sound 40 to 110 dBA* Indoor 1 k lx* (0 to 1,000 lx) In/Out 10 k lx (0 to 10,000 lx) Outdoor 100 k lx (0 to 100,000 lx) Light level Celsius 0 to 50°C* Celsius 0 to 110°C Celsius -30 to 110°C Temperature Fahrenheit 0 to 120˚F Fahrenheit 0 to 232˚F Fahrenheit -22 to 230˚F Vu will automatically display values using the range selected. The built-in sensors can be hidden from the display – see page 6. Sound sensor This sensor has one range, 40 to 110 dBA (decibels), which is used to measure sound pressure level (loudness). It is responsive to both single sounds (such as a whistle or handclap) and continuous background noise (such as passing traffic, classroom noise). Light level sensor This sensor has 3 ranges to choose from. • • • Indoor 1 k lx. This lower range is suitable for recording at indoor light levels and so is normally selected for use in the classroom. In/Out 10 k lx. This medium range is suitable for recording bright light levels indoors or low light levels outdoors. Outdoor 100 k lx. This larger range is suitable for recording light level outdoors in sunlight, which makes it ideal for environmental monitoring. Temperature sensor This sensor has six ranges to choose from three Celsius and three Fahrenheit. The range selected will also be applied to plug-in temperature sensors. Notes: • For convenience the built-in temperature sensor is displayed on the same scale as the plugin temperature sensors, however Vu can only be used in an environment of 0 to 40°C, 0 to 95%RH (non-condensing). • The speed of reaction of the built-in temperature sensor to any change in external temperature will be delayed by Vu’s plastic case. • If a FULL RESET (System) is performed on Vu it will return its sensors to their default settings (this sensor switched off). © Data Harvest Group Ltd. 5 EASYSENSE Vu Reference Manual DO241 (1) The plug-in sensors Sensor sockets Plug the sensors into the sockets labelled A and B on the back of the Vu logger. When a sensor is connected it will automatically be detected and displayed on the LCD display as A and/or B (depending on which input the sensor is connected to). Note: All Temperature sensors will use the same range (as selected for the built-in sensor). Sensors can be divided into two main types: 1. Analogue – used to measure physical quantities such as temperature, sound, light, pH, etc. 2. Digital - switch-type sensors (e.g. Light gates and Timing mats) that are either ON or OFF and are used to calculate time, speed and acceleration. Please contact your supplier for an up-to-date list of Vu sensors. Changing a sensor’s range or turning a sensor on or off • Use the up or down buttons (▲▼) to scroll the list until the cursor is pointing at Meter and press the enter button ►. • Press the enter button ► again. • Use the up or down buttons (▲▼) to move the cursor until it is pointing at the appropriate sensor and press enter ►. • ▼ Use the ▲▼ buttons to move the cursor until it points at the appropriate option and press enter ►. Sound ► Light Temperature ▲ ▼ Light ► Set range Turn Off Note: If a sensor only has one range then only Turn Off will be available. Set range The cursor will indicate the current range selected. Use the up or down buttons (▲▼) to scroll the list until the cursor is pointing at the required range. Press enter ► to select the range. Turning a built-in sensor ON or OFF the display With the cursor pointing at Turn Off or On press enter ►. • Press the stop button to return to the Meters window. ▼ ► 0-1k lx 0-10k lx 0-100k lx Light Set range ►Turn Off ▲ Note: If you change a sensor’s range or turn it on/off via the logger while connected to a computer, it maybe necessary to select New © Data Harvest Group Ltd. in the software for these changes to be detected. 6 EASYSENSE Vu Reference Manual DO241 (1) Ways to capture data with Vu There are different ways that Vu can be used to collect data. 1. As a stand alone instrument: Vu is used to display, collect and store data while disconnected from the computer. I.e. a. Display readings on its LCD screen (but not stored) using Meter mode. b. Displayed, collected and stored using Vu’s logging menu options e.g. Pictogram, EasyLog, Snapshot, Timing and Counting. c. Setup via Setup Remote in the EASYSENSE software to log data for a set time period. See page 22. The data collected is stored in Vu’s memory to either be reviewed on Vu’s screen or retrieved to the EASYSENSE software on a computer. Up to 6 sets of data can be stored in Vu’s memory. Once six sets have been stored, Vu will overwrite the earliest data set with the newest. 2. As a logger connected to a PC computer: Vu is entirely driven by the software on the host computer. The data from the sensors is transmitted immediately to the computer and displayed on the computers screen using the options in the EASYSENSE software. This method of collection is useful for many classroom-based experiments. See page 19. Using Vu standalone (without a computer) EASYSENSE Vu has no ON switch. To ‘switch’ on press any button on the panel. Notes: • If Vu is operating on battery power and is idle, it will automatically switch itself off after 2 minutes. Press any button to resume operation. • Vu does not auto switch off while powered from a USB port. Vu has a menu of different options available, which are displayed on the built-in LCD screen. There are six working modes, which can be used to collect data without being connected to the computer. These are Meter, Pictogram, Easy Log, Snapshot, Timing and Counting modes. A menu option is selected by using the scroll buttons to move the cursor up ▲ or down ▼ until it is pointing at the required option then press the enter ► button to select. Meter Pictogram EasyLog Snapshot Timing Counting Review System If using plug-in sensors they should be connected before entering a logging mode (except for Meters when they will automatically ID and then display readings). Note: Some of the following examples show the effect seen on the LCD display when there is no sensor plugged into Input A or B (so A and B are omitted from the list). © Data Harvest Group Ltd. 7 EASYSENSE Vu Reference Manual DO241 (1) Meter In Meter mode Vu will display measurements from the sensors (built-in and any plug-in sensors) on the LCD screen but will not store any data. Press stop to pause the display, (▌▌) then either stop again to exit Meter or enter to return to the meter screen A Meter Press the enter button to switch a sensor off or change its range 28.5 ˚C 50.9 dBA 150 lx Use the up or down buttons to view data from the sensors 1. Connect any plug-in sensors if required. If the display is turned off, press any button to wake up Vu. 2. While in the main menu use the up or down buttons ▲▼ to scroll until the cursor is pointing at Meter. Press the enter button ►to select. • Use the up and down buttons ▲▼ to view data from the sensors. • Use the enter button ► to check or change the sensors range or to switch a sensor off (see page 6). • The stop button will temporarily halt the updates to the sensors readings. Two lines ▌▌ (top left) indicate that the display is paused. o o Press enter ► to cancel pause and continue in Meters. Press stop again to exit Meters and return to the main menu. Pictogram Pictogram uses an image, block or bar to represent the data. Each represents a 10th of a total range (or span) of the sensor and displays a number from zero to ten (proportional to the reading). Sensor readings are captured every time the enter button ► is pressed, rather than at regular time intervals. The samples are stored to Vu’s memory - a maximum of ten samples per data set. Press either enter to confirm your choice or stop to continue logging ▼ ▼ Meter ► Pictogram EasyLog Icon ► Block Bar ▲ ▲ 3 5 4 ▌▌▌▌ Samples taken 2 Select whether data should be represented by an icon (picture), a block symbol or a bar © Data Harvest Group Ltd. ▌▌▌ ▌▌▌▌▌ 8 Press the enter button to collect a sample (maximum of 10) Stop Recording? ► for yes █ for no Samples taken 2 Press stop when you’ve taken enough samples EASYSENSE Vu Reference Manual DO241 (1) 1. Connect any plug-in sensors if required. If the display is turned off, press any button to wake up Vu. 2. While in the main menu use the up or down buttons ▲▼ to scroll until the cursor is pointing at Pictogram. Press the enter button ► to select. 3. Use the ▲▼ buttons to move the cursor until it points at how you want the data to be represented. Press enter ► to select. 4. Each time you press the enter button ► Vu will take a reading from the sensors (built-in and any plug-in) and will show the number of samples taken so far. Use the up or down buttons ▲▼ to scroll and view data from the sensors. ▼ ► Icon Block Bar 3 5 4 Samples taken 2 Note: If Vu goes into ‘sleep’ mode during logging, press any button to wake up the logger and then press ► to take a reading. 5. When you have finished sampling press the stop button to close the data set, then ► to confirm your choice. The readings will be stored as a data set with a maximum of ten samples per set. A data set is identifiable by the method and time and date the recording was started i.e. Pictogram 09/05/12 16:12:43. The contents of the data set can be • Reviewed on Vu - select Review from the main menu, use the ▲▼ buttons to locate the data set and press enter ► to select. Use the ▲▼ buttons to scroll through individual readings (see page 16). • Downloaded to a computer by selecting Retrieve Remote from the Home screen in the EasySense software (see page 23). Key for built-in sensors Sensor and range Scale (10th of range) Sensor and range Scale (10th of range) Sensor and range Scale (10th of range) Sensor and range Scale (10th of range) Sound 40 to 110 dBA 7 dBA Light 0 to 1 k lx Light 0 to 10 k lx Light 0 to 100 k lx 100 lx 1,000 lx 10,000 lx Temperature 0 to 50 ˚C Temperature 0 to 110˚C Temperature -30 to 110˚C 5˚C Temperature 0 to 120˚F © Data Harvest Group Ltd. 11˚C 14˚C Temperature 0 to 232˚F Temperature -22 to 230˚F 12˚F 23.2˚F 9 25.2˚F EASYSENSE Vu Reference Manual DO241 (1) EasyLog With EasyLog it is not necessary to set the duration of the recording – Vu will capture data until stopped. Press stop to finish logging, then either enter to confirm your choice or stop to continue logging ▼ Pictogram ► EasyLog Snapshot 40.0 251 24.0 dBA lx ˚C Stop Recording? ► for yes █ for no ▲ Press the enter button to view a logging summary, press enter again to return to the EasyLog screen Sampled 410 Interval 500 ms 00/00:03:24 1. Connect any plug-in sensors if required. If the display is turned off, press any button to wake up Vu. 2. While in the main menu use the up or down buttons ▲▼ to scroll until the cursor is pointing at EasyLog. Press the enter button ► to automatically begin logging. If using more than 3 sensors use the ▲▼ buttons to view the current value while still logging. The bottom line of the LCD display is a visual indicator of logging as it takes place, each time the line completes logged samples are compressed and the sample rate alters. Press the enter ► button to see a logging summary i.e. samples taken, current logging interval and the elapsed time (days / hours: minutes: seconds). Press enter ► again to return to the normal screen. Note: If Vu goes into ‘sleep’ mode during logging, any button press will wake up the logger. 3. When the investigation is complete press the stop button . Vu will continue to log data until you press the enter ►button to confirm your choice The data will be stored as a data set identifiable by the method and time and date the recording was started i.e. EasyLog 09/05/12 16:12:43. The contents of the data set can be • Reviewed on Vu - select Review from the main menu, use the ▲▼ buttons to locate the data set, press enter ► to select. Use the ▲▼ buttons to scroll through individual readings (see page 16). • Downloaded to a computer by selecting Retrieve Remote from the Home screen in the EasySense software (see page 23). © Data Harvest Group Ltd. 10 EASYSENSE Vu Reference Manual DO241 (1) Vu records data at a rate of 40 samples per second until it has captured 1,000 samples. At this point the sample rate halves (i.e. 20 samples per second) and alternate samples are discarded (leaving 500 samples). It will continue at this speed until it has captured another 500 samples (1,000 in total) then the sample rate halves (i.e. 10 samples per second) and discards half the stored data, and so on. Sample Rate Interval (seconds) 40 per sec 0.025 (25 ms) 20 per sec 0.05 10 per sec 0.1 (100 ms) 2 per sec 0.5 (500 ms) (50 ms) 1 per sec 1 Every 5 sec 5 Every 15 sec 15 Every 30 sec 30 Every 1 minute 60 Every 5 minutes 300 Every 15 minutes 900 Every 30 minutes 1800 Every 1 hour 3600 Samples Days Hours Min. Sec. 0 - 1000 25 Compress to a half 500 - 1000 Compress to a half 500 - 1000 Compress to a fifth 200 - 1000 Compress to a half 500 – 1000 Compress to a fifth 200 - 1000 Compress to a third 330 - 1000 Compress to a half 500 - 1000 Compress to a half 500 - 1000 Compress to a fifth 200 - 1000 Compress to a third 300 - 1000 Compress to a half 500 - 1000 Compress to a half 500 - 1000 50 1 40 8 20 16 40 1 23 20 4 10 0 8 20 0 16 40 0 3 11 20 0 10 10 0 0 20 20 0 0 41 16 0 0 While battery powered Vu will stay awake until the interval between readings reaches 5 seconds or greater – at this point it will begin to sleep (auto switch off) between samples to conserve battery power. When Vu is asleep, sensor readings can be viewed by pressing any button to ‘wake’ it up. Note: Vu does not auto switch off when accepting power from the USB port. When the sample interval is greater than or equal to one second (after logging for 8 minutes and 20 seconds), it is possible to download data from Vu to a computer to check its validity (without interrupting the recording) using Remote ► Retrieve Remote from Home screen in the EasySense software. Note: If you would prefer to record remotely for a specified time span use Remote ► Setup Remote from Home screen in the EasySense software. Snapshot Snapshot mode enables you to capture sensor readings every time the enter button ► is pressed, rather than at regular time intervals. At least 650 readings can be stored as a data set in Vu’s memory. Press enter to confirm your choice or stop to continue logging ▼ EasyLog ► Snapshot Timing ▲ 48.8 356 24.0 dBA lx ˚C Samples taken 8 Press the enter button to take a sample © Data Harvest Group Ltd. 11 Stop Recording? ► for yes █ for no Samples taken 2 Press stop when you’ve taken enough samples EASYSENSE Vu Reference Manual DO241 (1) 1. Connect any plug-in sensors if required. If the display is turned off, press any button to wake up Vu. 2. While in the main menu use the up or down buttons ▲▼ to scroll until the cursor is pointing at Snapshot. Press the enter button ► to select. 3. Each time you press the enter button ► a reading will be taken from the sensors. The bottom line of the LCD will display the number of samples taken so far. If using more than 3 sensors use the ▲▼ buttons to view the current value from the sensors while still logging. Note: If Vu goes into ‘sleep’ mode during logging, press any button to wake up the logger then press ► to take a reading. 4. When you have finished sampling press the stop button to close the data set, then enter ► to confirm your choice. The readings will be stored as a data set identifiable by the method and time and date the recording was started i.e. Snapshot 09/05/12 16:12:43. At least 650 samples can be stored in one data set (the limit is dependant on the number of sensors). The contents of the data set can be Reviewed on Vu - select Review from the main menu, use the ▲▼ buttons to locate the data set, press enter ► to select. Use the ▲▼ buttons to scroll through individual readings (see page 16). • Downloaded to a computer by selecting Retrieve Remote from the Home screen in the EasySense software (see page 23). • Timing Timing is used to set up and store simple time and speed measurements. Connect the digital switch type sensors before selecting Timing. The options available will depend on whether one sensor is connected to Input A or two are connected to Input A and Input B. The possibilities are Time at A, Time from A to B and Time A to A (stopwatch), Speed at A and Speed from A to B. For Vu to perform direct calculations of speed, you will need to select the parameter used in the experiment i.e. • For Speed A to B select the distance between the sensor connected to input A and the sensor connected to input B. Speed from A to B = Distance from A to B Time • For Speed at A select the width of the single interrupt card that will pass through the Light gate connected to input A. Speed at A = Length of single interrupt card Time © Data Harvest Group Ltd. 12 EASYSENSE Vu Reference Manual DO241 (1) Time example Speed example ▼ ▼ Snapshot ► Timing Counting Snapshot ► Timing Counting ▲ ▲ ▼ Time ► Speed ► Time Speed ▲ ▼ ▼ ► Time A Time A to A Time A to B ► Speed A Speed A to B Time at A 235 ms ▼ No. samples = 3 Press enter to alter display to seconds Card Width 40.0 mm Scroll to find the correct card width ▲ Speed at A 0.28 m/s Stop Recording? ► for yes █ for no No. samples = 5 Press stop to exit, then either enter to confirm your choice or stop to continue logging 1. If recording Time or Speed at A (or A to A) connect a digital sensor to input A. For Time or Speed from A to B connect digital sensors to both Input A and B. 2. If the display is turned off, press any button to wake up Vu. While in the main menu use the up or down buttons ▲▼ to scroll until the cursor is pointing at Timing. Press the enter button ► to select. 3. Use the ▲▼ buttons to scroll until the cursor is pointing at either Time or Speed. Press the enter button ► to select. © Data Harvest Group Ltd. 13 EASYSENSE Vu Reference Manual DO241 (1) 4. Use the ▲▼ buttons to scroll until the cursor is pointing at either, Time or Speed at A or Time or Speed from A to B or Time A to A (stopwatch). Press the enter button ►to select. 5. If Speed is selected ▲▼ scroll to choose the parameter that matches your setup. • For Speed at A select the width of the single interrupt card (from 10 to 1,000 mm). • For Speed from A to B select the distance from the sensor connected to A to the sensor connected at B (from 0.10 to 6.0 metres). Press the enter button ► to select. 6. When a signal change from the digital sensor/sensors is received, the timing measurement will be displayed on the LCD screen. Time data will be measured in milliseconds, press enter ► to alter the display to show seconds. Speed data is in metres per second (m/s). The bottom line of the LCD will display the number of samples taken so far. 5. Press the stop button to finish or cancel any pending timing event and then enter ► to confirm your choice. The readings will be stored as a data set identifiable by the method and time and date the recording was started i.e. Timing 09/05/12 16:12:43. Up to 850 samples can be stored in one data set. The contents of the data set can be • Reviewed on Vu - select Review from the main menu, use the ▲▼ buttons to locate the data set, press enter ► to select. Use the ▲▼ buttons to scroll through individual readings (see page 16). • Downloaded to a computer by selecting Retrieve Remote from the Home screen in the EasySense software (see page 23). Other calculations can be performed on the timing data by downloading to the EasySense software, then using the Show Data as function from the Settings menu in Timing. It will be necessary to enter the parameter used in the investigation e.g. the length of a segment of a double interrupt card to calculate acceleration from a single Light gate at A. Timing options Time or Speed at A: Timing starts when the signal at input A changes and stops when the signal reverts back. • With Light gates it will be the time it takes for an object to pass through the light beam. • For a Push Switch it will be the length of time that the switch is kept depressed. • For Timing mats it will be the length of time someone stands on the mat. © Data Harvest Group Ltd. 14 EASYSENSE Vu Reference Manual DO241 (1) Time or Speed from A to B A Start - A On B Stop - B On Timing will start when a signal change is detected at sensor A and stops when the signal at B changes (so it measures the time taken by an object to travel from sensor A to sensor B). Time A to A (stopwatch) The time will start to be measured when the signal at input A changes (ON) and will continue until the signal at A changes again (ON) i.e. like a stopwatch. Counting Counting is used to count events by using: • One digital switch type sensor connected to either input A or input B • Two digital switch type sensors connected to both input A and input B • The up ▲ (A) or down ▼ (B) buttons on Vu. If plug-in sensors are connected, Vu will automatically count using input from those sensors. Press either enter to confirm your choice or stop to continue logging ▼ Timing ► Counting Review ▲ Scroll icons indicate the up and down buttons are being used instead of a plug-in sensor to count. 0 ▲A ▼B 5 8 10 Stop recording? ► for yes █ for no A + B = 13 Select enter to perform simple mathematical functions on the A, B data 1. If you are using plug-in digital sensors connect them to input A and/or B. If the display is turned off, press any button to wake up Vu. 2. While in the main menu use the up or down buttons ▲▼ to scroll until the cursor is pointing at Counting. Press the enter button ► to select. 3. If you are using plug-in digital sensors each time the state of the sensor is changed to On e.g. by pressing a push switch, the number of counts will advanced by one. If the scroll buttons on Vu ▲▼are used then the count will increase by one each time you press a button. You can use either one or both buttons e.g. use the ▲ button to count people entering a room and ▼ to count those leaving. © Data Harvest Group Ltd. 15 EASYSENSE Vu Reference Manual DO241 (1) Vu will display both the numeric value and show it as a bar graph. The bar maximum starts as 10, if the count goes above 10 it will increase to 20, then 50, 100, 250, 500, up to a maximum of 1,000. Note: If Vu goes into ‘sleep’ mode during logging, press any button to wake it up. If counts are from both A and B pressing the enter button ► will cycle through simple calculations based on the counting data (e.g. A + B = 13, A – B = -3, B – A = 3, Difference = 3). 4. Press the stop button to finish and then enter ► to confirm your choice. The count will be stored as a data set identifiable by the method and time and date the recording was started e.g. Counting 09/05/12 16:12:43. Up to 999 samples can be stored in one data set. The contents of the data set can be • Reviewed on Vu - select Review from the main menu, use the ▲▼ buttons to locate the data set, press enter ► to select. • Downloaded to a computer by selecting Retrieve Remote from the Home screen in the EasySense software (see page 23). Review You can use Retrieve to view the readings previously stored in a data set on Vu’s screen. The most recently stored data is shown first. ▼ ▼ ▼ Counting ► Review System ▲ Snapshot 08/04/12 14:44:09 ▲ Data set 1 of 5 Scroll up or down the list of data sets until you find the right one. A ▲ 4.1 % 40.0 dBA 251 lx Sample 4 of 10 Scroll to view the data Use the enter button to toggle to the next screen if more than 3 sensors were logged 1. While in the main menu use the up or down buttons ▲▼ to scroll until the cursor is pointing at Review. Press the enter button ► to select. 2. Use the up and down buttons ▲▼ to scroll through the data sets, press enter ► when you locate the correct data set. The most recently stored data is shown first. 3. Use the up and down buttons ▲▼ to scroll through stored data points. If more than 3 sensors were logged, use the enter button ► to toggle to the second screen. 4. Press the stop button to return to the list of data sets then again to return to the main menu. © Data Harvest Group Ltd. 16 EASYSENSE Vu Reference Manual DO241 (1) System Counting Review ► System ▲ ▼ ► Switch Off Sensor Full Reset Language Date Style Decimals Use the scroll buttons to go up or down the list of options. Use enter to select an option. 1. While in the main menu use the up or down buttons ▲▼ to scroll until the cursor is pointing at System. Press the enter button ► to select. 2. Use the up and down buttons ▲▼ to scroll the menu until the cursor is pointing to the appropriate system menu option. Press the enter ► button to select. Switch Off Used to send Vu directly into low power (sleep mode), even when it’s connected to a USB port. With the cursor pointing at Switch Off press the enter ► button to select. Press any button to ‘wake up’ the logger. Note: While operating on battery power Vu automatically goes to low power (sleep) after a period of inactivity. Sensor (changing range or turning on or off) Note: These options are also available by pressing enter ► whilst in Meter mode. Some built-in and plug in sensors have multiple ranges and the built-in sensors can be switched On or Off the display e.g. Sound and Temperature switched off so only Light measurements are displayed. ▼ • Use the up or down buttons ▲▼ to move the cursor until it is pointing at the appropriate sensor and press enter ►. Sound ► Light Temperature ▲ • Use the ▲▼ buttons to move the cursor until it points at the appropriate option and press enter ►. Note: If a sensor only has one range then only Turn Off will be available. ▼ Light ► Set range Turn Off Set range The cursor will indicate the current range selected. Use the up or down buttons (▲▼) to scroll the list until the cursor is pointing at the required range. Press enter ► to select. Note: A plug-in Temperature sensor will use the same range as selected for the built-in Temperature sensor. © Data Harvest Group Ltd. 17 ▼ ► 0-1k lx 0-10k lx 0-100k lx EASYSENSE Vu Reference Manual DO241 (1) Turning a built-in sensor ON or OFF the display With the cursor pointing at Turn Off or On press enter ►. Light Set range ► Turn Off ▲ • Press stop to return to the System menu. Notes: • If you change a sensor’s range or turn it on/off via the logger while connected to a computer, it maybe necessary to select New in the software for these changes to be detected. • If a Full Reset is performed it will automatically return all sensors to their default position (internal Temperature Off, Sound and Light On). Full Reset A full reset erases all data sets and returns the logger back to the factory default settings. Note: A hard reset (see page 25) can be tried first if Vu simply stops responding, a hard reset won’t alter settings or erase data. A full reset will: o Erase all stored data sets. o Automatically return all sensors to their default position (internal Temperature Off, Sound and Light On). o Return the built-in sensors to their default range (Light - Indoor 1 k Lux, Temperature - Celsius 0 to 50˚C). o Return the date format to DD-MM-YY. o Return decimals to On with a full stop format. o Return language to its default. • With the cursor pointing at Full Reset press the enter ► button to select. • Select the enter button ► to confirm the reset or stop to cancel and exit. • Once done press enter ► to return to the System menu. Language Use to alter the selected language. • With the cursor pointing at Language press the enter ► button to select. The screen will show the language options (if any). The cursor will indicate the current language selected. • If you wish to alter the choice use the scroll (▲▼) buttons to scroll the cursor until it is pointing at the preferred language and press the enter ► button to select. Note: If a System Full Reset is performed language will automatically return to its default. Date Style Use this option to alter the format of the date display (how you would like the date displayed) i.e. from a European to USA date format (DD-MM-YY to MM-DD-YY). The actual time and date is set automatically by the computers clock (see notes). • With the cursor pointing at Date Style press the enter ► button to select. © Data Harvest Group Ltd. 18 EASYSENSE Vu Reference Manual • DO241 (1) The cursor will indicate the current selection. If you wish to alter the choice use the ▲▼ buttons to scroll the cursor until it is pointing at the preferred style and press the enter ► button to select. Notes: • • Vu’s internal clock is set automatically by the computers clock (date and time) each time it is connected to the computer and the EasySense software is run. If the date or time on a data set is not correct, check the date/time settings on your computer. If a System Full Reset is performed the date format will automatically return to its default (DDMM-YY). Decimals Use to switch decimals off and on, or to change the decimal format from a full stop to a comma. • With the cursor pointing at Decimals press the enter ► button to select. Turn On or Off With the cursor pointing at Turn Off / On press enter ► to alter the selection (from Off to On or visa versa). Format To change the format of the decimal separator from a full stop to a comma, scroll to Format and press enter ►. Scroll to the number displayed with a comma, press enter ► to select. • Press the stop button to return to System menu. Note: If a System Full Reset is performed decimals will automatically return to its default decimals On (displayed) and the format as a full stop. Using Vu connected to a computer for the first time Step 1: Install the EasySense software, if it is not already on your computer. For details of how to install and operate this program, please refer to the instructions provided with the EasySense software. EASYSENSE Vu requires version 3.1 or above of the EasySense software. (The version number can be verified in About from the Help menu). Step 2: Connect Vu to the computer’s USB port using the USB cable supplied. Windows will automatically detect a new device and install the drivers. Step 3: • Check that the LCD display on Vu is displaying the main menu (EasyLog, Snapshot, Timing, Counting, Review, System). Note: In most circumstances Vu will not communicate with the PC if it is taking samples. If the LCD screen shows samples being taken, press the stop button to finish recording. • Open the EasySense software program. © Data Harvest Group Ltd. 19 EASYSENSE Vu Reference Manual DO241 (1) Step 4: The first time the EasySense program is opened a ‘Select Program Level’ window will automatically open. Select a suitable user’s level. • • • Level 1 is aimed at ‘start’ level (e.g. up to 9 years old). Level 2 is aimed at ‘mid’ level (e.g. 9 – 15 years old) Level 3 is aimed at ‘exam’ level (e.g.15 years plus). Step 5: An Interface option window will open. Leave the Interface selection as EasySense Range and the method of connection as USB Port and select OK. The program will save your selection so it will be automatically configured when next used. Step 6: The Home window will open. Select one of the experiment modes e.g. EasyLog, Pictogram, Meters, Snapshot, Counting or Timing. Using Vu after the initial setup • • • Use the USB cable to connect Vu to the computer. Open the EasySense software program. Select one of the experiment modes e.g. EasyLog from the Home screen. The EasySense software overview Home is the main navigation screen, which contains the icons for all of EASYSENSE Vu’s logging options. The experiment options and the complexity of toolbars and functions are altered by the user level selected. Level 1 Level 2 Level 3 EasyLog EasyLog will open pre-set to record sensor values continuously as a line graph until stopped. A logging wizard will open, deselect the tick next to any sensors from which readings are not required and click on Finish. Click on the Start/Stop icon to begin recording. Logging will start with a time span of 30 seconds and when this has elapsed the time will double automatically. This will continue until the recording is stopped by clicking on the Start/Stop icon. © Data Harvest Group Ltd. 20 EASYSENSE Vu Reference Manual DO241 (1) Meters The Meters window gives an introduction to sensors and how they respond to change. Up to four section displays can be open at any one time and they can be any combination of sensors and displays. The program will open with live data from one sensor in a Numeric window. Click on the appropriate picture icon on the tool bar to open other section displays i.e. Numeric, Gauge, Colour Change or Bar. To alter the sensor displayed in a section, right click in the individual section window and select the sensor from the list. Click on the Start/Stop icon to stop recording. Pictogram (Level 1 only) The value from the sensors can be displayed as pictures or an abstract colour block or bar chart. Each picture represents a 10th of the range (or span) of the sensor and is also displayed as a number from zero to ten. The program will open with live data from the sensors displayed as pictures on a horizontal chart. The graph type can be changed to an abstract colour blocks, a bar chart or oriented vertically. The sensor readings are captured every time the Store icon is selected. Click on the Start/Stop icon to stop recording. Snapshot Snapshot will open pre-set to record sensor values on demand (manual sampling) with a bar graph display. A logging wizard will open, deselect the tick next to any sensors from which readings are not required and click on Finish. Click on the Start/Stop icon to begin recording. Click in the graph area to collect a sample for each active sensor. Click on the Start/Stop icon to stop data being recorded. Graph (Level 2 and 3 only) Graph is pre-set to record sensor values against a chosen time span as a line graph display. The window will open with the Real time logging wizard: 1. Deselect the tick next to any sensors from which readings are not required. Next. 2. Select the total recording time and the interval between the samples being taken (the shortest interval for Vu logger is 20 ms). Next. 3. Select the condition required for the recording to start i.e. • None - the recording will start as soon as you click on the Start/Stop icon. • Trigger on Level - the recording will start when the sensor selected is above, below, rises above or falls below a set level e.g. when the value from a Temperature sensor rises above 15˚C. 4. When the selection has been made, click on Finish. The recording will start when the start condition you have selected is met. The recording will stop when the selected time span has passed. Note: If you want to stop a recording before it has run the full term, click on the Start/Stop icon. © Data Harvest Group Ltd. 21 EASYSENSE Vu Reference Manual DO241 (1) Scope (Level 3 only) Scope has a simple oscilloscope type display. 1. 2. 3. A logging wizard will open, deselect the tick next to any sensors from which readings are not required and click on Finish. Select the Timebase (from panel on the right). The fastest interval between readings for View is 20 ms (roll mode). Click on the Start/Stop icon to begin recording. The graph trace will be redrawn continuously on the screen until you click on the Start/Stop icon when the trace will ‘freeze’. Timing Timing is used to allow students to study Time, Velocity, Acceleration, Momentum and Kinetic Energy relationships using switch-type (digital) sensors such as Light gates connected to input A or A and B. A wizard will open with the recording options available (these will depend on the user level selected). When the selection has been made, click on Finish. Click on the Start/Stop icon and a reading will be displayed when a change is detected in signal from the digital sensors. Click on the Start/Stop icon to stop data being recorded. Counting (Level 1 and 2 only) Use to count events by using switch-type (digital) sensors. The program will open pre-set to display a count as a number and horizontal bar graph. Click on the Start/Stop icon , each time the state of a sensor is changed to On e.g. by pressing a push switch, the number of counts will advanced by one. Click on the Start/Stop icon to stop data being recorded. Setup Remote Use to program Vu to capture data for a set time span while disconnected from the computer (remote). The collect data is stored in Vu’s memory to be retrieved by the computer at a later stage. The window will open with a logging wizard: 1. Deselect the tick next to any sensors from which readings are not required. Next. 2. Select the total recording time and the interval between the samples being taken, Next. 3. Select the condition required for the recording to start i.e. When Enter pressed - the recording will start as soon as you press the ► button on Vu. Trigger on Level – the recording will start when the sensor selected is above, below, rises above or falls below a set level e.g. when the value from a Temperature sensor rises above 15°C. Trigger on Digital Condition – the recording will start when a digital sensor connected to A or B is On, Off, rising to On or falling to Off. Trigger on Time – the recording will start at the time and date specified. This trigger is useful for recording at a time when a logger is unattended or to start multiple loggers at the same time. 4. When the selection has been made, click on Finish. The settings will be © Data Harvest Group Ltd. 22 EASYSENSE Vu Reference Manual DO241 (1) downloaded to Vu and a message on the computer will inform ‘The logger is now set up for remote logging’. Click on OK. Vu can now be disconnected from the computer and placed in its recording position. The recording will start when the start condition you have selected is met and stop when the selected time span has passed. Note: If you want to stop a recording before it has finished, press the stop button and follow the instructions on the display. Retrieve Remote Use this option to retrieve a data set stored in Vu’s memory. • A dialogue box will open showing the list of data sets (maximum of 6) currently stored in Vu. The most recent data set is first in the list. Select the required set of data and click on Retrieve. Notes: • When the maximum of 6 data sets is exceeded, the next set of data will replace the oldest set. • If the Erase data box is ticked, the set of data selected will be erased from the logger after retrieval. Technical information Selecting the sensor range Some of the internal sensors in Vu and some plug-in Vu sensors have more than one range. Once a range has been selected it will be used until reselected. The range of a sensor can be altered: • In Vu Meters (see page 6). • In Vu System (see page 17). • Using Sensor Config in the EasySense software (Settings menu). • Using New in the EasySense software (EasyLog, Graph, Pictogram, Snapshot, Counting mode). Powering Vu EASYSENSE Vu can be powered by: 1. By the USB port (whilst connected to the computer). © Data Harvest Group Ltd. 23 EASYSENSE Vu Reference Manual DO241 (1) 2. By its internal batteries (when charged). Connect Vu directly to a USB port on your computer* (or a powered USB hub) using the USB cable supplied with it. A full charge can take up to 8 hours. A battery charging symbol will be displayed on Vu’s screen while the logger is charging. *Your computer must be turned on and not in sleep or standby mode; otherwise, the battery may drain instead of charge. Notes: • Vu can also charge from a USB mains charger that outputs 5 V at 500 mA or more. • EASYSENSE Vu can only be connected directly to a computers USB port or by using a powered USB hub. It will not work with an unpowered hub (EASYSENSE Vu requires an output current of 500 mA). • An extension cable must be of a single direct port extension type. While Vu is accepting power from the USB port it will not operate auto switch off. Batteries Vu is fitted with a rechargeable lithium-ion battery pack. Whenever Vu is connected to the USB port on the computer, it will automatically re-charge the battery. Lithium-ion batteries are ‘memory-free’ and prefer a partial rather than a full discharge. Constant partial discharges with frequent recharges will not cause any harm. Frequent full discharges should be avoided whenever possible. Ideally Vu should be stored at about 40% or more charge. Do not store Vu with its battery fully discharged or with sensors connected. Even when turned off (asleep), Vu will use a small amount of current, and the battery will slowly discharge (some reserve charge is required to retain data and settings in memory). If Vu is to be stored for lengthy periods without use then it’s a good idea to recharge the battery every 6 – 8 weeks. When its battery is in good condition and fully charged it will power Vu in EasyLog or remote mode for a minimum of 41 days. The speed at which a lithium-ion battery will age is governed by both its storage temperature (preferably less than 40ºC) and state-of-charge. Ideally batteries should be replaced every 4 years. Eventually the battery pack will no longer deliver the stored energy and will need to be replaced. A fully charged battery that looses its charge quickly or a battery with symptoms of swelling or physical damage will demonstrate the need for replacement. When this happens, contact Data Harvest and request a battery replacement pack for EASYSENSE Vu – Product No. 5007. Auto switch off While battery powered Vu will normally auto switch off (go into low power sleep mode) to reduce power consumption if more than two minutes have passed since any measurements have been taken or a button was pressed. • • • If Vu is accepting power from the USB port or similar it will not operate auto switch off. Vu will wake up when any button is pressed. While remote recording on battery power in EasyLog mode or after using Setup Remote, Vu will stay awake until the interval between readings reaches 5 seconds or greater – at this point it will begin to use sleep mode between samples (waking up just in front of the sample time to allow the sensors to stabilise). © Data Harvest Group Ltd. 24 EASYSENSE Vu Reference Manual • DO241 (1) While in Timing or Counting mode Vu does not operate auto switch off and will stay awake ready to take a measurement. Internal Clock and Calender Vu’s internal clock will be updated automatically by the computers clock (date and time) each time it is connected to the computer and the EasySense software is run. Note: If the date or time on a data set is not correct, check the date/time settings on your computer. Vu’s memory Vu’s memory space is divided into 6 ‘data slots’ and so can store six investigations that have been collected in standalone mode (when not connected to the computer). Each slot is filled in turn. Once the 6th slot is used Vu will begin to overwrite existing data starting at memory slot 1 (the earliest data set). Note: A System Full Reset will erase all data sets and return the logger back to its factory default settings. See page 18. Fitting the lanyard Thread the ribbon strap completely through the open loop of the thin cord. Pull the thin cord end tight to achieve a secure fitting. Thread the thin cord loop through both slot holes in the base of the logger. Hard Reset If Vu fails to respond to the computer or a button press, carry out a Hard Reset. 1. If necessary attach Vu to USB power. 2. Press + + at the same time. If the hard reset has been done correctly, the LCD will display EASYSENSE Vu and the version number of its operating system before returning to the main menu. Note: A Hard Reset does not erase any stored data sets but if a recording is interrupted by a reset, then the data being captured will not be stored. © Data Harvest Group Ltd. 25 EASYSENSE Vu Reference Manual DO241 (1) If Vu still fails to respond apply a Full Reset (see below) or contact Technical Support at Data Harvest. Please provide details of: • The computer platform it is being used with. • The software version number • A description of the problem being encountered If possible, telephone from a location where you can operate Vu with the computer. Full Reset A Full Reset will return Vu back to the factory default. It will: o o o o o Erase all stored data sets. Automatically return all sensors to their default position (internal Temperature Off, Sound and Light On) and return the built-in sensors to their default range (Light - Indoor 1 k Lux, Temperature - 0 to 50˚C). Return the date format to DD-MM-YY. Return decimals to On with a full stop format. Return the language to its default. • Scroll ▲▼the menu to System, press enter ► to select. Scroll down▼ to Full Reset. Press the enter ► button to select. • Select enter ► to confirm this selection. • Select enter ► to return to the System menu. Specifications 128 x 64 graphic display Firmware upgradeable USB compatible communication V1.1 & V2.0 compatible Operating range: 0 - 40°C and 0 to 95%RH (non-condensing). Memory capacity: 6 data sets 10 bit sampling resolution Graph and Scope maximum logging speed: 20 millisecond (ms) interval between samples Digital timing: Resolution = 5.3 microseconds Power specifications: 5 V at 500 mA or more 90 mm 90 mm Weight of Vu: approx. 167 g 130 mm Dimensions: H 36 mm max., W 90 mm, D 130 mm. © Data Harvest Group Ltd. 26 36 mm EASYSENSE Vu Reference Manual DO241 (1) Care & Maintenance • • • • • • • Clean with a damp cloth, do not immerse in water or detergent. Vu is not waterproof. Vu is suitable for use in an operating range of 0 - 40°C and 0 to 95%RH (noncondensing). Do not subject to extreme heat or cold or leave in a location where it will get wet. If Vu has been left in the cold, let it warm to near room temperature before waking it from sleep. Do not expose to direct sunlight for extended periods of time. Do not expose to temperatures greater than 60˚ C, e.g. near a heater or inside a car in hot weather. Do not store Vu with its battery fully discharged. Ideally Vu should be stored at least 40% or more state-of-charge. See page 24. Updating EASYSENSE Vu’s Firmware Occasionally Data Harvest may release updated firmware which will contain improvements or new features. Updates will be made available from the Data Harvest website. To update the firmware of your EASYSENSE Vu logger: Step 1. Copy the English Firmware Update for Vu onto the hard disc of your computer and run the .exe. Step 2. Connect Vu to the computer using the USB cable. Step 3. Wait for a few seconds. A progress bar will indicate Vu is being programmed. A tick will indicate if the process was successful. Disconnect Vu. If you wish to repeat this process, connect another Vu and click on the update window. © Data Harvest Group Ltd. 27 EASYSENSE Vu Reference Manual DO241 (1) A cross will indicate that an error occurred. Click on the update window to go back to the start screen and reprogram. Step 4. Exit the program. Practical information for Vu’s plug-in Temperature sensor • • • • • • • • The sensor has a particularly low thermal inertia. The thermistor is housed at the end of the stainless steel tube, so it is the tip of the sensor that is most sensitive to temperature. Lay the sensor on its side, not its end, when measuring a surface temperature. Do NOT put any part of the sensor in a direct flame or on a hot plate. Temperatures higher than 150ºC will damage the sensor. The PVC insulation on the connecting cable has a working range of -10 to 85ºC, so keep this cable away from the source of heat. Avoid submerging the sensor beyond the stainless steel portion. Wash the sensor thoroughly after use. The boiling point of water will vary with changes in air pressure. At one atmosphere of pressure (101.3 kPa, 1013 mBar) pure water boils at 100ºC. Water boils when the vapour pressure of water equals the pressure of the gases above water, so if the pressure changes, then the temperature that the water boils at will also change. Boiling Point of Water vs. Pressure Pressure in kPA 101.3 99.5 97.8 96.0 94.4 92.7 Pressure in mBar 1013 995 978 960 944 927 Temperature in ºC 100.0 99.5 99.0 98.5 98.0 97.5 For Advanced Users Resolution 0.1˚C (0.1˚F) Accuracy ± 0.5˚C at 0 - 70˚C, rising to ±1˚C at extremes of range. • The 3 mm by 200 mm AISI 316 stainless steel tube has a high resistance to corrosion from a wide variety of weak acids and alkalis. Some environments e.g. saltwater may cause some discolouration to the stainless steel tube but this will have no effect on the sensor’s performance. • The sensor can be left in an alkaline solution such as Sodium Hydroxide (NaOH) for up to 48 hours, with only minor discoloration. We do not recommend use in a solution whose concentration is greater than 3 mol dm-3. • The maximum length of time recommended for exposure to an acid is dependent on the acid’s concentration. In general, we do not recommend that temperature © Data Harvest Group Ltd. 28 EASYSENSE Vu Reference Manual DO241 (1) sensors be left to soak in acids of between 1 – 3 mol dm-3 concentrations for longer than 48 hours. The exceptions to this rule are Hydrochloric acid (HCl), and Sulphuric Acid (H2SO4). The maximum recommended times for exposure are: Concentration of hydrochloric acid 1 mol dm-3 2 mol dm-3 3 mol dm-3 Maximum exposure 20 minutes 10 minutes 5 minutes Concentration of sulphuric acid 1 mol dm-3 2 mol dm-3 3 mol dm-3 Maximum exposure 48 hours 20 minutes 10 minutes Warranty EASYSENSE Vu is warranted to be free from defects in materials and workmanship for a period of 12 months from the date of purchase provided it has been used in accordance with any instructions, under normal laboratory conditions. This warranty does not apply if Vu has been damaged by accident or misuse. In the event of a fault developing within the 12 month period, EASYSENSE Vu must be returned to Data Harvest for repair or replacement at no expense to the user other than postal charges. Note: Data Harvest products are designed for educational use and are not intended for use in industrial, medical or commercial applications. WEEE (Waste Electrical and Electronic Equipment) Legislation Data Harvest Group Ltd is fully compliant with WEEE legislation and is pleased to provide a disposal service for any of our products when their life expires. Simply return them to us clearly identified as ‘life expired’ and we will dispose of them for you. This device complies with Part 15 (Radio Frequency Devices) of the Federal Communications Commission (FCC) rules. Operation is subject to the following two conditions: (1) this device may not cause harmful interference, and (2) this device must accept any interference received, including interference that may cause undesired operation. Data Harvest Group Ltd., 1 Eden Court, Leighton Buzzard, Bedfordshire LU7 4FY Tel: +44 (0)1525 373666, Fax: +44 (0)1525 851638 e-mail: [email protected], [email protected] Website: www.data-harvest.co.uk © Data Harvest Group Ltd. 29