1
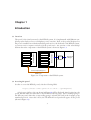
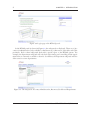
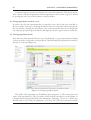
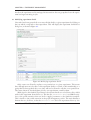
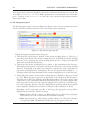
User’s Manual: The RTGrid Portal
Conformal Radiotherapy on the Grid
THE RTGRID PROJECT
funded by the EPSRC under grant number EP/C538641/1
and OMII-UK under the E NGAGE (Engaging research with e-Infrastructure) initiative
School of Computer Science
Cardiff University
Queen’s Buildings
5 The Parade, Roath
Cardiff CF24 3AA
Department of Medical Physics
Velindre Hospital
Velindre Road, Whitchurch
Cardiff CF14 2TL
Last update: March 26, 2009
Contents
1
Introduction
1.1 Overview . . . . . . . . . . . . . . . . . . . . . . . . . . . . . . . . . . . . . .
1.2 Accessing the portal . . . . . . . . . . . . . . . . . . . . . . . . . . . . . . . .
1
1
1
2
Installation
3
3
Installing Globus
3.1 Download and extract Globus . . . . . . . . . . . . . . .
3.2 Set environment variables . . . . . . . . . . . . . . . . .
3.3 Extract GSI certificates from your browser . . . . . . . .
3.4 Extract public and private keys from the PKCS12 file . . .
3.5 Store your certificate . . . . . . . . . . . . . . . . . . . .
3.6 Change access permissions for better security (Linux only)
3.7 Install the CA certificate and signing policy . . . . . . . .
3.8 Testing the globus installation . . . . . . . . . . . . . . .
.
.
.
.
.
.
.
.
5
5
5
5
6
6
7
7
7
4
Account management
4.1 Viewing and modifying user details . . . . . . . . . . . . . . . . . . . . . . . .
4.2 Changing the login password . . . . . . . . . . . . . . . . . . . . . . . . . . . .
4.3 Viewing the licensing terms . . . . . . . . . . . . . . . . . . . . . . . . . . . .
9
9
10
10
5
Administration
5.1 Creating a new user . . . . . . . . . . . .
5.2 Listing the users . . . . . . . . . . . . . .
5.3 Modifying user details . . . . . . . . . .
5.4 Creating a new user group . . . . . . . .
5.5 Listing the user groups . . . . . . . . . .
5.6 Listing the user groups owned by a user .
5.7 Viewing or modifying user group details
.
.
.
.
.
.
.
.
.
.
.
.
.
.
.
.
.
.
.
.
.
.
.
.
.
.
.
.
.
.
.
.
.
.
.
.
.
.
.
.
.
.
.
.
.
.
.
.
.
.
.
.
.
.
.
.
.
.
.
.
.
.
.
.
.
.
.
.
.
.
.
.
.
.
.
.
.
.
.
.
.
.
.
.
.
.
.
.
.
.
.
.
.
.
.
.
.
.
.
.
.
.
.
.
.
.
.
.
.
.
.
.
.
.
.
.
.
.
.
.
.
.
.
.
.
.
.
.
.
.
.
.
.
.
.
.
.
.
.
.
.
.
.
.
.
.
.
11
11
12
13
13
14
16
16
Resource management
6.1 Adding a new resource . . . . . . .
6.2 Sharing a resource . . . . . . . . . .
6.3 Listing resources accessible to a user
6.4 Listing resources owned by a user .
6.5 Viewing resource details . . . . . .
6.6 Modifying resource details . . . . .
6.7 Resource credential management . .
.
.
.
.
.
.
.
.
.
.
.
.
.
.
.
.
.
.
.
.
.
.
.
.
.
.
.
.
.
.
.
.
.
.
.
.
.
.
.
.
.
.
.
.
.
.
.
.
.
.
.
.
.
.
.
.
.
.
.
.
.
.
.
.
.
.
.
.
.
.
.
.
.
.
.
.
.
.
.
.
.
.
.
.
.
.
.
.
.
.
.
.
.
.
.
.
.
.
.
.
.
.
.
.
.
.
.
.
.
.
.
.
.
.
.
.
.
.
.
.
.
.
.
.
.
.
.
.
.
.
.
.
.
.
.
.
.
.
.
.
.
.
.
.
.
.
.
17
17
18
18
19
21
21
21
6
7
.
.
.
.
.
.
.
Profile management
.
.
.
.
.
.
.
.
.
.
.
.
.
.
.
.
.
.
.
.
.
.
.
.
.
.
.
.
.
.
.
.
.
.
.
.
.
.
.
.
.
.
.
.
.
.
.
.
.
.
.
.
.
.
.
.
.
.
.
.
.
.
.
.
.
.
.
.
.
.
.
.
.
.
.
.
.
.
.
.
.
.
.
.
.
.
.
.
.
.
.
.
.
.
.
.
.
.
.
.
.
.
23
ii
7.1
7.2
7.3
7.4
7.5
7.6
7.7
7.8
8
Creating a new profile . . . . . .
Sharing a profile . . . . . . . . . .
Listing profiles accessible to a user
Listing profiles owned by a user .
Viewing profile details . . . . . .
Modifying profile details . . . . .
File management panel . . . . . .
The components of a profile . . .
7.8.1 The profile extension . . .
7.8.2 Writing a profile extension
7.8.3 Edit profile extension . . .
.
.
.
.
.
.
.
.
.
.
.
.
.
.
.
.
.
.
.
.
.
.
.
.
.
.
.
.
.
.
.
.
.
.
.
.
.
.
.
.
.
.
.
.
.
.
.
.
.
.
.
.
.
.
.
.
.
.
.
.
.
.
.
.
.
.
.
.
.
.
.
.
.
.
.
.
.
.
.
.
.
.
.
.
.
.
.
.
.
.
.
.
.
.
.
.
.
.
.
.
.
.
.
.
.
.
.
.
.
.
.
.
.
.
.
.
.
.
.
.
.
.
.
.
.
.
.
.
.
.
.
.
.
.
.
.
.
.
.
.
.
.
.
.
.
.
.
.
.
.
.
.
.
.
.
.
.
.
.
.
.
.
.
.
.
.
.
.
.
.
.
.
.
.
.
.
.
.
.
.
.
.
.
.
.
.
.
.
.
.
.
.
.
.
.
.
.
.
.
.
.
.
.
.
.
.
.
.
.
.
.
.
.
.
.
.
.
.
.
.
.
.
.
.
.
.
.
.
.
.
.
.
.
.
.
.
.
.
.
.
.
.
.
.
.
.
.
.
.
.
.
.
.
.
.
.
.
.
.
.
.
.
.
.
.
.
.
.
.
.
.
.
.
.
.
23
25
25
26
26
27
27
29
30
32
36
Experiment management
8.1 Creating a new experiment . . . . . . .
8.2 Sharing an experiment . . . . . . . . .
8.3 Listing experiments accessible to a user
8.4 Listing experiments owned by a user . .
8.5 Viewing experiment details . . . . . . .
8.6 Modifying experiment details . . . . .
8.7 File management panel . . . . . . . . .
.
.
.
.
.
.
.
.
.
.
.
.
.
.
.
.
.
.
.
.
.
.
.
.
.
.
.
.
.
.
.
.
.
.
.
.
.
.
.
.
.
.
.
.
.
.
.
.
.
.
.
.
.
.
.
.
.
.
.
.
.
.
.
.
.
.
.
.
.
.
.
.
.
.
.
.
.
.
.
.
.
.
.
.
.
.
.
.
.
.
.
.
.
.
.
.
.
.
.
.
.
.
.
.
.
.
.
.
.
.
.
.
.
.
.
.
.
.
.
.
.
.
.
.
.
.
.
.
.
.
.
.
.
.
.
.
.
.
.
.
.
.
.
.
.
.
.
.
.
.
.
.
.
.
39
39
41
41
42
42
43
44
iii
iv
Chapter 1
Introduction
1.1 Overview
Experiments
Profiles
Resources
Administration
User account
Experiments
Profiles
Resources
WEB SERVICES
User account
RTGRID PORTAL
The portal is the visual front-end of the RTGrid system. It is implemented with JSR 168 compliant portlets deployed over a Gridsphere portal container. Each of the portlets displayed on
the portal communicates with the underlying web services, the back-end of the RTGrid system,
to perform service requests received from the portal users. An overview of the relationships
between the main components of the RTGrid system is shown in Figure 1.1.
Experiment
Manager
Database
Administration
Service Request/Response
SOAP Layer
Figure 1.1: Components of the RTGrid system.
1.2 Accessing the portal
In order to access the RTGrid portal, visit the following URL:
https://hhost-comsc.grid.cf.ac.uk:8000/gridsphere/
A login page similar to the one shown in Figure 1.2 will be displayed. After logging into the
portal, the user must first subscribe to the The RTGrid Portal group. This is done by going to
the Welcome panel, where the corresponding group is selected and saved in the Configure group
membership section. Once this is done, the The RTGrid Portal panel will appear on the portal
(shown in Figure 1.3).
1
2
CHAPTER 1. INTRODUCTION
Figure 1.2: Login page of the RTGrid portal.
In the RTGrid panel (as shown in Figure 1.3, five sub-panels are displayed. These are: 1) Account, 2) Administration (only available to administrators), 3) Resources, 4) Profiles, and 5) Experiments. Each of these sub-panels deals with a specific aspect of the RTGrid system. For
example, the Experiments sub-panel will only deal with viewing and controlling all the experiments that are currently accessible to the user. In addition, the Experiments sub-panel will also
allow creation of new experiments.
Figure 1.3: The sub-panels: Account, Administration, Resources, Profiles and Experiments.
User’s Manual: The RTGrid Portal (Version 2.0)
Chapter 2
Installation
Prerequisite packages to be installed are identified by the package name, a URL from which
they can be downloaded, and an appropriate command for installing the package on systems
that support Yum.
1. Install and start MySQL server The RTGrid system requires a MySQL database server
to be installed on the host system. For further details on the installation of MySQL, visit:
http://dev.mysql.com/. The Yum installation command is as follows:
$yum install mysql mysql-server
2. Create the RTGrid database After starting the MySQL server, create the RTGrid database
by running the following command as superuser:
$database/dbinit_RTGrid2.sh <user>
$database/dbinit_RTGridPortal.sh <user>
where <user> is the username that will run the portal.
3. Install other prerequisites The Experiment Manager requires the following packages:
(a) Python, http://www.python.org/
$yum install python
(b) MySQLdb, http://sourceforge.net/projects/mysql-python/
$yum install MySQL-python
4. Configure the installation To configure the installation, run the following commands
from the RTGrid source tree root:
$./configure -prefix=<prefix>
where <prefix> is the installation directory. If the file configure does not exists, it
may be created by running the following command:
$make -f Makefile.in bootstrap
For the above command to work, Autoconf must be installed. For further details on Autoconf, please visit http://www.gnu.org/software/autoconf/. The installation
command using Yum is as follows:
$yum install autoconf
5. Build the RTGrid system To build the RTGrid system, run the following:
$make
3
4
CHAPTER 2. INSTALLATION
6. Install the RTGrid system To install the newly built RTGrid system into the installation
directory, run the following:
$make install
During the installation process, you will be prompted to:
(a) accept the Gridsphere licence,
(b) confirm if you wish to install the Gridsphere documentation.
IMPORTANT:
If you are installing the RTGrid system for the first time, or want to start with a fresh
installation, run the following command:
$make fresh
Please we warned that this will wipe clean the existing Gridsphere portal database.
7. Create or update the RTGrid database To create or update the MySQL database used
by the RTGrid system, run the following:
$cd database
$python dbmake_RTGrid2.py
$cd ..
IMPORTANT:
Please note that the above commands will keep existing entries in the database. To rebuild
the database from scratch, run the following before running dbmake_RTGrid2.py:
$./dbclean.sh
If you wish to populate the database with some test users and profiles, run the following:
$python pop.py
8. Start the portal To start the portal, run the following:
$<prefix>/libexec/rtportal start
9. Start the experiment manager To start the Experiment Manager, run the following:
$<prefix>/libexec/rtmaster
The Experiment Manager may also be started as a daemon by running the following:
$nohup <prefix>/libexec/rtmaster > rtmaster.log 2>&1 &
10. Check the installation To verify the installation, please visit the following URL:
https://<HOSTNAME>:8000/
The RTGrid login page should now be displayed on the browser.
User’s Manual: The RTGrid Portal (Version 2.0)
Chapter 3
Installing Globus
3.1 Download and extract Globus
1. Goto http://www.globus.org/toolkit/downloads/.
2. Download the latest Java WS Core Binary Installer.
3. Extract the binary installer, if the file downloaded in step 2 is compressed.
4. Rename the directory to gt4.
3.2 Set environment variables
1. Set the environment variable GLOBUS_LOCATION to the unpacked distribution.
• Windows: set GLOBUS_LOCATION=c:\gt4
• Unix/Linux:
setenv GLOBUS_LOCATION /<home directory>/gt4/ or,
export GLOBUS_LOCATION=/<home directory>/gt4/
2. Add GLOBUS_LOCATION/bin to the path environment variable.
• Windows: set path=%path%;%GLOBUS_LOCATION%\bin
• Unix/Linux:
setenv PATH "$PATH:$GLOBUS_LOCATION/bin" or,
export PATH=$PATH:$GLOBUS_LOCATION/bin
It is advisable to set these environment variables permanently. Details on managing environment variables in Windows is available here:
http://vlaurie.com/computers2/Articles/environment.htm
3.3 Extract GSI certificates from your browser
• Firefox 3.0
1. Goto Tools > Options > Advanced > Encryption.
2. Click on “View certificates”.
3. Goto to “Your certificates”.
5
6
CHAPTER 3. INSTALLING GLOBUS
4.
5.
6.
7.
Select the relevant GSI certificate.
Click on “backup...”.
Save the certificate backup in PKCS12 format.
Enter password for protecting the certificate backup file.
• Internet explorer 7
1.
2.
3.
4.
5.
6.
7.
8.
Goto Tools > Internet Options > Content > Certificates > Personal.
Select the relevant GSI certificate.
Click on “Export”.
Select “Yes” export the private key, and click next.
Default PKCS12 format is fine. Click next.
Enter password for protecting the certificate backup file.
Supply filename for the certificate backup file.
Click on “Finish”.
3.4 Extract public and private keys from the PKCS12 file
1. If you are using Windows,
• download and install OpenSSL for windows.
http://www.slproweb.com/download/Win32OpenSSL_Light-0_9_8j.exe
You may also need to install Visual C++ 2008 redistributables.
• Set path for the OpenSSL commands:
set path=C:\OpenSSL\bin;%path%
2. Extract the public key:
openssl pkcs12 -in cert.p12 -clcerts -nokeys -out usercert.pem
You will be prompted to enter the passphrase protecting the certificate (see section 3.3).
3. Extract the private key:
openssl pkcs12 -in cert.p12 -nocerts -out userkey.pem
You will be prompted to enter the passphrase protecting the certificate (see section 3.3).
You will also be prompted to enter a new passphrase for protecting the extracted private
key. Please note that the certificate file extracted from the browser in section 3.3 could be
a PFX file if exported from Internet Explorer.
3.5 Store your certificate
Copy the extracted PEM files to the .globus directory.
• Windows:
cd %HOMEPATH%
mkdir .globus;
• Linux: mkdir ∼/.globus
User’s Manual: The RTGrid Portal (Version 2.0)
CHAPTER 3. INSTALLING GLOBUS
7
3.6 Change access permissions for better security (Linux only)
$
$
$
$
$
cd ~/.globus
chmod 644 usercert.pem
chmod 600 userkey.pem
cd ..
chmod 700 ~/.globus
3.7 Install the CA certificate and signing policy
1. Create a directory certificates in the .globus directory.
2. Download the UK e-Science CA certificate file from
http://www.grid-support.ac.uk/content/view/182/244/
and store it in the certificates directory.
3. Download the "Certificate (file)" for UK e-Science CA (e.g., 367b75c3.0)
4. Download the UK e-Science CA signing policy from
http://www.grid-support.ac.uk/content/view/182/244/
and store it in the certificates directory. (e.g., 367b75c3.signing_policy)
3.8 Testing the globus installation
Run the following command:
grid-proxy-init -hours 168 -out userproxy.pem
This will prompt you to enter the passphrase which you supplied while extracting the PEM
files from PKCS12 (see, section 3.4). If successful, a proxy file with the specified lifetime should
be created in the current directory. You can run the following command to check the lifetime
of this proxy certificate.
grid-proxy-info -f userproxy.pem
This proxy certificate should be uploaded to the RTGrid portal when using resources that
require a GSI certificate for authentication.
User’s Manual: The RTGrid Portal (Version 2.0)
8
CHAPTER 3. INSTALLING GLOBUS
User’s Manual: The RTGrid Portal (Version 2.0)
Chapter 4
Account management
The account management portlet allows a user to manage their user account. All the details that
are specific to a user are made available to that user through this portlet.
In the following sections we will discuss the various actions that can be performed from this
portlet. After an action has been performed, the portlet will display any information related to
that action (for instance, error messages etc.) on top of the contents panel.
4.1 Viewing and modifying user details
To view or modify the user details, click on the User details link on the action menu (panel on
the left). The user details dialog, as shown in Figure 4.1, will be displayed in the contents panel.
Figure 4.1: Viewing or modifying user details.
The user details dialog box displays the following user details:
• Last login: This is the time and date when the user last logged in. This is a read-only field.
9
10
CHAPTER 4. ACCOUNT MANAGEMENT
• Username: The username which identifies the user in the RTGrid system.
• Real Name: The real name of the user.
• Email ID: The email ID which will be used for any communications related to the usage
of the RTGrid system.
• Affiliation: The institution the user is currently associated with.
• Administrative status: Check this to agree to the RTGrid user terms and conditions.
The user license can be viewed by clicking on the User license link on the action menu.
4.2 Changing the login password
To change the login password, click on the Change password link on the action menu. The
change password dialog, as shown in Figure 4.2, will be displayed in the contents panel.
Figure 4.2: Changing the login password.
The change password dialog box displays the following fields:
• Username: The username which identifies the user in the RTGrid system.
• Old password: The old password which is to be changed.
• New password: The new password which replaces the old password.
• Re-type new password: Confirm the new password.
To make the changes, press the Change button; to cancel, press the Cancel button.
4.3 Viewing the licensing terms
Every user of the RTGrid system must agree to the licensing terms under which the RTGrid
services have been provided. To view these licensing terms, click on the User license link on the
action menu (panel on the left). This will display the licensing terms. The user can either Agree
or Decline the agreement by pressing the appropriate button. If the user declines the agreement,
he or she will be logged out of the RTGrid system. To agree to the terms, simply log into the
RTGrid system, and the licensing terms will be displayed to the user. The user can now agree to
the terms, and continue using the services provided by the RTGrid system.
User’s Manual: The RTGrid Portal (Version 2.0)
Chapter 5
Administration
The administration portlet allows administrators to create and manage users and user groups. By
using users and user groups, the RTGrid system controls access to resources, profiles (simulation
templates) and experiments.
In the following sections we will discuss the various actions that can be performed from this
portlet. After an action has been performed, the portlet will display any information related to
that action (for instance, error messages etc.) on top of the contents panel.
5.1 Creating a new user
Only administrators are allowed to create a new user. To create a new user, click on the Create user link on the action menu (panel on the left). The create user dialog box, as shown in
Figure 5.1, will be displayed in the contents panel.
Figure 5.1: Creating a new user.
The create user dialog box displays all of the following fields:
11
12
CHAPTER 5. ADMINISTRATION
• Username*: A username is used to identify a user of the RTGrid system. It must be a
unique alphanumeric word, without any white-spaces in-between characters (for example,
“rtgriduser” ). Once a user has been created, the assigned username cannot be changed. If
the username is already in used, the RTGrid system will alert the user.
• Real Name: The real name of the user (for example, “Peter Smith”).
• Affiliation: The institution the user is currently associated with.
• Email ID: The email ID which will be used for any communications related to the usage
of the RTGrid system.
• Password: A temporary password which will be given to the user, once the user has been
created successfully. It is important for the user to change this temporary password as
soon as they log in for the first time.
• Re-type password: Re-type the temporary password.
• Administrative status: Check this if the user should be granted administrative privileges.
Once all of the fields have been specified, the new user is created by pressing the Create
button. To cancel user creation, press the Cancel button. Please note that the field marked with
an ‘*’ cannot be changed after the user has been created.
5.2 Listing the users
In order to list all of the users that are currently registered with the RTGrid system, click on
the List users link on the action menu (panel on the left). This will display the first 10 users, as
shown in Figure 5.2, sorted in descending order of the last modification date, so that the users
who’s details were modified most recently are displayed first.
Figure 5.2: Listing the users.
The next 10 users (or, the previous 10 users), if available, can be listed by clicking on the
next >>, or << previous, link on the top right-hand corner of the list header.
In the users list, icons are used to identify the type and status of each of the users. These
icons and their meanings are as follows:
•
: Inactive user without administrative privileges.
•
: Active user without administrative privileges.
•
: Inactive user with administrative privileges.
•
: Active user with administrative privileges.
User’s Manual: The RTGrid Portal (Version 2.0)
CHAPTER 5. ADMINISTRATION
13
Only active users are allowed to use the RTGrid services. For a user to become active, he
or she must first agree to the terms and conditions under which the RTGrid services have been
provided.
5.3 Modifying user details
In order to modify the details of a given user, click on the row which corresponds to the user on
the users list. This will display the user modification dialog box, as shown in Figure 5.3.
Figure 5.3: Modifying user details.
In the user modification dialog box, the information that can be modified is displayed as
editable fields; the rest are left as normal text. In order to save any changes, press the Save
button. To cancel any changes, click on << Back to user list link. To delete the user from the
RTGrid system, press the Delete button. Saving changes to user details, and deleting users from
the RTGrid system require user confirmation.
5.4 Creating a new user group
Only administrators are allowed to create a new user group. To create a new user group, click
on the Create group link on the action menu (panel on the left). The create user group dialog
box, as shown in Figure 5.4, will be displayed in the contents panel.
The create user group dialog box displays all of the fields that are required in order to create
a new user group. These fields are:
• Group Name*: The group name is used to identify a user group. It must be a unique alphanumeric word, without any white-spaces in-between characters (for example, “admin”).
• Description: The description field provides further details about the group.
User’s Manual: The RTGrid Portal (Version 2.0)
14
CHAPTER 5. ADMINISTRATION
Figure 5.4: Creating a new user group.
• Select members: This field identifies the set of users who should become members of
this user group. It displays all of the users who are currently registered with the RTGrid
system. The members are selected from this list by checking the corresponding checkboxes.
Once all of the above fields have been specified, the new user group can be created by pressing
the Create button. To cancel user group creation, press the Cancel button. Please note that the
field marked with an ‘*’ cannot be changed after the user group has been created.
Figure 5.5: Listing the user groups.
5.5 Listing the user groups
In order to list all of the user groups that are currently active within the RTGrid system, click
on the List groups link on the action menu (panel on the left). This will display the first 10 user
groups, as shown in Figure 5.5, sorted in descending order of their last modification date so that
the user groups which were modified most recently are displayed first.
The next 10 user groups (or, the previous 10 user groups), if available, can be listed by
clicking on the next >>, or << previous, link on the top right-hand corner of the list header.
User’s Manual: The RTGrid Portal (Version 2.0)
CHAPTER 5. ADMINISTRATION
Figure 5.6: Viewing user group details.
Figure 5.7: Modify user group details.
User’s Manual: The RTGrid Portal (Version 2.0)
15
16
CHAPTER 5. ADMINISTRATION
5.6 Listing the user groups owned by a user
After a user group has been created, the administrator who created the group owns the group.
By clicking on the List owned groups link on the action menu (panel on the left), all of the groups
that are currently owned by this user will be listed.
5.7 Viewing or modifying user group details
Details of a user group can only be modified by its owner, or the administrator. If the user is
not the owner, clicking on the row which corresponds to a given user group on the group list,
will display a read-only dialog box, as shown in Figure 5.6. This dialog box displays all of the
information that can be view by normal users.
If the user owns the user group, clicking on the row which corresponds to the group on the
group list will display the user group modification dialog box, as shown in Figure 5.7.
In the user group modification dialog box, the fields that can be modified are displayed as
editable fields; the rest are left as normal text. In order to save any changes, press the Save button.
To cancel any changes, click on << Back to group list link. To delete the user group from the
RTGrid system, press the Delete button. Saving changes to user group details and deleting user
groups from the RTGrid system require user confirmation.
User’s Manual: The RTGrid Portal (Version 2.0)
Chapter 6
Resource management
The resource management portlet allows administrators to create and manage distributed resources that are accessible to the RTGrid system. These resources can be used by any user when
a new simulation experiment is created.
In the following sections we will discuss the various actions that can be performed from this
portlet. After an action has been performed, the portlet will display any information related to
that action (for instance, error messages etc.) on top of the contents panel.
6.1 Adding a new resource
Only administrators are allowed to create a new resource. To create a new resource, click on the
Create resource link on the action menu (panel on the left). The create resource dialog box, as
shown in Figure 6.1 will be displayed in the contents panel.
Figure 6.1: Creating a resource.
The create resource dialog box displays all of the fields that are required in order to create a
new resource. These fields are:
17
18
CHAPTER 6. RESOURCE MANAGEMENT
• Resource name: The resource name is used to identify a resource in the RTGrid system.
Although it is not necessary that this string be unique, it is advisable to choose a unique
name since resource names are used when listing available resources during the experiment
creation phase (see Figure 8.1).
• Job Manager: This field specifies the Uniform Resource Identifier (URI) for contacting
the resource manager associated with this resource. For instance, the job manager for the
Oxford NGS Grid is globus://grid-compute.oesc.ox.ac.uk/jobmanager-pbs.
• Description: This field is used to describe the resource in detail.
• Access permission: This field identifies the list of user groups which should be granted
access to this resource. Ultimately, all of the members of the selected groups will be
granted access to this resource. See Section 6.2 for further details.
Once all of the above fields have been specified, the new resource can be created by pressing
the Create button. To cancel resource creation, press the Cancel button. Please note that all of
the above fields may be altered after the resource has been created.
6.2 Sharing a resource
There are three ways in which an owner can share resources:
• Read: By granting read access to a group, the owner permits any user who is a member
of that group to view the resource details.
• Edit: By granting edit access to a group, the owner of the resource permits any member
of that group to modify the details of the given resource. If a group is granted edit access,
the RTGrid system will also automatically grant read access—no edit access without read
access.
• Use: By granting use access to a group, the owner of the resource permits any member of
that group to use the given resource for running simulations. When a group is granted use
access, the RTGrid system will also automatically grant read access—no use access without
read access.
Please note that in the experiment creation portlet (see Figure 8.1), only active resources
that are accessible to a user (either resources which the user owns, or resources with use
access set to true) will be available in the drop-down menu. By controlling the use access
to resources, administrators can control the users who are allowed to run simulations on
certain resources, depending on the current state of the resources (say, testing out a new
resource before granting general access to normal users).
6.3 Listing resources accessible to a user
In order to list all of the resources that are accessible to a user due to group membership, click
on the List accessible link on the action menu (panel on the left). This will display the first 10
resources, as shown in Figure 6.2, sorted in descending order of their modification time so that
the most recently updated resources are displayed first.
The next 10 resources (or, the previous 10 resources), if available, can be displayed by clicking
on the next >>, or << previous, link on the list header.
Associated with each of the displayed resource are the following details:
User’s Manual: The RTGrid Portal (Version 2.0)
CHAPTER 6. RESOURCE MANAGEMENT
19
Figure 6.2: Listing resources.
• State: This summarises the current state of the resource.
• Name: The name of the resource, which briefly describes the resource.
• Description: The description provides more detail about the resource. This is used to
provide in-depth detail about the resource and its settings.
• Last modified: The date and time when the resource was last modified.
A check-box appears in each row, if the user can control the resource. This may be used to
select a subset of the listed resources. Selected resources can be deleted by pressing the Delete
button on the list header.
To summarise the current state of the resource, four types of icons are used. These icons are:
•
: The locked icon is used to identify resources that are currently not usable by any user,
except for the owner. A resource is locked when none of the groups are granted use access.
•
: The unlocked icon is used to identify resources to which jobs can be submitted by any
user who is a member of the groups that have been granted use access. In order to unlock
a resource, at least one group must be granted use access.
•
: The active icon is used to identify resources that are ready for use. Depending on the
type of the resource, certain user specific parameters may have to be set before the resource
is used, i.e. authentication. Once the relevant parameters have been set, the resource
becomes active, and therefore usable. Currently, the user must specify the credential type
to activate a resource (see Section 6.7).
•
: The inactive icon is used to identify resources that are not ready for use. In order to
activate a resource, the user must first set the user specific parameters (see Section 6.7).
Please note that in the experiment creation dialog box (see Figure 8.1), only resources which
are unlocked, accessible to the user and activated by the user are listed.
6.4 Listing resources owned by a user
In order to list all of the resources that are owned by a user, click on the List owned link on the
action menu (panel on the left). Contrary to the listing described in Section 6.3, this will only
list resources that are currently owned by the user. Hence, some of the resources that are not
shared with any other user group will appear in this list, although, they may not appear in the
accessible list.
User’s Manual: The RTGrid Portal (Version 2.0)
20
CHAPTER 6. RESOURCE MANAGEMENT
Figure 6.3: Viewing resource details.
Figure 6.4: Modifying resource details.
User’s Manual: The RTGrid Portal (Version 2.0)
CHAPTER 6. RESOURCE MANAGEMENT
21
6.5 Viewing resource details
Users who have been granted read access may view the details of a given resource by clicking on
the row which corresponds to the resource. This will display the resource information dialog
box, as shown in Figure 6.3.
The details of the resource are divided into two main parts: a) The user specific credential
management panel where the user set user specific parameters for activating the resource, and b)
the common details of the resource.
6.6 Modifying resource details
Users who have been granted edit access may edit the details of a given resource by clicking on
the row which corresponds to the resource. This will display the resource modification dialog
box, as shown in Figure 6.4.
Only owners are allowed to update access permissions of a given resource. This means that,
although users may be able to edit resource details as a result of their membership to a group
that has been granted edit access, they will not be allowed to edit the access permissions. The
owner, therefore, has the highest priority over resources owned by them.
6.7 Resource credential management
Some resource managers require user authentication in order to validate job submissions to
resources under their control. To fulfill this requirement, every resource is associated with a
credential management module. When a user with use access views the details of a given resource,
the interfaces that are related to credential management appears on the top (see Figure 6.3).
In order to activate a resource which requires user authentication, the user must first update
the type of credential which he or she wishes to use. To do this, first select the credential
type, and press the Update button. Once the credential type has been updated successfully, any
interfaces related to that credential type will be displayed, as shown in Figure 6.5.
Figure 6.5: Credential management panel.
There are two ways for supplying a credential:
• MyProxy credential: By using this module, the user requests the RTGrid system to obtain
the required credential from a MyProxy server. This feature is currently not implemented.
User’s Manual: The RTGrid Portal (Version 2.0)
22
CHAPTER 6. RESOURCE MANAGEMENT
• GSI proxy file: By using this module, the user will upload a GSI credential proxy file
from the local file system. On Globus systems, a proxy file may be generated by using the
following command:
grid-proxy-init -hours 10 -out ~/proxy.pem
In order to upload a GSI credential proxy file, select the proxy file by clicking on the
Browse... button. Then press the Upload button to upload the proxy file. If a valid
credential was uploaded successfully, the credential management panel will display the
remaining lifetime of the proxy file, as shown in Figure 6.6.
Figure 6.6: Credential remaining lifetime.
Users can delete an existing proxy by pressing the Delete button, or renew the proxy by
uploading a new one. When a proxy is renewed, the old proxy file will be over-written.
Please note that although a given resource may be shared by many users, resource credentials
are managed separately for each of the users. Thus, resource credentials are user specific.
User’s Manual: The RTGrid Portal (Version 2.0)
Chapter 7
Profile management
This profile management portlet allows users to create and manage simulation templates (which
we call profiles in the RTGrid system). These profiles can be used by a user for deriving simulation experiments by using the template specification.
In the following sections we will discuss the various actions that can be performed from this
portlet. After an action has been performed, the portlet will display any information related to
that action (for instance, error messages etc.) on top of the contents panel.
7.1 Creating a new profile
To create a new profile, click on the Create profile link on the action menu (panel on the left).
This create profile dialog box, as shown in Figure 7.1, will be displayed in the contents panel.
The create profile dialog box displays all of the fields that are required in order to create a
new profile. These fields are:
• Profile name: The profile name is used to identify a profile in the RTGrid system. Although it is not necessary that this string be unique, it is advisable to choose a unique
name since profile names are used when listing available profiles during the experiment
creation phase (see Figure 8.1).
• Description: This field describes the profile in detail.
• Access permission: This field identifies the list of user groups which should be granted
access to this profile. Ultimately, all of the members of the selected groups will be granted
access to this profile. See Section 7.2 for further details.
• Profile files: This field allows a user to upload files that are required by this profile. All
of the files that have been uploaded successfully using this field will be associated with the
new profile, and they will be stored in the unique directory allocated to this profile.
In this field, all of the files that have been uploaded successfully will also be displayed, as
shown in Figure 7.2. Uploaded files may be deleted by pressing the Delete button. If a file
that is being uploaded has the same filename as one of the files in the uploaded list, the
existing file is always over-written.
• Profile extension: This allows a user to upload a XML description of a profile extension.
By using profile extensions, users are allowed to pass experiment specific parameters to
the simulation template. To upload a profile extension, select the XML description file by
pressing on the Browse... button, and press the Upload button to upload the extension. If
23
24
CHAPTER 7. PROFILE MANAGEMENT
Figure 7.1: Creating a profile.
Figure 7.2: Uploading profile files.
User’s Manual: The RTGrid Portal (Version 2.0)
CHAPTER 7. PROFILE MANAGEMENT
25
the profile extension is valid, a preview of the profile extension will be displayed, as shown
in Figure 7.3. To discard a profile extension, press the Discard button.
Figure 7.3: Uploading profile extension.
Once all of the above fields have been specified, the new profile can be created by pressing
the Create button. To cancel profile creation, press the Cancel button. Please note that all of the
above fields may be altered after the profile has been created.
7.2 Sharing a profile
There are three ways in which an owner can share profiles:
• Read: By granting read access to a user group, the owner of the profile permits any
member of that group to view the profile details.
• Edit: By granting edit access to a user group, the owner of the profile permits any member
of that group to modify the profile details. If a group is granted edit access, the RTGrid
system will also automatically grant read access—no edit access without read access.
• Use: By granting use access to a group, the owner of the profile permits any member
of that group to use the profile for creating new simulation experiments. If a group is
granted use access, the RTGrid system will also automatically grant read access—no use
access without read access.
7.3 Listing profiles accessible to a user
In order to list all of the profiles that are accessible to a user due to group membership, click
on the List accessible link on the action menu (panel on the left). This will display the first 10
profiles, as shown in Figure 7.4, sorted in descending order of their modification time so that
the most recently updated profiles are displayed first.
The next 10 profiles (or, the previous 10 profiles), if available, can be displayed by clicking
on the next >>, or << previous, link on the list header.
Associated with each of the displayed profiles are the following details:
User’s Manual: The RTGrid Portal (Version 2.0)
26
CHAPTER 7. PROFILE MANAGEMENT
Figure 7.4: Listing profiles.
• Status: This status of the profile.
• Name: The name of the profile, which briefly describes the profile.
• Description: The description provides more detail about the profile. This is used to
provide in-depth detail about the profile and its settings.
• Last modified: The date and time when the profile was last modified.
A check-box appears in each row, if the user can delete the profile. This may be used to select
a subset of the listed profiles. Selected profiles can be deleted by pressing the Delete buttons on
the list header.
To summarise the current status of the profile, two types of icons are used. These icons are:
•
: The locked icon is used to identify profiles that are currently not usable by any user,
except for the owner. A profile is locked when no group has been granted use access.
•
: The unlocked icon is used to identify profiles that are usable. Simulation experiments
can be derived from these profile. In order to unlock a profile, at least one of the groups
must be granted use access.
In the experiment creation portlet (see Figure 8.1), only profiles that are accessible to a user
(either profiles which the user owns, or profiles with use access set to true) will be available in
the drop-down menu.
7.4 Listing profiles owned by a user
In order to list all of the profiles that are owned by a user, click on the List owned link on the
action menu (panel on the left). Contrary to the listing described in Section 7.3, this will only
list resources that are currently owned by the user. Hence, some of the resources that are not
shared with any other user group will appear in this list, although, they may not appear in the
accessible list.
7.5 Viewing profile details
Users who have been granted read access may view the details of a given profile by clicking on
the row which corresponds to the profile. This will display the profile information dialog box,
as shown in Figure 7.5.
User’s Manual: The RTGrid Portal (Version 2.0)
CHAPTER 7. PROFILE MANAGEMENT
27
Figure 7.5: Viewing profile details.
The details of the profile are divided into two main parts: a) the File management panel,
and b) the general details about the profile. The final management panel is used to browse and
perform file management actions on the profile directory. Files can be deleted, edited, or new
files uploaded. The general details section provides general details about the profile; for instance,
the profile name, creation time, last modification time etc..
7.6 Modifying profile details
Users who have been granted edit access may edit the details of a given profile by clicking on the
row which corresponds to the profile. This will display the profile modification dialog box, as
shown in Figure 7.6.
Only owners are allowed to update access permissions of a given profile. This means that,
although users may be able to edit profile details as a result of their membership to a group that
has been granted edit access, they will not be allowed to edit the access permissions. The owner,
therefore, has the highest priority over profiles owned by them.
7.7 File management panel
The file management panel, as shown in Figure 7.7, allows a user to browse and perform certain
actions on the files and directories that are associated with a given profile.
The file management panel has three main parts:
User’s Manual: The RTGrid Portal (Version 2.0)
28
CHAPTER 7. PROFILE MANAGEMENT
Figure 7.6: Modifying profile details.
Figure 7.7: The file management panel.
User’s Manual: The RTGrid Portal (Version 2.0)
CHAPTER 7. PROFILE MANAGEMENT
29
1. This shows the actions that are allowed on the current working directory. They are: a)
uploading a new file into the current working directory, b) deleting the current working
directory, and c) archiving the current working directory into a compressed archive file
(this also saves the file permissions).
2. This shows the current working directory relative to the profile home directory. The displayed information is the path from the home directory to the current working directory.
If the depth of the path is more than five, only the five closest components to the current
working directory are displayed. The rest are replaced with an ellipsis (’. . . ’). Clicking on
the path component link sets the current working directory to that directory.
3. This displays the contents of the current working directory. Each file or directory is listed
in a row. Where file types are known, an appropriate icon is displayed. The file name
is displayed next to this icon. Clicking on the file name results in one of two actions:
if the component is a file, it will display the file download dialog box, for downloading
that file; if the component is a directory, the current working directory will be set to this
directory. For a file component, the size of the file is displayed next; following which the
last modified time is displayed. Finally, the actions that are allowed to be performed to
this component are listed.
Depending on the component type (file or directory), the appropriate actions will be
displayed in the actions list. These actions are:
• Delete: Deletes the file or directory. When directories are deleted by pressing the
Delete button, all of the contents will also be deleted recursively.
• Edit: Opens the file for online editing. Online editing is not allowed for files that
are larger than 1MB. The Edit button will, therefore, not appear in this case.
• Archive: Archives the given directory, which generates a compressed file with the
contents of the directory. The profile home directory cannot be archived, since, it is
the root directory. Please note that when a directory is archived, the compressed file
also appears in the same directory, next to the directory just compressed.
• Extract: Extracts the contents of an archive file. The archive formats that are currently recognised by the RTGrid system are: .zip, .tar, .tgz, .tar.gz, .tar.bz2, .jar.
Note that .jar archives do not restore file permission information. If file permissions
are significant, use the .tar or .zip formats. Of course, in this case, the files should
have been created by using the appropriate file permission restoration switches turned
on.
7.8 The components of a profile
A profile consists of two main components: (1) the set of executable objects that are invoked
by the experiment manager at each of the stages of the experiment, and their relevant data, and
(2) the profile extension, which allows specialisation of the profile by providing an interface for
passing experiment-specific parameters. This relationship is shown in Figure 7.8.
Depending on the current state of the experiment, the experiment manager executes specific scripts which are defined in the profile. The profile extension specialises these scripts by
providing interfaces for passing experiment specific parameters to these scripts. By supplying
the appropriate parameters, the behaviour of the execution may be changed from that which
User’s Manual: The RTGrid Portal (Version 2.0)
30
run.sh
...
Experiment
Manager
PARAMETERS FROM THE
PROFILE EXTENSION
pre.sh
THE EXPERIMENT
CHAPTER 7. PROFILE MANAGEMENT
Done
post.sh
PROFILE
Figure 7.8: The main parts of a profile, and how the experiment manager uses them.
is specified in the template. Where such specialisations are not necessary, the profile extension
may be left undefined.
7.8.1 The profile extension
Although the profile scripts can capture most of the simulation invariants, it may be desirable to
allow users of the profile to change certain parameters (for example, the profile may allow a user
to specify the number of particles etc.). To provide the profile creator with such flexibilities, a
profile extension is used.
A profile extension is nothing but an XML file which describes a set of controls which
should be displayed to the user of the profile, when the profile is selected from the drop-down
menu in the experiment creation panel. For any given profile, only one profile extension is
allowed. If the uploaded profile extension is valid, a preview will be displayed. Figure 7.3 shows
a valid profile extension after it has been uploaded. If there are warnings or errors, they will be
highlighted.
In Figure 7.9, we summarise the flow of data between the Profiles sub-panel and the Experiments sub-panel.
A profile extension XML description is uploaded while creating a new profile. If the XML
file is valid, the extension is stored into the root directory associated with the profile (shown
in the file browser). When a user selects this profile on the experiment creation panel, controls which correspond to the extension are displayed to the user (as shown in Figure 7.10).
This is achieved by translating the XML description, and generating the corresponding HTML
fragments, which are then displayed inside a form to the user.
If the controls have default values, they are displayed to the user. The user may either accept
these settings, or change the values. Once the experiment is created, the HTML form is parsed
to generate another XML description where the name/value pairs are stored (as shown below).
Finally, the profile uses this name/value XML description to retrieve values for each of the
parameters that are specified in the profile extension. See Section 8.6 for further details about
these XML files.
<?xml version="1.0" encoding="UTF-8"?>
<Parameters>
User’s Manual: The RTGrid Portal (Version 2.0)
31
CHAPTER 7. PROFILE MANAGEMENT
XML
Database
XML
YES
NO
valid?
parse
Create
upload
ext.xml
Profile Creation
XML
Name/Value pairs
Failure
XML to HTML
Display HTML
Create
HTML to XML
Experiment Creation
Figure 7.9: Profile extension, and their relationship with the experiments.
Figure 7.10: When a profile is selected in the create experiment panel, the corresponding profile
extension, if it has been defined, is displayed to the user.
User’s Manual: The RTGrid Portal (Version 2.0)
32
CHAPTER 7. PROFILE MANAGEMENT
<NameValue>
<Name>Text</Name>
<Value>Hello</Value>
</NameValue>
<NameValue>
<Name>Param</Name>
<Value>Hello</Value>
</NameValue>
<NameValue>
<Name>Billy</Name>
<Value>Hello</Value>
</NameValue>
<NameValue>
<Name>Selection</Name>
<Value>Gamma</Value>
</NameValue>
<NameValue>
<Name>Radio</Name>
<Value>Delta</Value>
</NameValue>
<NameValue>
<Name>Checkbox</Name>
<Value>Beta</Value>
<Value>Gamma</Value>
</NameValue>
</Parameters>
7.8.2 Writing a profile extension
The profile extension extends a given profile by allowing parametric specialisation. As we have
seen in Figure 7.9, an XML description is used to express the extension. For example, the XML
description for the extension shown in Figure 7.10 is as follows:
<?xml version="1.0" encoding="UTF-8"?>
<Extension>
<Control type="TEXT">
<Label>Text: </Label>
<Name>Text</Name>
<Size>30</Size>
<Default>Hello</Default>
</Control>
<Control type="TEXT">
<Label>Param: </Label>
<Name>Param</Name>
<Size>30</Size>
<Default>Hello</Default>
</Control>
<Control type="TEXT">
<Label>Billy: </Label>
<Name>Billy</Name>
<Size>30</Size>
<Default>Hello</Default>
</Control>
<Control type="SELECTION">
<Label>Selection: </Label>
User’s Manual: The RTGrid Portal (Version 2.0)
CHAPTER 7. PROFILE MANAGEMENT
<Name>Selection</Name>
<Default>Gamma</Default>
<Option>
<Label>Alpha</Label>
<Value>Alpha</Value>
</Option>
<Option>
<Label>Beta</Label>
<Value>Beta</Value>
</Option>
<Option>
<Label>Gamma</Label>
<Value>Gamma</Value>
</Option>
<Option>
<Label>Delta</Label>
<Value>Delta</Value>
</Option>
</Control>
<Control column="2" type="CHOICE">
<Label>Radio</Label>
<Name>Radio</Name>
<Default>Delta</Default>
<Option>
<Label>Alpha</Label>
<Value>Alpha</Value>
</Option>
<Option>
<Label>Beta</Label>
<Value>Beta</Value>
</Option>
<Option>
<Label>Gamma</Label>
<Value>Gamma</Value>
</Option>
<Option>
<Label>Delta</Label>
<Value>Delta</Value>
</Option>
</Control>
<Control column="2" type="ASSORTMENT">
<Label>Checkbox</Label>
<Name>Checkbox</Name>
<Choice>
<Label>Alpha</Label>
<Value>Alpha</Value>
<Checked>NO</Checked>
</Choice>
<Choice>
<Label>Beta</Label>
<Value>Beta</Value>
<Checked>YES</Checked>
</Choice>
<Choice>
<Label>Gamma</Label>
<Value>Gamma</Value>
User’s Manual: The RTGrid Portal (Version 2.0)
33
34
CHAPTER 7. PROFILE MANAGEMENT
<Checked>YES</Checked>
</Choice>
</Control>
</Extension>
A profile extension is a list of controls that are defined by the profile creator. These controls
correspond to HTML fragments which are automatically generated upon parsing the XML description. In the current version, there are four controls that are available for use in a profile
extension. They are:
• Text control: The text control is the simplest of all the controls. It displays a form field
where the experiment creator can enter values. This control may be used for receiving
information that must be provided explicitly by the user.
A text control is described in the following manner:
<Control type="TEXT">
<Label>Number of particles: </Label>
<Name>numParticles</Name>
<Size>10</Size>
<Default>1000</Default>
</Control>
Here, the type attribute of the control element, <Control>, is set to TEXT, for text controls. Then, we specify the label, <Label> tag, which will be displayed next to the input
field. The <Name> tag specifies the string to be used as the parameter name while generating the name/value pair (see Figure 7.9). The <Size> tag specifies the size (in number
of characters) of the input field. Finally, the <Default> tag is used to specify a default
value for this field. The specified default value will be shown when the profile extension
is displayed.
• Selection control: The selection control allows the user to select a value from a list of
possible values. The possible values are displayed in a drop-down menu.
A selection control is described in the following manner:
<Control type="SELECTION">
<Label>Select a city: </Label>
<Name>City</Name>
<Default>1</Default>
<Option>
<Label>Cardiff</Label>
<Value>1</Value>
</Option>
<Option>
<Label>Edinburgh</Label>
<Value>2</Value>
</Option>
<Option>
<Label>London</Label>
<Value>3</Value>
</Option>
</Control>
User’s Manual: The RTGrid Portal (Version 2.0)
CHAPTER 7. PROFILE MANAGEMENT
35
Here, same as the text control, we specify the type by setting the type attribute to SELECTION. Then we specify the label and the name of the parameter. Next we specify the
default value, if any. Note here that this value must match the value of one of the supplied
options. Each option that should be displayed to the user is specified with an <Option>
element, which has the elements: (1) the label to be displayed in the drop-down menu,
and (2) the value to be returned if selected.
• Choice control: The choice control is similar in functionality to the selection control
because it allows the user to select a value from a set of possible values. The main difference
is primarily in the manner in which the values are displayed: all the possible values for the
choice control are displayed with radio buttons.
A choice control is described as follows:
<Control type="CHOICE" column="4">
<Label>Select a greek alphabet</Label>
<Name>Alphabet</Name>
<Default>2</Default>
<Option>
<Label>Alpha</Label>
<Value>1</Value>
</Option>
<Option>
<Label>Beta</Label>
<Value>2</Value>
</Option>
<Option>
<Label>Gamma</Label>
<Value>3</Value>
</Option>
</Control>
The description of the choice control is very similar to that of the selection control. The
only differences are in the type attribute, which is set to CHOICE, and the column attribute
which specifies the number of columns to be used for displaying the options. Note here
that the minimum and maximum number of columns that are allowed is one and four
respectively.
• Assortment control: The assortment control allows a user to select a set of values from a
given set of choices. The main difference between this control and the rest is that it allows
multiple values for a given parameter. An assortment control is specified as follows:
<Control type="ASSORTMENT" column="4">
<Label>Select favourite fruits</Label>
<Name>Fruits</Name>
<Choice>
<Label>Apple</Label>
<Value>1</Value>
<Checked>YES</Checked>
</Choice>
<Choice>
<Label>Orange</Label>
<Value>2</Value>
User’s Manual: The RTGrid Portal (Version 2.0)
36
CHAPTER 7. PROFILE MANAGEMENT
</Choice>
<Choice>
<Label>Mango</Label>
<Value>3</Value>
<Checked>YES</Checked>
</Choice>
</Control>
The description is quite similar to that of the choice control, except for the value ASSORTMENT for the type attribute. In addition, to specify an option, we now use the
<Choice> element instead. There is no <Default> tag for specifying default value. Instead, we use the <Checked> tag with value YES to select those choices that must be
selected by default. More than one choice can be selected at once.
7.8.3 Edit profile extension
There are two ways in which a profile extension can be added, edited, or deleted from a profile
once it has been created.
Editing online
The first approach involves editing the profile extension XML online. In order to add a new
profile, simply add the XML description of the extension in the Profile extension XML field, as
shown below:
Figure 7.11: Editing profile extension.
User’s Manual: The RTGrid Portal (Version 2.0)
CHAPTER 7. PROFILE MANAGEMENT
37
In order to modify an existing profile, simply edit the XML description in the Profile extension XML field, as shown above. When the details of a profile are displayed, the current XML
description of the profile extension will be loaded automatically, and displayed in the Profile
extension XML field.
Uploading a new profile extension
Figure 7.12: Editing profile extension by uploading.
The profile extension XML description is stored in the profile home directory as extension.xml,
as shown in Figure 7.12. Simply uploading a new extension.xml file, with the new XML
description of the extension will over-write the existing profile extension file. Another way of
editing the profile extension is to click on the Edit button which corresponds to the profile in the
file management panel. This will load the extension.xml file for online editing. To remove
an existing profile extension, simply delete the extension.xml file by clicking on the Delete
button in the file management panel.
Naming the profile extension XML description as extension.xml is simply a convention used by the RTGrid system. It is, therefore, important to note that, by default, RTGrid
assumes that any file in the profile home directory with the name extension.xml is a profile
extension.
User’s Manual: The RTGrid Portal (Version 2.0)
38
CHAPTER 7. PROFILE MANAGEMENT
User’s Manual: The RTGrid Portal (Version 2.0)
Chapter 8
Experiment management
The experiment management portlet allows users to create and manage simulation experiments.
In order to understand the following sections, the user must first understand access control
(see Chapter 5), resource management (see Chapter 6) and the concepts underlying simulation
templates (see Chapter 7).
In the following sections we will discuss the various actions that can be performed from this
portlet. After an action has been performed, the portlet will display any information related to
that action (for instance, error messages etc.) on top of the contents panel.
8.1 Creating a new experiment
To create a new experiment, click on the Create experiment link on the action menu (panel on
the left). The create new experiment dialog box, as shown in Figure 8.1, will be displayed in the
contents panel.
The create new experiment dialog box displays all of the fields that are required in order to
create a new experiment. These fields are:
• Experiment name: An experiment name is a short description of the experiment. Although it is not necessary that this string be unique, it is advisable to choose an experiment
name that is unique.
• Description: This field describes the experiment in detail.
• Resource*: This field is used to choose the distributed resource, where all the jobs associated with the simulation experiment must be submitted.
• Profile*: This field is used to choose the profile (simulation template) that is to be used
to create the new experiment. After a profile has been selected, a profile extension that is
associated with that profile will be displayed. The user can either accept the default values,
or specify new ones.
• Access permission: This field identifies the list of user groups which should be granted
access to this simulation experiment. Ultimately, all of the members of the selected groups
will be granted access to this experiment. See Section 8.2 for further details.
• Experiment files: This field allows a user to upload files that are required by this experiment. All of the files that have been uploaded successfully using this field will be associated
with the new experiment, and they will be stored in the unique directory allocated to this
experiment.
39
40
CHAPTER 8. EXPERIMENT MANAGEMENT
Figure 8.1: Creating an experiment.
In this field, all of the files that have been uploaded successfully will also be displayed, as
shown in Figure 8.2. Uploaded files may be deleted by pressing the Delete button. If a file
that is being uploaded has the same filename as one of the files in the uploaded list, the
existing file is always over-written.
Figure 8.2: Uploading experiment files.
Once all of the above fields have been specified, the new experiment can be created by
pressing the Create button. To cancel experiment creation, press the Cancel button. Please note
that all of the above fields may be altered after the experiment has been created, except for those
that are marked with an ‘*’.
User’s Manual: The RTGrid Portal (Version 2.0)
CHAPTER 8. EXPERIMENT MANAGEMENT
41
8.2 Sharing an experiment
There are three ways in which an owner can share experiments:
• Read: By granting read access to a user group, the owner of the experiment permits any
member of that group to view the experiment details.
• Edit: By granting edit access to a user group, the owner of the experiment permits any
member of that group to modify the details of the given experiment. If a group is granted
edit access, the RTGrid system will also automatically grant read access—no edit access
without read access.
• Control: By granting control access to a user group, the owner of the experiment permits
any member of that group to control the given experiment. Controlling the experiment
includes stopping the experiment, restarting the experiment etc.. If a group is granted
control access, the RTGrid system will also automatically grant read access—no control
access without read access.
8.3 Listing experiments accessible to a user
In order to list all of the experiments that are accessible to a user due to group membership click
on the List accessible link on the action menu (panel on the left). This will display the first 10
experiments, as shown in Figure 8.3, sorted in descending order of their last modified time so
that the most recently updated experiments are displayed first.
The next 10 experiments (or, the previous 10 experiments), if available, can be displayed by
clicking on the next >>, or << previous, link on the list header.
Figure 8.3: Listing experiments.
Associated with each of the displayed experiments are the following details:
• Status: This summarises the current execution status of the experiment. It is divided into
two parts: a) the first part displays the phase the experiment is currently in (for instance,
“Executing” or “Not Yet Started”). The second part displays the progress in that phase
(for instance, “Pending”, “Failed” etc.).
• Name: The name of the experiment, which briefly describes the experiment.
• Description: The description provides more detail about the experiment. This is used to
provide in-depth detail about the experiment and its settings.
• Last modified: The date and time when the experiment was last modified.
User’s Manual: The RTGrid Portal (Version 2.0)
42
CHAPTER 8. EXPERIMENT MANAGEMENT
A check-box appears in each row, if the user can control the experiment. This may be used to
select a subset of the listed experiments. Selected experiments can be started, stopped or deleted
by pressing the Start, Stop or Delete buttons on the list header.
8.4 Listing experiments owned by a user
In order to list all of the experiments that are owned by a user, click on the List owned link on
the action menu. Contrary to the listing described in Section 8.3, this will only list experiments
that are currently owned by the user. Hence, some of the experiments that are not shared with
any other user group will appear in this list, although, they may not appear in the accessible list.
8.5 Viewing experiment details
Users who have been granted read access may view the details of a given experiment by clicking
on the row which corresponds to the experiment. This will display the experiment information
dialog box, as shown in Figure 8.4.
Figure 8.4: Viewing experiment details.
The details of the experiment are divided into three main parts: a) The current phase and
status of the experiment, b) The job statistics, which includes information on the number of
jobs (and their percentages) that have been “Submitted”, “Running”, “Done” etc.; and also the
detailed status of each of the jobs (displayed as a job list), and c) The static information which
User’s Manual: The RTGrid Portal (Version 2.0)
CHAPTER 8. EXPERIMENT MANAGEMENT
43
describes the experiment and its settings; this information does not get updated once the experiment has begun executing its jobs.
8.6 Modifying experiment details
Users who have been granted edit access may edit the details of a given experiment by clicking on
the row which corresponds to that experiment. This will display the experiment modification
dialog box, as shown in Figure 8.5.
Figure 8.5: Modifying experiment details.
Only owners are allowed to update access permissions of a given experiment. This means
that, although users may be able to edit experiment details as a result of their membership to a
group that has been granted edit access, they will not be allowed to edit the access permissions.
The owner, therefore, has the highest priority over experiments owned by them.
With regard to the simulation parameters, the relevant details are stored in two files, which
reside in the experiment home directory. The first file, extension.xml, is an XML description of the profile extension that was used to supply parameters to the simulation template.
This is similar to the profile extension in the profile management portlet. The main difference
between the two, however, is that the extension.xml file in the experiment directory also
User’s Manual: The RTGrid Portal (Version 2.0)
44
CHAPTER 8. EXPERIMENT MANAGEMENT
saves the parameters that were supplied to the extension when the experiment was created. The
second file, parameters.xml, is an XML representation of the parameters (as name/value
pairs). Contrary to the extension.xml file, this only contains the experiment parameter
name and its values.
8.7 File management panel
The file management panel, as shown in Figure 8.6, allows a user to browse and perform certain
actions on the files and directories that are associated with a given experiment.
Figure 8.6: The file management panel.
The file management panel has three main parts:
1. This shows the actions that are allowed on the current working directory. They are: a)
uploading a new file into the current working directory, b) deleting the current working
directory, and c) archiving the current working directory into a compressed archive file
(which also saves the file permissions).
2. This shows the current working directory relative to the experiment home directory.
The displayed information is the path from the home directory to the current working
directory. If the depth of the path is more than five, only the five closest components to
the current working directory are displayed. The rest are replaced with an ellipsis (’. . . ’).
Clicking on the path component link sets the current working directory to that directory.
3. This displays the contents of the current working directory. Each file or directory is listed
in a row. Where file types are known, an appropriate icon is displayed. The file name is
displayed next to this icon. Clicking on the file name results in one of two actions: if the
component is a file, it will display the file download dialog box, for downloading that file;
if the component is a directory, the current working directory will be set to this directory.
For a file component, the size of the file is displayed next; following which the last update
time is displayed. Finally, the actions that are allowed to this component are listed.
Depending on the component type (file or directory), the appropriate actions will be
displayed in the actions list. These actions are:
• Delete: Deletes the file or directory. When directories are deleted by pressing the
Delete button, all of the contents will also be deleted recursively.
• Edit: Opens the file for online editing. Online editing is not allowed for files that
are larger than 1MB. The Edit button will, therefore, not appear in this case.
User’s Manual: The RTGrid Portal (Version 2.0)
CHAPTER 8. EXPERIMENT MANAGEMENT
45
• Archive: Archives the given directory, which generates a compressed file with the
contents of the directory. The experiment home directory cannot be archived, since,
it is the root directory. Please note that when a directory is archived, the compressed
file also appears in the same directory, next to the directory just compressed.
• Extract: Extracts the contents of an archive file. The archive formats that are currently recognised by the RTGrid system are: .zip, .tar, .tgz, .tar.gz, .tar.bz2, .jar.
Note that .jar archives cannot restore file permissions. If file permissions are significant, use the .tar or .zip formats. Of course, in this case, the files should have been
created by using the appropriate file permission restoration switches turned on.
User’s Manual: The RTGrid Portal (Version 2.0)