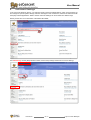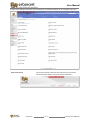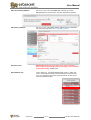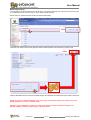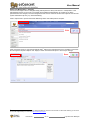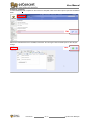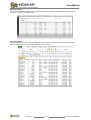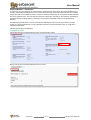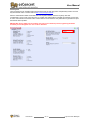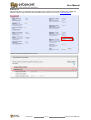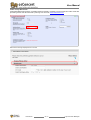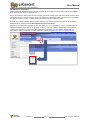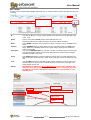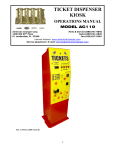
1
osConcert osConcert osConcert visual on-line seat reservation visual on-line seat reservation visual on-line seat Userreservation Manual User Manual User Manual V6 | Aug-12 V6 | Aug-12 V6 | Jan-13 User Manual Welcome to osConcert .......................................................................... 6 Please Read –yes, this is important…! ................................................ 7 Quick set-up of osConcert .................................................................... 8 DEVELOPERS: .................................................................................................... 8 osConcert – Administration interface .................................................. 9 Beginners set-up of osConcert ........................................................... 10 1. Shop Setting .................................................................................... 11 General Shop Settings ........................................................................................... 11 Store Name ........................................................................................................................... 11 Store Owner .......................................................................................................................... 11 Email Address ....................................................................................................................... 11 Email From ............................................................................................................................ 11 Country .................................................................................................................................. 11 State/Province ...................................................................................................................... 12 Send Admin confirmation and Extra Order… .................................................................. 12 Store Address and Phone ................................................................................................... 12 Default Theme ...................................................................................................................... 12 Company Logo ..................................................................................................................... 12 Date Display to display dates ............................................................................................. 12 Server Date off-set ............................................................................................................... 12 We are selling „Seats as Products‟ .................................................................................... 12 Time format to display time ................................................................................................ 12 Advanced Shop Settings - Customers ................................................................ 13 Customer Accounts fields ................................................................................................... 13 DEVELOPERS: .................................................................................................. 13 To enable Customer Account Fields ................................................................................. 14 To create new Customer Account Field: .......................................................................... 14 To edit a Customer Account Field ..................................................................................... 14 DEVELOPERS: .................................................................................................. 16 2. osConcert Settings ......................................................................... 17 OsConcert version ............................................................................................................... 18 Enable PDF E-tickets .......................................................................................................... 19 E-Ticket Delivery Status ...................................................................................................... 19 Display PDF for delivery status .......................................................................................... 19 Currency Left Symbol .......................................................................................................... 19 Enable “How to” guide ......................................................................................................... 19 Hide choose Billing Address ............................................................................................... 20 Hide Delivery Address ......................................................................................................... 20 Seat Plan Cache .................................................................................................................. 20 Expand Menus List .............................................................................................................. 20 Seatplan Live Logging ......................................................................................................... 21 DEVELOPERS: .................................................................................................. 21 Seatplan Timeout ................................................................................................................. 21 Seatplan Refresh.................................................................................................................. 21 Google Analytics account ................................................................................................... 21 Seatplan Requires Login ..................................................................................................... 21 Add Extra Fields ................................................................................................................... 21 User Manual Jan-13 Page 1 of total 108 Pages User Manual DEVELOPERS: .................................................................................................. 21 Add Social Networking ........................................................................................................ 21 Purchase without an Account ............................................................................................. 21 Maximum quantity in cart .................................................................................................... 21 Disable creating account entirely? .................................................................................... 21 Show subcategory count ..................................................................................................... 22 Cine Style Image .................................................................................................................. 22 Hide GA quantity .................................................................................................................. 22 Hide Footer Info links ........................................................................................................... 22 Enforce Coupon.................................................................................................................... 22 DEVELOPERS: .................................................................................................. 22 3. Products - introduction .................................................................. 23 Product / Shows - Editing ..................................................................................... 24 Category name =back-end ................................................................................................. 24 Category heading title =front-end ...................................................................................... 24 Category Date ....................................................................................................................... 24 Category Time ...................................................................................................................... 24 Date (show) Expires ............................................................................................................ 24 Time (show) Expires ............................................................................................................ 24 Master quantity (Gen. Admission only) ............................................................................. 24 Description ............................................................................................................................ 24 Upload a new Cat/Show image .......................................................................................... 24 Show Image editing ................................................................................................ 25 Delete a Show image .......................................................................................................... 27 Expiry Date/Time..................................................................................................... 28 Server Time Off-Set ............................................................................................................. 28 Show Expiry Time Difference ............................................................................................. 29 Date Expiry Cron .................................................................................................................. 29 Date/Time (this show) Expires ........................................................................................... 30 Master Quantity ....................................................................................................... 31 Advanced Show editing......................................................................................... 35 Alternative Edit Categories ................................................................................................. 35 Color banding.......................................................................................................... 37 Edit Seat Color-banding (via Products) ............................................................................ 38 Edit Seat Color-banding (via Alternative Edit Categories) ............................................. 39 Upload Show and Category images .................................................................... 41 DEVELOPERS: .................................................................................................. 42 4. Marketing ......................................................................................... 43 Marketing Templates.............................................................................................. 43 Admin User Manipulation - Template ................................................................................ 44 Admin User Password Remember – Template ............................................................... 45 User Creation -Template ..................................................................................................... 46 Customer Password Remember - Template ................................................................... 47 Message to All Customer -Template ................................................................................. 48 Customized Invoice Page – Template .............................................................................. 49 Contact Us –Template ......................................................................................................... 50 Product Sale –Template...................................................................................................... 51 DEVELOPERS: .................................................................................................. 51 User Manual Jan-13 Page 2 of total 108 Pages User Manual Social Networking .................................................................................................. 52 Add social bar ....................................................................................................................... 52 Twitter ID ............................................................................................................................... 52 Facebook ID .......................................................................................................................... 52 Linkedin ID ............................................................................................................................ 52 Googleplus ID ....................................................................................................................... 52 DEVELOPERS: .................................................................................................. 52 5. Sales ................................................................................................. 53 Sales Discount-Coupons ...................................................................................... 53 Emailing Discount Coupons ................................................................................. 55 Discount Reports .................................................................................................... 57 Discount Usage .................................................................................................................... 57 Discount History ................................................................................................................... 57 Sales Report ............................................................................................................ 58 On Line Sales Report .......................................................................................................... 58 PDF Sales Report ................................................................................................................ 59 Excel Sales Report .............................................................................................................. 59 6. Payments ......................................................................................... 60 Currencies ............................................................................................................... 60 Setting up a New (default) Currency ................................................................................. 61 Title ......................................................................................................................................... 61 Code ....................................................................................................................................... 61 Symbol Left (front end) ........................................................................................................ 61 Symbol Right (front-end) ..................................................................................................... 61 Decimal Point ........................................................................................................................ 61 Thousand Point .................................................................................................................... 61 Value ...................................................................................................................................... 61 Editing a Currency................................................................................................................ 62 Displaying Currencies (front end) ...................................................................................... 63 Payment Selection (at Front End) ........................................................................ 64 Payment, Order Status and Ticket Delivery ..................................................................... 65 Payment Module Inclusions/Exclusions ........................................................................... 65 Installing Payment Modules................................................................................................ 66 Deleting a Payment Module ............................................................................................... 66 Payment Modules – introduction ......................................................................... 67 Cheque/Money Order .......................................................................................................... 67 COD (Cash On Delivery) .................................................................................................... 68 Paypal/Paypal Credit Cards (IPN) ..................................................................................... 69 Box Office .............................................................................................................................. 71 Free Payment ....................................................................................................................... 72 Authorize.net ......................................................................................................................... 73 Credit card by Beanstream ................................................................................................. 74 Wallet Payment. ................................................................................................................... 75 PayPal PayFlow ................................................................................................................... 76 User Manual Jan-13 Page 3 of total 108 Pages User Manual Tax Module – introduction .................................................................................... 77 Tax – Setting up ................................................................................................................... 77 Tax-GEO zones introduction .............................................................................................. 78 Tax Classes – Adding a new Tax Class ........................................................................... 79 Tax – Adding a new Tax Rate ............................................................................................ 80 Setting up a Service or Booking fee .................................................................................. 81 Tax – Amount/Display Settings .......................................................................................... 82 Tax Decimal Places ............................................................................................................. 82 Display Prices with Tax ....................................................................................................... 82 Order-Totals Module ............................................................................................................ 83 Deleting a Tax or Service Charge ..................................................................................... 84 Tickets ...................................................................................................................... 85 Ticket Background Image ................................................................................................... 86 Ticket Fonts........................................................................................................................... 86 Ticket Placeholders.............................................................................................................. 86 Ticket Printing ....................................................................................................................... 87 Ticket – Clear from your server .......................................................................................... 87 Bar-Coding............................................................................................................... 88 Codereadr ............................................................................................................................. 88 Codereadr API Active .......................................................................................................... 88 Codereadr API Ticket logo.................................................................................................. 88 Codereadr API Key .............................................................................................................. 88 Codereadr Barcode Size ..................................................................................................... 88 Codereadr Invalid Ticket ..................................................................................................... 88 Codereadr Not Released .................................................................................................... 89 Cine Style Images ................................................................................................................ 89 7. Concert Details ................................................................................ 90 Edit a SHOW ............................................................................................................ 91 ID ............................................................................................................................................ 91 Active ..................................................................................................................................... 91 Name ...................................................................................................................................... 91 Heading ................................................................................................................................. 91 Description ............................................................................................................................ 91 Venue ..................................................................................................................................... 91 Time ....................................................................................................................................... 91 Date ID ................................................................................................................................... 91 Edit Prices of a complete show/category ........................................................... 92 How to arrange SHOWs in a sort order for the Front End menu.................... 92 How to reset after the show has ended .............................................................. 93 DEVELOPERS: .................................................................................................. 93 8. Home Page Edit (CMS) ................................................................... 94 DEVELOPERS: .................................................................................................. 94 Image for Home page;............................................................................................ 94 9. Static Pages (CMS) ......................................................................... 95 Ticket Delivery......................................................................................................... 96 Privacy Notice ......................................................................................................... 97 Terms of Service ..................................................................................................... 98 About us ................................................................................................................... 98 User Manual Jan-13 Page 4 of total 108 Pages User Manual 10. Admin User Groups ....................................................................... 99 Admin User Groups................................................................................................ 99 Adding Admin User Member .............................................................................................. 99 Move Member to other Admin group............................................................................... 101 Edit Admin Group Access/Rights..................................................................................... 102 Create New Admin Group ................................................................................................. 104 11. Additional Notes: ................................................ 105 Installation Folder ................................................................................................. 105 My Account (Admin) ............................................................................................ 105 Amount Rounding Factor .................................................................................... 106 12. More resources: ............................................................................ 107 Check the HELP documents in Admin>Help Manuals ................................................. 107 Log in to www.osconcert/support..................................................................................... 107 Email us your questions or comments; osConcert Support ........................................ 107 User Manual Jan-13 Page 5 of total 108 Pages User Manual Welcome to osConcert osConcert was originally devised as an online visual reservation self-hosted software to help users manage their seat bookings. Our newest technology combines multiple venues for your Visual Reserved Seating and also allows you to create unlimited 'General Admission' events. Creating and integrating your Visual Seat-plan Layouts is the service we provide. Our osConcert team guarantees a perfectly LOADED system. Tampering with the Visual Seat-Layouts is NOT recommended. Our support is fast, free and with over five years of experience. OsConcert is an adapted php open source shopping cart software that can be customized by you or your developers. Some of the original features may well be useful for developers so we have preserved the code. Note that deep within the software there are sections that remain hidden and that are not part of the standard osConcert software package. Be very careful when digging deeper in the settings, take notes of any changes you make that are outside of this guide. If you break the functionality you may need to revert back to the default set up. This User Manual is focusing on getting started with osConcert and explains the sections that your project may require. For more refer to our separate on-line PDF guides. For Developers, at each chapter, we state customized „Developers‟ notes. Contact us for more Technical Developers Support Especially first time users, PLEASE take your time to read this „User Manual‟ carefully. Check the HELP Document or Email us any questions you may have; osConcert support Try to understand and enjoy the simple features that this User Manual explores and we are sure that your business will be a success! User Manual Jan-13 Page 6 of total 108 Pages User Manual Please Read –yes, this is important…! Your ultimate goal is to allow your visitors to choose seats, register an account (which is optional) and then to make an order for the products they have added to their shopping basket. Note that „Seats are Products‟ and osConcert will help you to monitor the products sales or reservations as a visual aid. osConcert can also generate a sales report in the format of an Excel or PDF file. For every order we must have an order status. This order status is governed by the payment method. The difference between these order statuses is very important; a 'Pending' status will tell us that we are waiting for full payment to be made for that order and a 'Delivered' status should tell us that payment for that order is completed. osConcert is popular for its sales of E-Tickets in PDF format. Normally, you should only allow release of PDF E-tickets when an order has a status of 'Delivered' Now you know there is 'Pending' and 'Delivered'. As an Administrator you can update each order accordingly and the results will be reflected in the osConcert SALES report. While every SHOW that you enable in osConcert will have a unique DATE ID, in this latest version of osConcert you can now use the osConcert-report to filter ALL the sales with a status of 'Delivered' and download that report as a list in Excel or PDF format. Finally, for every 'Reserved' seat you see in the front end SHOW, each of the seats should be noted as 'Delivered'; anything 'Pending' must be attended to. If you do not have received payment you may consider deleting the order and returning the seats back in stock. User Manual Jan-13 Page 7 of total 108 Pages User Manual Quick set-up of osConcert For advanced users, or those in a hurry, please follow the following quick-set up steps; Step-1. Personalize Shop Settings Ad mi n> Shop Settin gs> G ene ra l Step-2. Customize the Sign-Up Form Ad mi n> Shop Settin gs>Adv ance d> Cus to mers Step-3. Server-Time-Offset Ad mi n> S hop Settin gs> Serv er - ti me -o ffse t Step-4. Edit Static Pages, edit the default complimentary text(s) or write your own Ad mi n> CMS Step-5. Home page edit, delete the default osConcert homepage Ad mi n>CMS> Ho mep ag e Step-6. Edit Customer email receipt as well as the rest of the marketing templates Ad mi n>M arke tin g> E -Ma rke ting> pro duc ts> Prod uc t Sa le Step-7. If you plan to provide PDF E-Tickets for download, enable e-tickets then configure your ETicket Ad mi n>Qu ick L inks> T icke t> Ed i t Eve n t T icke t Step-8. Set up a payment module. Use Check/Money Order to test or rename a module as a nonpayment reservation module Ad mi n> Payme n t> Payme n t G a teways Step-9. Set up a Tax, Booking Fee or a Discount module. Then enable (these) module(s) in the Order Totals module. Ensure you first disable all modules first, then re-enable 1 by 1. Ad mi n> Payme n t> Payme n t G a teways> Advanc ed> O rder To ta ls Step-10. Edit your shows, venue etc in Concert Details. IMPORTANT! use a unique DATE ID for each show, ONLY THEN edit prices Ad mi n> Conc er t De tail s Step-11. Set up the correct default currency Ad mi n> Shop Settin gs>Adv ance d> Cu rrenc ies DEVELOPERS: Please see the Table of Content for a summary of all DEVELOPERS comments throughout this User Manual. User Manual Jan-13 Page 8 of total 108 Pages User Manual osConcert – Administration interface After a successful installation of the osConcert package, log-in to the osConcert Administration Interface or Admin. Alternatively, open your internet browser and browse to the osConcert Administration Interface; www.yourdomain/osconcert/admin (where 'osconcert' is the name of your application directory) For info about the installation of the osConcert software package, please view the osConcert installation video. Use the (administrator) email address and Password that you created during installation of the osConcert software package. User Manual Jan-13 Page 9 of total 108 Pages User Manual Beginners set-up of osConcert We suggest beginners to osConcert to go through the following steps; 1. Shop Settings 2. osConcert Settings 3. Products 4. Marketing 5. Set up Payment Module 6. Concert Details 7. Home Page edit (CMS) 8. Edit Static Pages (CMS) User Manual Jan-13 Page 10 of total 108 Pages User Manual 1. Shop Setting In Admin>Shop Settings you set all shop-related information that is both visible on the front-end and -if you decide to do so, in the emails that osConcert sends automatically for new orders and users registration. From the Left (-side) Menu, select SHOP SETTINGS. Admin>Shop Settings>General General Shop Settings In the General section of SHOP SETTINGS edit ALL references to Cartzone, email addresses, links and change these with your own; Store Name Use the Store Name to identify both the Front and Back End. Handy feature if you manage several different osConcert shops simultaneously. No limit. Store Owner Type here the name of your store. No limit. Email Address IMPORTANT! Do NOT FORGET to edit. Email From IMPORTANT! Do NOT FORGET to edit. Country Select country from pull-down and click the save button User Manual Jan-13 Page 11 of total 108 Pages User Manual State/Province Set country first, and then select State/Province (zone) from pull-down. Click the save button to save your selection. Send Admin confirmation and Extra Order… Set this field to receive order confirmations to your mailbox. Separate multiple emails with a comma. Store Address and Phone Edit to display Store address and Phone number(s). Can be left empty. Default Theme Select a template from the drop down list. Light =Cartzone (default) Dark = Blackzone). Company Logo Must be .png format. There is no forcible limit to the image size, just a recommended limit of 200px (W). NOTE:: this image will be used throughout the site and email responses so keep it small and neat. Date Display to display dates Click and select from the pull down a date format. Default= dd-mm-yyyy Server Date off-set Set your time-zone based on GMT. This time is used for log files and for example in confirmation emails. We are selling „Seats as Products‟ Items sold in the shop are „Seats as Products‟. Note that osConcert does not support other sections of this software. Use at your own risk. Default=Products. Time format to display time Click and select either the 12hr or 24hr display option. Default= 12hr User Manual Jan-13 Page 12 of total 108 Pages User Manual Advanced Shop Settings - Customers The Advanced Shop Settings for Customers offers a selection of Customer Account Fields from a list that you want to configure for the registration of new customers at the front-end (see below). Also, osConcert will use these Customer Account fields for fields in automatic emails and orders. Customer Accounts fields osConcert has all common Customer Account Fields pre-installed (stored on several pages), which can be enabled and edited, including making Customer Account Fields required to be filled out by new customers. IMPORTANT! Customer account Fields can be reduced to a bare minimum but Country/State is needed for payment modules to function. DEVELOPERS: To eliminate the country field make a default country in table structure „address book‟ Admin>Shop Settings>Advanced>Customers User Manual Jan-13 Page 13 of total 108 Pages User Manual To enable Customer Account Fields Click the respective field-tab and change the display STATUS by clicking the GREEN bullet. To ease managing the (enabled) Customer Account Fields, it is possible to change the listing sequence of the Field-tabs by clicking the small blue UP or DOWN buttons next to the green status bullet. To create new Customer Account Field: Admin>Shop Settings>Advanced>Customers>Customer Account Fields>NEW. IMPORTANT! Instead of creating a NEW FIELD(s) from scratch, Cartzone recommends to edit 1 of the fields that is not needed. To edit a Customer Account Field Select and expand the Field-tab you want to edit and click the EDIT button. Edit On the expanded tab, a status summary is shown. Click the EDIT button. Edit User Manual Jan-13 Page 14 of total 108 Pages User Manual Save General Status Default Value Input Information Text Box Use the tick-boxes to set status; Active (in order to be used in osConcert emails and orders), Show Label (= show front end) and Required. This field can be used to show a greyed text inside the field at the front end that will be overwritten by the customer, for example “Only Numeric” or “Other Mobile”, see below example. NOTE: especially when using a Drop-Down menu is it advisable to use here a predefined default-value (eg. a text saying “click for options...”). Set Size; Minimum Length and Maximum Length. These values are set when Customer Account Field was created and can be edited. Ask the help of a webmaster to achieve this. NOTE:; this Text-box can be replaced with a Title, Text Area, Check-Box, Option Button, Drop Down Menu or Custom box. To change the default Text-box, first Delete the Customer-Account-Field then re-create a new Customer-Account-Field and select a Pull-Down-(text)-field. Populate or edit the Pull Down Menu with your own “Option Names” and “Option Values” using the insert/delete buttons. Label Text Edit the Label-, Error-, Input Rollover- and Input Help-texts as per your own requirements. Select Pages to Display Front End Back End Tick boxes to show this field at Sign up and Account Edit Tick boxes to show this field at Create Account and Edit Account IMPORTANT! osConcert allows the creation of new and the deletion of all Customer Account Fields all except the COUNTRY and STATE Customer Account Fields. DO NOT DELETE the COUNTRY and/or the STATE Customer Account Fields as these 2 fields are used by osConcert in the payment module and ocConcert will crash if these fields are deleted. User Manual Jan-13 Page 15 of total 108 Pages User Manual DEVELOPERS: If you select 'Input Type' as 'Custom' you have to write your code to validate and prepare entered values to be stored in database. The following are the needed functions For Rendering the Field, create the function 'edit__<uniquename entered>' in includes/classes/customerAccount.php For retrieving the Field from db, create the function 'getdb__<uniquename entered>' in includes/classes/customerAccount.php For Validation and preparing field for storage, create the function 'check__<uniquename entered>' in includes/classes/customerAccount.php For Validation on javascript, create the function 'validation.check__<uniquename entered>' in includes/javascript/customer_account.js Also without choosing 'Input Type' as custom you are still able to create any of the above functions for your needs. Our Working code adjusts to call your own defined functions To eliminate the country field all together make a default country in table structure „address book‟ User Manual Jan-13 Page 16 of total 108 Pages User Manual 2. osConcert Settings In the “osConcert Settings” section, you configure specific osConcert related settings, switch on/off modules, set and change set specific system settings, edit error messages or and not limited to, switch on/off interactions with third party software applications. NOTE: that the osConcert Settings can be accessed in 2 different ways; Directly via the short-cut in the header of the SHOP SETTINGS; And alternatively, use the (blue) submenu section; Admin>Shop settings>Advanced>osConcert Settings; User Manual Jan-13 Page 17 of total 108 Pages User Manual In Admin>Shop Settings>Advanced>osConcert Settings, the followings settings can be configured at any time. OsConcert version Text in the top margin of the front end. Edit text to suit your needs. Can be left empty. Default= „osConvert version information….‟ User Manual Jan-13 Page 18 of total 108 Pages User Manual Enable PDF E-tickets Set to “True” will generate PDF E-ticket. Default=true. See also Admin>Tickets E-Ticket Delivery Status 1=Pending. This means E-tickets are not delivered automatically by osConcert and you need to send e-tickets manually, for example by snail-mail. osConcert is using the following status codes; 2=Processed. E-ticket will be delivered only after payment is processed. 3=Delivered (=Default status to view E-tickets). Display PDF for delivery status Status displays “E-ticket & PDF icon” when payment is delivered and E-tickets enabled. Default=true. Currency Left Symbol Text field Currency Symbol on left side of amount only on E-ticket. Default=$ Enable “How to” guide User Manual Note: Set up for default currency used in osConcert, including decimal settings, abbreviation etc in Admin>Payment>Currencies Displays at the front-end a “How to” guide under the seat-plan. Jan-13 Page 19 of total 108 Pages User Manual Hide choose Billing Address Set “Yes” or “No”. Yes= Does NOT allow customer to “choose” Billing address info on Check-out. See also Hide Delivery Address Hide Delivery Address Set “Yes” or “No”. Yes=Hiding Delivery address info on confirmation check-out page. See also Hide choose Billing Address Seat Plan Cache IMPORTANT! Seat plan cache when set to 'True' will render a faster seat plan by retaining memory of the pages. This should be enabled after testing. Default=True. Expand Menus List If set to TRUE a 2 line will be displayed with “Venue”, “Date” and “Time” under all listed SHOWs in the left side Menu at the front-end. “True” you will reduce the number of Shows that can be seen at the front-end. Default=FALSEe nd User Manual Jan-13 Page 20 of total 108 Pages User Manual Seatplan Live Logging Enables debugging. Live logging is for testing of seat plan selection only. Live logging will log every 'mouse click' event, guest and users. Default=false. DEVELOPERS: Use the Seatplan Live Logging feature to identify problems Seatplan Timeout Ordering will be reset after 600s of inactivity. Default=600 (seconds). Seatplan Refresh Refresh rate of Seat Visual Seatplan. No need to change. Default=2000 (milliseconds). Google Analytics account Enter code. More info; http://www.google.com/analytics/ Seatplan Requires Login A seat reservation is only possible with an active log-in. Default=True. Add Extra Fields Use when, for whatever reason, you may need to employ extra fields at checkout. Data from these fields will be displayed in Admin/Orders and Customer Account. Also a handy option when “Purchase without account” and very helpful for nominated Box Office users because BO can state customers details here. Default=No. IMPORTANT! If the language definitions are empty the field will not be visible. Therefore you can choose how many fields you want to employ. DEVELOPERS: from includes/languages/english.php Add Social Networking If set to YES, a small Twitter + Facebook icon will be added on the lower section of order-confirmation page. Default=No. IMPORTANT! The „includes/social_networking.php‟ file will need to be edited with your own social network links for this to be effective. Ask the help of a webmaster to achieve this for you. See also Social Networking Purchase without an Account Set to Yes if you want your customers to be able to purchase tickets without an account? Default=No. Maximum quantity in cart Set the maximum number of tickets per order. 0=unlimited. Use –for example when 1 registered user can only order 1 ticket. Default=0 Disable creating account entirely? Do you want to skip log-in entirely and send customers directly to check-out process? Handy for “Free” tickets but do note that NO user details will be registered/printed on the E-tickets! Default=No. User Manual Jan-13 Page 21 of total 108 Pages User Manual Show subcategory count For reserved seating with visual seat plans. Enable setting to calculate, count and view remaining OR the available seats in a sub category. Choose „Reserved‟, „Remaining‟ or „False‟. Default= Remaining Note; to disable from the front end, set to „FALSE‟‟. Cine Style Image Hide GA quantity Set the category image of the ROOT Show category only. Hide General Admission (GA) product quantity when using category master quantities. Hide Privacy, Terms and Contact us links in the footer. For more info see also Static Pages CMS. Enforce Coupon Entry at Checkout. See also Sales Discount Coupons. Hide Footer Info links Enforce Coupon DEVELOPERS: Use the Seatplan Live Logging feature to identify problems Extra fields from includes/languages/english.php User Manual Jan-13 Page 22 of total 108 Pages User Manual 3. Products - introduction The Admin>Products section serves as your „catalog‟. In Products shows and thereof are created then displayed in a „category‟ type structure, for example a Row, Stall, Balcony etc, each will be a Sub-category of a SHOW. Sub categoriesl of Show 1 Sub categories of General Admission (show) In a General Admission show it is possible to add a sub or child category that will show as „sub-products‟, for example for Concession tickets1. See Help manual To manage products in your catalog, osConcert offers you to use the following dedicated menu options, each has specific advantages; Admin>Products = Limited information/pane - To add new (GA) show - To edit a Show Image - To delete a Show Image - Set Expiry dates and times - Set Master Quantity Admin>Alternative Edit Category = General overview on 1 pane - Add new Category - Add new Product - Advanced user settings incl. path information - Hide individual seats Note: before you continue and start working with Products, we recommend first to get a feel for what your customers‟ experience when ordering your tickets? What do the various settings you have set so far actually do at the front- and backend etc? Then, when you are more familiar working with osConcert, explore the various options and check out (the advanced user) documents in; Admin>ShopSettings>HELP MANUALS Related chapter: osConcert Details. 1 Concession tickets give the holder of the ticket the right to enter the venue to see the show, normally with a discounted price. It could also mean that the ticket holder has the right to get something from the „concession‟ (snack) stand. For example „Child‟ or „Old Age Pensioners‟ tickets (OAP). It is common that concession ticket holders show an ID. User Manual Jan-13 Page 23 of total 108 Pages User Manual Product / Shows - Editing In the editing section of Admin>Products, the following Show sections can be configured; , Category name =back-end Text field. Min. 1, Max. 17 characters Category heading title =front-end Text field. Min. 1, Max. 17 characters Category Date Text field for the Show Date (eg. 14th Jan 13, or New Years Day) Category Time Text field for the show Time (1 PM, 13:00hr, from 13.00hr etc) Date (show) Expires Text field, use date format defined in Admin>Shop Settings>Date Time (show) Expires Text field, use time format defined in Admin>Shop Settings>Time Master quantity (Gen. Admission only) Tick box if GA show with a Master Quantity. See Master Quantity. Description Text field or HTML script. Upload a new Cat/Show image Upload/delete a Cat/Show image. See Editing Show Image. User Manual Jan-13 Page 24 of total 108 Pages User Manual Show Image editing In Products Each Show can have its own „Show-Image‟. This is the image that your customers see when they click on a loaded show at the front-end and you see in the Show tab summary. Admin>Products. Click and expand the Show-tab that needs editing. Edit Then click on the EDIT option on the right hand side to further expand the Show-tab that you want to edit. Save Click the BROWSE button and select the SHOW image to be uploaded.To complete the image upload, click SAVE Attention! osConcert will automatically resize your image; recommended image size should not exceed 260(W) x260 (H) px, see above example image Attention! If your SHOW has a section eg. Stalls, Circle, Balcony etc then upload the images in the ACTUAL Category. DO NOT upload images in Products Seats. User Manual Jan-13 Page 25 of total 108 Pages User Manual After image is uploaded (saved), the Show image will show in the expanded Show tab. And the Show image will show at the Front end when a visitor selects the Show from the left-menu User Manual Jan-13 Page 26 of total 108 Pages User Manual Delete a Show image Only if a Show image is uploaded, a Delete Category Image function is enabled. There are 2 options to delete a uploaded Show image. Admin>Product> Select and expand the Show# tab, on the 1st pane, click on the TRASH CAN Alternatively, Admin>Product> Select and expand the Show# tab into the 2nd pane. At the very bottom of the Show screen, at the Category image section, tick the “delete category image”, see below; To complete the image deletion from back and front-end, click SAVE User Manual Jan-13 Page 27 of total 108 Pages User Manual Expiry Date/Time To hide a show automatically at the front-end at a given date (and time), a show in osConcert can be configured with an expiry DATE (and TIME). Server Time Off-Set In order for the EXPIRY date/time setting to function properly, the date and time of the SERVER that is hosting your website needs to be OFF-SET to the date and time you are using osConcert in. ATTENTION! Failure to off-set the server date/time will result in Show(s) either being hidden or continue to be displayed at the front-end at an incorrect date and time! To off-set server date and time, please follow/configure the following steps: Admin>Shop Settings/Server Date Off-Set Save If your server is located in HOUSTON, Texas, USA and you are (selling on-line tickets in), for example London, UK,, then the server time off-set needs to be set to +6hours and click SAVE. Attention! Note that off-set hours are based on GMT! User Manual Jan-13 Page 28 of total 108 Pages User Manual To test if your server off-set date and time are configured correctly, it is possible to display a date and time at the front end; Admin>Products>Expiry Date Show Expiry Time Difference Default setting is NO, to display the server time at the footer of the front-end, change setting to YES and click the SAVE button. Save Date Expiry Cron Cron(tabs) is a time based job scheduler for computers2. For an accurate display of the off-set time, set the Date Expiry Cron to “60” (sec) and click the SAVE button. Save Date/Time displayed for testing purposes at the Front End is the date and time of the very moment the page is loaded and will not change automatically without refreshing the page (F5); Attention! After testing is completed, do not forget to switch off the Show Server Time (at the front end)! 2 Cron is the time-based job scheduler in Unix-like computer operating systems. Cron enables users to schedule jobs (commands or shell scripts) to run periodically at certain times or dates. It is commonly used to automate system maintenance or administration, though its general-purpose nature means that it can be used for other purposes, such as connecting to the Internet and downloading email. For more info; http://en.wikipedia.org/wiki/Cron User Manual Jan-13 Page 29 of total 108 Pages User Manual Date/Time (this show) Expires See configuration instructions in previous section "Server Time Off-Set". Open the Show that requires an Expiry Date and Time; Admin>Products>SHOW # Edit Use the Calendar to select the required Expiry Date. Alternatively, type the Expiry Date. Attention! When typing the date, use the date-format as configured in Admin>Shop Settings> Date format. Type the time in the (12 or 24hr) format as configured in Admin>Shop Settings> Time format and click SAVE. Save Please do note that the summary of the SHOW tab updates with the expiry date and time User Manual Jan-13 Page 30 of total 108 Pages User Manual Master Quantity For General Admission (GA) events, osConcert offers a Master Quantity option. A Master Quantity is often used for concession ticket sales that are created as (sub category-) products. Concession tickets normally involve lesser priced tickets as a consideration and therefore you may want to „cap‟ ticket quantities. The Master Quantity is NOT the combined total of the sub categories but is the number you decide to „cap‟ ticket-sales in osConcert as the number of available seats the venue is offering. If the master quantity is reached (i.e the venue is full) by 1 or a combination of the sub-categories, then when the order is processed and it does reach the Master Quantity figure, the code will prevent any further purchases of all ticket types: Master Quantity is not an option for Reserved Seating because here customers select from a visual seat plan and when all seats are reserved, osConcert will simply disable the „Order‟ buttons. Master Quantity is strictly for General Admission (GA) shows. The below example explains the Master Quantity. Create or open a General Admission (GA) show in Admin>Products If ticked, this you will get some new fields to complete; Set initial seats remaining to the total of seats in your venue. Set seats remaining to the same value (or a lesser one if you wish to reserve some tickets). Make sure you save your settings by clicking the SAVE icon. The new Master Quantity will be displayed in the SHOW-tab. User Manual Jan-13 Page 31 of total 108 Pages User Manual Now add ticket types to the event using „+New product‟. Save Note: set the individual product STOCK-QUANTITY (Kg)! In order to be used with a Master Quantity, ensure stock quantities are more than the set Master Quantity. Save your settings by clicking the SAVE icon. Front end page with three ticket types added (stock=400) Total (stock= 25) stock 475 (stock= 50) The highlighted section tells your customers the total number of seats left to purchase. Next to each ticket type is the number of tickets left (e.g. still in stock). Clicking the „order‟ button will take a customer to the page for that ticket – here there will also be a reminder as to how many tickets are available: Note that this total is valid at the point the page loads and does not include quantities in this customer‟s (or any other customer‟s) basket – only those tickets already (physically) sold User Manual Jan-13 Page 32 of total 108 Pages User Manual In case a customer is trying to buy too many tickets the following happens: If the customer is trying to order more tickets than there are available in the respective category, the customer will get redirected to MY ORDER and a message will show; If the customer is trying to order more than the remaining Master Quantity figure, then when they try to Check out the customer will get redirected to their “MY ORDER” with the „remaining seats‟ message as shown If one type of ticket gets sold out the General Admission event page will change the „ORDER‟ button to „SOLD‟ button. ‟ User Manual Jan-13 Page 33 of total 108 Pages User Manual If eventually the master quantity is reached (i.e. the venue is full) then when the order is processed that reaches that figure the code will prevent any further purchases of all ticket types: There will be a message “There are 0 seats remaining for this show. All ORDER buttons will change to “SOLD”. (Original qnty=400, sold 150) (Original qnty= 25, sold 25) Master Quanity 200 seats (Original qnty= 50, sold 25) User Manual Jan-13 Page 34 of total 108 Pages User Manual Advanced Show editing Alternative Edit Categories osConcert offers advance users an Alternative Edit Category 1 pane option to create, delete, copy (sub)categories, move, edit the status, color banding of single seats, change stock status, edit Product price, Product weight, Product quantity and Product image. ATTENTION! The DELETE option in is designed for all shows other than Shows that have reserved seating. DO NOT DELETE any (sub-)categories (eg. rows or seats of a seat-plan) because a deletion WILL CORRUPT the Dbase of the seat-plan and will require a re-install of the seat-plan. osConcerts recommends, instead of deleting (sub-) categories, set the STATUS of the (sub-)category to HIDE. Alternatively, you may want to request a service ticket. Admin>Alternative Edit Category Click YELLOW folder to DRILL THRU to next level! Or select EDIT/DELETE/MOVE from right menu Please note that depending on the level of the Categories/Products, the options in the right hand menu change; to MOVE a Show/Product/Category up/down in the Front-end listing, click MOVE. From the pull down menu, select the new position and click the MOVE button. User Manual Jan-13 Page 35 of total 108 Pages User Manual To edit the next level: Click YELLOW folder to DRILL THRU to next level! Or select EDIT/DELETE/MOVE from right menu Select SEAT and click the EDIT/COPY/MOVE button At the Alternative Edit Categories (seat) pane various settings can be edited in 1 pane; =Product Name in Back end =Mouse-over text at Front-end After editing is complete, click PREVIEW, then the UPDATE (or CANCEL) button User Manual Jan-13 Page 36 of total 108 Pages User Manual Color banding Color banding is referring to the colors used to identify and categorize seats in loaded seat-plans whereby each color represent a price range and/or a category (eg Stalls, Balcony, VIP, Student, Child etc). An automatic legend above the seat-plan at the front end displays all the colors/prices and any tickets that are currently in your seatplan, shopping basket or already sold (reserved). osConcert is using a few colors by default (for example darkslategrey for „reserved/seats‟). The following colorbanding colors can be selected for color banding of seats; Attention! COLOR BANDING NAME = ALL SMALL CAPS! (characters)! Color-banding: Color: Hex RGB: Decimal: Websafe: red #FA9C9F 0,38,36,2 10460410 blue #C0FFFF 25,0,0,0 16777152 green #80FF80 50,0,50,0 8454016 yellow #FFFFC0 0,0,25,0 12648447 fuchsia #FFC0FF 0,25,0,0 16761087 salmon #FA8072 250,128,114 7504122 teal #008080 0,128,128 8421376 orange #FFA500 0,35,100,0 42495 palegreen #98FB98 39,0,39,2 10025880 skyblue #87CEEB 43,12,0,8 15453831 thistle #D8BFD8 0,12,0,15 14204888 When a seat-plan with categories is ordered and loaded into your ocConcert, the different categories will have different colors programmed into the dbase. For editing color banding of large(r) seat-plans or large quantities of seats simultaneously, please contact us for instructions how to edit color banding in the database. At this moment, within Admin it is (only) possible to change the color-banding of 1 seat at a time. There are 2 easy ways to change the color banding of a (single) seat; User Manual Jan-13 Page 37 of total 108 Pages User Manual Edit Seat Color-banding (via Products) Select the Show#, then select Row#/Stall/Balcony to be edited. Click EDIT to open the seat-pane. Admin>Products Save In the expanded SEAT tab, select TYPE from the left-menu. In the seat-pane, select “Seat Price Color Band for seat-cells” and type the name of the seat-color: Click SAVE and refresh your Show page at the Front-end Front-end: User Manual Jan-13 Page 38 of total 108 Pages User Manual Edit Seat Color-banding (via Alternative Edit Categories) osConcert offers advance users an Alternative Edit Category 1 pane option edit categories and Products including editing color banding of single seats Admin>Products>Alternative Edit Categories> select Show# Attention!, DRILL THRU by clicking the YELLOW folder, then DRILL THRU into the ROW, (Stall/Balcony etc), then Seat to be edited. Click the EDIT button in the right menu. Click YELLOW folder to DRILL THRU to next level! Click YELLOW folder to DRILL THRU to next level! Select SEAT and click the EDIT button (See next page) User Manual Jan-13 Page 39 of total 108 Pages User Manual At the Alternative Edit Categories (seat level) pane select COLOR BANDING; Color-banding: Hex RGB: Decimal: Websafe: red Color: #FA9C9F 0,38,36,2 10460410 blue #C0FFFF 25,0,0,0 16777152 green #80FF80 50,0,50,0 8454016 yellow #FFFFC0 0,0,25,0 12648447 fuchsia #FFC0FF 0,25,0,0 16761087 salmon #FA8072 250,128,114 7504122 teal #008080 0,128,128 8421376 orange #FFA500 0,35,100,0 42495 palegreen #98FB98 39,0,39,2 10025880 skyblue #87CEEB 43,12,0,8 15453831 thistle #D8BFD8 0,12,0,15 14204888 To save the settings, click the UPDATE (or CANCEL) button Related chapter: Color Banding User Manual Jan-13 Page 40 of total 108 Pages User Manual Upload Show and Category images To upload Show or Category Images, please use the Edit Show Image as explained in Admin>Products or Upload the Show or category image using the Alternative Edit Categories and select the Product Image Upload. User Manual Jan-13 Page 41 of total 108 Pages User Manual DEVELOPERS: Use this SQL query in phpMyAdmin to quickly clear all test orders and make the orders tables ready. TRUNCATE TABLE orders; TRUNCATE TABLE orders_products; TRUNCATE TABLE orders_status_history; TRUNCATE TABLE orders_total; TRUNCATE TABLE orders_products_attributes; TRUNCATE TABLE payment_response; User Manual Jan-13 Page 42 of total 108 Pages User Manual 4. Marketing Marketing Templates. One of the nice features of osConcert is the editable build-in set of templates to send emails for new orders and when users are created. These email-templates are by default filled out with Cartzone email-addresses and confirmation and you will need to change the Cartzone details to your own details and wishes. To ensure your email templates are showing the correct information and details, osConcert is using %%field%% references. Therefore, it is HIGHLY RECOMMENDED to first edit chapter 1. SHOP SETTINGS before you test your email templates. Failure to do so will result in Cartzone receiving your important emails! There are total 8 editable email Templates stored in 2 sections of osConcert; 7 USER related Templates in Admin/Marketing/General; 1 2 3 4 5 6 7 And 1 PRODUCT template in Admin>Marketing>eMarketing>Products; 8 User Manual Jan-13 Page 43 of total 108 Pages User Manual Admin User Manipulation - Template osConcert encourages users to strengthen the(ir) Admin password. Every time there is a “manipulation” in the Administration section of osConcert, for example when additional Administrators are created or an Admin password has been changed, osConcert will generate and send an automatic email to the respective user and the system administrator (that is you). Admin>Marketing. Click to expand and to preview the Admin>Marketing>Admin User Manipulation Template. Edit Click on the EDIT option to open the WYSIWYG editor3. Edit the text and add/remove the %%field%% references. Do not forget the required “Subject” and “Reply-to” fields. Click the SAVE option to save all your settings. Save 3 There where possible, osConcert is using a WYSIWYG editor or “What You See Is What You Get” editor allowing you to format all text, add images easily. For more info; http://www.tinymce.com/ User Manual Jan-13 Page 44 of total 108 Pages User Manual Admin User Password Remember – Template The “Admin User Password Remember Template” in Admin>Marketing is used every time an Administrator Password is changed. osConcert will then generate and send an automatic reminder email to the user in the Administrator-group as well as the system administrator (that is you) Click to expand and to preview the Admin>Marketing>General>Admin User Password Remember Template. Edit Click on the EDIT option to open the WYSIWYG editor. Edit the text and add/remove the %%field%% references. Do not forget the required “Subject” and “Reply-to” fields. Click the SAVE option to save all your settings. Save User Manual Jan-13 Page 45 of total 108 Pages User Manual User Creation -Template In Admin>Marketing click to expand on the “User Creation Template”. Click on the EDIT option to open the WYSIWYG editor. Edit Edit the text and add/remove the %%field%% references. Do not forget to click the SAVE option to save all your settings. Save User Manual Jan-13 Page 46 of total 108 Pages User Manual Customer Password Remember - Template In Admin>Marketing click to expand on the “Customer Password Remember Template”. Click on the EDIT option to open the WYSIWYG editor. Edit the text and add/remove the %%field%% references. Do not forget to click the SAVE option to save all your settings. Edit Click on the EDIT option to open the WYSIWYG editor. Edit the text and add/remove the %%field%% references. Do not forget the required “Subject” and “Reply-to” fields. Click the SAVE option to save all your settings. Save User Manual Jan-13 Page 47 of total 108 Pages User Manual Message to All Customer -Template In Admin>Marketing click to expand the “Message to All Customers”. Click the small envelope to open the WYSIWYG editor. Select the Customer(s) via the pull-down option you want to email this message to; SEND Tave Create a text and add/remove the %%field%% references as you wish. Do not forget to edit the “From” field and fill out the Subject line. NOTE the tick-box “CREATE PASSWORD” in the lower section (this can be handy in case you need to inform all your customers a new user password). IMPORTANT; when you click the SEND envelope, your email will be uploaded to your server and the following warning message will show; Click “SEND EMAIL” or “CANCEL”. User Manual Jan-13 Page 48 of total 108 Pages User Manual Customized Invoice Page – Template The “Customized Invoice Page” in Admin>Marketing is probably one of the most important templates you use in osConcert. This template is for the Printable INVOICE in the CUSTOMER ACCOUNT (eg the customer section where customers can check their account and orders). Click the Admin>Marketing>Email messages>Customized Invoice page Edit Click on the EDIT option to open the WYSIWYG editor. Edit the text and insert/remove the %%field%% references as you wish. Do not forget to click the SAVE option to save all your settings. Save User Manual Jan-13 Page 49 of total 108 Pages User Manual Contact Us –Template In Admin>Marketing click to expand on the “Contact Us Template” Click on the EDIT option to open the WYSIWYG editor. Edit Edit the text and add/remove the %%field%% references. Do not forget to click the SAVE option to save all your settings. Save User Manual Jan-13 Page 50 of total 108 Pages User Manual Product Sale –Template IMPORTANT! The “Product Sale Template” is located in; Admin>Marketing>eMarketing>Products The “Product Sale Template” is used for the EMAIL RECEIPT that every customer will receive after completion of the sale. This template also has an option to send a “Test” email. Admin>Marketing>eMarketing>Products Click EDIT to edit text in WYSIWYG or click the small envelope to send a Test Mail. Edit SEND test email Edit the text and add/remove the %%field%% references as you wish. Do not forget the required “Subject” and “Reply-to” fields. Click the SAVE button to save your settings. Save DEVELOPERS: edit „email_messages‟ table directly. User Manual Jan-13 Page 51 of total 108 Pages User Manual Social Networking osConcert has a build-in Social Networking-bar that, when enabled shows your social networking icons for Twitter, FaceBook, Linkedin and Googleplus. Admin>Marketing>Options Add social bar Set to TRUE will display a social networking bar in the right top corner of the osConcert header at the front end. Default=TRUE Note; only if an ID is edited, the respective social network icon is enabled. No ID=No icon.. Twitter ID Edit your Twitter ID here to be displayed in the Social Networking bar in front end Header. Note; see „Add social bar‟. Facebook ID Edit your Facebook ID here to be displayed in the Social networking bar in front end Header. Note; see „Add social bar‟. Linkedin ID Edit your Linkedin ID to be displayed in the Social networking bar in Header. Note; see „Add social bar‟. Googleplus ID Edit your Googleplus ID to be displayed in the Social networking bar in Header. Note; see „Add social bar‟. DEVELOPERS: edit file includes/modules/socialbar.php Related information: Add Social Networking User Manual Jan-13 Page 52 of total 108 Pages User Manual 5. Sales Sales Discount-Coupons With osConcert it is possible to generate Discount-Coupons. From the Left Menu, click the link „COUPONS‟ Menu button. That will open the Admin>„Vouchers/Coupons Click the „New Discount Coupon‟. Create the conditions for your Coupon with the help of the guide on the right side. User Manual Jan-13 Page 53 of total 108 Pages User Manual Click the PREVIEW button and click the CONFIRM button This should save the coupon as Coupon Name list and you need to click the red status button to from RED to GREEN to activate it. That should have created and activated a coupon and its COUPON code that you can send to your customers. But before we do that we should also set the Order Totals in the osConcert to display coupon discount correctly at checkout. Admin>Payment>Advanced>Order Totals In the Oder Totals module first DELETE the already installed modules (SubTotal, Total etc) and then RE-INSTALL with Discount Coupons most likely your first module, followed by SubTotal and then Total module. This will give a correct order display in the checkout confirmation page. User Manual Jan-13 Page 54 of total 108 Pages User Manual Emailing Discount Coupons After the Discount-Coupon is created it can be emailed to your customers. Click and highlight the Coupon-tab and click on the EMAIL icon to open the coupon-email generator. From the pull down menu, select to whom you want to email the Discount Coupons to. Use the wysiwyg editor to edit the Discount Coupon text. Click the PREVIEW button to preview the Discount Coupon Email. Then click the SEND EMAIL button. User Manual Jan-13 Page 55 of total 108 Pages User Manual Your customers will receive the Coupon by email. All a customer need to do when they receive the COUPON code from you, is tick the Redeem Gift Voucher tick-box on the front end and enter the Voucher code in the appropriate REDEEM box where it now appears in the checkout process. Note that the discount will be calculated and shown in all Order Details and in Reports inside osConcert. User Manual Jan-13 Page 56 of total 108 Pages User Manual Discount Reports OsConcert has several reports to manage and monitor Discount Vouchers. Discount Usage To check on the Discount Usage, check the Admin>Sales>Discount/Vouchers tab Discount Usage Discount History For a History of emailed discount vouchers, Admin>Sales>Discount/vouchers, click the Email History icon on the Discount Voucher tab Email History User Manual Jan-13 Page 57 of total 108 Pages User Manual Sales Report All orders have an Order Status. Among other functions, osConcert is using these order statuses to generate a Sales Report on-line and that can be Exported to PDF and MS-excel. Admin>Sales Make the appropriate selection from the pull down-menus and click either the SEARCH button or the EXPORT TO PDF or EXPORT TO EXCELL button. On Line Sales Report Enable or disable the “Sub Totals” tickbox. After the SEARCH button is clicked, the following Sales Report will show; User Manual Jan-13 Page 58 of total 108 Pages User Manual PDF Sales Report When clicking EXPORT TO PDF, osConcert will generate a pop-up with the following Sales Report. Click the „Saved as…‟ button to save the PDF file; Excel Sales Report After the EXPORT TO EXCEL Button is clicked, a popup will ask you to save the file. Excel will generate the following Sales report that can be further edited to suit your needs; User Manual Jan-13 Page 59 of total 108 Pages User Manual 6. Payments In Admin>Payment the payment related modules Payment gateways, Tax Currencies, and Tickets are configured and managed. Note that the modules in this chapter are explained in order of setting-up importance. Currencies In osConcert any currency can be created and edited at any time. The default currency of osConcert is USD ($) but this default setting and any other currency settings, including the denotation (symbol), Decimal or Thousands Point can easily be edited to suit your needs User Manual Jan-13 Page 60 of total 108 Pages User Manual Setting up a New (default) Currency IMPORTANT! It is recommended to set up a (new) Default Currency early on! Click on NEW CURRENCY in Admin>Payment>Currencies Click to expand the NEW CURRENCY tab then click the EDIT button to fill out the respective fields. Save Title Type here the TITLE of the new currency (=back end information) used for the listing at the Admin>Payment>Currencies. Code Type here the CODE or an abbreviation of the Currency, Code is used in the preview of the expanded currency tab. Symbol Left (front end) Type the denotation (symbol) at the LEFT of the amount. For international currency codes, see also www.oanda.com. Tip! Use a word processor to generate the symbol, then copy&paste the symbol into the Symbol left field in osConcert. Symbol Right (front-end) Some currencies require a symbol or string of characters after the amount, for example “cents”. Type here the right symbol. Decimal Point Type here the symbol for the decimal point. Thousand Point Type here the symbol for the Thousand Point. Value If this is the “Default currency”, set value to 1.00000000. If this not the default currency, type here the exchange-rate value for your currency, eg the value in relationship to your Default Currency. NOTE: the exchange rate values need to be manually updated periodically. See also www.oanda.com. IMPORTANT! EVERYTIME a currency is set up OR edited, ensure to tick the default-tick-box to set the currency as the default currency and click the SAVE button! Failure to do so will result in osConcert displaying “Price=0” without a Currency. User Manual Jan-13 Page 61 of total 108 Pages User Manual The „New Currency‟ listing at the back end: Editing a Currency To edit a currency, also the Default currency, follow instructions in Setting up a New (default) Currency User Manual Jan-13 Page 62 of total 108 Pages User Manual Displaying Currencies (front end) After setting up 2 or more currencies, „Enable Currency‟ module in Admin>Shop Settings>Templates>Info boxes. This will add a currency pull-down module at the front end that allows your customers to make a currency selection at the left side menu at the front end at the moment of ordering. After selection of a different currency, all prices will automatically display in the selected currency. The „New Currency‟ listing at the back end: User Manual Jan-13 Page 63 of total 108 Pages User Manual Payment Selection (at Front End) Regardless how you configure osConcert offering tickets to your customers (eg. Paid, Free, with Seat-Plans, General Admission or with a Box Office), in order to complete a successful transaction, osConcert needs to be configured with 1 or more pre-installed payment modules4. NOTE: only if 2 or more Payment Modules are installed AND these Payment Modules are set-up to be (world)zone-specific, customers (from these specific World Zones will be able to make a preferred selection at the Front-End. Payment Modules in Admin>Payment>Payment Gateways Payment Modules enabled in Admin Payment selection at Front End 4 osConcert offers several tested and ready to use.Error! Reference source not found. Other supported Payment Modules are; WorldPay, NovelNet (GermanDirectDebit),SagePay(UK), MPESA (Cellphone Payments), NBEPay (Malaysia), GestPay-banco sella (Italy), CC-Avenue,Maybank (Malaysia), iPay88 (Malaysia), PaymentTech, GlobalGateway, ePDQ (UK) and.need to be configured by a professional payment technician/programmer. All other loaded payment modules in osConcert serve are free open source files for further payment integration within osConcert. User Manual Jan-13 Page 64 of total 108 Pages User Manual Payment, Order Status and Ticket Delivery In osConcert as in any shopping cart it is important to understand the „order status‟. We should remember that a „Pending‟ status will mean that we have yet to collect full payment and a „Delivered‟ status will mean that we have full payment and we can release our PDF E-Tickets for download and printing. All our Payment Modules will need the correct payment status. We have „Pending‟(1), „Processed‟(2), „Delivered‟(3),‟Backorder‟(4), „Refund‟(5), and „Preparing [Paypal]‟(6), -where () is the programming element. IMPORTANT!: It is recommended that new users DO NOT set the delivery status of a Payment Module to “Processed” as the final status. The Payment Modules for paid ticket sales with osConcert are programmed in such way that the default delivery status of e-tickets is set to the appropriate delivery setting to ensure a successful transaction. If osConcert is set up to offer e-tickets for which first a payment needs to be received (=processed), for example by a Cheque/Money Order or Bank Transfer, the default delivery status in these Payment Modules is set to “Pending”. And, for example for FREE tickets, the default delivery status is set to “Delivered”. OsConcert will send an automatic email with the e-ticket and customers can also access their account to retrieve e-ticket(s) immediately as there is no need to first process (receive) any payment. Payment Module Inclusions/Exclusions Because osConcert comes with a build in security feature that automatically detects and records the IP-address of ordering customers, the zone and/or the country of ordering customer is determined by osConcert. The Payment Modules has to be configured to be zone and/or country selective; if zones and/or countries are set to be included or excluded in a Payment Module, this payment method is either enabled or disabled for customers in these zone and/or countries. This is a handy feature if, for example, to focus money orders from only customers in a certain zone and/or country. For all customers from all other zones and/or countries the Money Order option will not be visible at the front end but these customers will see the other payment options for which they are not excluded. For Free Tickets, osConcert has a pre-installed Free Payment module; if a true “0” order value is detected, there is a modified check-out, bypassing the whole check-out process altogether. User Manual Jan-13 Page 65 of total 108 Pages User Manual Installing Payment Modules osConcert offers a list of Payment Modules that you can install, rename, edit and delete (uninstall) from the listing. For example Cheque, Money Order, PayPal or a dedicated payment processing option of one of many national Banks5. Admin>Payment>Payment Gateways In the Payment gateways the INSTALLED and the UNINSTALLED Payment Modules are listed. The order of the installed Payment Modules (=Back-end and Front-end) can be changed by clicking the up or down arrow next to the Payment Module name. For UNINSTALLED payment modules, select a payment Module from the uninstalled modules and click to expand the payment module tab. Click the INSTALL button. The installed Payment Module will now be listed in the Installed Payment Gateways summary. Deleting a Payment Module It is possible to delete a Payment Module. However, it may be easier just to HIDE a payment module at front end and preserve the settings; to do so, double click to expand the Payment Module tab, click EDIT and change the TRUE status to FALSE. 5 If the payment option you want to use is not listed and you want to have a customized payment module, Cartzone may be able to assist but please do not underestimate this (credit card) processing; you will need a merchant account with a bank and your bank might recommend third party software extensions that needs to be integrated into osConcert. For more info, please contact us [email protected]. User Manual Jan-13 Page 66 of total 108 Pages User Manual Payment Modules – introduction In osConcert, as in any shopping cart it is important to understand the 'order status'. We should remember that a 'Pending' status will mean that we have yet to collect full payment and a 'Delivered' status will mean that we have full payment and we can release our PDF E-Tickets for download and printing. All our Payment Modules will need the correct payment status. The most important payment statuses are; 'Pending'(1), 'Processed'(2), 'Delivered'(3). (the other statuses are 'Backorder'(4), 'Refund'(5), and 'Preparing [Paypal]'(6), where ()is the programming element) All installed Payment Modules in osConcert are listed in alphabetical order and can be previewed by double clicking on a Payment Module tab. To edit, install the module first, then click the EDIT button to configure the Payment Module fields. Admin>Payment>Payment Gateways Cheque/Money Order This module serves as a simple starting point for use with „Pending orders‟. Money order payment message displayed at the Front End: User Manual Jan-13 Page 67 of total 108 Pages User Manual COD (Cash On Delivery) Similar to Cheque/Money order Payment Module, Cash on Delivery (COD) Module is also a simple module for use with “Pending” or “Back-order” orders. User Manual Jan-13 Page 68 of total 108 Pages User Manual Paypal/Paypal Credit Cards (IPN) The Instant Payment Notification (IPN) is a message service that notifies you of events related to PayPal transactions. Our free Paypal IPN module will give you 2 options at the Paypal Payment page; #1 The option for customers with a Paypal account to easily login and complete payment (note: as long as you have "PayPal Account Optional" enabled inside your PayPal merchant account settings). #2 The option to choose to pay by Paypal Credit Cards (Mastercard is for USA only) This PayPal service is free but you must have a Paypal business email account. For more info, please visit PayPal. IMPORTANT! Failure to make the correct settings for the Payment IPN will be disastrous! Set up this Payment Module VERY CAREFULLY! READ the SPECIAL help file; Using PayPal IPN The PayPal Credit Cards IPN payment message displayed at the Front End will depend on what payment option you have with PayPal: The payment option will also determine if your customers are leaving your website or not. User Manual Jan-13 Page 69 of total 108 Pages User Manual Bank Transfer Payment The Bank Transfer/Money Order Payment Module (BT) is configurable for all banks for „Pending‟ orders and not for Direct debit. NOTE; the various Australian and German bank Payment Modules are basically identical Bank Transfer modules and need to be edited to suit your needs. Bank Transfer/Money order payment message displayed at the Front End: User Manual Jan-13 Page 70 of total 108 Pages User Manual Box Office The Box Office Payment Module (BO) is the associated module for the osConcert Front End Box Office system. OsConcert has ability to nominate special customer accounts to be in the BOX OFFICE (by selecting BO in the Country Zone). The Administrator should nominate a (Customer) account to be a Box Office Staff or Agent, therefore they may well register through the Front End or the Administrator can create the customer account in the Admin>Customers>New Customer. Details described here: Box Office Checkout. User Manual Jan-13 Page 71 of total 108 Pages User Manual Free Payment The Free Payment is an invisible module introduced recently to help users issue complimentary tickets. The Free Payment Module works in tandem with the Gift Voucher/Coupon feature. . After the administrator installs and enables the Free Payment Module, whenever anybody uses their complimentary coupon code (100% discount) e.g „COMP‟ they will be able to complete the checkout process with as „zero‟ order total and if the order status of the module is set at „Delivered‟ they will be able to generate and print their tickets without problem. IMPORTANT! A truly FREE concert is taken care of by a free checkout process, bypassing the whole checkout process altogether if a „zero‟ order is detected. User Manual Jan-13 Page 72 of total 108 Pages User Manual Authorize.net Authorize.net (AN) is a USA based Payment Gateway that is fully functional. After installation the module only needs an Authnet Login Username and Transaction Key to activate. For more info; www.authorize.net Authorize.net message displayed at the Front End: User Manual Jan-13 Page 73 of total 108 Pages User Manual Credit card by Beanstream Credit Card Beanstream (CCB) is a Canadian Payment gateway, merchant account provider and online credit card processing service and was functional 2 years ago. For more info; www.beanstream.com Bean Stream message displayed at the Front End: User Manual Jan-13 Page 74 of total 108 Pages User Manual Wallet Payment. Wallet Payment (WP) is a wonderful seldom used payment option. Registered users are able to top up their digital wallet account and use the balance later for purchasing tickets. One advantage is that the Administrator is able to top user-accounts with money for whatever reason. User Manual Jan-13 Page 75 of total 108 Pages User Manual PayPal PayFlow PayPal PayFlow Payment Module (PPF) is a robust more professionally integrated option for PayFlow Account holders with Standard (free), Advanced (paid) and Pro (paid) options. Users will need their Vendor merchant login ID. PayPal Flow is essentially “only” a merchant account. The transactions conducted via PayFlow Pro (for US Merchants) do not appear in your PayPal account. Instead, they are forwarded directly to your merchant bank account. Basically, PayFlow Pro is just like any other traditional payment gateway (like to Authorize.net etc). In North America you can connect the PayFlow Pro service to your own merchant bank account. In the UK, the Payflow Pro service is actually bundled as a hybrid service with Website Payments Pro, connecting all the transactions to your UK PayPal account, and all monies are deposited to your PayPal account, instead of directly to your bank account. For more info: PayPal PayFlow. NOTE: If you are new to the e-commerce landscape, then you are probably better off working with Paypal/Paypal Credit Cards (IPN) for processing, simply because it‟s an all-in-one solution that is inexpensive. However, for merchants who are established, process numerous orders daily and need more advanced reporting, then PayFlow Pro is the better solution. User Manual Jan-13 Page 76 of total 108 Pages User Manual Tax Module – introduction OsConcert comes standard with a Tax module that is integrated in the Payment Modules. After a complete setup, the Tax module calculates an unlimited amount of Taxes, General Service Charges or Fees at the moment of sale. The Tax or Service Charges are Zone (=Country) specific and the rate(s) can be fully customized. Tax – Setting up Taxes and Service Charges are set up in 3 steps in: Admin>Payment>Tax Step-1 Set up in osConcert the Tax or Service Charge specifics, e.g. Tax-Class (this includes Tax name and Tax description) and a Tax Rate (this includes Tax rate in % and assigns a Zone (country). Step-2 Edit the database to get the Tax (or Service Charge) an ID to each product through the database to eventually have a Tax(es) displayed in the order confirmation page. NOTE; at this moment there is no setting for this and you may want to ask help of a webmaster to assist you with this as linking the Tax to products (or zones) is usually managed at your phpMyAdmin. Also see Error! Reference source not found. Step-3 Set up osConcert to display the Tax (or Service charge) in the Order Totals-Module (Admin>Payment Modules>Advanced>Order Totals). IMPORTANT!: Whenever a new „Order Totals‟ related module such as a Tax or Service Charge is installed, it is best to “uninstall” ALL the „Order Totals-modules‟ and then re-enable each module one by one. To do so, DELETE the Sub-Total and the Totals THEN install Tax, Service Charge, Sub Total and Total. User Manual Jan-13 Page 77 of total 108 Pages User Manual Tax-GEO zones introduction Taxes and Service Charges are Zone (=country) specific. At this moment osConcert has 4 build-in GEO ZONES; USA, Australia, Box Office and World Zones. NOTE: “World Zones” incorporates ALL the countries of the world outside of the USA and Australia and Box Office. This means the Tax or Service Charge you set to be charged for World Zone will be charged for ALL customers in the selected zone(s) (=country, including orders generated by the nominated Box Office). Normally, the 4 default installed GEO-zones are sufficient to get started with osConcert and do not require any additional set-up (please proceed to Error! Reference source not found.). However, for a more focused exposure in your own country e.g. UK .it is possible to create a new GEO Zone as UK (United Kingdom) especially for the purposes of setting a new Tax or Service Charge like VAT that will be unique to that zone and not seen to any other (World Zone) customers. You may want to ask the help of a webmaster to assist you with this. For more information, please see Setting up a Tax for a specific Country. User Manual Jan-13 Page 78 of total 108 Pages User Manual Tax Classes – Adding a new Tax Class In most countries a Sales Tax is applied to the sale of a product or a service. These Tax “Classes” are called “Sales and Use” Tax in the United States, “Value Added Tax” (VAT) in the European Community and “Goods & Service Tax” (GST) in several other Countries. To create a new Tax Class, click Admin>Payment>Tax>Classes Click the NEW TAX CLASS tab. Edit the Tax Class Title field with the TAX abbreviation and add a short Description. Click SAVE to save your settings. Save User Manual Jan-13 Page 79 of total 108 Pages User Manual Tax – Adding a new Tax Rate A Tax is calculated in % of the total ticket price(total). Set this % Tax rate in Admin>Payment>Tax>Tax Rates Click the NEW TAX RATE. Click to open New Tax Rates tab. Make a selection from the pull down to set the Tax Title. Select a GEO Zone and set a Tax Rate (%). Click SAVE to save your settings. Save To enable click the GREEN/RED status bullet. To change the listing sequence, click the arrow up/down. To edit or to delete a Tax Rate, click the Tax Rate tab and click the Edit or Delete icon. IMPORTANT! Adding a new Tax Class will create a Tax Class ID in the database. The ID can be found in the „tax_class‟ table as the “Value Added Tax” eg. The class that was just set up. At this moment there is no setting for this and to proceed you may want to ask help of a webmaster to assist you with this as linking A Tax, Service or Booking Fee to products and to the correct GEO zone is usually managed at your phpMyAdmin. See Setting up Service Charge or Booking Fee. User Manual Jan-13 Page 80 of total 108 Pages User Manual Setting up a Service or Booking fee osConcert also allows setting up a specific Booking Fee (in % of order total) that is based on charging a Tax. The Booking fee will be charged to your customers additionally to the order total amount. IMPORTANT! Adding a new Tax Class that be used to create a Booking Fee will create a Tax Class ID in the database. The ID can be found in the „tax_class‟ table that will be created after you created the new Booking Fee Class. At this moment there is no setting for this and you may want to ask help of a webmaster to assist you with this as linking A Tax, Service or Booking Fee to products and to the correct GEO zone is usually managed at your phpMyAdmin. See Setting up Service Charge or Booking Fee. User Manual Jan-13 Page 81 of total 108 Pages User Manual Tax – Amount/Display Settings On the Admin>Payment>Tax main-page the following Tax Amount/Display Settings can be set up; Tax Decimal Places To “pad” the Tax value with a decimal value, click Admin>Payment>Tax>Tax Decimal Places. Default=0 Display Prices with Tax The order price can be displayed included in the ticket price or state the Tax separately at the confirmation page. Admin>Payment>Tax>Display Prices with Tax. TRUE= display ticket price with the Tax included. FALSE= tax will be stated separately at the end. Default= FALSE. User Manual Jan-13 Page 82 of total 108 Pages User Manual Order-Totals Module By default osConcert is set up to show „Order Totals‟ without displaying any Tax, Service Charge or Booking-Fee at the confirmation page at the front-end. IMPORTANT! To display a (new) Tax, Service Charge or Booking Fee, ENSURE that (all) products have gotten a tax-ID in the product and tax database as explained in Tax-GEO zones. In order to display the (new) Tax (or Service charge) at the confirmation page at the front-end, the (new) Tax (or Service Charge) needs to be Installed and Enabled in the „Order Totals-Module‟. Admin>Payment Modules>Advanced>Order Totals The new Tax or Service Charge will be listed in the UNINSTALLED Modules. Double Click on the Tax or Service Charge module and click the INSTALL button. After installation, the new module will now list in the INSTALLED Modules and display at the front-end. Edit Tax Module at Front End User Manual Jan-13 Page 83 of total 108 Pages User Manual Deleting a Tax or Service Charge Although it is possible to delete (uninstall) a Tax or Service Charge Module by clicking the trash icon, we recommend just to HIDE a Tax or Service Charge module at front end and preserve the settings. To do so, double click to expand the installed Module tab, click EDIT and change the TRUE status to FALSE. User Manual Jan-13 Page 84 of total 108 Pages User Manual Tickets osConcert comes standard with a printable PDF ticket, the “Events Customer Ticket”. If you don‟t want the option for customers to view and print PDF E-Tickets. Disable the option in: Admin>Shop Settings>Advanced>osConcert Settings>Disable E-Tickets NOTE that editing the Event Customer Ticket template is limited. Admin>Payment >Payment Gateways>Tickets or via Ticket in the Quick Links Menu (left side). User Manual Jan-13 Page 85 of total 108 Pages User Manual Standard osConcert e-ticket, with standard placeholders (=words/text that osConcert is using and referring to). 1x e-ticket over page width Enable/disable and sort %%Field%% codes at will 1-4x e-tickets/page Barcode-128 Background image -editable Event Conditions IMPORTANT! Ticket Background Image Use only the ticket.jpg field for your background image. Upload the image to /images folder. The ideal size is 465px x 206px to leave enough room for the bar code at the right hand side. Test E-tickets in Admin>Orders>Edit>Ticket Ticket Fonts Top Line is the Bigger Arial Font. Bottom Line is the smallest font (=Event Condition). Anything in between is midsized Arial font. That is all we have control of unless you take time to edit the hard coded files in the application. Ticket Placeholders For the placeholders we ignore the original Freeway placeholders in the content pane at the right and use the following to represent your concert details. %%Concert Name%% = Concert Heading Titles %%Concert Venue%% = Venue %%Concert Date%% = Date %%Concert Time%% = Time %%Discount Type%% = Type of discount added %%Coupon%% = If Coupon Discount used or not %%Concert Price%% = Price of ticket as number (may need hard coded currency symbol added) %%First_Name%% %%Last_Name%% %%Products Name%% = Seat Name and Number %%Ref ID%% = reference ID %%Prd ID%% = product ID %%Ticket ID%% %%Billing Name%% User Manual Jan-13 Page 86 of total 108 Pages User Manual Ticket Printing Customers should be informed that they need to set their (Adobe reader) printing options to allow „page handling‟ which will enable multiple tickets per page to be printed at once; Adobe reader; File/Print/Page Handling pull down, select “Multiple pages per sheet. Ticket – Clear from your server The PDF tickets generated by osConcert consist of 2 sections; #1. the PDF Event Ticket (PDF section) #2. the Ticket Bar PNG (Barcode section) From time to time you will need to clear out the PDF Event Tickets and Ticket Bar PNG as they are generated in the /images folder and will use unnecessary web-space over time. Eg: ticket_bar_3-1-368.png eg: events_tickets__1242527996.pdf Use server date to help you delete unwanted files. User Manual Jan-13 Page 87 of total 108 Pages User Manual Bar-Coding Codereadr Codereadr is the integrated third party application within osConcert to collect read and validate bar-codes that are printed on your osConcert e-Ticket. To do so you will need to get and activate here the Codereadr API. An API or Application Programming Interface is a specification intended to be used as an interface by software components to communicate with each other. With the default Codereadr settings you are able to use osConcert and print e-tickets. osConcert is recommending Codereadr software if you decide scanning and upload (scanned) the barcodes that are printed on your e-Tickets either ONLINE or OFFLINE. For more HELP, check the About Codereadr integration document in Admin>Shop settings. You may want to ask help of a webmaster to assist you. Admin>Payments>Codereadr Codereadr API Active Default=False. Only True if you registered and have received the Codereadr API. For more info; http://codereadr.com/ Codereadr API Ticket logo URL for your Codereadr Tickets logo. Codereadr API Key Your API key assigned by Codereadr. Codereadr Barcode Size Select here the bar-code size for the Codereadr barcode 3= small (=Default, do not change) 2=medium 1= large NOTE: This is NOT the size of the barcode printed on your E-tickets but the size of the barcode Codereadr software displays on your scanner device in the event you to scan then upload scanned barcodes. This function (among other options) requires a database and you will also need to register with Codereadr. Codereadr Invalid Ticket Text field for Codereadr invalid or unauthorized barcode (=on the scanning device at the moment of scanning the barcode). . User Manual Jan-13 Page 88 of total 108 Pages User Manual Codereadr Not Released Text field of Codereadr message when payment is not yet confirmed (=reply on scanning device at moment of scanning the barcode on the PDF E-ticket). Cine Style Images Presently ONLY IN osConcert CINEMA. Select Yes or No. Default= NO. User Manual Jan-13 Page 89 of total 108 Pages User Manual 7. Concert Details In osConcert THE dedicated place to set up, edit and reset loaded shows (visual seat plans) is in “Concert Details”. In “Concert Details” each available loaded show will be listed and new shows can be set up or re-priced –even in hurry! Admin>Concert Details At the preview pane of the console it is possible to change the SHOWS display STATUS (green/red) by clicking the GREEN bullet in the “active” column User Manual Jan-13 Page 90 of total 108 Pages User Manual Edit a SHOW In Admin>Concert Details simply highlight and double click on of the text fields to expand and open the entire row for editing. Save ID Type here an ID (eg. A note) as a quick identifier at the back end. Can be text field, HTML or left mpty. Active Tick-box to set Show ACTIVE. Green status bullet=Show is Live! Red status bullet=Show is hidden from the front end but visible in the Menu Name Type a NAME of the Show at the back-end (console). Text field, no limit. Can NOT be left empty. Type a HEADING text to be shown at the front-end. Text field, no limit. Can NOT be left empty. NOTE: that HEADING will be used on page category headings and will also be used on final e-ticket. Type a short DESCRIPTION here. Text field or HTML. Can be left empty but Venue, Date, Time and Description can also provide more detail whenever a visitor views a seat plan. See below example of front-end. Heading Description Venue Type VENUE details here. Can be left empty but Venue, Date, Time and Description can also provide more detail whenever a visitor views a seat plan. See below example of frontend. Time Type the TIME of the show. Text field, no limit. Can be left empty but Venue, Date, Time and Description can also provide more detail whenever a visitor views a seat plan. See below example of front-end. Date ID IMPORTANT! The DATE ID is V E R Y I M P O R T AN T and should be edited for each new event and must be unique! Eg. If you have a show for a certain date then make the DATE ID a short text to identify that show from the rest, Eg. FRI-NOV-21st.-NO SPACES please. =Heading =Venue - Date –Time =Description =Name User Manual Jan-13 Page 91 of total 108 Pages User Manual Edit Prices of a complete show/category IMPORTANT! Ensure the unique DATE-ID is set-up FIRST! If no DATE-ID is set up first, it will not be possible to edit prices of a complete show/category. To edit or to set up prices for a Show or Category, click on the small blue arrow on the left to open up and edit the prices section. Ensure the DATE-ID is set up first! You will see your price banding listed with some information about total seats for the color-band and how many seats are sold. Double click to open a price text field. IMPORTANT! Press ENTER on your keyboard to SAVE the new values. To close the editing mode, click again on the small blue arrow on the left. How to arrange SHOWs in a sort order for the Front End menu. Simply drag and drop a row to arrange a sort order for the Front End main menu. User Manual Jan-13 Page 92 of total 108 Pages User Manual How to reset after the show has ended After a test or at the end of a listed show, a show can be RESET. To reset a show, click the dustbin icon at the very last column of the show. After clicking the “reset” button, all reserved (sold) seats will be set to available again. DEVELOPERS: Use this SQL query in phpMyAdmin to quickly clear all test orders and make the orders tables ready. TRUNCATE TABLE orders; TRUNCATE TABLE orders_products; TRUNCATE TABLE orders_status_history; TRUNCATE TABLE orders_total; TRUNCATE TABLE orders_products_attributes; TRUNCATE TABLE payment_response; User Manual Jan-13 Page 93 of total 108 Pages User Manual 8. Home Page Edit (CMS) By default, on the HOME page (Front End) of osConcert, a “Cartzone Proudly Presents” welcome image (mainpage.php) is displayed. You may want to change the text and the image with your own in Admin>CMS>Homepage On the Admin>CMS>Homepage, click the EDIT button. Then edit the text in the WYSIWYG editor. DEVELOPERS: The Homepage can be edited directly; templates/cartzone/content/english/mainpage.php Image for Home page; Create a jpg file of 500px W (x no limit, the Cartzone image is156pt H) named banner.jpg. Then overwrite the above Cartzone “banner.jpg” image with your own image in www.cartzone.co.uk/banner.jpg where “cartzone.co.uk” is the name of your own ticketing configuration on your server. User Manual Jan-13 Page 94 of total 108 Pages User Manual 9. Static Pages (CMS) Static pages are pages that are delivered to a user exactly as they are stored. Static pages in osConcert are the “Ticket Delivery”, “Privacy Notice”, “Conditions of Use” and ”About us”. In osConcert the Static Pages are stored in the CMS section (Content Management System). Either switch OFF or EDIT the default complimentary‟ Cartzone text‟ and replace all „osConcert‟ references with your own shop-name or write your own in Admin>CMS>Static Pages On the preview pane of the Ticket Delivery Static Page it is possible to change the display STATUS (green/red) by clicking the GREEN bullet. The listing of the Static Pages is set by default by osConcert but the listing sequence of the Static Pages on the Front End can be changed by clicking the small blue UP or DOWN buttons next to the green status bullet. User Manual Jan-13 Page 95 of total 108 Pages User Manual Ticket Delivery On the Ticket Delivery you write, for example “Refund” information or the “Right to cancel a show without prior notice”. Click on the Ticket Delivery to expand. On the expanded tab, click EDIT Edit Save Use the WYSIWYG editor to edit PAGE NAME and type Your Ticket Delivery Article here. Click SAVE to save your Static Page text. At the Front-End , the Ticket Delivery Static Page button will show on the left side Menu, under the Show-listings; User Manual Jan-13 Page 96 of total 108 Pages User Manual Privacy Notice In the Privacy Notice there is information about the scope of the website, text about Information Collection and the use this information. Admin>CMS>Privacy Notice Edit Either switch OFF or EDIT the default complimentary „Cartzone text‟ and replace ALL „osConcert‟ references with your own shop-name or write your own! Click EDIT to enter the WYSIWYG editor. If you require, an additional subpage can be added in the Level2. Save At the Front-End, the Privacy Notice (and other Static Pages such as Conditions of Use and About us) are normally listed in the right hand bottom corner. User Manual Jan-13 Page 97 of total 108 Pages User Manual Terms of Service Terms of service (abbreviated as ToS or TOS) are terms to by which one must agree to abide by or sets the “rules” governing the use of the web site. Either switch OFF or EDIT the default complimentary „Cartzone text‟ and replace ALL „osConcert‟ references with your own shop-name or write your own! To edit the text of the Terms of Service Static Pages, please follow above steps. Admin>CMS>Static Pages About us To edit the text of the About Us Static Pages, please follow above steps. Admin>CMS>Static Pages User Manual Jan-13 Page 98 of total 108 Pages User Manual 10. Admin User Groups Admin User Groups The Admin User Groups allow you to manage the osConcert software. In the Admin User Group you can add and delete Admin Groups, Member accounts and change their system access permissions. Admin>Shop Settings>Admin User groups Adding Admin User Member Osconcert has pre-loaded Admin User Groups, for example Instructor, Call Centre Manager and Reservation Manager. The access rights for each of these specific group are set to default but can be changed at will. Each Group can be populated with (new) group members. It is not required that these Admin users are first registered to the osConcert Front-end (as customers). Select the group to add a new member to and expand the tab. Save Click NEW MEMBER. Fill out the credentials of the new Call Centre Staff member. Click the Save button. User Manual Jan-13 Page 99 of total 108 Pages User Manual Edit (delete/move) To assign a password for the new member that can be changed later at will, RE-OPEN the tab by clicking the EDIT button. Save l Assign a password and click the SAVE button. After the new member credentials are saved, osConcert will send an automatic confirmation email to the new (group)member. See also template editing: Admin>Marketing>General>“User Creation (template)” User Manual Jan-13 Page 100 of total 108 Pages User Manual Move Member to other Admin group To move a saved Admin user group-member to another group, click the MOVE Move Save To complete the move, from the pull-out menu, select the new Group you want this member to move to and click the SAVE button. User Manual Jan-13 Page 101 of total 108 Pages User Manual Edit Admin Group Access/Rights Of each Admin Group specific access/rights can be configured. Admin>Shop Settings>Admin User Groups>New Permissions, then jump to Admin Group via pull down menu. User Manual Jan-13 Page 102 of total 108 Pages User Manual Save Of each Admin group, the following sections and osConcert menu options can be (un)ticked; Customer >> Orders Cms >> Faq Cms >> Level Cms >> News OsConcert Customer Checkout Customer Create Customer >> Edit >> Orders Customer >> Wallet Marketing >> Affiliate Marketing >> Services Marketing >> Subscription Marketing >> Survey Payments Products Reports >> Sales Reports >> Products Report >> Services Report >> Services >> Surveys Reports >> Subscription Sales >> Coupons Services Subscription Ensure to SAVE the Admin Group access rights settings. User Manual Jan-13 Page 103 of total 108 Pages User Manual Create New Admin Group If, for whatever reason a complete new Admin User Group needs to be created, click the NEW GROUP option. Type new Admin Group Name and click the SAVE button. Save Via the Pull down menu, select the new group via Admin>Shop Settings>Admin User Groups>New Permissions To grant Web Developer(s) access to the various osConcert sections, tick the respective options and click SAVE. Save To add a new member to the new group, see Adding Admin User Members. User Manual Jan-13 Page 104 of total 108 Pages User Manual 11. Additional Notes: To get the most out osConcert, please note the following additional notes; Installation Folder Ensure the osConcert installation folder on your server is REMOVED after you have your site up and running. My Account (Admin) Cartzone is encouraging all Administrators to strengthen the Admin password in Admin>My Account. The Admin Account is accessible from all menus and sections in osConcert; User Manual Jan-13 Page 105 of total 108 Pages User Manual Amount Rounding Factor To round of amounts used in the Order Total Module to a pre-defined factor, edit the settings in Admin>Payments>Advanced>Order Totals User Manual Jan-13 Page 106 of total 108 Pages User Manual 12. More resources: You can find more HELP and requesting support for specific questions and tasks by using one of the following; Check the HELP documents in Admin>Help Manuals Log in to www.osconcert/support Email us your questions or comments; osConcert Support User Manual Jan-13 Page 107 of total 108 Pages