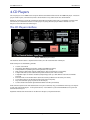
1
DJ-1800 version 3.2
User Manual
DJ-1800
User Manual
For DJ-1800 version 3.2 – August 2008
© Dave Addey – http://www.dj1800.com/
Page 1 of 62
DJ-1800 version 3.2
User Manual
Contents
1. Introduction ........................................................................................................................5
What is DJ-1800?......................................................................................................................... 5 Benefits ...................................................................................................................................... 5 Features...................................................................................................................................... 5 Professional music control................................................................................................................................................................... 5
Full software mixer................................................................................................................................................................................. 5
Features (continued) ................................................................................................................... 6 Multiple outputs and modes ............................................................................................................................................................ 6
Library management ........................................................................................................................................................................... 6
2. System Requirements .........................................................................................................7
A note about System Requirements for Pitch Lock .................................................................................................................. 7
3. Working with the Rack .......................................................................................................8
Maximising, minimising and hiding Rack Devices ......................................................................... 8 Minimising a device .............................................................................................................................................................................. 9
Maximising a device ............................................................................................................................................................................. 9
Hiding a device....................................................................................................................................................................................... 9
The “View” menu ................................................................................................................................................................................... 9
Keyboard focus when using the Rack .......................................................................................... 10 Resizing the Rack window ......................................................................................................... 10 Full Screen mode....................................................................................................................... 10 4. CD Players ......................................................................................................................... 11
The CD Player interface .............................................................................................................. 11 Track selection .......................................................................................................................... 12 Track Number........................................................................................................................................................................................12
Current Track indicator ......................................................................................................................................................................12
Previous / Next Track ..........................................................................................................................................................................13
Playing and Cueing tracks.......................................................................................................... 13 Cue and Play / Pause..........................................................................................................................................................................13
Setting new Cue points.....................................................................................................................................................................14
Finding a position in a track....................................................................................................... 15 Track scan ................................................................................................................................................................................................15
Track search via Jog Wheel ..............................................................................................................................................................15
Track Position bar ..................................................................................................................... 16 Changing a track’s tempo .......................................................................................................... 17 Tempo Shift ............................................................................................................................................................................................17
Pitch Lock .................................................................................................................................................................................................18
Tempo Bend ...........................................................................................................................................................................................19
Track Play modes....................................................................................................................... 20 Time Display ............................................................................................................................. 21 Time Display mode..............................................................................................................................................................................21
Set default StartPoint..........................................................................................................................................................................21
5. The Library ....................................................................................................................... 22
The Library Interface.................................................................................................................. 22 The Sources list ......................................................................................................................... 23 Updating Sources ................................................................................................................................................................................24
The Find field ............................................................................................................................ 27 How the Find filter works ..................................................................................................................................................................27
Clearing the Find field .......................................................................................................................................................................27
The Tracks list ............................................................................................................................ 28 Sorting the Tracks list..........................................................................................................................................................................28
Adding and removing columns in the Tracks list...................................................................................................................28
Re-ordering columns in the Tracks list.........................................................................................................................................28
Re-sizing columns in the Tracks list...............................................................................................................................................28
The difference between Libraries and Playlists.......................................................................................................................29
Protected Files and the Protection Type icons..........................................................................................................................30
Selecting tracks in the Tracks list....................................................................................................................................................31
Loading tracks into CD Players from the Tracks list................................................................................................................31
6. The Mixer and Crossfader ............................................................................................... 33
The Mixer and Crossfader interface ............................................................................................. 33 Headphones (“Phones”) Volume twister ..................................................................................... 34 Page 2 of 62
DJ-1800 version 3.2
User Manual
Channel controls....................................................................................................................... 34 Cue button .............................................................................................................................................................................................34
Volume fader .........................................................................................................................................................................................34
Gain twister .............................................................................................................................................................................................35
Cue Level VU display ..........................................................................................................................................................................35
Hi, Mid and Low twisters ...................................................................................................................................................................36
Crossfader controls ................................................................................................................... 37 Crossfade Assign buttons ................................................................................................................................................................37
Crossfader slider ...................................................................................................................................................................................37
Master Out Level controls .......................................................................................................... 38 Master Volume fader ..........................................................................................................................................................................38
Master Out VU Level meter ..............................................................................................................................................................38
7. StartPoints, AutoGain and BPM...................................................................................... 39
StartPoints ............................................................................................................................... 39 StartPoint Preferences ........................................................................................................................................................................39
AutoGain .................................................................................................................................. 40 AutoGain Preferences.........................................................................................................................................................................40
BPM.......................................................................................................................................... 41 BPM Preferences ...................................................................................................................................................................................41
Saving values to iTunes / iPods ................................................................................................... 42 Preferences for saving values to iTunes / iPods.......................................................................................................................42
8. Output Modes + Output Preferences............................................................................. 46
Multiple output devices............................................................................................................. 46 Which output mode should I use? .............................................................................................. 47 Mode 1 – Mono + Mixer .............................................................................................................. 48 What is the “Mono + Mixer” mode?..............................................................................................................................................48
When would I use this mode?.........................................................................................................................................................48
What are the benefits of this mode? ............................................................................................................................................48
What are the limitations of this mode? ........................................................................................................................................48
Setting the preferences for this mode.........................................................................................................................................48
Mode 2 – Mono Thru .................................................................................................................. 49 What is the “Mono Thru” mode? ...................................................................................................................................................49
When would I use this mode?.........................................................................................................................................................49
What are the benefits of this mode? ............................................................................................................................................49
What are the limitations of this mode? ........................................................................................................................................49
Setting the preferences for this mode.........................................................................................................................................49
Mode 3 – Dual + Mixer ................................................................................................................ 50 What is the “Dual + Mixer” mode?................................................................................................................................................50
When would I use this mode?.........................................................................................................................................................50
What are the benefits of this mode? ............................................................................................................................................50
What are the limitations of this mode? ........................................................................................................................................50
Setting the preferences for this mode.........................................................................................................................................50
Mode 4 – Multi Thru ................................................................................................................... 51 What is the “Multi Thru” mode?.....................................................................................................................................................51
When would I use this mode?.........................................................................................................................................................51
What are the benefits of this mode? ............................................................................................................................................51
What are the limitations of this mode? ........................................................................................................................................51
Setting the preferences for this mode.........................................................................................................................................51
9. Keyboard Control ............................................................................................................ 52
Defining your own keyboard controls for DJ-1800 ...................................................................... 52 Keyboard layouts ...................................................................................................................... 53 Standard Mac keyboard layout .....................................................................................................................................................53
DJ-1800 shortcuts with mixer enabled (modes 1 and 3) .....................................................................................................53
DJ-1800 shortcuts with mixer disabled (modes 2 and 4) ....................................................................................................53
Keyboard shortcuts ................................................................................................................... 54 Fader multipliers...................................................................................................................................................................................54
Rack window shortcuts ......................................................................................................................................................................55
Track position shortcuts.....................................................................................................................................................................55
Play / Pause and Cue shortcuts......................................................................................................................................................56
Select CD Player shortcuts ................................................................................................................................................................56
Pitch control shortcuts ........................................................................................................................................................................57
Channel Volume and Master / Phones Volume shortcuts..................................................................................................58
Channel Gain and EQ shortcuts ....................................................................................................................................................59
Crossfader control shortcuts ............................................................................................................................................................60
Page 3 of 62
DJ-1800 version 3.2
User Manual
10. Controller Plug-Ins ........................................................................................................ 61
About Controller Plug-Ins ......................................................................................................... 61 Downloading new Controller Plug-Ins ....................................................................................... 61 Installing Controller Plug-Ins..................................................................................................... 61 Installing a Controller Plug-In for all users on a Mac ..............................................................................................................61
Installing a Controller Plug-In for just one user on a Mac ....................................................................................................61
Viewing the installed Controller Plug-Ins...................................................................................................................................62
Controller Plug-In search order.......................................................................................................................................................62
Creating your own Controller Plug-Ins ....................................................................................... 62 Page 4 of 62
DJ-1800 version 3.2
User Manual
1. Introduction
What is DJ-1800?
DJ-1800 is an Apple Mac application that emulates the Denon DN-1800F professional CD Player system used
by many DJs and radio stations. It allows you to play any QuickTime audio files (including MP3 and AAC files)
via a professional DJ-standard CD player interface, with cue, positional searching, and pitch lock and bend. It
includes a fully featured software mixer with Master and Cue out, and plays music from your existing iTunes
and iPod music libraries, including music purchased from the iTunes Store.
Benefits
A complete, self-contained professional DJ system – all you need is some amplification
No need for a mixer, CD players or record decks
No need to carry your music collection around in hefty boxes
Features
Professional music control
4 professional-quality CD players emulated
Play / Pause
Cue with custom cue point setting
Position bar to jump to any point in a track
Pitch Lock to fix a track’s pitch whilst adjusting tempo by up to +/- 10%
Pitch Bend +/- 32%
Track scan up to +/- 8x speed
Track search jog dial with stutter for precise position finding
Auto-find track start point *
Auto-find track gain levels *
Auto-calculate BPM *
Multiple time display modes
Multiple play modes (single / continuous / loop / next)
Dual keyboard and mouse control
Support for a wide range of hardware controllers via a documented Plug-In API
(* StartPoint, AutoGain and BPM calculation are not available for Protected music files purchased from the iTunes Store)
Full software mixer
4-channel software mixer with crossfader
Multichannel Crossfader assign
Hi / Mid / Low EQ per channel, with a user-definable range of up to -20 dB / +12 dB *
Output Gain control per channel
Master out volume
Cue level volume
Stereo Master output level monitoring
Per-channel Cue level monitoring for precise level balancing
Dual keyboard and mouse control
(* Mid EQ is not available for Protected music files purchased from the iTunes Store. The EQ range for Protected music files is -4 dB to +4 dB.)
Page 5 of 62
DJ-1800 version 3.2
User Manual
Features (continued)
Multiple outputs and modes
Support for multiple sound devices
Support for multi-channel output devices
Four output modes:
o Mono multichannel emulation for Master / Cue with no extra hardware
o Mono multichannel emulation passthru for use with external mixer with no extra hardware
o Dual output Master / Cue with internal mixer for full stereo DJ environment
o Multiple output stereo pass-thru for use with external mixer and multiple outputs
Library management
Your iTunes and iPod libraries and playlists are right there on the DJ-1800 interface, and update
whenever they change in iTunes
Drag and drop tracks from your libraries onto DJ-1800’s CD Players
Import any QuickTime-supported audio file format (MP3, AAC, WAV, AIFF…)
Support for tracks purchased from the iTunes Music Store *
StartPoints, AutoGain and BPM values can be saved to your iTunes / iPod libraries
(* Protected Music Videos and Protected Movies from the iTunes Store cannot be played by DJ-1800)
Page 6 of 62
DJ-1800 version 3.2
User Manual
2. System Requirements
DJ-1800 v3.1 requires the following minimum system configuration:
Mac OS X 10.4.9 or later
QuickTime 7.3 or later
Without using Pitch Lock:
o 1GHz G4, G5 or Intel processor with 512MB of RAM
Using Pitch Lock:
o 1.5GHz G5 with at least 1GB RAM, or
o 1.5GHz Intel Core Duo processor with at least 512MB RAM
A monitor capable of 1024x768 resolution
iTunes 6
A note about System Requirements for Pitch Lock
DJ-1800 v3.0 introduced a new Pitch Lock feature. Pitch Lock dynamically resamples your audio tracks to play
the audio faster or slower without a noticeable change in pitch.
Pitch Lock is a processor-intensive feature, and as such DJ-1800 offers several different quality levels for Pitch
Lock. The default setting is to offer a Pitch Lock quality of Medium, which uses a spectral algorithm to
dynamically modify the pitch. If you find that your computer is struggling to play multiple tracks at Medium
quality, then we would recommend trying Low quality instead, which uses a less intensive time-domain
algorithm. If this is still too high a load, then you can turn off Pitch Lock altogether to reduce processor load. As
a general rule, if you are experiencing distortion or audio dropouts when playing audio in DJ-1800, it is highly
likely that this is caused by your Pitch Lock settings. Try lowering the Pitch Lock quality, or turning off Pitch
Lock.
You may also find that using an external hardware mixer with DJ-1800 (in either the “Mono Thru” or “Multi
Thru” output modes) will help to reduce the CPU load of Pitch Lock, compared to using DJ-1800’s internal mixer
(in either the “Mono + Mixer” or “Dual + Mixer” modes). This is because using DJ-1800’s internal mixer requires
DJ-1800 to play two copies of the audio (one for the master output, and one for the headphones output),
whereas using an external hardware mixer only requires DJ-1800 to play one copy of the audio.
With so many different hardware configurations and system specifications available, it is very difficult to make a
guaranteed recommendation as to what system requirements are needed for a particular Pitch Lock quality
setting. We would always recommend that you download the demo of DJ-1800 v3.1 and try it with your own
hardware configuration before registering. The demo of DJ-1800 is fully-featured, and the only difference
between the demo and the registered version is a 30-minute demo timeout per launch. As a result, the audio
performance you experience with the demo is the same as you will experience once registered.
Page 7 of 62
DJ-1800 version 3.2
User Manual
3. Working with the Rack
The main DJ-1800 window, which contains the CD Players and mixer described above, is known as the “Rack”,
as it represents a typical rack-mount. DJ-1800 provides several options for modifying and displaying the Rack
on-screen.
The DJ-1800 Rack interface
Maximising, minimising and hiding Rack Devices
The Rack is made up of five Rack Devices – from top to bottom:
CD Players 1 + 2
The Library
CD Players 3 + 4 (shown minimised in the picture above)
Internal Mixer (in Output Modes 1 and 3 only)
Crossfader (in Output Modes 1 and 3 only)
Each of these devices can be minimised to save on screen space, or completely hidden if required.
Page 8 of 62
DJ-1800 version 3.2
User Manual
Minimising a device
To minimise a Rack Device, click on its “minimise” icon in the top left of the device.
The “minimise” icon
The device’s height will reduce, and the Rack window will shrink to fit the current device view. In the case of the
CD Player devices, a reduced CD Player control set will be visible:
When a CD Player is minimised, all of its keyboard shortcuts will still function.
Maximising a device
To maximise a minimised Rack Device, click on its “maximise” icon.
The “maximise” icon
The device’s height will return to full size, and the Rack window will grow accordingly.
Hiding a device
Each of the Rack Devices can be hidden. To hide a Rack Device, click on its “hide” icon in the top right of the
device.
The “hide” icon
A CD Player cannot be hidden whilst it is playing a track. Once a CD Player is hidden, its keyboard shortcuts will
not be operational until it is made visible again. You cannot hide both pairs of CD Players at the same time.
When the Mixer is hidden, it will continue to mix with its current settings. Its keyboard shortcuts will continue to
work, even though the Mixer is not visible.
When the Crossfader is hidden, it ceases to have an effect on the output. Instead, the four CD Players will
output directly to the master out at their current mixer volume levels. The Crossfader will start to have an effect
as soon as it is made visible.
The maximised / minimised / hidden state of Rack Devices is saved when you quit DJ-1800. So, if (for example)
you want to only work with 2 CD Players, you can hide players 3 + 4, and this setting will be saved for future
use.
The “View” menu
The View menu is used to show hidden devices, or as an alternative method of hiding and minimising devices.
Select a Rack Device from the View menu in order to toggle its show / hide or minimised status.
If you are using the “Mono Thru” output mode or the “Multi Thru” output mode, then the Mixer and the
Crossfader will be greyed out in the View menu, and will not be visible on screen. These output modes do not
use the Mixer or Crossfader. For more information on output modes, see chapter 8.
Page 9 of 62
DJ-1800 version 3.2
User Manual
Keyboard focus when using the Rack
DJ-1800 uses a dual keyboard focus when working with the Rack. This enables full keyboard control of the CD
Players and Mixer / Crossfader, whilst also enabling the keyboard to be used to scroll through Sources and
Tracks, and to enter search text in the Library’s Find field.
At any time, one of the four CD Players is the “current” CD Player. This is indicated by a focus ring around the
edge of the CD Player. The current CD Player will receive all key presses from the keyboard, with the following
exceptions:
If you switch to the Sources list (via the Library menu, or via the Command-S keyboard shortcut, or by
clicking in the Sources list), then the up and down arrow keys will scroll up and down through the
Sources list.
If you switch to the Tracks list (via the Library menu, or via the Command-L keyboard shortcut, or by
clicking in the Tracks list), then the up and down arrow keys will scroll up and down through the
Tracks list
If you switch to the Find field (via the Library menu, or via the Command-F keyboard shortcut, or by
clicking in the Find field), then all key presses from the keyboard will be handled by the Find field, to
enable you to enter search keywords in the Find field
In each of the three cases listed above, the current CD Player’s focus ring will change to grey rather than bright
blue. This is to indicate that a control other than the CD Player has some or all of the keyboard focus.
Whenever you switch to the Sources list, Tracks list or Find field, pressing the Tab key will return the entire
keyboard focus back to the current CD Player. The focus ring around the CD Player will turn bright blue rather
than grey to indicate that the CD Player has regained the full keyboard focus. Alternatively, you can select
“Switch to Current CD Player” from the Library menu, or press Command-P.
Resizing the Rack window
The Rack window can be resized horizontally and vertically. To resize the Rack window, click on the “Rack
Resize” icon in the bottom right-hand corner of the window, and drag the icon until the window is the preferred
size. The minimum allowed width of the window is 1024 pixels.
The “Rack Resize” icon
To make the Rack window fill the entire screen, click on the green “Maximize” icon in the top left-hand corner of
the window. Click the “Maximize” icon again to return to the previous window size.
The “Rack Maximize” icon
Full Screen mode
Press the “Escape” key on your keyboard to enter or exit Full Screen mode, or select “Full Screen” from the
“View” menu.
The Mac OS X menu bar is not displayed in Full Screen mode, but you can still access the menu bar using the
menu keyboard shortcuts. Press “Escape” to exit Full Screen mode at any time.
If your Mac has more than one screen attached, DJ-1800 will use the screen that contains the most of the Rack
window when switching to Full Screen mode.
Page 10 of 62
DJ-1800 version 3.2
User Manual
4. CD Players
The “CD players” in DJ-1800 are based upon software emulations of the Denon DJ-1800F CD player. These CD
players come in pairs, rack-mounted, with a control interface very similar to the one shown below.
Of course, we won’t be using this interface to control the playback of actual CDs, as audio files are much more
convenient (and most Macs don’t have 4 CD players anyway). But the players will be referred to as “CD
Players” because of their real-world origins.
The CD Player interface
The DJ-1800 CD player interface
The interface shown above is duplicated four times, once for each of the four CD Players.
Each CD Player has the following controls:
Search / Scan wheel
Play Mode, Time Mode, Track, Time, Tempo and BPM LCD display
Track position bar (showing the current position in the track)
Pitch Lock on / off button (toggles pitch lock on / off, as indicated by a green LED)
Tempo Shift slider (sets the current tempo shift amount, from –10% to +10%)
Tempo Bend plus and minus buttons (temporarily speed up / slow down the current track whilst
pressed)
Previous Track / Next Track buttons (move the CD Player forward and back by one track)
Cue button (returns the CD Player to the most recent cue point)
Play / Pause button (plays or pauses the CD Player)
Current Track indicator box (positioned below the CD Player interface)
Each control is explained in more detail below. To try these controls, drag a track from the Library (see chapter
5) and drop it onto CD Player 1. In the picture above, “Leave Home” by the Chemical Brothers has just been
loaded into CD Player 1.
Keyboard shortcuts for all controls can be found in chapter 9, “Keyboard Control”.
Page 11 of 62
DJ-1800 version 3.2
User Manual
Track selection
Track Number
The Track Number display
The track number of the current track is displayed in the LCD panel of the CD Player. The total number of
tracks loaded into the CD Player is also displayed. In the example above, track 1 of 1 is currently selected.
Clicking on the track number will display a pop-up menu listing all currently loaded tracks for this CD Player,
together with their track number and artist. Select any track from this menu to jump straight to that track.
Current Track indicator
The Current Track indicator
The Current Track indicator (at the bottom of each CD Player) displays the track number, artist and title of the
currently loaded track. Click anywhere on the Current Track indicator to display a pop-up menu listing all
currently loaded tracks for this CD Player, together with their track number and artist. Select any track from this
menu to jump straight to that track.
If no track is loaded, the Current Track indicator displays “No track loaded”.
Page 12 of 62
DJ-1800 version 3.2
User Manual
Previous / Next Track
The Previous / Next Track buttons
If the CD Player is currently paused or cued, and the current track position is before or equal to the StartPoint of
the track, clicking on the “Previous Track” button will move the CD Player backwards by one track.
If the CD Player is currently paused or cued, and the current track position is after the StartPoint of the track,
then clicking on the “Previous Track” button will move the CD Player back to the StartPoint of the current track.
Clicking again will move the CD Player back to the very beginning of the track (0:00.00 seconds).
The same is true in both cases if the CD Player is playing a track when you click on “Previous Track”, except that
the CD Player will continue to play.
Clicking on the “Next Track” button will always move the CD Player to the start of the next loaded track. The CD
Player will continue to play if it was already playing.
Playing and Cueing tracks
DJ-1800 uses the same cueing methods as the Denon DJ-1800F it emulates. These are described in detail
below.
Cue and Play / Pause
The Cue and Play/Pause controls
When you load one or more tracks into a CD Player, the CD Player will set itself to be cued to the StartPoint of the
first loaded track. To start the track playing, click on the “Play / Pause” button. All being well, you should hear
the track. (If not, check your Output Preferences – see chapter 8, “Output Modes + Output Preferences”.)
If a StartPoint has been calculated or loaded for a track, then this StartPoint is always used for the track (rather
than beginning playback at the very beginning of the track). This avoids playing blank space at the
beginning of a track, and saves you having to find the real start point of your tracks. If no StartPoint has been
calculated, the track will start from the very beginning of the file. (See chapter 7 for more information on
StartPoints.)
Whilst the track is playing, click on “Cue”. The CD Player will stop playing, and return to the beginning of the
track (or to the found StartPoint, as appropriate). Pressing “Play / Pause” will start it playing again.
When a track is cued, the red LED above the “Cue” button is illuminated. When a track is playing, the green
LED above the “Play / Pause” button is illuminated. When a track is paused, the green Play / Pause LED flashes.
Page 13 of 62
DJ-1800 version 3.2
User Manual
Setting new Cue points
DJ-1800 allows you to set your own cue points in tracks. Starting from the original Cue point, if you Play, Pause
and then Play again, the first Pause point will become the new Cue point for this track. You can use this fact to
pause the CD Player at roughly the location of your desired new Cue point, and then subsequently press Cue
to take you back to this point whilst the CD Player is playing.
Optionally, whilst the CD Player is paused, you can use the Jog Wheel to fine-tune the Cue position. See the
section below on “Track search via Jog Wheel” for more detail. Using the Jog Wheel also sets the Cue position.
This can be quite confusing! But once you get the hang of it, it’s a simple and powerful way to set cue points
for your tracks. The table below shows how cue points are set. Red text is used to indicate where pressing
“Cue” returns to.
Start
point
First
Action
Second
Action
Third
Action
Fourth
Action
Cued
Play
Cued
Play
Pause
Cued
Play
Pause
Play
Cued
Play
Pause
Play
Pause
Cued
Play
Pause
Play
Pause
Cued
Play
Pause
Jog
Wheel
Cued
Play
Pause
Jog
Wheel
Play
Cued
Play
Pause
Jog
Wheel
Play
Fifth
Action
Clicking “Cue” sets the
CD Player to be…
Cued at the initial Cue point
Cued at the initial Cue point
Cued at the first Pause point
Cued at the first Pause point
Play
Cued at the Second Pause point
Cued at the final Jog Wheel position
Cued at the final Jog Wheel position
Pause
Cued at the final Jog Wheel position
As can be seen from this table, “Pause” followed by “Play” sets the Cue point. Also, using the Jog Wheel sets
the Cue point.
Cue points are only stored whilst a track is active. For example, moving forward one track and then back again
will remove custom cue points for the track.
Page 14 of 62
DJ-1800 version 3.2
User Manual
Finding a position in a track
DJ-1800 provides two ways to locate a particular point in a track – Track Scan, and Track Search. Both of these
methods are based on the same control, shown below.
The Scan and Search control
Track scan
The outer wheel of this control is used to scan quickly forwards and backwards within a track. To use this
control, click on the outer wheel whilst a track is playing, and drag clockwise (to scan forwards) or anti-clockwise
(to scan backwards) through the currently loaded track.
The further you drag the outer wheel, the faster the current track will scan. The outer wheel steps through 2x,
3x, 4x, 5x, 6x and finally 8x speeds. (8x is positioned 120 degrees from the top of the wheel in either direction).
Once you have found roughly the point in the track that you require, release the mouse button to stop
scanning. The CD Player will continue playing at normal speed, and the outer wheel will ‘snap back’ to zero.
The outer wheel does not perform any action when the track is cued or paused, or when no track is loaded.
Track search via Jog Wheel
The inner wheel of this control (known as the ‘jog wheel’) is used to move backwards and forwards through a
track by small amounts, to fine-tune a cue position (for example, to find the point in a track where a quiet
introduction ends and a drum beat begins). To use this control, click anywhere on the indent in the inner
wheel, and drag clockwise (to search forwards) or anticlockwise (to search backwards) through the currently
loaded track.
Whilst you are searching through a track, the CD Player will ‘stutter’ a small section of the track (0.25 seconds) so
that you can hear where the current track point is in relation to changes in volume in the track. Move the jog
wheel until the required sound (e.g. a drum beat) is just audible at the very end of the stutter. Pressing “Cue”
will then cue the CD Player such that the very end of the stutter is the cue point (and stop the stuttering),
whereas pressing “Pause / Play” will start the CD Player playing from this same position. In either case, the final
stutter position will become the current cue point for the CD Player. (See the table above, under “Setting new
cue points”, for examples of this.)
If you are using DJ-1800’s internal mixer, please note that these ‘stutters’ will only be played through your
headphones for cueing, and not through the master output. In order to hear the ‘stutters’ in your
headphones, you may need to enable a particular CD Player for cueing in the Mixer. See chapter 6 for more
information on enabling headphone cueing for a particular CD Player.
Page 15 of 62
DJ-1800 version 3.2
User Manual
Track Position bar
The Track Position bar
The Track Position bar serves three purposes:
1)
2)
3)
It provides a visual indication as to how much of a track has been played
It allows you to scan through a track at high speed
It enables you to jump to a particular point in the track
To quickly scan at high speed, click on the Track Position bar’s position indicator, and drag the position indicator
left or right whilst keeping the mouse button held down. Once you have found the desired point in the track,
release the mouse button.
To jump straight to a particular point in a track, click to the left or to the right of the track position indicator. The
indicator will jump directly to that point, and if the track was already playing, playback will continue from the
new position.
Page 16 of 62
DJ-1800 version 3.2
User Manual
Changing a track’s tempo
DJ-1800 features two methods of tempo control, to assist with beat mixing and smooth transitions from one
track to the next. These methods are Tempo Shift, and Tempo Bend, as shown below. An additional option,
Pitch Lock, enables you to modify a track’s tempo without changing the track’s pitch.
The Pitch Lock, Tempo Bend and
Tempo Shift Slider controls
The Tempo Shift display and
BPM display
Tempo Shift
Tempo Shift is used to alter the speed of a track, in order to match its BPM to that of another track. DJ-1800
allows tempo shift of up to +/-10% of the track’s original tempo.
Tempo Shift Slider
The Tempo Shift Slider (on the right-hand side of the image above) is used to specify the Tempo Shift amount.
Click on the slider’s knob and drag down to increase (or drag up to decrease) the Tempo Shift amount. As you
do so, the Tempo Shift display (indicated by “Tempo %” in the CD Player’s LCD panel) will update to show the
new Tempo Shift amount.
Moving the Tempo Shift slider with the mouse will not always move the slider in exact 0.1% increments, due to
the resolution of the interface widget used. For accurate control over the pitch slider, we recommend using
keyboard control for the Tempo Shift slider, as this will modify the pitch amount in 0.1% increments. For more
details, see chapter 9, “Keyboard Control”.
Alternatively, clicking on the minus and plus graphics, at the top left and bottom left of the slider, will decrease /
increase the pitch by precisely 0.1% per click. Clicking on the “0%” text in the middle of the slider will move the
Tempo Shift slider’s knob back to 0%. Option-clicking on the plus and minus graphics will modify the Tempo
by 0.01% for very accurate modification.
Clicking above or below the knob, on the slider’s background, will move the knob directly to the position of the
click.
BPM Display
The BPM Display shows the current BPM (Beats Per Minute) playback speed of the loaded track. When the
tempo of the track increases or decreases via Tempo Shift, the BPM Display is updated to show the revised BPM.
Page 17 of 62
DJ-1800 version 3.2
User Manual
Pitch Lock
Pitch Lock fixes the current track’s pitch when the Tempo changes. This avoids a “chipmunk” effect when
increasing a track’s tempo (and likewise a “deep voice” effect when decreasing a track’s tempo).
Pitch Lock is turned on or off by clicking on the “Pitch Lock” button. When Pitch Lock is on, the green LED
above the Pitch Lock button is illuminated. Pitch Lock is turned on by default when you first launch DJ-1800.
DJ-1800 has five different quality levels for Pitch Lock, which can be selected in the Pitch Lock preferences.
These preferences can be found in the “General Preferences” window. This can be found under the “DJ-1800
3.1” menu. Select the “Pitch Lock” section, if it is not already selected.
The General Preferences window – Pitch Lock Preferences
The “Pitch Lock quality” popup menu has five options for Pitch Lock quality, from Minimum to Maximum. The
default setting is Medium quality, which uses a good-quality spectral algorithm for Pitch Lock. The Low quality
setting uses a faster, more efficient time-domain algorithm for pitch lock, at the expense of a slight reduction in
audio quality.
In general, the higher quality settings require a faster computer. This becomes more evident when playing
several tracks at the same time. If you find that DJ-1800 is performing slowly or not responding when using a
higher quality setting, then reducing the Pitch Lock quality should help.
Please note that changes to the Pitch Lock quality setting will not affect currently-loaded tracks. These tracks
will need to be reloaded in order to benefit from the new quality setting.
If you find that a slower computer is not performing well when playing tracks using Pitch Lock, then you can
turn Pitch Lock off altogether. This will use a much faster algorithm for adjusting the track’s playback speed, at
the expense of using Pitch Lock. To turn off Pitch Lock, uncheck the “Use Pitch Lock” checkbox in the Pitch Lock
Preferences window shown above. This will use the same algorithm as used in earlier (v2.x) versions of DJ-1800.
Page 18 of 62
DJ-1800 version 3.2
User Manual
Tempo Bend
The Tempo Bend buttons
Tempo Bend is used to temporarily increase or decrease the speed of a track. This is useful when beat mixing, if
one track in a mix has dropped slightly behind the other (resulting in the beats of the two tracks not quite
being in sync). Temporarily boosting the speed of the slower track (or slowing the speed of the faster track) will
bring them back in sync.
Clicking on either the Tempo Bend Minus or Tempo Bend Plus buttons will start the Tempo Bend in that
direction. The longer you hold down the mouse button, the more the tempo will be ‘bent’ by, up to a
maximum of 32% in either direction. Releasing the mouse button immediately returns the tempo to its original
value.
Note that Tempo Bend operates in addition to Tempo Shift. If Tempo Shift was already increasing the tempo by
a full 10%, then pressing and holding Tempo Bend would increase the tempo further.
Tempo Bend works even when Pitch Lock is turned off. In this situation, Tempo Bend will adjust the pitch as
well as the tempo of the track.
Page 19 of 62
DJ-1800 version 3.2
User Manual
Track Play modes
DJ-1800 has four different Track Play modes. The selected mode determines what happens when a track
reaches its end whilst playing. The current Track Play mode is displayed at the top of the CD Player’s LCD
panel.
The Track Play mode display
Clicking on the Track Play mode display toggles between the four different Track Play modes:
Single
In this Track Play mode, the CD Player stops automatically at the end of the track, returns to the current cue
point for that track, and enters the “Cued” state. This is the default Track Play mode.
Continue
In this Track Play mode, when a track reaches its end, the next track starts playing automatically. If the last
loaded track ends, then the first loaded track starts automatically. Use this mode to play an entire album,
playlist or other collection of music in one CD Player without having to start each track individually.
Loop
In this Track Play mode, when a track reaches its end, the track will be automatically re-cued to its last cue point,
and will automatically begin playing from this point. This mode is useful for setting up radio “beds”, where a
particular piece of music is used to loop behind a feature of undefined length.
Next
In this Track Play mode, when a track reaches its end, the next track is loaded and cued to its StartPoint. This is
useful for loading a number of sound effects or stings into a CD Player and playing them in a pre-determined
order, with the next effect loading in a cued state as soon as the previous effect has finished playing.
Page 20 of 62
DJ-1800 version 3.2
User Manual
Time Display
DJ-1800 displays the current track’s position in the LCD panel of the CD Player. The current track position is
displayed in [minutes] : [seconds] . [hundredths] format.
The Time Display
Time Display mode
The current Time Display mode is displayed at the top of the CD Player’s LCD panel. Clicking on the Time
Display mode text cycles the Time Display through four different Time Display modes:
Elapsed
In this mode, the current track’s elapsed time is displayed in the LCD panel.
Remain
In this mode, the current track’s remaining time is displayed in the LCD panel. This is the default time mode, as
shown in the image above.
T. Elapsed
In this mode (“Total elapsed”), the duration of all loaded tracks before the current track, plus the currently
elapsed time of the current track, is displayed in the LCD panel.
T. Remain
In this mode (“Total remaining”), the duration of all loaded tracks after the current track, plus the remaining
time of the current track, is displayed in the LCD panel.
Set default StartPoint
If you have found a custom cue point for a track, you can choose to save this cue point as the default StartPoint
for that track. To do this, click on the track position time display area whilst the track is paused or cued at the
cue point you wish to save. Clicking on the time display area will display a pop-up menu with the option to “Set
as default StartPoint”. Selecting this option will display a prompt, asking if you want to set the current pause or
cue point to become the new default StartPoint for this track.
Setting the default StartPoint
You can use this feature to save custom StartPoints for a track, for future use. If you have chosen to save
calculated StartPoints to iTunes or to iPods, then your custom StartPoint will also be saved to the iTunes or iPod
library when you select “Set as default StartPoint”. See the “Saving values to iTunes / iPods” section in chapter
7 for more information on saving StartPoints to iTunes / iPods. Otherwise, the new default StartPoint will be lost
when you next synchronise with iTunes / with the iPod.
Page 21 of 62
DJ-1800 version 3.2
User Manual
5. The Library
The Library Interface
The DJ-1800 Library interface
DJ-1800 features an integrated Library rack device for viewing and playing your iTunes and iPod libraries. The
Library allows you to load tracks into CD Players via drag and drop, or via keyboard shortcuts.
The Library interface is made up of three elements:
The Sources list
The Find field
The Tracks list
These three elements are described in more detail below.
To resize the Library, click on the resizer icon in the bottom right-hand corner of the Library, and drag up or
down whilst holding down the mouse button.
The Library resizer icon
Page 22 of 62
DJ-1800 version 3.2
User Manual
The Sources list
The Sources list – on the left of the Library – displays your iTunes library and all of your iTunes playlists. The
layout of the Sources list is similar to that of iTunes 6. The Sources list also displays any attached iPods, if you
have enabled the “Detect new iPods when they are connected” option in DJ-1800’s General Preferences. See
the “Detecting and importing iPods when they are connected” section below for more information.
The Sources list
To give the Sources list the keyboard focus, click anywhere inside the Sources list, or select “Switch to Sources
List” from the Library menu, or press Command-S.
Click on “Library” to view all of the tracks from your iTunes library in the Tracks list. If you have enabled any of
the “Movies”, “TV Shows”, “Podcasts” and / or “Audiobooks” sub-libraries in iTunes, then these sub-libraries will
also be displayed in the Sources list.
Any Playlists or Smart Playlists you have created in iTunes will be displayed in the Sources list. To view the
contents of any Playlist, click on its name in the Source box, and the Playlist’s contents will be displayed in the
Tracks list area. To view the contents of all playlists in a folder, click on the folder’s name. To view any Playlists
nested within a folder, click on the black triangle to the left of the folder to expand the folder.
Any attached iPods are displayed in the Sources list. Click on the iPod in the Sources list to view all tracks on the
iPod. Click on the black triangle to the left of the iPod to view all playlists on the iPod.
To change the width of the Sources list, click on the resizer icon at the right-hand edge of the Sources list’s title,
and drag to the left or right whilst holding down the mouse button.
The resizer icon
Page 23 of 62
DJ-1800 version 3.2
User Manual
Updating Sources
Libraries and Playlists in the Sources list are not updated as soon as they change in iTunes or on an iPod. You
must re-import the appropriate Library into DJ-1800 before changes to the Library or Playlist will be visible.
Updating from iTunes manually
To update your iTunes library manually, right-click (or Command-left-click) on any iTunes Library or Playlist
source in the Sources list. A contextual menu will be displayed, as shown below:
If you select “Check for iTunes changes”, DJ-1800 will check to see if the iTunes XML Library file has been
modified since it was last imported into DJ-1800. If it has changed, DJ-1800 will re-import the iTunes library.
If you select “Re-import all from iTunes”, DJ-1800 will re-import the entire iTunes library and playlists, regardless
of whether they have actually changed.
Note that for large libraries, it can sometimes take a few seconds for iTunes to re-write its iTunes XML Library file
following a change to the iTunes library. As a result, you may occasionally find that selecting “Check for iTunes
changes” does not detect that changes have been made. Selecting it a second time after a few seconds have
passed should enable DJ-1800 to detect and import the changes.
As an alternative, you can use the Library menu to update from iTunes. If an iTunes Library or Playlist source is
selected in the Sources list, then the Library menu will contain the same options as the contextual menu
described above. This is illustrated in the image below:
You can also use the keyboard shortcuts shown on the menu to update from iTunes.
Updating from iPods manually
The process for updating from an iPod is exactly the same as described above for iTunes. Simply select an iPod
Library or Playlist source in the Sources menu, and then proceed as above. The only difference is that the
contextual menu and Library menu will say “iPod” rather than “iTunes”, as shown below:
Page 24 of 62
DJ-1800 version 3.2
User Manual
Automatically updating sources on launch
DJ-1800 can be set to check for changes in your iTunes and iPod libraries each time DJ-1800 is launched. To
enable this option, turn on the “Automatically check for updates in iTunes when launching DJ-1800” and / or
“Automatically check for updates in connected iPods when launching DJ-1800” preference. These preferences
are found in the iTunes and iPods sections of the General Preferences window respectively, as shown below.
The iTunes General Preferences window – Updates preferences
The iPods General Preferences window – Updates preferences
Note that this iPod preference will only cause DJ-1800 to check iPods that are already connected when DJ-1800
launches. See below for how to check iPods that are connected to your Mac whilst DJ-1800 is already running.
Prompting before loading iTunes / iPod updates
If you turn on the “Prompt before loading iTunes updates” and / or “Prompt before loading iPod updates”
options shown above, then you will be prompted and given the option to cancel any updates whenever they
are detected.
Note that you won’t be prompted and given the option to cancel “Reimport all from iTunes / iPod” updates.
Page 25 of 62
DJ-1800 version 3.2
User Manual
Detecting and importing iPods when they are connected
DJ-1800 can optionally detect new iPods when they are attached. This means that if someone brings an iPod to
a gig, you can plug in the iPod and use it to DJ without breaking your set.
To use this feature, turn on the “Detect new iPods when they are connected” option, from the iPods section of
the General Preferences window.
The iPods General Preferences window
If you would like iPods to be checked for library updates when they are connected, turn on the “…and
automatically import any changes” option too. Library updates will be detected and automatically re-imported.
Note: If this option is not turned on, then new iPods will not be imported the first time they are connected.
They can still be imported manually, as described above.
Page 26 of 62
DJ-1800 version 3.2
User Manual
The Find field
The Find field is used to filter the contents of a Library or Playlist, to help you find a particular track or tracks.
The Find field
To give the Find field the keyboard focus, click anywhere inside the Find field, or select “Switch to Find” from
the Library menu, or press Command-F. You can then start to type your search keyword(s) into the Find field.
How the Find filter works
The Find field works in a very similar way to iTunes, in that each word is searched for separately, in any order.
So if you entered “burn ash” in the Find field, this would find the track “Burn Baby Burn” by “Ash”, but would
also find “Crash And Burn” by “Busted” and “London’s Burning” by “The Clash”, as shown below:
Similarly, entering “white room” in the Find field would find all tracks from the album “White Room” by The
KLF, but would also find the track “Little Room” by “The White Stripes”, and the track “Girls Room” from the
album “Whitechocolatespaceegg” by Liz Phair, as shown below:
All of the imported iTunes fields are searched for the filter text, including those that are not currently displayed
on screen in the Tracks list. This includes the text entered in the Comments, Grouping and Composer fields, as
well as the Genre of each track.
Clearing the Find field
To clear the Find field’s contents and remove the current Find filter, click on the small grey cross icon at the
right-hand side of the Find field.
Page 27 of 62
DJ-1800 version 3.2
User Manual
The Tracks list
The Tracks list displays all tracks in the currently selected Library or Playlist.
The Tracks list
To give the Tracks list the keyboard focus, click anywhere inside the Tracks list, or select “Switch to Tracks List”
from the Library menu, or press Command-L.
Sorting the Tracks list
To sort the Tracks list, click on any of the column headers. In the image above, the Name column is currently
selected to sort the list. Clicking on a column header a second time reverses the sort order.
Adding and removing columns in the Tracks list
You can change which columns are displayed in the Tracks list by selecting or deselecting the columns in the
Library menu, as shown in the image below. When a new column is turned on, it is added to the right-hand
side of the Tracks list.
To speed up the synchronisation of iTunes and iPod libraries, not all iTunes columns are imported. The image
above shows the complete list of iTunes columns available in DJ-1800.
Re-ordering columns in the Tracks list
To change the order of the columns in the Tracks list, click on a column’s header and drag the column to the left
or right. Drop the column on the new location for the column.
Re-sizing columns in the Tracks list
To re-size a column, click on the right-hand edge of the column’s header and drag to the left or the right. Note
that some columns cannot be resized, and that others have minimum or maximum sizes.
Page 28 of 62
DJ-1800 version 3.2
User Manual
The difference between Libraries and Playlists
iTunes and iPods have two different types of source. These are Library and Playlist sources. The main
difference is that Playlist sources have an index order, whereas Library sources do not.
The image below shows a Library source. In this example, the iTunes Library is selected in the Sources list. In
the image below, the Tracks list is sorted by the “Name” column.
The image below shows a Playlist source. In this example, a Smart Playlist called “[Single]” is selected. Smart
Playlists (and normal Playlists) have an extra “Playlist Index” column when viewed in the Tracks list. In the
image below, the Tracks list is sorted by this “Playlist Index” column.
The “Playlist Index” column enables you to create playlists in iTunes, with a specific track order, and then view
this order in DJ-1800. You can always hide the Playlist Index column if you choose not to use it. The table below
shows which sources are Library sources, and which are Playlist sources.
Library Sources
Library
Music
Movies
TV Shows
Podcasts
Audiobooks
iPods
Folders
Playlist Sources
Purchased
Playlists
Smart Playlists
Page 29 of 62
DJ-1800 version 3.2
User Manual
Protected Files and the Protection Type icons
Not all media files can be played by DJ-1800. This section explains which files can and cannot be played, and
how to tell the difference in the Tracks list.
Unprotected audio files, either purchased from the iTunes store (“iTunes Plus” files), or from your own music
collection, can be played by DJ-1800. StartPoints, AutoGain values and BPM values can be calculated for these
unprotected files. The only requirement is that the audio file must be playable by QuickTime.
Protected audio files, purchased from the iTunes store, can also be played by DJ-1800. However, DJ-1800 is
not able to calculate StartPoints, AutoGain values or BPM values for these files, due to DRM limitations in
QuickTime.
Unprotected video files can be played in DJ-1800, as long as they are playable by QuickTime and have at
least one audio track. DJ-1800 will play the first audio track in the video file, and will not play any video tracks.
DJ-1800 can calculate StartPoints, AutoGain values and BPM values for the first audio track in an unprotected
video file.
Protected video files, purchased from the iTunes store, cannot be played by DJ-1800 at all, due to DRM
limitations in QuickTime. This includes protected Movies, protected TV Shows and protected Music Videos.
The “Protection Type” column indicates the different types of file, and the associated protection on that file.
The different icons can be seen in the first column in the image below.
The icons below indicate the following protection types:
Icon
No icon
Protection Type
Unprotected audio file
DJ-1800 can play this file, and can calculate StartPoints, AutoGain
values and BPM values for the file.
Protected audio file
DJ-1800 can play this file, but can’t calculate StartPoints, AutoGain
values or BPM values.
Unprotected video file
DJ-1800 can play the first audio track from this file, and can
calculate StartPoints, AutoGain values and BPM values for the first
audio track.
Protected video file
DJ-1800 cannot play this file.
Page 30 of 62
DJ-1800 version 3.2
User Manual
Selecting tracks in the Tracks list
To select tracks in the Tracks list, click on a track to select it; Shift-click to select a range of tracks; or Commandclick on a track to add / remove it to / from the current selection.
Note: if you click on an already-selected track without holding down the Shift or Command key, the selection
does not change to select just that track. This is different from the normal Mac OS X selection behaviour.
However, this approach is preferred here, to avoid accidentally losing a large selection of tracks with a careless
mouse click during a live DJ performance.
Loading tracks into CD Players from the Tracks list
Once you have selected a track or tracks from the Tracks list, there are two ways you can load these tracks into a
CD Player:
Drag and Drop
Keyboard Control
Loading Tracks via Drag and Drop
To load tracks via drag and drop, click and hold on an existing selection, and then drag that selection onto a CD
player. In the example below, 14 tracks are being dropped onto CD Player 1.
Once you have dropped the tracks onto the CD Player, the first track will be loaded and cued, as shown below:
All 14 tracks are available in the CD Player, as can be seen from the “1/14” track display.
If you drag and drop tracks onto an already-playing CD Player, then the dropped tracks will be appended to
the end of the CD Player’s existing contents, rather than replacing the CD Player’s contents.
Page 31 of 62
DJ-1800 version 3.2
User Manual
If you hold down the option key whilst dragging and dropping tracks onto a CD player, then the dropped
tracks will always be appended to the end of the CD Player’s existing contents, regardless of whether the CD
Player is already playing.
Loading Tracks via Keyboard Control
As an alternative to drag-and-drop, you can also load tracks into a CD Player via the keyboard. When the
Tracks list has the focus (indicated by a bright blue colour for the current selection), press the Command key
and the number 1, 2, 3, or 4 to load the current selection into the corresponding CD Player. The current
selection will replace the contents of the CD Player, and the CD Player will be given the focus.
Note that this will only work if the CD Player is not currently playing a track. This avoids accidentally loading a
new track over a playing one.
If you hold down the Option key whilst pressing Command-1/2/3/4, then the current track selection will be
appended to the end of the appropriate CD Player, regardless of whether the CD Player is already playing.
Page 32 of 62
DJ-1800 version 3.2
User Manual
6. The Mixer and Crossfader
The Mixer and Crossfader interface
The DJ-1800 Mixer and Crossfader interface
DJ-1800 has a built-in 4-channel mixer. The mixer interface is shown above. Working from left to right, this
mixer features:
A headphones (“Phones”) Volume twister
Four CD player channel controls
A Crossfader, with four left and four right assign buttons
A Master Volume fader
A stereo Master Out Level VU display
Not all of DJ-1800’s output modes use the internal mixer and crossfader. For example, if you were using an
external hardware mixer with the “Multi Thru” output mode, then you would not need to use the internal
mixer or crossfader. For more information on output modes, see chapter 8, “Output Modes + Output
Preferences”.
Page 33 of 62
DJ-1800 version 3.2
User Manual
Headphones (“Phones”) Volume twister
The Headphones (“Phones”) Volume twister sets the maximum output level for the Cue output device.
Effectively, if you are cueing through headphones, this twister sets the headphones volume level. This twister
does not affect the Master output in any way.
To change the Phones Volume twister’s setting, click on the twister and hold down the mouse button whilst
dragging up (to increase the Cue Level) or down (to decrease the Cue Level). Release the mouse button one
the required Phones Volume is reached. Double-clicking on the Phones Volume twister resets the twister to its
default value of 10.
Channel controls
The Channel controls are made up of:
Cue button with LED indicator
Volume fader
Gain twister
Cue Level VU display
Hi, Mid and Low EQ twisters
The channel controls
Cue button
The cue button toggles whether or not this CD Player channel will be audible through the Cue output device
(used to set up new tracks without them being played “live” through the master output), in addition to the
Master output device. If a CD Player is set to be audible through the Cue output device, then a green LED
above the cue button will be lit.
Volume fader
Each CD Player channel has a volume fader, which sets the maximum possible master output level for that
channel. 0 is zero volume, and 10 is maximum volume. The volume fader is set to 10 by default for all channels.
To adjust the Volume fader, click on the Volume fader’s knob and hold down the mouse button whilst
dragging up (to increase the volume) or down (to decrease the volume). Release the mouse button once the
required volume is reached. Clicking above or below the volume fader knob will move the knob directly to the
clicked position.
In some circumstances, the CD Player will (intentionally) not be audible through the Master output device, even
though the CD Player’s Volume fader is not at zero. This will be the case when:
The Master Volume fader is at zero
The CD Player’s channel is not selected for either the left or right side of the Crossfader
The CD Player’s channel is selected for use in the Crossfader, but the Crossfader is fully set to a
different channel
See the appropriate section below for more information on these situations.
Page 34 of 62
DJ-1800 version 3.2
User Manual
Gain twister
The Gain twister boosts or reduces the CD Player’s output. This is used to increase (or decrease) the volume for
a particular track relative to other tracks.
For example, imagine you have one track playing that is quite loud. Mixing into a second quieter track will
sound wrong due to the difference in track volumes. (Sometimes, tracks from the same genre, which may be
just as “noisy” as each other, can still be quieter due to different recording methods and production.) The
quieter track can be “boosted” by increasing its gain, resulting in similar volumes when both tracks’ Volume
faders are set to the same value.
To change the Gain twister’s setting, click on the twister and hold down the mouse button whilst dragging up
(to increase the gain) or down (to decrease the gain). Release the mouse button one the required levels are
reached. Double-clicking on the Gain twister resets the gain to its default value of 5.
Gain affects the CD Player’s output through both the Master output and the Cue output (unlike the Volume
fader, which only affects the master output). As a result, you can listen to a new track through the Cue output
whilst an existing track is playing, compare their levels in the Cue Level VU display (see below), and adjust the
gain levels accordingly until they match.
Cue Level VU display
The Cue Level VU display shows the actual levels of the track currently being cued in this CD Player. You can
use the Cue Level VU display to make sure that the levels of the tracks you are cueing are roughly the same.
Increasing or decreasing the Gain control for a CD Player will increase or decrease these levels.
Page 35 of 62
DJ-1800 version 3.2
User Manual
Hi, Mid and Low twisters
The Hi, Mid and Low twisters provide EQ balancing for the CD Player’s output. Increasing the Hi setting will
boost the treble levels of the CD Player output, whereas decreasing Hi will reduce the treble. Increasing the Mid
setting will boost or reduce the mid-range levels of the CD Player output. Likewise, the Low twister will boost or
reduce the bass levels of the CD Player output. The default range of each twister is -20 dB / +6 dB. No EQ
balancing is applied when the twister is pointing directly upwards (i.e. when the twister is at 0 degrees).
To move any of the twisters, click on the twister and hold down the mouse button whilst dragging up (to
increase the treble, mid-range or bass) or down (to decrease the treble, mid-range or bass). Release the mouse
button once the required level is reached. Double-clicking on any of the twisters will reset it to its default value
of 0 dB (no EQ adjustment).
Note 1: Mid-range adjustment is not available for Protected AAC files purchased from the iTunes Music Store. If
you load a Protected AAC file into a CD Player, the Mid twister for that CD Player’s channel on the mixer will be
greyed out. You will still be able to move the twister, but it will have no effect on the audio output.
Note 2: The Hi and Low range for Protected AAC files is much smaller than for all other files. The available Hi
and Low range for Protected AAC files is approximately -4 dB / +4 dB. This is due to a limitation in QuickTime.
This reduced range will be displayed on the Hi and Low twisters for a particular CD Player whenever a Protected
AAC file is loaded into that CD Player.
Changing the Hi, Mid and Low EQ ranges
In order to set EQ preferences, open the “General Preferences” window. This can be found under the “DJ-1800
3.1” menu. Select the “EQ” section, if it is not already selected.
The General Preferences window - EQ Preferences
Use the popup menus to individually adjust the Attenuation and Gain limits for each of the Hi, Mid and Low
ranges. Click OK when you are done. The amended EQ ranges will be displayed on the mixer, as shown below:
In this example, the Hi EQ twister has been adjusted to have a range of -15 dB / +9 dB, and this is reflected on
the on-screen Hi twister.
Page 36 of 62
DJ-1800 version 3.2
User Manual
Crossfader controls
The Crossfader controls are used to fade between CD Player channels when mixing. The effect is roughly the
same as moving one CD Player’s volume fader down to zero, whilst increasing the volume of a second channel.
However, with the Crossfader, it is much easier to move back and forth between two channels in one
movement.
The Crossfader can be deactivated if you prefer to work exclusively with the mixer volume controls. For more
information, see chapter 3, “Working with the Rack”.
The Crossfade controls
Crossfade Assign buttons
The four left-hand and four right-hand Crossfade Assign buttons are used to select which CD Player channels
are assigned to the left and right-hand sides of the Crossfader slider. By default, CD Players 1 and 3 are
assigned to the left, and CD Players 2 and 4 are assigned to the right, as shown in the picture above.
Click once on any of the Crossfade Assign buttons to toggle the status of that CD Player channel. When the
green LED above the button is lit, that channel will be audible when the Crossfader is in the appropriate
position.
If a particular CD Player is not selected for either the left or the right-hand side of the Crossfader, and the
Crossfader is enabled on the Rack, then that CD Player’s output will not be audible through the Master Output,
regardless of its channel Volume fader setting.
Crossfader slider
When the Crossfader knob is in the middle of the Crossfader slider (as in the picture above), all selected CD
Players will be audible and their outputs mixed together. Moving the Crossfader knob to the left or right will
reduce the amount of the opposing channel(s) that is audible.
Let’s call the CD Player(s) assigned to the left of the Crossfader “A”, and the CD Player(s) assigned to the right of
the Crossfader “B”. When the Crossfader knob is in the middle, 100% of both A and B will be audible (taking
into account each CD Player’s Volume and Gain settings). When the Crossfader knob is half-way between the
left-hand side and the middle of the Crossfader, 100% of A and 50% of B will be audible. When the Crossfader
knob is fully to the left, 100% of A is audible and B is not audible at all.
If you were to assign a particular CD Player channel to both sides of the Crossfader, then that CD Player channel
will be audible regardless of the position of the Crossfader.
To adjust the Crossfader position, click on the Crossfader knob and hold down the mouse button whilst
dragging left or right. Release the mouse button once the required Crossfader position is reached.
Clicking to the left or right of the Crossfader knob will move the knob directly to the clicked position.
Page 37 of 62
DJ-1800 version 3.2
User Manual
Master Out Level controls
The Master Out Level controls
Master Volume fader
The Master Volume fader sets the maximum output level for all four CD Players’ output.
The actual signal level of the Master output is a combination of all currently “live” CD Player channels’ output
levels (based on their Volume and Gain), the Master Volume fader’s value, and the Crossfader settings (if the
Crossfader is enabled).
Even if all CD Players’ Volume faders were set to 10, reducing the Master Volume fader to 5 (for example) would
halve the actual output volume of the combined CD Players. If the Master Volume fader is set to 0, no sound
will be output through the Master output device, regardless of any other settings.
To adjust the Master Volume fader, click on the Master Volume fader’s knob and hold down the mouse button
whilst dragging up (to increase the Master Volume) or down (to decrease the Master Volume). Release the
mouse button once the required Master Volume is reached.
Master Out VU Level meter
The Master Out VU Level meter shows the levels of the actual Master mixer output. This is a combination of all
currently “live” CD Player channels’ output levels (based on their Volume and Gain), the Crossfader settings (if
the Crossfader is enabled), and the Master Level slider’s value. Effectively, this is the level of what can actually
be heard through the Master output.
The Master Out VU Level meter operates in stereo in Mode 3 (see below), showing separate levels for the left
and right channels respectively. In Mode 1 (which outputs CD Players in mono only), the meter displays the
same mono output level in each of its left and right channels.
Page 38 of 62
DJ-1800 version 3.2
User Manual
7. StartPoints, AutoGain and BPM
DJ-1800 can automatically calculate and use:
A track’s “true” start point
The average peak levels of a track
The BPM (Beats Per Minute) value for a track
StartPoints
Most tracks on CD contain a small amount of “blank time” at the start of the track, containing no sound at all.
Since most audio files are ripped from CD, chances are that most of your files will also contain this “blank time”.
When DJing, it is useful to be able to cue a track to the true start point of the track – immediately after this
“blank time” – so that pressing play will start the track instantly.
DJ-1800 can calculate the true start point of a track when the track is loaded into a CD Player. You can specify
conditions for StartPoint finding in DJ-1800’s General Preferences, as described below.
StartPoint Preferences
In order to set StartPoint preferences, open the “General Preferences” window. This can be found under the
“DJ-1800 3.1” menu. Select the “StartPoint” section, if it is not already selected.
The General Preferences window - StartPoint Preferences
Find missing StartPoints when loading tracks into CD Players
This option tells DJ-1800 to calculate the StartPoint when loading a track into a CD Player. If a StartPoint has
already been calculated or is stored in the iTunes / iPod library, then the previously found StartPoint will be
used.
Use found StartPoints to set the start point when loading tracks into CD Players
The second option tells DJ-1800 to actually use StartPoints when loading tracks into CD Players. If this option is
unchecked, tracks will be cued to their very beginning (00.00 seconds) when loaded into CD Players.
“Search Through…” settings
You can specify how many seconds of the track should be used to find the StartPoint. DJ-1800 has to create a
waveform of the track from compressed audio information in order to calculate an accurate StartPoint, and
increasing the number of seconds used to find StartPoints increases the time for this waveform calculation.
Most tracks’ StartPoint is within the first 3 seconds, and it is unlikely you will need to increase this value. In any
case, as soon as a StartPoint is found, the search will stop, regardless of the value entered here.
Page 39 of 62
DJ-1800 version 3.2
User Manual
AutoGain
“Gain” boosts or reduces a CD Player’s output, to increase (or decrease) the volume for a particular track relative
to other tracks.
For example, imagine you have one track playing that is quite loud. Mixing into a second quieter track will
sound wrong due to the difference in track volumes. (Some tracks of a similar genre, and maybe just as “noisy”
as each other, can still be quieter due to different recording methods and production.) The quieter track can be
“boosted” by increasing its gain, resulting in similar volumes when both tracks’ Volume faders are set to the
same value.
DJ-1800 can calculate the average peak levels for each track, and use these levels to automatically set the Gain
level when a track is loaded into a CD Player. This results in mixes between tracks sounding smoother without
the need to manually adjust the Gain for each track.
You can specify conditions for AutoGain level finding in the General Preferences, as described below.
AutoGain Preferences
In order to set AutoGain preferences, open the “General Preferences” window. This can be found under the
“DJ-1800 3.1” menu. Select the “AutoGain” section, if it is not already selected.
The General Preferences window - AutoGain Preferences
Calculate missing AutoGain levels when loading tracks into CD Players
This option tells DJ-1800 to calculate the AutoGain levels when loading a track into a CD Player. If AutoGain
levels have already been calculated, or an AutoGain value is stored in the iTunes / iPod library, then the
previously found AutoGain level will be used.
Use AutoGain levels to set the channel gain when loading tracks into CD Players
The second option tells DJ-1800 to actually use AutoGain levels when loading tracks into CD Players. If this
option is unchecked, Gain will not be automatically adjusted when tracks are loaded into CD Players.
“Use this many samples…” settings
You can specify how many samples should be taken from the track to calculate the AutoGain levels. DJ-1800
has to create a waveform of the track from compressed audio information in order to calculate AutoGain levels,
and increasing the number of samples used to find AutoGain levels increases the time for this waveform
calculation. A setting of 5 samples produces reasonably accurate AutoGain levels in almost all cases. Increasing
this value will further improve accuracy, especially for tracks that contain both very quiet and very loud sections.
Page 40 of 62
DJ-1800 version 3.2
User Manual
BPM
A track’s speed is measured in Beats Per Minute (BPM). This indicates how many beats of the track would be
heard within a minute’s playback. BPM values typically fall between 80 (for slow tracks) and 180 (for fast tracks).
DJ-1800 features an automatic BPM calculation library, which automatically estimates the BPM of audio files,
based on the audio waveform of the file.
Note that it is not possible to calculate an accurate BPM value for every track. For example, a spoken word audio
track will not contain any regular “beats”, and so will not have a BPM as such. Similarly, some tracks may vary in
speed during the track, and so any calculated BPM value will not apply to the entire track.
It is also possible for the automatic BPM estimate to be calculated at twice the speed you might expect, or half
the speed you might expect. The BPM calculation is based on the number of detectable “beats” in the audio
signal, and this may not match the expected value for very slow or very fast songs.
BPM Preferences
In order to set BPM preferences, open the “General Preferences” window. This can be found under the “DJ1800 3.1” menu. Select the “BPM” section, if it is not already selected.
The General Preferences window - BPM Preferences
Find missing BPM values when loading tracks into CD Players
This option tells DJ-1800 to calculate the BPM value of a track when loading the track into a CD Player. If a BPM
value has already been calculated, or a BPM value is stored in the iTunes / iPod library, then the previously
found BPM value will be used.
Stop calculating BPM as soon as an initial estimate is available
Calculating the BPM value of a track can take several seconds. If this option is ticked, DJ-1800 will stop
calculating the BPM of the track as soon as an initial estimate is available. This increases the speed of BPM
calculation at the expense of accuracy. Typically, an initial BPM estimate is good enough for many purposes,
but if you are using DJ-1800 for beat-mixing, you may prefer turn this option off.
Use this much of the track to calculate the BPM
You can specify how much of the track should be used to calculate the BPM value. DJ-1800 will continue to
process the track and refine the calculated BPM value until the selected percentage of the song has been
processed. For the greatest accuracy BPM calculation, set this to 100%. Note that if “Stop calculating BPM as
soon as an initial estimate is available” is selected, then the complete percentage will not be used if an estimate
is found earlier.
Keep BPM values within this range
This option allows you to specify a typical range of BPM values for the tracks you play. If you find that many of
the tracks you play are being calculated at half or twice the BPM you would expect, try adjusting the minimum
Page 41 of 62
DJ-1800 version 3.2
User Manual
and maximum values of this option. Any calculated BPM values that fall below the minimum will be doubled,
and any calculated values above the maximum will be halved.
Saving values to iTunes / iPods
To save DJ-1800 from having to calculate StartPoints, AutoGain and BPM values every time a track is loaded, you
can optionally save calculated values to your iTunes library, and / or to iPod libraries.
Separate preference options are provided for iTunes and for iPods. This is because you may want to save
values to your own iTunes library, but not to the libraries of iPods belonging to other people. The same options
are provided for both iTunes and iPods, but they can be set separately from each other.
Preferences for saving values to iTunes / iPods
In order to set preferences for saving values to iTunes / iPods, open the “General Preferences” window. This can
be found under the “DJ-1800 3.1” menu. Select the “iTunes” or “iPods” section as appropriate.
The General Preferences window - iTunes Preferences
The General Preferences window - iPods Preferences
The important section for either iTunes or iPods is the middle section of this window, shown below using the
iTunes pane as an example:
These preference options are explained in more detail below. In each case, iTunes is used as the example, but
the same principle applies to iPods too.
Note that calculated values are only saved to iTunes when a track is unloaded from a CD Player, not when the
values are first calculated. This avoids audio dropouts caused by iTunes re-writing the file’s metadata whilst DJ1800 is playing the track.
Page 42 of 62
DJ-1800 version 3.2
User Manual
Save calculated StartPoints to iTunes / iPods
If this option is selected, then any calculated StartPoint values will be saved to iTunes, in the iTunes “Start Time”
field.
You can view the Start Time field by selecting a track in iTunes, and selecting “Get Info” from the File menu in
iTunes. The example below shows the Options tab for a track called “(intro)”.
The “Start Time” field in iTunes
In this example, a Start Time of 1.14 seconds into the track has been saved to the Start Time field by DJ-1800.
Note that this Start Time field is used by iTunes when it plays tracks. So, if DJ-1800 saves a StartPoint value into
the Start Time field in iTunes, then iTunes will use that value as the start point of the track when it is played in
iTunes.
If you do not want to adjust the Start Time value in iTunes, then leave this preference option unchecked in DJ1800’s preferences.
Note: if you have set your own Start Time values in iTunes, these will be imported by DJ-1800 and used as the
StartPoint in DJ-1800, even if the “Save calculated StartPoints…” preference option is turned off.
Page 43 of 62
DJ-1800 version 3.2
User Manual
Save calculated AutoGain values to iTunes / iPods
If this option is selected, then any calculated AutoGain values will be saved to iTunes, in the iTunes “Volume
Adjustment” field.
You can view the Volume Adjustment field by selecting a track in iTunes, and selecting “Get Info” from the File
menu in iTunes. The example below shows the Options tab for a track called “(intro)”.
The “Volume Adjustment” field in iTunes
In this example, a Volume Adjustment of 62% has been saved to the Volume Adjustment field. This
corresponds to an AutoGain value of +3.1 in DJ-1800.
An AutoGain value of 0 in DJ-1800 corresponds to a Volume Adjustment of “None” (0%) in iTunes. An
AutoGain value of +5 in DJ-1800 corresponds to a Volume Adjustment of +100% in iTunes.
Note that this Volume Adjustment field is used by iTunes when it plays tracks. So, if DJ-1800 saves an AutoGain
value into the Volume Adjustment field in iTunes, then iTunes will use that value to adjust the playback
volume of the track when it is played in iTunes.
If you do not want to adjust the Volume Adjustment value in iTunes, then leave this preference option
unchecked in DJ-1800’s preferences.
Note: if you have set your own Volume Adjustment values in iTunes, these will be imported by DJ-1800 and
used as the AutoGain in DJ-1800, even if the “Save calculated AutoGain values…” preference option is turned
off.
Page 44 of 62
DJ-1800 version 3.2
User Manual
Save calculated BPM values to iTunes / iPods
If this option is selected, then any calculated BPM values will be saved to iTunes, in the iTunes “BPM” field.
You can view the BPM field by selecting a track in iTunes, and selecting “Get Info” from the File menu in iTunes.
The example below shows the Info tab for a track called “(intro)”.
The “BPM” field in iTunes
In this example, a BPM value of 144 has been saved to the BPM field in iTunes.
If you do not want to set the BPM value in iTunes, then leave this preference option unchecked in DJ-1800’s
preferences.
Note: if you have set your own BPM values in iTunes, these will be imported by DJ-1800 and used as the BPM
value in DJ-1800, even if the “Save calculated BPM values…” preference option is turned off.
Save precise BPM values to iTunes / iPods
iTunes’ BPM field only stores whole-number values for BPM. Whereas DJ-1800 can calculate and use an
accurate BPM value of 143.5 for a track, iTunes can only store a rounded BPM value of 144. This means that DJ1800 could calculate an accurate value for BPM, save it to the less-accurate BPM field in iTunes, and then this
less-accurate version would be loaded and used the next time you imported your iTunes library.
To work around this limitation in iTunes, DJ-1800 has the option to save a precise value of BPM into one of the
text-based fields in iTunes. For example, in the image above, a (very!) precise value of 143.554688 has been
saved into the Comments field for this track. DJ-1800 will then detect this precise BPM value (by looking for the
[BPM] [/BPM] tags) when it next imports the Comments field.
…using this field in iTunes
This option allows you to specify which iTunes field is used for saving the precise BPM value. You can select
from the Comments, Grouping or Composer fields (all of which can be viewed on the “Info” tab in iTunes, as
shown in the image above).
DJ-1800 will never overwrite an existing Comment, Grouping or Composer value. If text already exists in the
selected field in iTunes, DJ-1800 will append the [BPM][/BPM] tags to the end of the existing value.
Page 45 of 62
DJ-1800 version 3.2
User Manual
8. Output Modes + Output Preferences
DJ-1800 has four different output modes, each of which is appropriate for a different hardware set-up and
DJing requirement. This chapter describes the four modes, and explains how to set output preferences for
each mode.
Multiple output devices
Some of the modes described below support more than one output device. Why would you want to do this?
Many Macs come with just one built-in audio device, and therefore just one stereo audio output. This is the
output that is used by the headphones socket on your Mac. Plug in some headphones, or wire this output to
your stereo, and you can hear the Mac’s sound output through the headphones or external speakers.
This is all well and good for listening to iTunes, but what happens when you want to start DJing? In order to
mix tracks together, you really need to be able to play one track, and then listen to another track and find the
StartPoint / set its volume / set its speed whilst the first track is playing to your audience. If you try and do this
through one output, then the crowd can hear the second track too.
(Actually, DJ-1800 has a ‘cheat’ solution to this, as described in Modes 1 and 2 below, which involves playing
each CD Player in mono. One channel is used for “live” tracks, and the other for cueing. It’s cheating, and it’s
not in stereo, but it works!)
In order to do professional stereo DJing, it is necessary to have two output devices – one for the “Master” (live)
output, and one for your “Cue” (headphones) output. Typically, the Master output would go to your
amplifiers, and the Cue output would go to your headphones.
Some newer Macs – notably the Mac Pro – have a second stereo output built in to the Mac. But most Macs (and
all Mac laptops) still have only one stereo output.
Fortunately, it is relatively easy to add a second output device to your Mac. We particularly recommend the
Griffin iMic from Griffin Technology (http://www.griffintechnology.com/) - it provides a USB-driven second stereo
output, as well as a microphone / line input.
You can use pretty much any audio output device that supports QuickTime playback with DJ-1800. You can
also use devices that have more than one stereo output. For more information about setting up specific output
devices with DJ-1800, together with latest device compatibility updates, visit our Audio Hardware page, at
http://www.dj1800.com/audiohardware.php .
DJ-1800 allows you to DJ without a second output device such as the iMic, via its stereo emulation modes. But if
you do get a second output device, life (and DJing) is so much more fun.
Page 46 of 62
DJ-1800 version 3.2
User Manual
Which output mode should I use?
DJ-1800 comes with four output modes, to match different hardware set-ups. The table below gives an
overview of what hardware is required (and what options are available) for each mode.
Needs a second
output device?
Uses DJ-1800’s
internal mixer?
Uses an
external mixer?
Plays in stereo?
Mode 1 – Mono + Mixer
Mode 2 – Mono Thru
Mode 3 – Dual + Mixer
Mode 4 – Multi Thru
Mode
Each of these modes, and the situations in which you might use them, are described in detail below.
Page 47 of 62
DJ-1800 version 3.2
User Manual
Mode 1 – Mono + Mixer
What is the “Mono + Mixer” mode?
In this mode, the Master and Cue outputs of the internal mixer are fed through separate mono channels of one
output device. Stereo tracks are mixed down to mono.
When would I use this mode?
Mono + Mixer mode should be used if:
You only have one output device (the built-in Mac sound device)
You want to use DJ-1800’s internal mixer
What are the benefits of this mode?
No need for an external mixer
No need for a second output device
Entirely self-contained, using internal software mixer
What are the limitations of this mode?
Each CD Player plays in mono only
Setting the preferences for this mode
Mode 1 “Mono + Mixer” preferences
If you have a second output device, you can select this device instead of the Mac’s built-in output device if you
wish.
In this mode, you can select which channel of the selected output device is used for the Master and Cue
outputs. On a stereo device, by default the left speaker channel will be Master, and the right speaker channel
will be Cue.
Page 48 of 62
DJ-1800 version 3.2
User Manual
Mode 2 – Mono Thru
What is the “Mono Thru” mode?
Each CD player's output is passed straight out through a mono channel of one output device. The internal
mixer is not used. Stereo tracks are mixed down into mono.
When would I use this mode?
Mono Thru mode should be used if:
You only have one output device (the built-in Mac sound device)
You want to use an external mixer
This mode is designed for users who want to use an external hardware mixer, but do not have a second output
device such as an iMic. Typically, CD Players 1 and 3 are passed through the left stereo channel to one input
channel on the external mixer, and Players 2 and 4 through the right stereo channel to a second input channel
on the mixer. The external mixer then performs Master and Cue functionality.
What are the benefits of this mode?
Use an external mixer for all 4 CD players without the need for a second output device
What are the limitations of this mode?
Each CD Player plays in mono only
Setting the preferences for this mode
Mode 2 “Mono Thru” preferences
If you have a second output device, you can select this device instead of the Mac’s bult-in output device if you
wish.
In this mode, you can select which channel of the output device is used for each of the CD players. The default
is CD Players 1 and 3 through the first (left) channel, and CD players 2 and 4 through the second (right)
channel.
Page 49 of 62
DJ-1800 version 3.2
User Manual
Mode 3 – Dual + Mixer
What is the “Dual + Mixer” mode?
The Master output of the internal mixer is fed through one output device at the Master volume specified in the
mixer.
The Cue output of the internal mixer is fed through a second output device at the Cue level specified in the
mixer.
Alternatively, both Master and Cue can be fed through different stereo outputs on the same multi-channel
output device.
When would I use this mode?
Dual + Mixer mode should be used if:
You have two output devices (or one multi-channel output device)
You want to use DJ-1800’s internal mixer
This mode is designed for users who have a second output device (such as an iMic), but do not wish to use an
external mixer.
What are the benefits of this mode?
No need for an external mixer
Entirely self-contained, using internal software mixer
Master and Cue both in stereo via separate output devices
What are the limitations of this mode?
Requires a second output device
Setting the preferences for this mode
Mode 3 “Dual + Mixer” preferences
In this mode, you must select an output device for both the Master and Cue outputs.
If you are using a device with more than one stereo output channel, you can optionally select which pair of
channels to use for Master and for Cue. In the picture above, the “Built-in output” has only one stereo output,
and so the “1 + 2” channel select list is disabled. However, the “GIGAPort AG” has eight mono output channels,
and in this example, mono outputs “5 + 6” are being used as a stereo pair for Cue output.
For more information about setting up specific output devices with DJ-1800, visit our Audio Hardware page, at
http://www.dj1800.com/audiohardware.php .
Page 50 of 62
DJ-1800 version 3.2
User Manual
Mode 4 – Multi Thru
What is the “Multi Thru” mode?
Each CD player's output is passed through a selected output device in stereo.
The internal mixer is not used in this mode.
When would I use this mode?
Dual + Mixer mode should be used if:
You have two or more output devices
You want to use an external mixer
This mode is designed for users who have two or more output devices, and want to use an external mixer. In
this situation, DJ-1800 is used as a music player only, and the internal mixer is not used.
Typically, with a second output device such as an iMic, CD Players 1 and 3 are output through one device into
one channel of the external mixer, and Players 2 and 4 are output through the other device into a second
channel of the external mixer. However, if you have more than two outputs available, or an output device with
more than one stereo output, there is nothing stopping you using a different output device or channel for
each of the CD Players in this mode.
What are the benefits of this mode?
Use an external mixer with all 4 CD Players in stereo
What are the limitations of this mode?
Requires an external mixer
Requires a second output device
Setting the preferences for this mode
Mode 4 “Multi Thru” preferences
In this mode, you must select an output device and stereo channel pair for each of the four CD Players. You can
select the same device for several CD Players. In the example above, the “Built-in Output” is being used for CD
Player 1. Six of the eight mono output pairs on an eight-channel “GIGAPort AG” device are being used for the
other three CD Players.
For more information about setting up specific output devices with DJ-1800, visit our Audio Hardware page, at
http://www.dj1800.com/audiohardware.php .
Page 51 of 62
DJ-1800 version 3.2
User Manual
9. Keyboard Control
All of the CD Player and Internal Mixer / Crossfader controls can be controlled with either the mouse or the
keyboard. This chapter describes the keyboard shortcuts for keyboard control of DJ-1800. Mouse control is
described in the appropriate chapters earlier in this manual.
These keyboard shortcuts are designed to work with both extended and laptop keyboards. This is why some
commands have more than one shortcut. The shortcut keys supplied in the tables below are based on an
English keyboard. For other localities, the appropriate key will be the key from the same physical location on
the keyboard as in the keyboard layout pictures below.
Once you start using the keyboard to control DJ-1800, we think you’ll probably use it in preference to a mouse.
The layout is deliberately designed to match the mixer.
Note that Mode 2 (Mono Thru) and Mode 4 (Multi Thru) do not use the internal mixer or crossfader. In these
modes, the mixer and crossfader shortcut keys are disabled. See chapter 8, “Output Modes + Output
Preferences”, for more information on the different output modes.
Defining your own keyboard controls for DJ-1800
If you would like to define your own keyboard controls for DJ-1800, you can create your own “User-Defined
Keyboard” plug-in. To create your own keyboard plug-in, download the DJ-1800 Plug-In API, which contains
documentation, plug-in templates and instructions for creating your own plug-ins. You can download the
plug-in API from this web page: http://www.dj1800.com/plugins.php . See chapter 10, “Controller Plug-Ins”, for
more information.
Page 52 of 62
DJ-1800 version 3.2
User Manual
Keyboard layouts
Standard Mac keyboard layout
DJ-1800 shortcuts with mixer enabled (modes 1 and 3)
DJ-1800 shortcuts with mixer disabled (modes 2 and 4)
Page 53 of 62
DJ-1800 version 3.2
User Manual
Keyboard shortcuts
Fader multipliers
These keys are indicated in pink on the keyboard layouts above.
When using many of the controls in DJ-1800 via the keyboard, holding down either Shift, Ctrl or Option will
accelerate or multiply the action by a certain amount, as shown in the table below:
CD Player
Currently
controlling…
No multiplier
pressed
Option pressed
Ctrl pressed
Shift pressed
Track scan wheel
Scan 2x speed
Scan 3x speed
Scan 4x speed
Scan 8x speed
Track search
jog wheel
Search 1x speed
Search 6x speed
Search 12x speed
Search 32x speed
Tempo Shift slider
Move 1x speed
Move 6x speed
Move 12x speed
Move to -10% or
+10%
Internal Mixer
Currently
controlling…
No multiplier
pressed
Option pressed
Ctrl pressed
Shift pressed
Channel Volume
fader
Move 1x speed
Move 6x speed
Move 12x speed
Move to 0 or 10
Gain twister
Move 1x speed
Move 6x speed
Move 12x speed
Move to 0 or 10
Hi twister
Move 1x speed
Move 6x speed
Move 12x speed
Move to -5 or +5
Mid twister
Move 1x speed
Move 6x speed
Move 12x speed
Move to -5 or +5
Low twister
Move 1x speed
Move 6x speed
Move 12x speed
Move to -5 or +5
Crossfader slider
Move 1x speed
Move 6x speed
Move 12x speed
Move to A or B
Master Level fader
Move 1x speed
Move 6x speed
Move 12x speed
Move to 0 or 10
Cue Level twister
Move 1x speed
Move 6x speed
Move 12x speed
Move to 0 or 10
Page 54 of 62
DJ-1800 version 3.2
User Manual
Rack window shortcuts
These shortcuts are indicated in purple on the keyboard layouts above.
Name on
keyboard layout
Full Scrn
Key #1
Key #2
Escape
Equivalent to
Entering / exiting Full Screen mode
Track position shortcuts
These shortcuts are indicated in green on the keyboard layouts above.
Name on
keyboard layout
Key #1
Key #2
Equivalent to
Prev. Track
F1
1
Clicking on “Previous Track” button on current CD Player
Next Track
F2
2
Clicking on “Next Track” button on current CD player
First Track
F3
Clicking “Previous Track” until back at first track on current
CD Player
Last Track
F4
Clicking “Next Track” until at last track on current CD Player
Scan left
F5
3
Dragging Track Scan wheel to the left on current CD Player
Scan right
F6
4
Dragging Track Scan wheel to the right on current CD Player
Srch Left
F7
5
Spinning Track Search jog wheel anticlockwise on current
CD Player
Srch Right
F8
6
Spinning Track Search jog wheel clockwise on current CD
Player
Play Mode
F9
7
Clicking “Play Mode” button on current CD Player
Time
F10
8
Clicking “Time” button on current CD Player
Page 55 of 62
DJ-1800 version 3.2
User Manual
Play / Pause and Cue shortcuts
These shortcuts are indicated in orange on the keyboard layouts above.
Name on
keyboard layout
Key #1
Key #2
Equivalent to
Play / Pause
Space bar
Clicking on Play / Pause button for current CD Player
Cue
Return
Clicking on Cue button for current CD Player
Play / Cue
M
Toggle between Play and Cue when finding cue points
Ch 1 Play / Pause
Z
Clicking on Play / Pause button for CD Player 1
Ch 2 Play / Pause
X
Clicking on Play / Pause button for CD Player 2
Ch 3 Play / Pause
C
Clicking on Play / Pause button for CD Player 3
Ch 4 Play / Pause
V
Clicking on Play / Pause button for CD Player 4
Select CD Player shortcuts
When using keyboard control, there are certain shortcuts that require you to specify which CD Player you wish
to control. For example, in order to use the Gain + and Gain – shortcuts, you need to specify a CD Player to
modify the Gain settings of. The shortcuts below let you select which CD Player is currently available to control.
The currently selected CD Player is highlighted by a focus ring around the CD Player.
These shortcuts are indicated in yellow on the keyboard layouts above.
Name on
keyboard layout
Key #1
Key #2
Numpad
full stop
Equivalent to
Tog. Cue
Top left
key
Next Channel
Tab
Selects next CD Player (1 2 3 4 1)
Shift-Tab
Selects previous CD Player (1 4 3 2 1)
Ch 1
Numpad
1
Selects CD Player 1 for control
Ch 2
Numpad
2
Selects CD Player 2 for control
Ch 3
Numpad
3
Selects CD Player 3 for control
Ch 4
Numpad
4
Selects CD Player 4 for control
Clicking on current CD Player’s “Cue” button on mixer
Page 56 of 62
DJ-1800 version 3.2
User Manual
Pitch control shortcuts
These shortcuts are indicated in blue-green on the keyboard layouts above.
Name on
keyboard layout
Key #1
Key #2
Equivalent to
Pitch Bend -
9
Clicking and holding down Pitch Bend Minus button for
current CD Player (release key to stop Pitch Bend)
Pitch Bend +
0
Clicking and holding down Pitch Bend Plus button for
current CD Player (release key to stop Pitch Bend)
Tempo Shift 0
- (minus)
Resetting Tempo Shift slider to 0% for current CD Player
Tempo Shift -
= (equals)
Moving Tempo Shift slider upwards on current CD Player
Tempo Shift +
]
Moving Tempo Shift slider downwards on current CD Player
Tempo Shift on /
off
Backspace
Clicking on Pitch button on current CD Player
Page 57 of 62
DJ-1800 version 3.2
User Manual
Channel Volume and Master / Phones Volume shortcuts
These shortcuts are indicated in red on the keyboard layouts above.
Name on
keyboard layout
Key #1
Key #2
Equivalent to
Ch 1 vol +
Q
Moving CD Player 1 Volume fader upwards on mixer
Ch 1 vol -
A
Moving CD Player 1 Volume fader downwards on mixer
Ch 2 vol +
W
Moving CD Player 2 Volume fader upwards on mixer
Ch 2 vol -
S
Moving CD Player 2 Volume fader downwards on mixer
Ch 3 vol +
E
Moving CD Player 3 Volume fader upwards on mixer
Ch 3 vol -
D
Moving CD Player 3 Volume fader downwards on mixer
Ch 4 vol +
R
Moving CD Player 4 Volume fader upwards on mixer
Ch 4 vol -
F
Moving CD Player 4 Volume fader downwards on mixer
Out vol +
Y
Moving Master Volume fader upwards on mixer
Out vol -
H
Moving Master Volume fader downwards on mixer
Cue vol +
U
Moving Phones Volume twister clockwise on mixer
Cue vol -
J
Moving Phones Volume twister anti-clockwise on mixer
Page 58 of 62
DJ-1800 version 3.2
User Manual
Channel Gain and EQ shortcuts
These shortcuts are indicated in dark blue on the keyboard layouts above.
Name on
keyboard layout
Key #1
Key #2
Equivalent to
Gain +
I
Moving the current CD Player’s Gain twister clockwise
Gain -
K
Moving the current CD Player’s Gain twister anti-clockwise
Hi +
O
Moving the current CD Player’s Hi twister clockwise
Hi -
L
Moving the current CD Player’s Hi twister anti-clockwise
Mid +
P
Moving the current CD Player’s Mid twister clockwise
Mid -
;
Moving the current CD Player’s Mid twister anti-clockwise
Low +
[
Moving the current CD Player’s Low twister clockwise
Low -
‘
Moving the current CD Player’s Low twister anti-clockwise
Page 59 of 62
DJ-1800 version 3.2
User Manual
Crossfader control shortcuts
These shortcuts are indicated in cyan on the keyboard layouts above.
Name on
keyboard layout
CF m.lft
CF m.rgt
Key #1
Comma &
number
keys 1 to 4
Period &
number
keys 1 to 4
Key #2
Equivalent to
Clicking on Crossfade Assign buttons 1 to 4 on left-hand
side of Crossfader
Clicking on Crossfade Assign buttons 1 to 4 on righthand side of Crossfader
CF Zero
/ (forward
slash)
Resetting Crossfader knob to middle of Crossfader
Crossfade Zero
Numpad 0
Resetting Crossfader knob to middle of Crossfader
CF <left
Left arrow
Moving Crossfader knob left on Crossfader
CF right>
Right arrow
Moving Crossfader knob right on Crossfader
CF left
Shift + Up
arrow
CF right
Shift +
Down arrow
Moving Crossfader knob far left on Crossfader (releasing
the up arrow returns the crossfader to its previous
position)
Moving Crossfader knob far right on Crossfader
(releasing the down arrow returns the crossfader to its
previous position)
Note that pressing “Shift-left arrow” will move the Crossfader to the far left and leave it there. Likewise, “Shiftright arrow” will move the Crossfader to the far right and leave it there. Pressing “Shift-up arrow” or “Shift-down
arrow” moves the Crossfader to the far left and far right respectively, but returns the Crossfader to its original
position once released.
Holding down the Command key when clicking on a Crossfader channel assign button will toggle the
assignment for that CD Player channel, and change the other three channels on that side of the Crossfader to
be the same. (This is useful to “turn all channels on / off” in one click).
Holding down the Option key when clicking on a Crossfader channel assign button will turn on Crossfader
assignment for that channel, and turn off all other channels on the same side of the Crossfader. (This is useful
to turn on just one channel in one click.)
Page 60 of 62
DJ-1800 version 3.2
User Manual
10. Controller Plug-Ins
About Controller Plug-Ins
DJ-1800 supports a whole range of external hardware controllers via software "plug-ins". Plug-ins act as
extensions to DJ-1800, containing all of the information DJ-1800 needs to initialize and support an external
hardware controller.
Downloading new Controller Plug-Ins
The latest controller plug-ins can be found on the DJ-1800 web site, at the following address:
http://www.dj1800.com/plugins.php
Please visit this web page to download new or updated controller plug-ins for use with DJ-1800.
Installing Controller Plug-Ins
Installing a Controller Plug-In for all users on a Mac
To install a DJ-1800 controller plug-in for all users on a Mac, copy the plug-in into this folder on your Mac:
/Applications/DJ-1800/Plug-Ins/
You can copy either the entire plug-in folder and documentation, or just the plug-in itself.
When you next launch DJ-1800, it will detect and load any plug-ins found in the folder mentioned above. If
you have installed a new plug-in, you will need to quit and re-launch DJ-1800 in order for the new plug-in to
be detected and used.
These instructions assume that you have installed DJ-1800 in the default location of /Applications/DJ-1800/ . If
you have installed DJ-1800 in some other location, simply place the plug-in in a folder called "Plug-Ins"
alongside your DJ-1800 application.
Installing a Controller Plug-In for just one user on a Mac
To install a DJ-1800 controller plug-in for just one user on a Mac, copy the plug-in into this folder:
/Users/[your username]/Library/Application Support/DJ-1800/Plug-Ins/
You can find this Library folder within the current user's home directory.
You can copy either the entire plug-in folder and documentation, or just the plug-in itself.
If either of the "DJ-1800" folder or the "Plug-Ins" folder do not exist, then you will need to create them before
installing the plug-in in this location. Alternatively, If you launch DJ-1800 v3.1 or later, then DJ-1800 will
automatically create the correct folders for you.
When you next launch DJ-1800, it will detect and load any plug-ins found in the folder mentioned above. If
you have installed a new plug-in, you will need to quit and re-launch DJ-1800 in order for the new plug-in to
be detected and used.
Page 61 of 62
DJ-1800 version 3.2
User Manual
Viewing the installed Controller Plug-Ins
If you would like to see which plug-ins are installed, simply open the General Preferences window in DJ-1800,
and select the "Controllers" pane. A list of all controller plug-ins will be displayed, together with the version of
each plug-in.
If a plug-in is listed as being "in use", this means that the plug-in was able to find and initialize a controller
device when DJ-1800 was launched.
If a controller plug-in has a "Web Site" button, click on the "Web Site" button to view the manufacturer's web
page for that controller.
If a controller plug-in has an "Options..." button, click on the "Options..." button to view and change any
preference options for that controller.
Controller Plug-In search order
DJ-1800 searches for controller plug-ins in the following order:
1)
2)
/Users/[your username]/Library/Application Support/DJ-1800/Plug-Ins/
/Applications/DJ-1800/Plug-Ins/
If you have a copy of the same plug-in in both locations, the copy of the plug-in from the first location on the list
will be used.
Creating your own Controller Plug-Ins
For instructions on creating your own controller plug-ins, please download the DJ-1800 Plug-In API, which
contains documentation, plug-in templates and instructions for creating your own plug-ins. You can download
the Plug-In API from this web page: http://www.dj1800.com/plugins.php .The Plug-In API enables you to create
plug-ins for any MIDI-compliant device or HID (Human Input Device)-compliant device, as well as creating
plug-ins for devices with their own custom drivers. You can also use the Plug-In API to create a custom
keyboard plug-in to define your own keyboard mapping.
Page 62 of 62