1
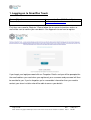
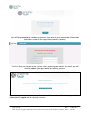
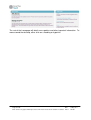
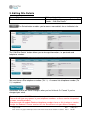
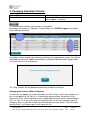
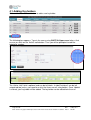
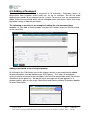
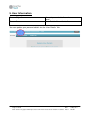
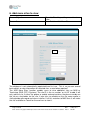
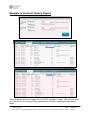
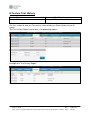
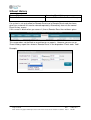
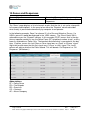
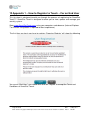
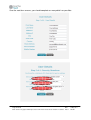
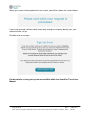
User Manual
Instruction for the Registration
And Operation of
Page 1 of 26
Some screens may appear differently to those shown in the manual due to variations in software
Issue:
Date:
Author:
6
12 May 2011
KW /DL
Table of Contents
1. Logging on to SmartPac Touch ........................................................................................................3
2. Desktop and pull down menus .........................................................................................................5
3. Editing Site Details ..........................................................................................................................7
4. Changing Keyholder Details .............................................................................................................8
4.1 Adding Keyholders.........................................................................................................................9
4.2 Adding a Password ...................................................................................................................... 11
4.3 Deleting keyholders ..................................................................................................................... 12
5. User Information ........................................................................................................................... 13
6. Add more sites to view .................................................................................................................. 14
7.To View Event History .................................................................................................................... 15
8.To view Test History....................................................................................................................... 17
9.Reset History ................................................................................................................................. 18
10.Zones and Responses ................................................................................................................... 19
11.Reports via the toolbar ................................................................................................................. 20
Appendices ....................................................................................................................................... 22
12.Appendix 1 – How to Register to Touch – For an End User ............................................................. 23
Page 2 of 26
Some screens may appear differently to those shown in the manual due to variations in software
Issue:
Date:
Author:
6
12 May 2011
KW /DL
1. Logging on to SmartPac Touch
Screen Objective
Screen Access
Log on to the SmartPAC Touch System
www.smartpactouch.com
First time users need to ‘Register’. Please follow the on screen instructions and an email will be sent to confirm your new details. See Appendix to see how to register.
If you forget your login/password click on ‘Forgotten Details and you will be prompted for
the email address you used when you registered, your username and password will then
be emailed to you. If you’ve forgotten you’re memorable information then you need to
contact your alarm installer who will be able to access your details.
Page 3 of 26
Some screens may appear differently to those shown in the manual due to variations in software
Issue:
Date:
Author:
6
12 May 2011
KW /DL
You will be prompted for random characters from one of your memorable information
questions asked at the registration process (above).
The first time you log on to the system, after receiving your details via email you will
need to update your password for security reasons.
If you leave your desk or do not use the software for more than 15 minutes you will be
automatically logged out for security reasons.
Page 4 of 26
Some screens may appear differently to those shown in the manual due to variations in software
Issue:
Date:
Author:
6
12 May 2011
KW /DL
2. Desktop and pull down menus
Screen Objective
Screen Access
Accessing Pull Down Menus - Homepage
Click on the headings to access all options
Always ‘Log Out’ when you have finished using SmartPac Touch.
The ‘Toolbar’ allows access to various options. ‘Home and Sites’ is your starting point.
This is your homepage and will list your available sites.
The right hand side of this screen allows you to scroll up or down by dragging the arrow.
This example shows both active and’ inactive’ sites. To view and amend sites please
refer to the section titled ‘Add More Sites to View.’
Page 5 of 26
Some screens may appear differently to those shown in the manual due to variations in software
Issue:
Date:
Author:
6
12 May 2011
KW /DL
The rest of the homepage will detail news updates and other important information. To
move around the desktop, either click on a heading or hyperlink.
Page 6 of 26
Some screens may appear differently to those shown in the manual due to variations in software
Issue:
Date:
Author:
6
12 May 2011
KW /DL
3. Editing Site Details
Screen Objective
Screen Access
Editing site details
Home and Sites Homepage – Select – Site
Details – Edit Site Details
The Select button enables you to access more details for an individual site.
The’ Edit Site Details’ button allows you to change information, i.e. postcode and
telephone number.
We must have a Site telephone number (Tel 1 :). A second site telephone number (Tel
2 :) is optional.
Remember to click on ‘Save Changes; when you’ve finished. Or ‘Cancel’ if you’ve
changed your mind.
Please always use CAPITAL letters where possible.
Please do not type any spaces in your telephone numbers as these can be interpreted
as zeros, causing misdials.
Also please do not update Redcare telephone numbers here as this involves a service
change via Redcare. Please send us this via SmartForms via your Alarm Company.
Page 7 of 26
Some screens may appear differently to those shown in the manual due to variations in software
Issue:
Date:
Author:
6
12 May 2011
KW /DL
4. Changing Keyholder Details
Screen Objective
Screen Access
Editing keyholder details
Home and Sites – Select your preferred
site to update - Contacts
The Select button enables you to access more details.
Keyholders are known as ‘Contacts.’ Please always use CAPITAL/Upper case letters
when adding information.
Keyholders can be moved up or down by clicking on the appropriate arrows. You will be
reminded that you have updated something or cancelled something with a pop up box.
You must click on ‘OK’ to proceed.
The “Seq” number will be updated automatically following a change.
Changing the Contact Callout Sequence
As Contacts are added, the system provides you with a ‘Seq’, it puts each contact in a
call list numbered 10, 20, 30 etc. It is possible to move contacts around the list by
altering the ‘Seq ‘ When inputting a new number Administration work in denominations
of 5’s, or 10’s. i.e. If you wish a person to be placed 1st in the call sequence input 10
and press Enter. If you wish the person to be called 2nd, input 20 etc. Site Password
remains Seq 1 so it always goes to the top of the list.
Page 8 of 26
Some screens may appear differently to those shown in the manual due to variations in software
Issue:
Date:
Author:
6
12 May 2011
KW /DL
4.1 Adding Keyholders
Click on the ‘New Contact’ button to add a new keyholder.
The following box appears. Type in the name using CAPITAL/Upper case letters. And
ensure you click on the ‘Active’ radio button. Then you will be prompted to add the
telephone number.
The ‘Active Until’ field is optional and can be left blank. ‘Inside/Outside of’ can be left
untouched too (unless you need to restrict the times we call a keyholder.) Once ‘Update’
is clicked, your keyholder will be added. The keyholder can be edited from then on.
Page 9 of 26
Some screens may appear differently to those shown in the manual due to variations in software
Issue:
Date:
Author:
6
12 May 2011
KW /DL
To add another telephone number, click on ‘Add Phone Num.’ Remember to leave no
gaps in telephone numbers please. To delete a phone number In the Phone numbers
tab, click on the ’X. ‘
Page 10 of 26
Some screens may appear differently to those shown in the manual due to variations in software
Issue:
Date:
Author:
6
12 May 2011
KW /DL
4.2 Adding a Password
The customers Password/PIN is a maximum of 10 characters. Preferably Letters, to
differentiate from engineer codes which we set up as numbers. We do not allow
duplicate passwords to be entered into the system. For ease of use, we recommend a
global shared site password which can be changed when staff leaves rather than every
keyholder having a separate password.
The following screenshot is an example of adding the site password from
scratch. As you ‘Add’ a new keyholder (see previous section) enter the PIN/Password
at the same time.
Adding a password to an existing keyholder.
By clicking on the ‘Edit ‘button next to the chosen contact, a password can be added.
Another keyholder must be added as per ACPO policy. This states all monitored
systems need a minimum of two keyholders who must be contactable within 20 minutes
attendance of the premises. We do not leave messages on answer phones as a
company policy; please refer to our Operational and Administrational Procedure booklet
for more information.
Page 11 of 26
Some screens may appear differently to those shown in the manual due to variations in software
Issue:
Date:
Author:
6
12 May 2011
KW /DL
4.3 Deleting keyholders
Contacts are not to be deleted from the system; they are set as 'Inactive' contacts and
placed into another list which is available for viewing called ‘Inactive.’ This is useful if
you have a site that uses temporary contacts, once the information is input the contact
can be moved from the active to inactive list as required
To delete a keyholder. In ‘Contacts’ choose ‘Edit’
By clicking on the radio button (circle) and changing the ‘Active state to ‘Inactive’, the
keyholder will be taken from the live callout list.
We prefer that keyholder lists are straightforward and easy to amend to prevent errors.
However some sites have special callout instructions, i.e. call Fred for Fire alarms only.
Or always call the security office then Area Manager for some corporate sites. If
procedural instructions or special call out lists exist it is very difficult for you to update
your own keyholders, so we suggest any changes for these sites are done by our own
Administration Department.
Page 12 of 26
Some screens may appear differently to those shown in the manual due to variations in software
Issue:
Date:
Author:
6
12 May 2011
KW /DL
5. User Information
Screen Objective
Screen Access
Amend personal details and see access
level
User Details link on the toolbar
You can update your personal details via the ‘User Details’ link.
Page 13 of 26
Some screens may appear differently to those shown in the manual due to variations in software
Issue:
Date:
Author:
6
12 May 2011
KW /DL
6. Add more sites to view
Screen Objective
Screen Access
Populate Touch by adding more sites to
view.
User Details – Add More Sites
The database is not automatically populated from first use. This is so you can amend
basic details or view information on selected sites as and when required.
The ‘ADD More Sites’ function enables users to view additional sites on MAS or
Touchview (RVR CCTV Systems) The site ID is the ‘cs number’ or ‘alt ID’ to add, it will
only add the site if either the phone or mobile entered matches the phone number on
the site or a keyholder for the site. It also tries to validate on the site name and/or a
site/keyholder password and alarm installer. If all this matches to MAS then it will make
the site available on Touch for the end user to view it.
Page 14 of 26
Some screens may appear differently to those shown in the manual due to variations in software
Issue:
Date:
Author:
6
12 May 2011
KW /DL
7.To View Event History
Screen Objective
Screen Access
Accessing History – Event log
Home and Sites - Select– Event History
Use the ‘Next’ button to move to another date/review history. From the left hand side of
the screen, the date and time is listed of the event that occurred. The ‘EventID’ code is
explained under the ‘Description’ heading.
On Lone Worker Alarms this page will lookup the map.
The Event History Report search box is used to produce reports that can be converted
to e.g. Excel files.
Useful Terminology:
Alarm Accessed = The time an operator picked the alarm up.
FC = Full Clear - An operator finished all alarm handling instructions.
PC = Part Clear – An operator has to return to complete all alarm handling instructions.
CDO = Critical Data Omission – information is missing that prevents the alarm being
handled efficiently. An e-mail is sent to the Alarm Company.
1999 Contact Verified – someone quoted the password as I.D.
HC History Comment = A note left by an operator to leave a log at that time or Admin
has their initials and the date i.e. after they amend information sent via SmartForms.
Page 15 of 26
Some screens may appear differently to those shown in the manual due to variations in software
Issue:
Date:
Author:
6
12 May 2011
KW /DL
Example of an Event History Report.
Select a format to save the report to, i.e. EXCEL, and press Export. You can then alter
or e-mail the file as a normal Excel spreadsheet. ‘Reselect’ to go back and change
dates.
Page 16 of 26
Some screens may appear differently to those shown in the manual due to variations in software
Issue:
Date:
Author:
6
12 May 2011
KW /DL
8.To view Test History
Screen Objective
Screen Access
Accessing Test Results
Home and Sites - Select– Test History
Use this screen to view just Test results, alternatively use Event History to see all
events.
The Test History Report search box is for producing reports.
Example of a Test History Report
Page 17 of 26
Some screens may appear differently to those shown in the manual due to variations in software
Issue:
Date:
Author:
6
12 May 2011
KW /DL
9.Reset History
Screen Objective
Screen Access
Accessing Reset History
Home and Sites - Select– Reset History
If a system is set up to allow for Remote Reset and a Remote Reset code has been
given to a customer this can be viewed separately. Alternatively view via the normal
Event History screen.
If this screen is blank when you access it, then a Remote Reset has not been given.
This screen does not facilitate a search box to run reports. However you can run an
‘Event History; report then choose ‘Remote Reset’ in the drop down ‘Event code:’ field.
Example:
Page 18 of 26
Some screens may appear differently to those shown in the manual due to variations in software
Issue:
Date:
Author:
6
12 May 2011
KW /DL
10.Zones and Responses
Screen Objective
Screen Access
Accessing Zones and their response plan
Home and Sites - Select– Zones and
Responses
The ‘Zones’ page displays a list of channels or pins that the site is set up for, along with
full response descriptions. In the event of an alarm the ‘Dispatch’ column describes
what exactly is presented automatically by computer to an operator.
In the following example, Zone 2 or channel 2 is the Personal Attack or Duress. If a
URN is present it would be displayed in the ‘URN’ column. The ‘Event Code’ 200 is
actionable as per the ‘Dispatch’ column. In this example PF(PF) means that in the day
time an operator would just see the Police Force (PF) telephone number to call, so they
know its actionable as Police Only The brackets describe what is presented in the day
time. Daytime, means the last Open or Close signal was an ‘Open’ or ‘Disarm’ signal.
Night time would mean that the last signal was a ‘Close’ or ‘Arm’ signal. The ‘Level’
column will advise whether the Police attend. This will denote ‘On Response’ or ‘Off
Response.’ (Withdrawn.)
Abbreviations:
PF = Police Force
FB = Fire Brigade
PR = Premises
CO = Contacts
AC = Alarm Company
Page 19 of 26
Some screens may appear differently to those shown in the manual due to variations in software
Issue:
Date:
Author:
6
12 May 2011
KW /DL
11.Reports via the toolbar
Choose the report you need
Select a site from the drop down list
This is a test site
Page 20 of 26
Some screens may appear differently to those shown in the manual due to variations in software
Issue:
Date:
Author:
6
12 May 2011
KW /DL
Example:
Page 21 of 26
Some screens may appear differently to those shown in the manual due to variations in software
Issue:
Date:
Author:
6
12 May 2011
KW /DL
Appendices
1 – How to Connect to Touch
This is for End User Information
Page 22 of 26
Some screens may appear differently to those shown in the manual due to variations in software
Issue:
Date:
Author:
6
12 May 2011
KW /DL
12.Appendix 1 – How to Register to Touch – For an End User
This tip sheet is designed to walk you through the process of registering for SmartPac
Touch™. SmartPac Touch is designed to allow you to view, update and manage your
security system.
Open www.SmartPacTouch.com using your computers web browser (Internet Explorer
7 or FireFox 3 or greater is required for best experience.)
The first time you log in you have to register. Choosing ‘Register’ will show the following
You are an “End User”, you should then click on “I Agree” to accept the Terms and
Conditions of SmartPac Touch.
Page 23 of 26
Some screens may appear differently to those shown in the manual due to variations in software
Issue:
Date:
Author:
6
12 May 2011
KW /DL
Over the next four screens, you should complete as many details as possible.
Page 24 of 26
Some screens may appear differently to those shown in the manual due to variations in software
Issue:
Date:
Author:
6
12 May 2011
KW /DL
The third screen is used to help identify you and attach your account to your own
system and is thus very important that the correct details are entered. Hover over the
lightbulbs for more help/information. If you are still not sure of any of these details, it is
suggested that you contact your service company.
The final step is used to ensure that the person registering is actually human (e.g. can
differentiate between the letters shown which a computer can’t easily do).
Note that each ‘CAPTCHA’ image will be different and you should only enter the details
shown on your own screen.
Page 25 of 26
Some screens may appear differently to those shown in the manual due to variations in software
Issue:
Date:
Author:
6
12 May 2011
KW /DL
When you successfully complete the last screen, you will be shown the screen below
If you have entered sufficient detail accurately enough to uniquely identify you, your
account will be set up.
Possible error messages…
Further details of using the system are availble within the SmartPac Touch User
Manual.
Page 26 of 26
Some screens may appear differently to those shown in the manual due to variations in software
Issue:
Date:
Author:
6
12 May 2011
KW /DL