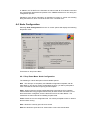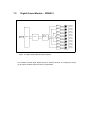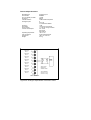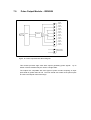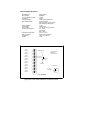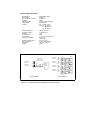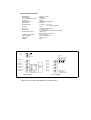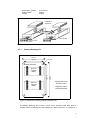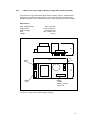
1
VersaNet2
Radio Data Network
User Manual
Radio Data Technology Limited
England
Publication MAN/VN2-USER/2/2002
© 2002 Radio Data Technology Limited
10-11 Taber Place, Crittall Road, Witham, Essex, CM8 3YP, England
Telephone +44 (0) 1376 501255 Telefax +44 (0) 1376 501312
email: [email protected]
Version 2.1 (March 03)
web: www.radiodata.co.uk
Manual Contents
Section 1 General Information
1.1
1.2
1.3
1.4
Introduction
How to use this manual
Safety and limitations of use
Warranty
Section 2 System description
2.1 How VersaNet2 operates
2.2 Data handling
2.3 Software
Section 3 Designing and Building a System
3.1
3.2
3.3
3.4
3.5
3.6
3.7
System Planning
Node locations and Communication Functions
I/O Scheme
Power Supply Requirement
Enclosure Selection
Antennas
Configuring a node
Section 4 VersaNet Manager, VNMGR
4.1
4.2
4.3
4.4
Introduction
Preparing for Configuration
Accessing the Configuration Software
Node Configuration
Section 5 Installation
5.1 Enclosure Installation
5.2 Antenna Installation
5.3 Connecting Cables to a Node
Section 6 Commissioning a System
6.1 Selecting an RF Channel
6.2 Checking Signal Strength
Section 7 Technical Specifications
7.1 General
7.2 Communications Controller Specification
7.3 IRDN201 Digital Output Module
7.4 IRDN202 Digital/Pulse Input Module
7.5 IRDN203 Combination Input Module
7.6 IRDN206 DC Adaptor Module
7.7 IRDN207 Analogue Input Module
7.8 IRDN208 Analogue Output Module
7.9 IRDN209 Pulse Output Module
7.10 IRDN210 Combination Output Module
7.11 IRDN211 Low Power Input Module
7.12 IRDN212 Low Power Pulse Input
7.13 IRDN214 Alarm Output Module
8 Digital Out
8 Digital or Pulse In
4 Dig + 4 Analogue In + PSU
8 Analogue In
4 Analogue Out
8 Pulse Out
4 Digital + 2 Analogue Out
4 Digital + 4 Analogue In
8 Pulse Inputs
8 Alarm Out
Section 8 Accessories
8.1 Enclosures
8.1.1 Depth Extension Kit
8.1.2 Side Extension Kit
8.1.3 Battery Mounting Kit
8.1.4 Antenna Top Plate Mounting Kit
8.1.5 Antenna Bulkhead Cable Kit
8.2 Antennas
8.2.1 ½ Wave Whip
8.2.2 End Fed Dipole & Colinears
8.2.3 Yagi
8.2.4 Low Profile Vandal Resistant
8.3 Cables
8.4 Power Supplies
8.4.1 1 Amp Switch Mode
8.4.2 2 Amp Switch Mode
8.4.3 3 Amp Switch Mode
8.4.4 3 Amp Linear with Battery Charging
8.5 GSM Modem
8.6 Wire Line Modem
Section 9 Appendices
9.1
9.2
9.3
9.4
T2-BUS Connections
RS232 (JP12) Data Highway Connections
RS232 (JP7) Configuration Port Connections
Modbus Protocol
Section 1
1.1
General Information
Introduction
VersaNet2 is a secure radio data network used for a variety of data transfer
applications, including process monitoring and control. The use of radio for such
tasks can permit a more cost-effective and flexible solution than offered by cabled
methods.
VersaNet2 accepts signals from all types of standard industrial transducers
(analogue, digital or pulse count). It then sends these signals, usually by uhf radio,
to one or more remote receiving points where they may be output in their original
form, or to a computer based SCADA system.
Every unit (Node) contains a highly intelligent, fully programmable, communications
controller, which coupled with the units modular structure, offers true flexibility. The
intelligent controller ensures efficient and secure transmission with features such as,
Listen Before Transmit – which saves wasted transmissions on shared bands;
Multiple Error Checks – ensuring data integrity at every stage; a proprietary Radio
Protocol – employing message acknowledgements and automatic retries, improving
transmission security. There are many other features, which are covered in the
relevant sections of this manual.
Powerful repeater functions mean VersaNet2 can reach difficult locations not
possible with other point to point systems. Every VersaNet2 Node can act as a
repeater – even a low power Node and there is virtually no limit to the number of
repeater steps in a chain. ( There are some overall system size limitations
discussed later).
For locations outside of the range of the uhf radio, VersaNet2 has the capability of
using standard wire line modems or GSM. Using this facility, there is virtually no
limit to the coverage area of the system. Each Node can be configured to work with
either a uhf radio, a GSM modem or both. This is particularly useful to enable GSM
to be used as a back-up (secondary route) in case of failure of the radio link. Using
a GSM modem, SMS messages can also be sent for example, to an engineer to
advise of a problem.
All VersaNet2 nodes are constructed and configured from standard modules to
handle various data Input/Output (I/O) combinations, including analogue, digital and
pulse signals. A serial data highway is also available for direct connection to PC's
and equipment used within SCADA systems. Where appropriate, a Node may also
be configured as a Low-Power Node utilising the battery economizer system
By operating in the low-power Industrial, Scientific and Medical (ISM) bands,
VersaNet2 may be used in some countries without the need for a license (UK
MPT1329), or on licensed frequencies, where no license free allocation exists.
VersaNet2 meets the European R&TTE Directive 1999/5/EC and most worldwide
radio standards for both radio performance and EMC regulations such as ETS 300
220, ETS 300 113 and ETS 300 683.
.
1.2
How to use this Manual
Section 1 - General Information
This section should be studied by all users as it gives a good introduction to the
system and contains important safety and warranty information to be followed when
using a VersaNet2 System.
Section 2 – System Description
In this section you will find details of how the VersaNet2 system operates, including
a description of the data handling, I/O addressing and message construction. There
is also a brief overview of the VersaNet2 software modules and how to load and run
them.
Section 3 – Designing and Building a System
This section covers the steps required to successfully plan a reliable and efficient
VersaNet2 Radio Data Network. It helps the reader understand how VersaNet2
operates and how all the component parts interact. It also covers selection of the
correct I/O Modules, Power Supplies, Enclosures and Antennas. The section
finishes with a brief overview of programming a Node, which is described in detail in
section 4.
Section 4 – Versanet Manager (VNMGR)
This section begins with the configuration of the Node hardware and how to
programme the parameters into the Node. There is then a detailed explanation of all
the features programmable through the Node Manager software.
Section 5 - Installation
This section should be followed when constructing, installing and configuring a
VersaNet2 system. It takes the reader through logical steps enabling VersaNet2 to
be operated successfully with minimum effort. The section assumes the desired
system has been properly planned, an I/O scheme drawn-up and the necessary
modules and accessories have been procured.
Section 6 - Commissioning
This section covers the setting up and testing of a VersaNet2 system on site, once
the hardware has been installed. It mainly deals with the radio communications,
selecting RF channels and checking signal strength.
Section 7 – Technical Specifications
There is a general introduction followed by a detailed specification for each module.
Details include mechanical dimensions, circuit block diagram and connection chart.
Section 8 – Accessories
This section includes details of a full rang of accessories to support VersaNet2,
including, enclosures, antennas, power supplies and modems.
Section 9 – Appendices
Details of the various external interfaces including Modbus are given in this section.
1.3
Safety and Limitations of Use
VersaNet2 has been designed to the highest standards to enable it to be used in a
wide range of demanding applications. It is not, however, infallible and should
always be complemented by fail-safe mechanisms in the overall system in which it
operates. VersaNet2 is not authorised for use in life-support or airborne civil
defence applications without express written approval from RDT.
1.3.1 Electrical Safety
The equipment has been manufactured and tested according to ISO9000 guidelines
and has been supplied in a safe condition. When operated from mains power
supplies, the equipment should be properly earthed. It is important that the following
precautions are followed to ensure safe operations:
1.3.2 Physical Damage
If the equipment appears or is suspected of having suffered physical damage due to
extremes of transit or storage it should not be connected to an electrical supply
unless comprehensively checked by an authorised representative of the supplier.
1.3.3
Access to Circuitry
The nature of the product means that live parts may be exposed when the
enclosure lid is removed or if an open mounting arrangement has been used. For
this reason, only qualified personnel aware of the potential hazard should be
permitted access to operational equipment for configuration or maintenance
purposes. If it is necessary to add or remove modules, the power supply should be
completely isolated beforehand. Note that capacitors on the power supply module
may still be charged after the supply has been disconnected.
VersaNet2 makes use of electronic solid state devices, many of which are static
sensitive. Should there be a need to handle the modules, care should be taken to
ensure only the edges are touched and standard precautions for static sensitive
devices should be followed.
1.3.4 Fuses
Fuses are fitted to all power supply modules and should be replaced with new fuses
of the equivalent type, if failure occurs. The use of repaired fuses or short circuiting
fuse holders should be strictly avoided and this will also invalidate the warranty.
1.3.5 Mechanical Safety
In order to construct a VersaNet2 node, the Basic Enclosure may need to have
polycarbonate panels removed to take cables or accessories. This involves the use
of some force and may result in small particles of polycarbonate being a potential
hazard to unprotected eyes. For this reason, it is strongly suggested that in addition
to observing good workshop practice, eye protection is used throughout the node
construction process.
1.4
Warranty
1.4.1 Guarantee
a. The Seller guarantees at its discretion to refund the price of the goods or to
repair or replace free of charge any of the goods found to its satisfaction to be
defective within 12 months of the date of delivery owing to faulty design, materials
or workmanship, provided that the goods have not been modified or repaired other
than by the Seller and have been operated, stored and maintained within the
Seller’s recommendations for use.
b. Goods returned under this guarantee shall be delivered to the Seller’s premises
at the Purchaser’s expense.
c. The Seller’s obligation herein to refund repair or replace the goods is the sole
liability of the Seller as regards the quality fitness or description of the goods and
their correspondence with sample. All other representations warranties conditions
terms and statements as regards the same express or implied, statutory or
otherwise are excluded save where not capable of exclusion at law. The Seller is
under no further liability in contract tort or otherwise for any loss damage or injury
arising directly or indirectly from or in relations to the quality fitness or description of
the goods and their correspondence with samples.
d. The Purchaser shall inspect the goods and notify the Seller of any defects or
other non conformance within 30 days from the date of delivery.
1.4.2 Limitations of Use
Suppliers products are not authorised for use in devices or systems for life support
applications or airborne civil aviation applications without the express written
approval of RDT. RDT does not assume any responsibility for the use of the
products described. No product patents are implied and RDT reserves the right to
change the said products without notice at any time.
Section 2
2.1
System Description
How VersaNet2 Operates
2.1.1 Nodes & Networks
VersaNet2 modules are connected together to form nodes. Each node is configured
to handle its Input and Outputs (I/O) and communicate with other nodes. The way
in which different nodes communicate depends upon the functionality required and
the available radio paths.
8
1
2
5
4
9
7
6
1 1
3
1 0
M
1 2
1
M
V E R S A N E T N O D E
M
M O D E M
R A D IO P A T H
D IA L U P
Figure 1 Example VersaNet2 System
The diagram shows an example VersaNet2 network. All nodes have a
Communication Controller containing the radio and node intelligence, as well as
storing the node configuration in non-volatile memory. Every VersaNet2 Node has
the same capability so they communicate using a ‘peer-to-peer’ architecture rather
than ‘master-slave’.
The main function of Nodes is to send and receive I/O. They operate on a single
radio channel and may be used to form a simple point-to-point system or a network
of nodes with each Node being capable of communicating with any other Node
within radio range. Any Node can function as a 'repeater' or 'relay' which extends
the effective system range and/or permits the circumnavigation of obstacles.
In the above example, Node 12, which is outside of the normal radio coverage, is
fitted with a GSM modem for a dialup connection. This Node can send information
to any other Node in the system via Node 5, which also has a GSM modem. In
addition, any Node fitted with a GSM modem can send SMS messages.
A Node can be fitted with either a uhf radio, a GSM modem, or both, as in the case
of Node 11 in the above diagram. Note that a Wire Line modem can also be used in
place of the GSM. See Section 8 for details of the GSM and Wire Line Modems
supported.
All Nodes within the same system must have a unique Node Number and the same
Network Name.
2.1.2 Communications
A Network is formed by a number of Nodes, with the simplest being a two Node
chain.
Nodes operate entirely on a single configured RF channel. When no data is being
exchanged, the receiver is switched to the RF channel and waits for an instruction.
For example, in a three node network, if node 1 needs to send data to node 2, it first
listens to the RF channel to check it is not in use (Listen before Transmit) and then
sends a message to node 2. Node 2 acts on the message and sends an
acknowledgement back to Node 1.
If Node 3 also wanted to send data to Node 2 at the same time it would have
encountered activity on the RF channel and thus would have waited until it was
clear. Care should, therefore, be taken to ensure your system can handle potential
delays that may occur when channel activity is high.
Every transmission from one Node to another is acknowledged. If a transmission is
unsuccessful then the Node will re-try up to a maximum number of 9 times. The
number of re-tries is configurable between 0 and 9.
If after the programmed number of retries, communication is still unsuccessful and
no acknowledgement is received, a ‘comms-fail’ alarm is activated. It is strongly
recommended that this alarm is programmed to activate only after at least 2 TX
intervals i.e. 2 attempts to send the data. This is because there are a number of
reasons why occasionally radio communications may fail, interference, weather
conditions etc. Setting the alarm delay to twice the transmission interval reduces
false alarms. See section 4.4, programming.
Data to be sent from one Node, (e.g. Node 1), to another Node, (e.g. Node 6), is
programmed in a connection list. A ‘Primary Route’ is also programmed. This gives
information such as send data via Node 2, where Node 2 acts as a repeater. It is
also possible to programme a ‘Secondary Route’. If the primary route fails or is
unavailable for any reason the system automatically defaults to the secondary route.
This route may go via Node 3, where Node 3 is the repeater. The secondary route
may also be a wire-line or GSM Modem.
2.2
Data Handling
The previous pages explained how VersaNet2 operates as a communications
system. This section explains what types of data VersaNet2 can handle and how it
uses this communications system to send securely coded data over sometimes
complex paths.
The explanation breaks down into the following components:
2.2.1 Input and Output Types
Data gets into and out of a VersaNet2 Node via I/O modules, or the I/O on the
Communications Controller module. These I/O modules are connected to the
Communication Controller via T2-BUS interconnections to form a complete Node.
The modules listed in the table below are the “prime” I/O modules and up to sixteen
of each may be used in a single Node. ( Note: to a maximum of 128 inputs and
outputs per Node).
Module Name
IRDN202
IRDN201
IRDN207
IRDN208
IRDN209
IRDN212
IRDN214
No of Inputs/Outputs
Digital/Pulse Input
Digital Output
Analogue Input
Analogue Output
Pulse Output
Low Power Pulse Input
Alarm Output
8 Inputs per Module
8 Outputs per Module
8 Inputs per Module
4 Outputs per Module
8 Outputs per Module
8 Inputs per Module
8 Alarm Outputs per Module
Table 1 – Prime I/O Modules
Note that each channel on the IRDN202 module is software configurable to accept
either Pulse Counting Inputs or Digital Inputs (volt-free contacts).
All these modules must be used in conjunction with a suitable power supply.
The next table lists the three modules having a mixture of I/O types.
Module Name/Code
I/O Configuration
IRDN203 Combination Input
IRDN210
Combination
Output
IRDN211 Low Power Input
4 Digital Input + 4 Analogue Input + Mains PSU
4 Digital Output + 2 Analogue Output
4 Digital Input + 4 Analogue Input + DC Connection
Table 2 – Mixed I/O Modules
Only one of each of the modules in the above table can be used in a Node since
they each have a fixed address. See Section 2.2.2b below.
The final module capable of handling I/O directly is the Communication Controller.
It has the following data ports:
Communications Controller Data Ports
1 Digital Input, 1 Digital Output
1 Analogue Input, 1 Analogue Output
1 Pulse Counting Input, 1 Pulse Output
1 Alarm Output
1 Serial Data Highway
1 Configuration/Monitoring Port
Table 3 – I/O Capability of Controller Module
2.2.2 Addressing
All data inputs and outputs are allocated a unique address enabling data to be
transferred anywhere within a system. Addressing breaks down into two areas:
a. Node Address
Every Node has a unique address, constructed as follows:
[NETWORK NAME] [NODE NUMBER]
For example, Node 3 in network ABC has a Node address of ABC3.
b. Data Address
Each data point is allocated a data address, constructed as follows:
[I/O TYPE] [MODULE NUMBER] [CHANNEL NUMBER]
[ I/O TYPE ]
A
D
P
[ MODULE NUMBER ]
0
1-16
17-29
30
31
32
33-256
[ CHANNEL NUMBER ]
1-N
Analogue
Digital
Pulse
Communications Controller
“Prime” I/O Modules
Virtual Memory
Combination Output
Combination Input
Low Power Input
Virtual Memory
Where ‘N’ is the total number
of that I/O type on a module
Table 4 – Data Address Definition
For example, an Analogue Input Module on a card that has been set to Card
Address 1, will have the following valid data addresses, corresponding to the eight
input channels:
A1.1, A1.2,……. to A1.8
If a second Analogue Input Module is added to the same Node and set to Card
Address 2, the additional addresses available are:
A2.1 to A2.8
A Combination module always takes a unique Module Number of 30 (Output), 31
(Input) and 32 (Low Power Input). The Communication Controller is always Module
Number 0.
Note that it is possible to have an input and an output with the same data address
and Node address. For example, a Node fitted with analogue inputs and outputs
will have the following valid data address:
Inputs A1.1 to A1.8
Outputs A1.1 to A1.4
VersaNet2 will interpret the addresses correctly based on their position in the
message packet, as described in the next section.
c. Virtual Memory (Virtual Address)
From table 4 it can be seen that addresses (channel numbers) from 0 to 16 are
normally used for hardware I/O modules. These addresses are set by DIL Switches
on the modules. It is possible however to use addresses 17 - 29 and 33 - 256 as
Virtual Memory locations (or Virtual Outputs). Note that if no hardware is fitted,
addresses 1 – 16 may also be used as virtual outputs.
When a Node receives data for a Virtual Output, there is no hardware (output
module) associated with this address. Instead, the Node stores the data in memory,
which can be accessed by the SCADA. This data can also be accessed through
VNMGR using the Monitor facility
2.2.3 Message Address Construction
The Node Number and Data Addresses are used to configure VersaNet2 by
constructing messages defining what data is sent to where. Only Nodes with the
same Network Name will communicate with each other. The message packet
construction is as follows:
SOURCE
DESTINATION
ROUTE
Node Number: Data
Address
Node Number: Data Address
Node Number
In normal use, this message is entered in parts by responding to questions during
configuration. For example, Data Input A1.3 on Node number 1 is to be sent via
Node 2 to Node 4 and output on Data Output A1.4
The SOURCE and DESTINATION parts of the message are entered into the
'Connections' screen within the VersaNet2 Node Manager Software (VNMGR). The
ROUTE is entered into the 'Routing' screen.
SOURCE
DESTINATION
ROUTE
A1.3
4A1.4
2
NOTE: It is not necessary to enter the Node number (as part of the address) in the
source, since this is the Node being programmed.
Data inputs may be sent to more than one output by simply entering additional
connections and routes. Similarly, more than one input may be sent to a single
output, but care should be taken to avoid unexpected results. Pulses, for example,
must only have a single input sent to a final destination, otherwise the pulse count
will be incorrect.
2.2.4. Over the Air Protocol.
VersaNet2 uses a proprietary ‘over-air’ protocol to ensure secure sending and
receiving of data messages. A brief description of the message structure is as
follows:
A message is transmitted as a series of fixed length packets, each 23 bytes long. A
message will contain a string of these packets in the sequence, preamble, header,
data. The number of data packets depends on the amount of data in the message.
Each packet takes approximately 75mS to transmit.
Every packet in a message contains synchronization bits, the number of packets in
the message, network name, originating Node and destination Node. Each packet
ends with a checksum, which allows for error checking of each packet at the
receiving Node. The Header packet contains additional information including
message number and routing details. The data packet has 7 bytes reserved for the
message content. Longer messages are split over a number of packets.
If the message is received and decoded correctly with no errors, the receiving Node
sends back an acknowledgement of a single packet.
A full description of the over-air protocol is available from RDT if required.
2.3 Software
There are 3 software modules associated with VersaNet2:
Node Software
Flash Download
VersaNet Manager
filename: NODE2-XX.A20
file name: VNFUD2-XX.EXE
file name: VNMGR2-XX.EXE
Approx size: 325Kb
Approx size: 600Kb
Approx size: 760Kb
These are all supplied on CD and must be loaded into your own PC. See below for
details of loading software. (Note: floppy disk versions are available on request)
The PC should be running Windows 95 or later (including NT and XP)
Note: Software version control is by the two digits shown in the above file names as
XX. For example NODE2.01, NODE2.02 etc. To check the version of software
running on a Node use VersaNet Manager, ‘Test’ facility. See Section 4.4.12
The version of VersaNet Manager in use is displayed in the title bar at the top of the
open window.
Node Software
This programme is written in ‘C’ and then compiled down to machine code. The
programme is loaded into the flash memory of the on-board microprocessor for
each Node.
Note: VersaNet2 Nodes are shipped from the factory with the Node software preloaded. Normally therefore, it should not be necessary for customers to load Node
software. If you need to load software, to update to a new version, follow the
instructions later in this section.
Flash Download
This programme, written in Delphi, is required to download the Node software into
the flash memory of the processor. If you need to update your Node software,
follow the instructions later in this section.
VersaNet Manager.
The VersaNet Manager programme is the main customer interface to a VersaNet2
Node. It allows programming of all customer selectable parameters, data I/O
connections, routing etc. and has powerful monitoring and test facilities. All the
features of VersaNet Manager are described fully in section 4.
The CD Contents
As well as the three major software modules above, the CD has a complete copy of
the VersaNet2 Manual and other useful information. See the leaflet supplied with
the CD for more information.
Running the CD
Place the CD in the drive. Using Windows Explorer, copy or drag the files to a
convenient folder. ( It is advisable to first create a VersaNet2 folder and keep all
information together in this folder). If required, create a shortcut for VNMGR and
send to the desktop.
Downloading Node Software
Connect the Node, configuration port JP7, to your PC with an RS232 cable (see
section 9.3) and power up the Node. Wait for the Node to initialize (Red power LED
‘on’, Orange RX LED ‘on’ and Green run LED ‘on’ and steady).
Open VNFUD.
Check that the correct COM port is selected in the box at the top of the screen.
Using the Browse facility, select the version of NODE software to be downloaded.
Click on it in the VersaNet folder and ‘open’. It will then appear in the Object File
field.
Check that ‘LINK 1’ on the controller card is set to ‘RUN’ position and Click ‘Start
Transfer’.
The first status bar will indicate the progress of the Flash Upload. Once the initial
upload is completed, you will be prompted to move ‘LINK 1’ to the ‘PGM’
(programme) position. The software will then continue with the downloading. The
status bars indicate the progress.
When the download is completed, you will be prompted to move the ‘LINK 1’ back to
the ‘RUN’ position. Wait a short time and you will be prompted that the download
was successful and the new version number will be displayed.
The whole process takes a few minutes.
If you encounter any problem downloading, try aborting the download and checking
the ‘Use Low Speed’ box on the initial screen. This will run the whole process
slower, which may be required for some older machines, especially notebooks.
Section 3
3.1
Designing and Building a System
System Planning
Planning a VersaNet2 Radio Data System requires some knowledge of the
product’s capabilities and how the component parts interact. This section of the
manual begins with a planning overview and continues with all the technical and
practical information required to plan an efficient and reliable radio data system.
3.1.1 OVERVIEW
a. Establish Node Locations and Communication Functions
The first major step in system planning is to establish the location of each Node and
decide on the method of communication, normally uhf radio. Section 3.2 describes
this operation in more detail.
b. Establish I/O scheme
The entry and exit points in the system for all data, including the type etc, should be
carefully planned. This enables the correct I/O modules to be selected, destinations
for each message and the update period for each communication to be established.
Refer to Section 3.3 for more information.
c. Establish Power Supply Requirements
Having selected the I/O modules, the overall current consumption can be calculated
and the necessary power supply modules selected. Refer to Section 3.4 for power
consumption of modules and power supply options.
d. Select Enclosures and Accessories
The number, type and size of enclosure space required for each Node should be
calculated. Additional enclosures and fixings can be selected if required. Refer to
Section 3.5 for Enclosure sizes.
e. Select Antennas and Fittings
Refer to Section 3.6 for Antennas and cable. Select the correct antenna for the
application based on location and required coverage distance.
3.2
Node Location and Communication Functions.
The best approach to planning a system is to start by drawing the proposed network
on paper, or better still on a map of the area. Check that distances between sites
are within radio coverage range and that there are no large obstructions blocking
the line of sight between Nodes. Refer to Section 3.6 for guidance on antenna
selection and coverage range. Remember that raising the height of the antenna
clear of all obstructions will significantly increase coverage range and improve
reception.
Accurate planning will almost certainly require visits to sites. Care should also be
taken on locating the equipment. This should be positioned, wherever possible, in a
sheltered location with easy access for installation and ongoing maintenance.
Distances between the radio and antenna should be kept to a minimum for optimum
performance.
In addition to uhf radio, VersaNet2 provides for connection using wire line modems
or GSM. If any of the proposed sites are outside of the normal radio coverage area,
one of these options could be considered. If GSM is an option, check with the local
carrier on coverage for the proposed sites.
During the planning stage, consideration should be given to Secondary Routing.
VersaNet2 can be programmed to automatically select an alternative route if the
Primary Route (first choice) fails for any reason. This is a very powerful feature
giving added system integrity and it can make use of wire line or GSM modems for
the secondary route as an alternative to radio, or where a second radio path is not
possible.
3.3
I/O Scheme
Refer to Section 2.2 for details of available I/O.
As part of the planning process, the input and output requirements for each Node
must be decided. This will enable selection of the correct I/O modules and in turn,
the correct power supply and housing.
It is a good idea at this stage to produce a connection list for each Node detailing
the inputs and their corresponding outputs on other Nodes. This information will be
required when programming the Node. In addition, from the network drawing,
decide on any requirement for secondary routing and possible use of GSM or Wire
Line modems. All of this information will ensure correct selection of hardware and
make it easy to programme the Node prior to installation.
3.3.1.
Routing
Data can be sent from any Node in the network to an output on any other Node in
the network. To enable this facility, information about the route the message takes
through the network must be programmed into the relevant Nodes. Refer to the
network example shown in figure 1, section 2.1.1.
Each Node in the network can communicate with an adjacent Node directly without
repeaters and therefore requires no entry in the routing table for these straight point
to point connections. In the example Node 7 can communicate directly with Nodes
6, 8, 9, 10 and 11.
To send a message from Node 2 to Node 7 however requires Nodes 4, 5 and 6 to
be used as repeaters. These Nodes must be programmed with routing information.
Node 2 must be told to go via Node 4. Node 4 must be told to go via Node 5 and
likewise Node 5 is told to go via Node 6. Note that Node 6 needs no routing since
Node 7 is adjacent.
Note. There is no need to programme reverse paths for acknowledgements. These
are learnt from the outward message.
3.3.4.
Secondary Routing
A Secondary route may be programmed, which will be automatically selected if for
any reason the Primary route fails, or is unavailable. In figure 1 assume Node 1 is
programmed to send to Node 3 via Node 2. Node 1 would have the routing
information programmed as in 3.3.1 above.
A Secondary route could be
programmed to go via Node 4 in the event of a problem with the Primary route.
Node 1 may be programmed to send a digital input D0.1 to a digital output 3D0.1. It
is programmed for 3 retries. If after 3 retries the communication is unsuccessful,
there has been no response from Node 2, it will automatically default to the
secondary route and make the connection via Node 4. At the next transmission it
will revert to the Primary route again and repeat the process if the problem still
persists. Note that the ‘comms-fail’ alarm will be activated by the failure of the
Primary route. There is no alarm on the secondary route.
3.4
Power Supply Requirements
There are a number of options for powering a VersaNet2 Node. It may be powered
directly from a DC supply or from an optional mains supply. There is also the
possibility to configure the mains supply for battery back-up. The total power
requirement for the Node must be calculated (see table 5 below – use Max values)
and the correct power supply selected.
A small Node can be constructed using an IRDN203 Combination Card and a
Communications Controller Card. The IRDN203 has a built in mains supply that can
run both itself and the Controller. The Power Supply does not have enough
capacity to run any further cards.
A further option is to construct a Low Power Node. This is particularly useful for
remote locations with no mains power availability. The Node can be powered by
batteries running from Solar Cells or Wind Generator. There are 2 cards especially
designed for this purpose, the IRDN211 and IRDN212.
Current consumption of cards
Card type
Description
Typ
current
Max
current
IRDN200
IRDN201
IRDN202
IRDN207
IRDN208
IRDN209
IRDN210
Communications Controller
8ch Digital Output
8ch Digital or Pulse Input
8ch Analogue Input
4ch Analogue Output
8ch Pulse Output
Combination – 4 Digital + 2 Analogue
Output
380mA - RX
130mA
50mA
50mA
50mA
50mA
50mA
650mA - TX
250mA
70mA
100mA
120mA
75mA
120mA
IRDN211
IRDN212
Low Power Input, 4 Digital + 4 Analogue
Low Power Input, 8 Pulse
*50mA
5mA
100mA
5mA
WMOD2B
TD-32
GSM Modem (Wavecom)
Wire Line Modem (Westermo)
130mA
700mA - TX
Table 5 Module Current Consumption
* Only 400µA in sleep mode ( see section 3.4.8)
3.4.1 DC Power Supply
A 12v DC power supply can be connected to the Communications Controller Card
through connector JP13. This supply is then distributed via the T2-BUS to all the
other cards in the Node. Use the table above to calculate the maximum current
required for the particular Node configuration. Note that the maximum input current
at JP13 is 3 Amps. A second supply can be added if required using a DC Adaptor
card IRDN206.
3.4.2
Mains Power Supplies
An integral mains power supply can be fitted in the Node, with the DC output
connected to JP13 of the controller card for distribution to other cards, as above.
Calculate the total current consumption of the Node from the above table, then
select the appropriate power supply as follows:PSU 1291
PSU 1292
PSU 1293
90 - 264vAC - 12v output @ 1.0 A Nominal Size 90L x 51W x 22H
90 - 264vAC - 12v output @ 2.0 A Nominal Size 102L x 51W x 32H
90 - 264vAC - 12v output @ 3.0 A Nominal Size 102L x 51W x 32H
Notes
Two or more power supplies may be fitted for larger Nodes, where required. To
connect a second power supply a DC Adaptor Unit, IRDN206, will be required to
connect the supply directly to the T2-BUS.
C O M M S
C O N T R O L L E R
T 2 -B U S
V E R S A N E T 2
I/O M O D U L E S
P O W E R
S U P P L Y
T 2 -B U S
D C
A D A P T O R
IR D N 0 0 6
O P T IO N A L
2 N D
P O W E R
S U P P L Y
P S U 1 2 9 1
P S U 1 2 9 2
P S U 1 2 9 3
Figure 2 Module arrangement for Mains Powered Option
3.4.3
Battery Back-up
There are a number of factors to be considered when using battery back-up. For
this type of application, where the battery will be continuously trickle charged, it is
recommended to use a sealed lead acid battery.
If the battery becomes discharged, during a power failure for example, it will initially
draw a high current from the power supply, when the mains supply returns. This
means the power supply must be capable of handling the current requirement for
the Node, plus this initial (inrush) demand from the battery. To select a Power
Supply with the correct rating therefore, you need to calculate the current for the
Node and add the battery inrush current.
First, you must calculate the capacity of the battery required.
From table 5 above add up the total power requirement for the Node using the
typical figure. ( This assumes a reasonable duty cycle where the Node will not be
taking full power most of the time. If the Node is exceptionally busy and has a high
duty cycle, use the ‘max’ current figures)
Decide on the length of back-up required.
The length of back-up in hours, multiplied by the total current (in Amps) for the Node
will give the size of battery in Ah.
Example:
Total current (typ) for Node
= 560mA
= 0.56A
Back up time 4 hours
4 hours x 0.56A = 2.2 Ah minimum.
or
Total current (max) for Node = 1,000mA
= 1.00A
Back up time 4 hours
4 hours x 1.00A = 4Ah
It is not recommended to discharge the battery below about 50% therefore for the
above example a battery of about 4 Ah and 8Ah respectively, should be used.
Now calculate the capacity of the Power Supply/Charger.
This is the total of the Node requirement using the max figures from table 5 plus the
inrush current for a 4 Ah or 8Ah battery.
Battery specifications vary for different makes but as a guide the following apply:4 Ah battery Inrush current 1A
8Ah battery Inrush current 2A
16 Ah battery Inrush current 4A
Node max current 1A plus inrush current 1A requires a 2Amp Power Supply
Node max current 1A plus inrush current 2A requires a 3Amp Power Supply
In both the above cases the battery will take approximately 6 to 8 hours to recharge
when flattened about 50%.
From completely flat it will take 20 to 24 hours but it is strongly advised not to let
batteries discharge below the 50% level.
C O M M S
C O N T R O L L E R
T 2 -B U S
P O W E R
S U P P L Y
B A T T E R Y
P S U
VersaNet2
V E R S A N E T 2
I Modules
/O M O D U L E S
1 2 8 9
Figure 3 Module arrangement for Battery Back-up
The following Power Supply/Battery Charger is recommended for the above
applications:
PSU 1289
240vAC 12vDC output @ 3 Amp
Size 171L x 89W x 70 H
3.4.4
ENC 005 Battery Mounting Kit
The Battery Mounting Kit, ENC/005, is used in conjunction with the Basic
Enclosure, ENC/001, to facilitate connection of a battery to a VersaNet2 Node. The
kit comprises a cable to go from the VersaNet2 module to the battery and a metal
base plate incorporating battery retainers for standard 3 A/hr lead acid batteries.
3.4.5
IRDN 203 Combination Input Module
This module is used to provide an on board AC mains power supply and some data
inputs, thus forming a small Node. The power supply is only capable of running this
card plus the Communications Controller. This option provides a Node with the
standard Digital, Analogue and Pulse I/O of the Controller, plus 4 Digital and 4
Analogue Inputs on the IRDN203 Card.
3.4.6
IRDN 211 Low Power Input Module
This module can be used with a Communications Controller (IRDN200) operating in
Low Power mode. Such a Node is configured to enter a sleep mode during which
period the current consumption is less than 400 µA. The possible Low Power
modes of operation are explained in more detail in section 3.4.8
Alternatively, this module may be used in a standard permanently powered system
as a cost effective means of combining 4 x Digital & 4 x Analogue Inputs.
3.4.7
IRDN 212 Low Power Pulse Input Module
This module can be used with a Communications Controller (IRDN200) operating in
Low Power mode. Such a Node is configured to enter a sleep mode during which
period the current consumption is 5mA. Whilst in sleep mode, the Node continually
counts pulses, transmitting the totalised count each time the Node wakes up. The
possible Low Power modes of operation are explained in more detail in section
3.4.8
Up to sixteen of these modules may also be used in a standard permanently
powered system.
3.4.8
Low Power Modes of Operation
For applications where Nodes are located at sites without suitable external power
supply, a Node may be configured to operate from a DC supply such as a battery,
with the Node switching into a low current sleep mode in between operations, to
conserve battery life. It is possible to connect a DC system comprising a battery
and solar panel / wind generator to replace current consumed over time, thus
eliminating the need to visit remote sites to replace discharged batteries.
The Communications Controller module (IRDN/200), can be programmed to operate
as a Low Power Node making use of its on board I/O. If additional I/O is required
then only the Low Power Input modules (IRDN/211 & IRDN/212) may be used.
Attempting to use any other VersaNet2 module in this mode may cause damage to
the module and invalidate the warranty.
Normally a Low Power Node would be at the remote end of a link, used to gather
information and transmit back to a central Node. Additional inputs can be added
with the 211 and 212 modules. If however the Low Power Node is used at the
receiving end, only the single inputs on the Controller Card are available.
A Low Power Node can be used as a repeater to extend coverage distance. In this
case it must be programmed as a Low Power Receiver so that it will wake up and
receive the signal for onward transmission.
The following section shows examples of Low Power Node configurations:
a.
Low Power Transmitter (Send & Sleep Mode)
In this mode, the Node switches on at the end of the sleep period or when the
Digital Input (D0.1) on the Communications Controller changes state. The function
of the Alarm relay is changed so that it is activated when the Node switches on and
can be used as a means of switching power to an external device, via a DC Adaptor
Module, IRDN 206.
If the 'Pre Transmit On-Time’ is programmed then the Alarm Relay will activate
earlier, to allow time for the external device to become fully operational and a
reliable reading to be taken prior to transmission.
Note: The maximum power available for the external device is 12V @ 250mA.
Once powered, the Node then rapidly scans all inputs, switches to transmit mode
and sends the data to the configured destination. It then switches back to receive
mode to accept the acknowledgement before de-activating the Alarm relay and
returning to the sleep condition for a further programmable sleep period.
The transmit and receive periods, will vary in accordance with network activity, but
should be approximately 100mS each. During the sleep periods the Node only
draws 400uA. It draws the normal current during the transmit and receive periods.
During the pre transmit on-time the Node will draw the same as in the receive state.
Note: In this mode of operation the alarm relay is used to switch an external device
and is therefore not available for normal alarm operation.
C O M M U N IC A T IO N S
C O N T R O L L E R
IR D N /0 0 5
T -B U S
L O W
P O W E R IN P U T
M O D U L E
1 0 -1 4 V
D C IN P U T
O R
T -B U S
D C A D A P T O R
IR D N /0 0 6
1 0 -1 4 V D C O U T P U T
T O P O W E R S E N S O R S
1 0 -1 4 V
D C IN P U T
Figure 4 Low Power Node with Power to External Device
b. Low Power Receiver (Sniff Mode)
In this mode, the Node is powered down for 1.9 seconds out of every 2 seconds.
During the remaining 100mS, the Node powers up, initialises the receiver and looks
for a carrier on the channel. If a carrier is detected (on the channel but not
necessarily for that Node) the Node powers up and receives the message.
If the message is not for this Node, it powers down. If it is for this Node, the Node
will act upon the message and power down when the action is completed.
The transmitting Node will send out a long preamble (2.5 - 3 seconds) to get the
attention of the Low Power receiver. It is recommended that the Transmitter is
programmed for at least 2 re-tries.
The Node draws only 400uA during the sleep period but draws the normal current
during transmit and receive periods.
Any transmitter always assumes it is talking to a Low Power receiver, when it first
communicates. Once a successful communication has taken place, the Transmitting
Node remembers which Nodes are Low Power and from then on sends the long
preamble to those Nodes.
c. Low Power Transmit and Receive
It is possible to programme a VersaNet2 Node to operate in both Low Power
Transmit and Low Power Receive mode simultaneously. The Node will operate
exactly as described in section ‘a’ above, except that during the normal sleep
period, the receiver will be ‘sniffing’ every 2 seconds, looking for carrier.
d. External Wake-up of Low Power Node
A Node configured as a Low Power Node may be woken up by changing the state
of the digital input (D0.1) on the Communications Controller. Once awake, the Node
will operate as specified under sections ‘a’, ‘b’ and ‘c’ above, as configured by the
user. Each time the Node is woken up, it sends the status of all its inputs to their
programmed destinations.
3.5 Enclosure Selection
In order to actually select the size of enclosure required and hence procure the
correct parts, more information is required. By now, you will have drawn up a list of
the modules required at each Node. Using the table below, calculate the total
height of all modules in each Node:
Module Number and Name
IRDN200 Communications Controller
IRDN201 Digital Output
IRDN202 Digital/Pulse Input
IRDN203 Combination Input
IRDN206 DC Adaptor
IRDN207 Analogue Input
IRDN208 Analogue Output
IRDN209 Pulse Output
IRDN210 Combination Output
IRDN211 Low Power Input
IRDN212 Low Power Pulse Input
IRDN214 Alarm Output
PSU1291 1.0 Amp Power Supply
PSU1292 2.0 Amp Power Supply
PSU1293 3.0 Amp Power Supply
PSU1289 3.0 Amp Power Supply/Battery Charger
Height/mm
32
22
32
47
32
22
22
22
32
32
22
32
30
40
40
80
Table 6 Module Heights
Depending upon the number of Depth Extensions fitted, the available height of the
enclosure is:
Enclosure Construction
Basic Enclosure only
Basic Enclosure + 1 Depth Extension
Basic Enclosure + 2 Depth Extensions
Available Height
108m
158mm
208mm
Table 7 Enclosure Heights
Where the height of the modules exceeds 208mm or available height is restricted,
side extensions (ENC/002) may be used to link enclosures. Where space permits,
side extensions may also be used to improve access to terminations.
See Section 8.1 for details.
3.6
Antennas
Any antenna with a 50 ohm impedance designed for use at the relevant operating
frequency band may be used, with the selected type dependent upon the
application. The radio range achieved will be dictated by the land topography
between the Nodes. In general, at UHF, good communications will be achieved up
to 20km with 500 mW of power if there is line-of-sight. For applications where clear
line-of-sight is not possible, the link integrity may be tested using the Received
Signal Strength Indicator (RSSI) of VersaNet2. In many situations, raising the
height of an antenna can dramatically improve performance.
With VersaNet2, additional Nodes can always be inserted as 'Relays' to increase
the overall system range. A particular feature of VersaNet2 is that every Node can
act as a repeater, therefore every Node is a potential relay point.
Antennas can be connected to VersaNet2 in two ways. The first is for enclosure-top
antennas, such as the RDT part ENC206, which is connected via the Antenna
Mounting Kit (ENC003), fitted to the top of the enclosure. Alternatively, different
types of antennas may be connected via a suitable RF feeder cable to the N-type
female socket provided by the Antenna Bulkhead Cable kit (ENC007). This is fitted
to the gland plate in place of a cable gland.
Three different types of antennas cover the majority of applications, as shown in the
table. These details are only a guide and the precise antenna performance may
vary in different applications and between different manufacturers.
Antenna Type
½ Wave Whip
End-fed Dipole
8 Element Yagi
Range
Up to 1 Km
Up to 10 Km
Up to 20 Km
Coverage
Omnidirectional
Omnidirectional
Directional (40º)
Gain
-3dB
0dB
10dB
Mounting
Enclosure top
Pole Mounted
Pole Mounted
Applications
Short range, general
Medium range, general
Long range, directional
Table 8 Antenna Types
3.6.1 Feeder Cables
Many different types of RF feeder cables are available, designed for different
applications. For most VersaNet2 applications the following types are suggested:
Cable type
Ohms
Loss dB/10m
Max
length
URM67 or RG213/U
Heliax LDF-250
50
50
2
0.8
25m
75m
suggested
Table 9 RF Feeder Types
3.7
Configuring a Node
Introduction
The following steps must be carried out to ensure your VersaNet2 system is
correctly constructed, configured and installed.
1. Plan your system, noting all Node locations, I/O connections and signal routes.
2. Connect power to each Node.
3. Configure each Node to meet the requirements of the plan, using VNMGR
4.
Securely install each Node, its associated antenna system and connect
Input/Output (I/O) terminations as required.
5. Run Commissioning and Test routines on each Node.
6. Check all terminations and then secure enclosure lid (if used).
Note: The Node may be configured on site, after installation, if preferred. It is
however generally easier to programme the Nodes in advance working in an office
environment. An alternative is to prepare the configuration files in the office and
save them ready for simple download on site.
The following sections 3.7.1 to 3.7.3 give a brief overview of the Node
configuration procedure. Refer to Section 4 for a complete guide to the features and
facilities available through the VNMGR software.
3.7.1 Module Hardware Configuration
1
4
3
2
O N
Configuration of the I/O modules consists of setting the DIL switches marked SW1 &
SW2 on each of the expansion modules (see diagram).
T -B U S
C O N N E C T O R S
1
2 o n ly f itt e d o n m o d u le s
w ith a n a lo g u e in p u ts
2
4 -2 0 m A
2
3
4
0 -5 V
1
S W
O N
S W
S W
Figure 5 Location of DIL Switches on Modules
DIL switch setting should be performed without power connected. Each I/O module
should be set to a unique address for that module type in a Node. For example, up
to sixteen Digital Output modules may be used in a single Node, with the DIL
switches on the modules set from one to sixteen. The actual switch positions
required are shown in Table 6.
SW1 SETTING
ADDRESS
1
2
3
4
On
Off
On
Off
On
Off
On
Off
On
Off
On
Off
On
Off
On
Off
On
On
Off
Off
On
On
Off
Off
On
On
Off
Off
On
On
Off
Off
On
On
On
On
Off
Off
Off
Off
On
On
On
On
Off
Off
Off
Off
On
On
On
On
On
On
On
On
Off
Off
Off
Off
Off
Off
Off
Off
1
2
3
4
5
6
7
8
9
10
11
12
13
14
15
16
Table 6 DIL Switch Settings
The Digital/Pulse Input module is configured in software to accept Digital or Pulse
inputs for each of the eight input channels.
In addition to this configuration, the Analogue Input Module, Combination Input
Module and Low Power Input Module may also be configured to accept either
analogue voltage or current inputs. This is done by switching the DIL switch, SW2,
shown in Fig 5, between “Volts” and “mA” for each channel.
Communications Controller
The Communications Controller Card has a number of Switches, Links and
Connectors with the following functions.
Switch 1 (SW1). 4 way DIL switch.
SW1/1
OFF normal operation
SW1/2
OFF normal operation
SW1/3
OFF normal operation
SW1/4
ON Normal operation
ON
ON
ON
OFF
factory test only
factory test only
factory test only
turns off LED’s
SW1/4 may be used to switch off LED’s, on a low power Node, to reduce current.
Link 1
Link 2
Link 3 & 4
Link 5 & 6
RUN Normal operation or PGM programming mode (see Sect 2.3)
Sets Analogue input to V (1-5volts) or mA (4-20 mA)
Sets Digital input to LP (low power mode) or ISOL (normal mode)
Sets Pulse input to LP (low power mode) or ISOL (normal mode)
JP 1 & JP 2
JP 3
JP 4
JP 5
JP 6
JP 7
JP 8
JP 9
JP 10
10 way IDC connectors for the T-BUS
Not fitted
Set jumper to position 5 for mains operation and position 3 for battery
operation.
In position 5 the unit will stop working if the DC falls below 10v
indicating a mains failure.
In position 3 a battery low alarm will be given at 10v although the unit
will continue working below 10v (at reduced power).
16 pin connector for Radio Module
Factory test only
9 Way ‘D’ plug for configuration port
5 Way plug for Digital I/O
3 Way plug for Alarm output
4 Way plug for Analogue I/O
JP 11
JP 12
JP 13
4 Way plug for Pulse I/o
9 Way ‘D’ plug for Data Highway port
2 Way plug for DC input.
See Section 7, Technical Specification for pin connections and current ratings.
CD
RUN
RF-Tx
RF-Rx
UHF Synthesised
FM Transceiver
ALARM
POWER
JP4
5
3
1
Type IRDN031/0
LK1
406 to 470 MHz
500 mW max.
RUN
PGM
4
Frequency Range
ERP
3
Made in England
ON
2
Radio Data Technology Ltd
1
JP6
SW2
SW1
SW3
JP7
LK2
V
mA
LK3 LK4
LK5 LK6
LP
ISOL
DIGITAL
JP10
PULSE
JP8
JP9
JP11
1 2 3 4 5
6 7 8
9 10 11 12
13 14 15 16
Digital
I/P O/P
Alarm
Output
Analogue
I/P O/P
Pulse
I/P O/P
JP12
JP13
17 18
RS232
DC
Supply
Figure 6 Communications Controller Module
3.7.2 Node Software Configuration
Before a Node can operate, it must be configured with information concerning its
role in the system and any data it has to handle. It is the Communications
Controller module in each Node that is configured with this information, stored in
non-volatile memory. In addition, where applicable, each I/O module must be
configured to its address within a Node using DIL switches.
Note: The controller module is normally supplied with NODE software installed. If for
any reason you need to install software or upgrade to a new version, see Section
2.3 for details.
3.7.3
Using VNMGR
Connect the configuration cable supplied to the correct port of the PC and connect
the other end to JP7, the RS232 Port, on the controller. Power the Node and wait
until the Node has initialized. This is indicated by the following LED’s, Red power
‘on’, amber RX ‘on’ and green run ‘on’ in steady state, not flashing. This takes a few
seconds.
Open VNMGR on the PC. Watch the Icon in the top right corner. Blue dots will
travel from the Node Icon to the PC Icon. This is the PC uploading data from the
Node.
Select the Node Configuration pull down menu, and select ‘New’ or ‘Receive from
Node’. The latter will upload the current settings, which can be overwritten.
Fill in the boxes on the Network screen. Note; if a GSM modem only is to be used
on the Node, tick the GSM only box. The radio parameter fields are then greyed out
because they are not relevant.
Use the tabs at the bottom of the screen to move to the other screens.
Complete the Connections screen with all the I/O information for the Node. Note: all
the module cards that are connected will be displayed on the left of the screen.
Each can be opened out to show the I/O available.
Complete the Routing screen, if required. This information is needed for networks
with multiple Nodes so that each repeater stage has details of the route to the final
destination.
Complete the Highway screen only if GSM, wire line modems or Modbus are being
connected to this Node.
Complete the SMS and Dial-up screens only if a GSM or external wire line modem
are being connected.
Note: if any of the boxes are completed incorrectly, warning messages will appear
asking you to make a correction.
Screenshot 1 Warning Message
Once all the information is complete, select the
Node Configuration pull down menu and select
‘Send to Node’. Watch the icon in the top right
corner and red dots will travel from the PC icon
to the Node icon, indicating downloading.
There is also information under the icon on the
download status. This process may take a few
minutes depending on the speed of the PC and
the file size (number of connections etc.).
Screenshot 2 Download Icon
As soon as the download is completed, power the Node down, wait a few seconds
and power up again. This ensures that the Node will reset to all the new
parameters and connections. The Node is now operational.
Section 4
VNMGR
Introduction
A VersaNet2 Node is normally supplied with the NODE Software already installed. If
you need to install new software or update to a later version, see Section 2.3 for full
details on software installation.
The VNMGR programme does not alter the Node software, but it allows the user to
configure parameters, which are then downloaded and stored in non volatile
memory.
Before configuring the Communications Controller, if any other I/O cards are fitted to
the Node they must have their address set using the on board DIL switches. See
Section 3.7.1 for switch settings.
4.1 VNMGR Introduction
VersaNet2 is a truly modular radio telemetry product offering unrivalled flexibility.
Any VersaNet2 Node can have Digital, Analogue, Pulse and Serial Data I/O
capabilities. The powerful configuration program permits any Input Channel to be
sent to any Output Channel destination anywhere within the radio network. This
concept enables the construction of simple ‘point-to-point’ links or complex multiNode networks from a standard range of I/O modules, providing an efficient and
economical solution for every application.
VersaNet2 normally communicates using UHF Radio Links but it also has the
capability of using modems, wire line or GSM, to further increase its flexibility.
Using a modem increases the range to virtually any geographical location well
outside of the range of the UHF Radio. A Node can be configured to use UHF Radio
only, an external modem only or a combination of both. A GSM Modem may for
example be configured as a back-up (secondary route) in case of failure of the main
radio path.
The VersaNet2 Communications Controller is supplied with VersaNet2 Manager
configuration software (VNMGR). This software runs on a standard PC under
Windows 95 (or later) and facilitates the rapid installation of a VersaNet2 system.
See Section 2.3 for more details on system requirements and installation.
4.2 Preparing for Configuration
Each VersaNet2 Node must contain a Controller module and, optionally, a selection
of I/O modules from the standard range available. It is the Controller that must be
configured using the VNMGR software supplied with the system.
In addition to the software you will require a PC running Windows 95 (or later) and a
configuration lead (serial data cable) which is supplied with the Controller.
Connect one end of the configuration lead to the appropriate serial port (RS232) on
the PC. The other end of the lead must be connected to the RS232 configuration
port (JP7) on the Controller. See Figure 6 Section 3.7.1 for board layout.
4.3 Accessing the Configuration Software
Install the VersaNet2 Manager software (vnmgr2-XX.exe) onto your PC by following
the instructions printed on the floppy disk or CD supplied with your system, or as
follows:• Insert disc into floppy drive ‘a’ (or CD in appropriate drive)
•
•
View the directory of drive ‘a’ (or CD) using explore
Copy the vnmgr2-XX.exe file to your preferred folder and create a shortcut
or
Drag the VNMGR Icon directly to the desktop
Note. The version of the software is indicated by the number 2.XX i.e.2.01, 2.02 etc.
Once installed, access the software by ‘double-clicking’ the VersaNet2 Icon on your
screen.
When the software has loaded the following screen will be displayed:-
Screenshot 3 Initial Screen
The next step is to select the correct COM port for sending and receiving data to the
Controller. This is achieved by selecting the Setup drop down menu at the top of
the screen. Next select Port and you will see a list of available COM ports for this
PC. Select the correct COM port from the list shown. The software will always
default to this COM port in future.
In the top right-hand corner of the screen you will see a colour graphic which shows
a PC and Controller. Assuming that the Controller is powered and the configuration
lead is connected correctly, a thin white line should be visible connecting the PC to
the Controller Icon and the Controller Icon will be green/yellow in colour.
If the white line is not visible and the Controller Icon is displayed in dark green then
there is no communication and you must check the Configuration Lead, the power
supply to the Controller and the Setup Port selection to find the problem. Note:
when first connected it may take several seconds for communication to be
established.
When you first access the VNMGR software, all the
static data from within the Controller is uploaded. Static
data refers to parameters that are factory set within the
radio and cannot be modified using the VNMGR
software, such as, Radio Serial Number, Operating
Frequency Range, Max number of radio channels,
Channel Spacing etc.
Screenshot 4
In addition, the T2-BUS on the Controller is scanned and all I/O modules connected
are automatically detected and reported to the VNMGR software for use during the
configuration process.
Uploading of the above information is indicated on-screen by a blue dot traveling
along the white line, which connects the PC to the Controller Icon.
4.4 Node Configuration
Selecting Node Configuration from the on-screen options will display the following
drop down menu:-
Screenshot 5 Drop Down Menu
4.4.1 Drop Down Menu ‘Node Configuration’
The following is a brief description of the available options.
New This will open a completely new VNMGR configuration template, with all
fields blank. If you have a current configuration file open, you will be prompted to
save or discard the file before opening a new template.
Open Allows previously saved configuration files to be opened. If for example,
several Nodes are being programmed and they all have similar connections, once
the first has been configured, save the file and use it for the other Nodes. The
saved files are also useful when installing a spare Node.
Close Closes the current configuration file. You will be prompted to save or discard
the file before closing.
Save Allows the currently open file to be saved.
Save as Allows the open file to be saved under a new name and location.
Receive from Node Uploads the existing file from the Connected Node.
Send to Node Downloads the current file to the Node.
Resume This is used to return to the programming screen from either the Monitor
or Test screens.
Verify After entering all the programming information verify can be used to check
the information prior to downloading.
Exit Closes VNMGR and returns to Windows.
4.4.2 Drop Down Menu ‘Setup’
After selecting Setup, select the correct
COM Port for your PC from the list
shown. The software will always default
to this COM Port in future.
Screenshot 6
4.4.3 Entering a New Configuration
Select Node Configuration from the on-screen options followed by New. The
following screen is displayed:
Screenshot 7 New Screen
By default, the Network Tab is selected which permits you to configure all of the
Network parameters as follows:-
Network Name
Enter a Network Name which must be common to all Nodes in the network. Valid
characters are A-Z, 0-9 and Space. This field can be any combination of letters and
numbers up to a maximum of 5 characters.
Node Number
Enter a Node Number in the range 1 to 254 inclusive. This is the unique identifier for
this Node within the Network.
Note
At this stage, select the type of communication to be used for this Node. If a
UHF radio is to be used on this Node, tick the box at the bottom left, this will
activate the greyed out radio parameter fields, which should then be
completed.
Channel
Enter a valid RF channel between 1 and the maximum available. All Nodes within
the Network must be set to operate on the same channel. The channel/frequency
allocations are supplied with each IRDN200 in the form of a single A4 sheet of
paper. The maximum number of channels available can also be found on the TEST
screen.
Transmit Power
Enter a value between 50 and 500 (mW) inclusive or select one of the pre-set
values from the drop-down menu.
Transmission Interval
Enter the transmission interval between 20 seconds and 24 hours ( in increments of
10 seconds). Times can be specified in seconds, minutes or hours. (See on screen
notes). This value specifies how often the Controller will scan all inputs and transmit
their status to other Nodes on the Network.
Screenshot 8 On Screen ‘Wizard’
Maximum Retries
Enter a number between 1 and 9 inclusive. All Node transmissions are
acknowledged and this field allows you to specify the maximum number of
transmission attempts that can be made before the controller reports a failed
acknowledgement (communication). The number of retries is related to the
transmission interval. For example, with a short transmission interval, it is not
sensible to programme a large number of retries, because the Node would be
attempting to transmit continuously. The limits are therefore:under 1 minute TX interval, 1 retry;
under 2 minutes TX interval, 2 retries etc.
If numbers are entered outside of these limits, an on screen messages (Wizard)
appears, to alert you and adjust the number of retries within these limits.
Alarm Delay
Each Controller is equipped with an Alarm LED and an Alarm Relay Output on
(JP9). Every transmission to another Node is Acknowledged (Ack) to indicate
correct receipt of the data. If no Ack. is received from the target Node, the alarm
timer is started. If no valid Ack. is received from that target Node over the alarm
delay period, the alarm will activate. Note that only an Ack. from that target Node
will clear the alarm. Acks. or Transmissions from any other Node, will not clear the
alarm.
The relay alarm output is a changeover switch that is normally in the energized state
on a healthy Node. Note that in Low Power Modes (see below and Section 3.4.10)
the alarm is disabled as the alarm relay is used for other purposes.
The Alarm Delay period should be set to a minimum of twice the TX interval. This is
so that 1 single missed transmission will not immediately cause an alarm. (It is
possible that a radio communication will be missed for a number of reasons such
as, radio interference, abnormal weather conditions etc.). An on screen message
will alert you if the alarm delay is set too low. It may be set for up to a maximum of
48 hours.
Screenshot 9 Typical Completed Network Screen
For special applications an alarm delay of zero may be selected. Remember, in this
case the alarm will trigger immediately a single communication failure occurs. For
this reason, zero alarm delay is not generally recommended.
Modem ( GSM or Wire Line )
It is possible to configure a Node to use both UHF radio and a Modem (GSM or wire
line), for example when the Modem is used for a back up (secondary route). If a
UHF radio is to be used on this Node, check the first box. If a modem is used, check
either the Dial-up or Leased Line box. For a Node using only a Modem and no UHF
radio, un-check the UHF radio box. (This will grey out the radio parameters).
Note that the tabs at the bottom of the screen change depending on the selection.
Only the relevant tabs are available.
Low Power Transmitter
When selected, this check-box will configure the controller to operate as a Low
Power Transmitter (refer to section 3.4.10). Note that if this box is checked, the ‘PreTransmit On-Time’ box is available. This should be used if the Node is being used
to power an external device. The Node will be turned on for this period of time prior
to transmitting so that the external device has time to stabilize. The range is
between 0 and 60 seconds. Note: if no pre-transmit time is required, enter ‘0’.
Low Power Receiver
When selected, this check-box will configure the controller to operate as a Low
Power Receiver (refer to section 3.4.10).
When all the above parameters have been entered you can proceed to the next stage
of configuration, Connections, by selecting the Connections Tab in the bottom lefthand corner of the screen
4.4.4 Connections
The following screen is displayed after selection of the Connections tab on the
Node Configuration screen:-
Screenshot 10 Connection Screen
Any Input Channel to be used within the Node must be sent to a corresponding
Output Channel on another Node, somewhere within the Network. At this stage it
does not matter if the Destination Node is within radio range because the Routing
Table can be entered at a later stage (see Routing, )
The connections screen allows you to specify a destination output for all Input
Channels found within the Node you are configuring.
The screen area marked ‘Modules Available’ displays an expandable tree view of
cards available.
Selecting the ‘+’ symbol next to the relevant card in the ‘Modules Available’ area,
expands the view to display the available Input Channels on that Module.
Subsequently, selecting an Input Channel (e.g. D0.1) immediately transfers the
Input Channel address to the connections box labeled ‘Input’. (Select an input by
highlighting with a left mouse click). Alternatively the input address may be typed
directly into the box.
Screenshot 11 Modules Available (Expanded)
Now you must specify where you want the Input Channel to be sent by selecting the
screen area labeled ‘Output’ and entering a valid Node Number and Output
Destination.
For example, entering 32D0.1 into the Output box will send the selected Input
Channel to Node 32 and output it on Channel D0.1 (please refer to section 2.2, Data
Handling, for more information on the addressing formats for VersaNet2).
Immediately after the output destination box there is a ‘state change’ tick box,
marked with a triangle. Checking this box allows you to specify the conditions under
which a change in state of the input will cause a transmission. Note: A transmission
will be sent indicating the status of all inputs at every transmit interval (defined on
the Network screen). Checking the state change box will cause a transmissions to
be sent, for that input only, immediately the input changes.
If the State Change Icon is selected and the Input Channel you are connecting is an
Analogue, then you will also be asked to specify the percentage change that needs
to occur before the Analogue value will be sent. For example, a % change of 10 will
cause a transmission to occur every time the input value increases or decreases by
10% of full scale or more, since the last transmission.
If the State Change Icon is selected and the Input Channel you are connecting is a
Pulse, then you will also be asked to specify the number of pulses that need to
occur before the count will be sent. For example, a value of 5 will cause a
transmission to occur every time the input value increases by 5 or more. Note: the
count is cumulative so a total of 5 or more will cause a transmission.
Each time you complete an entry, the Connect button must be pressed. This
transfers a summary of the connection made to the ‘Connections’ area on the
screen. The connection process can be repeated for each Input Channel by
repeating this process.
If you wish to remove/delete any connections simply highlight the appropriate
connection in the Connections Made area on-screen and press the Remove button.
Screenshot 12 Completed Connection Screen
Note: If after you add a connection, the black triangle state change indicator is red,
this indicates an error. It may be that you have selected Low Power TX or RX on the
Network screen. Connections on event (state change) are not supported in Low
Power Mode, (The Node is asleep and will not see the input change), except for
digital input D0.1.
Pulse to Analogue
For special applications, it is possible to programme a pulse input to be sent to an
analogue output. In this case, the pulses are counted and averaged over the TX
Interval period. The total number of pulses received within the this period is then
converted to an analogue value, corresponding to a rate of flow. This figure is then
transmitted to the destination Node where it can be output and displayed.
When a pulse input is entered with an analogue output as the destination, other
boxes appear so that the parameters can be added.
Figure 13 Pulse to Analogue
In the ‘PPM’ field enter the number of pulses per minute that will equal the full scale
deflection. Tick the offset box to change the range from 0 – 20 mA to 4 – 20 mA.
Example:
Enter 20 in the PPM field.
This means that a rate of 20 pulses per minute will equate to full scale deflection,
i.e. will output 20mA.
An average rate of 10 pulses per minute will therefore equate to 50% FSD and will
output 10mA.
If your system is working on 4 – 20mA instead of 0 – 20mA, tick the offset box. The
figures output will then relate to this scale.
4.4.6 Routing
Select the Routing tab at the bottom of the screen.
This facility allows you to specify the Routing table to be followed for all connections
that you have made. A Route is defined as a radio path between three or more
Nodes. Routing Tables must be established for every Node within the Network that
cannot directly communicate with the Destination Node specified on the
Connections list. This powerful facility permits the construction of complex Networks
with many repeaters to circumnavigate obstructions or extend range.
9
12
8
16
10
Primary Route
11
Secondary Route
Figure 7 Example of Network Routing
Assume you are programming Node 8.
In the above example a connection is programmed from Node 8 to Node 9. There is
no need for an entry in the routing table since Node 9 is adjacent to Node 8 and
does not require a repeater Node. Similarly no routing is required for a connection to
Node 10.
A connection programmed from Node 8 to Node 16 however, requires routing
information since Node 9 and 12 will be used as repeaters. To programme this
route:
Make sure ‘Primary’ is selected
Enter ‘16’ in the Destination box
Enter ‘9’ in the Repeater box. (make sure ‘Repeater Node’ is checked)
Press the ‘Add’ button and the route will be transferred to the routing list.
Note that only the first repeater is programmed in the routing table. When
programming Node 9 the route from Node 9 to Node 16 will be added.
Figure 14 Primary Route
The facility exists to have two Routes for any particular Node, Primary & Secondary.
The Secondary Route will only ever be followed if the Primary Route reports a
communications failure.
In the above example, in Fig 7, a secondary route could be programmed from Node
8 to Node 16 using Nodes 10 and 11 as repeaters. If communication fails to Node 9,
the secondary route via Node 10 would automatically be selected. To programme
this route:Make sure ‘Secondary’ is selected
Enter ‘16’ in the destination box
Enter ‘10’ in the repeater box (make sure ‘Repeater Node’ is checked)
Press the ‘Add’ button
Remember, when programming Node 10 the route to Node 16 via Node 11 must be
added.
Screenshot 15 Secondary Route Using a Modem Connection
It is also possible to use a GSM or Wire Line Modem for either a Primary or
Secondary route. Follow the same principle as above but this time check
‘Telephone’ instead of ‘Repeater’. Enter the telephone number of the destination
Node. Note that unlike uhf radio, the destination Node for modem connection can be
anywhere and need not be the next adjacent Node in the chain. Once the telephone
number has been entered add the number of retries and the interval in seconds.
The Node will then, if unsuccessful the first time, automatically dial that number of
retries at the specified interval.
Each telephone number has an index number associated with it for reference.
These telephone numbers are stored on a list, which is used by the routing screen
and the dial up screen. In other words telephone number 3 will be the same on both
screens, change it on one and it changes on the other. You can scroll through the
numbers using the arrow keys. Up to 32 telephone numbers may be entered.
If a GSM Modem is used for a Primary route note that it will dial out and send the
status of all inputs at the interval set by the TX interval on the Network screen. If you
only require the GSM to be triggered by special events use the Dial-Up screen for
programming.
4.4.7
Modbus
Select the Modbus tab from the bottom of the screen.
This screen is only required if you are using a Modbus interface, such as a SCADA
package.
Screenshot 16 Modbus Screen
For Modbus operation Select ‘RTU’ or ‘ASCII’. Check with your SCADA package
which version you are using. Also check the details required for the RS232 Protocol
and fill in the ‘Character size’ section accordingly.
4.4.8 SMS
Select the SMS tab at the bottom of the screen.
This screen is only required if you are using a GSM modem with SMS messaging.
The ‘Modules Available’ is the same as the Connection screen. Modules can be
expanded to show all available I/O.
The SMS is programmed so that if a certain defined set of conditions occur (a
trigger or alert), a pre-defined message is sent to a specific telephone number. (i.e.
a service engineer with a GSM mobile).
a. Defining the Alert (Trigger)
As with the Connection screen, either select an input or output from the Modules
Available list or type the information directly into the input box. Select the trigger
condition from the drop down menu in the third box.
Screenshot 17 SMS Screen with Analogue Input
The above example shows the conditions for an Analogue Input. After selecting the
trigger condition, set the parameters in the following two boxes using the drop down
menu options for the fourth box. The operation is similar for Digital or Pulse Inputs
and all outputs.
Screenshot 18 Analogue Drop Down Options
It is possible to use a ‘Virtual’ output to trigger an SMS message. Programme this in
the same manner as above as an ‘output’. Note, by using a Virtual output on this
Node to trigger an SMS, a corresponding input on any Node in the network can be
used to send SMS messages from this Node.
b.
Defining a Message
For each SMS, a message must be entered in the message box. This can be free
text of up to 160 characters per message. Note: a cumulative character count is
shown under the message box. Each message is assigned an index number for
reference. Using the arrow keys you can scroll through the messages. If required,
the same message can be assigned to a number of I/O conditions. (i.e. different
triggers can be used to send the same message). It is also possible to embed a
variable string within a message. ( Contact RDT for a separate data sheet ).
Note: Up to 32 separate messages may be defined, of up to 160 characters each to
a cumulative maximum total of 2,000 characters.
Screenshot 19 Example Message and Telephone Number
c.
Telephone Numbers
Once the trigger conditions have been set up and the required message composed,
enter the required destination telephone number in the box marked with the
telephone icon. Again, each telephone number has an associated index number for
reference. You can scroll through the numbers using the arrow keys.
Once you have associated a particular trigger with its message and telephone
number, press the ‘Add’ button and the details will be transferred to the ‘Alerts
Setup’ table. Using the arrow keys you can scroll through the alerts list and delete a
highlighted selection if required. A number of different messages can be sent to the
same telephone number.
Note: These telephone numbers are not linked to the Routing or Dial-up screen
telephone number list.
4.4.9
Dialup
Select the Dialup tab at the bottom of the screen.
This screen is only required if you are using a Wire Line or GSM Modem for a
Dialup connection.
The ‘Modules Available’ is the same as the Connection screen. Modules can be
expanded to show all available I/O.
The Dialup feature is programmed basically in the same way as the standard
connection screen except that the transmission is via a telephone rather than uhf
radio, so the destination telephone number must be specified for each connection.
a.
Entering a Connection
Screenshot 20 Primary Input
In the first box make sure ‘Primary’ is selected.
As with the Connection screen, either select an input or output from the Modules
Available list or type the information directly into the input boxes.
In the fourth box enter the destination Node and Address
Note: The final destination may be the Node at the other end of the modem link
( Node 6 in the example below) in which case enter the Node number for that Node,
e.g. 6D0.1
Node 6 can however act as a repeater and forward the message to other Nodes in
the Network. In this case enter the final destination Node number in the destination
box.
Example:
Assume we wish to programme D0.1 on Node 5 to go to D0.1 on Node 9
Enter 9D.01 in the destination box.
Node 5 will dialup and send the message to Node 6
Node 6 will act as a repeater and send the message to Node 9
Note: Node 6 will need to have the routing information programmed into its routing
table.
7
4
5
9
6
3
8
5
VersaNet Node
Radio Path
GSM Modem
Figure 8 Example of Dial Up Routing
Once the connection details and destination are entered specify the conditions for
sending the message using the boxes in the bottom left of the screen.
If you want to send the connection at a specific time interval ( TX interval) check the
box next to the clock icon. In the second box enter the time interval in minutes.
If you want to send the connection on event, check the box next to the triangle icon.
In the second box enter specify the event that triggers the transmission:For analogue this is the % of FSD up or down
For pulse it is the number of pulses required to trigger a transmission.
b.
Secondary Connections
This is a very useful feature that allows the status of a number of I/O to be sent at
the same time using only 1 telephone call.
First enter the Primary Connection. This will be the trigger condition to make the
dialup connection. You can then add other I/O as Secondary messages to be sent
at the same time, obviously to the same telephone number.
Example:
Node 5 (in the previous diagram, Fig 9) is the originating Node.
A Primary connection is programmed to send if D0.1 changes: D0.1 to 9D0.1
Secondary connections are added to send D0.1 to 6D0.1 and P0.1 to 7P0.1.
When D0.1 on Node 5 changes the Node will dialup and send all 3 connections.
The screen will look like the above example. Note: the Secondary connections are
indented on the connection list. When entering the Secondary connections some of
the boxes are greyed out, TX time, Event and Telephone number, because they are
only relevant to the Primary connection.
Screenshot 21 Secondary Connection
c. Telephone Numbers
Once the connection details have been completed, enter the required telephone
number in the box. Under the telephone number enter the required number of redials
and the spacing. If the first attempt fails, the Node will redial the specified number of
times at the set interval.
Each telephone number has an index number associated with it for reference. These
telephone numbers are stored on a list, which is used by the routing screen and the
dial up screen. In other words telephone number 3 will be the same on both screens,
change it on one and it changes on the other. You can scroll through the numbers
using the arrow keys. Up to 32 numbers may be entered.
When the connection details and the associated telephone number have been
entered, press the ‘Add’ button and the information will be transferred to the
Connection list. A connection can be removed by highlighting it and pressing the
‘Remove’ button.
4.4.10
Leased Line Modems
Select the Leased Line tab at he bottom of the screen. Note; this tab will only be
available if the leased line modem option is selected on the Network screen.
Screenshot 22 Leased Line Modem
The leased line screen works exactly as described above for the dialup modem
except of course no telephone numbers are required. Leased line modems can
only operate point to point, although the receiving Node can act as a repeater and
forward the data to any other Node in the network, in the normal way.
4.4.11 Downloading New Parameters
Once all the new parameters have been entered in the various sections of VNMGR,
they must be downloaded to the Node.
The first step, which is optional, is to check that the data is entered correctly, i.e.
that no parameters are set outside of acceptable limits and that all mandatory fields
have been completed. From the Node Configuration drop down menu select
‘Verify’. If all details are OK a confirmation message will appear. If not, an error
message indicating the fault will be displayed. If so, correct the fault and repeat the
‘verify’ operation.
From the Node Configuration drop down menu select ‘Send to Node’. If there is any
problem with the parameters, an error message will be displayed. Correct any faults
and try again.
Watch the icon at the top right of the screen. Red dots will travel from the PC to the
Node icon throughout the download process. Under the icon, information about the
status of download will be displayed. Finally, after the download is complete, the
new network name and Node number will be displayed under the icon.
It is now advisable to power the Node down and back up again to ensure correct
initialisation of the Node with the new parameters.
The Node is now operational.
4.4.12 Monitoring and Maintenance
The VNMGR software incorporates a monitoring section which aids system
installation and maintenance. It permits the user to display the value of any piece of
data either entering or exiting that Node (i.e local I/O).
Using the monitoring function does not suspend the normal operation of a
VersaNet2 Node.
After selecting the Monitor option from the main menu, the following screen is
displayed:-
Screenshot 22 Monitor Screen
The screen area labeled ‘Modules Available’ displays an expandable tree view of
cards available. Selecting one of the Card entries from the ‘Modules Available’ area
expands the view to display the current Input and/or Output channels on that
Module. Subsequently selecting a particular channel immediately instructs the
monitoring software to read the input/output channel continuously and display the
current value within the ‘Channel Status’ box on screen. In the screen shown above,
an analogue input, A0.1 is being monitored. It is set to show a percentage of FSD
which in this case is 40.05%.
For Digital channels the status will be shown as 0 (off) or 1 (on). For Pulse channels
the status will display the current Pulse Count.
The status of all the Digital I/O of a module can be seen by selecting the card as
opposed to the individual I/O channel. This will be displayed in the form ‘10011101’,
where ‘1’ is on and ‘0’ is off.
Alternatively, an input or output address may be typed directly into the box to the
right of the buttons marked 'Input' and 'Output'. This is particularly useful where
'Virtual' addresses are used in a Node employing MODBUS to communicate to a
SCADA system.
For Analogue channels it is possible to select how the status is displayed by
selecting the on-screen drop down box ‘Show Analog Value as..’ and selecting an
option from the available list.
4.4.13 Test
VNMGR is equipped with a Test facility which allows the user to conduct various
tests, which aid the commissioning process.
Selecting the Test option from the main menu displays the following screen :-
Screenshot 23 Test Screen
On entry to the Test screen, all static data is uploaded from the radio module. Static
data includes Serial Number, Channel Layout and Number of Channels. This data is
displayed constantly while the Node is connected to the PC. You can also see the
version of software currently running.
Local/Network Mode
Two modes of operation exist within the Test facility, Network and Local.
With Network selected, it is possible to instruct a Remote Node, within radio range,
to send you approximately 30 seconds of RF Carrier. This will be displayed onscreen in the form of a coloured sliding scale in the Received Signal Strength box.
You can select the Node number to receive from, set its channel and power.
Using the Network mode does not suspend the normal operation of a VersaNet2
Node however, whilst the remote Node is transmitting the test signal, other Nodes in
the network may experience radio interference, which may prevent them
transmitting (listen before transmit).
For information on the signal strength indication, see Section 6.
Screenshot 24 Test Screen Showing RSSI
Local mode allows the user to ‘toggle’ between Transmit and Receive manually.
In Local mode the channel and output power can be selected. In Receive mode,
each channel can be monitored for activity using the RSSI sliding scale with a
suitable free channel selected. Transmit mode allows the user to measure output
power and check antenna matching.
As a safety precaution, the Node will revert from Local back to Network mode after
30 seconds of inactivity. All original Network parameters are restored when
reverting back.
It should be noted that accessing the Local mode suspends the normal operation of
a VersaNet2 Node.
For full details of how to use the Test facilities refer to Section 6, Commissioning.
Section 5
Installation
The installation of a VersaNet2 Node can be split into three main areas. The first
covers the physical siting and installation of the enclosure, the second the siting of
the antenna system and the third covers all the necessary terminations.
5.1 Hardware Installation
If the Node is to be mounted in a protected location, such as a control panel, then
the module stack can be mounted directly without the IP67 Enclosure. For exposed
locations an IP67 Enclosure must be used to protect the modules from ingress of
dust and moisture.
A Node constructed from single or multiple enclosures may be installed with or
without the modules fitted. In fact, an assembled stack of modules complete with
metal base may be completely removed from an enclosure by unscrewing the four
large bolts located at the four corners of the base plate. This may facilitate
enclosure handling during installation.
Figure 9 Node Construction
5.1.1 Choice of Location
The location of a Node will depend upon its application, although it is suggested the
following guide-lines are considered.
•
Avoid locating near to High Tension electrical equipment or to machinery
likely to generate excessive electrical noise.
•
Avoid locating near to existing radio equipment.
•
Choose a location that minimises cable runs, particularly the RF cable.
•
Avoid extremes of temperature, humidity and vibration.
•
Locate in a convenient position for making terminations and accessing the
Node for future re-configuration or monitoring purposes.
•
A Node may be mounted in any physical orientation, although upright against
a flat, vertical surface is the most practical.
•
Ensure sufficient clearance is allowed for cables, particularly considering any
bending radius restrictions.
5.1.2 Fixing Method
Four mounting holes are provided outside the sealed area for fixing to the chosen
surface, spaced as shown in Fig. 10. Bolts or screws of M6 x 40mm or equivalent
should be used. When installing multiple enclosure Nodes, use a fixing bolt through
all mounting holes to achieve maximum physical stability. Alternatively, a Node may
be mounted onto a pole or other structure using simple metal braces. Nodes may
also be secured inside outer cabinets or marshalling kiosks to suit the application.
1 6 4
4 M o u n tin g H o le s 7 O
A V A IL A B L E D E P T H
2 8 0
2 5 4
1 0 8
1 9 0
1 0 0
3 0
N O T E : A ll d im e n s io n s in m m .
Figure 10 Mechanical Drawing of Enclosure
5.2
Antenna Installation
The performance of an antenna and hence the equipment using it, is very
dependent upon the environment in which it is mounted. Although it is often
advisable to employ specialist personnel to install antenna systems, following the
broad guide-lines contained in this section will result in successful installations in the
majority of situations. In all cases, antennas should be vertically polarised. The
precise type of antenna will have been selected during system planning, although
further details may be found in Section 3.6 of this manual.
5.2.1 Choice of Location
As a general rule, the less directional the antenna, the more likely it is to be affected
by the environment it is mounted in.
In practice, a Yagi antenna should be mounted with all its elements at least one
wavelength (70cms) away from the supporting structure i.e., walls. This avoids
excessive degradation of both the directional and gain performance of the antenna.
Omni directional antennas such as dipoles and collinear arrays only achieve
genuine omni directional performance when mounted at the top of its supporting
structure.
When deciding upon the location of an antenna, consideration should be given to
the effect of the surrounding land on the radio signal. In general, Nodes should be
located so that their antennas are in line-of-sight of each other. Following this
guideline will result in reliable signal paths up to about 20 km for 500 mW ERP in
the majority of situations.
An additional factor in radio propagation is the effect of multiple signal paths
between sites, often caused by reflections off buildings, water or other fixed objects.
This can cause a dramatic reduction in received signal strength due to phase
cancellation, but can be cured easily by moving the receiving antenna about 0.3m
(half a wavelength).
Temporary fading of the received signal can also occur due to reflections off moving
vehicles again due to multiple paths. This phenomenon is less important in fixed
link data networks, as its effect is only momentary and VersaNet’s retry algorithm
will offset this problem.
Also, an antenna mounted just below the brow of a hill should theoretically receive
very little signal. In practice, however, it is likely that such an antenna would receive
a reasonable signal due to the bending of the wave front over the hill by diffraction.
The antenna should be mounted as far away as possible from another antenna. If
this is unavoidable, the antennas must be mounted at different levels.
Section 5 of the manual covers the procedure for measuring the performance of the
paths, but it will be assumed that the antenna location has already been decided
upon. It is worth noting here, however, that increased range performance can
usually be attained by raising the height of an antenna by only a few metres.
5.2.2 Antenna Cables and Connectors
It is advisable to keep the antenna feeder down to as short a length as possible to
avoid unnecessary degradation of signal.
For the majority of applications, UR-M67, RG213/U or equivalent cable should be
used with N-type connectors. The Antenna Bulkhead Cable Kit provides a
bulkhead-mounted N-type female enabling an antenna feeder cable to be
connected. Fitting RF connectors to RF cable is a specialist task and should only
be carried out by trained personnel. Alternatively, a number of organisations,
particularly antenna suppliers, offer a cost-effective cable making service. A poorly
fitted connector can seriously impair the operation of a radio system.
All exposed metal connectors should be protected from the ingress of moisture by
using non-setting sealing pastes, self-amalgamating tapes or by using the PVC
boots or drip-covers often supplied already fitted to antennas.
Where particularly long antenna feeders cannot be avoided, or if the feeders may be
adjacent to other higher power radio-systems, semi-rigid or double-screened cables
should be used. It is also advisable to ensure that if antenna feeders must cross
each other, they do so at right-angles to reduce any coupling.
5.2.3 Lightning Protection
Antenna systems can be particularly prone to lightning strikes due to their generally
exposed location and relatively high structures. It is not possible to completely
remove the possibility of a lightning strike although a number of sensible
precautions may be taken to reduce the risk and minimise any damage caused in
the event of a strike.
Antenna supply and installation organisations will have specific experience with
regard to lightning protection and should be consulted where possible. Additionally,
the relevant British Standard (BS6651:1985) Code of Practice for the Protection of
Structures Against Lightning, may be consulted. By following the guide-lines
contained here, the risk can be minimised.
The overall aims are to provide the shortest, most direct path to earth for the
lightning current, to ensure good bonding between all site metalwork and the
earthing system to reduce side flashing, and to avoid the entry of flashes or surges
into buildings. The general guide-lines include:
•
All earth straps, tapes and bonding interconnections should be of uninsulated
copper tape of minimum cross section 25 x 3mm
•
All connections, clamps and supports should be protected by non-reactive
paste or tape.
•
Ground mounted support structures should be connected at their base to an
earth ring arrangement by the method described.
•
Roof mounted structures should be connected to the building earth by the
most direct route possible.
•
Mast guy wires should be directly bonded to earth at their lowest point.
•
Antenna feeders should be bonded to the supporting structure at the upper
and lower ends and earthed at the point of entry into the building. Surge arresters
may be fitted at this point, although they will not prevent damage arising from a
direct strike.
•
Associated plant, pipes, fences or gantries and other metalwork within about
3 metres of the support structure should be bonded directly to earth.
An earth ring usually consists of copper tape with driver electrodes or radial tapes
around the base of the structure, as close as possible. The ring should be buried to
a depth of between 0.6m and 1.0m where conditions permit. It should be connected
to the main building earth by the most direct route possible, buried as appropriate.
5.3
Connecting Cables to a Node
In addition to any RF cable, power and signal connections will also need to be made
to a Node. There connections are made via the two-part terminals fitted to all
VersaNet2 modules.
Cables of up to 2.5mm cross sectional area may be used in the connectors. Cables
are passed up through the nearest cable glands and inserted into the correct
terminal using a small flat-bladed screwdriver. The terminals are designed to be
removed from the module-mounted section to allow easy connection. Where
possible, avoid armoured cable directly entering a Node as this will make
manipulations more difficult.
Take particular care when making connections to 2-way connectors as damage can
be caused by excess flexing of the connector. When used in an external cabinet or
kiosk, connections can be made to a sequentially numbered DIN rail fitted with
suitable terminals and corresponding to an approved wiring scheme.
It is suggested that a wiring scheme be drawn up prior to installation and numbered
ferrules used to aid identification. The function of all the I/O and Power Supply
terminals are shown in Section D of this manual and on the Module Datasheets
supplied with each module.
Once connections have been made, the cable glands may be tightened to form an
environmental seal, preventing the ingress of dust and moisture.
Note: Whilst precautions have been taken to make VersaNet2 a rugged product,
transient dips and spikes on the power supply should be avoided, as far as possible.
Section 6 Commissioning a System
Commissioning a VersaNet2 system consists of:
checking carefully all connections;
ensuring all Nodes are correctly configured;
powering up and running the Test programme accessed via the VNMGR software
supplied with each Communications Controller;
checking that all inputs are reflected correctly at their corresponding outputs on the
destination Node.
Connecting the Communications Controller to your PC using the configuration lead
supplied and running the VNMGR software will provide access to the Test screen
where you can perform all of the commissioning routines.
On entry to the Test screen, all static data regarding the RF module is displayed
along with a Received Signal Strength Indicator (RSSI) for the RF channel
indicated. The RSSI display travels from left to right across the screen and consists
of three colours and a numeric readout.
Signal levels at -120dBm or less are displayed in red.
Signal levels between -120dBm and -114dBm are shown in yellow.
Signal levels >-114dBm are shown in green.
6.1
Selecting a suitable RF Channel
In some countries VersaNet2 is supplied to operate on a particular RF channel that
has been pre-allocated by the National Radio Authority for the country in question. If
this is the case then the frequency should be free from interference by other users.
Other countries, such as the UK, have a band of radio channels available that are
classed as 'licence-free'. This means that anyone can operate type approved radio
equipment on any of the available RF channels and care needs to be taken to avoid
selection of a 'busy' radio channel that may impair the performance of the system
you are commissioning. VersaNet2 uses a 'listen-before-transmit' strategy, which
effectively checks the RF channel for activity prior to sending any data and
minimises the chances of interference. A busy channel may therefore cause
unacceptable delays.
On entry to the Test screen select the Local button, which places the Node into
Local mode and permits you to monitor RSSI on all of the available RF channels in
order to select an appropriate operating channel for the network. Obviously if you
are adding a Node to an existing network the correct channel must be selected to
match the other Nodes in the system.
Step through each of the available RF channels in turn by selecting the channel
up/down arrow. After each channel change, monitor the RSSI indicator for channel
activity. Make sure all other Nodes in the system are turned off or they may be seen
on the indicator.
If any green segments of the display are visible, this indicates RF noise at a level
that will prevent the VersaNet2 Node from transmitting.
Noise may vary from site to site so this procedure should be followed at all planned
VersaNet2 locations and an RF channel should be selected that is available for use
at all locations.
6.2 Checking Signal Strength between Nodes
The ‘Remote’ facility allows you to ask another VersaNet2 Node to send you
approximately 30 seconds of RF carrier so that you can correctly check the received
signal strength at the Node you are commissioning.
To request a remote Node to send you a test signal you must first make sure that
Network is selected on the Test screen.
Next select the 'Node' box and enter the number of the remote Node that you wish
to send you a test signal. Set the channel and the power. This will remotely set the
channel and transmit power of the selected Node.
Finally click on the 'Request' button. The remote Node selected will now transmit RF
carrier for approximately 30 seconds allowing you time to monitor the RSSI display.
To ensure reliable operation between the two Nodes selected, it is advisable that
the RSSI bar graph is steadily showing a minimum of -110dBm, which is equivalent
to any part of the indicator being green.
Note: Before performing the RSSI signal strength check, wait a few minutes and
check that the channel is quiet. Any activity on the channel may affect your results
and could prevent the selected Node from transmitting.
When the requested signal is first received, the RSSI indicator may flash up and
down. This is because the Node is receiving valid data from the selected Node.
Wait for this to finish then hit the request button again.
During the 30 second test period other units on the same channel may be affected.
If no RSSI display appears then check all antenna and cable connections before
repeating the process.
Section 7
General
7.1.1 Mechanical
All VersaNet2 modules, except for the DC Adaptor, meet the same mechanical
specifications shown in Figure 11. All except the Communications Controller are
supplied with a T2-BUS cable.
In addition, mounting pillars are supplied with each module to provide adequate
clearance above the module.
1 5 2 m m
1
4
3
2
O N
1 0 m m
C le a r a n c e
T -B U S
C O N N E C T O R S
S W 1
1 3 2 m m
H o le s fo r M 3
1 6 7 m m
S W 2 o n ly fitt e d o n m o d u le s
w ith a n a lo g u e in p u t s
1
3
2
O N
S W 2
4
7.1
Technical Specifications
1 3 2 m m
2 -P A R T C O N N E C T O R B L O C K
( L e n g t h s v a r y w it h m o d u le s )
1 0 m m
C le a r a n c e
Figure 11 Mechanical Drawing of a Module
7.1.2 Environmental
VersaNet2 module are temperature rated from - 10° to + 55°C. and are designed to
withstand Relative Humidity of 95%, non-condensing.
7.2 Communications Controller
P R O G R A M
M E M O R Y
D A T A
M E M O R Y
M O D E M
U H F
T R X
1 2 v D C
T -B U S
µ P R O C
S E R IA L
P O R T
S E R IA L
P O R T
O U T P U T
D R IV E R
R E L A Y
D IG IT A L
O U T P U T
R E L A Y
A L A R M
O U T P U T
P U L S E
O U T P U T
O P T O
IS O L A T O R
C O N F IG U R A T IO N /
M O N IT O R T E R M IN A L
D A T A
H IG H W A Y
D IG IT A L
IN P U T
O P T O
IS O L A T O R
P U L S E
IN P U T
A N A L O G U E
IN P U T
D /A
C O N V E R T E R
A N A L O G U E
O U T P U T
Figure 12 Communications Controller Block Diagram
This module is at the heart of every Node, containing the main micro controller
circuitry, modem and UHF synthesized FM transceiver. It handles the Node
management, data security, health checks and retains the Node configuration in
RAM. The module also has I/O capability in the form of a digital input and output,
analogue input and output, Pulse input and output, alarm output and RS232 serial
data highway.
RF Section
General
Frequency Range
Mode
Approvals
406-470Mhz
Half duplex
ETS300 220
ETS300 113
ETS300 683
Transmitter
RF output power
Modulation
Adj. Chan. Power
Spurious emissions
Freq. tolerance
FM deviation
1W max
GMSK
<-37dBm
<-36 dBm
+/- 1kHz
+/- 2 kHz
Receiver
Sensitivity
-110 dBm
for 10-4 BER
Spurious
>70 dB
Blocking
> 84dB
Intermodulation
> 70dB
Adj. Channel
> 60 dB
Technical Specification
Module Name
Part Number
Communications Controller
IRDN2xx (Digital I/O only)
IRDN2xxA (Digital + Analogue I/O)
1
Hitachi H3048
2 x T2-BUS Master
1 opto-isolated, volt free
1 changeover relay, 8A @ 250V AC, 8A @ 30V DC
1 changeover relay, 5A @ 240V AC, 5A @ 30V DC
1, 0-5 V DC or 0-20mA
12 bit
<1S
1, 0-20mA
10 bit
250 Ω
500mS max.
1
5 mS min.
100 Hz max.
65535
<1S
1
1xRS232 Serial Data Highway
1xRS232 Configuration ASCII Port
+ 11-14v DC via JP3
Sleep Mode
400µA typical
Operating (RX)
380mA
Operating (TX)
650mA (@500mW)
600mA (@250mW)
550mA (@100mW)
520mA (@50mW)
-100 to +550C
Configuration - 9-way D male
Serial Data Highway - 9-way D male
All other 2 part screw terminals
152 x 167 x 42mm
0.6kg
No. of Modules per Node
Processor
Internal interface
Digital Inputs
Digital Outputs
Alarm Output
Analogue Input (IRDN2xxA)
Precision
Scan Rate
Analogue Output (IRDN2xxA)
Precision
Load resistance
Output settling time
Pulse Input
Input Pulse Width
Input Pulse Frequency
Maximum Pulse Count
Scan Rate
Pulse Output
Serial Ports
Power Supply
Current Consumption
Operating Temperature
User Connection
Dimensions
Weight
CD
RUN
RF-Tx
RF-Rx
UHF Synthesised
FM Transceiver
ALARM
POWER
JP4
5
3
1
Type IRDN031/0
LK1
406 to 470 MHz
500 mW max.
RUN
PGM
4
Frequency Range
ERP
3
Made in England
ON
2
Radio Data Technology Ltd
1
JP6
SW1
SW2
SW3
JP7
LK2
V
mA
LK3 LK4
LK5 LK6
LP
ISOL
DIGITAL
JP8
JP9
JP10
PULSE
JP11
1 2 3 4 5
6 7 88
9 10 11 12
13 14 15 16
Digital
I/P
O/P
Alarm
Output
Analogue
I/P O/P
Pulse
I/P O/P
JP12
JP13
17 18
RS232
Figure 13 Communications Controller
DC
Supply
OPTO-ISOLATOR
3k3
1
Digital
Input
Digital
Output
2
N/C
COM
N/O
0V
3
4
5
RELAY
Alarm
Output
N/C
COM
N/O
6
7
8
RELAY
Analogue
Input
+
0V
9
10
mA
V
Analogue
to Digital
Converter
CURRENT OUTPUT
0-20 mA
Analogue
Output
+
0V
Current
Driver
11
12
3k3
Pulse
Input
+
0V
OPTO-ISOLATOR
13
14
+12V
0V
Pulse
Output
+
0V
Power
Input
+12V
0V
15
16
17
18
+12 V
0V
Figure 14 Communications Controller Connection Chart
0V
Digital to
Analogue
Converter
7.2
Digital Output Module – IRDN201
T -B U S
µ P R O C
L A T C H
R E L A Y
D R IV E R S
R E L A Y
D IG IT A L
O U T P U T
R E L A Y
D IG IT A L
O U T P U T
R E L A Y
D IG IT A L
O U T P U T
R E L A Y
D IG IT A L
O U T P U T
R E L A Y
D IG IT A L
O U T P U T
R E L A Y
D IG IT A L
O U T P U T
R E L A Y
D IG IT A L
O U T P U T
R E L A Y
D IG IT A L
O U T P U T
Figure 15 Digital Output Module Block Diagram
This module provides eight digital outputs to external devices via changeover relays.
Up to sixteen modules may be used in a single Node.
Technical Specification
Module Name
Part Number
No. of modules per Node
Processor
Internal Interface
Relay Outputs
Loading
Digital Output
IRDN201
16 max
80C31
T2-BUS Slave Peripheral
8 Latching changeover
min
1mA @ 1V DC
max
8A @ 240V AC
8A @ 120V AC
8A @ 30V DC
Output settling time
20 ms per channel from
receipt of T-Bus command
Contact life expectancy
(mechanical)
Power Supply
Current Consumption
1 x 10⁷ operations
11-14V DC through T2-BUS
min 30 mA
type 130 mA
max 250 mA
-10°C to +55°C
2 part screw terminals
152 x 167 x 32 mm
0.3kg
Operating temperature
User connection
Dimensions
Weight
D IG IT A L
O U T P U T 1
D IG IT A L
O U T P U T 2
D IG IT A L
O U T P U T 3
D IG IT A L
O U T P U T 4
N /O
C O M
N /C
1
2
N /O
C O M
N /C
N /O
C O M
N /C
D IG IT A L
O U T P U T 6
N /O
C O M
N /C
D IG IT A L
O U T P U T 7
N /O
C O M
N /C
D IG IT A L
O U T P U T 8
N /O
C O M
N /C
3
N /O
C O M
N /C
N /O
C O M
N /C
D IG IT A L
O U T P U T 5
4
5
6
7
8
9
1 0
1 1
1 2
R e la y
2 -P A R T T E R M IN A L S
Figure 16 Digital Output Module Connection Chart
1 3
1 4
1 5
1 6
1 7
1 8
1 9
2 0
2 1
2 2
2 3
2 4
7.4
Digital / Pulse Input Module – IRDN202
-5 v
T -B U S
µ P R O C
B U F F E R
O P T O
IS O L A T O R
D IG IT A L /P U L S E
IN P U T
O P T O
IS O L A T O R
D IG IT A L /P U L S E
IN P U T
O P T O
IS O L A T O R
D IG IT A L /P U L S E
IN P U T
O P T O
IS O L A T O R
D IG IT A L /P U L S E
IN P U T
O P T O
IS O L A T O R
D IG IT A L /P U L S E
IN P U T
O P T O
IS O L A T O R
D IG IT A L /P U L S E
IN P U T
O P T O
IS O L A T O R
D IG IT A L /P U L S E
IN P U T
O P T O
IS O L A T O R
D IG IT A L /P U L S E
IN P U T
N O T E : T h is m o d u le is s w itc h a b le b e tw e n D ig ita l in p u ts a n d P u ls e in p u ts .
Figure 17 Digital / Pulse Input Module Block Diagram
This module is used to collect eight channels of either volt free digital contacts or
pulse counting inputs into a VersaNet2 Node. Each individual channel on the
module mat be configured as a Pulse or Digital input, giving the module a dual
function. A maximum of sixteen modules may be used in one Node with any
combination of digitals and pulses.
Each input channel consists of an opto-isolated input (+ve) and a common negative
(-5v) for connection to the users volt free contacts or open collector transistor
outputs.
When used for pulse counting, only pulses wider than 5mS will be detected. Each
input channel has a counter capable of storing a maximum count of 65535. The
user must ensure that an appropriate transmission interval is selected to avoid
counter overflow, between transmissions as no indication of such an overflow is
provided.
Technical specifications
Module Name
Part Number
No. of modules per Node
Processor
Internal Interface
Input Channels
Input terminal voltage
Input Pulse Width
Input Pulse Frequency
Maximum Pulse Count
Scan Rate (Digital i/ps)
Power Supply
Current Consumption
Digital/Pulse Input
IRDN202
16 max.
80C31
T2-BUS Slave Peripheral
8 (Programmable for Digital or Pulse)
+/- 5 V DC
5 mS min.
100 Hz max.
65535
1 second
11-14V DC through T2-BUS
min. 30 mA
typ. 50 mA
max. 70 mA
-20° to + 70°
2 part screw terminals
152 x 167 x 22 mm
0.2kg
Operating Temperature
User Connections
Dimensions
Weight
D IG IT A L
IN P U T 1
+
D IG IT A L
IN P U T 2
+
D IG IT A L
IN P U T 3
+
D IG IT A L
IN P U T 4
+
D IG IT A L
IN P U T 5
+
D IG IT A L
IN P U T 6
+
D IG IT A L
IN P U T 7
+
D IG IT A L
IN P U T 8
+
+ 5 V S u p p ly
1
2
4 k 7
3
4
5
O p to - is o la to r
6
-5 V
7
8
9
-
1 0
1 1
-
1 2
1 3
-
1 4
1 5
IN P U T C IR C U IT
S A M E O N A L L
T E R M IN A L P A IR S
1 6
2 -P A R T T E R M IN A L S
Figure 18 Digital / Pulse Input Module Connection Chart
7.5
Combination Input Module – IRDN203
B U F F E R
T -B U S
µ P R O C
O P T O
IS O L A T O R
D IG IT A L
IN P U T
O P T O
IS O L A T O R
D IG IT A L
IN P U T
O P T O
IS O L A T O R
D IG IT A L
IN P U T
O P T O
IS O L A T O R
D IG IT A L
IN P U T
A N A L O G U E
IN P U T
A to D
A N A L O G U E
IN P U T
A N A L O G U E
M P X
A N A L O G U E
IN P U T
A N A L O G U E
IN P U T
R E G U L A T O R
T -B U S
R E C T IF IE R
T -B U S
IN T E R F A C E
T R A N S F O R M E R
1 1 0 /2 4 0 V A C
IN P U T
M A IN S F A IL
M O N IT O R
Figure 19 Combination Input Module Block Diagram
This module is used to collect up to four digital steady-state inputs and four DC
analogue channels. The analogues may be either 0-5V DC or 0-20mA, switchable
for each channel individually. The module also incorporates an on-board mains
power supply which is capable of supplying up to 800mA to a Node. Due to
addressing restrictions only one module is permitted per Node.
Each Digital input channel consists of an opto-isolated input (+ve) and a common
negative (-5v) for connection to the users volt free contacts or open collector
transistor outputs. Note that the analogue inputs are not isolated.
Technical Specifications
Module Name
Part Number
No. of modules in a Node
Processor
Internal Interface
Digital Inputs
Analogue Inputs
Combination Input
IRDN203
1 maximum
80C32
T2-BUS Slave Peripheral
4 Volt free
4 channels 0-5V DC or
0-20mA DC switchable
12 bit
1 second for all channels
110V AC/240V AC + 10% (switchable)
50 mA typ.
-20°C to +70°
2 part screw terminals
152 x 167 x 32mm
0.6kg
Precision
Scan rate
Power Supply
Current Consumption
Operating Temperature
User Connection
Dimensions
Weight
F u s e r a tin g s
5 0 0 m A a n ti- S u r g e ( 1 1 0 V )
2 5 0 m A a n ti- S u r g e ( 2 4 0 V )
F U S E
M A IN S
IN P U T
L
M A IN S
F IL T E R
N
M A IN S
S E L E C T
S W IT C H
1 1 0 /2 4 0 V
+ 5 v S u p p ly
E
4 k 7
A N A L O G U E
IN P U T 1
A N A L O G U E
IN P U T 2
A N A L O G U E
IN P U T 3
A N A L O G U E
IN P U T 4
+
1
0 v
+
2
0 v
3
+
4
0 v
5
m A
6
+
0 v
V
7
8
A n a lo g u e
to D ig ita l
C o n v e rte r
D IG IT A L
IN P U T 1
+
D IG IT A L
IN P U T 2
+
D IG IT A L
IN P U T 3
+
D IG IT A L
IN P U T 4
+
O p to - is o la to r
9
-
1 0
-
1 1
1 2
-
1 3
-
1 4
-5 v
IN P U T C IR C U IT
S A M E O N A L L
T E R M IN A L P A IR S
1 5
1 6
IN P U T IM P E D A N C E
2 5 0 O h m s fo r c u rre n t
2 .5 K O h m s fo r v o lta g e
2 -P A R T T E R M IN A L S
2 -P A R T T E R M IN A L S
Figure 20 Combination Input Module Connection Chart
7.6
DC Adaptor Module – IRDN206
+ 1 2 V
3
IN P U T
P R O T E C T IO N
D C N O M IN A L
IN P U T
0 V
T -B U S
IN T E R F A C E
T -B U S
4
+ 1 2 V
1
D C N O M IN A L
O U T P U T
D C P O W E R
S W IT C H
2
0 V
Figure 21 DC Adaptor Module Block Diagram
This module is used to allow connection of a second power supply to the T2-BUS of
a VersaNet2 Node. Each module can handle up to 3A input power and a maximum
of 2 modules may be used in a single Node.
This module may be mounted over the front or rear pillars of a module stack using
the long T2-BUS cable supplied. The module can also be used to supply up to
250mA @ 12V DC to an external device controlled via the Communication
Controller.
C O M M S
C O N T R O L L E R
T 2 -B U S
V E R S A N E T 2
I/O M O D U L E S
P O W E R
S U P P L Y
P S U 1 2 9 1
P S U 1 2 9 2
P S U 1 2 9 3
Figure 22 Additional Power Supply Connection
T 2 -B U S
D C
A D A P T O R
IR D N 0 0 6
O P T IO N A L
2 N D
P O W E R
S U P P L Y
Technical Specification
Module Name
Part Number
No. of modules in a Node
Internal Interface
Input Voltage
Output voltage to
external device
Input Protection
Output voltage on-time
Operating Temperature
User Connection
Dimensions
Weight
DC Adaptor
IRDN206
2 maximum
T2-BUS peripheral
11-14DC, max 3A
12V DC nominal, max 250mA
Reverse polarity protected
Programmable via Communications
Controller
-20°C to +70°C
2-part screw terminals
152 x 42 x 32mm
0.1kg
1 5 2
1 3 2
C O
4 0 m m
H o le s
fo r M 3
F U S E
D C
O
m
m
m
T - B U S
N N E C T O
m
R S
U T P U T
Figure 23 Mechanical Drawing of DC Adaptor Module
D C
IN P U T
7.7
Analogue Input Module – IRDN207
A N A L O G U E
IN P U T
A N A L O G U E
IN P U T
A N A L O G U E
IN P U T
A to D
T -B U S
µ P R O C
A N A L O G U E
M P X
A N A L O G U E
IN P U T
A N A L O G U E
IN P U T
A N A L O G U E
IN P U T
A N A L O G U E
IN P U T
A N A L O G U E
IN P U T
Figure 24 Analogue Input Module Block Diagram
This module is used to collect up to eight analogue readings into a Node. The data
may be in the form of DC voltage in the range of 0-5V or a DC current of 0-20mA.
This is switchable for each input channel individually. Up to sixteen of these
modules may be used in a single Node.
The use of external isolators is recommended.
Technical Specifications
Module Name
Part Number
No. of modules per Node
Processor
Internal Interface
Analogue Inputs
Analogue Input
IRDN207
16 max
80C32
T2-BUS Slave Peripheral
8
0-5 V DC
or 0-20mA DC suitable
12 bit
1 second for 8 channels
11-14V DC through T2-BUS
min 10mA
type 50mA
max 100mA
-20° to +70°
2 part screw terminals
152 x 167 x 22 mm
0.2 kg
Precision
Scan Rate
Power Supply
Current Consumption
Operating temperature
User connection
Dimensions
Weight
A N A L O G U E
IN P U T 1
A N A L O G U E
IN P U T 2
A N A L O G U E
IN P U T 3
A N A L O G U E
IN P U T 4
1
2
+
3
0 v
4
+
5
0 v
6
+
7
0 v
A N A L O G U E
IN P U T 5
0 v
A N A L O G U E
IN P U T 6
0 v
A N A L O G U E
IN P U T 7
0 v
A N A L O G U E
IN P U T 8
+
0 v
0 v
m A
8
+
V
A n a lo g u e
to D ig ita l
C o n v e rte r
9
+
1 0
1 1
+
1 2
1 3
IN P U T C IR C U IT
S A M E O N A L L
T E R M IN A L P A IR S
1 4
+
1 5
1 6
IN P U T IM P E D A N C E
2 5 0 O h m s fo r c u rre n t
2 .5 k O h m s fo r v o lta g e
2 -P A R T T E R M IN A L S
Figure 25 Analogue Input Module Connection Chart
7.8
Analogue Output Module – IRDN208
D to A
D to A
T -B U S
V to I
A N A L O G U E
O U T P U T
V to I
A N A L O G U E
O U T P U T
V to I
A N A L O G U E
O U T P U T
V to I
A N A L O G U E
O U T P U T
µ P R O C
D to A
D to A
Figure 26 Analogue Output Module Block Diagram
This module provides four channels of DC analogue output for connection to
external devices. The signals are in the form of DC currents between 0-20mA. A
DC voltage output may be obtained by adding external precision resistors to each
channel. Up to sixteen of these modules may be used in a single Node.
Note: Analogue outputs do not require an external loop power supply.
Technical Specifications
Module Name
Part Number
No. of modules per Node
Processor
Internal Interface
Analogue Outputs
Precision
Load resistance
Output settling time
Power supply
Current Consumption
Operating temperature
User connectors
Dimensions
Weight
A N A L O G U E
O U T P U T 1
Analogue Output
IRDN208
16 max
80C31
T2-BUS Slave Peripheral
4 x 0-20mA current devices
12 bit
250 Ω
500mS maximum
from receipt of T2-BUS command
11-14V DC via T2-BUS
min
15mA
type
50mA
max
120mA
-20°C to +70°C
2 part screw terminals
152 x 167 x 22mm
0.2k
C U R R E N T O U T P U T
0 -2 0 m A
+
1
0 v
2
C u rre n t
D r iv e r
+
A N A L O G U E
O U T P U T 2
0 v
A N A L O G U E
O U T P U T 3
0 v
A N A L O G U E
O U T P U T 4
0 v
3
4
+
D ig ita l to
A n a lo g u e
C o n v e rte r
5
6
+
7
8
O U T P U T C IR C U IT
S A M E O N A L L
T E R M IN A L P A IR S
2 -P A R T T E R M IN A L S
Figure 27 Analogue Output Module Connection Chart
7.9
Pulse Output Module – IRDN209
P U L S E
O U T P U T
P U L S E
O U T P U T
P U L S E
O U T P U T
T -B U S
µ P R O C
P U L S E
O U T P U T
B U F F E R
P U L S E
O U T P U T
P U L S E
O U T P U T
P U L S E
O U T P U T
P U L S E
O U T P U T
U S E R S U P P L Y
F O R P U L S E S
Figure 28 Pulse Output Module Block Diagram
This module provides eight solid state outputs generating pulse signals.
sixteen of these modules may be used in a single Node.
Up to
The outputs are compatible with most types of pulse counters requiring an input
pulse width of greater than 50 mS. The user should use scalers at the pulse inputs
to ensure the outputs react fast enough.
Technical Specifications
Module Name
Part Number
No. of modules per Node
Processor
Internal Interface
Solid State Outputs
Pulse Outputs
Pulse Width
Power supply
Current Consumption
Operating temperature
User connection
Dimensions
Weight
P U L S E
O U T P U T 1
+
P U L S E
O U T P U T 2
+
P U L S E
O U T P U T 3
+
P U L S E
O U T P U T 4
+
P U L S E
O U T P U T 5
+
P U L S E
O U T P U T 6
+
P U L S E
O U T P U T 7
+
P U L S E
O U T P U T 8
+
1
-
Pulse Output
IRDN209
16 max
80C31
T2-BUS slave peripheral
8 Open collector
Max switching current 500mA
Max switching voltage 60v
17 Hz
50mSec min.
11-14V DC through T2-BUS
min 10mA
type 50mA
max 75mA
-20°C to +70°C
2 part screw terminals
152 x 167 x 22mm
0.2kg
U S E R S U P P L Y (+ )
2
O U T P U T C IR C U IT
S A M E O N A L L
T E R M IN A L P A IR S
3
4
5
6
7
8
9
-
1 0
S Y S T E M 0 v
-
1 1
U S E R S U P P L Y
1 2
-
1 3
+ 1 1 -1 4 v d .c .
S Y S T E M 0 v
-
1 4
1 5
L 1
L 2
1 6
2 -P A R T T E R M IN A L S
Figure 29 Pulse Output Module Connection Chart
7.10
Combination Output Module – IRDN210
R E L A Y
D R IV E R S
L A T C H
T -B U S
R E L A Y
D IG IT A L
O U T P U T
R E L A Y
D IG IT A L
O U T P U T
R E L A Y
D IG IT A L
O U T P U T
R E L A Y
D IG IT A L
O U T P U T
µ P R O C
D to A
V to I
A N A L O G U E
O U T P U T
D to A
V to I
A N A L O G U E
O U T P U T
Figure 30 Combination Output Module Block Diagram
This module provides four digital outputs through changeover relays and two
channels of DC analogue data. The analogues are 0-20mA DC current outputs and
may be converted to DC voltage using external precision resistors.
Due to addressing restrictions, only one such module may be used in a Node.
Note: Analogue outputs do not require an external loop power supply.
Technical Specifications
Module Name
Part Number
No. of modules in a Node
Processor
Internal Interface
Relay outputs
Loading
Combination Output
IRDN210
1 maximum
80C31
T2-BUS Slave Peripheral
4 changeover
min 1mA @ 1V DC
max 1A @ 240V AC
3A @ 120V AC
3A @ 30V DC
Output settling time
Analogue Outputs
Precision
Load resistance
Power Supply
Current Consumption
500mS maximum
2 x 0-20mA DC
12 bit
250 Ω
11-14 V DC through T-Bus
50 mA min.
120mA max.
-20°C to +70°C
2 part screw terminals
152 x 167 x 32mm
0.6kg
Operating Temperature
User Connection
Dimensions
Weight
A N A L O G U E
O U T P U T 1
A N A L O G U E
O U T P U T 2
O U T P U T C IR C U IT
S A M E O N B O T H
T E R M IN A L P A IR S
+
1
0 v
2
+
0 v
D ig it a l to
A n a lo g u e
C o n v e rte r
3
4
C U R R E N T O U T P U T
0 -2 0 m A
2 -P A R T T E R M IN A L S
D IG IT A L
O U T P U T 1
N /O
C O M
N /C
D IG IT A L
O U T P U T 2
N /O
C O M
N /C
D IG IT A L
O U T P U T 3
N /O
C O M
N /C
D IG IT A L
O U T P U T 4
N /O
C O M
N /C
R e la y
1
2
3
4
5
6
7
8
9
1 0
1 1
1 2
2 -P A R T T E R M IN A L S
Figure 31 Combination Output Module Connection Chart
7.11
Low Power Input Module – IRDN211
B U F F E R
T -B U S
µ P R O C
O P T O
IS O L A T O R
D IG IT A L
IN P U T
O P T O
IS O L A T O R
D IG IT A L
IN P U T
O P T O
IS O L A T O R
D IG IT A L
IN P U T
O P T O
IS O L A T O R
D IG IT A L
IN P U T
A N A L O G U E
IN P U T
A to D
A N A L O G U E
IN P U T
A N A L O G U E
M P X
A N A L O G U E
IN P U T
A N A L O G U E
IN P U T
T -B U S
T -B U S
IN T E R F A C E
IN P U T
P R O T E C T IO N
1 2 V
D C N O M IN A L
IN P U T
Figure 32 Low Power Input Module Block Diagram
This module is used to collect up to four digital steady-state inputs and four DC
analogue values. The analogues may be either 1-5V DC or 4-20mA, switchable for
each channel individually. The module may be connected directly to a nominal 12v
DC power source. This module is used with a Communications Controller and
optionally a DC Adaptor, to form a Low Power Node for locations without mains
power supplies. It can also be used in conjunction with an IRDN212 Low Power
Pulse Input Module.
Due to addressing restrictions, only one such module may be used in a Node.
Technical Specifications
Module Name
Part Number
No. of modules in a Node
Processor
Internal Interface
Digital Inputs
Analogue Inputs
Precision
Scan rate
Power supply
Current Consumption
Operating Temperature
User Connection
Dimensions
Weight
D C
IN P U T
Low Power Input
IRDN211
1 maximum
80C32
T2-BUS Slave Peripheral
4 volt free
4 channels 1-5 V DC
4-20 mA DC switchable
10 bit
1 second for all channels
11-14v DC direct
or 11-14v DC from DC Adaptor via T2-BUS
100 mA typ.
300 uA in low power mode
-20°C to +70°C
2 part screw terminals
152 x 167 x 32
0.3kg
1
2
+ 5 V S u p p ly
4 k 7
A N A L O G U E
IN P U T 1
+
3
0 v
+
4
A N A L O G U E
IN P U T 2
0 v
A N A L O G U E
IN P U T 3
+
0 v
A N A L O G U E
IN P U T 4
+
0 v
5
6
7
m A
8
V
9
1 0
IN P U T C IR C U IT
S A M E O N A L L
T E R M IN A L P A IR S
2 -P A R T T E R M IN A L S
A n a lo g u e
to D ig ita l
C o n v e rte r
D IG IT A L
IN P U T 1
+
D IG IT A L
IN P U T 2
+
D IG IT A L
IN P U T 3
+
D IG IT A L
IN P U T 4
+
O p t o - is o la to r
1 1
-
1 2
1 3
-
-5 V
1 4
1 5
-
1 6
1 7
1 8
IN P U T C IR C U IT
S A M E O N A L L
T E R M IN A L P A IR S
2 -P A R T T E R M IN A L S
Figure 33 Low Power Input Module Connection Chart
7.12
Low Power Pulse Input Module – IRDN212
T -B U S
C M O S
B U F F E R
P U L S E
IN P U T
C M O S
B U F F E R
P U L S E
IN P U T
C M O S
B U F F E R
P U L S E
IN P U T
C M O S
B U F F E R
P U L S E
IN P U T
C M O S
B U F F E R
P U L S E
IN P U T
C M O S
B U F F E R
P U L S E
IN P U T
C M O S
B U F F E R
P U L S E
IN P U T
C M O S
B U F F E R
P U L S E
IN P U T
µ P R O C
Figure 34 Low Power Pulse Input Module Block Diagram
This module is used to collect up to eight pulse counting inputs and has the added
benefit of being able to be connected directly to a DC power source. This module is
used with a Communications Controller and optionally a DC Adaptor, to form a Low
Power Node for locations without mains power supplies. It can also be used in
conjunction with an IRDN 211, Low Power Input Module.
Only pulses wider than 5mS will be detected with each input channel having a
counter capable of storing a maximum count of 65535. The user must ensure that
an appropriate transmission interval is selected to avoid counter overflows between
transmissions. Eight LED's are provided to provide indication of pulse activity on
each channel. The LED's can be switched 'OFF' via the on-board DIL switch. It
should be noted that each illuminated LED will add approx. 2mA to the current
consumption of the module.
Technical Specifications
Module Name
Part Number
No. of modules in a Node
Processor
Internal Interface
Pulse Inputs
Input Pulse Width
Input Pulse Frequency
Power supply
Low Power Pulse Input
IRDN212
16 max.
PIC16C74
T2-BUS Slave Peripheral
8
5 mS min.
100 Hz max.
11-14v DC direct
or 11-14v DC via T2-BUS
70 mA Typ.
5mA Low Power Mode (LED's switched OFF)
-20°C to +70°C
2 part screw terminals
152 x 167 x 32
0.3kg
Current Consumption
Operating Temperature
User Connection
Dimensions
Weight
0 v
P U L S E
IN P U T 2
0 v
P U L S E
IN P U T 3
0 v
P U L S E
IN P U T 4
0 v
P U L S E
IN P U T 5
0 v
P U L S E
IN P U T 6
0 v
P U L S E
IN P U T 7
+
0 v
P U L S E
IN P U T 8
+
0 v
+ 5 V
+
P U L S E
IN P U T 1
1
2
+
3
4 7 k
4
+
C M O S
B U F F E R
5
6
+
0 V
7
8
+
9
1 0
+
1 1
1 2
1 3
IN P U T C IR C U IT
S A M E O N A L L
T E R M IN A L P A IR S
1 4
1 5
1 6
2 -P A R T T E R M IN A L S
(J 4 )
+ 1 2 V
0 V
1
2
2 -P A R T T E R M IN A L S
(J 3 )
Figure 35 Low Power Pulse Input Module Connection Chart
7.13 Alarm Output Module – IRDN214
T -B U S
µ P R O C
L A T C H
R E L A Y
D R IV E R S
R E L A Y
A L A R M
O U T P U T
R E L A Y
A L A R M
O U T P U T
R E L A Y
A L A R M
O U T P U T
R E L A Y
A L A R M
O U T P U T
R E L A Y
A L A R M
O U T P U T
R E L A Y
A L A R M
O U T P U T
R E L A Y
A L A R M
O U T P U T
R E L A Y
A L A R M
O U T P U T
Figure 36 Alarm Output Module Block Diagram
The alarm output module allows an individual alarm output per Node, within the
VersaNet2 network. The alarm occurs at the receiving end of the link being
monitored. It is particularly useful in systems where the 'transmitter' is battery or
solar powered.
The alarm output module has identical hardware to a digital output module
IRDN201, but the software is different. In the non-alarm state the relays are
energized.
OPERATION.
On 'power up', all alarm output relays will be energized and a software timer will be
started. If no message is received within 30* minutes the relay will de-energize
giving an alarm output. If a message is received at any time before the 30 minute
period has elapsed the timer is re-started holding the relay in the energized ‘no’
alarm state.
* The 30 minute time is factory programmed within the EPROM. Other times can be
supplied up to a maximum of 18 hours.
CONFIGURATION.
The alarm output board is installed in the receiving node in the same way as any
other Input/Output module*. The module is set to a unique address for that node
using SW1*. Having used an address for alarm outputs that address will no longer
be available for digital outputs.
At the transmitting end of the link being monitored, a digital input must be configured
to be sent to the specific relay selected for that purpose at the output end of the link.
For example in a system where:
Network Name = ABC
The 'Transmitter' is Node 1
The 'Receiver' is Node 2
The alarm output card is given address 2
At 'Connection Screen'
Select 'IRDN200 (on board) from available list
Select D0.1 from sub-tree
Enter '2D2.3' in Destination Output box
Select 'Connect' button
The above will cause relay 3 on alarm output module 2 to monitor transmissions
from Node 1 and to de-energize if no message is received from Node 1 in 30
minutes.
Technical Specification
Module Name
Part Number
No. of modules per Node
Processor
Internal Interface
Relay Outputs
Loading
Alarm Output
IRDN201
16 max
80C31
T2-BUS Slave Peripheral
8 changeover
min
1mA @ 1V DC
max
1A @ 240V AC
3A @ 120V AC
3A @ 30V DC
Output settling time
20 ms per channel from
receipt of T-Bus command
Contact life expectancy
(mechanical)
Power Supply
Current Consumption
1 x 10⁷ operations
11-14V DC through T2-BUS
min 30 mA
type 130 mA
max 250 mA
-20°C to +70°C
2 part screw terminals
152 x 167 x 32 mm
0.3kg
Operating temperature
User connection
Dimensions
Weight
A L A R M
O U T P U T 1
A L A R M
O U T P U T 2
A L A R M
O U T P U T 3
A L A R M
O U T P U T 4
N /O
C O M
N /C
1
2
N /O
C O M
N /C
N /O
C O M
N /C
A L R M
O U T P U T 6
N /O
C O M
N /C
A L A R M
O U T P U T 7
N /O
C O M
N /C
A L A R M
O U T P U T 8
N /O
C O M
N /C
3
N /O
C O M
N /C
N /O
C O M
N /C
A L A R M
O U T P U T 5
4
5
6
7
8
9
1 0
1 1
1 2
R e la y
2 -P A R T T E R M IN A L S
Figure 37 Alarm Output Module Connection Chart
1 3
1 4
1 5
1 6
1 7
1 8
1 9
2 0
2 1
2 2
2 3
2 4
Section 8
8.1
Accessories
Enclosures
Basic Enclosure
164
4 Mounting Holes 7 dia
AVAILABLE DEPTH
28 25
0 4
108
190
100
30
NOTE: All dimensions in mm.
Figure 37 Mechanical Drawing of Basic Enclosure
The Basic Enclosure is an impact resistant, polycarbonate enclosure which offers
protection from dust and moisture in accordance with IP67 (IEC529/DIN
40050/BS5490). It is moulded from homogeneous thermoplastic polycarbonate, is
resistant to normal atmosphere corrosion and is resistant to most mineral and
organic acids. Contact should be avoided, however, with organic solvents and
strong alkalies. The material is self-extinguishing and does not release any toxic
combustion products.
It is supplied complete with lid, gland plate, four cable glands and metal base plate,
ready to take VersaNet modules. A depth of 108mm is available in an unexpanded
enclosure. Enclosures may be bolted together or increased in depth using suitable
accessories to accommodate larger numbers of modules.
The enclosure is supplied with a grey finish (RAL7035) and may be painted and
machined with normal tools or ultrasonic welding apparatus. Cleaning should be
performed with soap and water only.
1
Specifications
Part Name
Part Number
Dimensions
Basic Enclosure
ENC/001
190 x 280 x 130
(Available Depth 108mm)
1.5kg
No Limit
Soap & Water Only
AVOID ORGANIC SOLVENTS or STRONG ALKALIES
Weight
No. in a node
Cleaning
8.1.1 Depth Extension Kit
280 mm
Fasteners pass
through Depth
Extension and secure
into Enclosure.
They also provide
thread for Lid Screws.
(4 supplied)
190 mm
50 mm
Figure 38 Mechanical Drawing of Depth Extension Kit
The Depth Extension Kit is used to increase the available depth of the Basic
Enclosure. Each extension provides an additional 50mm, therefore when the
suggested maximum of 2 extensions are fitted, a total depth of 208mm is available.
When fitted in accordance with the instructions in Section C of this manual, the IP67
protection is maintained.
Specifications
Part Name
Part Number
No. in a node
Weight
Depth Extension Kit
ENC/004
No Limit (maximum 2 per Basic Enclosure)
0.4 kg
2
E N C L O S U R E L ID
P A N E L R E M O V E D
F O R T O P P L A T E
D E P T H E X T E N S IO N
S ID E P A N E L
B A S IC E N C L O S U R E
C A B L E G L A N D P L A T E
Figure 39 Example Enclosure Construction
8.1.2
Side Extension Kit
Gasket supplied with
4 nuts & bolts and
250 mm T-BUS cable
Figure 40 Side Extension Kit
The Side Extension Kit is used to connect two Basic Enclosures together to
accommodate large numbers of modules.
It consists of a sealing gasket, four nuts and bolts and an extended T-BUS cable.
When fitted in accordance with instructions in Section C of this manual, the IP67
protection is maintained.
Specifications
Part Name
Part Number
No. in a node
Side Extension Kit
ENC/002
No Limit
3
Dimensions - gasket
T2-BUS cable
Weight
215 x 80mm
250mm
0.05kg
V E R S A N E T
M O D U L E S
T -B U S
E N C L O S U R E
C A B L E -G L A N D
E N T R Y
Figure 41 Example Enclosure Construction
8.1.3
Battery Mounting Kit
1 4 8 m m
1 2 0 m m
7 m m d ia .
B a tte r y R e ta in e r s
S p a c e fo r
L e a d - A c id
B a tte ry
2 2 8 m m
2 0 2 m m
S p a c e fo r
L e a d - A c id
B a tte ry
S u p p lie d w ith 4 b o lts
a n d b a tte r y c a b le .
D e s ig n e d to r e p la c e
s ta n d a r d b a s e p la te
Figure 42 Mechanical Drawing of Battery Mounting Kit
The Battery Mounting Kit is used in place of the standard metal base plate to
provide means of retaining two 12V batteries in a Basic Enclosure. It consists of a
4
formed metal base plate, battery retention straps, fasteners and a battery cable to
connect to the relevant VersaNet Module (Low Power Input or DC Adaptor)
Specifications
Part Name
Battery Mounting Kit
Part Number
ENC/005
No. in a node
1 maximum
Dimensions - base plate 148 x 228 mm
- battery cable 250mm
Weight
0.5kg
Battery space
2 off 150 x 100 mm
V e r s a N e t M o d u le
L e a d - A c id
B a tte ry
(S p a re )
B a tte ry
R e ta in e r
L e a d - A c id
B a tte ry
B a tte r y C a b le
B a s e P la te r e p la c e d w ith
B a tte r y M o u n tin g K it
Figure 43 Battery Kit Construction
5
8.1.3
Antenna Top Plate Mounting Kit
1 4 0 m m
B N C S o c k e t fo r A n te n n a
S u p p lie d w ith 4 n u ts & b o lts
a n d g a s k e t fo r fittin g to
e n c lo s u r e to p
C o n n e c ts to R a d io
Figure 44 Mechanical Drawing of Antenna Top Plate Mounting Kit
The Antenna Mounting Kit is used to provide a means of connecting an enclosuretop antenna directly to a VersaNet enclosure. It consists of a metal plate fitted with
a short RF cable, sealing gasket and four nuts and bolts. When fitted in accordance
with the instructions in Section C of this manual, the IP67 protection is maintained.
Specifications
Part Name
Part Number
External RF Connection
No. in Node
Dimensions - plate
- cable
Antenna Top Plate Mounting Kit
ENC/003
BNC female, bulkhead mounted
1 maximum
140mm x 50mm x 2mm
300mm
6
8.1.5 Antenna Bulkhead Cable Kit
2 0 0 m m (A p p ro x )
C o n n e c ts to R a d io
B u lk h e a d
(u p to 8 m m )
P a s s e s th ro u g h
C a b le G la n d H o le
Figure 45 Antenna Bulkhead Cable Kit
The Antenna Bulkhead Cable Kit is used to provide an N-type female bulkhead
socket in the gland plate of the Basic Enclosure. It is fitted in place of a standard
cable gland and allows direct connection of external antennas or feeders.
Specifications
Part Name
Part Number
No. in a node
Dimensions
Weight
Antenna Bulkhead Cable Kit
ENC/007
1 maximum
300 mm x 10 mm dia. (approx)
0.1kg
7
8.2
Antennas
8.2.1
½ Wave Whip Antenna
The ½-Wave Whip Antenna is used in
conjunction with the Antenna Mounting Kit for
those applications requiring a relatively short
transmission range. The antenna is nominally
rated at a loss of 3 dB and is suitable for
ranges up to about 1km, dependent upon
topography.
3 2 0 m m
The construction is a corrosion-proof metal
shaft with a resistive black plastic cover. The
connector is black chromium plated brass.
A p p ro x .
Note: The BNC connection should be sealed
with self amalgamating tape after installation.
Specifications
Part Name
½-Wave Whip Antenna
Part Number AT006
No. in a node 1 maximum
Frequency Range406-470 MHz
VSWR
<2 when mounted on top plat
Impedance
50 Ohms
Connector
BNC
ANT006A
ANT006C
440 – 470 MHz
406 – 440 MHz
300mm Long
330mm Long
Figure 46
8
8.2.2
End Fed Dipole / Colinear
The end fed dipole and collinear antennas are a professional
range of products designed for outside installations requiring mid
to long range transmissions.
The construction is a parallel glass fibre tube with an integral die
cast aluminium alloy mounting bracket.
The Colinear antennas offer 3 or 6 dB gain, which can be useful
to recover losses in feeder cable.
Note: Check with local regulations to ensure the allowed ERP is
not exceeded.
The antenna is supplied with 2 x ‘U’ bolts for mounting to a
standard 50mm diameter pole and is complete with a 3 metre tail
of RG213 cable terminated with an ‘N’ type male connector.
Specification
Part number
ANT008
Frequency range
Impedance
VSWR
Polarization
400 – 470MHz
50 Ώ
<1.5 : 1
Vertical
Figure 47
Figure 48
Figure 49
Endfed Dipole
3dB Colinear
Part no
Gain
Length
Weight
Wind loading
ANT008
0 dBd
0.6mtrs
0.6Kg
37 N
Part no
Gain
Length
Weight
Wind loading
Figure 50
6 dB Colinear
ANT008-3
3dBd
1.6mtrs
1.0 Kg
70 N
Part no
Gain
Length
Weight
Wind loading
ANT008-6
6dBd
3.1mtrs
2.0 Kg
156 N
9
8.2.3
Yagi Antenna
Figure 51
The 2 element and 8 element Yagi antennas are a professional range of products
designed for long distance applications or where a directional signal is required i.e.
to avoid receiving other nearby transmissions.
The 2 element Yagi offers a gain of 3 dBd and the 8 element, 10dBd.
Note: Check with local regulations to ensure the allowed ERP is not exceeded.
The construction is from aluminium alloy tubing with a zinc alloy diecast saddle
clamp for mounting to a standard 50mm pole. The antenna is supplied complete
with a 3 mtr tail of RG213 cable terminated with a ‘N’ type male connector.
Specification
Freq range
Impedance
VSWR
Polarisation
Part no
Gain
Length
Weight
Wind loading
Beamwidth (H)
Beamwidth (E)
400 – 470MHz
50 Ω
<1.5 : 1
Horizontal or Vertical
2 Element
ANT009-2
3 dBd
0.6 mtrs
1.8 Kg
54 N
0
84
0
62
Figure 52 – 2 Element
8 Element
ANT009-8
10 dBd
1.6 mtrs
3.5 Kg
128 N
0
50
0
43
Figure 53 – 8 Element
10
Low Profile Vandal Resistant
This antenna is a small, lightweight, low profile unit suitable for any application
where there is a height restriction. Because of its shape and mounting position, it
also offers a degree of protection against vandalism. It is mountable on most
surfaces as the ground plane is integral.
45
160 Dia
8.2.4
Adhesive Pad
Mounting Bush
Cable with BNC Jack
Figure 54 Low Profile Antenna
Specification
Part no
Frequency range
VSWR
Impedance
Polarisation
Connector
ANT014
400-470 MHz
<1.5 :1
50 Ohm
Vertical
BNC + 0.5 mtr of cable
11
8.3.5
Antenna Mounting Hardware
RDT can supply the following mounting hardware to assist with the installation of
antennas.
Figure 55
Standard Yagi Clamp
Designed to fit standard 50mm Poles and
supplied with 2 x U bolts and nuts.
Part Number 1329
Figure 56
Crossover Clamp 50mm x 32mm (2” x 1¼”)
Supplied with 4 x U bolts and nuts
Part number 1330
Figure 57
Standard Colinear Clamp
Designed to fit standard 50mm poles and
supplied with 2 x U bolts and nuts.
Part number 1331
12
Figure 58
Colinear Parallel Clamp
Designed to fit standard 50mm poles and
supplied with 2 x fixing bolts and nuts.
Part number 1332
Figure 59
Wall Mounting ‘A’ Brackets
Supplied as a pair with 2 x U bolts and nuts
Part number 300mm stand-off 1333
450mm stand-off 1334
600mm stand-off 1335
Figure 60
Wall Mounting ‘T’ and 'K’ Brackets
Supplied as a pair with 2 x U bolts and nuts
Part number 300mm stand-off 0074
450mm stand-off 0076
600mm stand-off 1336
Figure 61
Channel Bracket
Supplied with 2 x U bolts and nuts.
Part number 1337
13
8.3
Cables
The following cables are available from RDT stock:
RDT Part No
Length
Description
Application
CAB0019
CAB0019
CAB1338
CAB1339
1.5mtrs
1.5mtrs
450mm
1.5mtrs
9 Way ‘D’ Skt to 9 Way ‘D’ Skt
9 Way ‘D’ Skt to 9 Way ‘D’ Skt
9 Way ‘D’ Skt to 15 Way ‘min D’ Plg
9 Way ‘D’ Skt to 25 Way ‘D’ Plg
RS232 Data Highway Port
RS232 Configuration Port
VN2 to GSM Modem
VN2 to Wire Line Modem
CAB1622
CAB1623
110mm
400mm
10 Way IDC Skt to 10 Way IDC Skt
10 Way IDC Skt to 10 Way IDC Skt
T2-BUS
T2-BUS
CAB1610
CAB1611
400mm
400mm
URM43 BNC bulkhead to SMA male
URM43 ‘N’ type male to SMA male
Radio to Top Plate
Radio to Bulkhead
CAB001-1
CAB001-3
CAB-001-5
CAB001-10
CAB001-15
CAB001-20
CAB001-25
CAB001-30
1mtr
3mtr
5mtr
10mtr
15mtr
20mtr
25mtr
30mtr
RG213 ‘N’ type male to ‘N’ type male
RG213 ‘N’ type male to ‘N’ type male
RG213 ‘N’ type male to ‘N’ type male
RG213 ‘N’ type male to ‘N’ type male
RG213 ‘N’ type male to ‘N’ type male
RG213 ‘N’ type male to ‘N’ type male
RG213 ‘N’ type male to ‘N’ type male
RG213 ‘N’ type male to ‘N’ type male
VN2 to Antenna
VN2 to Antenna
VN2 to Antenna
VN2 to Antenna
VN2 to Antenna
VN2 to Antenna
VN2 to Antenna
VN2 to Antenna
8.3.1
Connectors
RDT Part No
Description
Application
0022
0029
0013
1063
0042
0048
0049
2 Way free socket
3 Way free socket
4 Way free socket
5 Way free socket
8 Way free socket
12 Way free socket
16 Way free socket
DC input
Data I/O
Data I/O
Data I/O
Data I/O
Data I/O
Data I/O
0879
0880
9 Way ‘D’ socket
9 Way ‘D’ cover and retaining screws
RS232
RS232
0511
0510
0525
SMA male for URM43
R/A ‘N’ type male for URM43
‘N’ type male straight, for RG213
Connection to Radio
Connection to Antenna
Antenna cable
14
8.4
Power Supplies
There is a range of 4 power supplies, 3 switch mode and 1 linear for use when
battery back-up is required.
8.4.1 1 Amp Switch Mode (Part number PSU1291)
Specification
Input Voltage Range
Inrush Current
Output Power
Output Voltage
Size
Input Connector
Output Connector
85-264 VAC
20A /115 VAC
40A / 230 VAC
1A Continuous
12VDC Nominal
90L x 51W x 22H
Mates with Molex 09-50-3031
Mates with Molex 09-50-3041
Figure 62 1Amp power supply
15
8.4.2
2 Amp Switch Mode (Part number PSU1292)
Specification
Input Voltage Range
Inrush Current
Output Power
Output Voltage
Size
Input Connector
Output Connector
8.4.3
90-264 VAC
50A / 264 VAC
2A Continuous
12VDC Nominal
102L x 51W x 32H
Mates with Molex 09-50-3031
Mates with Molex 09-50-3041
3 Amp Switch Mode (Part number PSU1293)
Specification
Input Voltage Range
Inrush Current
Output Power
Output Voltage
Size
Input Connector
Output Connector
90-264 VAC
50A / 264 VAC
3A Continuous
12VDC Nominal
102L x 51W x 32H
Mates with Molex 09-50-3031
Mates with Molex 09-50-3041
Figure 63 2 Amp and 3 Amp Power Supplies
16
3 Amp Linear Power Supply / Battery Charger (Part number PSU1289)
This model is a high power linear power supply / battery charger , with automatic
change over on mains fail. See Section 3.4.4 of this manual for connection and
operational details. The unit will also switch an output to provide a mains fail alarm.
Specification
*220 – 240 VAC
3 Amp continuous
12VDC Nominal
172L x 90W x 70H
1.72 Kg
70
Input Voltage Range
Output Power
Output Voltage
Size
Weight
Mains
Fuse
DC
Fuse
172
90
8.4.4
Mains
Input
Output
12VDC
Battery Charger
Mains Fail
Figure 64 3 Amp Linear Power Supply / Charger
17
8.5
GSM Modem
The VersaNet2 software, has been specifically designed to interface with the
Wavecom WMOD2B dual-band GSM Modem. Other GSM Modems may work
perfectly well with VersaNet2, but their operation cannot be guaranteed. For
example, most modems use a similar command set in normal point to point mode,
but they seem to use different protocols for SMS messaging.
Before using the modem, it will be necessary to purchase a SIM Card and set up a
service agreement with a network provider. Make sure that the network provider
selected has good coverage in the proposed area. In general it is better to select a
900MHz system because the coverage is more widespread and the modem
operates at a higher power level.
Specification
Part number
Dual Band
Size
Supply
Current Idle Mode
Antenna connection
RS232 connection
Power in
WMOD2B
900 / 1800 MHz
98L x 54W x 25H
12VDC @ 130mA typ. (900)
12VDC @ 95mA typ (1800)
4mA
SMA
15 pin sub ‘D’
4 pin Micro-Fit
LED Indicator Functions
LED off
LED on
LED on flashing slowly
LED on flashing rapidly
Modem switched off
Modem on, connecting to Network
Modem connected, Idle mode
Modem communicating with Network
Figure 65 Mechanical details of WMOD2B GSM Modem
18
Section 9
Appendices
9.1 T2-BUS Interface
1
V e r s a N e t In te r n a l S ig n a ls
N o t fo r U s e r C o n n e c tio n
2
3
1 0
4
W a y
ID C
5
V in
6
7
8
G N D
9
1 0
Figure 66 T2-BUS Interface Connections
T2-BUS is the proprietary communications protocol between all VersaNet2 modules in a
node. It is a secure, robust bit-bus structure that permits all processors to communicate
directly.
In some circumstances, it may be necessary for system builders or end users to
construct spare T2-BUS cables. This may be done easily using standard components.
The cable is a 10 way keyed IDC parallel cable.
9.2 RS232 Data Highway Port
IR D N 2 0 0
P O R T
J P 1 2
T X D
R X D
G N D
D T R
D S R
C T S
3
3
5
5
2
2
4
6
8
T X D
R X D
G N D
P C P O R T
9 -W a y D
R S 2 3 2 C a b le C o n n e c tio n s
Figure 67 RS 232 Data Highway Port Connections
The RS232 Data Highway Port on the Communications Controller (JP12) is used to
communicate with external process instruments and computers that utilize the
MODBUS protocol.
9.3
RS232 Configuration Port
IR D N 2 0 0
P O R T
J P 1 2
T X D
R X D
G N D
3
3
5
5
2
D T R
D S R
C T S
2
4
T X D
R X D
G N D
P C P O R T
9 -W a y D
6
8
R S 2 3 2 C a b le C o n n e c tio n s
.
Figure 68 RS232 Configuration Port Connection
In order to configure a VersaNet 2 node or to monitor local I/O, a PC running Windows
95 (or later) is plugged into the Configuration port on the Communications Controller
(JP7). The serial port on the PC must be configured as follows:PC Serial Port Configuration
Baud Rate
Parity
No. of Data Bits
No. of Stop Bits
9600
None
8
1
9.4 Modbus Protocol
Controllers can be setup to communicate on standard Modbus networks using either of
two transmission modes: ASCII or RTU. Users select the desired mode, along with the
serial port communication parameters (baud rate, parity mode, etc.), during
configuration of each controller. The mode and serial parameters must be the same for
all devices on a Modbus network.
The selection of ASCII or RTU mode pertains only to standard Modbus networks. It
defines the bit contents of message fields transmitted serially on those networks. It
determines how information will be packed into the message fields and decoded.
On other networks like MAP and Modbus Plus, Modbus messages are placed into
frames that are not related to serial transmission. For example, a request to read
holding registers can be handled between two controllers on Modbus Plus without
regard to the current setup of either controller’s serial Modbus port.
ASCII Modbus
When controllers are setup to communicate on a Modbus network using ASCII
(American Standard Code for Information Interchange) mode, each 8-bit byte in a
message is sent as two ASCII characters. The main advantage of this mode is that it
allows time intervals of up to 1 second top occur between characters without causing an
error.
The format of each byte in ASCII code is:Coding system:
Hexadecimal, ASCII characters 0-9, A-F.
One hexadecimal character contained in each ASCII character of
the message.
Bits per Byte:
1 start bit
7 data bits, least significant bit sent first
1 bit for even/odd parity; no bit for no parity
1 stop bit if parity is used; 2 stop bits for no parity
Error check field:
Longitudinal Redundancy Check (LRC)
RTU Mode
When controllers are setup to communicate on a Modbus network using RTU (Remote
Terminal Unit) mode, each 8-bit byte in a message contains two 4-bit hexadecimal
characters. The main advantage of this mode is that its greater character density
allows better data throughput than ASCII for the same baud rate. Each message must
be transmitted in a single steam.
The format for each byte in RTU mode is:Coding system:
8-bit binary, hexadecimal 0-9, A-F
Two hexadecimal characters contained in each 8-bit field of the
message.
Bits per byte:
1 start bit
8 data bits, least significant bit sent first
1 bit for even/odd parity; no bit for no parity
1 stop bit if parity is used; 2 stop bits for no parity
Error check field:
Cyclical Redundancy Check (CRC)
Modbus Message Framing
In either of the two serial transmission modes (ASCII or RTU), a Modbus message is
placed by the transmitting device into a frame that has a known beginning and ending
point. This allows receiving devices to begin at the start of a message, read the
address portion and determine which device is addressed (or all devices, if the
message is broadcast), and to know when the message is completed. Partial
messages can be detected and errors an be set as a result.
On networks like MAP or Modbus Plus, the network protocol handles the framing of
messages with beginning and end delimiters that are specific to the network. Those
protocols also handle delivery to the destination device, making the Modbus address
field imbedded in the message unnecessary for the actual transmission. (The Modbus
address is converted to a network node address and routing path by the originating
controller or its network adapter).
ASCII Framing
In ASCII mode, messages start with a ‘colon’ (☺ character (ASCII 3A hex), and end with
a ‘carriage return-line feed’ (CRLF) pair (ASCII 0D and 0A hex).
The allowable characters transmitted for all other fields are hexadecimal 0-9, A-F.
Networked devices monitor the network bus continuously for the ‘colon’ character.
When one is received, each device decodes the next field (the address field) to find out
if it is the addressed device.
Intervals of up to one second can elapse between characters within the message. If a
greater interval occurs, the receiving device assumes an error has occurred. A typical
message frame is shown below.
START
1 CHAR
ADDRESS
2CHARS
FUNCTION
2 CHARS
DATA
N CHARS
LRC
CHECK
END
2 CHARS
2 CHARS
CRLF
Reading Pulses Using Modbus
There is no provision in the Modbus protocol to directly read pulse counts. This may be
achieved however using the following procedure.
At the transmitting end, programme the node to send its pulse input to a virtual output at
the receiving node.
e.g. P0.1 to 2P3.1 (address P3.1 at node 2 where no physical output card exists)
The pulse count will be sent to this virtual location at node 2 and can be read by
Modbus.
To read the pulse count treat it as an analogue read (Function Code 3), but add 10,000
to the register value.
e.g.
Register value for A3.1 = 17 (see table section 9.5)
Add 10,000 = 10,017 dec = 2721 hex
Interrogate
: 02 03 2721 0001 B2
Where:02
= Destination Node
03
= Function 3
2721 = Register value (10,017 dec)
0001 = The number of registers to be read
B2
= Check sum
Reply
Where:02
=
03
=
02
=
XXXX =
KK
=
: 02 03 02 XXXX KK
Node address
Function code
Byte count (the number of bytes to follow, 02 for a single register read)
pulse count value (hex)
Check sum
RTU Framing
In RTU mode, messages start with a silent interval of at least 3.5 character times. This
is most easily implemented as a multiple of character times at the baud rate that is
being used on the network (shown as T1-T2-T3-T4 in the figure below). The first field
then transmitted is he device address.
The allowable characters transmitted for all fields are hexadecimal 0-9, A-F. Networked
devices monitor the network bus continuously, including during the ‘silent’ intervals.
When the first field (the address field) is received, each device decodes it o find out if it
is the addressed device.
Following the last transmitted character, a similar interval of at least 3.5 character times
marks the end of the message. A new message can begin after this interval.
The entire message frame must be transmitted as a continuous stream. If a silent
interval of more than 1.5 character times occurs before completion of the frame, the
receiving device flushes the incomplete message and assumes that the next byte will
be the address field of a new message.
Similarly, if a new message begins earlier than 3.5 character times following a previous
message, the receiving device will consider it a continuation of the previous message.
This will set an error, as the value in the final CRC field will not be valid for the
combined message. A typical message frame is shown below:
START
ADDRESS
FUNCTION
DATA
T1-T2-T3-T4
8-BITS
8-BITS
n x 8-BITS
CRC
CHECK
16 BITS
END
T1-T2-T3-T4
9.5 Modbus / VersaNet2 Address Mapping.
The following table shows the mapping of the Modbus Register number to the card I/O
address on VersaNet2. This is an extract from the complete table. Obviously the table is
continuous from register 0 to 2048 with the corresponding card addresses running from
1 to 256.
Register ‘0’ corresponds to the I/O on the main communications controller card with
addresses D0.1 and A0.1.
There are 2 combination cards which have fixed addresses;
- the combination Output card is card number 30, which has 4 Digital and 2 Analogue
outputs, addresses D30.1, D30.2, D30.3, D30.4 and A30.1, A30.2
- the combination Input card is card number 31, which has 4 Digital and 4 Analogue
Inputs, addresses D31.1, D31.2, D31.3, D31.4 and A31.1, A31.2, A31.3, A31.4
The card numbers 1 to 29 can be assigned to any I/O cards in a Node. Numbers 32 to
256 can be used as Virtual outputs.
Table of Modbus / VersaNet Address Mapping
Register
0
Digital
Analog
Inputs
Inputs
D0.1
A0.1
Analog
24
D3.8
A3.8
D3.8
A3.8
Outputs Outputs
25
D4.1
A4.1
D4.1
A4.1
26
D4.2
A4.2
D4.2
A4.2
27
D4.3
A4.3
D4.3
A4.3
28
D4.4
A4.4
D4.4
A4.4
29
D4.5
A4.5
D4.5
A4.5
30
D4.6
A4.6
D4.6
A4.6
31
D4.7
A4.7
D4.7
A4.7
32
D4.8
A4.8
D4.8
A4.8
33
D5.1
A5.1
D5.1
A5.1
34
D5.2
A5.2
D5.2
A5.2
35
D5.3
A5.3
D5.3
A5.3
36
D5.4
A5.4
D5.4
A5.4
37
D5.5
A5.5
D5.5
A5.5
38
D5.6
A5.6
D5.6
A5.6
39
D5.7
A5.7
D5.7
A5.7
40
D5.8
A5.8
D5.8
A5.8
41
D6.1
A6.1
D6.1
A6.1
42
D6.2
A6.2
D6.2
A6.2
43
D6.3
A6.3
D6.3
A6.3
44
D6.4
A6.4
D6.4
A6.4
45
D6.5
A6.5
D6.5
A6.5
46
D6.6
A6.6
D6.6
A6.6
47
D6.7
A6.7
D6.7
A6.7
48
D6.8
A6.8
D6.8
A6.8
49
D7.1
A7.1
D7.1
A7.1
50
D7.2
A7.2
D7.2
A7.2
Digital
D0.1
A0.1
1
D1.1
A1.1
D1.1
A1.1
2
D1.2
A1.2
D1.2
A1.2
3
D1.3
A1.3
D1.3
A1.3
4
D1.4
A1.4
D1.4
A1.4
5
D1.5
A1.5
D1.5
A1.5
6
D1.6
A1.6
D1.6
A1.6
7
D1.7
A1.7
D1.7
A1.7
8
D1.8
A1.8
D1.8
A1.8
9
10
D2.1
D2.2
A2.1
A2.2
D2.1
D2.2
A2.1
A2.2
11
D2.3
A2.3
D2.3
A2.3
12
D2.4
A2.4
D2.4
A2.4
13
D2.5
A2.5
D2.5
A2.5
14
D2.6
A2.6
D2.6
A2.6
15
D2.7
A2.7
D2.7
A2.7
16
D2.8
A2.8
D2.8
A2.8
17
D3.1
A3.1
D3.1
A3.1
18
D3.2
A3.2
D3.2
A3.2
19
D3.3
A3.3
D3.3
A3.3
20
D3.4
A3.4
D3.4
A3.4
21
D3.5
A3.5
D3.5
A3.5
22
23
D3.6
D3.7
A3.6
A3.7
D3.6
D3.7
A3.6
A3.7
51
D7.3
A7.3
D7.3
A7.3
99
D13.3
A13.3
D13.3
A13.3
52
D7.4
A7.4
D7.4
A7.4
100
D13.4
A13.4
D13.4
A13.4
53
D7.5
A7.5
D7.5
A7.5
101
D13.5
A13.5
D13.5
A13.5
54
D7.6
A7.6
D7.6
A7.6
102
D13.6
A13.6
D13.6
A13.6
55
D7.7
A7.7
D7.7
A7.7
103
D13.7
A13.7
D13.7
A13.7
56
D7.8
A7.8
D7.8
A7.8
104
D13.8
A13.8
D13.8
A13.8
57
D8.1
A8.1
D8.1
A8.1
105
D14.1
A14.1
D14.1
A14.1
58
D8.2
A8.2
D8.2
A8.2
106
D14.2
A14.2
D14.2
A14.2
59
D8.3
A8.3
D8.3
A8.3
107
D14.3
A14.3
D14.3
A14.3
60
D8.4
A8.4
D8.4
A8.4
108
D14.4
A14.4
D14.4
A14.4
61
D8.5
A8.5
D8.5
A8.5
109
D14.5
A14.5
D14.5
A14.5
62
D8.6
A8.6
D8.6
A8.6
110
D14.6
A14.6
D14.6
A14.6
63
D8.7
A8.7
D8.7
A8.7
111
D14.7
A14.7
D14.7
A14.7
64
D8.8
A8.8
D8.8
A8.8
112
D14.8
A14.8
D14.8
A14.8
65
D9.1
A9.1
D9.1
A9.1
113
D15.1
A15.1
D15.1
A15.1
66
D9.2
A9.2
D9.2
A9.2
114
D15.2
A15.2
D15.2
A15.2
67
D9.3
A9.3
D9.3
A9.3
115
D15.3
A15.3
D15.3
A15.3
68
D9.4
A9.4
D9.4
A9.4
116
D15.4
A15.4
D15.4
A15.4
69
D9.5
A9.5
D9.5
A9.5
117
D15.5
A15.5
D15.5
A15.5
70
D9.6
A9.6
D9.6
A9.6
118
D15.6
A15.6
D15.6
A15.6
71
D9.7
A9.7
D9.7
A9.7
119
D15.7
A15.7
D15.7
A15.7
72
D9.8
A9.8
D9.8
A9.8
120
D15.8
A15.8
D15.8
A15.8
73
D10.1
A10.1
D10.1
A10.1
121
D16.1
A16.1
D16.1
A16.1
74
D10.2
A10.2
D10.2
A10.2
122
D16.2
A16.2
D16.2
A16.2
75
D10.3
A10.3
D10.3
A10.3
123
D16.3
A16.3
D16.3
A16.3
76
D10.4
A10.4
D10.4
A10.4
124
D16.4
A16.4
D16.4
A16.4
77
D10.5
A10.5
D10.5
A10.5
125
D16.5
A16.5
D16.5
A16.5
78
D10.6
A10.6
D10.6
A10.6
126
D16.6
A16.6
D16.6
A16.6
79
D10.7
A10.7
D10.7
A10.7
127
D16.7
A16.7
D16.7
A16.7
80
D10.8
A10.8
D10.8
A10.8
128
D16.8
A16.8
D16.8
A16.8
81
D11.1
A11.1
D11.1
A11.1
129
D17.1
A17.1
D17.1
A17.1
82
D11.2
A11.2
D11.2
A11.2
130
D17.2
A17.2
D17.2
A17.2
83
D11.3
A11.3
D11.3
A11.3
131
D17.3
A17.3
D17.3
A17.3
84
D11.4
A11.4
D11.4
A11.4
132
D17.4
A17.4
D17.4
A17.4
85
D11.5
A11.5
D11.5
A11.5
133
D17.5
A17.5
D17.5
A17.5
86
D11.6
A11.6
D11.6
A11.6
134
D17.6
A17.6
D17.6
A17.6
87
D11.7
A11.7
D11.7
A11.7
135
D17.7
A17.7
D17.7
A17.7
88
D11.8
A11.8
D11.8
A11.8
136
D17.8
A17.8
D17.8
A17.8
89
D12.1
A12.1
D12.1
A12.1
137
D18.1
A18.1
D18.1
A18.1
90
D12.2
A12.2
D12.2
A12.2
91
D12.3
A12.3
D12.3
A12.3
138
139
D18.2
D18.3
A18.2
A18.3
D18.2
D18.3
A18.2
A18.3
92
D12.4
A12.4
D12.4
A12.4
140
D18.4
A18.4
D18.4
A18.4
93
D12.5
A12.5
D12.5
A12.5
141
D18.5
A18.5
D18.5
A18.5
94
D12.6
A12.6
D12.6
A12.6
142
D18.6
A18.6
D18.6
A18.6
95
D12.7
A12.7
D12.7
A12.7
143
D18.7
A18.7
D18.7
A18.7
96
D12.8
A12.8
D12.8
A12.8
144
D18.8
A18.8
D18.8
A18.8
D19.1
A19.1
D19.1
A19.1
97
D13.1
A13.1
D13.1
A13.1
145
98
D13.2
A13.2
D13.2
A13.2
146
D19.2
A19.2
D19.2
A19.2
147
D19.3
A19.3
D19.3
A19.3
148
D19.4
A19.4
D19.4
A19.4
196
D25.4
A25.4
D25.4
A25.4
149
D19.5
A19.5
D19.5
A19.5
197
D25.5
A25.5
D25.5
A25.5
150
D19.6
A19.6
D19.6
A19.6
198
D25.6
A25.6
D25.6
A25.6
151
D19.7
A19.7
D19.7
A19.7
199
D25.7
A25.7
D25.7
A25.7
152
D19.8
A19.8
D19.8
A19.8
200
D25.8
A25.8
D25.8
A25.8
153
D20.1
A20.1
D20.1
A20.1
201
D26.1
A26.1
D26.1
A26.1
154
D20.2
A20.2
D20.2
A20.2
202
D26.2
A26.2
D26.2
A26.2
155
D20.3
A20.3
D20.3
A20.3
203
D26.3
A26.3
D26.3
A26.3
156
D20.4
A20.4
D20.4
A20.4
204
D26.4
A26.4
D26.4
A26.4
157
D20.5
A20.5
D20.5
A20.5
205
D26.5
A26.5
D26.5
A26.5
158
D20.6
A20.6
D20.6
A20.6
206
D26.6
A26.6
D26.6
A26.6
159
D20.7
A20.7
D20.7
A20.7
207
D26.7
A26.7
D26.7
A26.7
160
D20.8
A20.8
D20.8
A20.8
208
D26.8
A26.8
D26.8
A26.8
161
D21.1
A21.1
D21.1
A21.1
209
D27.1
A27.1
D27.1
A27.1
162
D21.2
A21.2
D21.2
A21.2
210
D27.2
A27.2
D27.2
A27.2
163
D21.3
A21.3
D21.3
A21.3
211
D27.3
A27.3
D27.3
A27.3
164
D21.4
A21.4
D21.4
A21.4
212
D27.4
A27.4
D27.4
A27.4
165
D21.5
A21.5
D21.5
A21.5
213
D27.5
A27.5
D27.5
A27.5
166
D21.6
A21.6
D21.6
A21.6
214
D27.6
A27.6
D27.6
A27.6
167
D21.7
A21.7
D21.7
A21.7
215
D27.7
A27.7
D27.7
A27.7
168
D21.8
A21.8
D21.8
A21.8
216
D27.8
A27.8
D27.8
A27.8
169
D22.1
A22.1
D22.1
A22.1
217
D28.1
A28.1
D28.1
A28.1
170
D22.2
A22.2
D22.2
A22.2
218
D28.2
A28.2
D28.2
A28.2
171
D22.3
A22.3
D22.3
A22.3
219
D28.3
A28.3
D28.3
A28.3
172
D22.4
A22.4
D22.4
A22.4
220
D28.4
A28.4
D28.4
A28.4
173
D22.5
A22.5
D22.5
A22.5
221
D28.5
A28.5
D28.5
A28.5
174
D22.6
A22.6
D22.6
A22.6
222
D28.6
A28.6
D28.6
A28.6
175
D22.7
A22.7
D22.7
A22.7
223
D28.7
A28.7
D28.7
A28.7
176
D22.8
A22.8
D22.8
A22.8
224
D28.8
A28.8
D28.8
A28.8
177
D23.1
A23.1
D23.1
A23.1
225
D29.1
A29.1
D29.1
A29.1
178
D23.2
A23.2
D23.2
A23.2
226
D29.2
A29.2
D29.2
A29.2
179
D23.3
A23.3
D23.3
A23.3
227
D29.3
A29.3
D29.3
A29.3
180
D23.4
A23.4
D23.4
A23.4
228
D29.4
A29.4
D29.4
A29.4
181
D23.5
A23.5
D23.5
A23.5
229
D29.5
A29.5
D29.5
A29.5
182
D23.6
A23.6
D23.6
A23.6
230
D29.6
A29.6
D29.6
A29.6
183
D23.7
A23.7
D23.7
A23.7
231
D29.7
A29.7
D29.7
A29.7
184
D23.8
A23.8
D23.8
A23.8
232
D29.8
A29.8
D29.8
A29.8
185
D24.1
A24.1
D24.1
A24.1
233
D30.1
A30.1
186
D24.2
A24.2
D24.2
A24.2
234
D30.2
A30.2
187
D24.3
A24.3
D24.3
A24.3
235
D30.3
188
D24.4
A24.4
D24.4
A24.4
236
D30.4
189
D24.5
A24.5
D24.5
A24.5
237
190
D24.6
A24.6
D24.6
A24.6
238
191
D24.7
A24.7
D24.7
A24.7
239
192
D24.8
A24.8
D24.8
A24.8
240
193
D25.1
A25.1
D25.1
A25.1
241
D31.1
A31.1
194
D25.2
A25.2
D25.2
A25.2
242
D31.2
A31.2
195
D25.3
A25.3
D25.3
A25.3
243
D31.3
A31.3
244
D31.4
A31.4
2017
D253.1
A253.1
D253.1
A253.1
245
2018
D253.2
A253.2
D253.2
A253.2
246
2019
D253.3
A253.3
D253.3
A253.3
247
2020
D253.4
A253.4
D253.4
A253.4
248
2021
D253.5
A253.5
D253.5
A253.5
249
D32.1
A32.1
D32.1
A32.1
2022
D253.6
A253.6
D253.6
A253.6
250
D32.2
A32.2
D32.2
A32.2
2023
D253.7
A253.7
D253.7
A253.7
251
D32.3
A32.3
D32.3
A32.3
2024
D253.8
A253.8
D253.8
A253.8
252
D32.4
A32.4
D32.4
A32.4
2025
D254.1
A254.1
D254.1
A254.1
253
D32.5
A32.5
D32.5
A32.5
2026
D254.2
A254.2
D254.2
A254.2
254
D32.6
A32.6
D32.6
A32.6
2027
D254.3
A254.3
D254.3
A254.3
255
D32.7
A32.7
D32.7
A32.7
2028
D254.4
A254.4
D254.4
A254.4
256
D32.8
A32.8
D32.8
A32.8
2029
D254.5
A254.5
D254.5
A254.5
257
D33.1
A33.1
D33.1
A33.1
2030
D254.6
A254.6
D254.6
A254.6
258
D33.2
A33.2
D33.2
A33.2
2031
D254.7
A254.7
D254.7
A254.7
259
D33.3
A33.3
D33.3
A33.3
2032
D254.8
A254.8
D254.8
A254.8
260
D33.4
A33.4
D33.4
A33.4
2033
D255.1
A255.1
D255.1
A255.1
261
D33.5
A33.5
D33.5
A33.5
2034
D255.2
A255.2
D255.2
A255.2
262
D33.6
A33.6
D33.6
A33.6
2035
D255.3
A255.3
D255.3
A255.3
263
D33.7
A33.7
D33.7
A33.7
2036
D255.4
A255.4
D255.4
A255.4
264
D33.8
A33.8
D33.8
A33.8
2037
D255.5
A255.5
D255.5
A255.5
265
D34.1
A34.1
D34.1
A34.1
2038
D255.6
A255.6
D255.6
A255.6
266
D34.2
A34.2
D34.2
A34.2
2039
D255.7
A255.7
D255.7
A255.7
267
D34.3
A34.3
D34.3
A34.3
2040
D255.8
A255.8
D255.8
A255.8
268
D34.4
A34.4
D34.4
A34.4
2041
D256.1
A256.1
D256.1
A256.1
269
D34.5
A34.5
D34.5
A34.5
2042
D256.2
A256.2
D256.2
A256.2
270
D34.6
A34.6
D34.6
A34.6
2043
D256.3
A256.3
D256.3
A256.3
271
D34.7
A34.7
D34.7
A34.7
2044
D256.4
A256.4
D256.4
A256.4
272
D34.8
A34.8
D34.7
A34.8
2045
D256.5
A256.5
D256.5
A256.5
2046
D256.6
A256.6
D256.6
A256.6
2047
D256.7
A256.7
D256.7
A256.7
2048
D256.8
A256.8
D256.8
A256.8