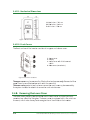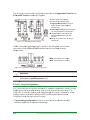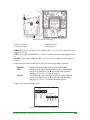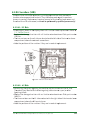
1
USER MANUAL
www.eltek.com
Inform
mation in th
his documen
nt is believe
ed to be acc
curate as off the date o
of publicatio
on
and is subject to change
e without notice.
n
Thiss documen
nt and the informatio
on
conta
ained herein do not re
epresent eitther a com mitment orr any guara
antee on th
he
part of Eltek regarding the
e reliability, fitness or compatibiliity of the p
products an
nd
proce
edures desc
cribed.
While
e every reas
sonable effo
ort is made to ensure tthe accurac
cy and completeness o
of
this document,
d
Eltek
E
assum
mes no responsibility orr liability forr any damag
ges that ma
ay
be directly or ind
directly attributed to the
t use of tthe informattion contain
ned within o
or
to an
ny errors or omissions.
No part of this document
d
may
m be reprroduced or transmitted in any forrm or by an
ny
mean
ns - electro
onic or mec
chanical, inc
cluding pho tocopying a
and recordiing - for an
ny
purpo
ose withoutt the expres
ssed consen
nt of Eltek.
Copyrigh
ht ©: Eltek, 2013
NS-EN ISO 9
9001 Certified
Certifica
ate No:
4072-2007-A
AQ-NOR-NA
NS-EN ISO 14
4001 Certified
Certifica
ate No:
11276-2007-A
AE-NOR-NA
3571
116.013
Issue 2.0
0, April 2013
Publiished 2013-04
4-12
IngBjjoNo
II
User Manu
ual THEIA HE- t U
UL String Inverte
ers 357116.013, Issue 2.0, April 2013
IMPORTANT SAFETY
INSTRUCTIONS!
SAVE THESE INSTRUCTIONS!
Safety Instructions
This User Manual contains important safety instructions for THEIA HE-t UL string
inverters, which must be thoroughly read and followed prior to installation, operation
and maintenance of the inverter. Ignoring these instructions may have serious
consequences and may invalidate the warranty!
Qualified persons
Persons involved in installation, operation and maintenance of the inverter must be
suitably qualified, and follow the instructions in this User Manual.
Safety Protection
The inverter offers a maximum level of safety to protect persons and equipment
during installation, operation and maintenance. A high frequency transformer
ensures galvanic isolation between the inverter and the grid. Anti-islanding
protection monitors the grid preference and ensures interruption of the inverter’s
supply of power whenever the grid voltage or frequency fluctuations are outside the
required limits. A Ground Fault Detection and Interruption circuit ensures
disconnection from the grid if a ground fault occurs.
Warning Signs
Three different warning signs highlight important information related to avoidance
of personal injury and equipment damage. Pay attention when DANGER, WARNING
and CAUTION appear in the text
Electrical Codes
The electrical installation must comply with the local regulations, the National
Electrical Code (NEC), ANSI/NFPA 70 and OSHA regulations.
User Manual THEIA HE-t UL String Inverters 357116.013, Issue 2.0, April 2013
III
IV
User Manual THEIA HE- t UL String Inverters 357116.013, Issue 2.0, April 2013
CONT
C TENTS
S
1.
Introducttion ................................................................................................. 7
2.
Product Overview
O
........................................................................................ 9
2.1.
2.2.
2.3.
2.4.
3.
Safety Precautions ................................................................................... 16
3.1.
3.2.
3.3.
4.
Ch
heck List by Failure ............................ ..................................................................81
Ta
able of Even
nts ..................................... ..................................................................81
Maintenance ............................................................................................. 87
8.1.
8.2.
8.3.
8.4.
9.
Ac
ccess Levels
s and Passw
words .......... ..................................................................58
LC
CD Screen Menus
M
................................ ..................................................................58
Co
onnection be
etween Inve
erter and PC
C ................................................................73
Intternal Webs
server ............................... ..................................................................76
Troublesh
hooting........................................................................................ 81
7.1.
7.2.
8.
Initial Start .............................................. ..................................................................46
Operation
n .................................................................................................. 5
58
6.1.
6.2.
6.3.
6.4.
7.
Me
echanical Installation ........................ ..................................................................23
Ch
hecks Prior to
t Electricall Installation
n ................................................................26
Ele
ectrical Insttallation............................ ..................................................................27
Start Up ...................................................................................................... 4
46
5.1.
6.
Ge
eneral Prepa
arations ........................... ..................................................................16
Sitte Preparatiions .................................. ..................................................................18
Re
equired Safe
ety Equipme
ent ............... ..................................................................20
Installatio
on ................................................................................................ 23
4.1.
4.2.
4.3.
5.
Sttandards and Approvals
s ................... .................................................................... 9
Ge
eneral Inform
mation.............................. .................................................................... 9
Wa
arning Symb
bols .................................. ..................................................................10
Un
npacking an
nd Inspection .................. ..................................................................12
Sw
witch-OFF .............................................. ..................................................................87
Re
egular Syste
em Inspectio
ons .............. ..................................................................87
Re
eplace Devic
ces .................................... ..................................................................93
Re
eturn and Disposal ............................. ..................................................................95
Warranty ................................................................................................... 97
9.1.
9.2.
10.
Wa
arranty Serv
vice................................... ..................................................................97
Wa
arranty Disc
claimer ............................. ..................................................................97
Tech
hnical Data
a .................................................................................. 99
10.1.
10.2.
Inv
verter datas
sheet................................ ..................................................................99
Fie
eld Adjustab
ble Trip Leve
els................ .............................................................. 1
101
User Manual
M
THEIA HE
E-t UL String Inve
erters 357116.01
13, Issue 2.0, April 2013
V
Addendum ..................................................................................................... 102
Contact Information ..................................................................................... 103
VI
User Manual THEIA HE- t UL String Inverters 357116.013, Issue 2.0, April 2013
1. IN
NTRO
ODUC
CTION
N
The THEIA
T
HE-t UL
U inverters
s are among
g the most e
efficient sin
ngle phase g
grid-tie
inverrters on the market, wh
hich results in high yield
ds from the solar array.
Figure
F
1.1: PV system overv
view
o AC
DC to
In a grid-connect
g
ted photovo
oltaic system the interfface between the solar array and
the grid
g consists
s of an inverrter, which converts
c
DC
C power pro
oduced from
m the solar
array
y into AC power compattible with th
he voltage a
and frequen
ncy of the grid.
s
THEIA HE-t UL series
The topology
t
of the THEIA HE-t
H
UL series consistss of an embe
edded high-frequency
trans
sformer, which provides
s galvanic is
solation from
m the grid tthereby mee
ets the
stricttest safety standards. Because off great adap
ptability and
d user friend
dliness, the
THEIA
A HE-t UL is the perfectt choice for any photov
voltaic (PV) installation
n. Different
confiiguration op
ptions make
e it suitable for crystalliine as well a
as thin-film modules,
and make
m
it easy
y and afford
dable to con
nfigure for v
various cond
ditions and c
countryspecific requirem
ments. The compact
c
an
nd lightweig
ght construc
ction provide for easy
and straightforw
s
ward installa
ation and maintenance .
Integ
grated Web
b Server
The inverter is equipped witth an integrated web se
erver, which
h records da
ata on a
daily,, monthly an
nd yearly ba
asis. All information is d
displayed alpha-numeriically and in
graph
hs on a colo
ored LCD scrreen on the front of the
e inverter. T
The data is a
also
accessible eithe
er directly from a PC or via
v the Inte rnet. All setttings and d
data are
saved in the inte
egrated logg
ger, which provides
p
sto
orage of datta with fifteen-minute
interv
vals for one
e week, daily
y intervals for
f one yearr or weekly iintervals for thirty
years
s.
Auto
omatic Syst
tem
The system
s
is fu
ully automattic. The inve
erter starts up in the m
morning whe
en the solar
array
y generates enough pow
wer. During the day the
e maximum power poin
nt tracking
User Manual
M
THEIA HE
E-t UL String Inve
erters 357116.01
13, Issue 2.0, April 2013
7
(MPPT) function ensures the highest possible energy harvest. The inverter goes into
sleep mode at dusk when the solar array stops generating power.
8
User Manual THEIA HE- t UL String Inverters 357116.013, Issue 2.0, April 2013
2. PROD
P
UCT OVER
O RVIEW
W
This chapter
c
gives an overv
view of the inverter wit h its supplie
ed compone
ents and
how they are assembled. A brief explan
nation of ho
ow to unpac
ck and hand
dle the
inverrter safely is
s given, and symbols ap
ppearing bo
oth on the in
nverter and in this Userr
Manu
ual are expla
ained.
2.1. Standa
S
ards an
nd Apprrovals
THEIA
A HE-t UL in
nverters are compatible
e with most directives a
and safety s
standards,
depe
ending upon the grid setttings chosen:
Table 2.1: Approved
d standards
Grid
d Protection
n
Safety
EMC
• IEE
EE 1547
• UL 1741
•
•
•
•
•
FCC level B
IEC/EN 610
000-6-2 (imm
munity)
IEC/EN 610
000-6-3 (emission)
IEC/EN 610
000-3-2/-12 (harmonics)
IEC/EN 610
000-3-3/-11((flicker)
2.2. Genera
G
al Inforrmation
n
Seve
eral variation
ns of the TH
HEIA HE-t UL
L are availab
ble for different configu
urations and
d
country-specific
c requiremen
nts.
2.2.1
1. Varian
nts
The instructions
s given in this User Man
nual are app licable to th
he following
g range of
THEIA
A HE-t UL so
olar inverterrs:
• THE
EIA 2.0 HE-tt UL
• THE
EIA 2.9 HE-tt UL
• THE
EIA 3.8 HE-tt UL
• THE
EIA 4.4 HE-tt UL
2.2.2
2. Optio
ons
• Neg
gative or po
ositive groun
nded system
m
• DC fuses
User Manual
M
THEIA HE
E-t UL String Inve
erters 357116.01
13, Issue 2.0, April 2013
9
2.2.3
3. Key Features
F
• World’s highestt peak effic
ciency for iso
olated inverrters: up to 97.3 %
• Flex
xible system
m configuration
• Mon
nitoring 24/
/7
• Inte
ernal data lo
ogger with storage
s
cap
pacity of 15 minutes inttervals for o
one week,
dailly intervals for one yea
ar or weekly intervals fo
or thirty yea
ars
• MPP
PT range: 23
30 - 500VDC
• DC voltage ran
nge: 220 - 60
00VDC
• Auttomatic ON/
/OFF switch
hing and tem
mperature re
egulation
• Antti-islanding protection
p
• Rev
verse DC polarity protection (diode
es)
• Gro
ound Fault Detection
D
an
nd Interruption
2.3. Warnin
W
ng Sym
mbols
The warning
w
sym
mbols used in
i this User Manual hig hlight important inform
mation on
how to avoid haz
zards to peo
ople and equipment. Pa
ay particula
ar attention
n when
these
e symbols appear!
a
Table 2.2: Symbols appearing
a
in th
he manual
Symb
bol
De
escription
DA
ANGER: Situations where
e an immedia
ate hazard co
ould cause se
erious
inju
ury or death to
t workers and/or the ge
eneral public if not avoide
ed.
WA
ARNING: Sittuations whe
ere a potentia
ally hazardou
us condition e
exists that
cou
uld result in the
t death or serious injury
y of workers and/or the g
general
pub
blic if not avo
oided.
CA
AUTION: Situ
uations wherre a non-imm
mediate or pottential hazarrd presents
a le
esser threat of injury thatt could resultt in minor or moderate injjuries to
wo
orkers and/orr the generall public.
NO
OTICE: Situa
ations where a non-immed
diate or potential hazard presents a
risk
k to damage of property and
a equipme
ent. May be u
used to indica
ate
imp
portant operational chara
acteristics. T here is no “S afety Alert” o
or
atttention symb
bol present in
n this situatio
on.
10
User Manu
ual THEIA HE- t U
UL String Inverte
ers 357116.013, Issue 2.0, April 2013
2.3.1
1. Labeling
2.3.1
1.1. Produ
uct Label
The product
p
labe
el is attache
ed to the low
wer right sid
de of the inv
verter hous
sing. It
conta
ains importa
ant identific
cation inform
mation and characterisstics for the inverter,
and must
m
be clearly visible after
a
installlation.
Figure 2.1: Product Labell
Table 2.3: Symbols appearing
a
on the
t product label
Symb
bol
Description
D
Discharge
D
tim
me: High volta
ages may be present insid
de the invertter for 1
hour after switch OFF
Refer
R
to this User
U
Manuall: The safety precautions and instructtions in this
manual
m
must be read and understood p
prior to insta
allation
Danger:
D
Shock hazards – lethal voltage
es are presen
nt
UL
U listing: The
e product me
eets the UL 1
1741 safety, health and
environmenta
al protection requirementts.
Disposal:
D
Do not
n dispose in
n general wa
aste! Collect tthe various p
parts
separately an
nd recycle the
em according
g to local reg
gulations
S – NO: Serial Number for inverter
i
iden tification
2.3.1
1.2. PCB Labels
L
The PCB
P
labels id
dentify impo
ortant inforrmation abo
out the diffe
erent termin
nals in the
custo
omer conne
ection area.
User Manual
M
THEIA HE
E-t UL String Inve
erters 357116.01
13, Issue 2.0, April 2013
11
Table 2.4: Symbols appearing
a
on the
t PCB
Sym
mbol
De
escription
Symboll
AC
C: Alternating
g current
te
erminal.
Descrription
DC: Dirrect current terminal.
Grrounding: Gro
ound termina
al.
2.4. Unpack
U
king an
nd Insp
pection
n
Follow
w the instru
uctions in th
his section to
t unpack a nd lift the in
nverter safe
ely and to
preve
ent injury an
nd equipment damage.
2.4.1
1. Shipp
ping Damage
The THEIA
T
HE-t UL
U inverters
s are thorou
ughly check ed and testted in accordance with
international sta
andards and
d approvals prior to ship
pping. The in
nverter is ca
arefully
packed before shipping. How
wever, if an
ny damage tto the invertter is found when
unpa
acking, pleas
se report it to
t your disttributor imm
mediately!
2.4.2
2. Lifting and Ca
arrying th
he Invertter
Liftin
ng and carry
ying the inve
erter must be
b correctly
y performed
d to preventt back
injuries, as the in
nverters’ we
eight is 49 – 53 lbs. / 22
2 - 24 kg (depending on
n model).
Fiigure 2.2: Corre
ect lifting of th
he inverter
• When lifting, be
end the kne
ees, and kee
ep the back straight.
• Liftt carefully, hold
h
the inve
erter close to
t the body
y and let the
e leg muscle
es do the
work.
• Turrn the whole
e body as on
ne unit to av
void twistin g the lowerr back.
• Carrry the inverrter close to
o the body.
12
User Manu
ual THEIA HE- t U
UL String Inverte
ers 357116.013, Issue 2.0, April 2013
2.4.3
3. Unpac
cking
Unpa
ack the inve
erter as follo
ows:
• Place the box in
i position, with
w the top
p clearly vissible and acc
cording to tthe arrow
markings on th
he packaging.
• Cutt the seal, and open the
e box.
• Rem
move the up
pper part off the foam packing
p
matterial and ta
ake out the Installation
Guiide and the envelope with
w the extrra product la
abel.
• Botth sides of the
t inverter case are na
arrowed in o
order
to get
g a betterr grip on the
e inverter. Liift the inverrter
carefully out of
o the box us
sing the “ha
andles” as
strated in Fiigure 2.3.
illus
• Rem
move the lower section
n of the foam
m packaging
g and
tak
ke out the in
nverter mou
unting brack
ket.
• The
e bag with accessories
a
is attached
d to the brac
cket.
• Sto
ore all the orriginal packiing materiall for possiblle
late
er reuse.
Figu
ure 2.3: “Handles”
Afterr unpacking the inverte
er, check tha
at all compo
onents are iincluded and
unda
amaged.
2.4.4
4. Scope
e of Deliv
very
• THE
EIA HE-t UL single phas
se inverter
• Mou
unting bracket
• Insttallation Guide
• Acc
cessories: grounding sttrap, bracket screws, ex
xtra produc
ct label
NOTICE
Conduiits, fittings and
a bonding
g straps are
e not part off the standa
ard scope
of supp
ply, and mus
st be provid
ded by the ssystem insta
aller.
2.4.5
5. Invert
ter Enclo
osure
The housing
h
of the
t THEIA HE-t
H
UL inverrter is desig ned to:
• NEM
MA 3R or 4X
X (depending
g upon mod
del) for indoo
or and outdoor use.
• Pro
ovide a degree of protec
ction from falling
f
dirt, rrain, sleet, ssnow, windb
blown dust,
spla
ashing wate
er, hose-dire
ected waterr and corrossion.
• Be undamaged
d by the extternal forma
ation of ice o
on the houssing.
User Manual
M
THEIA HE
E-t UL String Inve
erters 357116.01
13, Issue 2.0, April 2013
13
3
2.4.5
5.1. Mech
hanical Dim
mensions
3 inches / 72
20 mm
H: 28.3
W:13.9
9 inches / 35
53 mm
D: 6.2 inches / 158
8 mm
Figure 2.4
4: Mechanical dimensions
2.4.5
5.2. Front
t Covers
The front
f
surfac
ce of the inv
verter consis
sts of an up
pper and a lo
ower cover..
pper cover
1. Up
2. Dissplay
3. Lo
ower cover w
with DC discon
nnect
sw
witch
4. Ho
ole covers (K
Knockouts)
Figure 2.5:: Inverter struc
cture
u
coverr may be rem
moved by Eltek
E
author ized person
ns only. Rem
moval of the
e
The upper
uppe
er cover by unauthorize
u
ed persons voids
v
the wa
arranty!
The lower
l
coverr protects th
he custome
er connectio
on area, and
d may be rem
moved by
the system
s
insta
aller for elec
ctrical conn
nection and maintenanc
ce.
2.4.6
6. Remo
oving the
e Lower Cover
C
The lower cover protects th
he connectio
on area in th
he inverter and also the inbuilt
comb
biner box ca
alled the Strringbox. The
e lower cove
er is equippe
ed with a DC
C switch on
n
the front,
f
which make it eas
sy to de-ene
ergize the D
DC terminalss on the inve
erter.
14
User Manu
ual THEIA HE- t U
UL String Inverte
ers 357116.013, Issue 2.0, April 2013
WARN
NING
The inv
verter is cha
arged with high
h
voltage
es, and remo
oval of the lower coverr
may on
nly be perfo
ormed by qualified perso
ons.
urn OFF the AC circuit breaker
b
and the DC - sw
witch.
1. Tu
DANG
GER
Always
s disconnect the PV arrray cables ffrom the inv
verter after turning the
AC and
d DC OFF, bu
ut before removing the
e covers, as the PV arra
ay can
supply up to 600 VDC to the in
nverter whe n exposed tto sunlight.
2. Re
emove the four screws on the front with a 4 m
mm hex key..
3. An
ngle the cov
ver outwards, and take it off carefu
ully.
Figu
ure 2.6: Remov
ving the lowerr cover
4. Store the lower cover and screws sa
afely to avo id loss or da
amage.
5. Fasten the screws on the
e lower cove
er with a torrque of 0.74
4 ft-lbf / 1.0
0 Nm.
CAUT
TION
Never remove the
e inverter low
wer cover in
n wet condittions! Remo
oval of the
inverte
er lower cov
ver during ra
ain or in dam
mp condition
ns can dama
age
sensitive internal electronic
e
components
c
s.
User Manual
M
THEIA HE
E-t UL String Inve
erters 357116.01
13, Issue 2.0, April 2013
15
5
3. SAFET
S
TY PR
RECAUTIONS
This chapter
c
con
ntains instru
uctions on how
h
to insta
all, operate a
and maintain the THEIA
A
HE-t UL inverters safely. These safety precautionss must be re
ead thoroug
ghly and
unde
erstood prior to installattion. Failure
e to follow th
he safety precautions may result
in inju
ury or death
h and may void
v
the warrranty.
3.1. Genera
G
al Preparation
ns
The THEIA
T
HE-t UL
U inverters
s contain no
o user-servic
ceable partss, and insta
allation and
main
ntenance mu
ust be perfo
ormed by qu
ualified perrsons, who h
have knowle
edge of
state
e and federa
al electrical regulations
s ANSI/NFPA
A 70 NEC an
nd OSHA, an
nd follow
such regulations
s, and the in
nstructions in this Userr Manual.
NOTICE
The safety precau
utions and in
nstructions in this Userr Manual mu
ust be read
thoroughly to be able
a
to insta
all and opera
ate the inve
erter correc
ctly.
3.1.1
1. Conne
ections
Contact the loca
al utility com
mpany for in
nterconnecttion agreem
ments and po
ower
appro
oval before connecting
g to the grid.
WARN
NING
To ensure safe and correct ellectrical con
nnection of the inverter and
preven
nt injury to persons
p
or damage
d
to tthe equipme
ent the elec
ctrical
wiring and connec
ction must be
b performe
ed by qualifiied persons
s.
DANG
GER
Never work
w
with energized
e
po
orts! Prior to
o the electrical connecttion, the AC
C
circuit breaker(s) and
a the DC switch
s
musst be turned
d OFF to ensure that
the terrminals are discharged
d
and safe to
o work on.
• Rea
ad the instru
uctions and cautions on
n the PV mo
odules priorr to the elec
ctrical
con
nnection.
• The
e inverter must be conn
nected to a dedicated A
AC circuit. N
No other dev
vices are to
o
be connected to
t this circu
uit.
16
User Manu
ual THEIA HE- t U
UL String Inverte
ers 357116.013, Issue 2.0, April 2013
3.1.2
2. Opera
ation
The inverter mus
st only be operated
o
in accordance
a
e with the instructions iin this User
Manu
ual.
NOTICE
The TH
HEIA HE-t UL
L is a grid intteractive inv
verter and m
must be use
ed
exclusively for its designed purpose, whiich is to con
nvert PV-generated DC
electric
city into AC electricity to
t feed into
o the grid.
• The
e inverter must be operrated without any unau
uthorized modifications
s.
• To avoid
a
damage to the in
nverter, it must be used
d within the operationa
al limits give
en
in the
t technica
al specificattions.
CAUT
TION
Keep the voltage and currentt within the specified lim
mits! The vo
oltage
genera
ated by PV modules
m
is in
nversely pro
oportional tto the temperature; at
lower temperature
t
es the PV vo
oltage incre
eases from tthe productt label
rating and
a at highe
er temperattures the PV
V voltage de
ecreases fro
om the
produc
ct label ratin
ng.
NOTICE
The op
pen circuit voltage, VOC, must neverr exceed 60
00VDC under any
conditions. The ma
aximum PV system volltage is equal to the sum of the
rated open-circuit
o
s, corrected
d
voltage, off the series--connected PV modules
for the
e lowest exp
pected ambient temperrature.
• Mis
suse of the inverter may
y damage the device o
or other elec
ctrical equip
pment and
can
n interfere with
w the ope
eration of th
he inverter, or may even
n cause inju
ury or death
h
to persons
p
ope
erating and maintaining
g the inverte
er.
• Igno
oring the ins
structions and
a guidelines in this Usser Manual and not perrforming
reg
gular mainte
enance may void the inv
verter warra
anty.
3.1.3
3. Maint
tenance
Prior to service and
a mainten
nance, the inverter musst always b
be disconnected on
both the AC and
d the DC side
es and be fu
ully dischar ged. Refer tto 8.1. Switch-OFF.
User Manual
M
THEIA HE
E-t UL String Inve
erters 357116.01
13, Issue 2.0, April 2013
17
NOTICE
Access
sing the inve
erter upper section voi ds the warrranty. The in
nverter
upper cover
c
must only be ope
ened by autthorized perrsons due to
o danger of
damag
ge to interna
al componen
nts.
• The
e inverter lower cover must
m
only be
e taken off by qualified
d persons du
uring the
electrical insta
allation and maintenanc
ce or repairss.
• No unauthorize
ed modificattions may be
b made to tthe inverterr. Contact th
he system
insttaller or disttributor in case of failure.
• Reg
gular mainte
enance mus
st be perform
med to max
ximize the life expectan
ncy of the
inve
erter (refer to 8.2. Regu
ular System
m Inspection
ns).
• A safety comp
ponent mustt always be replaced by
y the same type and ra
ating.
3.2. Site
S
Prreparattions
Obse
erve the following preca
autions whe
en mounting
g and installing the THE
EIA HE-t UL
inverrter on a suitable site. This
T
is crucia
al to mainta
ain the efficiency of the
e inverter!
3.2.1
1. Mounting Loca
ation
Sufficient ventila
ation and lo
ow ambient temperaturre are neede
ed to prevent
perature buiild-up inside
e the inverte
er, which ca n result in p
power losse
es.
temp
CAUT
TION
Insuffic
cient cooling
g may lead to degradattion of perfo
ormance! En
nsure
sufficie
ent air space around th
he inverter a
and unblock
ked ventilatiion
openings for optim
mum cooling
g and efficie
ent operatio
on.
• Obs
serve the minimum
m
disttances spec
cified below
w to maintain
n optimal co
ooling:
18
User Manu
ual THEIA HE- t U
UL String Inverte
ers 357116.013, Issue 2.0, April 2013
5.75 inches / 400 mm
1. 15
2. 11
1.81 inches / 300 mm
3. 5.9
91 inches / 1
150 mm
4. 5.9
91 inches / 1
150 mm
Figure 3.1: Minimum distances for
fo optimum co
ooling
WARN
NING
The mo
ounting surfface must be
b suitable ffor the weig
ght (44-49 lb
bs/20-22
kg) and
d temperatu
ure (194°F /90°C)
/
of the
e inverter.
• The
e inverter must be mou
unted in a ve
ertical posittion.
• Kee
ep the lower cover clos
sed when mounting the
e inverter to
o avoid damage to
inte
ernal compo
onents.
• It is
s not recommended to install the in
nverters in lliving areas due to possible noise
leve
els of the in
nverter.
• The
e display sho
ould be at eye-level,
e
th
he product la
abel must b
be visible an
nd the
con
nnection are
ea readily ac
ccessible.
3.2.2
2. Enviro
onment
The installation of the inverrter must co
omply with llocal regulations, the N
National
Electtrical Code and
a the OSH
HA regulatio
ons.
WARN
NING
Protect the inverter from flam
mmable and
d explosive e
environmen
nts to avoid
fire, as the inverte
er heat sink can reach ttemperature
es as high a
as
194°F/
/90°C during
g long period
ds of high p
performance
e operation.
• Ens
sure a longe
er life and op
ptimum perfformance off the inverter by installing it in a
clea
an, non-dus
sty, dry and cool environ
nment
• Ens
sure a non-fflammable and
a non-exp
plosive envirronment to avoid fire.
User Manual
M
THEIA HE
E-t UL String Inve
erters 357116.01
13, Issue 2.0, April 2013
19
• The
e ambient te
emperature
e must be be
etween -13°°F and 140 °°F/-25 °C an
nd +60 °C. If
the
e temperatu
ure rises abo
ove 104°F/+
+40°C the in
nverter may
y start to red
duce powerr
to protect
p
inte
ernal compo
onents.
• It is
s recommen
nded that no
on-condensing relative humidity sh
hould be between 4 %
and
d 95 %.
NOTICE
Avoid exposing
e
the inverter to direct sun
nlight! Directt sunlight m
may cause
yield lo
osses, as dirrect sunlight causes inc
creased inte
ernal tempe
erature thatt
can lea
ad to reduce
ed power ou
utput. Also, direct sunlight may cause
degrad
dation of the
e LCD screen quality.
CAUT
TION
The inv
verter shoulld be installed on a loca
ation where
e people can
nnot
accidentally come
e in contact with the re ar inverter ssurface, due
e to
temperatures up to
t 194°F/90
0°C.
• The
e inverter is suitable forr outdoor op
peration, bu
ut should be
e sheltered ffrom direct
sun
nlight, snow
w and rain, du
ust and san
nd.
• Inve
erter locatio
on should be
e in close prroximity to tthe PV array
ys to minim
mize DC
loss
ses.
3.3. Require
R
ed Safe
ety Equipmen
nt
Comp
pliance with
h the local and
a federal electrical
e
re
egulations iss required to
o satisfy the
e
safetty equipmen
nt requirements.
NOTICE
Safety
y equipmentt must be prrovided and installed by
y the system
m installer
in compliance with
h NEC to ens
sure the req
quired prote
ection of the
e PV
system
m is adequatte.
3.3.1
1. Disconnection
n Devices
s
Disco
onnection devices, swittches or circ
cuit breake
ers, enable a shut-off frrom the
powe
er source du
uring operattion. They protect the c
current-carrrying conductors and
other system co
omponents from
f
powerr surges and
d system ma
alfunctions, and help to
o
shut down the in
nverter safe
ely for mainttenance an d repairs.
• Botth AC circuitt breaker(s) and DC switch are reco
ommended on every cu
urrentcarrying condu
uctor to faciilitate mainttenance wo
ork and repa
airs of the in
nverter.
20
User Manu
ual THEIA HE- t U
UL String Inverte
ers 357116.013, Issue 2.0, April 2013
• The
e disconnect devices must
m
conform
m to the loc
cal and fede
eral electrica
al
reg
gulations, an
nd have an interrupt ratting sufficie
ent for the v
voltage and current
ava
ailable in the
e circuit.
• Eac
ch disconnection device
e must be re
eadily accesssible and totally enclo
osed. All
dev
vices must be
b permane
ently marked
d for their p
purpose.
3.3.2
2. Overc
current Protectio
P
on Device
es
Overcurrent prottection devices, fuses or circuit brreakers, pro
otect the circuit
erheating as a result off overload, sshort circuitt or ground
conductors and prevent ove
fault.
• An overcurrentt protection
n device is re
equired on e
each ungrou
unded cond
ductor.
• If a fuse blows or a circuit breaker trip
ps, the causse should allways be de
etermined
beffore replacin
ng or resettting it.
3.3.2
2.1. Grou
und Fault Protection
P
n (GFDI)
• The
e GFDI prote
ects the neg
gative/posittive grounde
ed strings ffrom ground
d faults in
the
e PV array orr in the PV conductors.
c
It is located
d in the low
wer compartment of the
e
Stringbox and is equipped
d with a fing
ger-safe fuse
e holder.
• If th
he ground fa
ault currentt exceeds 1A the GFDI o
opens and tthe inverterr shuts down
(Refer to 7.2. Table
T
of Eve
ents).
• The
e rating of the GFDI is 600VDC and 1A.
1
3.3.2
2.2. DC Fu
uses
• DC fuses prote
ect the cond
ductors from
m back feed
d currents frrom parallell strings.
The
ey are located in the Sttringbox, equipped with
h finger-safe
e fuse holde
ers to
disc
connect eac
ch fuse inde
ependently.
• The
e rating of the DC fuses
s should be as per the rrecommend
dations of th
he PV
module manuffacturer, UL requiremen
nts and NEC
C, with a maximum of 40 A.
• DC fuses are normally nott a part of th
he scope off delivery, an
nd must be provided by
y
the
e system ins
staller. Eltek
k may supplly DC fuses,, if they are specified att the time o
of
ord
der.
Table 3.1: DC curren
nt characteristtics and recom
mmended fuse
e ratings
Inv
verter Type
Max DC
Curre
ent
1x
x PV String
Fuses
2x PV Sttring
Fusess
3x P
PV String
F
Fuses
THE
EIA 2.0HE-t UL
L
THE
EIA 2.9HE-t UL
L
THE
EIA 3.8HE-t UL
L
THE
EIA 4.4HE-t UL
L
9.5A
13.5
5A
18.0
0A
21.0
0A
15A
22A
29A
33A
8A
11A
15A
17A
5A
8A
10A
11A
User Manual
M
THEIA HE
E-t UL String Inve
erters 357116.01
13, Issue 2.0, April 2013
21
NOTICE
Overcu
urrent prote
ection is nott required fo
or PV stringss where the
e maximum
currentt, which is equal
e
to 1.25
5 x ISC, from all sourcess cannot exc
ceed the
ampacity of the PV
V string con
nductors or the maximu
um overcurrrent device
size sp
pecified on the
t PV modu
ule product label.
3.3.2
2.3. AC Ov
vercurrent Protectiion
• The
e AC Overcu
urrent Detec
ctor (OCD) protects
p
the
e supply con
nductors be
etween the
inve
erter and th
he grid.
• AC OCD must be
b provided by the systtem installe
er.
CAUT
TION
To redu
uce the risk
k of fire, the inverter AC
C terminals m
must only b
be
connec
cted to a cirrcuit provide
ed with bran
nch circuit o
overcurrentt protection
in acco
ordance with
h the Nation
nal Electrica
al Code, ANS
SI/NFPA 70, and
having maximum ratings
r
as per Table 3.2
2 below
Table 3.2: AC curren
nt characteristtics and fuse rating
r
Inv
verter Type
THE
EIA 2.0HE-t UL
THE
EIA 2.9HE-t UL
THE
EIA 3.8HE-t UL
THE
EIA 4.4HE-t UL
Max AC
C Current
208VAC
10.0A
14.0A
18.5A
21.5A
240VAC
8.5A
12.0A
16.0A
18.5A
AC Fusses
208VAC
15A
20A
25A
30A
2
240VAC
15A
15A
20A
25A
Tripping
Ch
haracteristic
cs
Type
B or C
Double
Pole
3.3.3
3. Surge
e Protecttion
Overv
voltage protection is used to prevent voltage
e surges thrrough sensittive
equip
pment. The THEIA HE-t UL inverterrs are equipp
ped with Te
emperature protected
Meta
al Oxide Variistors (TMOV) on both the
t DC sourrce current a
and the AC output
curre
ent, which diverts the excessive
e
cu
urrent from voltage surrges to grou
und.
• PV systems ins
stalled in an
n open or ex
xposed envi ronment ne
eed added p
protection on
botth the DC an
nd AC sides,, as they can act as ligh
htning rods..
• When the cond
ductors are exposed to
o transients,, their behav
vior limits th
he
effe
ectiveness of a surge arrester.
a
One or more s urge arrestters are needed in
insttallations with
w long con
nductors to obtain the required lev
vel of protec
ction.
• Reffer to NEC guidelines
g
fo
or selecting appropriate
e kA ratingss for overvoltage
pro
otection dev
vices.
• IEEE
E provides a good base
e for selectin
ng kA rating
gs of the surge arrester: The THEIA
A
HE--t UL inverte
ers are desig
gned for category B: 10
00 kA – 150
0 kA per pha
ase.
22
User Manu
ual THEIA HE- t U
UL String Inverte
ers 357116.013, Issue 2.0, April 2013
4. IN
NSTA
ALLAT
TION
This chapter
c
des
scribes how
w to install th
he inverter c
correctly, b
both mechan
nically and
electtrically, and details important issue
es related to
o the installation. The iinformation
n
is inttended for qualified
q
persons who follow
f
the in
nstallation iinstructions
s as
described in this
s User Manu
ual.
DANG
GER
Never work
w
with energized
e
po
orts! All worrk on the inv
verter mustt be
perform
med with th
he terminals
s disconnectted.
NOTICE
The Sa
afety Precau
utions (referr to 3. Safetty Precautio
ons) and the
e following
detaile
ed installatio
on procedurres must be
e read carefu
ully prior to
installa
ation.
4.1. Mecha
M
nical In
nstallation
The mounting
m
su
urface and the
t mountin
ng method m
must be suittable for the inverter’s
weight, dimensio
ons and hou
using tempe
erature (Reffer to 10. Te
echnical Datta).
WARN
NING
Followiing the insta
allation insttructions wi ll prevent p
poor perform
mance or
possible lethal con
nsequences
s.
4.1.1
1. Wall Bracket
B
Depe
ending on th
he mounting
g surface, diifferent mou
unting meth
hods may be
e required tto
secure the wall bracket.
b
The system in
nstaller is re
esponsible ffor selecting
g the correc
ct
type and numbe
er of fastene
ers to suppo
ort the weig
ght of the in
nverter on the mounting
surfa
ace.
• The
e bracket is designed to
o support 176.4 lbs. / 8
80 kg.
• The
e inverter must be mou
unted in a ve
ertical orienttation!
• Mou
unt the inve
erter in com
mpliance with
h the minim
mum spacing
g to ensure optimum
coo
oling (Refer to 3.2.1. Mo
ounting Loca
ation). This is especially
y importantt with
sev
veral inverte
ers installed
d.
• The
e recommen
nded height for the con
nnection are
ea is 40 - 55
5 inches /10
000-1400
mm
m above floo
or level.
User Manual
M
THEIA HE
E-t UL String Inve
erters 357116.01
13, Issue 2.0, April 2013
23
3
Asse
embling
The bracket
b
con
nsists of thre
ee parts:
verter Bracket
A. Inv
B. Sp
pacer (Option
nal)
C. Sttringbox brac
cket
Figure 4.1: Wall bracket components
c
emble the brracket as fo
ollows:
Asse
Figure
e 4.2: Assembling of the wa ll bracket
24
User Manu
ual THEIA HE- t U
UL String Inverte
ers 357116.013, Issue 2.0, April 2013
1. Fix
x the drilling
g template onto
o
the mo
ounting surfface, and ussing a spirit level ensure
e
the
e template is correctly leveled.
2. Us
sing the guid
de holes on the drilling template, d
drill holes intto the moun
nting
surrface suitab
ble for ¼ inc
ch fixings off a type rele
evant to the
e mounting s
surface, and
d
we
eight of the inverter.
3. Re
emove the drilling
d
temp
plate from th
he mounting
g surface.
4. Fasten the inv
verter brack
ket to the wall
w with a m
minimum 2 sscrews. The installer is
res
sponsible fo
or selecting the correctt dimension of the screws. The holles in the
bra
acket have a diameter of ¼ inch.
5. Th
he correct distance between the in
nverter brac
cket and the
e Stringbox bracket is:
1
45
D3
3 = 19 /8” (+
+ /64”). Fastten the Stringbox brac ket to the w
wall with minimum 2
scrrews. The holes in the Stringbox
S
bracket have
e a diamete r of ¼ inch.
The distances
d
be
etween the
e screws:
CC1:: 3”
CC2:: 6”
CC3:: 7”
CC4:: 2”
CC5:: 3”
D1: 2
21” (+ 45/64” – 0”)
D2: 2
21 ¾” (+ 45/644” – 0”)
Figure
F
4.3: Disttances betwee
en the fastene
ers
User Manual
M
THEIA HE
E-t UL String Inve
erters 357116.01
13, Issue 2.0, April 2013
25
5
4.1.2
2. Invert
ter
Attac
ch the inverrter to the mounting
m
brracket as fo
ollows:
Figure 4.4:
4 Fasten the
e inverter to th
he bracket
ooks for the carrier slotts (A) on the
e upper back
k of the inve
erter and
1. Locate the ho
e locating pin taps on the Stringbo
ox (B).
the
2. Lifft the invertter and guide the upperr hooks into
o the slots o
on the invertter bracket..
Alig
gn the lowe
er taps into the slots an
nd slide the inverter onto the bracket.
3. En
nsure that th
he inverter is
i securely aligned
a
in th
he bracket rrails, and fasten the
inv
verter with 2 screws on
n the bottom
m of the Str ingbox. Rec
commended
d tightening
torrque is 0.74 ft-lbf / 1.0 Nm.
NOTICE
Check that the inv
verter is pro
operly faste ned and sec
cured to the
e bracket
prior to
o the electriical wiring.
4.2. Checks
C
s Prior to Elec
ctrical Installlation
; Make
M
sure th
hat both the
e AC circuit breaker(s)
b
a
and the DC sswitch are O
OFF and that
;
;
;
;
th
he terminals
s are in a dis
scharged sttate to prev ent shock h
hazards during the
in
nstallation of
o the invertter. Refer to
o 8.1. Switch
h-OFF.
All electrical installations shall comply with the
e current loc
cal and fede
eral
ellectrical reg
gulations.
Check that th
he PV and the grid spec
cifications a
are compatiible with the
e inverter
sp
pecifications. Refer to 10. Technic
cal Data.
Check that th
he inverter is properly fastened
f
an
nd secured tto the brack
ket.
En
nsure that the
t conducttors are liste
ed for PV ap
pplications a
and the site
e
en
nvironment, and that they have th
he correct color coding..
26
User Manu
ual THEIA HE- t U
UL String Inverte
ers 357116.013, Issue 2.0, April 2013
; En
nsure that the
t electrica
al installatio
on compliess with the lo
ocal and nattional
ellectrical reg
gulations in force at the
e installation
n site.
4.3. Electri
E
cal Installatio
on
Corre
ect electrica
al connectio
on is critical for achievin
ng safe, long-term and reliable
opera
ation of the
e entire PV system.
s
NOTICE
The ele
ectrical connections mu
ust be perfo
ormed by qu
ualified persons and
comply
y with local and federall electrical rregulations and the insttructions
detaile
ed in this User Manual.
Figu
ure 4.5: Simpliffied system ov
verview
4.3.1
1. Condu
uctors
Two important criteria
c
mustt be conside
ered in selec
ction of con
nductor size
es, namely
ampa
acity and vo
oltage drop. Using corre
ectly sized c
conductors improves the efficienc
cy
of the PV system
m.
• Am
mpacity refe
ers to the cu
urrent-carrying capacity
y of the con
nductor. The
e larger the
con
nductor is, the greater its
i capacity
y to carry cu
urrent.
• Volltage drop is the reduction of volta
age due to c
cross sectio
on, current fflow and
leng
gth of the conductor.
c
Itt is recomm
mended to m
minimize the
e system conductor
volttage drop. Voltage
V
drop is equivale
ent to loss iin energy yield
CAUT
TION
The conductor cro
oss section area must c
conform to tthe ratings of the NEC
ards to prevent overhea
ating and firre.
standa
User Manual
M
THEIA HE
E-t UL String Inve
erters 357116.01
13, Issue 2.0, April 2013
27
• Use
e adequatelly sized conductors witth the corre ct temperatture rating and sunligh
ht
resistance.
• Sec
cure conduc
ctors so that they are kept
k
away ffrom objectss that can d
damage the
insu
ulation (e.g. sharp edge
es).
CAUT
TION
The conductors must
m
be liste
ed for PV ap plications a
and the site
environ
nment and have
h
the co
orrect color coding to av
void material damage
and bo
odily harm.
4.3.2
2. Conne
ection Arrea
1. CAN
N bus termina
al
2. RS-4
485 terminall
3. Ethe
ernet connec
ction
4. Inte
ernal DC term
minal blocks,
+PO
OS and -NEG
5. Inte
ernal DC ground terminal,
GND
D/PE
6. Inte
ernal AC term
minal block
7. DC ffuse board, S
Stringbox
8. Equ
uipment grounding bar,
Strin
ngbox
Figure 4.6: Customer connection
c
are
ea
• DC connection
n can be eith
her a negatiive or positi ve grounde
ed PV string
con
nfiguration.
• AC connection
n is performed differenttly dependin
ng on the grrid configuration.
• Nettwork connections are
e the same regardless
r
o
of the differrent DC and AC
con
nnection opttions.
28
User Manu
ual THEIA HE- t U
UL String Inverte
ers 357116.013, Issue 2.0, April 2013
4.3.2
2.1. Conduits
The THEIA
T
HE-t UL
U inverter Stringbox is
s equipped w
with covere
ed holes (knockouts) to
o
fit the recomme
ended condu
uit fittings.
• The
e Stringbox connected to the bottom of the in
nverter is m
made of non--conductive
e
material and sh
hipped with
h knock outs
s for ¾” and
d 1” conduit fittings.
• The
e knock outs
s are locate
ed on the lefft and right sides, botto
om and back of the
Stringbox as specified in the
t figure be
elow.
• It is
s recommen
nded to use a hole saw to remove tthe knockou
uts, to ensu
ure the hole
is even
e
for fixin
ng of the co
onduit.
Figurre 4.7: Knock outs
o
on the Stringbox
Figure
re 4.8: Remova
al of the knock
k outs
• Use
e a 1” hole saw
s
to remo
ove the knoc
ck outs for tthe ¾” fittin
ngs and 1- 5/16” hole saw
w
to remove
r
the knock outs
s for the 1” fittings.
f
• Pos
sition the ho
ole saw in th
he middle off the knock out face.
• Drill through th
he cover.
• Carrefully file down any rou
ugh edges.
NOTICE
For con
nduit hubs, use
u only UL
L Listed rainttight, or we
et location, h
hubs for
entry in
nto the enclosure
Conduiits are conn
nected to th
he Stringbox
x as follows :
• DC co
onduits are mounted on
n the botto
om of the Sttringbox.
• AC co
onduits are mounted on
n the right sside of the Stringbox.
• Netw
work conduitts are moun
nted on the left side off the Stringb
box.
Listed conduit fittings that fulfill the fo
ollowing critteria should be used forr the THEIA
ox knock ou
uts:
HE- t UL Stringbo
User Manual
M
THEIA HE
E-t UL String Inve
erters 357116.01
13, Issue 2.0, April 2013
29
Figurre 4.9: Size critteria for condu
uits to fit the S
Stringbox kno ck outs
Table 4.1: Recomme
ended size for the conduits
Sym
mbol
A
B
C
D
E
F
Size
e
1
1 /9” / 28.8 mm
1 3/7” / 35.8 mm
2
/7” / 7.0 mm
1 3/7”/ 35.5
1 9/14
m
1 ” / 42.5 mm
11
m
1 /14” / 45.3 mm
NOTICE
Follow the guidelin
nes from the conduit m
manufacture
er regarding
g
connec
ction, groun
nding and tig
ghtening torrque.
4.3.3
3. Groun
nding
Prope
er grounding
g of the enttire PV syste
em limits vo
oltage surge
es, gives a c
common
referrence point for the cond
ductive partts and faciliitates the o
operation off the
overc
current prottection deviices.
DANG
GER
Ground
ding should be carried out
o by qualiffied persons only, and comply
with local and national electriical regulatiions to prev
vent shock h
hazards.
• The
e AC input and AC output circuits are
a isolated from the en
nclosure an
nd that
sys
stem ground
ding, if required by Secttion 250 of the Nationa
al Electrical Code,
ANS
SI/NFPA 70, is the resp
ponsibility off the install er
• The
e Photovolta
aic System Grounding shall
s
be insttalled per th
he requirements of
Sec
ctions 690.4
41 through 690.47
6
of th
he of the Na
ational Electrical Code, ANSI/NFPA
A
70 and is the responsibilitty of the insttaller
• PV strings may
y have the negative
n
or the
t positive
e conductorrs grounded
d. The
ounded cond
ductors are terminated
d at the equ
uipment gro
ounding barr in the
gro
Stringbox via the
t GFDI (Fig
gure 4.6, pos
s. 8).
30
User Manu
ual THEIA HE- t U
UL String Inverte
ers 357116.013, Issue 2.0, April 2013
• All metallic conduit fitting
gs shall also
o be bonded
d to the equ
uipment gro
ounding barr
t Stringbo
ox (Figure 4.6, pos. 8).
in the
• Folllow the insttructions an
nd specificattions from tthe different PV module
e
manufacturers
s regarding grounding requirement
r
ts.
• All metal parts
s of the THE
EIA HE-t UL inverters are
e electricallly bonded to
o ground
ough the te
erminal GND
D at the AC terminal
t
blo
ock (Figure 4
4.6, pos. 6).
thro
CAUT
TION
Ground
ded PV cond
ductors are grounded v
via the GFDI to the grou
unding bar
in the Stringbox
S
an
nd must NO
OT be ground
ded at any o
other point in the
system
m, as voltage potentials
s can appea
ar and possibly damage
e electrical
compo
onents.
4.3.4
4. DC Co
onnection
ns (PV)
The DC
D connectiions include
e wiring from
m the PV mo
odules throu
ugh a combiner box to
the in
nverter. The
e inverter is configured with a Strin
ngbox.
DANG
GER
Always
s disconnect the PV arrray before sstarting the DC connecttions, as
the PV array can supply
s
up to
o 600 VDC to the inverte
er when exp
posed to
sunligh
ht.
NOTICE
When removing
r
th
he lower cov
ver to accesss the conne
ection term
minals
ensure
e that the DC
C switch is in
i the OFF p
position.
4.3.4
4.1. DC Te
erminals
Figure 4.10
0: DC terminal blocks
User Manual
M
THEIA HE
E-t UL String Inve
erters 357116.01
13, Issue 2.0, April 2013
31
The incoming PV
V conductorrs shall be te
erminated a
at the 1.Ung
grounded T
Terminal and
d
2.Gro
ounded Terminal inside
e the Stringb
box.
Figure 4.11: Fu
use board in th
he Stringbox
F
F1, F2, F3: DC
C fuse holderrs.
F
F4: Ground fu
use holder (GFDI).
1
1. Ungrounde
ed Terminal: Terminal
block for th
he ungrounde
ed PV
conductorss.
2
2. Grounded T
Terminal: Te
erminal block
for the grou
unded PV conductors.
N
N: Receptacle
e for monitorring the
voltage bettween phase
es and
neutral.
N
N-N: Terminal block for th
he neutral
conductor.
P conducto
ors go throu
ugh the DC switch
s
in th
he Stringbox
x, and are th
hen
The PV
terminated at th
he +POS and
d –NEG term
minal blockss in the lowe
er inverter
partment.
comp
+P
POS: Positive
e terminal blo
ock
-N
NEG: Negativ
ve terminal bllock
Figu
ure 4.12: Term
minals in inverte
er lower comp
partment
NOTICE
The connection re
equires remo
oval of the iinverter low
wer cover, an
nd must be
med by qualified perso
ons only!
perform
4.3.4
4.2. Array
y Configurration
A PV string cons
sists of a certain numbe
er of PV mo
odules conne
ected in serries. Strings
s
can be
b connecte
ed in paralle
el forming an
n array and attached to
o the inverter. The
THEIA
A HE-t UL in
nverters hav
ve a large vo
oltage range
e, and several feasible PV string
confiigurations are
a possible.. Follow the NEC and th
he module m
manufacture
er
instru
uctions whe
en configuring the PV array!
a
• The
e grounding
g configurattion of the PV
P array and
d the conne
ection to the
e DC
term
minals depe
end on the module
m
tech
hnology.
32
User Manu
ual THEIA HE- t U
UL String Inverte
ers 357116.013, Issue 2.0, April 2013
• The
e inverter is delivered frrom the fac
ctory with a negative g
grounded PV
V array
con
nfiguration as a standa
ard, but may
y also be de
elivered for a positive g
grounded PV
V
arra
ay configurration.
• The
e positive grounded PV
V array conffiguration d
differs from the negativ
ve grounded
d
PV array config
guration by the connec
ction to the DC terminal blocks in tthe inverter
low
wer comparttment and in
n the Stringbox and the
e DC switch in the Strin
ngbox.
• Array configurration depends on the module
m
tec hnology use
ed. Both the
e positive
d negative DC
D terminal blocks have
e three pairss of inputs, which allow
w three
and
striings to be connected in
n parallel. Du
ue to the inv
verter havin
ng one MPP
P-tracker the
PV power shou
uld be identtical for every string.
NOTICE
Maximum Voltage
e: The open circuit volta
age, VOC, mu
ust never ex
xceed 600
VDC und
der any conditions. The
e voltage ge
enerated by PV modules is
inverse
ely proportio
onal to the temperatur
t
re; at lower temperaturres the PV
voltage
e increases from the na
ameplate ra
ating and att higher tem
mperatures
the PV voltage decreases from the name
eplate rating.
4.3.4
4.3. DC Sw
witch
The Stringbox
S
is attached to
t the botto
om of the inv
verter, and provides PV
V string
connection via the wiring th
hat runs from
m the PV arrray. A DC diisconnect s
switch is
proviided and mo
ounted in th
he Stringbox
x.
NOTICE
Before removing the
t lower co
over to acce
ess the conn
nection term
minals
ensure
e that the DC
C switch is in
i the OFF p
position, and
d the PV arrray cables
are disconnected.
I = ON
0 =O
OFF
Figure 4.13: DC disco
onnect switch
D switch is
s rated at:
The DC
600V
Vdc
25A
User Manual
M
THEIA HE
E-t UL String Inve
erters 357116.01
13, Issue 2.0, April 2013
33
3
4.3.4
4.4. Posit
tive Grounded PV Sttring
The inverter is shipped
s
with a negative grounded
d string configuration, if nothing
else is specified at the time
e of order. Th
he differenc
ce between
n negative a
and positive
nded PV con
nfigurations
s is the conn
nection to tthe Ungroun
nded and Grrounded
groun
terminal blocks in
i the String
gbox and th
he +POS and
d –NEG term
minal blocks in the
inverrter lower co
ompartment.
The figure
f
below
w shows the
e difference between n egative and
d positive grrounded
string
gs.
Negative Grounded PV
P String
Figure
F
4.14: Ne
egative ground
ded PV string
Positive Grounded PV String
Fig
gure 4.15: Possitive grounded
d PV string
hange from Negative ground
g
to Po
ositive grou
und:
To ch
• Terrminate the positive co
onductors att the termin
nal block lab
beled 2. Gro
ounded in
the
e Stringbox.
• Terrminate the negative conductors at
a the termiinal block la
abeled 1. Un
ngrounded in
the
e Stringbox.
• Terrminate the grounded positive
p
con
nductor from
m the fuse b
board at the
e +POS
term
minal block in the inverrter lower co
ompartmen
nt.
• Terrminate the ungrounde
ed negative conductor ffrom the DC
C switch at tthe -NEG
term
minal block in the inverrter lower co
ompartmen
nt.
• Tightening torq
que is 1.47 ft-lbf / 2.0 Nm
N for all te
erminals.
34
User Manu
ual THEIA HE- t U
UL String Inverte
ers 357116.013, Issue 2.0, April 2013
4.3.4
4.5. Connection Pro
ocedures
• The
e DC voltage
e on the con
nductors co
onnecting th
he PV array to the inputt of the
inve
erter must have
h
a maximum rating
g of 600VDC at any operrating temp
perature.
• The
e DC conduc
ctor must be
e sized for correct
c
tem
mperature ra
ating and sunlight
resistance. Use
e copper co
onductors be
etween 10 A
AWG and 6 AWG / 6 mm
m2 and
2
16m
mm and tem
mperature rating
r
of 194°F / 90°C ffor all conne
ections.
• Folllow the safe
ety instructtions and sp
pecificationss from the m
module man
nufacturers
reg
garding insta
allation.
• Terrminate the ungrounde
ed conducto
ors at the te
erminal block labeled 1..
Ung
grounded, and
a tighten the screws by applying
g 1.11 ft-lbff / 1.5 Nm o
of torque.
• Terrminate the grounded conductors
c
at the term
minal block la
abeled 2. Grrounded,
and
d tighten the screws by
y applying 1.11 ft-lbf / 1.5 Nm of ttorque.
NOTICE
PV systems with GFDI
G
that inc
corporate th
he system g
grounding c
connection
must not
n have an additional grounding
g
co
onnection.
4.3.4
4.6. Reverrsed DC Co
onnection
n
If the
e positive an
nd negative terminals are
a reversed
d during con
nnection, th
he inverter
will not
n start. Th
he inverter will
w not be damaged du e to interna
al reverse bllocking
diode
es, but high currents arre generated in the con
nductors.
DANG
GER
Be awa
are of high currents!
c
If the
t DC term
minals are re
eversed duriing
installa
ation, high currents
c
are
e generated in the cond
ductors, whiich can
pose shock hazard
ds.
cedure
Proc
• Turrn OFF the AC
A circuit bre
eaker(s) and
d the DC sw
witch.
DANG
GER
The PV
V conductors are still ch
harged afte
er the DC sw
witch on the Stringbox
is turne
ed OFF, due to power fe
eeding PV m
modules. Alw
ways turn O
OFF the
remote
e DC switch and wait un
ntil the PV m
modules do not feed po
ower.
• Rem
move the PV
V connectorrs
• Che
eck if the te
erminals are discharged
d by using a voltmeter.
• Disc
connect the
e conductorrs from the terminal blo
ock.
User Manual
M
THEIA HE
E-t UL String Inve
erters 357116.01
13, Issue 2.0, April 2013
35
5
• Rec
connect the
e conductors
s to the corrrect termin
nal block.
• Tes
st the polarity using a voltmeter
v
be
efore turnin
ng ON the DC
C switch an
nd the AC
circ
cuit breakerr(s).
4.3.4
4.7. Jump
per Positio
on for Systtem Groun
nding Setu
up
The jumper abov
ve the - NEG
G terminal block in the iinverter low
wer comparttment
monitors the arrrangement of
o the DC co
onnection a ccording to
o the ground
ding setup.
The jumper is po
ositioned forr a negative
e grounded PV string c
configuration.
ending on th
he grounding
g requireme
ents from th
he module m
manufacture
er the
Depe
jumper must be repositione
ed.
In cas
se of a mism
match in gro
ounding setup the follo
owing messa
age will app
pear in the
displa
ay: “Fuse fa
ault”. Refer to
t 7.2 Table
e of Events
Table 4.2: Jumper position for the
e DC grounding
g configuration
n
Inve
erter lower compartme
ent
Top view
v
Systtem
Neg
gative groun
nded PV con
nfiguration::
The jumper sho
ort-circuits tthe two
righttmost pins ((default).
Posiitive ground
ded PV Conffiguration:
The jumper sho
ort-circuits tthe two
leftm
most pins.
1. Ju
umper monitorring the ground
ding
setup.
4.3.5
5. AC Co
onnections (Grid))
The AC
A connectiion includes
s wiring from
m the AC disstribution pa
anel through one or
more
e circuit brea
akers to the
e AC termina
al block of tthe inverterr (refer to 4..3.2
Conn
nection Area
a).
Veriffy that the AC
A grid para
ameters are compatible
e with the in
nverter spec
cifications
beforre connectin
ng the inverrter to the grid:
g
• Sing
gle phase 240VAC/120V
VAC
• Sing
gle phase 208VAC/120V
VAC WYE
• Frequency rang
ge: 55.0 to 63.0 Hz
NOTICE
The TH
HEIA HE-t UL
L inverter prrovides a vo
oltage outpu
ut range fro
om 184 VAC
to 276 VAC.
36
User Manu
ual THEIA HE- t U
UL String Inverte
ers 357116.013, Issue 2.0, April 2013
CAUT
TION
The AC
C output / Neutral
N
of th
he inverter iss not bonde
ed to ground
d.
WARN
NING
To redu
uce the risk
k of fire, do not
n connectt to an AC c
circuit break
ker panel
having multi-wire branch
b
circu
uits connec ted.
DANG
GER
Turn OFF the AC circuit breaker(s) and th
he DC switch
h before con
nnecting
the inv
verter to the
e grid to pre
event electrrocution.
AC po
ower system
ms are foun
nd in both co
ommercial/ industrial an
nd residential/office
applications. Pha
ase power systems
s
usu
ually have tthree conductors:
Table 4.3: The differrent AC condu
uctors
Term
m (Abbr.)
Descriptio
on
Phas
se conductor (L1/L2)
The ungrou
unded condu
uctors, which carry curren
nt to the
load.
A circuit co
onductor carrrying the unb
balanced currrent of the
ungrounde
ed conductors.
An electric
cal path to grround, design
ned to carry ffault current.
Neutral conducttor (N)
nd
Equiipment groun
cond
ductor (GND))
These three con
nductors are
e connected
d to the serv
vice entranc
ce panel. Th
he typical
hase is prov
vided by con
nnection of either L1 an
nd N or L2 a
and N. L1
120 VAC single ph
and L2
L provide 240
2 VAC whille L1 and N or L2 and N provide 12
20 VAC.
120 VAC loads must be distrributed even
nly between
n L1 and L2 to keep the
e system in
balan
nce. Also, by
y connecting to a three
e-phase sys tem the loa
ad must be d
distributed
evenly between the three phases.
p
NOTICE
Single phase inverrters connec
cted to a th
hree phase p
primary pow
wer source
must not
n significantly increas
se unbalanc
ced system voltages.
4.3.5
5.1. Connection Pro
ocedures
Depe
ending on su
upply voltag
ge configura
ation the co
onnections to the inverter must b
be
perfo
ormed differrently.
User Manual
M
THEIA HE
E-t UL String Inve
erters 357116.01
13, Issue 2.0, April 2013
37
• The
e current ca
arrying conductors on the AC side m
must be ratted for the c
current and
2
be maximum 6 AWG /16 mm
m . Ensure
e complianc e with electtrical regula
ations!
• The
e current ca
arrying conductors on the AC side m
must be ratted for the a
appropriate
currrent and vo
oltage. Ensure complian
nce with the
e state and federal elec
ctrical
reg
gulations!
• The
e AC conduc
ctors must be
b between
n 10 AWG an
nd 6 AWG / 6 mm2 and 16mm2 and
d
with a tempera
ature rating
g of 194°F / 90°C for all connection
ns
• When selecting
g AC conduc
ctors, resisttance shoulld be minimiized by sele
ecting a
larg
ger size of conductors.
c
• Folllow the safe
ety instructtions and sp
pecificationss from the c
conduit man
nufacturers
reg
garding insta
allation.
• Terrminate the conductors
s to the corrresponding terminals in
n the connection area.
• Tigh
htening torq
que of the terminal
t
screws is 1.5 N
Nm / 1.11 ftt-lbf.
• Che
eck that the
e connection
n is perform
med correctlly.
w
Neutrall
Single Phase with
240
0 VAC phase to
t phase
120
0 VAC phase to
t neutral
240 VAC phase to ph
hase
120 VAC phase to ne
eutral
208
8 VAC phase to
t phase
120
0 VAC phase to
t neutral
38
User Manu
ual THEIA HE- t U
UL String Inverte
ers 357116.013, Issue 2.0, April 2013
Figure 4.16: Connections for
f single phasse with neutra
al
• Terrminate the line 1 cond
ductor at the
e terminal la
abeled L1 on the AC terminal block
k
in the
t right side of the inverter lower compartme
ent.
• Terrminate the line 2 cond
ductor at the
e terminal la
abeled L2/N
N on the AC terminal
block in the rig
ght side of the inverter lower comp
partment.
• Terrminate the neutral con
nductor at the
t termina l block labeled N-N in riight side of
the
e Stringbox.
• Terrminate the equipmentt ground con
nductor at tthe groundiing bar in th
he lower
righ
ht side of th
he Stringbox
x.
• Con
nnect the bo
onding stra
ap (white or grey colore
ed) between
n the flat re
eceptacle
labeled N abov
ve the N-N terminal
t
block in the Sttringbox and
d the unmarrked
rec
ceptacle to the
t right of the DC grou
und termina
al in the inve
erter lower
com
mpartment. This is to monitor
m
the voltage
v
bettween the p
phases and n
neutral.
User Manual
M
THEIA HE
E-t UL String Inve
erters 357116.01
13, Issue 2.0, April 2013
39
Single Phase with
w
no Neuttral
0 VAC phase to
t phase on
nly
240
208 VAC p
phase to ph
hase only
Figure 4.17: Connections for
f Delta grid w
with no neutra
al
• Terrminate the line 1 cond
ductor at the
e terminal la
abeled L1 on the AC terminal block
k
in the
t right side of the inverter lower compartme
ent.
• Terrminate the line 2 cond
ductor at the
e terminal la
abeled L2/N
N on the AC terminal
block in the rig
ght side of the inverter lower comp
partment.
40
User Manu
ual THEIA HE- t U
UL String Inverte
ers 357116.013, Issue 2.0, April 2013
• Terrminate the equipmentt grounding conductor at the grou
unding bar in
n the
Stringbox.
a: Corner Grounded
G
Delta
240
0 VAC phase to
t phase on
nly
C phase to p
phase only
208 VAC
Figure 4.18: Conne
ections for Dellta corner grou
unded and Dellta Wye
User Manual
M
THEIA HE
E-t UL String Inve
erters 357116.01
13, Issue 2.0, April 2013
41
• Terrminate the line 1 cond
ductor at the
e terminal la
abeled L1 on the AC terminal block
k
in the
t right side of the inverter lower compartme
ent.
• Terrminate the grounded phase
p
condu
uctor at the
e terminal la
abeled L2/N
N on the AC
term
minal block in the rightt side of the inverter low
wer comparrtment.
• Terrminate the equipmentt grounding conductor at the grou
unding bar in
n the
Stringbox.
• Con
nnect the grrounding sttrap (green and yellow colored) be
etween the fflat
rec
ceptacle lab
beled PE to the
t left side
e of the AC tterminal blo
ock and the unmarked
rec
ceptacle to the
t right of the DC grou
und termina
al in the inve
erter lower
com
mpartment. This is to monitor
m
the voltage
v
bettween groun
nd and the g
grounded
pha
ase.
4.3.6
6. Network Conn
nections
The inverter is equipped witth three com
mmunicatio n interfacess: Ethernet, CAN, and
RS-48
85. Etherne
et provides communica
c
tion betwee
en the integ
grated web--server and a
comp
puter, either directly co
onnected orr via a route
er/switch. CA
AN allows
comm
munication between se
everal invertters. RS-485
5 allows com
mmunicatio
on with
certa
ain third party equipment.
1. Client inverter
2. Mas
ster inverter
3. CAN
N bus cable
4. Ethe
ernet cable
5. RS-4
485 cable
6. Com
mputer
7. Data
a logger
Figu
ure 4.19:Connection without network
4.3.6
6.1. Connection Pro
ocedures
If sev
veral inverte
ers are conn
nected toge
ether, all inv
verters mustt be connec
cted to the
CAN bus prior to
o the Start Up
U procedurre to benefitt from singlle installatio
on setup.
42
User Manu
ual THEIA HE- t U
UL String Inverte
ers 357116.013, Issue 2.0, April 2013
Figure
F
4.20: Ne
etwork connecction
1. CA
AN bus terminal
2. RS
S-485 termin
nal
3. Ethe
ernet port
4. Cablle gland
• Eth
hernet: Use CAT5 or better, with siize 24 AWG / 0.21 mm2 and a maximum total
leng
gth of 100 m.
m
• CAN: Use a cable size of 26
2 AWG / 0.13 mm2, witth a maximu
um total len
ngth of 500
m.
• RS--485: Use a cable size of
o 26 AWG / 0.13 mm2, with a max
ximum total length of
120
00 m.
• Terrminate the cables at th
he terminals
s in the con
nnection are
ea as follows
s:
- Ethernet:
- CAN:
- RS-485:
Plug the
t Etherne
et cable dire
ectly into the
e RJ45 portt.
The conductors
c
must
m
be terrminated to the same la
abeled
terminals at both
h ends: i.e. H connected
d to H, L to L etc.
Apply
ying 0.15 ft--lbf / 0.2 Nm
m of torque.
The conductors
c
must
m
be terrminated to the same la
abeled
terminals at both
h ends: i.e. A connected
d to A, B to B etc.
apply
ying 0.15 ft-lbf / 0.2 Nm
m of torque tto tighten.
• Tighten the co
onduit fitting
gs firmly.
CAN
B(+)
A(-)
GND
B(+)
A(-)
GND
H
L
COMGND
H
L
COMGND
R
RS-485
Figure 4.21: CAN and
d RS-485 conn ection pin-outt
User Manual
M
THEIA HE
E-t UL String Inve
erters 357116.01
13, Issue 2.0, April 2013
43
3
4.3.6
6.2. Jump
per Positio
on for Term
mination R
Resistance
e
When
n several inv
verters are connected, the jumperr located be
ehind the CA
AN / RS-485
5
terminals activates the term
mination res
sistance wh
hen the pinss are terminated (short-circuited). This minimizes
m
sig
gnal reflecttions in the c
cables and helps to avo
oid
interfference.
• Sing
gle inverterr: The two pins
p
can be terminated
t
ected.
or disconne
• Sev
veral inverters connectted: The ma
aster-client configuration requires terminated
d
pins
s on the firs
st inverter and
a on the la
ast inverterr in the linke
ed series. Th
he pins must
be open on the
e inverters between
b
the
e first and la
ast inverterr in the linke
ed series.
• To disconnect
d
the pins the
e jumper mu
ust be pulle
ed up and pla
aced only on one of the
e
pins
s.
• Be careful not to bend the
e pins when removing o
or installing the jumper!
Table 4.4: Jumper position for the
e termination resistance
r
Con
nnection Are
ea
Jumper Position
Pins
The pin
ns are terminated.
The pin
ns are discon
nnected.
1. CA
AN termination
n resistance
2. RS
S-485 termination resistance
e
44
User Manu
ual THEIA HE- t U
UL String Inverte
ers 357116.013, Issue 2.0, April 2013
4.3.7
7. Check
ks before
e Start Up
U
; Moounting:
;
;
;
;
;
;
;
;
;
at the brack
ket and the inverter are
e correctly m
mounted an
nd secured.
- Check tha
PV
V wiring:
- Check tha
at the PV ca
ables are rated for the PV current and for the expected
environm
mental conditions.
- Check tha
at the wiring
g is perform
med accordin
ng to local a
and federal electrical
regulations.
Connection:
- Check tha
at the PV co
onductors are
a correctly
y torqued to
o the DC terrminals.
- Check tha
at all connectors and cable glandss are correcttly tightene
ed and
sealed.
DC side:
at the PV op
pen-circuit voltage,
v
VOC , does not e
exceed 600 VDC
- Verify tha
- Check tha
at the DC po
olarity is corrrect.
AC side:
at the AC co
onductors on
o are correc
ctly connec
cted to the A
AC
- Verify tha
terminals
s.
Grounded co
onductors:
- Check tha
at the equip
pment groun
nding condu
uctors are p
properly size
ed, and not
fused or switched.
s
Ju
umpers:
- Check tha
at the jumpers for the grounding
g
ssetup and fo
or the termination
resistanc
ce are correc
ctly position
ned.
Disconnects:
- Verify tha
at all curren
nt-carrying conductors
c
on both the
e DC and AC
C side can be
e
disconnected, and th
hat the brea
akers and D C disconnec
cts are loca
ated
correctly and are eas
sily accessib
ble.
Overcurrent protection:
at the overc
current prottection on b
both the DC and the AC side are
- Verify tha
sized correctly, and capable
c
of being
b
chang
ged withoutt touching live contacts
s.
In
nverter cove
er:
- Ensure th
hat no cable
es interfere with the se aling of the
e inverter low
wer cover,
and faste
en the coverr firmly to th
he housing. Recommen
nded tighten
ning torque
is 1.0 Nm / 0.74 ft-lb
bf.
CAUT
TION
Verify that
t
the low
wer cover is correctly tiightened, so
o that no moisture
enters the housing
g and damages the ele
ectronic com
mponents.
User Manual
M
THEIA HE
E-t UL String Inve
erters 357116.01
13, Issue 2.0, April 2013
45
5
5. START
S
T UP
This chapter
c
pro
ovides instru
uctions to ensure a saffe start- up o
of the THEIA
A HE-t UL
inverrters. A minimum voltag
ge of 184VAC
,
and
230V
V
,
and
a
po
ower
greate
er
than 7WDDC
A
DC
is req
quired from the PV systtem before the THEIA H
HE-t UL-t inv
verters starrt-up and
begin
n feeding po
ower to the grid. Do nott attempt to
o start up o
or commissio
on the
inverrter if one off the voltag
ge sources is
s not availa ble
AC Side
S
• Turn ON the AC circuitt breaker(s).
DC Side
S
• Turn ON the DC switch
h(es).
5.1. Initial
I
Start
S
When
n the inverter is started
d for the firs
st time, an i nstallation menu is auttomatically
displa
ayed to ena
able the con
nfiguration of
o certain va
alues and op
perational s
settings.
5.1.1
1. Custo
omizing the
t Inverrter Setttings
Single Inverter
• When both the
e DC and the
e AC disconn
nects are tu
urned ON an
nd the inverrter is
sup
pplied with enough
e
pow
wer, the insttallation me nu is display
yed on the L
LCD screen..
Mult
tiple Inverte
ers Connec
cted
1. CA
AN
• Con
nnecting all inverters viia the CAN bus
b enabless the configuration of a
all inverters
in a plant via one inverter.. The Start Up
U can then
n be carried out on any inverter,
and
d if configured as the master
m
inverrter the conffiguration ssettings of ttime, date,
lang
guage and grid
g setting
gs will be tra
ansferred to
o all the othe
er client inv
verters on
the
e network.
• Eac
ch client inv
verter is auto
omatically assigned
a
an
n ID number from the m
master during
g
Sta
art Up.
NOTICE
If multiiple inverterrs are conne
ected togetther, all inve
erters must be
connec
cted to the CAN bus, an
nd receiving
g sufficient AC and DC p
power,
before Start Up to
o benefit fro
om single insstallation se
etup.
46
User Manu
ual THEIA HE- t U
UL String Inverte
ers 357116.013, Issue 2.0, April 2013
2. RS
S-485
• Con
nnecting the
e inverters via
v the RS-4
485 bus ena
ables comm
munication w
with certain
3rd party equipment. In an RS-485 nettwork, the 3 rd party equ
uipment willl act as a
master, while all
a inverters
s will become clients.
• Eac
ch inverter must
m
be ass
signed an ID number, a bit rate num
mber and a p
parity
num
mber manua
ally:
- The ID number must be between
n 1 and 247
7.
- Both the master inve
erter and th
he client inve
erters requiire a bitrate
e number
and a parrity number..
- Determine the setup
p in the 3rd party
p
equipm
ment (e.g. an
n external d
data
logger) an
nd program these numbers in the iinverter by accessing tthe
network menu
m
on the
e inverter display. Refe
er to section
n 6.2.3.2 Ne
etwork
Setup forr further dettails.
Default bitrate: 1920
00
Default parity: even
• The
e RS-485 co
ommunicatio
on is complia
ant with Su nspec Modb
bus specific
cations.
5.1.2
2. User Interface
I
e
The User
U
Interfa
ace on the frront of the inverter
i
con
ntains a LCD
D screen, three LEDs
and six
s function keys.
5.1.2
2.1. LCD Screen
S
To na
avigate in th
he LCD screen the six function key
ys must be u
used. By sellecting one
of the seven item
ms in the Main Menu, a further nav
vigation thro
ough differe
ent
subm
menus is pos
ssible. There
e are four different me nu levels.
Home,, Status, Eve
ent Log, Stattistics:
The infformation an
nd values are
e read-only.
Setup
p, Commandss, Alarm Setu
up:
The infformation an
nd values can
n be
modifiied.
Figurre 5.1: LCD scrreen interface
Padlock: Opens
O
up when
w
correctt password is entered.
Lines: Num
mber of highlighted line
es indicatess the curren
nt menu/sub
bmenu
level, with
h the top lin
ne being the
e first level ((Main Menu)).
• To activate the
e display wh
hen the scre
een saver iss active (bla
ank), press a
any key.
User Manual
M
THEIA HE
E-t UL String Inve
erters 357116.01
13, Issue 2.0, April 2013
47
5.1.2
2.2. LEDs
There
e are three LEDs next to
t the displa
ay screen. T
The upper on
ne is red, th
he middle is
yellow and the lo
ower one is green.
Table 5.1: LEDs.
Sym
mbol
LED
Func
ction
Action
Red
Malffunction! Inve
erter in
shuttdown mode
Look ffor alarms in A
Active
Alarmss
Green
n&
Yellow
Cauttion! Inverter still operate
es,
but at
a a limited le
evel
Look ffor warnings in
Active
e Alarms
Green
n
NO
ONE
Yellow
Operrates; inverte
er feeds pow
wer
to th
he grid
Inverrter is OFF (Power < 7WDC)
No acttion
No acttion
5.1.2
2.3. Funct
tion Keys
The function
f
key
ys have the following uses:
u
Table 5.2: Function keys
Sym
mbol Functtion
Symbol
Function
n
Up: Sc
croll up / incrrease value
Right: Na
avigate one p
page or value
e
right
Down: Scroll down
n / decrease
value
Enter: Se
elect option / go to next
level
Left: Navigate
N
one
e page or
value left
Cancel: S
Stop operatio
on / back to
previous menu item
• The
e selected ittem is alway
ys highlightted in yellow
w.
• A re
egistered to
ouch of a bu
utton causes a “click” s ound to be heard.
5.1.3
3. Start installattion
At firrst power-up
p, and with sufficient AC
A power, th
he display s hows the Start
Insta
allation screen.
48
User Manu
ual THEIA HE- t U
UL String Inverte
ers 357116.013, Issue 2.0, April 2013
1. St
tart
Left – Cancel
Rightt – Ok
Enterr – Confirm
2. La
anguage Se
election
Defa ult – English
Enterr – Call up the list of languages
Up orr Down – Nav
vigate throug
gh the list
to fin
nd the preferred language
e; English;
Span
nish; etc…
Enterr – Confirm
Rightt – Next
Enterr – Confirm
3. Tim
me Format
t
Defau
ult – 12 h
at list
Enterr – Call up the time forma
Up orr Down – Sele
ect the time format;
12h, or 24h
Enterr – Confirm
Left – Back
Rightt – Next
Enterr – Confirm
User Manual
M
THEIA HE
E-t UL String Inve
erters 357116.01
13, Issue 2.0, April 2013
49
4. Da
ate
DD.M
MM.YYYY
Enterr – Call up the date
Up – Increase present digit
Down
n – Decrease
e present digiit
Left – Select prev
vious digit
Rightt – Select nex
xt digit
Enterr – Confirm
Left – Back
Rightt – Next
Enterr – Confirm
5. Tim
me
HH.M
MM
Enterr – Call up the date
Up – Increase pre
esent digit
n – Decrease
e present digiit
Down
Left – Select prev
vious digit
Rightt – Select nex
xt digit
Enterr – Confirm
Left – Back
Rightt – Next
Enterr – Confirm
NOTICE
The tim
me setting must
m
match the time on
n the actual installation
n site;
otherw
wise data ma
ay be overw
written!
6. Se
et Bus ID
Enter – Call up the
e digits
Up – In
ncrease pressent digit
Down – Decrease p
present digitt
Enter – Confirm
Left – Back
Right – Next
Enter – Confirm
50
User Manu
ual THEIA HE- t U
UL String Inverte
ers 357116.013, Issue 2.0, April 2013
If RS4
485 commu
unication is used,
u
set a unique bus ID for the in
nverter. For any client
inverrters, this will be require
ed to be sett manually u
under Setup
p > Network
k Setup >
Bus ID (RS485). If RS485 co
ommunicatio
on is not use
ed, this step
p can be missed.
7. Se
et as Maste
er Unit
Defa ult – No
Enterr – Call up th e options
Up – Yes
n – No
Down
Enterr – Confirm
Left – Back
Rightt – Next
Enterr – Confirm
e inverter is set to mastter, data mu
ust be colle cted from tthe client inv
verters. The
e
If the
follow
wing screen
n will be disp
played:
8. Grrid Configuration (Earrthing Systtem)
Enter – Call up the
e list of grid
config
gurations
Up or D
Down – Selec
ct the grid co
onfiguration
of the actual installation site:
TN/TT
T, IT, Undefine
ed
Enter – Confirm
Left – Back
Right – Next
Enter – Confirm
User Manual
M
THEIA HE
E-t UL String Inve
erters 357116.01
13, Issue 2.0, April 2013
51
9. Fe
eeding Phas
se
Enter – Call up the
e list of phase
es
Up or D
Down – Selec
ct the preferrred phase:
- If con
nfigured for T
TN/TT: Not s
set, L1, L2, L3
3
- If con
nfigured for IT: Not set, L1-L2, L1-L3,
L2-L3
3
Enter – Confirm
Left – Back
Right – Next
Enter – Confirm
If the
e inverter is set to mastter, and the
ere is more tthan one inv
verter in the
e plant, the
follow
wing screen
n is displaye
ed:
e inverter is configured as master: step throug
gh and set tthe feeding phase (L1,
If the
L2, L3
3, L1-L2, L1-L3, or L2-L3 as require
ed) for all cliient inverters.
G
Code
10. Grid
Ente
er – Call up th
he list of grid
conffigurations
Up o r Down – Sellect the grid setting of
the a
actual installation site: Co
ont 240 D:
No N
N; Cont 240D:: 120spl; HI 2
208 D: 120Y;
HI 20
08 D: C gr; etc
c.
Ente
er – Confirm
Left – Back
Ente
er – Confirm
52
User Manu
ual THEIA HE- t U
UL String Inverte
ers 357116.013, Issue 2.0, April 2013
Due to
t the limita
ation in the number of characters
c
tthat can be displayed o
on the
scree
en the grid codes
c
have been shortened from ttheir full nam
mes. Please
e see below
w
for a reference list of the ab
bbreviations
s to relevan
nt full namess:
Table 5.3: Grid code
e abbreviation
Abbrreviation
Full name
Cont 208D: No N.
Continentall North Amer ica 208V Dellta
with No Neu
utral
Cont 208D: 120Y
Continentall North Amer ica 208V pha
ase to
phase with 120V phase to Neutral
Cont 208D: C.gr
Continentall North Amer ica 208V Dellta
with Cornerr Grounding
Cont 240D: No N.
Continentall North Amer ica 240V Dellta
with No Neu
utral
p
Cont 240D: 120sp
Continentall North Amer ica 240V pha
ase to
phase and 120V
1
split ph
hase and Neu
utral
Cont 240D: C.gr
Continentall North Amer ica 240V Dellta
with Cornerr Grounding
08D: No N.
HI 20
Hawaii state
e 208V Delta
a with No Neu
utral
HI 20
08D: 120Y
Hawaii state
e 208V phas e to phase w
with
120V phase
e to Neutral
HI 20
08D: C.gr
Hawaii state
e 208V Delta
a with Cornerr
Grounding
HI 24
40D: No N.
Hawaii state
e 240V Delta
a with No Neu
utral
HI 24
40D: 120sp
Hawaii state
e 240V phas e to phase and
120V split phase
p
and Ne
eutral
HI 24
40D: C.gr
Hawaii state
e 240V Delta
a with Cornerr
Grounding
Grid Code Selec
ction
User Manual
M
THEIA HE
E-t UL String Inve
erters 357116.01
13, Issue 2.0, April 2013
53
3
If Grid
d Code settting fails and
d the grid co
ode is not co
orrectly sett, the follow
wing window
w
is dis
splayed:
With inverters co
orrectly con
nnected in a Master/Cliient configu
uration a ‘Wa
arning’ box is
displa
ayed if an error
e
occurre
ed during ins
stallation:
ning Box
Warn
Possib
ble errors:
1. No communicattion
2. Wroong grid settings
3. Suffficient DC p
power is unav
vailable on
con
nnected clien
nts inverters
• Loo
ok at the dis
splayed men
nu and the LEDs
L
on the
e inverters: It is not carrried out
corrrectly if the
e installation
n menu is sttill displayed
d and/or the
e green LED
D is not lit
and
d the yellow
w and red LEDs are lit.
• If th
he Start Installation scrreen is still shown,
s
run through the
e installatio
on process
on the
t individu
ual nverter.
CAU
UTION
• An installation timer ensure
es that the g
grid settingss can be cha
anged
(using
g the Owner password)) within 5 ho
ours of feed
ding power tto the grid.
There
eafter it is only
o
accessiible using th
he Installer p
password, w
which may
only be
b obtained
d for installe
ers and grid operators b
by contactin
ng Eltek.
• The selected
s
grid
d configurattion must m
match that o
on the actua
al
installation site; otherwise the
t inverterr may not op
perate or be
e compliant
to rellevant state
e and federa
al electricall regulationss due to incorrect limit
value
es.
The following
f
sc
creen is disp
played while
e inverter se
ettings are b
being updatted:
54
User Manu
ual THEIA HE- t U
UL String Inverte
ers 357116.013, Issue 2.0, April 2013
11. Screen
S
Timeout
Enterr – Call up the digits
Defa ult – Screen backlight turns OFF
afterr 60 sec
Left – Back
Rightt – Next
Enterr – Confirm
NOTICE
The low
west value allowed
a
to be
b set is 30 sec, and th
he highest is
s 99 sec.
Setting
g the value to
t 0 disable
es the scree
en timeout a
and leaves tthe screen
backlig
ght ON at all times.
12. Customer
C
Name
N
Enterr – Call up the keyboard
The k
keyboard ena
ables typing a text
entry
y.
Left – Back
Rightt – Next
Enterr – Confirm
In som
me of the submenus th
he settings must be typ
ped using th
he function keys:
Lettter keyboarrd
Num
mber keyboa
ard
User Manual
M
THEIA HE
E-t UL String Inve
erters 357116.01
13, Issue 2.0, April 2013
55
5
Table 5.4: Available symbols in the keyboard
Symbol
Description
Symbol
Description
n
Uppe
er- or lower-c
case letter
Confirm cha
anges and ex
xit the
menu
Point
Clear the ty
yping field
ce
Spac
Go back witthout saving changes
Canc
cel last letter
Go to the Le
etter keyboard
Go to the Nu
umber keybo
oard
• Entter must be pressed until the wantted letter/n
number/sym
mbol is show
wn.
• It is
s possible to
o navigate between
b
the
e characterss by using tthe Up arrow
w to set the
e
marker into the
e text window, then us
sing Left and
d Right to navigate bettween the
cha
aracters.
• The
ere is a maximum space
e for 19 cha
aracters in tthe text win
ndow.
13. Site
S
Enterr – Call up the keyboard
The k
keyboard ena
ables typing of a site
name
e.
Left – Back
Rightt – Next
Enterr – Confirm
14. Unit
U
Name
Ente
er – Call up th
he keyboard
The u
unit name he
elps to disting
guish and
identtify specific inverter in a llarger plant.
Left – Back
Righ t – Next
Ente
er – Confirm
56
User Manu
ual THEIA HE- t U
UL String Inverte
ers 357116.013, Issue 2.0, April 2013
15. Message
M
Enterr – Call up the keyboard
This m
message fielld is to help d
distinguish
and id
dentify specific inverters
s in a
large
er plant, or otther informattion.
Left – Back
Rightt – Next
Enterr – Confirm
16. Owner
O
Pass
sword
Enterr – Call up the digits
Defau
ult – 0003.
Chan
nge the passw
word to 4 opttional
digitss
NOTIICE
This p
password is n
not transmittted to
otherr inverters on
n the CAN bu
us on GUI
firmw
ware revisions below v1.3
32.
Left – Back
Rightt – Finish
Enterr – Confirm
NOTICE
With se
everal inverters connec
cted it mustt be checke
ed that the installation
is been
n carried outt correctly on
o all the cliient inverte
ers.
• Look at the displlayed menu
u and the LE
EDs: It is nott carried outt correctly iff
the in
nstallation menu
m
is still displayed a
and/or the g
green LED is
s not lit and
d
the yellow
y
and re
ed LEDs are
e lit.
• Check that the connection
c
of
o the CAN cables are c
correct, tha
at the AC
and DC
D switches
s are ON, tha
at the volta
ages are >18
84 VAC and 2
230 VDC
and there
t
is a greater than 7 WDC of pow
wer.
• If the
e Start Up ph
hase is correctly carrie
ed out the in
nverters are
e ready to
use. They
T
are fullly automattic during no
ormal operattion, and no
o manual
contrrol is necess
sary for feeding power into the griid.
User Manual
M
THEIA HE
E-t UL String Inve
erters 357116.01
13, Issue 2.0, April 2013
57
6. OPERA
O
ATION
N
This chapter
c
des
scribes how
w to operate the menuss in the LCD screen with
h the
functtion keys orr with a PC connected
c
to
t the embe
edded websserver.
Pleas
se refer to 5.1.2.
5
User In
nterface forr a descript ion of the L CD Screen a
and the
mean
nings of the
e colored LEDs
6.1. Access
A
s Levells and Passwo
P
ords
There
e are three access leve
els to the diffferent sub menus:
Table 6.1: Password
d access levels
s
Password Acc
cess
Guest
Own
ner
Insta
aller
Rea
ad only acces
ss to all value
es.
Rea
ad and write access to alll values and sset levels ex
xcept the insttaller
rela
ated values. The
T default Owner
O
passw
word is 0003.. This passwo
ord can be
cha
anged by nav
vigating to: Setup>Genera
al Setup>Passsword.
If th
he password is lost or forrgotten, pleasse contact E
Eltek to obtaiin a new
pas
ssword.
Rea
ad and write access to alll levels and sset values. Th
he Installer password is
bas
sed on the inv
verter serial number. If th
he password is lost or forg
gotten,
plea
ase contact Eltek to obta
ain a new passsword. It willl require the inverter
serial number.
NOTICE
Any ch
hange of settting needs a password
d. Once the password h
has been
entered, modificattions must be
b done witthin 1 minutte before th
he access
resets to Guest level.
6.2. LCD
L
Sc
creen Menus
M
To na
avigate in th
he LCD screen the six function key
ys must be u
used. By sellecting one
of the seven item
ms in the Main Menu, a further nav
vigation thro
ough differe
ent
subm
menus is pos
ssible. There
e are four different me nu levels.
58
User Manu
ual THEIA HE- t U
UL String Inverte
ers 357116.013, Issue 2.0, April 2013
Home,, Status, Eve
ent Log, Stattistics:
The infformation an
nd values are
e read-only.
Setup
p, Commandss, Alarm Setu
up:
nd values can
n be
The infformation an
modifiied.
Figure 6.1: LC
CD screen inte
erface
Padlock: Opens
O
up when
w
correctt password is entered.
Lines: Num
mber of highlighted line
es indicatess the curren
nt menu/sub
bmenu
level, with
h the top lin
ne being the
e first level ((Main Menu)).
• To activate the
e display wh
hen the scre
een saver iss active (bla
ank), press a
any key.
6.2.1
1. Home
e
Home is the stan
ndard displa
ay, which is always sho
own if no butttons are to
ouched
within the screen timeout in
nterval, which is set du
uring installa
ation (minim
mum 30 sec,
maximum 99 sec
c, or OFF).
If the
e unit is set as master, the
t default menu conttains status/mode information of
the whole
w
plant..
Single Inverter
Valuess of PV (DC) a
and feed-in (A
AC) current,
voltag
ge and powerr are shown n
numerically.
The in stantaneouss output pow
wer is shown
as a ba
ar graph.
Figurre 6.2: Standarrd display for a single invertter
User Manual
M
THEIA HE
E-t UL String Inve
erters 357116.01
13, Issue 2.0, April 2013
59
PV Plant
Plantt values of fe
eed-in (AC) cu
urrent and
volta
age for each phase, and a
active power
for a ll phases are
e shown num
merically. The
curre
ent output po
ower is show
wn as a bar
grap h.
Figurre 6.3: Standarrd display for a larger PV pla
ant
t scroll ke
eys to obserrve daily, monthly and y
yearly value
es:
Use the
Up or D
Down – Navig
gate in the screen.
Left orr Right – Obsserve the daily, monthly
and to
otal yearly va
alues of :
• Enerrgy harvest [W
Wh/kWh]
• Peak
k power [Wp]
• Earn
ning [value off the respecttive country]
• Avoi ded CO2 emisssion [kg].
Figurre 6.4: Energy harvest throu
ughout the day
y
6.2.1
1.1. Uppe
er Display Area
A
The left
l
section shows the status of th
he inverter. Refer to Ta
able 6.2 for the three
different status options. It is also a sho
ortcut to the
e Active Ala
arms.
The middle
m
secttion shows the
t operatio
on mode. Re
efer to Table
e 6.3 for the
e eight
different modes options.
r
sectio
on shows the
e serial num
mber of the inverter, wh
hich is also tto be found
The right
on th
he product label.
60
User Manu
ual THEIA HE- t U
UL String Inverte
ers 357116.013, Issue 2.0, April 2013
Up o r Down – Nav
vigate in the screen.
er – Confirm
Ente
Figurre 6.5: Upper display
d
area off the home scrreen
Table 6.2: Inverter status
s
Sign
n
Status
s
LEDS
Normall: inverter ope
erates with no
n warnings o
or alarms
Green
Warning
g: inverter sttill operates, but there is a warning
Green&
&Yellow
Alarm: inverter in sh
hutdown, the
ere is an alarm
m
Red
Info: inv
verter still op
perates, but there
t
is addittional
informa
ation availablle
Green&
&Yellow
Table 6.3: Inverter mode
m
Sign
n
Mode
Off: Inp
put power is not
n sufficientt to start the
e power conttrol
circuitry
y
Sleepin
ng: automatic
c shutdown. Input power is not sufficient
to startt up
LEDs
Yellow
w
Yellow
w
Start-U
Up: initialization of input values
v
and grrid conditionss
Green & Yellow
Running
g: grid feedin
ng
Green
De-ratin
ng: output po
ower is reduc
ced to protec
ct the inverte
er
againstt overheating
g
Green & Yellow
Shuttin
ng Down: inve
erter in shutd
down mode
Yellow
w
Shutdo
own: inverter/
/system failu
ure or unstab
ble operation
nal
conditio
ons
Red
Service
e Mode: inverrter can be manually
m
overrridden
Yellow
w
User Manual
M
THEIA HE
E-t UL String Inve
erters 357116.01
13, Issue 2.0, April 2013
61
6.2.1
1.2. Lowe
er Display Area
A
The lower sectio
on contains a shortcut to
t the Main
n Menu and sshows the c
current date
e
and time.
t
Up or Down – Nav
vigate in the s
screen.
Enterr – Confirm
Figurre 6.6: Lower display
d
area off home screen
6.2.2
2. Statu
us
Statu
us displays the
t operatin
ng mode an
nd status off the inverte
er and the PV plant. All
the values
v
are re
ead-only.
Up o r Down – Nav
vigate throug
gh the
menus
subm
Ente
er – Select a ssubmenu/co
onfirm
Figure 6.7: Submenus
S
of Status
S
6.2.2
2.1. Activ
ve Alarms
Activ
ve Alarms diisplays deta
ailed informa
ation aboutt the currentt operating mode - and
d
statu
us signs app
pearing in th
he upper lefft corner of tthe Home sscreen. Refe
er also to 7.2
2.
Table
e of Events.
62
User Manu
ual THEIA HE- t U
UL String Inverte
ers 357116.013, Issue 2.0, April 2013
6.2.2.2. Inverter Status
Inverter Status displays the operating mode, status and operating parameters of
the inverter.
Inverter Mode
Inverter Error
Input Parameters
Output Parameters
Inverter Peak Power
Energy produced today
Temperature
Isolation Resistance
Operating Hours
Apparent Power (VA)
Extended Status 11
Extended Status 21
The inverter has 8 different modes. Refer to Error! Reference source
not found.
The inverter has 3 different status levels. Refer to Error! Reference
source not found.
Current, voltage and power fed from the PV modules to the inverter
Current, voltage, frequency and power fed from the inverter to the
grid
Highest power achieved throughout the day
Total energy harvest throughout the day
Temperature inside the inverter
Level for a safe insulation between DC - and AC side to prevent
injury or equipment failure. The resistance should be minimum 600
kΩ
Total inverter running time from Start Up
The product of voltage and current from the inverter [VA]
0xZZZZ (hexadecimal code for diagnostics/service)
0xZZZZ (hexadecimal code for diagnostics/service)
1. Extended Status codes are available from GUI revision 1.41 onwards.
6.2.2.3. Plant Status
Plant Status displays the operating mode, status and operating parameters of the
PV plant, if there are other inverters connected, and the inverter has been set as the
master unit.
Plant Mode
Plant Status (Error)
Number of inverters
Number of active inverters
Number of inverter alarms
Number of inverter warnings
Input Current
Input Power
Output Power
Energy produced today
The plant has 8 different modes. Refer to Error! Reference source
not found.
The plant has 3 different status levels. Refer to Error! Reference
source not found.
Total number of inverters in the plant
Number of active inverters in the plant
Event alarms in the plant
Event warnings in the plant
Total current from the PV modules to the inverters
Total power from the PV modules to the inverters
Total feed-in power to the grid from all active inverters
Total energy production throughout the day for the plant
Phase Values
Phase Values displays the inverter’s various feed-in parameters for the different grid
phases.
Output current (L1)
Output voltage (L1)
Output power (L1)
Value of current fed into phase 1
Value of voltage fed into phase 1
Value of power fed into phase 1
User Manual THEIA HE-t UL String Inverters 357116.013, Issue 2.0, April 2013
63
Outp
put current (L2
2)
Outp
put voltage (L2)
Outp
put power (L2))
Value of curre
ent fed into ph
hase 2
Value of volta
age fed into ph
hase 2
Value of powe
er fed into pha
ase 2
Outp
put current (L3
3)
Outp
put voltage (L3
3)
Outp
put power (L3))
Value of curre
ent fed into ph
hase 3
Value of volta
age fed into ph
hase 3
Value of powe
er fed into pha
ase 3
6.2.3
3. Setup
p
Setup displays settings
s
and
d data from the inverte
er, the grid a
and the PV p
plant.
Up or D
Down – Navig
gate through
h the
subme
enus
Enter – Select a su
ubmenu/conffirm
Figure 6.8: Submenus
S
of Setup
S
6.2.3
3.1. General Setup
Gene
eral Setup displays som
me of the general param
meters of th
he inverter, w
which can a
all
be ch
hanged usin
ng the Owne
er password
d.
Lang
guage
Time
e format
Date
e
Time
e
Time
e zone
Pass
sword
CO2 Rate
R
Earnings Rate
Earnings Currency
y
Screen Timeout
Powe
er Saving during night
time
e
64
The preferred
d language mu st be set durin
ng installation
n: English
[default], Germ
man, Spanish, French, Italian
n, etc.
The time form
mat must be se
et during insta
allation: 24 h [d
default], 12 h.
Current date must
m
be set d uring installattion
Current time must
m
be set du
uring installation
Used to define the time zon
ne used for FTP data upload
Owner password must have
e 4 digits. Defa
ault is 0003
Avoided CO2 emissions,
e
bassed on 0.7 kg/ kWh
Feed-in tariff in the respecttive country
Valid currency
y in the respecctive country
ON time for th
he display bac klight
Power saving can either be ON or OFF durring nighttime. Enabling this
option turns the
t GUI off 15 minutes afterr the inverter e
enters OFF
mode, ie. nigh
ht time, to save
e power. Only applicable forr client
inverters
User Manu
ual THEIA HE- t U
UL String Inverte
ers 357116.013, Issue 2.0, April 2013
6.2.3
3.2. Netw
work Setup
p
Netw
work Setup displays
d
the
e settings fo
or the conne
ected netw
work, which c
can all be
changed with th
he Owner pa
assword. Reffer to 6.3 C
Connection b
between Inv
verter and
PC.
NOTICE
All IP addresses re
elated to the
e inverter a nd web musst be config
gured within
n
the ran
nge that is allowed
a
by the
t local nettwork.
Netw
work IP-Address
[Stattic/DHCP]
Netw
work Subnet Mask
M
Netw
work Gateway
y
DNS server IP
Bus ID
I (RS-485)
RS48
85 bitrate
RS48
85 parity
Bus ID
I (CAN)
Set as
a Master unitt
Unique netwo
ork address forr the inverter
Indicates whe
ether the IP ad dress is static
c or dynamicallly assigned
Determines what
w
subnet th
he IP-address b
belongs to
Network pointt acting as enttrance to anotther network
The DNS IP ad
ddress
The inverter’s
s identification
n number on th
he RS-485 bus
Measurementt of data transsmitted in a giv
ven amount off time [bps]
Error detectin
ng code: A bit tthat ensures a
an odd or even
n number of
bits in a set off bits with valu
ue one. Selecttion: None, Od
dd, or Even
The inverter’s
s identification
n number on th
he CAN bus
Several invertters connected
d together in a power control and
monitoring sy
ystem, must ha
ave one maste
er inverter and
d the rest
must be client inverters.
6.2.3
3.3. Inverter Setup
Inverrter Setup displays the various datta for the sp
pecific inverrter set during the
manu
ufacturer prrocess, and is read-only
y.
Mode
el
Seria
al Number
Inverrter Part No.
Inverrter Revision
GUI Software
S
Partt No.
GUI Software
S
Reviision
GUI Hardware
H
Partt No.
GUI Hardware
H
Rev
vision
SW1 Part No.
SW1 Revision
SW1 CS
SW1 BL Part No.
SW1 BL Revision
SW1 BL CS
Conttrol Board Partt No.
Conttrol Board Rev
vision
Main
n Board Part No.
Main
n Board Hardw
ware
Re
evision
SW2 Part No.
Inverter mode
el
Unique identiffier for each in
nverter. Also to
o be found on the product
label
Identifier for each
e
inverter h
hardware conffiguration with
hin Eltek
Unique version name for ke
eeping track off the developm
ment of
within Eltek
different inverter revision w
The GUI1 softw
ware part num
mber.
Revision numb
ber for the GU
UI software
Identifier for the
t GUI-card h ardware
Revision numb
ber for the GU
UI hardware
The DSP12 sofftware part nu
umber.
Revision numb
ber for the DS P1 software
The DSP1 softtware checksu
um
The DSP1 boo
otloader softw
ware part numb
ber
Bootloader re
evision numberr for the DSP1 software
The DSP1 boo
otloader softw
ware checksum
m
DSP-card hard
dware part num
mber
Version name
e for the DSP ccontrol card ha
ardware
Identifier for the
t PCB3 hardw
ware.
Unique revisio
on number for keeping track
k of the develo
opment of
different main
n board revisio
ons
The DSP2 softtware part num
mber
User Manual
M
THEIA HE
E-t UL String Inve
erters 357116.01
13, Issue 2.0, April 2013
65
5
Revision number for the DSP2 software
The DSP2 software checksum
The DSP2 bootloader software part number
Bootloader revision number for the DSP2 software
The DSP2 bootloader software checksum
SW2 Revision
SW2 CS
SW2 BL Part No.
SW2 BL Revision
SW2 BL CS
1. GUI = Graphical User Interface, which allows interaction with the inverter through the display.
2. DSP = Digital Signal Processing, which is a microprocessor controlling the power conversion in the inverter.
3. PCB = Printed Circuit Board, which hosts all the components and subsystems of the inverter.
6.2.3.4. Plant Setup
Plant Setup displays useful information about the PV plant, which can be changed
using the Owner password.
Company/Customer Name
Site
Installation Date
Service Date
Responsible
Unit Name
Message
Plant Apparent Power
The customer / owner name
The site name
May be used for setting the install date
May be used for setting the most recent service date
Field for keeping a note of the company/person responsible for
service
This text string is displayed in the master unit’s list of connected
inverters
An extra message field for additional notes
The product of voltage and current from the entire PV plant [kVA]
6.2.3.5. Grid Setup
The Grid Setup displays the grid settings based on the selected country. The
settings can be changed within 5 hours after the installation using the Owner
password. Thereafter it is only accessible by using the Installer password, which will
only be available to the installer by contacting Eltek.
Field Adjustable Trip Limits
The system installer may change the grid settings according to electrical
regulations. The Installer password is needed to change these settings.
1. Voltage
208 VAC Delta: No Neutral, 120 WYE, Corner Grounded
Table 6.4: Adjustable voltage trip limits for 208 VAC
Trip Limits
Low limit
Low and fast limit
High limit
High and fast limit
66
Trip Voltage
Min
180.0 VAC
104.0 VAC
208.0 VAC
208.0 VAC
Trip Time
Max
208.0 VAC
208.0 VAC
249.6 VAC
249.6 VAC
Min
50 ms
50 ms
50 ms
50 ms
Max
1.95 s
120 ms
950 ms
120 ms
User Manual THEIA HE- t UL String Inverters 357116.013, Issue 2.0, April 2013
240 VAC Delta: No Neutral, 120 Split-phase, 120 Stinger, Corner Grounded
Table 6.5: Adjustable voltage trip limits for 240 VAC
Trip Limits
Low limit
Low and fast limit
High limit
High and fast limit
Trip Voltage
Min
180.0 VAC
120.0 VAC
240.0 VAC
240.0 VAC
Trip Time
Max
240.0 VAC
240.0 VAC
270.0 VAC
288.0 VAC
Min
50 ms
50 ms
50 ms
50 ms
Max
1.95 s
120 ms
950 ms
120 ms
2. Frequency
Table 6.6: Adjustable frequency trip limits
Trip Limits
Low limit
High limit
Trip Frequency
Min
55.00 Hz
60.00 Hz
Max
60.00 Hz
63.00 Hz
Trip Time
Min
50 ms
50 ms
Max
80 ms
80 ms
General Grid Setup
General Grid Setup displays grid parameters related to the selected grid.
Grid code
Description
Grid nom voltage
Grid nom frequency
Grid configuration
Feeding phase
Voltage limit min
Voltage limit max
Voltage time limits min
Voltage time limits max
Frequency limits min
Frequency limits max
Frequency time limits min
Frequency time limits max
Grid code of installation
Name of the grid protection standard
Nominal voltage of the grid on site
Nominal frequency of the grid on site
Grid configuration of the site: e.g. Delta Split-phase, Stinger etc
The phase the inverter is connected to:
Lower disconnection limit of the grid voltage on site
Upper disconnection limit of the grid voltage on site
Minimum disconnection time limit
Maximum disconnection time limit
Lower disconnection limit of the grid frequency on site
Upper disconnection limit of the grid frequency on site
Minimum disconnection time limit
Maximum disconnection time limit
6.2.3.6. Changing the Grid Code
• From the Main Menu: Setup > General Grid Setup > Grid Code.
• Enter – Confirm.
• After 5 hours of feeding in power to the grid after installation the Installer
password must be used to change the grid code settings. The Installer password is
obtained for system installers and grid operators only by contacting Eltek.
• The question “Change grid settings?” appears in the display.
User Manual THEIA HE-t UL String Inverters 357116.013, Issue 2.0, April 2013
67
OK – Continue
Canc
cel – The ope
eration is can
ncelled
Up orr Down – Sele
ect the respe
ective grid
code
Enterr – Confirm
ettings are changed,
c
the screen wiill return to the Grid Setup screen,
Afterr the grid se
show
wing the new
wly configurred grid setttings.
6.2.4
4. Comm
mands
Comm
mands give the ability to
t delete sttored data in
n the invertter logger us
sing the
Owne
er password
d.
Up or D
Down – Navig
gate through
h the list
Enter – Select a su
ubmenu/conffirm
Figure
F
6.9: Sub
bmenus to Com
mmands
68
User Manu
ual THEIA HE- t U
UL String Inverte
ers 357116.013, Issue 2.0, April 2013
6.2.4
4.1. Inverter Comm
mands
Inverrter Comma
ands gives the ability to delete e
events saved in the in
nverter datta
logge
er to provide
e storage sp
pace.
Delete Energy Log
g
Delete Data Log
Rese
et Web Admin Account
Uplo
oad service dia
agnostics
Deletes the energy log item
ms and summa
arized values o
of the inverter
Deletes the 15 minutes ave
erage power va
alues of the in
nverter
Resets the we
eb administrattor account ba
ack to default. User is set to
o
admin and Pa
assword to adm
min
Generates service FTP dum
mp of logs data
a-, energy-, and
d events, and
upload it to an
n FTP server fo
or service purp
poses.
6.2.4
4.2. Plant
t Command
ds
Plantt Command
ds gives the
e ability to delete
d
even
nts saved in
n the data logger of th
he
mastter inverter to provide storage
s
spa
ace.
Delete Energy Log
g
Delete Data Log
Rese
et Number of Inverters
Rebu
uild plant enerrgy log
Deletes the energy log item
ms and summa
arized values o
of the plant
Deletes the 15 minutes ave
erage power va
alues of the plant
Update if inve
erters are adde
ed or removed
d from the plan
nt
Rebuilds the plant
p
energy lo
og based on th
he energy logs
s of the
inverters currently connectted and runnin
ng in the system. This
process may take
t
several m
minutes.
6.2.5
5. Alarm
m Setup
Alarm
m Setup ena
ables config
guration of an
a email acc
count, so th
he inverter c
can send
inform
mation abou
ut energy production, status
s
and o
operation m
mode to one or more
receivers. Chang
ges require use
u of the Owner
O
passw
word.
Up or D
Down – Navig
gate through
h the list
Enter – Select a su
ubmenu/conffirm
Fig
gure 6.10: Sub
bmenus to Alarrm Setup
6.2.5
5.1. Notiffication Se
etup
In No
otification Se
etup parameters neede
ed for the in
nverter to send notifica
ations aboutt
mode
e and status
s on e-mail must
m
be typ
ped in.
User Manual
M
THEIA HE
E-t UL String Inve
erters 357116.01
13, Issue 2.0, April 2013
69
SMTP Server
SMTP port
Userr Name
Pass
sword
Send
der email addrress
Rece
eiver email 1
Rece
eiver email 2
The IP address of the SMTP
P server for ena
abling delivery
y of emails.
Can only be an IP address (i e. numeric).
Sets the SMTP port numberr for SMTP serrver. Default is
s 25 (initially
shown as 0)
User name for the mail serv
ver
Digits, letters and symbols making up the
e user passwo
ord for the mail
server.
A valid email address,
a
eg: xx
[email protected]
xxx, required tto be able to
send notificattions
Mail address for
f recipient 1
Mail address for
f recipient 2
E – Mail
M Set-up
To en
nable the inverter to se
end e-mail notificationss an SMTP se
erver is required, which
h
trans
sfers the ma
ails to the re
eceiver(s). Most
M
compa
anies have ttheir own se
erver, while
norm
mal households most lik
kely have to use their in
nternet serv
vice provide
er (ISP) mail
serve
er.
NOTICE
If an inv
verter is mo
oved, or con
nnected, to another nettwork not o
operated by
the sam
me ISP, a ne
ew SMTP server must b
be assigned.
edure
Proce
Go to
o the inverte
er menu Ala
arm Setup>Notification
n Setup. Co
omplete the text fields
(Refe
er to section
n 6.2.5.1. No
otification Setup).
S
• Use
er Name and
d password
d: Usually prrovided by tthe ISP provider.
• Sen
nder email address:
a
This is the e-m
mail addresss appearing in the From
m field when
receiving emails from the inverter. It must be con
ame@domaiin
nfigured as follows: na
• Rec
ceiver 1 and
d 2: The recipients’ e-m
mail addresse
es.
• SMTP server: The
T SMTP server addre
ess.
NOTICE
• All IP addresses related to the
t inverter and web m
must be conffigured
within the range
e that is allowed by the local netwo
ork
• For GUI
G revisions
s below v1.3
32, the serv er address must be configured
with numbers.
DNS IP
• For GUI
G revisions
s v1.32 onwards: if usin
ng a domain name, the D
addre
ess needs to be specified under Se
etup > Netw
work Setup.
• Be aw
ware that th
he ISP provid
der can cha
ange the SM
MTP IP addre
ess without
any notification.
n
If the e-mail reports su
uddenly sto
ops, do an ns
slookup to
see iff the IP addrress has been changed
d!
70
User Manu
ual THEIA HE- t U
UL String Inverte
ers 357116.013, Issue 2.0, April 2013
6.2.5
5.2. Inverter Alarms
In Inv
verter Alarm
ms the settin
ngs for notiffication typ es and time
e intervals o
of the
inverrter emails to
t the receiv
ver(s) must be defined..
Send
d production on
o email 1
Send
d mode on ema
ail 1
Send
d alarm on ema
ail 1
Send
d production on
o email 2
Send
d mode on ema
ail 2
Send
d alarm on ema
ail 2
Interrval
Notiffication time
Specified time
e for sending i nformation ab
bout energy prroduction to
email 1
Immediately sends
s
notificattion to e-mail 1 if operation mode
changes
Immediately sends
s
notifica
ation to e-mail 1 if warning o
or alarm
Specified time
e for sending i nformation ab
bout energy prroduction to
email 2
Immediately sends
s
notificattion to e-mail 2 if operation mode
changes
Immediately sends
s
notificattion to e-mail 2 if warning orr alarm
Interval betwe
een the notificcations: None, Hourly, or Daiily
Time for daily interval for e--mailing inform
mation about tthe energy
production. Used if interval is set to Daily
y
6.2.5
5.3. Porta
al Setup
Porta
al Setup displays settin
ngs for uploa
ading data tto a web po
ortal. Fifteen
n-minute
avera
aged energy
y data is uploaded everry hour to th
he portal. The upload is
s disabled iff
the user
u
name is
s left blank. The portal setup is com
mpatible with Meteoco
ontrol Setup
p.
FTP Server
S
IP
FTP Port
Userr Name
Pass
sword
FTP server IP address.
Sets the FTP port
p
number ffor FTP server. Default is 21
FTP server user name
FTP server password
Note
e: Only an inv
verter confiigured as a Master will upload FTP data. For th
hird-party
FTP services,
s
an additional cost
c
may be
e applied
6.2.6
6. Event
t Log
Even
nt Log displa
ays informattion about the
t inverter’’s logged ev
vents. The e
events are
listed
d with the most
m
recent event first..
Up o
or Down – Read the different values
Leftt – Go back to
o the previou
us screen
Righ
ht – Go to nex
xt screen
Figure 6.11:: Events in the
e log
User Manual
M
THEIA HE
E-t UL String Inve
erters 357116.01
13, Issue 2.0, April 2013
71
Warn
ning On mea
ans that a warning
w
even
nt has occu
urred.
Warn
ning Off mea
ans that an event has cleared.
c
6.2.7
7. Statis
stics
Statiistics displays values fo
or the daily, monthly, ye
early and to
otal energy harvest,
earniings, CO2 savings and peak
p
power. The inform
mation is read-only.
Up or D
Down – Read
d the differen
nt values
Enter – Select a su
ubmenu/conffirm
Figure
F
6.12: Su
ubmenus to Sttatistics
6.2.7
7.1. Inverter
Inverrter displays
s a summary
y of the mos
st importan
nt statistics of the inverter from
today
y, this montth, this yearr and in tota
al since Starrt Up.
Enerrgy
Earnings
CO2 avoided
a
Peak
k Power
Inverter’s tota
al energy prod
duction [kWh]
Cash value off the feed-in en
nergy in curren
ncy/kWh
Avoided CO2 emissions
e
[kg//kWh] compare
ed to fossil fuel
Inverter’s larg
gest instantan eous amount of power prod
duction [W]
6.2.7
7.2. Plant
t
Plantt displays a summary of the most important
i
sstatistics off the PV plan
nt from
today
y, this montth, this yearr and in tota
al since Starrt Up.
Enerrgy
Earnings
CO2 avoided
a
Peak
k Power
72
Plant’s total energy
e
producttion [kWh]
Cash value off the feed-in en
nergy in curren
ncy/kWh.
Avoided CO2 emissions
e
[kg//kWh] compare
ed to fossil fuel
Plant’s largest instantaneou
us amount of power produc
ction [W]
User Manu
ual THEIA HE- t U
UL String Inverte
ers 357116.013, Issue 2.0, April 2013
6.3. Connec
C
ction betwee
b
en Inverrter an
nd PC
Site performanc
p
ce can be mo
onitored rem
motely by u sing a comp
puter. The c
connection
betw
ween the inv
verter and th
he compute
er can be co
onfigured dirrectly or via
a a network..
6.3.1
1. Witho
out a Nettwork
To co
onnect the inverter
i
dire
ectly to a co
omputer a sstandard Eth
hernet cable
e is required
d.
In cas
ses where the
t network
k card in the
e computer does not su
upport Auto
osense, a
cross
sover cable is needed.
1. Client inverter
2. Mas
ster inverter
3. CAN
N bus cable
4. Ethe
ernet cable
5. RS-4
485 cable
6. Com
mputer
7. Data
a logger
Figu
ure 6.13: Conn
nection withou
ut network
NOTICE
With se
everal inverters connec
cted togeth
her via CAN bus, the Eth
hernet
cable should
s
be atttached to the
t master inverter onlly.
6.3.1
1.1. IP Add
dress
The computer
c
an
nd the inverrter IP addre
ess must be
e in the sam
me range. If tthe inverterr
IP address is 192
2.168.10.X, the computter IP addre
ess must be 192.168.10
0.Y, where X
and Y are differe
ent numbers
s between 1 and 254.
Inverrter
The inverter deffault IP address is 192.1
168.10.20. T
To change tthe IP addre
ess, navigate
e
to: Se
etup>Netw
work Setup and
a set the inverter IP a
address as required.
To sttart the web
b connection to the inverter, open a web brow
wser and typ
pe the
inverrter IP addre
ess into the web browser address line.
Computer
The example
e
below shows the
t steps to
o be followe
ed on a Wind
dows® 7* co
omputer to
manu
ually change
e the compu
uter’s IP add
dress. This p
procedure m
may vary on
n computers
s
with other opera
ating system
ms (OS):
User Manual
M
THEIA HE
E-t UL String Inve
erters 357116.01
13, Issue 2.0, April 2013
73
3
1. Op
pen the netw
work menu by clicking Start
S
2. Click Control Panel > Nettwork and Sharing
S
Cen
nter
erties
3. Click Local Arrea Connecttion > Prope
elect Interne
et Protocol Version 4 (TCP/IPv4)
(
es
4. Se
> Propertie
5. Se
elect Use th
he following
g IP address.
Entter the defa
ault parame
eters: IP address 192.16
68.10.10, ssubnet mask
k
255
5.255.255.0
0.
Clic
ck OK and OK
O
*Windo
ows is either a registered trademark or a trademark
t
of M
Microsoft Corp
poration in the
e United State
es
and otther countries
s.
6.3.2
2. With a Networrk
If a LA
AN or WAN network is available, th
he inverter c
can be hard
d wired by a CAT 5
netw
work cable to
o any RJ45 port,
p
where
e the DHCP ((Dynamic Ho
ost Configu
uration
Proto
ocol) server will automa
atically assign a dynam
mic IP addresss to the co
omputer and
d
the in
nverter.
1. Clie
ent inverter
2. Mas
ster inverter
3. CAN
N bus cable
4. Eth
hernet cable
5. Rou
uter/Switch
6. World Wide Web
b
mputer
7. Com
8. RS--485 cable
9. Datta logger
Figure 6.14: Connection with
w network an
nd World Wide
e Web
onnect the inverter
i
to a LAN or WA
AN network,, use a stan
ndard CAT5 or better
To co
cable
e to any of the
t LAN RJ4
45 ports on the
t router.
6.3.2
2.1. With DHCP – Dy
ynamic IP Address
A
Inverrter
1. Go
o to Setup>N
Network Se
etup.
2. Se
et the IP add
dress to 000
0.000.000.0
000. With th
his setting tthe router assigns a
dynamic (DHCP) IP addres
ss automatically to the
e inverter.
3. Pre
ess OK. The
e GUI will res
start to configure the n
new network settings.
74
User Manu
ual THEIA HE- t U
UL String Inverte
ers 357116.013, Issue 2.0, April 2013
6.3.2
2.2. Witho
out DHCP – Static IP
P Address
Inverrter
1. Go
o to Setup>N
Network Se
etup.
2. Se
et the IP add
dress to a de
esired, unique address for the inve
erter (Static
c). The
inv
verter’s IP ad
ddress mustt be an unused IP addre
ess in the network and
d in the same
ran
nge as the computer’s
c
IP address.
3. Pre
ess OK. The
e GUI will res
start to configure the n
new network settings.
6.3.3
3. Acces
ss from the
t Internet
In ord
der to make
e the inverte
er(s) access
sible from th
he internet, further parameters
mustt be set with
hin the netw
work setting
gs.
he inverter must
m
be ass
signed a static IP addresss in the loc
cal network
k. Refer to
1. Th
the
e previous section.
s
2. Po
ort Forwarding must be set up with
hin the locall network ro
outer. Port n
number 80 o
of
the
e router is fo
or Web trafffic (HTTP), and
a must be
e forwarded
d to the inve
erter’s static
c
IP address.
a
The external IP address of
o the route r can be fou
und at
htttp://www.w
whatismyip.com or similar web serv
vices, or by asking the relevant
Intternet Servic
ce Provider (ISP).
NOTICE
If the external
e
nettwork is assigned a dyn
namic IP add
dress from tthe ISP, this
IP addrress is unlike
ely to remaiin constant over a long
g time period
d. It is
possible for the inverter owne
er to set up
p an accountt with a com
mpany that
provide
es dynamic DNS service
es for comm
mercial and private users, which
allows the user to have a hos
stname (suc
ch as:
yourna
ame.serviceprovider.org
g) that pointts to a computer with a
an IP
addres
ss that regularly change
es.
In orde
er to have th
he dynamic DNS service
e operating correctly, tthe owner’s
router must be capable of rep
porting its IP
P address to
o the dynam
mic DNS
service
e provider. This
T
will mos
st likely be p
present in tthe router se
ettings
section
n which asks for the de
etails of the user accou
unt with the dynamic
DNS se
ervice provid
der.
If the owner’s
o
routter does nott report its IIP address tto the dynam
mic DNS
service
e and has a dynamic ex
xternal IP ad
ddress, then
n periodically
y a manual
update
e of the dynamic DNS settings will be required
d.
3. Wh
hen this is completed
c
itt should be possible to reach the T
THEIA HE-t U
UL
we
ebserver by typing the external IP address
a
of tthe local ne
etwork or th
he web
address (if a dynamic
d
DNS
S service is used) in the
e computer’’s web brow
wser.
User Manual
M
THEIA HE
E-t UL String Inve
erters 357116.01
13, Issue 2.0, April 2013
75
5
6.4. Interna
I
al Webs
server
The inverter has
s an internall, onboard webserver
w
p
providing dettailed inform
mation
abou
ut the operation, warnin
ng/alarms and energy p
production o
of the inverrter/plant.
• The
e webpage is
i best view
wed in Firefo
ox 6.0 or Inte
ernet Explorrer 8.0 and later
verrsions.
• From the intern
nal webserv
ver some inv
verter setti ngs can be changed via
a username
e
and
d password..
• Typ
pe the inverter’s IP addrress in the computer’s
c
web browser.
• Deffault administrator account is: Use
er: admin, Pa
assword: ad
dmin.
This
s can be changed by th
he user, and
d should be c
changed if tthe web serrver is
con
nnected to the
t internett.
6.4.1
1. Home
e
The Home
H
scree
en is the standard displa
ay, which iss always sho
own when o
opening the
web server.
Figure
F
6.15: Sttandard displa
ay
• Sys
stem status
s shows the
e status and
d operating mode of the
e inverter or the PV
plant. Current power production and input valuess on DC and
d AC side are
e listed to
the
e right.
• PV plant: More
e detailed in
nformation for
f specific inverters in a plant can
n be found in
n
the
e drop-down
n menu unde
er Plant to the
t right.
• Pro
oduction sta
atus shows the energy yield for th
he current day, month a
and year.
• More detailed values
v
from
m the produc
ction data c
can be viewe
ed by hoverring the
mouse cursor over
o
the gra
aphs.
76
User Manu
ual THEIA HE- t U
UL String Inverte
ers 357116.013, Issue 2.0, April 2013
6.4.2
2. Statis
stics
Statiistics gives a graphical overview ov
ver the ene rgy producttion from th
he current
week
k and the las
st 12 month
hs.
Figure 6.16
6: Statistics
• PV plant: More
e detailed in
nformation for
f specific inverters in a plant can
n be found in
n
e drop-down
n menu unde
er Plant to the
t right.
the
• More detailed values
v
from
m the produc
ction data c
can be viewe
ed by placin
ng the
mouse cursor over
o
the gra
aphs.
For GUI
G revision 1.32 and ab
bove:
• The
e energy log
g may be do
ownloaded by
b clicking o
on the ‘down
n’ arrow (willl be
disp
played if available).
• The
e energy datta download
ded is deterrmined by th
he unit sele
ected in the dropdown
box
x. This functtionality ma
ay not work on certain m
mobile devic
ces.
The data
d
may be
e imported into a sprea
adsheet prog
gram, with tthe data forrmat as
follow
ws:
<dp time=”YYYY
t
Y-MM-DD HH
H:MM:SS”>
<en>
>WWWW</e
en>
<pw>
>wwww</p
pw>
<va>€€€€</va>
>
</dp
p>
D
– the
t date and time stam
mp of the en
ntry
dp: Datapoint
en: Energy for th
he interval in
n Wh (watt--hours)
P
power for the inte
erval in wattts
pw: Peak
User Manual
M
THEIA HE
E-t UL String Inve
erters 357116.01
13, Issue 2.0, April 2013
77
va: Earnings/sav
vings for the
e interval with
w two dec
cimal points,, in the chos
sen
currency,
c
eg
g. ‘7778’ is 77.78
7
Euros
6.4.3
3. Setup
p
Setup shows the
e different settings
s
and
d informatio
on of every inverter in tthe PV plantt.
Figure 6.17: Setup
• Plant Informattion shows important characterist
c
tics of every
y inverter in the PV
plant. Model, serial numbe
er, revision and
a part no.. information are all rea
ad-only.
• Gen
neral Settin
ngs shows date
d
and tim
me, CO2 - ratting and rate
e and curren
ncy of the
earrning. All setttings can be
b modified.
• Ala
arm Setup shows inform
mation relatted to notifi cations and
d alarms from the
inve
erter/plant..
No
otification Setup:
S
Ala
arm Setup:
Po
ortal Setup:
78
me and IP ad dress/hostt name of th
he SMTP
Type usernam
a
of tthe inverterr and mail address of
serrver, the IP address
the
e receiver(s).
Type time for sending em
mail messages (0 – 23 h
h) and the
intterval of the
e messages (1440 min = 1 day).
The inverter may
m upload e
energy data
a to an FTP--server.
Specify the se
erver addresss (either IP
P address or DNS) in the
e
FTP
P Server IP field,
f
and op
ptionally a u
username an
nd passworrd
if needed.
n
The
e data will b e uploaded every hour.
No
ote: only an inverter con
nfigured as a master w
will upload
FTP
P data. For third-party
t
FFTP service
es, an additio
onal cost
ma
ay be applied.
User Manu
ual THEIA HE- t U
UL String Inverte
ers 357116.013, Issue 2.0, April 2013
• Nettwork show
ws the param
meters relatted to the ssending and receiving o
of email
messages. Typ
pe the IP add
dress (configured with numbers lik
ke 192.168
8.10.20),
et mask and
d gateway. Refer
R
to 6.3
3.1.1. IP Add
dress.
nettwork subne
• Use
er Account shows the current
c
user accounts and provide
es the ability
y to setup
and
d/or change
e user name
es and passw
words. The different levels are:
1.
1 Guest:
2.
2 Owner:
3.
3 Admin:
Access leve
el 1: Read only access tto all valuess.
Access leve
el 2: Read and write ac cess to all v
values and s
set levels
except the installer related valuess such as ne
etwork setttings and
user accounts.
Access leve
el 3: Read and write ac cess to all llevels and s
set values.
6.4.4
4. Event
t Log
Even
nt Log shows
s informatio
on about events that th
he inverter has logged.. The events
s
are listed with th
he most rec
cent event first.
f
Figure 6.18
8: Event Log
• Rec
cent events
s can be view
wed by naviigating direc
ctly to the d
different pa
ages in the
list on the botttom of the screen.
s
• Eve
ents from prrevious mon
nths and years can be v
viewed by sspecific date
es using the
e
cale
endar to the
e left.
For GUI
G revision 1.32 and ab
bove:
• The
e most recent events in
n the event log may be
e downloade
ed as a text file by
clic
cking the “do
own”-arrow (will be disp
played if ava
ailable).
• The
e latest events from th
he clients ma
ay be displa
ayed and do
ownloaded. T
This is only
ava
ailable if the
e clients also
o have the same
s
or new
wer GUI reviision as the master unitt.
User Manual
M
THEIA HE
E-t UL String Inve
erters 357116.01
13, Issue 2.0, April 2013
79
6.4.5
5. Statu
us
Statu
us displays any warning
gs and alarm
ms in the pla
ant, and giv
ves an overv
view of the
plantt’s technical characteris
stics and en
nergy yield.
Figure 6.1
19: Status
• Ala
arms tab ide
entifies any specific warning or ala rm in the plant, with an
ny activated
d
item
ms highlightted.
The
e Extended Status lines
s are used by
b Eltek serv
vice person
nnel to help diagnose
pos
ssible faults
s.
• Ove
erview prov
vides input parameters
p
from the PV
V panels to the inverte
er/plant, the
e
outtput parame
eters from the
t inverter/
/plant to th
he grid, as w
well as earnings, avoided
CO2 emission and
a total energy produc
ction with p
peak values from the
inve
erter/plant..
• Plant (available in a unit configured as
a a master when selec
cting ‘Plant’ in the drop
wn list) prov
vides a snap
pshot of the
e connected
d inverters, sstatus and e
energy
dow
pro
oduction info
ormation. To
o refresh th
he informatio
on, click the
e ‘Plant’ tab.
80
User Manu
ual THEIA HE- t U
UL String Inverte
ers 357116.013, Issue 2.0, April 2013
7. TROU
T
BLES
SHOOT
TING
This chapter
c
con
ntains usefu
ul informatio
on if the inv
verter malfu
unctions durring
opera
ation. Start by checking
g the installlation is carrried out corrrectly, and the display
y
inform
mation, and
d then check
k the inform
mation in 7.2
2. Table of E
Events for possible
soluttions. If this does not he
elp solve the problem, please conttact the sys
stem
insta
aller.
7.1. Check
C
List by
y Failurre
If the
e inverter do
oes not feed
d power to the
t grid, try
y to solve th
he problem b
by checking
g:
;
;
;
;
Th
hat both the
e AC and DC
C disconnec
ct circuit bre
eaker(s)/dissconnect(s) are ON.
Th
hat the irrad
diation is su
ufficient to generate
g
po
ower (>7 W).
Th
hat the ope
eration mode
e of the LED
Ds is normall (Refer to 5
5.1.2.2. LEDs
s).
Th
hat there arre no warnin
ngs or alarm
ms in the dissplay (Refer to 7.2. Tablle of
Events).
; Th
hat all conn
nection points in the sys
stem are prroperly tighttened.
; Th
hat the valu
ues of the PV
P voltage, current
c
and power mattch those in the display
y.
If all these
t
items
s are OK, and there is sttill no powe
er fed to the
e grid, conta
act your
distriibutor.
7.2. Table
T
of
o Even
nts
The inverter auttomatically identifies
i
op
perational isssues and d
displays the messages
on th
he screen. Detailed
D
info
ormation abo
out warning
gs and alarm
ms can be fo
ound in the
Even
nt Log menu. Refer to 6.4.4. Event Log.
L
sages that can
c appear in the displlay:
Mess
W = Warning:
W
inv
verter contin
nues to ope
erate at high
hest possiblle capacity (Yellow LED
D)
A = Alarm
A
(Red LED)
L
The Display
D
Mes
ssage code number (E0
01, E02, etc
c..) is the co
ode shown in the eventt
description as displayed
d
in the Event Log
L of the w
webserver v
view:
User Manual
M
THEIA HE
E-t UL String Inve
erters 357116.01
13, Issue 2.0, April 2013
81
Table 7.1: Description of messages appearing in the display during inverter failure
Display Message
Description
Action
Panel fault (W/A – E01)
PV module failure
- Contact the supplier*
Illegal grid setting
Grid settings check sum
error.
- Verify if the AC circuit breaker is
ON and operational
- Measure that the grid voltage is
>184Vac at the AC terminals
- Check that the DC switch is ON
and that the DC power is >7W
- Check that the grid settings
have been successfully set in
Setup>Grid Setup
No detection of the grid,
or grid setting never
stored
- Check that the grid settings
have been successfully set in
Setup->Grid setup
- Check the AC breaker is ON and
that the grid voltage is >184Vac
present at the AC terminals
- Check that the DC switch is ON
and that the DC power is >7W
- Restart Inverter (DC and AC) and
retry
For Italy int SPI self test:
Self test has failed
- Verify if the installation
procedure was executed. The
grid code should be set to Italy
int SPI
- Verify if the inverter is feeding
power to the grid (sufficient
irradiation)
- Restart the test later
Grid fault (I/A – E05)
No detection of the grid,
not able to synchronize
with the grid or fault
when setting the gridsettings
- Verify if the AC circuit breaker is
on and operational
- Measure that the grid voltage is
present at the AC terminals
- Check that the DC switch is on
and that the DC power is > 7W
- Check that the country settings
have been successfully set in
Setup>Grid Setup
- Turn the AC ‘off’ and then ‘on’
High DC voltage
(I/A – E07)
DC voltage threshold of
600 VDC is exceeded
- Fault is cleared automatically
when PV voltage reduces below
600V
- If the inverter remains in this
fault, contact the supplier
(W/A – E02)
Uninitialized grid setting
(W – E03)
Self test failure
(W/A – E04)
82
User Manual THEIA HE- t UL String Inverters 357116.013, Issue 2.0, April 2013
Low DC voltage (I/A – E08)
DC voltage is too low to
operate the inverter
- Fault is cleared automatically
when PV voltage exceeds 230V
- If the inverter remains in this
fault during daylight, contact
the supplier
Low PV isolation
resistance (I – E09
PV isolation resistance is
below the permitted
level
- Check the complete installation
(PV panels, frames, cables, etc.)
for areas of low resistance to
Earth
- The grounding setup is
configured incorrectly
- Check the jumper for the
grounding setup (refer to
4.3.4.7 Jumper Position for
System Grounding Setup)
Inverter DC side failure
(W/A – E10)
Inverter failure on the DC
side
- Failure on the DC side. Other
W/A are also shown
- If the inverter is in Shutdown,
turn off the AC side and then
the DC side. Wait for 30
seconds, then turn on the AC
side and then the DC side
- If the fault persists, contact the
supplier. Also record the
extended status values (see
6.2.2.2 Inverter Status)
Inverter AC side
(W/A – E11)
Inverter failure on the AC
side
- Failure on the AC side. Other
W/A are also shown
- If the inverter is in Shutdown,
turn off the AC side and then
the DC side. Wait for 30
seconds, then turn on the AC
side and then the DC side
- If the fault persists, contact the
supplier. Also record the
extended status values (see
6.2.2.2 Inverter Status)
High inverter temperature
(W/A – E12)
Maximum permissible
internal inverter
temperature is
exceeded
- Check that the ambient
temperature is within the
specification (Refer to 10
Technical Data)
- Check if the ventilation is
sufficient, the minimum
distances for cooling are
followed and the inverter is
shielded from direct sunlight
- Clean ventilation (Refer to 8.2.8
Ventilation)
User Manual THEIA HE-t UL String Inverters 357116.013, Issue 2.0, April 2013
83
Current / power limitation
(I – E14)
PV power exceeds
inverter rating
- Input PV power exceeds the
normal input levels of the
inverter. The inverter will
deliver maximum power.
- If in shutdown, the inverter will
try to start up again when the
temperature is within the
permissible range again
- Check if the ventilation is
sufficient, the minimum
distances for cooling are
followed and the inverter is
shielded from direct sunlight
- Clean ventilation (Refer to 8.2.8
Ventilation)
Communication failure (A –
E15)
Internal communication
failure
- If the inverter is in Shutdown,
turn off the AC side and then
the DC side. Wait for 30
seconds, then turn on the AC
side and then the DC side
- If the fault persists, contact the
supplier
Fan failure (W/A – E16)
Internal air distribution is
missing
- Contact the supplier for a
replacement fan
Fuse fault (A – E17)
The grounding jumper is
in the wrong place, or
one or more DC fuses are
blown
- The grounding setup is
configured incorrectly
- Check the jumper for the
grounding setup (refer to
4.3.4.7 Jumper Position for
System Grounding Setup)
- If the jumper is correctly
positioned, contact the supplier
- Contact the distributor for
replacement fuses
Active power limitation
(I – E18)
The inverter is in Active
power limitation mode.
- No action needed
Reactive power
compensation (I – E19)
The inverter is in
Reactive power
compensation mode.
- No action needed
84
User Manual THEIA HE- t UL String Inverters 357116.013, Issue 2.0, April 2013
Microprocessor fault
(W/A – E20)
Grid code not correctly
set, or, internal
processor fault
- Check the AC breaker is ON and
that the grid voltage is >184Vac
present at the AC terminals
- Check that the DC switch is ON
and that the DC power is >7W
- Check that the grid settings
have been successfully set in
Setup>Grid Setup
- If the inverter is in Shutdown,
turn off the AC side and then
the DC side. Wait for 30
seconds, then turn on the AC
side and then the DC side
- If the fault persists, contact the
supplier
Grid: High AC voltage
Too high AC voltage, the
inverter stops feeding
power
- The inverter will restart when
the voltage is within the
permissible range
- Check that the grid settings
have been successfully set in
Setup > Grid Setup
- If the failure persists, contact
the supplier
Too low AC voltage, the
inverter stops feeding
power
- The inverter will restart when
the voltage is within the
permissible range
- Check that the grid settings
have been successfully set in
Setup > Grid Setup
- If the failure persists, contact
the supplier
Grid: High AC frequency
(I – E24)
The frequency of the
grid voltage is above the
upper limit
- The inverter tries to restart
when the frequency is within
the permissible range
- Check that the grid settings
have been successfully set in
Setup > Grid Setup
- If the failure persists, contact
system installer
Grid: Low AC frequency
(I – E25)
The frequency of the
grid voltage is below the
lower limit
- The inverter tries to restart
when the frequency is within
the permissible range
- Check that the grid settings
have been successfully set in
Setup > Grid Setup
- If the failure persists, contact
the supplier
(I – E22)
Grid: Low AC voltage
(I – E23)
User Manual THEIA HE-t UL String Inverters 357116.013, Issue 2.0, April 2013
85
Grid: High output DC
current (I – E26)
Too high proportion of
DC current in the grid
feeding
- The inverter tries to restart
when the fault is cleared
- If the fault still occurs, contact
the supplier
Output powerimbalance
(I – E27)
Imbalance in the output
power
- No action needed
Grid fault, still running
Fault ride-through
- No action needed
VDR fault DC side (I – E29)
The varistors on the DC
side are damaged.
- Contact the supplier for new
parts
DNO Remote trip (I – E32)
Inverter tripped as a
result of a command
from the DNO
- The DNO must remove the
signal before the inverter will
restart
(I– E28)
* Reserved for future use
86
User Manual THEIA HE- t UL String Inverters 357116.013, Issue 2.0, April 2013
8. MAINT
M
TENA
ANCE
This chapter
c
exp
plains how to
t switch OF
FF and disch
harge the in
nverter safely. It also
proviides an overrview of imp
portant regu
ular mainten
nance proce
edures to ensure
troub
ble-free ope
eration of th
he THEIA HE
E-t UL invertters. Finally, it is explain
ned how to
remo
ove and retu
urn the inverters.
8.1. Switch
S
h-OFF
Always turn OFF
F and discon
nnect the inv
verter in the
e following order prior tto
maintenance wo
ork or repairrs:
DANG
GER
Never perform wo
ork on the in
nverter with out disconn
necting both
h the DC
and AC
C side becau
use of deadlly voltages present at tthe termina
als.
side
DC-s
• Turn OFF th
he DC switch.
• Disconnectt the connec
ctors.
side
AC-s
• Turn OFF th
he AC circuitt breaker(s)).
• Let the DC capacitor bank
b
discharrge.
WARN
NING
Lethal voltages may be prese
ent inside th
he inverter a
after switch
h OFF,
se of a charged capacittor bank. It m
must be disscharged forr 1 hour
becaus
before performing
g service or maintenanc
ce work on tthe inverterr.
8.2. Regula
R
ar System Inspectio
ons
The THEIA
T
HE-t UL
U inverters
s are design
ned and man
nufactured to operate trouble-free
e
for se
everal years
s. Performin
ng regular maintenance
m
e will ensure
e high efficie
ency and a
longe
er service liffe for the inverter.
User Manual
M
THEIA HE
E-t UL String Inve
erters 357116.01
13, Issue 2.0, April 2013
87
NOTICE
Only pe
ermit qualifiied persons to perform
m the work in
nside the inv
verter!
Mainte
enance work
k involving removal
r
of tthe inverter’s lower cov
ver must be
perform
med by qualified person
ns only, due
e to the requ
uirements o
of the
produc
ct warranty..
8.2.1
1. Modules
Mainttain the PV modules as
s recommen
nded from th
he manufac
cturer.
8.2.2
2. Cable
es
Regu
ularly check all cables in
nside and ou
utside for siigns of therrmal and me
echanical
dama
age. Replace
e frayed conductors im
mmediately!
8.2.3
3. Electrrical Con
nnection
Regu
ularly check that the terminals and
d plugs are ffirmly tighte
ened, and th
hat the
insula
ation is not deteriorate
ed or corroded. Do not fforget the c
combiner bo
ox!
8.2.4
4. Fuses
s/Circuit Breakerrs
Frequ
uently blown fuses or tripped
t
circu
uit breakerss are a clearr warning sig
gn of
overlload, short circuit
c
or gro
ound fault.
• Alw
ways determ
mine the reason for blow
wn fuses/trripped circuit breakers prior to
rep
placement/rresetting.
• The
e replaceme
ent/resettin
ng must be performed
p
b
by qualified persons on
nly!
8.2.5
5. DC Fu
uses / Gro
ound Fus
se
If a DC
D fuse blow
ws, the following messa
age will app ear in the display: “Fuse fault”
(Refe
er to 7.2. Table of Events).
DANG
GER
The ph
hotovoltaic modules
m
(pa
anels) delive
er power wh
hen exposed
d to light
and pro
oduce hazardous voltages, which is still prese
ent at the te
erminal
blocks and fuse ho
olders afterr switch OFFF. Do not rep
place the DC
C fuses
when the
t PV modu
ules are exp
posed to ligh
ht!
88
User Manu
ual THEIA HE- t U
UL String Inverte
ers 357116.013, Issue 2.0, April 2013
Replacement Procedure
P
• Turrn OFF both the AC circu
uit breaker((s) and DC s witch.
DANG
GER
Always
s disconnect both the DC
D and AC ssides before
e opening th
he inverter’s
s
lower cover
c
due to
o the risk off shock haza
ards.
• Rem
move the inv
verter’s low
wer cover (Re
efer to 2.4.5
5. Inverter E
Enclosure).
• Che
eck that the
e terminals are
a voltage free.
• Alw
ways check the
t cause of
o the defec
ctive fuse prrior to replacement.
• DC Fuses: Mea
asure the vo
oltage and current:
c
If th
he voltage iss close to or 0 VDC or
the
ere is a meas
surable currrent do not remove the
e fuse holde
er. Recheck wiring for
dea
ad shorts orr reversed polarity.
p
• Gro
ound Fuse: Measure
M
one string at a time: The voltage bettween the p
positive and
d
the
e ground terrminal block
k, and then the
t negative
e terminal a
and the grou
und termina
al
block. Both volltage measu
urements should be eq
qual to the o
open circuit voltage (VOOC
) div
vided by 2. If the measurements are differentt, there is a ground faullt. Repeat
for each string
g.
• If th
he voltage and
a current measureme
ents are corrrect, remov
ve and repla
ace the
deffect fuse(s)..
• Alw
ways exchan
nge the fuse
es with the same type and rating.
Figure 8.1: Dimensions
D
of the
t DC fuses//ground fuse
• Mak
ke sure thatt the replac
ced fuse(s) is
s completelly inserted iin the fuse h
holder, and
inse
ert the fuse
e holder.
• Fas
sten the inve
erter lower cover firmly
y (Refer to 2
2.4.5. Invertter Enclosurre).
• Turrn on the AC
C circuit brea
aker(s) and the DC swittch.
8.2.6
6. DC Dis
sconnectt Switch
h
To prrevent weld
ding of the contacts,
c
thereby exten
nding servic
ce life, the D
DC
switc
ch(es) must be operate
ed at least once
o
every 1
12 months, preferably at night or
when
n the AC is OFF.
O
8.2.7
7. Invert
ter
The interior of th
he inverter must
m
be che
ecked by th
he system in
nstaller for h
humidity an
nd
dust every 3 – 4 years.
User Manual
M
THEIA HE
E-t UL String Inve
erters 357116.01
13, Issue 2.0, April 2013
89
8.2.8
8. Ventilation
The heatsink
h
on the backsid
de of the inv
verter cond ucts heat a
away from the
electtronic components and must be cle
ean to ensu
ure sufficien
nt cooling, thereby
preve
enting yield losses. This
s is accomp
plished by ussing one of the followin
ng:
• Vac
cuum cleane
er
• Sofft brush
• Com
mpressed airr
Figure 8.2:
8 Heatsink cleaning
c
8.2.9
9. Fan
The fan
f circulate
es the air inside the inv
verter, which
h distributes heat and tthereby
maintains the co
onversion ca
apacity. The
e replaceme
ent of the fa
an requires removal of
the in
nverter upper cover and must be performed
p
b
by Eltek autthorized serrvice
perso
ons only!
Figure 8.3: Po
osition of the ffan
• A message
m
is shown
s
in the
e display wh
hen the fan needs repla
acement. Re
efer to 7.2.
Tab
ble of Eventts.
• If th
he fan fails, the inverte
er continues
s to feed the
e maximum amount of power
ava
ailable until a certain te
emperature threshold, a
at which point it starts to reduce
pow
wer to prote
ect itself ag
gainst overheating.
90
User Manu
ual THEIA HE- t U
UL String Inverte
ers 357116.013, Issue 2.0, April 2013
8.2.1
10. Varist
tors (VDR
R)
Varis
stors have a finite life expectancy,
e
and degrad
de and lose their protec
ctive
functtion when exposed
e
to transients.
t
They
T
thereffore need re
egular inspe
ections
(everry six month
hs). Replace
ement requires remova l of the inve
erter lower c
cover and
the use
u of the VDR
V service tool,
t
and mu
ust be perfo
ormed by qualified perrsons only!
8.2.1
10.1. DC Side
S
• A message
m
is shown
s
in the
e display wh
hen a DC va ristor needss replaceme
ent. Refer to
o
7.2. Table of Events.
• Rep
place the da
amaged varistor with DC
D Varistor K
Kit ordered ffrom Eltek, part numbe
er
271
1539.
• The
e two varisttors on the DC
D side are located on tthe left side
e of the inve
erter lower
com
mpartment above the network
n
con
nnections.
• Notte the posittions of the varistors if they are in need of rep
placement.
Fig
gure 8.4: Varistors on the DC
C side
8.2.1
10.2. AC Side
S
• No warnings arre given reg
garding the condition
c
off the varisto
ors on the A
AC side.
The
erefore, they need to be checked regularly
r
(att least once
e a year) or a
after
ligh
htning strike
es.
• Rep
place the da
amaged varistor with AC
A Varistor K
Kit ordered ffrom Eltek, part numbe
er
263
3574.
• The
e three varis
stors on the
e AC side are
e located in
n the right siide of the in
nverter lowe
er
com
mpartment above the AC
A terminal area.
• Notte the posittions of the varistors if they are in need of rep
placement.
User Manual
M
THEIA HE
E-t UL String Inve
erters 357116.01
13, Issue 2.0, April 2013
91
Fig
gure 8.5: Varistors on the AC
C side
ck of the AC
C Varistors
s
Chec
Meas
sure the ohm
ms (resistan
nce) betwee
en the term inal and the
e bent pin on
n each
varistor as per th
he below diagrams:
Figu
ure 8.6: Check
king the AC varristors
Table 8.1: Check if the
t varistors are
a damaged
Mea
asurements
s
Betw
ween GND (1)
( and the left
l
VDR (2))
Betw
ween L (3) and
a the mid
ddle VDR (4)
Betw
ween L (3) and
a the righ
ht VDR(5)
Undama
aged Dam
maged
0Ω
∞Ω
0Ω
∞Ω
0Ω
∞Ω
Replacement Procedure
P
• Use
e the service tool delive
ered in the packaging
p
w
with the new
w varistors ordered
from
m Eltek. The
e service to
ool is designed as a fork
k, and can o pen up all terminal
clam
mps simulta
aneously.
92
User Manu
ual THEIA HE- t U
UL String Inverte
ers 357116.013, Issue 2.0, April 2013
Fig
gure 8.7: Servic
ce tool to open the varistor terminal clam
mps
• Ope
en the term
minal clamps
s and remove the dama
aged varisto
or(s).
• Com
mply with Fiigure 8.4 an
nd Figure 8.5
5 to get the position off the varisto
ors right.
• Use
e the service tool to op
pen the clam
mps when in
nserting the new varisto
or(s).
8.3. Replac
R
ce Devic
ces
The inverter can
n be replaced without disassemblin
d
ng the Stringbox.
NOTICE
Remov
val of the inv
verter’s lower cover mu
ust be perfo
ormed by qu
ualified
person
ns only!
WARN
NING
Always
s disconnect the powerr sources prrior to remo
oval of the lo
ower cover!
The inv
verter is cha
arged with lethal voltag
ges, and rem
moval of the
e lower
cover poses
p
a sho
ock hazard iff the inverte
er is not disconnected.
8.3.1
1. Dismo
ounting
•
•
•
•
•
Rem
move the inverter lowe
er cover (Reffer to 2.4.5. 2 Front Cov
vers).
Disc
connect botth the DC an
nd AC termiinals.
Rem
move the sc
crews J and K inside the
e Stringbox .
Pull up the fixin
ng plate bettween the Stringbox
S
an
nd the inverrter.
Pull the inverte
er up and slide it out off the mount ing brackett.
User Manual
M
THEIA HE
E-t UL String Inve
erters 357116.01
13, Issue 2.0, April 2013
93
3
Figurre 8.8: Dismounting of the in
nverter
8.3.2
2. Repla
acement
• Slid
de the new inverter
i
carefully onto the mounti ng bracket (1 – 2 below
w). Refer to
4.1.2 Inverter.
• Che
eck that the
e connection
n holes on the
t inverter (E, F and G below) and on the
Stringbox (H) are
a aligned (3).
(
• Guide the fixing plate I into the slot between
b
the
e inverter an
nd the Stringbox (4).
• Fas
sten the screws J and K with a torq
que of 1.48 ft-lbf / 2.0 Nm.
Figurre 8.9: Procedu
ure for replacin
ng the inverte
er
94
User Manu
ual THEIA HE- t U
UL String Inverte
ers 357116.013, Issue 2.0, April 2013
It is possible
p
to add
a new inv
verters, or re
eplace existting inverterrs, in a PV system.
Clien
nt
• If th
he replaced inverter is a client, the
e master inv
verter will au
utomatically
y identify
the
e replaced device and put
p it into op
peration.
• The
e device num
mber is auto
omatically maintained.
m
Mast
ter
• If th
he replaced
d inverter is the masterr and masterr functionallity is desire
ed, an
exis
sting inverter needs to be set up as
a master. T
This is done in Setup>N
Network
Settup>Set as Master unitt. Select YES
S, and an au
utomatic log
gon-sequen
nce is
perrformed.
NOTICE
Remov
val of the inv
verter’s lower cover mu
ust be perfo
ormed by qu
ualified
person
ns only!
WARN
NING
Always
s disconnect the powerr sources prrior to remo
oval of the lo
ower cover!
The inv
verter is cha
arged with lethal voltag
ges, and rem
moval of the
e lower
cover poses
p
a sho
ock hazard iff the inverte
er is not disconnected.
8.4. Return
R
n and Disposal
When
n replacing an
a inverter, it can eithe
er be returne
ed to the diistributor orr disposed
according to sta
ate and fede
eral regulations. Eltek iss committed to its polic
cy of
envirronmental re
esponsibility
y and therefore appealls to end ussers who are
e disposing
inverrters to follo
ow local env
vironmentall legislation and to seek
k safe and rresponsible
mean
ns of dispos
sal.
8.4.1
1. Returrn
For re
eturn to the
e distributorr the inverte
er should alw
ways be in iits original p
packaging o
or
equiv
valent packa
aging.
In cas
se of return
n of the prod
duct as a result of inve rter failure, a fault repo
ort must be
e
subm
mitted to obtain a Returrn Material Authorizatio
A
on (RMA) nu
umber. The ffault report
temp
plate can be
e found at: www.eltek.c
w
com/supporrt.
User Manual
M
THEIA HE
E-t UL String Inve
erters 357116.01
13, Issue 2.0, April 2013
95
5
Priorr to Return
•
•
•
•
•
Loo
osen the loc
cking screws
s attached to
t the fixing
g clip on the
e mounting bracket.
Pull the inverte
er up and ou
ut of the bra
acket.
Pac
ck the invertter securely
y in the pack
kaging.
Add
d a fault rep
port if releva
ant.
Retturn to the given
g
address in the res
spective sta
ate.
8.4.2
2. Dispo
osal
In cas
se of return
n as a resultt of end of service life, tthe inverterr can be retu
urned to the
e
distriibutor or dis
sposed in th
he respectiv
ve country. S
Shipping to the distribu
utor is paid
by se
ender.
Recy
ycling and disposal of th
he THEIA HE
E-t UL invertter must be done accorrding to the
e
rules
s and regulations applic
cable in the state of dissposal. All m
material used
d for the
inverrter packagiing is recycllable.
96
User Manu
ual THEIA HE- t U
UL String Inverte
ers 357116.013, Issue 2.0, April 2013
9. WARR
W RANTY
Y
The inverters are
e compatiblle with all re
elevant stan
ndards and are guarantteed to be
free of
o manufacturing defects from the
e date of pu
urchase. Ple
ease refer to
o the
Warranty docum
ments on Elttek’s web siite (www.el tek.com) fo
or more deta
ailed
inform
mation abou
ut the warra
anty of the inverter. If a
any questio
ons, please c
contact you
ur
inverrter supplierr or the Elte
ek office in your
y
territorry.
9.1. Warran
W
nty Serrvice
The standard
s
wa
arranty applies for 10 years,
y
with a
an optional extension o
of up to 20
years
s. To mainta
ain the full warranty
w
pe
eriod, the inv
verter mustt be installed
d within 6
montths after the date of pu
urchase.
NOTICE
To maintain the warranties th
he inverter m
must be insttalled, operrated and
mainta
ained accord
ding to the instructionss detailed in
n this manua
al and all
the app
plicable loca
al regulation
ns.
9.2. Warran
W
nty Disclaime
er
The warranty
w
is void by misuse or when
n unauthorizzed repairs are perform
med on the
inverrter. The warranty does
s not cover normal wea
ar and tear o
of the invertter. The
warra
anty is only valid with an
a identifiab
ble and acce
epted seriall number.
9.2.1
1. Dama
age
Eltek
k takes no re
esponsibility
y for damag
ges to the in
nverter due to:
• Una
authorized persons
p
rem
moving the inverter upp
per cover.
• Una
authorized modification
m
ns made to the inverterr.
• Inve
erter installed, commissioned, ope
erated or ma
aintained inc
correctly.
• Rele
evant safetty regulation
ns and instrructions in tthis User Ma
anual being ignored.
• Inve
erter operatting beyond
d the limit va
alues given in 10. Technical Data.
• Inve
erter exposed to external abnorma
al condition
ns such as lig
ghtning, sto
orms, fire,
van
ndalism, etc
c.
Referr to the Warrranty docu
ument for de
etails of ben
nefits and e
exclusions tthat may
apply
y to you.
User Manual
M
THEIA HE
E-t UL String Inve
erters 357116.01
13, Issue 2.0, April 2013
97
98
User Manual THEIA HE- t UL String Inverters 357116.013, Issue 2.0, April 2013
10. TECH
HNICA
AL DA
ATA
10.1.. Invertter dattasheet
INPUT DATA
A (PV SIDE)
THEIA 2.0HE-t
2
Nominal DC power
p
Max recomme
ended PV pow
wer
Max input ope
erating curren
nt
Max input sho
ort circuit
Max DC voltage
Normal opera
ating range
Number of PV
V string inputs
s
Number of MP
PP trackers
Input features
2100W
3000W
4000
0W
4600W
2625W
3750W
5000
0W
5750W
9.5A
13.5A
18.0A
A
21.0A
11.5A
16.5A
22.0A
A
25.0A
600VDC
230 – 50
00VDC
3
1
Reverse polarity prote
ection; Ground fault monitoring; Integral DC switch; Integ
gral
s for string inp
puts (optional);; Field configu rable for posittive and negattive
DC fuses
grounded PV strings
THEIA 2.9 H
HE-t
THEIIA 3.8 HE-t
THEIA 4.4 H
HE-t
OUTPUT DA
ATA (GRID SID
DE)
Nominal outp
put power
Max output current
c
AC voltage
Mains frequency
Power Factorr (Cos Phi)
Inrush current
Max output fa
ault
value
current
duratio
on
2000W
2900W
3800
0W
10.0A / 8.5A
8
14.0A / 12.0A
A
18.5A
A / 16.0A
208 (+ 29%, - 14%) or 240VAC (+ 13 %
%, - 25 %) sing
gle phase
55.0 – 63
3.0 Hz
1
100 mA (rms), 2 A (pea
ak)
3.14 A
13 ms
4400W
21.5A / 18.5
5A
97.2 %
97.2 %
97.2 %
96.8 %
96.8 %
97.0 %
96.3 %
96.5 %
96.7 %
<7W
<1W
AC volta
age: ± 2.5V, Fre
equency: ± 0.1
1 %, Time: ± 30
0 ms
0.0 A
97.3 %
97.0 %
96.9 %
PERFORMAN
NCE DATA
Maximum effficiency
CEC efficiency
EU efficiency
Power feed starts at
Night mode power
p
Measurementts accuracy
Max utility ba
ackfeed to PV
MECHANICA
AL DATA
Protection de
egree
Dimensions
Weight
Cable access
Input cable co
onnection
Output cable connection
NEMA 3R
R or 4X depend
ding upon mod
del
H: 28.35
5inches/720 mm
m
W: 13.9in
nches/353 mm
m
D: 6.5inc
ches/165 mm (6.68 inches/1
169,5 mm with
h bracket)
<22kg / 49lbs.
<22kg / 49lb s.
<23k
kg / 51lbs.
Bottom
Conduits
s and screw te
erminals, otherrs on request
Conduits
s and screw te
erminals
23kg / 51lbs
s.
DESIGN STA
ANDARDS
EM compatibility
CE / UL marking
Other standards
Safety (prote
ective class)
EN 6100
00-6-2, EN 610
000-6-3, FCC le
evel B
Yes
UL 1741,IEEE 1547, IEC
C 61000-3-2/1
11, IEC 61000--3-3/12
Class I
ENVIRONME
ENTAL DATA
A
Operating tem
mperature
Storage temp
perature
Ventilation
-25 to +6
60 °C / -13 to +140
+
°F (Possiible power derrating above +
+40 °C / +104 °°F)
-40 to + 80 °C / -40 to +176 °F
Convecttion cooling
User Manual
M
THEIA HE
E-t UL String Inve
erters 357116.01
13, Issue 2.0, April 2013
99
ADDITIONAL FEATURES
Topology
Noise emission
Communication
Warranty
100
High frequency transformer, galvanic isolation
≤ 37dB
Graphical, color display with touch sense buttons, 3x LEDs for visual status
indication, embedded web-server, Ethernet, CAN bus, RS-485 bus
10 years, 15 years, 20 years options
User Manual THEIA HE- t UL String Inverters 357116.013, Issue 2.0, April 2013
10.2.. Field Adjusttable Trip Lev
vels
Table 10.1: Continen
ntal 208Vac Trip
T Details
VALUE
Vac Overvolta
age
high trip level
Vac Overvolta
age
high trip time
e
Vac Overvolta
age
low trip level
Vac Overvolta
age
low trip time
Vac Undervolltage
high trip level
Vac Undervolltage
high trip time
e
Vac Undervolltage
low trip level
Vac Undervolltage
low trip time
Vac Over freq
quency
trip level
Vac Over freq
quency
trip time
Vac Under fre
equency
trip level
Vac Under fre
equency
trip time
DEFAULT
D
SE
ETTING
MIN.
M
LEVEL
MAX. LEV
VEL
ACC
CURACY
247.1 V
208.0 V
249.6 V
±
±2.5V
120 ms
s
50 ms
120 mss
±
±30 ms
226.3 V
208.0 V
249.6 V
±
±2.5V
950 ms
s
50 ms
950 mss
±
±30 ms
185.5 V
180.0 V
208.0 V
±
±2.5V
1.95 s
50 ms
1.95 s
±
±30 ms
106.5 V
104.0 V
208.0 V
±
±2.5V
120 ms
s
50 ms
120 mss
±
±30 ms
60.45 Hz
z
60.00 Hz
63.00 H
Hz
±
±0.1%
80 ms
50 ms
80 ms
±
±30 ms
59.35 Hz
z
55.00 Hz
60.00 H
Hz
±
±0.1%
80 ms
50 ms
80 ms
±
±30 ms
DEFAULT
D
SE
ETTING
MIN.
M
LEVEL
MAX. LEV
VEL
ACC
CURACY
285.5 V
240.0 V
288.0 V
±
±2.5V
120 ms
s
50 ms
120 mss
±
±30 ms
261.5 V
240.0 V
270.0 V
±
±2.5V
950 ms
s
50 ms
950 mss
±
±30 ms
213.7 V
180.0 V
240.0 V
±
±2.5V
1.95 s
50 ms
1.95 s
±
±30 ms
122.5 V
120.0 V
240.0 V
±
±2.5V
120 ms
s
50 ms
120 mss
±
±30 ms
60.45 Hz
z
60.00 Hz
63.00 H
Hz
±
±0.1%
80 ms
50 ms
80 ms
±
±30 ms
59.35 Hz
z
55.00 Hz
60.00 H
Hz
±
±0.1%
80 ms
50 ms
80 ms
±
±30 ms
Table 10.2: Continen
ntal 240Vac Trip
T Details
VALUE
Vac Overvolta
age
high trip level
Vac Overvolta
age
high trip time
e
Vac Overvolta
age
low trip level
Vac Overvolta
age
low trip time
Vac Undervolltage
high trip level
Vac Undervolltage
high trip time
e
Vac Undervolltage
low trip level
Vac Undervolltage
low trip time
Vac Over freq
quency
trip level
Vac Over freq
quency
trip time
Vac Under fre
equency
trip level
Vac Under fre
equency
trip time
User Manual
M
THEIA HE
E-t UL String Inve
erters 357116.01
13, Issue 2.0, April 2013
101
ADDENDUM
Due to continuing product improvements and legislation changes, the specification
and functionality of the THEIA HE-t inverter described in the included documentation
may not match the specifications and functionality of the delivered inverter 100%.
A typical example is when firmware updates have been applied to the inverter postmanufacture.
Complete inverter user information can be found in the THEIA HE-t UL User Manual.
The latest version can to be found at www.eltek.com.
102
User Manual THEIA HE- t UL String Inverters 357116.013, Issue 2.0, April 2013
CONTACT INFORMATION
Eltek Inc. (Americas Headquarters)
2925 E. Plano Parkway
Richardson, TX 75074
USA
Phone: +1 (469) 330 - 9100
Fax: +1 (972) 424 - 0885
Web: www.eltek.com/us
E-mail: [email protected]
Service e-mail: [email protected]
NA Sales e-mail: [email protected]
Outside North America find your local office at: www.eltek.com
User Manual THEIA HE-t UL String Inverters 357116.013, Issue 2.0, April 2013
103
www.eltek.com