1
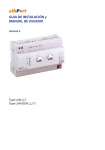
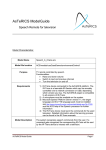
TouchMe CIS for iPad & iPhone User Guide © Copyright 2012 - Trikom Ingeniería. Published: November 16, 2012 Welcome! This document will guide you through the basics of operating the TouchMe CIS. For more information or technical assistance, please contact our support team. They are ready to answer your questions. IN THIS DOCUMENT: Initial Settings Insert Rows of Data Data Type “Area” Data Type “PLCBUS Dimmer (PLCBUS 2263 / 2264)” Data Type “PLCBUS Appliance (PLCBUS 2267 / 2268)” Data Type “PLCBUS Curtain (PLCBUS 3160)” Data Type “PLCBUS Scene” Data Type “PLCBUS IR (PLCBUS 3011)” Data Type “PLCBUS All Lights” Data Type “PLCBUS All User Lights” Data Type “IRTrans” Data Type “Macro” Data Type “Network IP Camera - Single” Data Type “Network IP Camera - Group” (only available in the iPad version) Edit data row Choose default row icon FAQ Support Revision Notes TouchMe CIS is a product of Trikom Ingeniería – http://www.trikom.com.ar/domotica - 1 Initial Settings Before you start customizing your smart home, you need to set the basics of the architecture of your home. Please look at the settings of your device and select the application "TouchMe CIS". You must complete all fields for proper operation of your home automation system. At first there are the general settings PLCBUS devices, in which you select the type of connection of the Ethernet-Serie converter connected to your wireless network (you can choose between TCP and UDP), the hostname or IP address of the same, as well as its port, the housing UserCode (in hexadecimal) and if it is a system of three-phase or single-phase type. In case your home has an IRTrans select the type of connection to them (you can choose between TCP and UDP). Finally, you must download the configuration file in your home for a proper functioning of the software. The last field, called "Configuration File Loaded", tells you if you have downloaded the file and the system is ready to enjoy the smart home. If the value of this row is "NO", the commands through the software will not be sent correctly. To fix this, you must activate the "Load File", and then enter the URL of our website (186.109.89.9) in the next field, to get the file at issue. Following this, run the application, and, during startup, it will try to download configuration data. Once charging is complete, exit the application, and disable the "Load Configuration File" to not try to connect to the server each time the application starts. You will notice that the "Configuration File Loaded" change its value to "YES". For any query fails or when downloading the configuration file, please contact the technical support of Trikom Ingeniería emailing to [email protected]. Insert Rows of Data To add a new data row must press the "+" button at the top right of the screen. This opens a new screen where you, initially, you should select the type of object to add to the first available field. Object types available are: Area PLCBUS Dimmer (PLCBUS 2263 / 2264) PLCBUS Appliance (PLCBUS 2267 / 2268) PLCBUS Curtain (PLCBUS 3160) PLCBUS Scene PLCBUS IR (PLCBUS 3011) PLCBUS All Lights PLCBUS All User Lights IRTrans Macro Network IP Camera - Single Network IP Camera - Group (only available in the iPad version) Depending on the type of object you select, complete the fields and set the configuration. TouchMe CIS is a product of Trikom Ingeniería – http://www.trikom.com.ar/domotica - 2 Detailed below each of these data type: The "Name" field indicates the general heading of the row, the field "Description" is the subtitle of the very short, while the "Image" is the icon row identifier. Data Type "Area" Allows you to divide your home in different sectors in order to help a faster and more intuitive navigation within the application Data Type “PLCBUS Dimmer (PLCBUS 2263 / 2264)” Add an object dimmable type, giving you the ability to turn on and off the light, as well as increase and reduce the brightness of it. When you add this type of data, you should choose the "Home" and "Unit" for the lamp to be controlled. Data Type “PLCBUS Appliance (PLCBUS 2267 / 2268)” Add an object of type appliance, giving you the ability to turn it on and off. When you add this type of data, you should choose the "Home" and "Unit" for the device to be controlled. Data Type “PLCBUS Curtain (PLCBUS 3160)” Add an object of curtain / motor, giving you the ability to open and close the curtain, as well as up and down it by steps. When you add this type of data, you should choose the "Home" and "Unit" for the curtain / motor to be controlled. Data Type “PLCBUS Scene” Adds a scene type, giving you the ability to turn on and off the scene PLCBUS preconfigured in your home. When you add this type of data, you should choose the "Home" and "Unit" for the scene to command. Data Type “PLCBUS IR (PLCBUS 3011)” Adds an IR type, giving you the ability to command multimedia device. In principle you are prompted to select the "Home" for your multimedia module. Because it allows a maximum of 32 commands (16 PLCBUS addresses), it is recommended that when you schedule your module 3011 a letter from your "Home" for this particular equipment and to record commands consecutively. For example, if we decide that our 3011 equipment occupies the letter F, will record the commands as follows: Command Nº1: F1 ON Command Nº2: F1 OFF Command Nº3: F2 ON Command Nº4: F2 OFF Command Nº5: F3 ON Command Nº6: F3 OFF TouchMe CIS is a product of Trikom Ingeniería – http://www.trikom.com.ar/domotica - 3 … … ... Command Nº31: F16 ON Command Nº32: F16 OFF This will ensure a complete agreement with the TouchMe CIS software. After the row has been generated for this type of data, if you press on it, will head a new screen empty. You must add each of the commands previously configured. To do this, press the "+" button at the top right of the screen, which will open a configuration screen where you are asked a series of data to complete. First select the number of commands that you want the new row to be added, allowing up to eight commands per row. For each command must specifically a name and an associated icon. Following the criteria explained above, the first command set of the first row direction send F1 ON, the second F1 OFF, the third F2 ON, and so on until the eighth command to send the address F4 OFF..Similarly, the first command sent from the second row address F5 ON, the second F5 OFF, the third F6 ON and so on until the eighth command to send the address F8 OFF. The maximum number of rows to add is four, as in the latter, the eighth command OFF F16 send the address. The following screenshot highlights the detailed above: Note that you can add fewer amounts of commands per row, but always send PLCBUS direction depending on the position of the button shown in the screenshot. Data Type “All Lights” Adds an object that gives you the ability to send commands "All Lights On" (Power On Button), "All Lights Off" (Lights OFF Button) and "All Units OFF" (Units Off Button). When you add this type of data, you should choose the "Home" for the sector to be controlled. TouchMe CIS is a product of Trikom Ingeniería – http://www.trikom.com.ar/domotica - 4 Data Type “All User Lights” Adds an object that gives you the ability to send commands "All User Lights On" (Power On Button), "All User Lights Off" (Lights OFF Button) and "All User Units OFF" (Units Off Button). Data Type “IRTrans” Adds a IRTrans type, giving you the ability to command the type IR multimedia device. When you add this data type, you must specify the hostname or IP address assigned to your device, as well as the name of the "remote" to control. After the row has been generated for this type of data, if you press on it, will head a new screen empty. You must add the commands related to its "remote". To do this, press the "+" button at the top right of the screen, which will open a configuration screen where you are asked a series of data to complete. First select the number of commands that you want the new row to be added, allowing up to eight commands per row. For each command must specify to a name, an associated icon and the name of the "CommandName" associated. Data Type “Macro” Adds a macro type, giving you the possibility to generate scenarios relating different device in your home. For example, you can create a macro to turn on three lights and close a curtain to turn on your projector, to turn off the lights and turn on your BluRay; to turn on your stereo, close the curtains and turn on lights in a given sector, etc. Macros can be generated containing only PLCBUS type commands, or commands only containing encased IRTrans type, as well as combinations of both. The only limitation is that you can send up to eight commands of any type for each macro generated. When you add a macro, first select the number of commands you want to send, and then for each type of command choose between: "Message PLCBUS ON", "Message PLCBUS OFF" and "Message of IRTrans". If you choose one of the first two types, you are prompted the "Home" and "Unit" of the device to be controlled, while for the latter must complete the fields for the "Hostname", "Remote" and "CommandName” of your IRTrans device. Then enter the delay or lag time between sending commands, in milliseconds. Note that a delay time low, you can have overlapping commands and not sent correctly. Note that when generating the macro creates two buttons: Power On Button: sends the commands as they were configured in the macro. Power Off Button: if you have configured PLCBUS device, send the command set contrary to the macro. For example, if the macro sends the commands "C1 ON" and "D7 OFF" to touch the "Power On Button”, in this case, pressing the button "Power Off Button", send the command "C1 OFF" and "D7 ON". For the case of IRTrans type commands, send exactly the same as configured in the macro. Data Type “Network IP Camera - Single” Adds an IP camera type, giving you the chance to view a camera connected to your home network or internet available. When you add this data type, you must specify the path of the camera image, for example being this "http://190.220.3.108:1059/jpg/1/image.jpg". The camera will be displayed on the same TouchMe CIS is a product of Trikom Ingeniería – http://www.trikom.com.ar/domotica - 5 screen when pressing on the row. Data Type “Network IP Camera - Group” Adds an IP camera type, giving you the ability to display a group of cameras connected to your home network or on the internet. When you add this type of data, you must select the number of cameras and specify the path of the image of each of these cameras. The cameras will be displayed in a new screen press on the line, allowing you to zoom by double tap on the camera in question. This data type is only available for the iPad version. Edit Data Rows To edit a data row must press the "Edit" at the top right of the screen. In edit mode you are given the possibility to position the rows as well as delete them. To change any parameter own row, hold the line for two seconds and access the setup screen for the selected object. Choose default row icon When you edit or add a row of data and select the icon in the row, you can choose between different icons in the gallery, as well as an image gallery of photos from your iPad / iPhone. To do this, click on the "Pictures" in the upper right of the screen in the gallery of icons to access the images from your device. FAQ Q1. The commands are not sent correctly to my devices. What should I do to fix it? First, verify that the configuration file has been downloaded. To do this, go to the Settings screen of your iPad or iPhone, and verify that the value of the last field is set to "YES". Otherwise, the command will not be sent to their PLCBUS devices or multimedia. Second, check that all devices are interconnected to the same Wi-Fi for your iPad or iPhone. Finally, make sure you have properly configured each of your devices. Q2. I can not download the configuration file If you have trouble downloading the configuration file smart home, please contact the Trikom Ingeniería Support that soon we will contact you in order to solve the problem. Support For any failure, questions, or suggestions about the software, please contact our support team and we will promptly contact you. Send us an email to [email protected], or contact our offices in Buenos Aires, Argentina by calling (+54 11) 4721-9021. TouchMe CIS is a product of Trikom Ingeniería – http://www.trikom.com.ar/domotica - 6 Revision Notes 1.0: original version published on 16 November 2012. TouchMe CIS is a product of Trikom Ingeniería – http://www.trikom.com.ar/domotica - 7