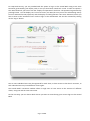
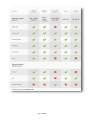
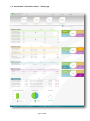
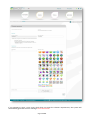
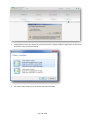
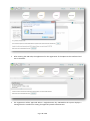
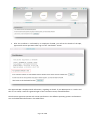
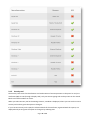
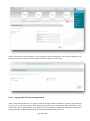
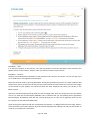
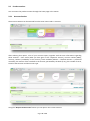
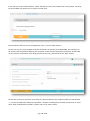
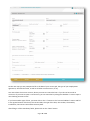
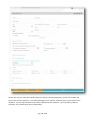
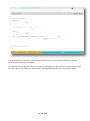
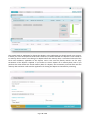
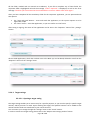
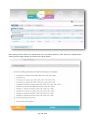
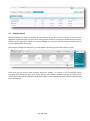
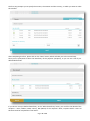
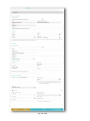
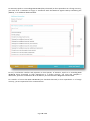
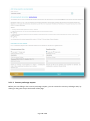
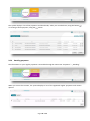
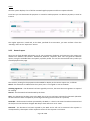
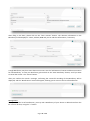
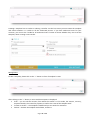
1
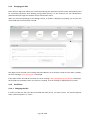
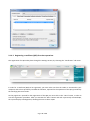
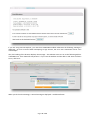
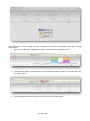
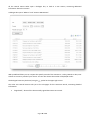
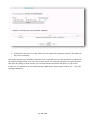
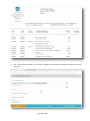
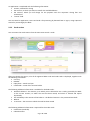
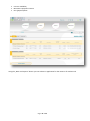
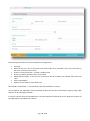
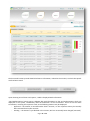
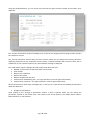
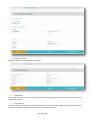
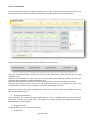
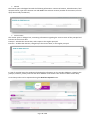
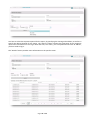
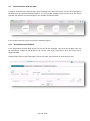
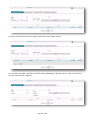
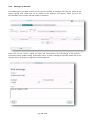
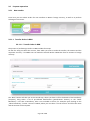
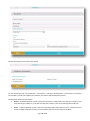
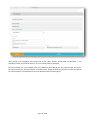
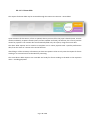
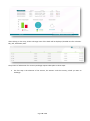
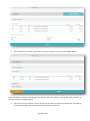
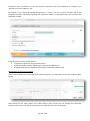
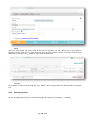
Table of Contents 1. LOG-IN AND HOME PAGE ................................................................................................................................... 2 1.1. 1.2. 2 LOG-IN TO THE TRANSACTION PORTAL OF THE VIRTUAL BANK......................................................................................... 2 VIRTUAL BANK’S TRANSACTION PORTAL – HOME PAGE ................................................................................................ 6 ADMINISTRATIVE PART ...................................................................................................................................... 7 2.1 SELF-ADMINISTRATION ............................................................................................................................................ 7 2.1.1 Changing the user name ............................................................................................................................... 7 2.1.2 Changing the password................................................................................................................................. 9 2.1.3 Changing your PIN ...................................................................................................................................... 10 2.1.4 Certificates .................................................................................................................................................. 10 2.1.4.1 2.1.4.2 2.1.5 Changing the QES.................................................................................................................................................10 Registering a certificate (QES) for active operations ...........................................................................................12 Security tool ................................................................................................................................................ 18 2.1.5.1 Signing with OTP (one-time-password) ...............................................................................................................19 2.2 PRODUCT SECTIONS .............................................................................................................................................. 22 2.2.1 Accounts Section ......................................................................................................................................... 22 2.2.2 Cards section ............................................................................................................................................... 31 2.2.2.1 2.2.2.2 2.2.3 2.2.4 Debit cards ...........................................................................................................................................................34 Credit cards ..........................................................................................................................................................38 Loans Section .............................................................................................................................................. 39 Savings Products Section............................................................................................................................. 47 2.2.4.1 Deposits ...............................................................................................................................................................48 2.2.4.1.1 Opening a deposit ...........................................................................................................................................48 2.2.4.1.2 Closing of deposits ..........................................................................................................................................51 2.2.4.2 Target savings ......................................................................................................................................................53 2.2.4.2.1 Opening a target saving ..................................................................................................................................53 2.2.4.2.2 Closing a Target Savings Product ....................................................................................................................56 2.3 EDITING PRODUCTS .............................................................................................................................................. 58 2.4 STATISTICS FOR LOG-IN TO THE VIRTUAL BANK .......................................................................................................... 59 2.5 COMMUNICATIONS WITH THE BANK ........................................................................................................................ 61 2.5.1 Information from the Bank ......................................................................................................................... 61 2.5.2 Messages to the Bank ................................................................................................................................. 63 2.5.3 Compliments and complaints...................................................................................................................... 64 2.5.4 Instructions to the Bank .............................................................................................................................. 65 2.6 PAYMENT OPERATIONS .......................................................................................................................................... 67 2.6.1 New transfer ............................................................................................................................................... 67 2.6.1.1 Transfer Orders in BGN ........................................................................................................................................67 2.6.1.1.1 Transfer Order in BGN.....................................................................................................................................67 2.6.1.1.2 Transfer to the national budget ......................................................................................................................70 2.6.1.1.3 Direct debit .....................................................................................................................................................74 2.6.1.2 Transfer orders in foreign currency .....................................................................................................................75 2.6.1.3 Currency exchange request .................................................................................................................................81 2.6.1.4 Future payments..................................................................................................................................................85 2.6.2 Utility payments .......................................................................................................................................... 86 2.6.3 Pending payments....................................................................................................................................... 88 2.6.4 Standing payments ..................................................................................................................................... 89 2.6.5 General report ............................................................................................................................................. 91 2.7 OTHER SERVICES .................................................................................................................................................. 92 2.7.1 Beneficiaries ................................................................................................................................................ 92 User Manual for Virtual Bank’s Transaction Portal 2.7.2 Templates.................................................................................................................................................... 94 2.8 SPECIAL FUNCTIONALITIES ...................................................................................................................................... 96 2.8.1 Calendar ...................................................................................................................................................... 96 2.8.2 Product advisor ........................................................................................................................................... 97 2.8.3 Wallet.......................................................................................................................................................... 99 1. Log-In and Home Page 1.1. Log-In to the Transaction Portal of the Virtual Bank In order to use the Virtual Bank’s transaction website you must be a client of BACB and to be registered for using the remote banking channels in BACB Plus. Each and every Client, who has a current, deposit, savings or special account with the Bank is entitled to access. In order to log in the transaction website, please follow the link of the “Log In“ button, on the portal website www.bacbplus.bg. When you click on the button, a new window is opened, where you have to enter your user name. Upon clicking the “Continue“ button, the personal image (avatar) and phrase, chosen by you during the registration process, are visualized in the window, as well as a box for entering the password. In case you recognize your personal image and phrase, please click on the „Log In“ button. Page. 2 of 99 For improved security, you are provided with the option to log-in to the Virtual Bank using a One Time Password, generated by your display card, in case you have been issued such a card. In order to request a One Time Password, you have to tick the “Display card password“ check box. The password is generated by pressing button 7 on the display card. You must enter your PIN (the one you use for withdrawing money from an ATM and for POS payments) and the display card will generate a One Time Password, which you have to enter in the “Password“ box in order to log in to the Virtual Bank. You can then continue by clicking on the “Log in“ button. One or more individual users may be registered for each client, to have access to that client’s accounts, as each individual user may have different access rights. The Virtual Bank’s transaction website allows a single user to have access to the accounts of different clients, using one and the same user name. On the next step, you can choose which clients you want to access during your current log-in to the Virtual Bank. Page. 3 of 99 The Transaction Website is not optimized for working properly via mobile devices. For that purpose, you may use the mobile banking application BACB Plus, developed by the bank, which can be downloaded from the Apple store for iPhones or from the Android market for Android systems, respectively. The Transaction Website and the mobile banking of BACB Plus operate with certain specificities through the various operating systems and browsers. You can find detailed information in the table below: Page. 4 of 99 Page. 5 of 99 1.2. Virtual Bank’s Transaction Portal – Home page Page. 6 of 99 The product tables provide you with systematic information on the current status and parameters of the products that you are using – accounts, cards, savings and loans. A click on any of the rows in the tables, will take you to the specific product in the respective product section. Detailed information on your products, as well as the options to manage them and submit requests for new products, can be found in the respective section in the Funds menu. The Last transactions section provides you with more information on the latest five incoming (highlighted in green) and outgoing (highlighted in red) movements in your payment accounts, as the Date field shows you the date of recording the transfer, and Reference is the unique number of the payment, as specified in the Bank’s accounting system. 2 2.1 Administrative part Self-administration During the process of your registration for use of the remote banking channels, you have entered your desired credentials – user name, password, PIN and active operations method – a Certificate (Qualified Electronic Signature - QES) or OTP through a display card. In case you want so, you can change the already selected credentials, using the “Settings“ section. 2.1.1 Changing the user name When you select a user name in the Settings section, the current user name is displayed and you are given the option to enter a new username, which meets the specified requirements. Page. 7 of 99 If you attempt to enter a user name, which does not meet the relevant requirements, the system will automatically generate the error message “Incorrect Format“ Page. 8 of 99 Also mandatory is to enter the “Control Number“, generated by the system and if it is not entered, the system will not permit the recording of the new user name. If you fail to complete all the mandatory boxes, the system generates an error message. After completing all the mandatory boxes and filling in the correct information you must click on the Confirm button. The request for a new user name will be accepted and upon your next Log In to the Transaction Portal you will have to enter your new user name. 2.1.2 Changing the password In order to ensure maximum security, clients must change their password from time to time. When you select Password Change in the Settings section, a window is opened, prompting you to fill in your current password and enter the desired new password, which must meet the specified requirements. If an attempt is made to enter a password, which does not meet the requirements, the system generates the error message „Incorrect Format.“ You must confirm the desired new password by retyping it, as if the two passwords do not match, the system will display the error message “Passwords do not match“. It is also mandatory to enter the „Control Number“, generated by the system and if it is not entered, the system will not register the new password. If you fail to complete all the mandatory boxes, the system generates an error message. After completing all the mandatory boxes and filling in the correct information you must click on the Confirm button. The request for a new password will be accepted and upon your next Log In to the Transaction Portal you will have to enter your new password. Page. 9 of 99 2.1.3 Changing your PIN PIN is the four-digit code, which you have entered during the registration process and is subsequently used for confirming operations when banking, using mobile devices. It is also necessary for your identification (authentication) through the customer service information centre. When you choose PIN Change in the Settings section, a window is displayed, prompting you to enter the current PIN and the value of the new PIN. Only digits can be entered in the existing and new PIN boxes. If an attempt is made to enter other symbols, the error message “Incorrect Format“ is displayed. If the values of the new PIN do not match, the error message “The entered PINs do not match“ is displayed. All the fields are mandatory and if any of them is omitted, an error message is displayed by the system. 2.1.4 Certificates 2.1.4.1 Changing the QES In order to make sure that your QES is installed and ready to use, you must check it. For Internet Explorer select “Internet Options” in “Tools“. Page. 10 of 99 The browser opens a dialogue box, where you must choose: 1. The „Content” option 2. „Certificates” Then a dialogue box is opened, containing information on the Registered QES. Page. 11 of 99 2.1.4.2 Registering a certificate (QES) for active operations The registration of a QES takes place through the Settings section, by choosing the “Certificates“ sub-menu. In order for a certificate (QES) to be registered, you must make sure that the reader is connected to your computer and to have previously installed the software, required for the operation of the QES, provided by the Certifying Service Provider. On the page that is opened for the registration of the QES you must click on the “Here“ button, in order to start the registration procedure. After you activate the “Here“ button and with a previously activated QES, the system displays a dialogue box, allowing the user to select a QES. Page. 12 of 99 If you are using Internet Explorer, you must have CAPICOM installed. Otherwise the following message is displayed – An error occurred when attempting to sign content, the error was: Automation server can’t create object. Also, the heading of the browser displays the message – This website wants to run-on the following add-on: ‘CAPICOM 2.1.2’ from ‘Microsoft Corporation’. If you trust the website and the add-on and want to allow it to run, click here… When you click on the message, a second message is displayed – Invalid Certificate. Page. 13 of 99 After clicking ОК on that message, you must complete the installation of CAPICOM, which goes through several steps. Click on the notification, highlighted in yellow, which starts the installation process a dialogue box appears, providing you with the installation options, where you should choose the Run add-on option the following window pops-up, where you should click on the Run button Page. 14 of 99 a dialogue box comes up, where you should choose the respective QES for registration of the active operations in the Transaction Portal. The system will prompt you to enter the PIN code of the QES. Page. 15 of 99 After entering the PIN code, the application for the registration of the QES must be confirmed and sent to the Bank. The registration will be approved within a single business day. Meanwhile the system displays a message that the certificate is waiting for approval by Bank’s administrator. Page. 16 of 99 After the certificate is confirmed by an employee of BACB, you will see the details of the QES, approved for active operations after Log In in the “Certificates“ section. The approved QES is displayed with information, regarding its details. If your QES expires or is stolen and then it is re-issued, it must be registered again in the Transaction Portal, as detailed above. The electronic signatures operate with certain specificities in the different operating systems and browsers. You can find detailed information in the table below: Page. 17 of 99 2.1.5 Security tool The Security Tool serves for identification and authorization of active operations in the portal. It may be a certificate (QES) or OTP (through a display card). Only one active signing tool can be present on the Virtual Bank’s transaction website at a time. When you select Security tool in the Settings section, a window is displayed, where you can see the current security tool and are given the option to change it. If your current security tool is QES, the relevant details of the certificate, registered with the system, are displayed and you are given the option to change it by selecting OTP. Page. 18 of 99 If OTP is selected, the system displays in the right-hand side of the window, a list of all the display cards, among which you can choose the one, which you will be using as a security tool. 2.1.5.1 Signing with OTP (one-time-password) “ОТР“ (“One time password”) is a unique, one-time, 8-digit numeric combination, which is the password that you use to identify yourself when performing payment and non-payment bank operations in the Virtual Bank. OTP is generated by your display card, using different mathematical algorithms (operation modes), defined as separate buttons and after entering the PIN for using the card. Page. 19 of 99 BUTTON 7 – “BACBplus” Used for signing of: Applications for the opening/closing of current accounts; Applications for the opening/closing, operations with deposits and savings accounts; Applications, related to debit cards (request for issuing, change of parameters and limits); Free form instructions to the Bank; Utility payments; General payments Log In to BACB Plus platform. You can select the BACBplus mode by pressing BUTTON 7. You must enter your PIN for using the respective card, and the display generates your “ОТР password“. The password generated in this way is used to sign into the transaction website of the Virtual Bank. BUTTON 8 – “e-sign” Used for signing of: Transfers in BGN (transfer in BGN, transfer to the national budget, multi-line transfer to the national budget, direct debit request); Foreign currency transfers; Foreign currency exchange. You can select the e-sign mode by pressing BUTTON 8. Please enter the values for the Account, as these are the first six numbers of recipient's account. Then you enter the respective value for Amount, as this is the amount of the transfer, without the numbers after the decimal mark. After that you enter the PIN for using the respective card and your ОТР is generated on the display. The password generated in this way is used for signing into the Virtual Bank’s transaction website. Page. 20 of 99 BUTTON 6 – “VbV” It is used for payments on the Internet. The card will generate a one-time password, to be entered in the payment form on the retailer’s website, when you make purchases on the Internet. BUTTON 9 – “bank ID” Used for mutual identification between a bank employee and a client on the phone. You can use that if you are in doubt that a call originates from the Bank. Select the bank ID mode by pressing BUTTON 9. During the identification process, the bank employee will request from you to provide your full name (if you have initiated the call) and the first 4 and the last 4 digits of the number of your display card, based on which the bank employee will verify your identity in the Bank’s system. After that, the bank employee will provide you with an 8-digit code, which you should enter into the display card. If it is valid, the card will display VERIFIED. This is evidence that you are speaking with a legitimated bank employee. Immediately after that the card will prompt you to enter your 4-digit PIN, which you use for payments at POS and ATM withdrawals. Upon entering the respective PIN, the card displays the response – an 8-digit code (response code), which is to be disclosed to the bank employee. By that the bank employee will identify you and you will be able to continue your telephone conversation. Page. 21 of 99 2.2 Product sections You can access the product sections through the home page or the menus. 2.2.1 Accounts Section The Accounts Section can be accessed from the main menu Funds > Accounts. After selecting that option, a list of your accounts opens, together with the main information regarding these amounts – short name (what you have given to the respective account), account number (IBAN), currency, balance (availability in the account), funds available (balance – blocked amounts + permitted overdraft), the amount of the overdraft to the account, permitted by the bank (if any), the number of cards, issued to that account and the account type. Using the “Request new account“ button you can open a new current account. Page. 22 of 99 Select the account type – current and click on the „Next“ button. Chose the account holder, currency, the account to be charged, tick the box, indicating that you agree to the framework agreement for the keeping and maintenance of the account and click on the “Save and Send“ button. Page. 23 of 99 If you want to review the application, you have made, select “Requests“ and click on the desired request. Detailed information on the application will be displayed, providing you with the option to print it. If you want to see more information on a specific account in the list of accounts, you just have to click on the “+“ symbol on the respective line and this will take you to the information section about that account. Page. 24 of 99 You can go directly to that information, if you click on an account in the list on the home page of the website. Page. 25 of 99 You can rename your accounts, by clicking on the edit icon . The field becomes editable and you can enter the desired short name for your account. This function can be used for easier recognition of your accounts. In order to preserve the change, you must confirm that from the the change, please select icon. If you want to cancel . The information section for each account has four horizontal buttons with reference information, related to the specific account. If you choose one of these statements, a table is displayed with information. The last movements will display the last 10 outgoing and incoming movements in the respective account. Last debit movements will only display a list of the outgoing transfers from the account. Page. 26 of 99 Last credit movements will only display a list of the incoming transfers to the account. Last balances will display a list of the last 10 balances of the account, together with information on the respective availability and the total turnovers as of the specific date (the end of the day, when there was a movement in the account). The total turnovers have been accumulated since the beginning of the calendar year. If there is no data to be displayed for the respective account, the “No data” message will be displayed. The vertical buttons let you receive more information about your account, as well as the diagram, visualizing your respective revenues and expenses. Page. 27 of 99 All the vertical menus either open a dialogue box, or lead to a new section, containing additional information about the account. A dialogue box opens “Balance“ and “Account Movements“. With predefined filters you can request the specific periods of the statement – Today, Month to date, Year to date or to enter a period of your choice. You can also choose the number of displayed results. The dialogue boxes may be closed, using the symbol in the upper right corner. The other two vertical buttons take you to the sub-pages of the Transaction Portal, containing detailed information: “Digital Safe“, where all the electronically signed documents are stored. Page. 28 of 99 “Statements“ takes you to a page, where you can request the respective period for the display of the account statement. The system displays all the available statements for the respective period, as the statements for individuals are monthly and generated once at the end of each month. The corporate statements are generated on a daily basis. By clicking on either of them, you can download that statement and open it on your screen. If there are no statements for the desired period, regarding the selected bank account, the – “No data” message is displayed. Page. 29 of 99 The “Close“ Button enables you to send a request to the Bank for closing the account you have selected. Page. 30 of 99 An application is completed with the following information: account, selected for closing the account, to which you want to transfer the available balance the account, which you will charge for the payment with the respective closing fees and commissions “reason” field. You can cancel an application, save it and send it for processing by the Bank later or sign it, using a QES and send it for processing by the Bank. 2.2.2 Cards section You can access the cards section from the main menu Funds > Cards After you choose this section, a list of all registered debit cards and credit cards is displayed, together with the following information: Currency Number Expiry date – month and year Card holder – name of the account holder The following additional information is available for the debit cards: Overdraft allowed – the amount, up to which you are allowed to use a credit, granted by the Bank to the current account, to which the card has been issued, and which is utilized and repaid dynamically The availability is the amount of the balance – the blocked amounts + the permitted overdraft Balance To account – the account to which the card has been issued The following additional information is required for the credit cards: Credit limit (overdraft) Utilized amount Page. 31 of 99 Current availability Minimum repayment amount Due (payment) date Using the „New card request“ button you can submit an application for the issuance of a Debit Card. Page. 32 of 99 The following information must be completed in the application: Card type Name on the card – this is the name of the card holder, to be inscribed on the card. The name on the card is entered in Latin letters Answer to a secret question – mother’s maiden name Account, to which the debit card is to be issued Mobile phone number, so that you can receive your PIN as an SMS, as the number must start with +359 Valid e-mail address Address for the delivery of the debit card All the fields, marked with “*” are mandatory and must be filled-in correctly. At your request, the application can be cancelled, saved to be sent later to the Bank or signed, using a QES and sent for processing by the Bank. In order to see the status of the applications, you have submitted, please click on the “Requests“ button. All the applications are loaded in this section. Page. 33 of 99 The following application statuses can be observed: Processed Returned Sent Saved Only saved applications can be edited and – respectively – sent for execusion. 2.2.2.1 Debit cards For more information about our debit cards, please refer to the product section and click on the „+“button on the line of the chosen card. This will open a sub-section with four horizontal and five vertical buttons. Page. 34 of 99 The horizontal buttons provide detailed reference information, related to the account, to which the specific card has been issued. Upon choosing one of these card reports, a table is displayed with information. “Card Authorizations“ button opens a dialogue box with information on the card authorizations, which are displayed in the system, immediately after the finalization of the transactions. These are all the latest transactions, involving the respective card, as the following statuses may be displayed: - Approved – the amount is recorded under client’s account, i.e. the respective money has actually been removed from his/her account - Pending – the amount is just blocked in the account, but has not actually been charged /removed/ Page. 35 of 99 Using the predefined filters, you can specify the period of the report and the number of the results, to be displayed. The “Account movements” button will display a list of the last 10 outgoing and incoming transfers from/to the respective account. The „Account statement“ button takes you to the section, where you can specify the necessary period for displaying statements for the respective current account, to which the debit card is issued. If there are no statements for the respective period, the „Not Available“ message is displayed. The “Card details” opens a dialogue box with information about the card: Number of the account to which the debit card is issued Card number Name of the cardholder Name of the holder Name as displayed on the card Card limits for withdrawing cash – for single transaction, 24-hour period and weekly Card limits for payments – for single transaction, 24-hour period and weekly All the vertical menus either open a dialogue box, or take you to a new section with additional information about the debit card. Change card parameters Upon clicking on the „Change of parameters“ button, a form is opened, where you can change the parameters, related to your Debit Card – the answer to the secret question, the mobile phone number, SMS notification, e-mail, address. Page. 36 of 99 Change card limits Using this button you can change the card limits. „Digital Safe“ This button takes you to the section, where all the electronically signed documents, between yourself and the Bank are stored. “Last balances” The last balances will display a list of the last 10 balances of the account, together with information on the respective availability, daily and total turnovers at the respective date. Page. 37 of 99 2.2.2.2 Credit cards For more information about our credit card, please click on the „+“button on the line of the chosen card. This will open a sub-section with detailed information in four horizontal and five vertical buttons. The horizontal buttons produce the relevant reports for the credit cards. Using the “Card Authorization“ button you can see all the transactions, made with the card and their respective status. Using the “Card movements“ button you can see all the transactions made and recorded, as well as the respective fees and amounts received through the card. Using the “Card Statement“ button you can see your statements – the card statements are monthly. Using the “Card Details“ button you can see the IBAN of the account, card number, the name of the account holder, the name of the card holder, the interest rates and the card limits. The vertical buttons either open a dialogue box or take you to another section on the website, and they have the following functions: Change card parameters Upon clicking on the „Change card parameters“ button, a form is opened, where you can change the parameters, related to your Credit Card – the answer to the secret question, the mobile phone number, SMS notification, e-mail, address. Change card limits Using this button you can reduce the card limits. „Digital Safe“ Page. 38 of 99 This button takes you to the section where are stored all the electronically signed documents between you and the Bank. Card repayment Using this button you can order a repayment of your credit card-related liability, as you have the option to choose among the minimum repayment installment, the entire installment or an amount of your choice. 2.2.3 Loans Section The Loans Section is accessible through the main menu Funds > Loans After selecting this operation, the page, containing a list of your loans is loaded, together with the basic information, related to these loans: Credit contract number Currency Page. 39 of 99 Contractual amount (the amount of the loan) The signing date of the loan agreement The maturity date – the date by which the loan is to be repaid Interest % Next installment amount – monthly repayment installment, payable on the next due date Next installment date – the due date of the next installment Status – regular/overdue The monthly repayment installment may include various components. Relevant information can be found on the home page, when you hold the mouse pointer over the amount of the installment. Should you need more information, regarding the specific loan, you just need to click on the „+“ symbol on the respective line and this will take you to the information section, about the respective loan. The information section contains a visualization of the current status of your loan, i.e. – the repaid and remaining principal. Also available are the following buttons: „Digital Safe“ This button takes you to the section, where are stored all the electronically signed documents between you and the Bank. Page. 40 of 99 Details This button opens a dialogue box with the following information: contractual amount, utilized amount, final repayment date, type of the interest rate and IBAN of the relevant account (number of the account, used to repay the monthly installment). Current state This button opens a dialogue box, containing information regarding the current status of the principal and interests at the current date. Principal – includes the amount due, with respect to the regular principal. Interests – includes the interests, charged up to the current date, on the regular principal. In case of overdue loans this window will also display information on the overdue liabilities, related to the principal, interests, penalty interests and other liabilities. Also shown is the number of dates of the delay. A new loan product can be requested using the New loan request button. Page. 41 of 99 It will take you to the Product Advisor, which will help you select the product that suits you best. Currently the Virtual Bank only allows you to request a Virtual Loan. The Next button will take you to the application form –“Virtual credit request“. On the first step you are prompted to choose the amount of the loan (up to BGN 2000), the period (up to 36 months) and the preferred date for the repayment of the monthly repayment installment. All the fields on this screen are mandatory. After filling in the date correctly, please click on the „Next“ button. On the next screen you must fill-in accurately your personal details. The mandatory fields are marked with “*". One of the fields must always be completed – landline or mobile phone number and personal or office email. After all the details are filled-in, please click on the “Next“ button. Page. 42 of 99 On the next step you are prompted to fill-in the data of your current job, the type of your employment agreement, the official income, as well as all other income sources, if any. You must select the current account, where you want to receive the loan. If you do not have such an account or if you want to open a new account, you can state that by ticking the checkbox “I want to open a new checking account in leva”. If you have another type of loan, you must click on the “+“button in the “Current liabilities“ section and fillin the agreed amount of the loan, the current debt, the type of the loan, the creditor, the monthly installment, the interest rate and the maturity date. After filling-in all the mandatory fields, please click on the “Next“ button. Page. 43 of 99 On the next step you must fill in details about your family status and education, as well as to indicate the type of your current residence – your own, belonging to your parents, rented or other. If you choose “own residence“ you are required to fill-in the relevant data about the residence – type of property, address, total area, any encumbrances and co-ownerships. Page. 44 of 99 The “Next“ button will take you to the last screen, where you can review all the information you have entered, before sending it to the Bank. You will also have the option the print the request, by clicking on the “Print“ button or save it by clicking on the “Save“ button. By clicking the “Send“ button, your application will be sent to the Bank for review. Page. 45 of 99 The Bank reviews your application and, if it is approved, the Bank will send you through the portal all the relevant pre-contractual information, as you will also receive an email message to that effect. Page. 46 of 99 The pre-contractual information may be found by clicking on the „Requests“ button in the „Loans“ section of the “Funds“ menu. Your application and its status and the pre-contractual information are displayed on the screen. You must read and accept that information. For that purpose, you must click on “Pre-contractual information“ and a file with all the parameters of your requested loan will be displayed. If you agree with all the parameters, click on “I accept the pre-contractual information“. Your consent is then sent to the Bank and it should be processed. After that the Bank will prepare a contract, which you can see by once again clicking on the “applications“ button in the “Loans“ section of the “Funds“ menu, as you will again receive an email. Please follow the “Loan Agreement“ link and your agreement and the general terms and conditions for the granting of loans will be displayed. After you read and agree with them, please click on the „Sign“ button. The agreement is signed and sent to the Bank for processing. The agreement will be available for signing for 5 days after you receive the respective email. 2.2.4 Savings Products Section The Savings Products Section is accessible from the main menu Funds > Savings After selecting this option, a list of your savings is opened, together with all the basic information on them: Deposits – amount and currency of the deposit, type, starting and maturity dates, period, interest % (applicable when interests are accrued on the amount of the deposit on its maturity date), penalty interest % (applicable in case of early termination of the deposit) Savings – currency, balance (the amount accumulated so far), objective (the final amount of the saving), the amount of the installment, installment date, interest % (applicable when the objective is reached and the specific saving is closed). Page. 47 of 99 If you need more information on a specific deposit / saving you just have to click on the “+“ symbol on the respective line and this will take you to the information section about the respective product. You can get to the same place directly, if you click on a specific deposit /saving on the home page of the website. 2.2.4.1 Deposits 2.2.4.1.1 Opening a deposit If you do not have Savings Products or if you want to create a new savings product, please click on the „Request new savings product“ button. After clicking on this button, the portal will load a list of the available products, among which you can make your choice. Let’s take Promotional 3 month deposit for example. Page. 48 of 99 After having selected your savings product, please click on the “Next“ button, in order to continue with your application. The system loads a screen, where can create your deposit. Page. 49 of 99 Here you can specify the period of the deposit, the account and amount to be used for the replenishment of the deposit, and the currency in which the deposit is to be opened. The currency of the deposit may differ from the currency of the account, from which it is to be replenished. The minimum amount for opening a deposit is 500 (five hundred) currency units. The fields “Agreed with General Terms and Conditions“ and “Agreed with the contract“ are mandatory. Upon clicking on the respective links, the documents are opened for reading. All the fields, marked with an asterisk are mandatory. If you fail to complete any of these fields, the respective field is highlighted red and the message “Field is required.“ is displayed, as well as the error message “The data you have entered in the marked fields is incorrect. Please check them again.“ After you complete the form with all the mandatory fields for the respective application, you are presented with two options: The “Save and Send“ Button – saves and sends the application, as the system requests it to be signed with a QES The “Save“ button – saves the application, as you can confirm it in the future After saving or signing, the status of the application can be seen in the “Requests“ menu of the „Savings“ section. Page. 50 of 99 2.2.4.1.2 Closing of deposits In order to access your savings you must select the “Savings“ menu in the „Funds“ section. After that you should select the deposit/saving, that you want to close from the displayed list and open its details, using the “+“ button. This opens a screen, where you have various options, as one of them is to close the deposit, by using the „Close“ button. Page. 51 of 99 The system loads an application for closing the deposit. In this application you should specify your account, in which you want the respective funds to be transferred, as well as whether the deposit is to be closed on its maturity date or earlier. The closing of a deposit before the maturity date, is considered a breach of the terms and conditions, applicable to the deposit, and in this case the penalty interest rate for early termination of the deposit is applied. If you choose to close a deposit on its maturity date, even if you perform this action before the actual maturity date of a deposit, the transaction portal will wait until the maturity date and then it will send the application for closing the deposit to the Bank for processing. Page. 52 of 99 All the fields, marked with an asterisk are mandatory. If you fail to complete any of these fields, the respective field is highlighted red and the message “Field is required.“ is displayed, as well as the error message “The data you have entered in the marked fields is incorrect. Please check them again.“ After you have completed all the mandatory fields for the respective application, you are presented with two options: The “Save and Send“ Button – saves and sends the application, as the system requests it to be signed with a QES The “Save“ button – saves the application, as you can confirm it in the future After saving or signing, the status of the application can be seen in the “Requests“ menu of the „Savings“ section. All the saved applications, which has not been sent to the Bank yet, can be edited, deleted or sent from the “Requests“ section of the “Savings“ menu. 2.2.4.2 Target savings 2.2.4.2.1 Opening a target saving The target saving enables you to save money for a specific purpose, as you can also specify a specific target amount, which you want to reach. Upon reaching the target, the specified interest rate is added to that amount and the funds are transferred to your current account. You can access your savings through the “Savings“ menu in the “Funds“ section. In order to create new target saving, please click on the “Request new savings product“ button. Page. 53 of 99 After clicking on that button, the portal loads a list of possible products, from which you should choose “Saving account target savings“ and click on the “Next“ button. Page. 54 of 99 After selecting your savings product, please click on the “Next“ button, to continue with your application. The system loads a screen, where you specify your target savings product. There you choose the name of the purpose, the account to be used for replenishing the target savings product, the target amount, the amount of the installment, to be applied for the replenishment of the target saving and choose one or two dates, on which the funds are to be transferred to your savings product every month. After specifying the parameters of your target savings product, you must check the “Agreed with the contract“ box. By clicking on the respective link you can load and read the agreement. All the fields, marked with an asterisk are mandatory. If you fail to complete any of these fields, the respective field is highlighted red and the message “Field is required.“ is displayed, as well as the error message “The data you have entered in the marked fields is incorrect. Please check them again.“ After you have completed all the mandatory fields in the respective application form, you are presented with two options: The “Save and Send“ Button – saves and sends the application, as the system requests it to be signed with a QES The “Save“ button – saves the application, as you can confirm it in the future After saving or signing, the status of the application can be seen in the “Requests“ menu of the „Savings“ section. Page. 55 of 99 From that menu you can also edit, delete or confirm an already saved application, which has not been sent to the Bank. 2.2.4.2.2 Closing a Target Savings Product You can access your savings through the „Savings“ menu in the „Funds“ section. After that choose the target saving, which you want to close from the displayed list and open its details, using the “+“ button. Page. 56 of 99 This will open a screen, where you have different options, one of them is its closing, using the “Close“ button. The system loads the application for closing the target saving. After reviewing the application, you can send it to the Bank for processing, using the “Save and Send“ button, by signing it with the QES or save it and send it in the future, by using the “Save“ button. After signing, the status of the application can be reviewed from the “Requests“ menu in the “Savings“ section. Page. 57 of 99 2.3 Editing Products The portal offers the option to visualize all your products or any one or more of them. In case you have registered yourself through the Internet for using remote channels, the portal by default displays all your products. If the registration is done in an office of BACB, you may have expressly specified which products are to be displayed by the system. The products, displayed by the system, are managed by the Settings menu, Edit products section. From here you can choose which products should be “hidden“ or “shown“ in the Transaction Portal, managing them, using the “hide“ and “show“ buttons. The “hidden“ products will only be visible in this section, where they can be selected to be displayed again. The changes will become effective upon the next log-in to the portal. Page. 58 of 99 2.4 Statistics for Log-In to the Virtual Bank As a client of the Virtual Bank, you can obtain a report for your session in the Virtual Bank and the channel, through which the access was made. In order to obtain such a report, you have to visit the section, specified below: Upon clicking on that button, a screen with your user details is displayed. Page. 59 of 99 You have to select the respective period for the report, by specifying the starting and end date, as well as to specify the desired channel for the report. The “Search“ button activates the generation of the respective report with information on the Log In date and time, the action, you have performed and the IP address, you have used to log in. The “Details“ button provides more information on the specific action. Page. 60 of 99 2.5 Communications with the Bank In order to facilitate your communication with us through the Transaction Portal, you can send messages to the Bank from the relevant dedicated section. The red number, displayed next to the icon of the section indicates the presence of new messages in your mailbox and their number. In this communications section you have the following options: 2.5.1 Information from the Bank In the Information from the Bank section you can find all the messages, sent to you by the Bank. This may be information, related to new products and services, new tariffs, promotions, news and other events, related to BACB. A table shows all the received messages, and you can open and read them or mark them as read. Page. 61 of 99 In order to see the full text of the message, please click on the “More“ button You can select messages, received in a certain period, depending on whether they are read or unread and sort and select them by categories. Page. 62 of 99 2.5.2 Messages to the Bank In the Messages to the Bank section you can send us any kind of messages with free text, which do not require signing with a QES and can be related to the products and services, which you use, the functionalities of the systems and their quality of operation. From here you can send us signals for issues and inaccuracies in the functioning of the systems – Transaction Portal, mobile banking, information centre. To send a message to the Bank, please click on the “Create“ button. A number is assigned to each message sent. Page. 63 of 99 2.5.3 Compliments and complaints In the “Compliments and complaints“ module you can submit your comments and recommendations to BACB, which will help us improve our services. In order to create a new message, please click on the “Create“ button, as the portal will open a form to be filled in. In the “Subject“ field, please specify the subject of the praise or complaint, as the limitation here is 100 characters. In “Feedback“, please specify how we can contact you, as you can choose among – email, regular mail, personally in a branch of the Bank or by phone. Page. 64 of 99 In the “Text“ field, please indicate the nature of your compliment or complaint, as the limitation here is 2000 characters. After filling in all the information you can either send the message, using the “Send“ button or cancel it, using the “Back“ button. All the compliments and complaints submitted to us are displayed in a list, as by clicking on the “+“ icon, you will see the details of the document, sent to the Bank and „-„ closes these details. A number is assigned to each message sent. 2.5.4 Instructions to the Bank In the Instructions to BACB module you can send any and all messages with free text, related to payments and active operations, concerning your products. Each and every instruction is to be signed, using the QES. To send a message, click on the “Create“ button, which will load a form to be filled in. Page. 65 of 99 Your name is automatically filled in the “From” field. In the “Subject“ field you can specify the subject of the instruction – Transfer Order, Standard Deposit, Promotional deposit, Transfer Clarification/Cancellation or Other. In the „The instruction refers to account“ field you can choose the account, to which the instruction refers. In “Description“ you should specify your instructions. For instructions, related to operations exceeding BGN 30 000 (thirty thousand) or their equivalence in a foreign currency, you must always fill in a statement of origin, in accordance with the Measures Against Money Laundering Act /MMLA/. After completing your instruction you can either save, or save and send it for implementation by the Bank. If you have submitted instructions to the Bank, you can review them by clicking on them. After the application is opened, you may also print it, using the “Print“ button. The sent and saved instructions are displayed in a list in the Instructions to the Bank section, where you can monitor their status – processed or returned, as well as to create a similar document, using the respective icon. Page. 66 of 99 2.6 Payment operations 2.6.1 New transfer From here you can submit orders for new transfers in BGN or foreign currency, as well as to perform exchange of currencies. 2.6.1.1 Transfer Orders in BGN 2.6.1.1.1 Transfer Order in BGN The process of performing transfers in BGN includes four steps. On the first step you select the account, from which you want to make the transfer, the amount and the respective currency – here BGN. You can make the Transfer Order in BGN also from an account in foreign currency. The “Next“ button will take you to the second step, where you have to fill in the details of the beneficiary (recipient), using either a list of pre-defined beneficiaries („Beneficiaries“ button), or the “Other Beneficiary“. Let’s take a beneficiary, who is not included in the list, for example. Upon clicking on the „Other beneficiary “ button a screen is loaded, where you can select a “Local account“ and fill in the name and the account of the recipient. Page. 67 of 99 On the third step you must fill-in the reason. On the fourth step you can review and – if necessary – edit the transfer details – the account, from which the transfer is made, the recipient, the amount, the reason and the payment system. The payment system may be either: BISERA– standard payment system, where the payment is made within the day (for transfers, sent for processing by 3.00 p.m.) or by the next day (for transfers, sent for processing after 3.00 p.m.) RINGS – express payment system, where the payment takes place within 2 hours. The price of this service is higher than Bisera and it is in accordance with the current tariff of the Bank. Page. 68 of 99 Page. 69 of 99 At all steps of the process, all the fields, marked with “*“ are mandatory and if not filled, the following error message will be displayed “Field is required.“ is displayed, as well as the error message “The data you have entered in the marked fields is incorrect. Please check them again.“and the fields are highlighted red. After filling-in and reviewing the document, you will have the option to either save it for subsequent sending or save and send it for processing by the Bank. In the “Save as“ section you can save the created transfer, as: A regular payment, with a certain name, which is to be made on a date of your choice at regular intervals Future payment, which is to be transferred on the date of your choice A template with a certain name, which can be subsequently opened and edited and send for processing More information on these options can be found in the relevant sections. 2.6.1.1.2 Transfer to the national budget The process of ordering a payment to the national budget again involves four steps. On the first step you select the account, from which you want to make the transfer, the amount and the currency – BGN. After you choose the account, the amount and the currency – BGN, please press the “Next“ button. All fields are mandatory and if you fail to fill-them in, an error message will be displayed. On the second step you have to fill-in recipient’s details – name and account (IBAN) of the governmental institution. Page. 70 of 99 After you fill in the respective data, please click on the „Next“ button. All the fields, marked with “*“ are mandatory and if you fail to fill-them in, an error message will be displayed. On the third step you are prompted to fill-in the details of the liable person, the payment type, the reason for payment the type, date and number of the document, based on which the payment is made (if required for such payments). The liable person may be different from the actual payer. Page. 71 of 99 After filling-in all the details, please press the „Next“ button. All the fields, marked with „*“ are mandatory and if you fail to fill-them in, an error message will be displayed. On the fourth step you can review and – if necessary – edit the transfer details – liable person, recipient (name and account), amount, type, number, date and period of the document, payment system.. The payment system may be: BISERA – standard payment system, where the payment is made within the day (for transfers, sent for processing by 3.00 p.m.) or by the next day (for transfers, sent for processing after 3.00 p.m.) RINGS – express payment system, where the payment takes place within 2 hours. The price of this service is higher than Bisera and it is in accordance with the current tariff of the Bank. After filling-in and/or editing the document, you will only be able to save it for subsequent sending, or to save and send it for processing by the Bank. Page. 72 of 99 Page. 73 of 99 2.6.1.1.3 Direct debit The request for direct debit may be accessed through the main menu Services – Direct debit. Upon activation of this section, a form is opened, where you must fill in the payer’s details (name, account number and bank), recipient’s details (name, account number and bank), the amount, the currency and the reason for payment. The creation date is automatically filled-in by the system, using the current date. The direct debit request can be saved as a Template or as a Future payment with a specific performance date, from the “Save as” section at the end of the form. After filling-in all the necessary information you have two options: either to only save the request for future sending or to save and send it to the Bank for processing. The saved direct debit requests are accessible and ready for future sending to the Bank in the Payments menu – Pending payments. Page. 74 of 99 2.6.1.2 Transfer orders in foreign currency The process for execution of transfers in foreign currency involves four steps. Page. 75 of 99 The first step prompts you to specify the account, the amount and the currency, in which you want to make the transfer. After completing the form, please click on the “Next“ button, which will take you to the second step. Here you are prompted to select the beneficiary of the payment (recipient), as you can use a list of predefined benficiaries. If you do not use a pre-defined beneficiary, in the “Other beneficiary“ menu, you can fill in the details of the recipient – name, address, IBAN, country, BIC (SWIFT) of the recipient’s bank, recipient Bank’s name. All this data must be completed in Latin letters. Page. 76 of 99 All the fields, marked with “*“ are mandatory, as well as the following combinations, one of which you must specify for the recipient’s bank: BIC BIC + name of the bank Name of the bank + city After you fill-in accurately all the recipient’s details, please click on the „Next“ button to continue with ordering the foreign currency transfer. In the next step you have to select the value date of the transfer, the reason for payment and the bank expenses. The value date can be: standard (2 business days), urgent (next business days) and express (within the same business day) The bank charges may be at the expense of the: “Payer“ (all the costs and expenses are covered by the payer), „ Beneficiary “ (all the costs and expenses are covered by the recipient) and “Shared“ (the outgoing costs and expenses are covered by the payer, the rest – by the recipient) Page. 77 of 99 All the fields are mandatory and the system will not allow you to go to the next step, if you have failed to fill-in any of them, as the following error message will be displayed“Field is required.“ is displayed, as well as the error message “The data you have entered in the marked fields is incorrect. Please check them again.“ After filling in accurately all the details, regarding the additional information, please click on the “Next“ button. The last step is the “Preview“ screen, where you can review and check the entire form for ordering a foreign currency transfer, with all the details and edit them, if necessary. Page. 78 of 99 Page. 79 of 99 For amounts equal to or exceeding BGN 30 000 (thirty thousand) or their equivalence in a foreign currency, you must fill in a statement of origin, in accordance with the Measures Against Money Laundering Act /MMLA/, in an additional dedicated field. For any cross-border transfers and payments to third parties, of amounts, equal to or exceeding BGN 30 000.00 (thirty thousand) or their equivalence in a foreign currency, you must also complete a declaration, pursuant to Ordinance 28 of the Ministry of Finance and the Bulgarian National Bank. For transfers of more than BGN 100 000.00 (one hundred thousand) or their equivalence in a foreign currency, you are required to fill-in a statistical form. Page. 80 of 99 2.6.1.3 Currency exchange request Before you start filling-in the currency exchange request, you can review the currency exchange rates, by clicking on the green strip at the bottom of the page. Page. 81 of 99 After clicking on the strip, all the exchange rates of the bank will be displayed, divided into four columns: Buy, Sell, Fixed Rate, Date. The process of submission of a currency exchange request takes place in three steps. The first step is the selection of the account, the amount and the currency, which you want to exchange. Page. 82 of 99 The second step is to select your account, where you want to receive the exchanged amount. After selecting the account and filling-in the amount and the currency, click on the “Next“ button, to continue with the exchange request. The last step is the “Preview“ screen, where you can review and check the entire form for ordering a currency exchange, with all the details and edit them, if necessary. Page. 83 of 99 The editable fields are: The payer’s account (IBAN of the account, which will be charged with the respective amount) The recipient’s account (IBAN of the account, which will be endorsed with the purchased amount) The amount, which the client wants to sell/buy The currency of the amount, which the client wants to sell/buy The reason for payment Page. 84 of 99 For amounts equal to or exceeding BGN 30 000 (thirty thousand) or their equivalence in a foreign currency, you must fill in a statement of origin, in accordance with the Measures Against Money Laundering Act /MMLA/, in an additional dedicated field. After you are ready with the review and/or editing, please click on the “Save and send“ button, to send the request to the Bank. The currency exchange request is saved in “Pending payments“ and a window is displayed, where you must confirm or cancel the exchange. For amounts, exceeding BGN 10 000.00 (ten thousand), you can negotiate the applicable exchange rate with the Bank. If there is an exchange agreed in advance with the Bank, the client must fill that in during the last step – the Edit screen, by clicking on the Agreed Exchange Rate box and entering the respective value in the Exchange Rate box. If the amount is below 10 000.00 (ten thousand) the following error message will be displayed in red: “Currency exchange orders at Agreed Exchange Rates are only accepted for amounts, exceeding 10,000 EUR or their equivalence.“ 2.6.1.4 Future payments Each of your transfers can be saved as a future payment. You can do that from the menu at the end of each transfer, whether made in BGN, in BGN to the national budget, in a foreign currency or for currency exchange. You only have to mark the „Future payment“ box at the end of the transfer form and specify the date for execution of the payment. Page. 85 of 99 The future payments are saved and confirmed immediately and executed on the specified date. 2.6.2 Utility payments The information for the payment of your bills is accessible from the main menu “Payments“ – “Utilities “ Creating utiltiy payment You can create a new bill payment, using the “New“ button. The system loads a screen, where you have to choose the service and the provider and click on the “Create“ button. Let’s take the payment of a monthly subscription to your ISP, for example. On the next screen you are prompted to enter your subscriber number, the account, from which you want to effect the payment and to create a name for the payment. Marking the „Agreec with General Terms and Page. 86 of 99 Conditions“ box is mandatory, as you can read the respective terms and conditions, by clicking on the “general terms and conditions“ link. By clicking on the “Check for pending bill payments “ button, you can check for any bills due to the respective provider. The field, indicating the respective liability, is displayed below the field with the subscriber number. From this point you have several options: to register the payment, using the Save button to pay the liability, without registering it, using the Pay Now button to register AND pay the respective bill, using the Save and Pay Now button Management of the utility payments - Editing After you have loaded the screen with all the bills for payment, you may edit a certain bill, using the “Edit” button. After clicking on the “Edit” button, the system loads a menu, where you can change your subscriber number, the account, from which the payments are made and the name of the payee. Page. 87 of 99 - Delete After you have loaded the screen with all the bills for payment, you may delete one or more bills for payment, as you must have to mark them and then click the “Delete“ button. The same result may be achieved by clicking on the symbol on each of the selected lines - Payment The Payment is effected by clicking the “Pay“ button, after having marked the desired bills for payment first. 2.6.3 Pending payments All your waiting payments may be accessed through the main menu „Payments“ – “Pending“ Page. 88 of 99 The system displays a list of the payments and their details, where you can edit them, using the button or creating a similar payment, using the button. 2.6.4 Standing payments The information on your regular payments is accessible through the main menu “Payments“ – „Standing“ When you access this section, the system displays a list of the registered regular payments and various options. Page. 89 of 99 Creation A regular payment can be created, using the “New“ button at the end of the list of regular payments. A regular payment is created similarly to the creation of a transfer. Each of your transfers can be saved as a regular payment, whether in BGN, in BGN to the national budget, in foreign currency, or as currency exchange. You must mark the “Recurrent payment“ field in the “Save as“ section at the end of the transfer form and specify the name (familiar to you), the periods of the payment (the period in which the payment is to be effected – every 1, 3, 6 ,9, 12 months) and the starting date (if you want it to be different from the ordering date). Management All the registered regular payments are accessible from the “Standing“ menu in the „Payments“ section. The system displays two lists with two different sections – Active and Inactive regular payments. Inactive After you create a regular payment you must activate it. You can do that by going to the “Inactive“ section and selecting the payment, which you want to activate. After that you should click on the “Activate“ button. The lists provide also detailed information on the regular payment – type, name, starting date, amount, period, status. Here you can edit the regular payment, delete it or create a similar payment. Upon clicking on the “Activate with automatic execution“ button, the regular payment will be saved and on the date, specified for execution, it will be executed automatically, without prompting you for confirmation Page. 90 of 99 Active Here the system displays a list of all the activated regular payments and their respective details. From here you can deactivate the payment or created a similar payment. To delete a payment, it must be inactive. The regular payment is saved and, on the date, specified for its execution, you must confirm it from the “Pending“ menu in the “Payments“ section. 2.6.5 General report Here you can find detailed information on all your movements, balances and payments. The reports are divided into different sub-sections: Movements, Balances, Payments, Bills. You can generate different reports, using the available filters and specify a specific period. You can also choose how many results you want displayed on the page. The statuses, existing for the payments and available for display in the various reports are, as follows: Saved – the document is submitted to the system, but it is not signed or sent to the Bank. Awaiting signatures – the document has been signed by one user, but more than one signature is required for sending. Denied – the document has been denied by the client. Sent – the document has been sent to the Bank, but it has not yet been processed by the Bank. (Whether the document has been accepted for processing and waiting second control or is queued) Recorded – the document has been processed by the Bank i.e. client’s instructions have been executed and the his/her account has been charged. We always show reference. Final status Returned – the document has been rejected by the Bank and it will not be executed. The rejection is accompanied by a description of the respective reason for the rejection. Final status Page. 91 of 99 2.7 Other services 2.7.1 Beneficiaries The Beneficiaries section is accessible through the main menu “Services” Creation After you enter the „ Beneficiaries “ section, select the “New“ button, to create a new record. On the next screen you should enter the name and address of the Beneficiary. If you have authorized users for your accounts, you can use the “Visible for all authorized persons“ button to choose whether they are to see the Beneficiary, when creating a new transfer. Here, only Beneficiary’s name is mandatory. If you fail to fill that in an error message will be displayed and the field will be highlighted red. After filling in the form, please click on the “Add account“ button. In the menu that opens, select whether the account is in Bulgaria or abroad, enter the IBAN, bank name, currency, city/country and address. Only the IBAN and BIC are mandatory. If you fail to fill in these fields, an error message will be displayed. Page. 92 of 99 After filling in the date, please click on the “Save account“ button. The relevant information on the Beneficiary will be displayed – name, address, IBAN and you can edit this information, if necessary. A single Beneficiary may have more than one account. Use the “Add Account“ button to add more accounts for the Beneficiary. To save your beneficiary, please click on the “Save beneficiary“ button, and if you want to cancel the record – the “Cancel“ button. After you confirm the record a message, confirming the successful recording of the Beneficiary will be displayed, and the “Beneficiaries“ button will appear, allowing you to return to the list of beneficiaries. Management After you load the list of beneficiaries, you may edit a Beneficiary of your choice or delete them from the list. You can do that, using the “+“ button. Page. 93 of 99 Editing a Beneficiary is similar to creating one. 2.7.2 Templates The Templates Section is accessible through the main menu Services. Creation Each of your transfers can be saved as a template. You can do that at the end of each transfer, whether in BGN, in a foreign currency, to the national budget or as a currency exchange. You have to mark the “Template“ box and specify a name in the “Template Name“ box. You can also create a template using the “New“ button at the end of the list of Templates. Page. 94 of 99 Creating a template here is similar to ordering a transfer. On the last screen you must name the template and choose whether it is visible to all the authorized persons. If you have authorized users for your accounts, you can use the “Visible for all authorized users“ button to choose whether they are to see the template, when creating a new transfer. Management To edit a template, please click on the “+“ button in front of template’s name. After clicking on the “+“ button, a menu with three options is displayed: “Edit“ – you can edit the account, from which the transfer is to be made, the amount, currency, recipient’s details, the reason for payment, as well as the name of the template itself “Create a Transfer“ – the template is loaded and you can send it for execution “Delete“ – deletes the template with all data, saved in it. Page. 95 of 99 2.8 Special functionalities 2.8.1 Calendar The payments’ own calendar may be accessed through the main menu Tools – Calendar. This functionality displays information in the form of a calendar of all your outgoing payments in the specific month, as the different types of payments are color coded: Registered utility payments (blue) Ordered standing payments (green) Pending payments for future dates (orange) Pending payments without a specified date (purple) – these are displayed below the calendar Page. 96 of 99 All the already performed payments are marked with If you place the pointer on an individual cell, a list of payments for that day is displayed, indicating their respective individual values and total amounts by type. If you click on the “Go to payments“ you will be taken to the Pending payments section. 2.8.2 Product advisor The product advisor can be accessed from the main menu Tools – Product advisor. If this service is activated, the selected starts by choosing among the main product types – Account, Loan product, Debit Card or Savings product. Page. 97 of 99 After a choice is made, the system will display a list of all the offered products of the selected type, as you can choose one of them. If you are not sure which of our products suits your needs best, this functionality will help you choose the most appropriate product, offered by the Bank. Based on an algorithm, on the principle of Q&A, the system will guide you until finally it shortlists the products, you should choose from. Page. 98 of 99 2.8.3 Wallet This functionality is accessible through the main menu Services – Wallet. In this section the current status of your funds – revenues, costs and expenses, savings, loans – is presented visually, using charts. Page. 99 of 99 Bulgarian-American Credit Bank AD