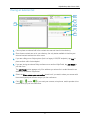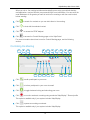
1
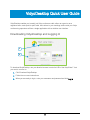
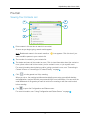
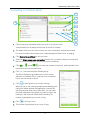
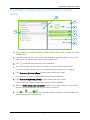
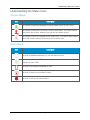
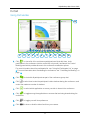
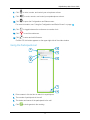
VidyoDesktop™ Quick User Guide Product Version 3.3 Document Version A August, 2014 © 2014 Vidyo, Inc. All rights reserved. Vidyo’s technology is covered by one or more issued or pending United States patents, as more fully detailed on the Patent Notice page of Vidyo's website http://www.vidyo.com/about/patent-notices/, as well as issued and pending international patents. The VIDYO logotype is a registered trademark of Vidyo, Inc. in the United States and certain other countries, and is a trademark of Vidyo, Inc. throughout the world. VIDYO and the Vidyo family of marks are trademarks of Vidyo, Inc. in the United States and throughout the world. VidyoDesktop Quick User Guide VidyoDesktop enables you to easily join Vidyo conference calls, either as a guest or as a registered user, make point-to-point calls, invite others to your meetings, and control your Vidyo conferencing experience all from a single application with an intuitive user interface. Downloading VidyoDesktop and Logging In 1 2 To download VidyoDesktop, use your favorite browser to enter the URL of the VidyoPortal™ that you want to connect to. 1. Click Download VidyoDesktop. 2. Follow the on-screen instructions. 3. When you are ready to log in, enter your username and password and click Log In. 2 VidyoDesktop Quick User Guide Pre-Call Viewing Your Contacts List 4 1 5 2 3 1. Enter a name in this text box to search for a contact. As soon as you begin typing, search results appear. Note: Beside each name in the search results, a want to add the person to your contacts list. icon appears. Click this icon if you 2. The number of contacts in your contacts list. 3. The status and name of the contact or room. Click to view information about the contact or room, place a direct call to the contact, join the contact’s room, or join a public room. For more information about placing a call or joining a contact’s room, see “Connecting to Contact’s Room or Connecting to a Contact Directly” on page 5. 4. Click to invite guests to a Vidyo meeting. When you do so, the meeting invitation automatically opens using your default desktop mail application, and pre-fills with your personal Vidyo room information. You can enter the email addresses of the guests you want to invite to the meeting or edit the email content before sending. 5. Click to open the Configuration and Status screen. For more information, see “Using Configuration and Status Screen” on page 12. 3 VidyoDesktop Quick User Guide Connecting to Your Own Room 2 3 4 1 5 6 7 8 1. Click to view more information about your room or to join your room. 9 Your personal room is always the first entry in the list of contacts. 2. The status of the room, the room’s owner, the room’s extension, and the tenant name. For more information about status, see “Understanding the Status Icons” on page 7. 3. Click Connect to your Room to join your room. 4. Select the Share screen upon connection check box if you want to share your screen with the rest of the participants as soon as you join the conference. 5. Click , , and/or if you want your camera, microphone, and/or speaker to be muted when you join the conference. 6. Click to access the Room Details pop-up. The Room Details pop-up enables you to enter a room, webcast, or moderator PIN, or copy the room or webcast link so you can send it to others. 7. Click to invite guests to your Vidyo meeting. When you do so, the meeting invitation automatically opens using your default desktop mail application, and pre-fills with your personal Vidyo room information. You can enter the email addresses of the guests you want to invite to the meeting or edit the email content before sending.The number of participants in your room (if any). 8. Click to lock your room. 9. The number of participants in your room (if any). 4 VidyoDesktop Quick User Guide Connecting to a Contact’s Room or Connecting to a Contact Directly 2 3 4 5 1 6 7 8 1. Click to view more information about the contact, place a direct call to a contact, or join the contact’s room. 2. For public rooms, tap the room to view more information about the public room or join the public room. You cannot make a direct call to a public room. 3. Click to remove this contact from your contacts list. 4. The name and status of the contact, the contact’s extension, and the tenant name. For more information about status, see “Understanding the Status Icons” on page 7. 5. Click Connect to [Contact]’s Room to place a direct call to the contact. If this contact is in a busy or offline state, this button will be disabled. 6. Click Connect with [Contact] Directly to place a direct call to the contact. If this contact is in a busy or offline state, this button will be disabled. 7. Select the Share screen upon connection check box if you want to share your screen with the rest of the participants as soon as you join the conference. 8. Click , , and/or if you want your camera, microphone, and/or speaker to be muted when you join the conference. 5 VidyoDesktop Quick User Guide Placing an External Call 2 3 1 4 5 6 1. Click to place an external call to the contact who was not found in the directory. 2. Since these contacts are not in your directory, the only status available is that they are external contacts and are the room owner. 3. If you are calling a non-Vidyo system (that is, a legacy H.323/SIP endpoint), tap Call to place a direct call to that endpoint. 4. If you are joining an external Vidyo conference on another VidyoPortal, tap Join Room to join that room. The Join Room button appears only if the address you entered is in a valid format for an address on a different VidyoPortal. 5. Select the Share screen upon connection check box if you want to share your screen with the external participant as soon as you join the conference. 6. Click , , and/or if you want your camera, microphone, and/or speaker to be muted when you join the conference. 6 VidyoDesktop Quick User Guide Understanding the Status Icons Contact Status Icon Description The contact is online and available to receive a direct call or to join a room. The contact is online but is currently in a call or conference. You cannot make a direct call to this contact; however, you can join the contact’s room. The contact is offline (not logged into the VidyoPortal). You cannot make a direct call to this contact; however, you can join the contact’s room. Room Status Icon Description The room is available and empty, so you can enter the room. The room is available and PIN-protected. If you attempt to join the room, you will be asked to enter a PIN. The room is occupied but available to enter. The room is locked, so you cannot enter it. The room is full, so you cannot enter it. 7 VidyoDesktop Quick User Guide In-Call Using theTask Bar 13 1 2 3 4 5 6 7 8 9 10 11 12 1. Click to view a list of the conference participants and chat with them, invite participants to the conference (via the contact list or by email), and launch the Control Meeting panel which provides access to the conference moderation options. For more information about the participants list, see “Using the Participants List” on page 9. For more information about moderating the conference, see “Controlling the Meeting” on page 10. 2. Click to chat with all participants as part of the conference group chat. 3. Click to select how to view the participants’ video windows during the conference, and control the maximum number of windows. 4. Click to select which application or screen you wish to share in the conference. 5. Click to toggle among the applications or screens that are being shared during the conference. 6. Click 7. Click to toggle your self-view preference. to show or hide the video feed from your camera. 8 VidyoDesktop Quick User Guide 8. Click 9. Click 10. Click to mute, unmute, and control your microphone volume. to mute, unmute, and control your speakerphone volume. to open the Configuration and Status screen. For more information, see “Using the Configuration and Status Screen” on page 12. 11. Click 12. Click 13. Click to toggle between the conference time and a clock. to end the conference. to enter and exit full screen. On Mac OS, this button appears on the upper right side of the video window. Using the Participants List 4 1 5 2 6 3 7 8 1. Enter a name in this text box to search for a participant. 2. The number of participants in the call. 3. The status and names of the participants in the call. 4. Click to invite guests to the meeting. 9 VidyoDesktop Quick User Guide When you do so, the meeting invitation automatically opens using your default desktop mail application, and pre-fills with your personal Vidyo room information. You can enter the email addresses of the guests you want to invite to the meeting or edit the email content before sending. 5. Click to search for contacts so you can invite them to the meeting. 6. Click to chat with the selected contact. 7. Click to access the DTMF dialpad. 8. Click to access the Control Meeting page on the VidyoPortal. For more information about how to use the Control Meeting page, see the following section. Controlling the Meeting 1 2 3 11 12 4 5 6 13 14 15 7 8 9 10 16 17 18 1. Click to add a participant to your room. 2. Click to invite a participant to your room via email. 3. Click to toggle between locking and unlocking your room. 4. Click to record or webcast a meeting using a selected VidyoReplay™ Record profile. This option is available only if your system includes VidyoReplay. 5. Click to pause a recording or webcast. This option is available only if your system includes VidyoReplay. 10 VidyoDesktop Quick User Guide 6. Click to stop a recording or webcast. This option is available only if your system includes VidyoReplay. 7. Click to access the Options pop-up. The Options pop-up enables you to access the VidyoReplay library (for systems that include VidyoReplay), set a moderator, room, or webcast PIN, and create or remove a room or webcast link. 8. Click to sort the list of your participants alphabetically. 9. Click order. to sort the list of your participants in attendance 10. Click to toggle between viewing the current conference duration and viewing the current time of day. The conference timer is the default. 11. Click to disable video on all participants’ cameras without allowing them to re-enable it. 12. Click it. to disable video on all participants’ cameras while allowing them to re-enable 13. Click to mute audio on all participants’ microphones without allowing them to reenable it. 14. Click it. to mute audio on all participants’ microphones while allowing them to re-enable 15. Click to disconnect all participants from your meeting room. 16. Click to disable video on the selected participant’s camera without allowing that participant to re-enable it. 17. Click to mute audio on the selected participant’s microphone without allowing that participant to re-enable it. 18. Click to disconnect the selected participant from your meeting room. 11 VidyoDesktop Quick User Guide Using the Configuration and Status Screen Click this… To… View user and conference status information; generate diagnostics reports. Configure the network settings: 1. VidyoPortal section: Select the Validate Server Certificate check box only if you are testing encryption with a self-signed certificate. Otherwise, do not select this check box. Enter the allowed media port range (between 50000 and 65535). 2. VidyoProxy section: Select the Always use VidyoProxy check box if you want VidyoDesktop to always connect via the assigned VidyoProxy. Vidyo recommends that you try to connect directly. 3. Web Proxy section: Select the Use settings from operating system check box if you want VidyoDesktop to follow the Internet Explorer Local Area Network settings on Windows or the OS settings on Mac. Otherwise, select the Use the following settings check box and then select: • Automatically detect settings to configure VidyoDesktop to try to connect using WPAD (Web Proxy Auto-Discovery Protocol). • Use automatic configuration script to configure VidyoDesktop to use a specific PAC script for connection. • Use proxy server to configure VidyoDesktop to connect through a specific Web Proxy server. If you select this check box, enter the Web Proxy address, port, username, and password. If you are trying to connect to a Web Proxy that requires authentication, you must enter the username and password regardless of the selected method. Note: For help with configuring your network settings, talk to your system administrator. Select the microphone, speaker, and camera you are using; control echo cancellation; set whether you want the microphone level to be automatically adjusted. Select your video quality preferences. 12 VidyoDesktop Quick User Guide Click this… To… Select the language of the user interface, whether you want VidyoDesktop to automatically start when you log in, whether you want VidyoDesktop to automatically answer incoming calls, and more. View the VidyoDesktop version being used; check for software updates. 13