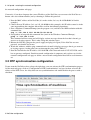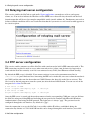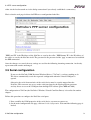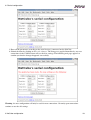
1
Codemat Sarl
Innere Margarethenstr. 10
4051 Basel
Switzerland
Tel: +41 (0)61 271 64 14
Web: http://www.netcube.ch
E-Mail: [email protected]
NetCube Desktop
User's Manual
Table of Contents
1 Presentation of NetCube Family..................................................................................................................1
1.1 The NetCube Family........................................................................................................................1
1.2 Products............................................................................................................................................1
1.3 Application field...............................................................................................................................1
1.4 Free programmable..........................................................................................................................1
1.5 Supported protocols and services.....................................................................................................2
2 Getting started...............................................................................................................................................3
2.1 Network connection.........................................................................................................................3
2.2 Power connection.............................................................................................................................3
2.3 Serial connection..............................................................................................................................3
3 NetCube configuration..................................................................................................................................4
3.1 Network configuration.....................................................................................................................4
3.1.1 Default configuration..............................................................................................................4
3.1.2 Testing the connection............................................................................................................4
3.1.3 Connecting to the NetCube.....................................................................................................4
3.1.4 Changing the default network configuration...........................................................................5
3.1.5 DHCP configuration................................................................................................................6
3.1.6 Ipsetd : restoring the network configuration...........................................................................6
3.2 NTP synchronisation configuration.................................................................................................7
3.3 Relaying mail server configuration..................................................................................................8
3.4 PPP server configuration..................................................................................................................8
3.5 Serial configuration..........................................................................................................................9
3.6 Password administration................................................................................................................11
3.7 The summary of the configuration.................................................................................................12
4 Using the SIGMA program generator......................................................................................................13
5 Specific Services for NetCube Desktop 3XX and NetCube Web-IO......................................................15
5.1 Managing digital inputs/outputs via CGI.......................................................................................15
5.1.1 Overview...............................................................................................................................15
5.1.2 Changing outputs..................................................................................................................16
5.1.3 Reading inputs.......................................................................................................................16
5.2 Managing digital inputs/outputs via gpio-server............................................................................16
5.2.1 Overview...............................................................................................................................16
5.2.2 Protocol of the server............................................................................................................17
5.2.3 Detailed explanations of the commands................................................................................17
6 VirCom and Redirector..............................................................................................................................20
6.1 The redirector service.....................................................................................................................20
6.2 VirCom - the COM Deviator driver for Windows.........................................................................21
6.2.1 Features.................................................................................................................................21
6.2.2 Installation.............................................................................................................................21
6.2.3 Configuration........................................................................................................................22
6.2.4 Status.....................................................................................................................................24
6.3 Virtual COM port API notes..........................................................................................................25
29/03/2012 11:40:10
i
Table of Contents
6 VirCom and Redirector
6.3.1 Supported Driver I/O API functions.....................................................................................25
6.3.2 Device Control Requests.......................................................................................................26
6.3.3 General behaviour notes........................................................................................................27
7 Other services..............................................................................................................................................30
7.1 Generic remarks.............................................................................................................................30
7.2 Telnet server...................................................................................................................................30
7.3 FTP server......................................................................................................................................30
7.4 FTP client.......................................................................................................................................30
7.5 DHCP client...................................................................................................................................30
7.6 HTTP server...................................................................................................................................31
7.7 HTTP client....................................................................................................................................31
7.8 COM deviator server......................................................................................................................31
7.9 Timezone support...........................................................................................................................31
8 Advanced configuration..............................................................................................................................33
8.1 Using the shell................................................................................................................................33
8.2 Text editors.....................................................................................................................................33
8.2.1 The nano editor......................................................................................................................33
8.2.2 The vi editor..........................................................................................................................33
8.3 Uploading/downloading a file with FTP........................................................................................34
8.4 Installing a package........................................................................................................................35
8.5 Overview of the directories............................................................................................................36
8.6 Start-up overview...........................................................................................................................38
8.7 Programming scripts......................................................................................................................38
9 Working with GPIO....................................................................................................................................39
9.1 Configuration.................................................................................................................................39
9.2 Reading inputs................................................................................................................................40
9.3 Writing outputs...............................................................................................................................40
9.4 Value of each pin............................................................................................................................40
10 Hardware of NetCube Desktop 2XX/3XX..............................................................................................41
10.1 Housing........................................................................................................................................41
10.2 Connectors....................................................................................................................................41
10.3 CPU-Board...................................................................................................................................41
10.3.1 Dimensions and connectors.................................................................................................41
10.3.2 Specifications......................................................................................................................42
11 Specifications of AC/DC power supply...................................................................................................43
12 Information about RS-485 Support.........................................................................................................44
12.1 CPU card configuration................................................................................................................44
12.2 Pinning of connectors...................................................................................................................44
29/03/2012 11:40:10
ii
Table of Contents
13 GPIO on DB25 connector.........................................................................................................................45
13.1 Pinning of GPIO on DB25 connector..........................................................................................45
13.2 Electrical specifications................................................................................................................45
14 Appendices.................................................................................................................................................46
14.1 URL for additionnal information.................................................................................................46
14.1.1 TeraTerm Pro - Serial Terminal for Windows 3.1/95/98/NT.............................................46
14.2 ASCII table...................................................................................................................................46
14.3 Serial pin description (null modem cable)...................................................................................49
29/03/2012 11:40:10
iii
1 Presentation of NetCube Family
1 Presentation of NetCube Family
1.1 The NetCube Family
The NetCube family consists of a comprehensive range of industrial-strength intelligent serial to Internet
converters. Despite their very small footprint (typically 135 x 85 mm) the NetCubes are complete PC-based
computers with a 486 CPU, up to 2 Gb Disc-On-Module and 128 Mb RAM.
1.2 Products
The NetCube Desktop family is divided into two models:
• NetCube Desktop 2XX: they have 2 COM ports, Ethernet 100 Mb and a disc on module of at least
64 Mb;
• NetCube Desktop 3XX: they have 2 COM ports, Ethernet 100 Mb, a disc on module of at least 64
Mb and a supplementary DB-25 connector (either parallel port or 16 digital inputs/outputs port).
They can be used as simple COM port deviators or you can develop complex, custom applications with the
Sigma program generator.
1.3 Application field
The NetCube family of intelligent converters can connect any RS232 enabled device to a TCP/IP network
and thanks to its intelligence achieve many tasks usually done by much bigger systems.
Typical applications include:
• Data logging to servers;
• Updates of machine or instruments;
• Real time data analysis;
• Process supervision including management of emergency messages with emails;
• Remote data acquisition and data transfer (Weather-, See stations, etc);
• Remote programming and/or debugging;
• Remote maintenance through networks or modems.
1.4 Free programmable
Thanks to the Linux operating system the NetCube Desktop are freely programmable. The NetCube
supports shell scripts (bash) and C programs by default but support for other languages may be added if
necessary.
This major feature allows to fully remote control client/server communications, to filter or to format data in
specified file systems and to store them continuously or at pre-programmed time intervals (logs).
Furthermore the customer applications written with script files are interpreted and can be tested or executed
immediately.
1 Presentation of NetCube Family
1
1.5 Supported protocols and services
1.5 Supported protocols and services
• Telnet server;
• FTP server;
• FTP client;
• DHCP client;
• HTTP server;
• COM deviator server;
• NTP client;
• PPP server;
• Samba (CIFS) server in option.
1 Presentation of NetCube Family
2
2 Getting started
2 Getting started
External connectors of the NetCube Desktop 2XX.
External connectors of the NetCube Desktop 3XX.
Note that the DB25 connector labelled LPT (parrallel port) can sometime be replaced by a GPIO connector.
2.1 Network connection
Connect the NetCube to your Network using a RJ45 patch cable Cat.5. One of the LEDs (usually the orange
one) indicates that the NetCube is connected to the LAN. Note that it will also flicker during network
activity.
2.2 Power connection
Connect the power adapter's DC plug into the NetCube jack.
Connect the power adaptor to an electrical outlet, the Power LED (usually the green one) goes on.
There is no on/off switch, the NetCube boots up automatically when plugged into the outlet.
2.3 Serial connection
Connect your serial device to the NetCube with a DB9 to DB9 cable (null modem cable, see appendix for
complete pin description).
2 Getting started
3
3 NetCube configuration
3 NetCube configuration
3.1 Network configuration
3.1.1 Default configuration
The default configuration set at the factory is the following:
• IP Address: 192.168.0.100
• Netmask: 255.255.255.0
• No gateway
Warning: For big orders, the NetCubes are usually provided with DHCP enabled by default and they use a
predefined hostname given by the customer.
3.1.2 Testing the connection
1. From the Windows desktop click on Start then select Run.
2. In the text input box type ping 192.168.0.100.
Warning: you need to be on the same sub-network as the NetCube. Any machine with an IP between
192.168.0.1 and 192.168.0.254 most probably is on the same sub-network.
3. The following text should appear on the screen:
Ping wird ausgeführt für 192.168.0.100 mit 32 Bytes Daten:
Antwort
Antwort
Antwort
Antwort
von
von
von
von
192.168.0.100:
192.168.0.100:
192.168.0.100:
192.168.0.100:
Bytes=32
Bytes=32
Bytes=32
Bytes=32
Zeit<10ms
Zeit<10ms
Zeit<10ms
Zeit<10ms
TTL=255
TTL=255
TTL=255
TTL=255
Ping-Statistik für 192.168.0.100:
Pakete: Gesendet = 4, Empfangen = 4, Verloren = 0 (0% Verlust),
Ca. Zeitangaben in Millisek.:
Minimum = 0ms, Maximum = 0ms, Mittelwert = 0ms
If this is not the case:
1. Test the connection of the NetCube to the network and try again;
2. If the system still displays no answer check the network configuration of your host and if necessary
modify it temporary to allow both the NetCube and your host to be on the same network.
3.1.3 Connecting to the NetCube
1. Start your favorite web browser and type in the following URL :
http://192.168.0.100
2. A connection between your computer and the NetCube should be established and a web page
appears.
If you have configured your browser to use a proxy for outgoing connections, you may need to
3 NetCube configuration
4
3.1.3 Connecting to the NetCube
switch back to direct connections, or at least configure your browser to not use the proxy for the
connections to the NetCube (modern browsers have exclusion lists). That's required if the proxy can't
reach the NetCube (because they are on different network for example).
The exact content of this web page may differ slightly depending on your kind of NetCube. But the main
links are always the same.
3.1.4 Changing the default network configuration
1. In the main page, click on Network configuration and wait until the page is loaded.
2. Once the following page is displayed, you can change all the values to fit your needs. Take care to
submit good values or you may loose the possibility to join the NetCube by network...
3 NetCube configuration
5
3.1.4 Changing the default network configuration
3. Once satisfied with your changes, submit the form by clicking on Store the changes and reboot. The
changes are applied immediately.
4. Wait a minute until the NetCube is rebooted and start again the process described in Connecting to
the NetCube but with the new IP address (if you changed it).
3.1.5 DHCP configuration
This section is applicable if you want the NetCube to use a DHCP server to retrieve its network
configuration at each reboot. The acronym DHCP stands for Dynamic Host Configuration Protocol. A
DHCP server provides IP addresses for new devices as they log into a network. As the operation of the
NetCube requires a fixed IP address, we recommend that you establish an IP reservation list in DHCP in
order to maintain fixed IP assignments based on the NetCube's MAC address (menu "Scope/Add
reservations" in Windows NT DHCP Manager, if you're unsure please check with your local network
administrator). The NetCube MAC address can be found on the product sticker or in the "Configuration
summary" web page.
DHCP can be enabled/disabled from the "Network configuration" web page described in the preceding
section. You just have to check the "Activate DHCP" checkbox to enable DHCP and to uncheck it to disable
DHCP.
During boot-up, if the NetCube can't join any DHCP server, then it will fallback to the default factory
network configuration (192.168.0.100 as IP address and 255.255.255.0 as netmask).
3.1.6 Ipsetd : restoring the network configuration
Ipsetd is a daemon that is active during 8 seconds during the start-up. This daemon watches IP packets
whose MAC destination address matches its MAC address. If it receives such a packet it will extract the IP
address from the IP header of that packet and use that IP address to start the networking service. This new
network configuration is not stored and will be lost at the next reboot unless you confirm the change with
3 NetCube configuration
6
3.1.6 Ipsetd : restoring the network configuration
the network configuration web page.
Concretely, if you have forgotten the correct IP address of the NetCube you can restore the NetCube to a
known sane state without troubles just by rebooting it. Follow this protocol:
1. Note the MAC address of the NetCube (it's on the sticker, let's say 44-4d-50-00-04-36 for this
example);
2. Choose the new IP address (let's say 192.168.0.200 for this example), this IP address must be in the
same network than the computer that will be used for the following operations;
3. Start a Windows Command Prompt (run the program cmd) and force the ARP resolution with this
command line:
arp -s 192.168.0.200 44-4d-50-00-04-36
4. Send packets in loop with this command line (run it in the Windows Command Prompt):
ping -t 192.168.0.200
This command will not return and will display various messages about the fact that it doesn't get
answers to its ping requests. This is okay. Keep this windows open.
5. Reboot the NetCube (plug out the power supply and plug it in again). If the NetCube was not
powered, you should start it now.
6. Watch the windows with the ping command and wait until it displays messages that it gets answers
to its ping requests. At that point you can interrupt the ping (with CTRL+C).
7. Now the NetCube has the IP address 192.168.0.200, with a network mask of 255.255.255.0, and it
has no gateway configured. But this network configuration is temporary and you have to visit the
network configuration web page to define a new network configuration that will be used from now
on.
3.2 NTP synchronisation configuration
If your want the NetCube to have always the right time, you can activate the NTP synchronization process.
On the main web page, click on "Configuration of NTP synchronization" and you can then select the IP
address of the NTP server, the delay between two synchronizations and enable/disable the process with a
checkbox.
3 NetCube configuration
7
3.3 Relaying mail server configuration
3.3 Relaying mail server configuration
This service enables the NetCube to send mails. Sigma applications can make use of it to send reports,
alarms, etc. You need to indicate the IP address of the SMTP server that will relay the mails and the local
domain name that will be used to complete unqualified emails (emails without @). Furthermore you need to
define a fallback email that will be used each time that that the system tries to send a mail to what appears to
be a local recipient.
3.4 PPP server configuration
This service enables someone to call the NetCube with a modem and to build a PPP connection with it. The
PPP connection can then be used to access other network services (telnet, com deviator, ftp, http) and to
work with the NetCube remotely even if it's not connected to any LAN (local Ethernet network usually).
By default the PPP server is disabled. If you want to activate it you need to uncomment one line in
/etc/inittab (you'll find two lines concerning the PPP server in that file, one to use when the modem is
on COM1 and the other one for the modem on COM2. Remove the sharp (#) on the line to activate). This
file is used by the init program to start the system just after the kernel initialisation. You can use one of the
integrated text editors for this task.
# PPP server on COM1
#ttyS0::respawn:/sbin/mgetty ttyS0 -D /dev/ttyS0
# PPP server on COM2
#ttyS1::respawn:/sbin/mgetty ttyS1 -D /dev/ttyS1
Once the PPP server is started and the modem connected on the corresponding COM port, you can dial into
the NetCube using any dialup PPP tool including the one provided in standard with Microsoft Windows.
Authentication is done using the PAP protocol. The login to use is always "ppp". The password can be
configured through the web interface, by default it is "ppp".
Once the connection is set up, the NetCube is accessible with the IP address established during the
connection. By default, it is 192.168.0.250 but this can be changed through the web interface (accessible
3 NetCube configuration
8
3.4 PPP server configuration
either via the local network or via the dialup connection if you already established a connection).
Here's what the web page dedicated to PPP server configuration looks like:
"PPP Local IP" is the IP address of the NetCube as seen by the caller. "PPP Remote IP" is the IP address of
the caller as seen by the NetCube itself. The password is the password of the "ppp" account used to establish
the PPP connection.
Once the changes are stored, the new settings are used for the following incoming connection. An already
open connection remains unchanged.
3.5 Serial configuration
If you use the NetCube COM Deviator Windows Driver ("VirCom"), you have nothing to do.
The driver automatically sends the requested configuration when the virtual COM port is
opened.
Otherwise the serial characteristics of the serial device must be exactly mapped into the
NetCube. This concerns any access to the serial port done by the Sigma program generator
and any direct access to the COM port done through TCP sockets (ports 2000 and 2001).
The configuration of VirCom (the NetCube's Windows Virtual Com Port Driver) is described in another
chapter.
Follow this procedure to configure the NetCube serial ports:
1. Note carefully the COM properties of the serial device you want to connect to.
2. On the main configuration web page, click on Serial configuration. Wait until the following page is
loaded:
3 NetCube configuration
9
3.5 Serial configuration
3. Enter all the parameters according to the serial device(s) connected on the NetCube.
4. Submit the form by clicking on Store the changes. The changes are applied immediately, any new
connection via the COM deviator will use the new settings. The following web page appears to
confirm you that the changes happened successfully:
Warning: the new configuration will only be used for new connections. Currently open connections
continue to use the old settings.
3 NetCube configuration
10
3.6 Password administration
3.6 Password administration
By default there is no password in the NetCube, to enter one do the following.
1. On the main configuration web page, click on Change password. Wait until the following page is
loaded:
2. Fill in all the fields (you can leave Old password empty if it's the first time you're setting the
password) and submit the form. An error will be displayed if the old password doesn't match the
previous password. Another error will also be displayed if the confirmation of the new password
differs from the original one.
Please note that you'd better use a password of 5 characters minimum.
If all goes well, you will see this confirmation screen:
From there on, you will need the password to access the other configuration web pages or to login with
telnet. For the web configuration, you'll be identified with a cookie which expires one hour after the
authentication. Thus cookie support is required in your browser.
3 NetCube configuration
11
3.7 The summary of the configuration
3.7 The summary of the configuration
If you load the page Configuration summary you'll have a global overview of the configuration of the
NetCube including:
• network configuration;
• serial configuration;
• versions of some software (including Sigma);
• MAC address.
If you ever contact Codemat for technical support, please include a copy of this page.
The page is similar to this one:
3 NetCube configuration
12
4 Using the SIGMA program generator
4 Using the SIGMA program generator
Sigma is a framework dedicated to simple development of custom NetCube applications. It is available on
all standard NetCubes. You can learn everything about this framework directly online. Click on "Sigma
program generator" on the main web page or access it directly via the following URL (if the NetCube has IP
192.168.0.100):
http://192.168.0.100/sigma/index.cgi
All its documentation is available in HTML format directly accessible in your Web browser while you're
working with Sigma. See the numerous links in the "Documentation" section below. You'll find more links
in the top-right corner of most Sigma webpages.
4 Using the SIGMA program generator
13
4 Using the SIGMA program generator
You can also find a tutorial on the CD delivered together with your NetCube.
4 Using the SIGMA program generator
14
5 Specific Services for NetCube Desktop 3XX and NetCube Web-IO
5 Specific Services for NetCube Desktop 3XX and
NetCube Web-IO
5.1 Managing digital inputs/outputs via CGI
5.1.1 Overview
The NetCube has a dedicated CGI in order to be able to display the status of the inputs and to change the
value of the outputs.
http://192.168.0.100/gpio-web.cgi
This CGI returns a decimal number calculated with the binary representation of the inputs and also a table
describing the value of each pin. Each input pin has number between 1 and 8 and each output pin has a
number between 9 and 16. If the pin is up (24V), the associated bit is 1. If the pin is low (0V), the associated
bit is 0. Pin 1 corresponds to the least significant bit.
Example: all pins are low except pin 10 and pin 2: the binary representation is the following:
0000001000000010 which is 210-1+22-1=514 in decimal.
Another way to calculate the corresponding decimal value is to use the table below and to sum all the values
read.
X
15
14
13 12 11 10 9 8 7 6 5 4 3 2 1 0
Value high 32768 16384 8192 4096 2048 1024 512 256 128 64 32 16 8 4 2 1
Value low
0
0
0
0
0
0
0 0 0 0 0 0 0000
Here's what it looks like in the web browser:
5 Specific Services for NetCube Desktop 3XX and NetCube Web-IO
15
5.1.1 Overview
5.1.2 Changing outputs
Below each output, there's a checkbox. If it's checked then the clicking on one of the two buttons below will
work on that input. The button "Toggle selected output" will invert the value of the selected outputs. The
button "Create a pulse on selected outputs" will only temporarily invert the value of the outputs. The change
will last the number of seconds indicated below.
5.1.3 Reading inputs
The status of the inputs is not automatically updated and thus you have to click on the "Refresh display"
button to force a reload of the web page.
5.2 Managing digital inputs/outputs via gpio-server
5.2.1 Overview
The gpio-server allows one to control the inputs/outputs via a TCP socket.
The server /bin/gpio-server is automatically started during the boot (by the script
/etc/init.d/gpio-server). The server listens on port 3000. If that port needs to be changed, you
can edit /etc/init.d/gpio-server and reboot the NetCube. Once the connection is established you
5 Specific Services for NetCube Desktop 3XX and NetCube Web-IO
16
5.2.1 Overview
can send simple ASCII queries to manage the digital inputs/outputs.
5.2.2 Protocol of the server
The server waits for queries (they always start with "Q:") and it responds to them by sending answers (they
always start with "A:"). Sometimes the server may deliver unsolicited informational messages (they start
with "I:"). Each command or answer is finished by a new line character ("\n" is the usual C representation
of that character).
Possible queries are:
Q:GET-INPUT <X>\n
Q:SET-OUTPUT <X> <0|1>\n
Q:GET-INPUTS <mask>\n
Q:SET-OUTPUTS <mask> <value>\n
Q:SET-SCANMASK <mask> <confirm> <delay>\n
Q:GET-CONFIG\n
Q:SET-PINGDELAY <delay>\n
Q:START-COUNTER <X> <value> <delta> <U|D> <confirm> <delay>\n
Q:RESET-COUNTER <X> <value>\n
Q:GET-COUNTER <X>\n
Associated answers:
A:INPUT <X> <0|1>\n
A:INPUTS <mask> <value>\n
A:OK\n
A:NOK\n
A:CONFIG <configuration>\n
A:COUNTER <X> <value>\n
Independent messages:
I:INPUTS <mask> <value>\n
I:PING\n
I:COUNTER <X> <value>\n
<X>, <mask>, <value> and <delta> are decimal values (for example "18"). <X> can be anything
between 0 and 15. Pin 0-7 are inputs, and 8-15 are outputs. \n represents a line feed.
5.2.3 Detailed explanations of the commands
Q:GET-INPUT <X>\n
This asks the status of the input <X> (<X> can be between 0 and 7). The answer is "A:INPUT <X>
<0|1>" where <0|1> is either 0 or 1. The answer can also be "A:NOK" if <X> is not in the allowed range.
Q:SET-OUTPUT <X> <0|1>\n
This set the status of the output <X> to <0|1> (0 or 1). The answer is either "A:OK" if the operation
succeeded or "A:NOK" if any problem happened (this can be the case if the <X> wasn't in the allowed
range).
5 Specific Services for NetCube Desktop 3XX and NetCube Web-IO
17
5.2.3 Detailed explanations of the commands
Q:GET-INPUTS <mask>\n
This requests several inputs at the same time. <mask> is a binary mask which can be calculated by
summing all the 2X where X is each input requested. For example requesting inputs 0, 2 and 7 can be done
with <mask> = 20 + 22 + 27 = 1 + 4 + 128 = 133
The answer is "A:INPUTS <mask> <value>\n", <mask> is simply repeated but can be corrected if
any invalid inputs had been requested. The value is constructed with the following formula:
<value> = SUM FOR ALL REQUESTED INPUTS (<value of input X> * 2<X>)
In the previous example, with inputs 0, 2 and 7, suppose that input 2 is set to 0 and inputs 0 and 7 are set to
1. Then the value would be:
1 * 20 + 0 * 22 + 1 * 27 = 1 + 0 + 128 = 129
Q:SET-OUTPUTS <mask> <value>\n
This command is used to set several outputs at the same time. The construction of <mask> and <value>
are similar to the GET-INPUTS command above except that <X> varies between 8 and 15.
Q:SET-SCANMASK <mask> <confirm> <delay>\n
The NetCube can continuously watch the inputs in order to detect a change and to send back a message
indicating the change. The <mask> indicates which inputs need to be surveyed. If <mask> is 0, then no
inputs are checked and this feature is disabled. As soon as a non-null mask is set, the NetCube starts to send
"I:INPUTS <mask> <value>\n" messages indicating the new status of all the inputs which are
surveyed. An "A:OK" answer is however sent before the first "I:INPUTS" message. "I:INPUTS"
messages share the same format than "A:INPUTS" messages. <confirm> can be either 0 or 1: if
<confirm> is 0, a message is generated as soon as a change happens, if <confirm> is 1 then the
message is generated only after 2 consecutive readings of the same value. This is useful to avoid some
electrical glitches. <delay> is the minimum time in milliseconds between two readings of the inputs
(50ms is a recommended value). If the same value is sent twice, that means that the value changed
temporarily but not long enough to be confirmed.
Q:GET-CONFIG\n
This returns a "A:CONFIG <config>\n" message indicating how the inputs/outputs are configured. In
<config> "I" represents an Input and "O" an Output, the letter on the right is the pin 0 and pins are
increasing one by one when going to the left. Typical answer is "A:CONFIG OOOOOOOOIIIIIIII\n"
for inputs on pin 0-7 and outputs on pin 8-15.
Q:SET-PINGDELAY <delay>\n
Ask the NetCube to send "I:PING\n" messages each <delay> seconds. This way, you can be sure that
the connection is still working. Setting <delay> to 0 disables the feature.
Q:START-COUNTER <X> <value> <delta> <U|D> <confirm> <delay>\n
Follow the input <X> as a counter. The initial value of the counter is <value>. If <delta> is greater than
0, then "I:COUNTER <X> <value>\n" messages will be sent every <delta> increments (0 means
disabled). If the fourth parameter is "U", then it will count up-front (<X> goes from 0 to 1). If it's "D", then it
5 Specific Services for NetCube Desktop 3XX and NetCube Web-IO
18
5.2.3 Detailed explanations of the commands
will count down-front (<X> goes from 1 to 0). If <confirm> is 1, then the value of the input must be
confirmed with a second reading of the same value before acknowledging any change (and thus before
counting the pulse). <delay> is a minimum number of milliseconds between two checks of the input
value.
If all parameters are valid, it starts the counter and returns "A:OK\n", otherwise "A:NOK\n".
Q:RESET-COUNTER <X> <value>\n
Change the value of an already running counter. Answers with "A:OK\n" or "A:NOK\n" if <X> is invalid.
Q:GET-COUNTER <X>\n
Retrieve the latest value of a running counter. It returns a "A:COUNTER <X> <value>\n" message.
5 Specific Services for NetCube Desktop 3XX and NetCube Web-IO
19
6 VirCom and Redirector
6 VirCom and Redirector
The NetCube runs a redirector service which makes the serial ports available on the network. The VirCom
Driver that comes on the NetCube CDROM is a virtual COM port driver for Windows. It creates new local
COM ports which are copies of NetCube COM ports. VirCom uses the redirector service of the NetCube to
manage that.
6.1 The redirector service
The redirector program is the main program of the NetCube Deviator. It waits for client on a given TCP/IP
socket. Once a client is connected, it sends to the client everything he can read on the serial port and writes
on the serial port everything that the client sends.
One instance of the redirector program is specific to a port number and a serial device. By default, two
instances of the redirector program are running on the NetCube. The first one listens on port 2000 and is
associated to the first serial device (COM1). The second one listens on port 2001 and is associated to the
second serial device (COM2). On models of NetCube with 4 COM, 2 supplementary instances are started:
one listening on port 2002 associated to the third serial device (COM3) and one listening on port 2003
associated to the fourth serial device (COM4).
Those instances are started by the script /etc/init.d/redirector. If you want to change the default
port numbers, you have to edit that file and to reboot the NetCube.
Additionally, the redirector program can be run by hand in a shell for debugging purpose. In that case you
may find interesting the following command line options offered by the redirector program:
display version and exit
display debug information about what's going on (use it multiple times to see more
-d
information)
-n <port>
select the port on which the redirector will listen for a data connection
select the port on which the redirector will listen for a control connection (default is data
-o <port>
connection port + 2000, the control connection is only used by the VirCom)
select the serial configuration. Allowed value for <bits> are 8N1, 8N2, 8E1, 8E2, 8O1,
-c <bits>
8O2 (and same for 7XX, 6XX, 5XX). 5/6/7/8 correspond to the number of data bits.
N/E/O means no/even/odd parity bit. 1/2 corresponds to the number of stop bits.
-s
use software flow control.
-h
use hardware flow control.
-p <com>
select the com port. <com> can be 1, 2, 3 or 4.
-b
select the baudrate. <baudrate> can be 50, 75, 110, 134, 150, 200, 300, 600, 1200,
<baudrate> 1800, 2400, 4800, 9600, 19200, 38400, 57600 or 115200.
select the timeout of a write operation. If the write operation on the serial side takes more
-w
than <timeout> seconds, then it's interrupted. Using value 0 means no timeout (this is
<timeout>
the default value). This option is only available since version 2.5 of the program.
Any option given on the command line will override the default configuration given via the NetCube
configuration webpage and the configuration sent by the VirCom Windows Driver.
-v
6 VirCom and Redirector
20
6.1 The redirector service
If /etc/com1/olduart exists, then the redirector program will handle the COM1 like a UART 16450
instead of the standard 16550. Same goes for /etc/com{2,3}/olduart for COM{2,3}. This 16450
UART has a FIFO buffer of only one byte (instead of 16) which is perfect if the other side of the COM port
connection has the same limitation (when the NetCube is connected to a very old machine for example).
Otherwise you may overrun the buffer of the machine connected on the COM port without noticing it.
6.2 VirCom - the COM Deviator driver for Windows
If you have legacy applications using directly a COM port, and if you want to run these applications on a
remote host without a direct COM connection, you can use the Virtual COM driver provided with your
NetCube. A virtual COM port will be seen by Windows like any other COM port but in fact any data
transmission will be handled over TCP/IP to the NetCube.
6.2.1 Features
• Automatically forwards the COM configuration to the NetCube (the NetCube only needs to be
configured for the network, there's no serial configuration to do);
• Restarts the network connection if it has been interrupted;
• Also forwards the state of the various serial lines (RTS/CTS/DTR/DSR/DCD/RNG).
6.2.2 Installation
The user should be a member of "Administrators" group in order to install the driver correctly. Launch
install.exe on the driver disk provided with your NetCube and follow the instructions. The installation
window appears:
Choose the full installation (other options are not appropriate and hence are not supported). The full
installation includes the installation of the driver itself and the installation of the control panel applet to
manage the driver.
6 VirCom and Redirector
21
6.2.2 Installation
6.2.3 Configuration
Once the driver has been installed, you should reboot. Then you can configure the driver. Launch the
"NetCube COM Deviator" item in the Control Panel. This dialog will appear:
Although only members of "Administrator" group can install/uninstall the driver and configure it, all users
are allowed to use virtual COM ports that are created by the driver.
6 VirCom and Redirector
22
6.2.3 Configuration
6.2.3.1 Creating new virtual COM port
Use the "Add new" panel to create Virtual COM ports.
Select desired COM port from "COM port" list. Fill in "IP address" and "Port" fields. Now press "Add"
button.
The list of available com ports will update itself. IP address is the IP address of the NetCube which will
relay the traffic of the virtual COM port to the real serial device. Port is the TCP/IP port on which the
redirector is listening. By default the NetCube has a redirector for its COM1 on port 2000 and a redirector
for its COM2 on port 2001. NetCube 4COM also has a redirector for its COM3 on port 2002 and a
redirector for its COM4 on port 2003.
6.2.3.2 Configuring disconnection timeout
The disconnect timeout is the time (in seconds) between the closing of the COM port and the closing of the
corresponding TCP/IP connection. This enables you to have a single TCP/IP connection in case the program
opens and closes the COM port frequently.
The default setting is adequate in most cases.
6.2.3.3 Line handling configuration
Note: If your application functions correctly when interoperating with a device while the
device is connected to the real COM port, but fails while operation using VirCom virtual
COM port, try activating transfer of additional lines. It is possible that the application is using
additional lines, which are not transferred by default.
By default the VirCom only transfers the data and doesn't transfer anything about the supplementary serial
lines. If your application is checking those lines directly or if it is setting those lines manually, then you will
need to activate one or more of the "advanced options" to make it work. Some devices are using those
additional lines to inform the user of a special event or an error. The application may never detect those
events or errors if the corresponding line is not activated here because the VirCom would respond with a
default value which is not related to the reality of the situation.
To do such a configuration, follow these steps:
1. Open the Control Panel and run "NetCube COM Deviator" configuration applet.
2. Now select the virtual COM port which configuration you would like to change and click on
"Advanced" button. The following dialog should appear.
6 VirCom and Redirector
23
6.2.4 Status
3. Now you can select which lines should be transferred over the network for the selected virtual COM
port.
The line which can be changed by the application are RTS and DTR. The lines CTS, DCD, DSR and RING
can only be read. Checking "Handle line manually" means that your application is setting this line and that
you want the VirCom to forward that request to the NetCube. On the contrary "Follow line" means that your
application is watching the line and wants to be informed of any change on the line.
6.2.4 Status
The "Status" tab shows the list of Virtual COM ports and their status (port is closed, connected, closed but
connected). You can also start and stop the service if needed.
6 VirCom and Redirector
24
6.3 Virtual COM port API notes
6.3 Virtual COM port API notes
Virtual COM ports created by VirCom behave generally identically to normal COM port, except as noted.
Extensive description of the Windows Device I/O API could be found in the "Device I/O" section of the
MSDN documentation.
http://msdn.microsoft.com/library/default.asp?url=/library/en-us/dnanchor/html/anch_DeviceIO.asp
6.3.1 Supported Driver I/O API functions
Here is a list of the functions from "Communications Reference" part of "Device I/O", commented regarding
to VirCom.
http://msdn.microsoft.com/library/default.asp?url=/library/en-us/devio/base/communications_reference.asp
Function
Comment
BuildCommDCB
Works as specified in MSDN.
BuildCommDCBAndTimeouts Works as specified in MSDN.
ClearCommBreak
Works as specified in MSDN.
Most of the errors (such as CE_BREAK, CE_FRAME, CE_OVERRUN,
CE_RXOVER, CE_RXPARITY) do not appear. This is related to the fact
ClearCommError
that only data about port lines, but not additional information are
transmitted over the network.
CommConfigDialog
Is not implemented.
GetCommConfig
Works as specified in MSDN.
GetCommMask
Works as specified in MSDN.
GetCommModemStatus
Works as specified in MSDN.
GetCommProperties
Works as specified in MSDN.
GetCommState
Works as specified in MSDN.
GetCommTimeouts
Works as specified in MSDN.
GetDefaultCommConfig
Works as specified in MSDN.
PurgeComm
Works as specified in MSDN.
SetCommBreak
Works as specified in MSDN.
SetCommConfig
Works as specified in MSDN.
It is allowed to set following flags: EV_BREAK, EV_CTS, EV_DSR,
EV_ERR, EV_RING, EV_RLSD, EV_RXCHAR, EV_TXEMPTY.
SetCommMask
Attempt to set any other flags, including EV_RXFLAG, would case an
error.
Value from the EvtChar field is remembered, but EV_RXFLAG event
SetCommState
would never arise.
SetCommTimeouts
Works as specified in MSDN.
SetDefaultCommConfig
Works as specified in MSDN.
Supplied values are ignored, except that if value for an input buffer is larger
SetupComm
than 8192, that call would return an error, otherwise call would succeed.
6 VirCom and Redirector
25
6.3.1 Supported Driver I/O API functions
TransmitCommChar
WaitCommEvent
DeviceIoControl
Works as specified in MSDN.
See comment for SetCommMask. Otherwise works as specified in MSDN.
This function could be used to send control requests directly to the driver.
Generally, device control requests are processed according to the
description in MSDN. But some requests have a specific behaviour as noted
in 4.2 Device Control Requests.
6.3.2 Device Control Requests
Here is a list of a serial device control requests as specified in "Serial Device Control Requests" in MSDN
documentation, commented regarding to VirCom. Any call to "Driver IO API" described above is
transformed by Windows system into one, or several of device control requests described bellow. Generally
these requests are sent only by Windows subsystem and device users should use them only if "Driver I/O
API" does not fit for a particular task.
http://msdn.microsoft.com/library/default.asp?url=/library/en-us/serial/hh/serial/serref_297b853b-2e0c-4a71-9642-9
Request
IOCTL_SERIAL_CLEAR_STATS
IOCTL_SERIAL_CLR_DTR
IOCTL_SERIAL_CLR_RTS
IOCTL_SERIAL_CONFIG_SIZE
IOCTL_SERIAL_GET_BAUD_RATE
IOCTL_SERIAL_GET_CHARS
Comment
Works as specified in MSDN.
Works as specified in MSDN.
Works as specified in MSDN.
Works as specified in MSDN.
Works as specified in MSDN.
Works as specified in MSDN.
Only AmountInInQueue and AmountInOutQueue are filled
IOCTL_SERIAL_GET_COMMSTATUS
in. Other fields are zeroed.
IOCTL_SERIAL_GET_DTRRTS
Returns STATUS_INVALID_PARAMETER error.
IOCTL_SERIAL_GET_HANDFLOW
Works as specified in MSDN.
IOCTL_SERIAL_GET_LINE_CONTROL
Works as specified in MSDN.
IOCTL_SERIAL_GET_MODEM_CONTROL Returns STATUS_INVALID_PARAMETER error.
Returns values for CTS (SERIAL_MSR_CTS), DSR
(SERIAL_MSR_DSR), RING (SERIAL_MSR_RI) and
IOCTL_SERIAL_GET_MODEMSTATUS
DCD (SERIAL_MSR_DCD) lines. Values are orâ ed
together and result is returned.
IOCTL_SERIAL_GET_PROPERTIES
Works as specified in MSDN.
Only TransmittedCount field is filled. Other fields are
IOCTL_SERIAL_GET_STATS
zeroes.
IOCTL_SERIAL_GET_TIMEOUTS
Works as specified in MSDN.
IOCTL_SERIAL_GET_WAIT_MASK
Works as specified in MSDN.
IOCTL_SERIAL_IMMEDIATE_CHAR
Works as specified in MSDN.
SERIAL_LSRMST_LSR_DATA event is never inserted
into data stream. All other events
(SERIAL_LSRMST_LSR_NODATA,
IOCTL_SERIAL_LSRMST_INSERT
SERIAL_LSRMST_MST and
SERIAL_LSRMST_ESCAPE) are inserted where
appropriate as specified in MSDN.
6 VirCom and Redirector
26
6.3.2 Device Control Requests
IOCTL_SERIAL_PURGE
IOCTL_SERIAL_RESET_DEVICE
IOCTL_SERIAL_SET_BAUD_RATE
IOCTL_SERIAL_SET_BREAK_OFF
IOCTL_SERIAL_SET_BREAK_ON
Works as specified in MSDN.
Does not perform any action.
Works as specified in MSDN.
Works as specified in MSDN.
Works as specified in MSDN.
Remembers supplied characters, so that next
IOCTL_SERIAL_SET_CHARS
IOCTL_SERIAL_GET_CHARS would return them, but
EV_RXFLAG event never arise.
IOCTL_SERIAL_SET_DTR
Works as specified in MSDN.
IOCTL_SERIAL_SET_FIFO_CONTROL
Returns STATUS_INVALID_PARAMETER error.
IOCTL_SERIAL_SET_HANDFLOW
Works as specified in MSDN.
IOCTL_SERIAL_SET_LINE_CONTROL
Works as specified in MSDN.
IOCTL_SERIAL_SET_MODEM_CONTROL Returns STATUS_INVALID_PARAMETER error.
Supplied values are ignored, except that if value for an
input buffer is larger than 8192, that call would return a
IOCTL_SERIAL_SET_QUEUE_SIZE
STATUS_INSUFFICIENT_RESOURCES error, otherwise
call would succeed (STATUS_SUCCESS return value).
IOCTL_SERIAL_SET_RTS
Works as specified in MSDN.
IOCTL_SERIAL_SET_TIMEOUTS
Works as specified in MSDN.
Only SERIAL_EV_RXCHAR, SERIAL_EV_TXEMPTY,
SERIAL_EV_CTS, SERIAL_EV_DSR,
SERIAL_EV_RING, SERIAL_EV_ERR,
SERIAL_EV_RLSD and SERIAL_EV_BREAK values are
IOCTL_SERIAL_SET_WAIT_MASK
allowed. Any other values (including
SERIAL_EV_RXFLAG, SERIAL_EV_RX80FULL,
SERIAL_EV_EVENT1 and SERIAL_EV_EVENT2) are
forbidden and would case an error upon setting.
IOCTL_SERIAL_SET_XOFF
Returns STATUS_INVALID_PARAMETER error.
IOCTL_SERIAL_SET_XON
Returns STATUS_INVALID_PARAMETER error.
IOCTL_SERIAL_WAIT_ON_MASK
Works as specified in MSDN.
IOCTL_SERIAL_XOFF_COUNTER
Would return STATUS_SUCCESS, but does nothing.
IOCTL_SERIAL_GET_COMMCONFIG
Returns STATUS_INVALID_PARAMETER error.
IOCTL_SERIAL_SET_COMMCONFIG
Returns STATUS_INVALID_PARAMETER error.
6.3.3 General behaviour notes
6.3.3.1 What is transferred across the network
Current version of VirCom and Redirector transfer information about state of the following serial port lines:
• From a Windows application to a device attached to a NetCube:
1. RTS
2. DTR
• From a device attached to a NetCube to a Windows application:
1. CTS
2. DCD
6 VirCom and Redirector
27
6.3.3 General behaviour notes
3. DSR
4. RING
5. break event
Also a data received from a device attached to a NetCube via RX line is transferred to be read using a Read
call and data written using a Write call is transferred to be received by the device via TX line.
Also note that by default, just after new virtual COM port is created using the "NetCube COM Deviator"
configuration applet, only the data lines information is transferred (see Line handling configuration).
No other data is transferred in any direction. This means, for example, that parity, frame or other data
transfer errors detected on the NetCube would not be observable through a virtual COM port, while data still
would be corrupted. And as a consequence error counters that are attached to virtual COM port would
always have zero values.
6.3.3.2 Connections and API calls
VirCom would establish 2 TCP connections to the Redirector, situated on a NetCube. First connection (data
connection) port is specified in virtual port settings in a VirCom control panel applet. Second connection
(control connection) port is defined by Redirector according to its configuration.
TCP connections would be established when it would be necessary for the first time. Connections would not
be closed just after virtual COM port has been closed, but after a timeout specified in disconnection timeout
field in configuration applet. If virtual COM port would be opened again during timeout period, then
existing connections would be used.
During time when virtual COM port is closed and TCP connection is open, all the data that is received from
a Redirector would be thrown away. When virtual COM port is opened, input buffer flush request is sent to
the Redirector. These actions reduce the probability that Windows application would receive data that was
written into real COM port on a NetCube noticeably earlier than virtual COM port was opened.
A TCP connection is established upon a read or a write operation that follows port opening or port control
settings change (such as a SetCommState call).
With regard to a Write call virtual COM port would behave as follows. If a TCP connection was not
established (because of some network error) during a Write call, than supplied data is written into an
outgoing data buffer and the call succeeds. If there is no more space left in a buffer and a TCP connection is
not established, than call would return an error. If a TCP connection is established, but there is no more
space left in an outgoing data buffer (which is 8kb in length) then the Write call would block, until required
amount of space would be freed, which means that data would be transferred to a NetCube (in this case the
call would succeed) or connection would be lost (in this case the call would fail).
With regard to a Read call virtual COM port would behave as follows. If a TCP connection was not
established (because of some network error) during a Read call, then data from an incoming data buffer
would be returned. If incoming data buffer is empty and a TCP connection is not established then the call
would return an error. If a TCP connection is established but there is no data in the incoming data buffer and
a Read call is a blocking call, than the call would block until some data is received from a NetCube (in this
case the call would succeed) or until the connection is lost (in this case the call would fail).
6 VirCom and Redirector
28
6.3.3 General behaviour notes
In any case after a connection would be lost or after an unsuccessful connection establishment attempt an
EV_ERR would be raised.
6.3.3.3 Synchronization issues and behaviour under blocking
Lines RX and TX are used to transfer "main" data stream between an application and a device, while all the
rest lines (such as RTS, DTR, CTS, DCD, DSR, RING and break event) are "additional" lines.
While using real COM port additional lines could be used in two modes with regard to main lines. In the
first mode (which is the default), data transferred through main lines and additional lines state are
synchronized, so that the line change happens exactly at the same time in the stream than it was when the
application did the call. The second mode is only used in some rare cases where the VirCom believes that
that the data stream is blocked: the synchronization is lost but the additional lines can still be changed even
if the main data stream is blocked. It is assumed that this second mode is needed when device appears to
hang and some event or line state change could make it process data again. In other words second mode is
activated when a Redirector on a NetCube assume device is hung or a VirCom driver assume a Windows
application is hung waiting for some event.
Hang situation is defined as if a Redirector incoming data buffer (a VirCom incoming data buffer) is full. In
other words Redirector and VirCom would switch into the second mode of operation when there incoming
data buffers would be full. If an incoming buffer would be freed again or at least one byte of it would be
read, a Redirector or a VirCom would switch back into the first mode of operation.
6 VirCom and Redirector
29
7 Other services
7 Other services
7.1 Generic remarks
In order to update the configuration of the NetCube, you'll have to update some configuration files. It is
advised to launch the sync command after having modified a file to be sure to write down the
modifications on the disk on module, otherwise you may loose the modifications if you remove the power
supply too quickly. Also note that most of those configurations files are read at start-up and thus the
modifications will not be taken into account until the next reboot.
Example:
netcube# vi /etc/inetd.conf
netcube# sync
netcube#
7.2 Telnet server
The telnet service is always activated. It is the only service that gives you full control over the NetCube via a
standard Linux shell. The service is started by inetd (the standard Internet Super Server) and thus it can be
deactivated by commenting out the appropriate line in /etc/inetd.conf. You are strongly discouraged
to do that however as you won't be able to recover from any failure or error if you can't administer the
NetCube with a shell.
7.3 FTP server
FTP means File Transport Protocol. It is a standard service used to upload/download files to/from the
NetCube. This service is also managed by inetd and can be (de)activated by (de)commenting out the
appropriate line in /etc/inetd.conf:
ftp
stream
tcp
nowait
root
/usr/sbin/in.ftpd in.ftpd
Commenting out this line is simply done by prepending a sharp ("#") at the beginning of the line.
All standard users (as listed in /etc/passwd) have an FTP access except those listed in
/etc/ftpusers which are explicitly denied access to the FTP service.
7.4 FTP client
The FTP client is a command line program available as /usr/bin/ftp. It's very similar to the Windows
version of this command described in the Uploading/downloading a file section. Note that a Sigma
application can also play the role of an FTP client.
7.5 DHCP client
The DHCP client is a program called pump. You don't need to use it directly since it's called automatically at
start-up if you configured the NetCube to use DHCP in the configuration web interface.
7 Other services
30
7.6 HTTP server
7.6 HTTP server
The HTTP server used in the NetCube is a lightweight server called boa. All its configuration files have
been placed in /etc/boa/. The files served by the server are installed under /var/www/. You can put
more files there (with FTP for example) and have them ready to be served by boa. The server doesn't
generate any log file with the standard configuration shipped in the NetCube.
If you want to reconfigure boa and/or benefit from other options, you can read its online documentation:
http://www.boa.org/documentation/
The HTTP server is running as a stand-alone daemon. It is started by the script /etc/init.d/boa. If
you want to deactivate the HTTP server, just add a line "exit 0" at the beginning of the
/etc/init.d/boa file (but after the first line). To reactivate it just remove that line (and reboot).
7.7 HTTP client
The NetCube includes a simple command-line HTTP client that can be used to retrieve files from any web
server. This client is called wget but it's not the full featured wget available on most Linux systems. It's the
wget provided by busybox, the lightweight toolbox for embedded systems with limited space.
Check http://www.busybox.net/downloads/BusyBox.html#item_wget for more information about busybox's
wget. Please note however that this documentation always documents the latest version and you don't
necessarily have the latest version on the NetCube.
7.8 COM deviator server
The com deviator server is a service developed specifically for the purpose of the NetCube. Two instances
of this server are always running by default. See "The redirector program" for more information about this
service.
Note however that even if the servers are running, the service may not be functional if the COM ports are
used by other programs (such as the PPP server). This is not problematic since you can connect only a single
device on each COM port: if you have a modem you have no other device to control on that COM port.
7.9 Timezone support
By default the NetCube always work with universal time (UTC). In some cases, you have to work with the
local time. You can extend the NetCube to handle timezones by installing the tzdata package that is
provided on the CD accompanying your NetCube. Once installed, you can select the current timezone
through the web interface (link "Timezone configuration"):
7 Other services
31
7.9 Timezone support
7 Other services
32
8 Advanced configuration
8 Advanced configuration
8.1 Using the shell
Since the NetCube is a tiny Linux system you have the possibility to obtain a shell prompt and to do various
operations using several command line utilities.
To obtain the shell:
1. Use telnet to connect to the NetCube.
2. Login as "root" with your administrator password.
3. After a short while you should see the command line prompt (netcube# ). You're now ready to
type in commands.
Most of the basic Unix/Linux utilities are available:
ls
to list the content of a directory
cd
travel into the hierarchy of directories.
rm, mv, cp
remove, move and copy files.
chmod
to manage the rights of the files.
mkdir, rmdir create and delete directories.
nano, vi
edit text files.
You can quit the shell by typing the exit command.
WARNING: The shell should be used with care, you have full access to the complete NetCube system and
thus inappropriate commands can damage your installation definitively! Please note that if the NetCube
has been damaged using the shell the warranty is not applicable.
8.2 Text editors
8.2.1 The nano editor
To start the editor type nano followed by the filename if any and press Enter. This traditional editor
displays a summary of all the commands at the bottom, they are all based on a key combination with the
control key. For example CTRL+X exits the editors and CTRL+O saves the file. You can type and edit text
like in any normal text editor.
8.2.2 The vi editor
To start the editor type vi followed by the filename if any and press Enter. To leave the editor press :q
(semi colon and q).
The vi editor requires some time to get used to but after some practice turns out to be very effective.
It has two modes: the command mode and the insert mode. When started the editor is in command mode:
each character typed is a command. To type in your text you have to change to insert mode by pressing the
8 Advanced configuration
33
8.2.2 The vi editor
character i on the keyboard. Now all characters you type are part of the text file. To quit the insert mode
press ESCAPE.
Some helpful commands in vi:
i
<esc>
Commands in command mode
x
dd
u
:q
:q!
:w <filename>
:e <filename>
changes from command mode to insert mode
leaves insert mode and goes back to command mode
deletes the char where the cursor stands
deletes the line where the curser stands in
undo last command
leaves the editor
leaves the editor without saving changes
saves file under <filename> (you don't need to set <filename> if it
already exists. Just type ":w")
open the file <filename> to edit
8.3 Uploading/downloading a file with FTP
In some case, you want to upload files to the NetCube (new software update, new Sigma application). The
NetCube runs an FTP (File Transfer Protocol) server for this. You have to use an FTP client to exchange
files with the NetCube. You can find graphical FTP clients on any operating system but Microsoft Windows
comes with a command-line program called ftp. In all cases, you have to know the IP address of the
NetCube (we assume 192.168.0.100 in this example).
To use this client, you have to open a command-line prompt (execute cmd from the Run window in the Start
menu). Go to the directory that contains the files that you want to upload (or that should contain the files that
you want to download) with the help of the cd directory command (cd .. goes one directory
upwards and X: changes to the drive X). The example below shows you how to upload the file MyApp.bin
to the directory /var/backups/sigma/ and how to download DemoPrinter.bin from the same directory.
C:> ftp 192.168.1.50
Connected to 192.168.1.50.
220 NetCube FTP server (Version 6.4/OpenBSD/Linux-ftpd-0.17) ready.
Name (192.168.1.50:rhertzog): root
331 Password required for root.
Password:
230 User root logged in.
Remote system type is UNIX.
Using binary mode to transfer files.
ftp> binary
200 Type set to I.
ftp> cd /var/backups/sigma/
250 CWD command successful.
ftp> put MyApp.bin
local: MyApp.bin remote: MyApp.bin
200 PORT command successful.
150 Opening BINARY mode data connection for '.bin'.
226 Transfer complete.
4749 bytes sent in 0.03 secs (171.3 kB/s)
ftp> ls
200 PORT command successful.
8 Advanced configuration
34
8.3 Uploading/downloading a file with FTP
150 Opening ASCII mode data connection for '/bin/ls'.
-rw-r----1 root
root
2464 Aug 23 06:10 DemoForward.bin
-rw-r----1 root
root
2998 Aug 23 06:15 DemoLamp.bin
-rw-r----1 root
root
3739 Aug 23 06:19 DemoLamp2.bin
-rw-r----1 root
root
4200 Aug 23 06:24 DemoLamp3.bin
-rw-r----1 root
root
2357 Aug 23 06:31 DemoMultiplication.bin
-rw-r----1 root
root
3441 Aug 23 06:37 DemoPrinter.bin
-rw-r----1 root
root
4749 Sep 25 22:55 MyApp.bin
-rw-r----1 root
root
920 Aug 23 06:38 ResetConfiguration.bin
drwxr-xr-x
2 root
root
1024 Sep 11 04:32 tmp
226 Transfer complete.
ftp> get DemoPrinter.bin
local: DemoPrinter.bin remote: DemoPrinter.bin
200 PORT command successful.
150 Opening BINARY mode data connection for 'DemoPrinter.bin' (3441 bytes).
226 Transfer complete.
3441 bytes received in 0.01 secs (503.0 kB/s)
ftp> quit
221 Goodbye.
As you saw, within ftp, the cd command changes the current directory of the remote side, the put
command uploads a file from the current local directory to the current directory of the FTP server while the
get command handles the download and the ls command displays the content of the remote directory.
WARNING: If you see that some files are transferred as ASCII (instead of BINARY), then type the
binary command first, otherwise your files may be mangled during the transfer.
8.4 Installing a package
The Linux system running on the NetCube integrates a small package manager called udpkg (used by
Debian in its debian-installer). It can be used to install a new software or to upgrade an already installed
software but not to remove an installed software. So take care to not install something that you don't want.
Packages are simple .udeb files. When Codemat provides you such a package, they also give you its
md5sum (a specific kind of checksum) so that you can ensure that the file has not been altered during its
transfer (by mail, by FTP).
Here are the steps to install a package:
1. Upload with FTP the package to the root directory of the NetCube;
2. Start a telnet session with the NetCube (login with the root user);
3. Check that the md5sum matches the one given to you;
4. Install the package with udpkg -i package.udeb;
5. Remove the udeb file, it's no more necessary;
6. Force write changes to the disk and reboot.
You can find below an example with the tzdata package. It's provided in a file named
tzdata_4.1.4_all.udeb whose md5sum is 590eead481093d86bb704432a4b34fdd.
C:\> ftp 192.168.1.100
Connected to 192.168.1.100.
220 NetCube FTP server (Version 6.4/OpenBSD/Linux-ftpd-0.17) ready.
Name (192.168.1.100:rhertzog): root
8 Advanced configuration
35
8.4 Installing a package
331 Password required for root.
Password:
230 User root logged in.
Remote system type is UNIX.
Using binary mode to transfer files.
ftp> binary
200 Type set to I.
ftp> put tzdata_4.1.4_all.udeb
local: tzdata_4.1.4_all.udeb remote: tzdata_4.1.4_all.udeb
200 PORT command successful.
150 Opening BINARY mode data connection for 'tzdata_4.1.4_all.udeb'.
226 Transfer complete.
276358 bytes sent in 0.13 secs (2143.5 kB/s)
ftp> quit
221 Goodbye.
C:\> telnet 192.168.0.100
Linux 2.6.29-codemat (NetCube) (ttyp0)
NetCube login: root
Password:
netcube# md5sum tzdata_4.1.4_all.udeb
590eead481093d86bb704432a4b34fdd tzdata_4.1.4_all.udeb
netcube# udpkg -i tzdata_4.1.4_all.udeb
(Reading database...)
[...]
(Updating database...)
netcube# rm tzdata_4.1.4_all.udeb
netcube# sync
netcube# reboot
netcube# Connection closed by foreign host.
8.5 Overview of the directories
Here's a list of directories available in the NetCube. Some explanations about the directory is given in
important case.
/bin
Standard UNIX utilities (including shells)
/boot
/boot/grub
Kernel image and bootloader stuff
/dev
Directory with block or char special files
/etc
Directory with configuration files
/etc/rcS.d
Startup scripts
/etc/boa
Webserver configuration
/etc/logrotate.d
8 Advanced configuration
36
8.5 Overview of the directories
/etc/init.d
Startup scripts
/etc/inetd.d
/etc/mgetty
Configuration files for mgetty : program which waits for
incoming calls on the modem
/etc/ppp
Configuration files for the PPP connection (pppd program)
/etc/com1
/etc/com2
Configuration files for the redirectors
/etc/pam.d
/etc/terminfo
/etc/terminfo/a
/etc/terminfo/l
/etc/terminfo/v
/lib
/lib/evms
/lib/modules
/lib/modules/2.6.29
/lib/modules/2.6.29-codemat
/lib/modules/2.6.29-codemat/kernel/[...]
Kernel modules
/mnt
/proc
/sbin
Standard UNIX system utilities
/tmp
/usr
/usr/sbin
Additional UNIX system utilities
/usr/lib
/usr/lib/cgi-bin
/usr/lib/boa
/usr/lib/ettcl1.0
/usr/lib/cgi-lib
/usr/lib/prebaseconfig.d
/usr/lib/grub
/usr/lib/grub/i386-pc
/usr/lib/netcube
/usr/lib/netcube/post-build.d
/usr/bin
Additional UNIX utilities
/usr/share
/var
8 Advanced configuration
37
8.6 Start-up overview
/var/lib
/var/lib/dpkg
/var/lib/dpkg/info
Internal files of the packaging system (udpkg)
/var/spool
/var/spool/fax
/var/spool/fax/incoming
/var/www
/var/www/cgi-bin
Files served by the HTTP server (boa)
/var/log
/var/log/mgetty
/var/log/boa
/var/lock
/var/run
8.6 Start-up overview
When you plug in the power supply the NetCube starts: the BIOS of the CPU-card gives the control to the
bootloader installed on the disk on module. The bootloader is grub, it will look for a file called
/boot/grub/menu.lst on any possible partition it can recognize and it will load the first available
kernel listed there. The kernel will then execute /sbin/init which will follow the instructions given in
/etc/inittab. Init will start /etc/init.d/rcS which will do some initialisations (e2fsck, mounting
root as read/write, mounting /proc, ...) and launch all scripts in /etc/rcS.d/ (in order of growing
numbers). Init may additionally start some serial device related services like mgetty (see section PPP
server).
8.7 Programming scripts
The NetCube provides a POSIX shell (/bin/sh or /bin/dash) and a Bourne Shell (/bin/bash). You can write
the scripts directly on the NetCube with an editor or you can write them on another computer and upload
them with FTP.
If you want to launch your script automatically during the start-up of the NetCube, you must add a shell
script in /etc/rcS.d/ that will launch the desired programs. That script should be named
SXXsomething where XX is a number which defines the order in which the scripts are launched (lower
numbers are started first). Look at existing files in that directory for examples (note that usually the real
start-up scripts are placed in /etc/init.d/ and symlinks are made in /etc/rcS.d).
8 Advanced configuration
38
9 Working with GPIO
9 Working with GPIO
The inputs/outputs can be managed through the command line and through any script with ease. All the
settings can be managed through the /proc/gpio virtual filesystem.
The NetCube offers 16 I/O numbered from 1 to 16 :
• For NetCube Director and NetCube Web-IO, pins 1 to 8 are inputs and pins 9 to 16 are outputs.
Beware: old NetCubes (produced between June 2004 and May 2005) may be configured differently
(inputs and outputs inverted). Check the sticker and/or the manual delivered with your NetCube.
• For NetCube Web-Input, pins 1 to 16 are inputs.
• For NetCube Embedded, it depends on the request of the customer.
This configuration is hard-coded in the BIOS. Internally the GPIO are numbered from 0 to 15. Here's a
conversion matrix explaining where each GPIO line is connected:
GPIO number (X) Web-Input Web-IO
0
Input 1
Input 1
1
Input 2
Input 2
2
Input 3
Input 3
3
Input 4
Input 4
4
Input 5
Input 5
5
Input 6
Input 6
6
Input 7
Input 7
7
Input 8
Input 8
8
Input 9 Output 1
9
Input 10 Output 2
10
Input 11 Output 3
11
Input 12 Output 4
12
Input 13 Output 5
13
Input 14 Output 6
14
Input 15 Output 7
15
Input 16 Output 8
9.1 Configuration
I/O are initially configured by the BIOS and you shouldn't need to reconfigure them. If you have to, here's
how you can do it:
On NetCube Director and Web-IO:
echo "OOOOOOOOIIIIIIII" >/proc/gpio/config
On NetCube Web-Input:
echo "IIIIIIIIIIIIIIII" >/proc/gpio/config
9 Working with GPIO
39
9.1 Configuration
If needed, you can check the actual configuration by reading /proc/gpio/config. The value is a string
of 16 characters (composed of "I" and "O"). The first character represents the GPIO number 15 and the last
one the GPIO number 0.
9.2 Reading inputs
cat /proc/gpio/value
This returns a decimal value between 0 and 65535. This is simply the decimal value of the binary
representation of all the inputs/outputs. Suppose that all pins are set to 0 and pin 10 (GPIO number 9) is set
to 1. We have "0000001000000000" as binary representation and the corresponding decimal value is 512
(210-1).
cat /proc/gpio/X/value
This returns the value for the GPIO number X (where X is between 0 and 15 and not 1-16). This value can be
"0" or "1".
9.3 Writing outputs
echo Y >/proc/gpio/value
Y is the decimal value corresponding to the desired binary representation of all outputs. Pins configured as
inputs are left untouched in all cases.
Suppose that you want to set pin 11 to 1, pin 13 to 1 and all other pins to 0. That means you want the
following binary representation:
00010100........
The corresponding decimal value is 5120 (1*211-1+1*213-1). The command is thus:
echo 5120 > /proc/gpio/value
You can change the value of a single output (leaving the others untouched) with:
echo 0 > /proc/gpio/X/value
echo 1 > /proc/gpio/X/value
Those commands defines the value of the GPIO number X (where X is between 8 and 15 and not 9-16)
9.4 Value of each pin
The following table can be used to calculate a decimal value corresponding to several inputs or outputs. You
simply need to sum the corresponding values of each GPIO pin.
X
15
14
13 12 11 10 9 8 7 6 5 4 3 2 1 0
Value high 32768 16384 8192 4096 2048 1024 512 256 128 64 32 16 8 4 2 1
Value low
0
0
0
0
0
0
0 0 0 0 0 0 0000
9 Working with GPIO
40
10 Hardware of NetCube Desktop 2XX/3XX
10 Hardware of NetCube Desktop 2XX/3XX
10.1 Housing
The housing of the NetCube consists of a sheet-metal case specially developed for heavy-duty industrial
environment.
Dimension of the 2XX: 135x85x26 (LxBxH)
Dimension of the 3XX: 135x111x26 (LxBxH)
10.2 Connectors
LAN: RJ45 connector for 100 Mbps Ethernet connection
Power Supply: +5V Power Plug connector
COM1: 9-pin D-SUB male
COM2: 9-pin D-SUB male
LPT1: 25-pin D-SUB female (NetCube Desktop 3XX only)
GPIO (General Purpose I/O): 25-pin D-SUB female (NetCube Desktop 3XX only)
10.3 CPU-Board
10.3.1 Dimensions and connectors
10 Hardware of NetCube Desktop 2XX/3XX
41
10.3.1 Dimensions and connectors
10.3.2 Specifications
• CPU: DM&P SoC CPU Vortex86SX-300MHz (compatible 486)
• BIOS: AMI BIOS
• RAM: 128Mb DDR2
• I/O: Enhanced IDE port (UltraDMA-100/66/33) x1
RS-232 port x3
RS-232/485 port x1 (RS485 with Auto Direction)
Parallel port x1
USB port x2 (USB 2.0 version)
16-bit GPIO port x2
10/100Mbps Ethernet port x1
• LAN: Integrated 10/100M Ethernet
• Power requirements: single voltage +5V @ 400mA
• Operating temperature: -20°C ~ +70°C
10 Hardware of NetCube Desktop 2XX/3XX
42
11 Specifications of AC/DC power supply
11 Specifications of AC/DC power supply
Input voltage: 100-230 V AC
Input frequency: 47-63 Hz
Input current: 0,1 A/230 V AC or 0,2A/115 V AC
Output voltage: 5V / 1.5A
Output current max: 1.5A
Operating temperature : 0 ~ 40°C
Storage temperature: -20 ~ 70°C
Conforms to:
• CE Label
• EN 60950+A1+A2
• EN 50081-1
• EN 50082-1
Basic Dimensions: 72x52x35 mm
Primary connector: Euro plug
Secondary connector:
5,5mm/2,1mm(0.08")
Thread: 5/16"
11 Specifications of AC/DC power supply
43
12 Information about RS-485 Support
12 Information about RS-485 Support
If you requested RS-485 support when you ordered your NetCube then the following paragraphs apply to
your NetCube:
12.1 CPU card configuration
The following modifications have been made:
• Jumper setting of J11 is 2-3 ("RS485: J13 active").
• The 2 wires of connector J13 (RS-485 connector on the CPU board) are connected to pin 2 and 3
from the COM2 DB9 male connector (following the schema below).
12.2 Pinning of connectors
COM2 DB9 male connector (external view):
+ | |
o o o o o
o o o o
Textual description of the pinning:
Pin 2: RS485 +
Pin 3: RS485 -
12 Information about RS-485 Support
44
13 GPIO on DB25 connector
13 GPIO on DB25 connector
13.1 Pinning of GPIO on DB25 connector
DB25 Female (connector available only on NetCube 3XX):
Pin Description Pin Description
1 GND
2 VCC
3 GP0
4 GP8
5 GP1
6 GP9
7 GP2
8 GP10
9 GP3
10 GP11
11 GP4
12 GP12
13 GP5
14 GP13
15 GP6
16 GP14
17 GP7
18 GP15
19 VCC
20 GND
GP0 to GP7 are configured as inputs.
GP8 to GP15 are configured as outputs.
Pin 21 to pin 25 are unconnected.
Beware: Old NetCube (delivered between June 2004 and May 2005) may be configured differently:
GP0 to GP7 are configured as outputs.
GP8 to GP15 are configured as inputs.
13.2 Electrical specifications
Inputs/outputs are 5V TTL.
VCC is +5V, but in practice you regularly have about +3.8V.
An unconnected input has +3,5V and thus returns "1". If the input is connected to VCC, then it returns "1"
as well. If the input is connected to GND, then it returns "0".
An output set to "0" is at 0V. An output set to "1" should be at 5V but in practice is regularly at 3,8V.
The voltage are measured between the ground (GND) and the outputs.
13 GPIO on DB25 connector
45
14 Appendices
14 Appendices
14.1 URL for additionnal information
14.1.1 TeraTerm Pro - Serial Terminal for Windows 3.1/95/98/NT
TeraTerm is a better telnet program than the one provided with Windows. You can use it as replacement if
you have problems with the standard telnet client.
Download: http://hp.vector.co.jp/authors/VA002416/teraterm.html
14.2 ASCII table
Character
NUL (Null)
SOH (Start of heading)
STX (Start of text)
ETX (End of text)
EOT (End of transmission)
ENQ (Enquiry)
ACK (Acknowledge)
BEL (Bell)
BS (Backspace)
TAB (Tabulation)
LF (Line Feed)
VT (Vertical tabulation)
FF (Form feed)
CR (Carriage return)
SO (Shift out)
SI (Shift in)
DLE (Data link escape)
DC1 (Device control 1)
DC2 (Device control 2)
DC3 (Device control 3)
DC4 (Device control 4)
NAK (Negative acknowledgement)
SYN (Synchronous idle)
ETB (End of transmission block)
CAN (Cancel)
EM (End of medium)
SUB (Substitute)
14 Appendices
Decimal value
0
1
2
3
4
5
6
7
8
9
10
11
12
13
14
15
16
17
18
19
20
21
22
23
24
25
26
Hex.
value
00
01
02
03
04
05
06
07
08
09
0A
0B
0C
0D
0E
0F
10
11
12
13
14
15
16
17
18
19
1A
46
14.2 ASCII table
ESC (Escape)
FS (File separator)
GS (Group separator)
RS (Record separator)
US (Unit separator)
SP (Space)
!
"
#
$
%
&
'
(
)
*
+
,
.
/
0
1
2
3
4
5
6
7
8
9
:
;
<
=
>
?
@
A
B
C
14 Appendices
27
28
29
30
31
32
33
34
35
36
37
38
39
40
41
42
43
44
45
46
47
48
49
50
51
52
53
54
55
56
57
58
59
60
61
62
63
64
65
66
67
1B
1C
1D
1E
1F
20
21
22
23
24
25
26
27
28
29
2A
2B
2C
2D
2E
2F
30
31
32
33
34
35
36
37
38
39
3A
3B
3C
3D
3E
3F
40
41
42
43
47
14.2 ASCII table
D
E
F
G
H
I
J
K
L
M
N
O
P
Q
R
S
T
U
V
W
X
Y
Z
[
\
]
^
_
`
a
b
c
d
e
f
g
h
i
j
k
l
14 Appendices
68
69
70
71
72
73
74
75
76
77
78
79
80
81
82
83
84
85
86
87
88
89
90
91
92
93
94
95
96
97
98
99
100
101
102
103
104
105
106
107
108
44
45
46
47
48
49
4A
4B
4C
4D
4E
4F
50
51
52
53
54
55
56
57
58
59
5A
5B
5C
5D
5E
5F
60
61
62
63
64
65
66
67
68
69
6A
6B
6C
48
14.3 Serial pin description (null modem cable)
m
n
o
p
q
r
s
t
u
v
w
x
y
z
{
|
}
~
Delete
109
110
111
112
113
114
115
116
117
118
119
120
121
122
123
124
125
126
127
6D
6E
6F
70
71
72
73
74
75
76
77
78
79
7A
7B
7C
7D
7E
7F
14.3 Serial pin description (null modem cable)
NetCube Pin
1 ---RD
2 ---TD
3 ---DTR
4 ---GND
5 ---DSR
6 ---RTS
7 ---CTS
8 ---9 ----
14 Appendices
Serial device pin
1
3
2
6
5
4
8
7
9
49