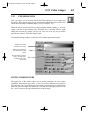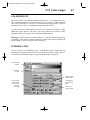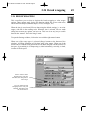
1
User's Guide 3.6 US.QXD 3/11/99 3:58 PM Page 1
TVPaint
User’s guide
User's Guide 3.6 US.QXD 3/11/99 3:58 PM Page 2
TVPaint is copyright ©1994-1995 CiS. All rights reserved.
This edition of the TVPaint User’s Guide manual is copyright ©1995 CiS. All
rights reserved.
This manual cannot, either wholly or partly, be copied, photocopied, reproduced,
translated, transcribed onto magnetic or optical media, or disposed of to any third
party, without first obtaining written consent from CiS.
CiS authorize registered users of this program to make one backup copy of the
program disks that are supplied with TVPaint for archival purposes only. All other
forms of duplication, either physical or electronic, are completely forbidden.
CiS offer neither implicit nor explicit guarantees as to the specific performance of
any particular program with regard to any particular usage, be it commercial or
non-commercial. Consequently, this programs is sold “as is”, and the purchaser
alone bears the risks of its functioning, or its suitability to any specific task.
At no time can CiS be held responsible for any liabilities accidental, direct or
indirect, or for any loss, financial or other, arising from the use of this product or
any of its constituent parts.
TVPaint is a registered trademark of CiS. All other products mentioned in this
manual are trademarks of their respective owners.
Programming:
Mister Windows:
George:
Additional Programming:
Design:
Documentation:
Hardware:
Installer:
Hervé ADAM
Patrick PAUSE
Jiji
Sébastien MORIN, Amiga Télécom Paris, Serge de
Pauli, Patrice BOUR, Nathalie LALAUT
Hervé ADAM, R. RAYMOND
R. RAYMOND
Jiji, Christian RENGLI
Laurent CERF
Thanks to Fred, Eric Matecki and to all those who contributed to the beta tests of
this program.
IDDN.FR.001.250005.02.R.P.1991.000.00000
User's Guide 3.6 US.QXD 3/11/99 3:58 PM Page 3
Table of Contents
1 Tutorials . . . . . . . . . . . . . . . . . . . . . . . . . . . . . . . . . . . . . . . . . . . . . . 1
1.1
1.2
1.3
1.4
1.5
1.6
Tutorial 1: Layers . . . . . . . . . . . . . . . . . . . . . . . . . . . . . . . . . . . . . . . 4
Tutorial 2: The Color, Replace and Behind modes . . . . . . . . . . . . . . 11
Tutorial 3: Color and density ranges . . . . . . . . . . . . . . . . . . . . . . . . 16
Tutorial 4: Some lighting effects . . . . . . . . . . . . . . . . . . . . . . . . . . . 23
Tutorial 5: Coloring a portrait . . . . . . . . . . . . . . . . . . . . . . . . . . . . . 29
Tutorial 6: A common problem with digitized pictures . . . . . . . . . . 36
2 All the Icons . . . . . . . . . . . . . . . . . . . . . . . . . . . . . . . . . . . . . . . . . . . 39
2.1 Toolboxes and Windows . . . . . . . . . . . . . . . . . . . . . . . . . . . . . . . . . 41
2.1.1 The main toolbox . . . . . . . . . . . . . . . . . . . . . . . . . . . . . . . . . . . . . . . 42
2.1.2 Basic concepts . . . . . . . . . . . . . . . . . . . . . . . . . . . . . . . . . . . . . . . . . . 43
2.2 Dotted Freehand Line . . . . . . . . . . . . . . . . . . . . . . . . . . . . . . . . . . . . 44
2.3 Freehand step by step . . . . . . . . . . . . . . . . . . . . . . . . . . . . . . . . . . . . 45
2.4 Freehand Line . . . . . . . . . . . . . . . . . . . . . . . . . . . . . . . . . . . . . . . . . . 46
2.5 Freehand shape . . . . . . . . . . . . . . . . . . . . . . . . . . . . . . . . . . . . . . . . . 48
2.6 Straight line . . . . . . . . . . . . . . . . . . . . . . . . . . . . . . . . . . . . . . . . . . . 49
2.7 Filled Polygon . . . . . . . . . . . . . . . . . . . . . . . . . . . . . . . . . . . . . . . . . 49
2.8 Straight line pressure settings . . . . . . . . . . . . . . . . . . . . . . . . . . . . . . 50
2.9 Spline Curve . . . . . . . . . . . . . . . . . . . . . . . . . . . . . . . . . . . . . . . . . . . 51
2.10 Continuous Spline Curve . . . . . . . . . . . . . . . . . . . . . . . . . . . . . . . . 51
2.11 Rectangle . . . . . . . . . . . . . . . . . . . . . . . . . . . . . . . . . . . . . . . . . . . . 52
2.12 Circle . . . . . . . . . . . . . . . . . . . . . . . . . . . . . . . . . . . . . . . . . . . . . . . 53
2.13 Ellipse . . . . . . . . . . . . . . . . . . . . . . . . . . . . . . . . . . . . . . . . . . . . . . . 54
2.14 Fill . . . . . . . . . . . . . . . . . . . . . . . . . . . . . . . . . . . . . . . . . . . . . . . . . 55
2.15 Cutting out a brush . . . . . . . . . . . . . . . . . . . . . . . . . . . . . . . . . . . . . 57
2.16 Perspective . . . . . . . . . . . . . . . . . . . . . . . . . . . . . . . . . . . . . . . . . . . 58
2.17 Text . . . . . . . . . . . . . . . . . . . . . . . . . . . . . . . . . . . . . . . . . . . . . . . . . 59
2.18 Clear function . . . . . . . . . . . . . . . . . . . . . . . . . . . . . . . . . . . . . . . . . 62
2.19 Redo function . . . . . . . . . . . . . . . . . . . . . . . . . . . . . . . . . . . . . . . . . 62
2.20 Undo function . . . . . . . . . . . . . . . . . . . . . . . . . . . . . . . . . . . . . . . . . 62
2.21 Zoom . . . . . . . . . . . . . . . . . . . . . . . . . . . . . . . . . . . . . . . . . . . . . . . 63
2.22 Smoothing . . . . . . . . . . . . . . . . . . . . . . . . . . . . . . . . . . . . . . . . . . . 64
2.23 Color ranges . . . . . . . . . . . . . . . . . . . . . . . . . . . . . . . . . . . . . . . . . . 65
2.24 Brush wrapping . . . . . . . . . . . . . . . . . . . . . . . . . . . . . . . . . . . . . . . 69
2.25 Color cycling . . . . . . . . . . . . . . . . . . . . . . . . . . . . . . . . . . . . . . . . . 71
2.26 Density mapping . . . . . . . . . . . . . . . . . . . . . . . . . . . . . . . . . . . . . . 72
2.27 Drawing tools . . . . . . . . . . . . . . . . . . . . . . . . . . . . . . . . . . . . . . . . . 77
2.28 The pen . . . . . . . . . . . . . . . . . . . . . . . . . . . . . . . . . . . . . . . . . . . . . . 78
2.29 The mechanical pen . . . . . . . . . . . . . . . . . . . . . . . . . . . . . . . . . . . . 79
2.30 The pencil . . . . . . . . . . . . . . . . . . . . . . . . . . . . . . . . . . . . . . . . . . . . 80
2.31 The chalk . . . . . . . . . . . . . . . . . . . . . . . . . . . . . . . . . . . . . . . . . . . . 82
2.32 The airbrush . . . . . . . . . . . . . . . . . . . . . . . . . . . . . . . . . . . . . . . . . . 84
2.33 The brush . . . . . . . . . . . . . . . . . . . . . . . . . . . . . . . . . . . . . . . . . . . . 86
2.34 Color palette . . . . . . . . . . . . . . . . . . . . . . . . . . . . . . . . . . . . . . . . . . 93
2.35 Grid . . . . . . . . . . . . . . . . . . . . . . . . . . . . . . . . . . . . . . . . . . . . . . . . . 98
2.36 Using layers . . . . . . . . . . . . . . . . . . . . . . . . . . . . . . . . . . . . . . . . . . 99
I
User's Guide 3.6 US.QXD 3/11/99 3:58 PM Page 4
II
Table of Contents
2.37
2.38
2.39
2.40
2.41
2.42
Drawing modes . . . . . . . . . . . . . . . . . . . . . . . . . . . . . . . . . . . . . . . 103
Disk operations . . . . . . . . . . . . . . . . . . . . . . . . . . . . . . . . . . . . . . . . 109
Printing . . . . . . . . . . . . . . . . . . . . . . . . . . . . . . . . . . . . . . . . . . . . . . 115
Clipboard . . . . . . . . . . . . . . . . . . . . . . . . . . . . . . . . . . . . . . . . . . . . 117
Twain devices . . . . . . . . . . . . . . . . . . . . . . . . . . . . . . . . . . . . . . . . . 117
System menu . . . . . . . . . . . . . . . . . . . . . . . . . . . . . . . . . . . . . . . . . 118
2.42.1 Undo mode . . . . . . . . . . . . . . . . . . . . . . . . . . . . . . . . . . . . . . . . . . . 118
2.42.2 File Requester . . . . . . . . . . . . . . . . . . . . . . . . . . . . . . . . . . . . . . . . . 118
2.42.3 Spare layer . . . . . . . . . . . . . . . . . . . . . . . . . . . . . . . . . . . . . . . . . . . . 118
2.42.4 Page size . . . . . . . . . . . . . . . . . . . . . . . . . . . . . . . . . . . . . . . . . . . . . 118
2.42.5 Coordinates . . . . . . . . . . . . . . . . . . . . . . . . . . . . . . . . . . . . . . . . . . . 119
2.42.6 Show page . . . . . . . . . . . . . . . . . . . . . . . . . . . . . . . . . . . . . . . . . . . . 119
2.42.7 Gamma monitor . . . . . . . . . . . . . . . . . . . . . . . . . . . . . . . . . . . . . . . 120
2.42.8 Sensitivity . . . . . . . . . . . . . . . . . . . . . . . . . . . . . . . . . . . . . . . . . . . . 121
2.42.9 Renaming the configuration . . . . . . . . . . . . . . . . . . . . . . . . . . . . . . 121
2.42.10 Display Mode . . . . . . . . . . . . . . . . . . . . . . . . . . . . . . . . . . . . . . . . . 121
2.43 Filters . . . . . . . . . . . . . . . . . . . . . . . . . . . . . . . . . . . . . . . . . . . . . . . 122
2.44 Quitting . . . . . . . . . . . . . . . . . . . . . . . . . . . . . . . . . . . . . . . . . . . . . . 122
3 George, the automatic pilot . . . . . . . . . . . . . . . . . . . . . . . . . . . . . . . 123
3.1
3.2
3.3
3.4
3.5
3.6
3.7
3.8
Description . . . . . . . . . . . . . . . . . . . . . . . . . . . . . . . . . . . . . . . . . . . . 125
How to use George . . . . . . . . . . . . . . . . . . . . . . . . . . . . . . . . . . . . . . 126
Editing command lines . . . . . . . . . . . . . . . . . . . . . . . . . . . . . . . . . . . 127
George multitasks . . . . . . . . . . . . . . . . . . . . . . . . . . . . . . . . . . . . . . . 129
The startup.grg file . . . . . . . . . . . . . . . . . . . . . . . . . . . . . . . . . . . . . . 129
George, a scripting language . . . . . . . . . . . . . . . . . . . . . . . . . . . . . . 130
TVPaint commands . . . . . . . . . . . . . . . . . . . . . . . . . . . . . . . . . . . . . 137
Writing George programs . . . . . . . . . . . . . . . . . . . . . . . . . . . . . . . . . 152
4 Filters . . . . . . . . . . . . . . . . . . . . . . . . . . . . . . . . . . . . . . . . . . . . . . . . 152
4.1 LUT (Look Up Table) . . . . . . . . . . . . . . . . . . . . . . . . . . . . . . . . . . . 161
4.2 Chroma key . . . . . . . . . . . . . . . . . . . . . . . . . . . . . . . . . . . . . . . . . . . 165
4.3 Color key . . . . . . . . . . . . . . . . . . . . . . . . . . . . . . . . . . . . . . . . . . . . . 167
4.4 Luma key . . . . . . . . . . . . . . . . . . . . . . . . . . . . . . . . . . . . . . . . . . . . . 168
4.5 Convolutions . . . . . . . . . . . . . . . . . . . . . . . . . . . . . . . . . . . . . . . . . . 169
4.6 Bump . . . . . . . . . . . . . . . . . . . . . . . . . . . . . . . . . . . . . . . . . . . . . . . . 172
4.7 Flip horizontal . . . . . . . . . . . . . . . . . . . . . . . . . . . . . . . . . . . . . . . . . 174
4.8 Flip vertical . . . . . . . . . . . . . . . . . . . . . . . . . . . . . . . . . . . . . . . . . . . 174
4.9 Lumix . . . . . . . . . . . . . . . . . . . . . . . . . . . . . . . . . . . . . . . . . . . . . . . . 174
4.10 Mosaic . . . . . . . . . . . . . . . . . . . . . . . . . . . . . . . . . . . . . . . . . . . . . . 175
4.11 Negative . . . . . . . . . . . . . . . . . . . . . . . . . . . . . . . . . . . . . . . . . . . . . 175
4.12 Noise . . . . . . . . . . . . . . . . . . . . . . . . . . . . . . . . . . . . . . . . . . . . . . . . 175
4.13 Panning . . . . . . . . . . . . . . . . . . . . . . . . . . . . . . . . . . . . . . . . . . . . . . 176
4.14 Print dots . . . . . . . . . . . . . . . . . . . . . . . . . . . . . . . . . . . . . . . . . . . . 177
4.15 Shadow . . . . . . . . . . . . . . . . . . . . . . . . . . . . . . . . . . . . . . . . . . . . . . 177
4.16 Smooth . . . . . . . . . . . . . . . . . . . . . . . . . . . . . . . . . . . . . . . . . . . . . . 179
4.17 Spare mixer . . . . . . . . . . . . . . . . . . . . . . . . . . . . . . . . . . . . . . . . . . 180
User's Guide 3.6 US.QXD 3/11/99 3:58 PM Page 5
Table of Contents
4.18
4.19
4.20
4.21
Tornado . . . . . . . . . . . . . . . . . . . . . . . . . . . . . . . . . . . . . . . . . . . . . . 181
Video fix motion . . . . . . . . . . . . . . . . . . . . . . . . . . . . . . . . . . . . . . . 182
Extended LUT . . . . . . . . . . . . . . . . . . . . . . . . . . . . . . . . . . . . . . . . 183
Plug-in Filters . . . . . . . . . . . . . . . . . . . . . . . . . . . . . . . . . . . . . . . . . 184
Appendix A: Textures in the windows . . . . . . . . . . . . . . . . . . . . . . . . . A-1
Appendix B: Keyboard shortcuts . . . . . . . . . . . . . . . . . . . . . . . . . . . . . B-1
Index
III
User's Guide 3.6 US.QXD 3/11/99 3:58 PM Page 6
User's Guide 3.6 US.QXD 3/11/99 3:58 PM Page 1
1. Tutorials
TVPAINT
1
Tutorials
1
User's Guide 3.6 US.QXD 3/11/99 3:58 PM Page 2
User's Guide 3.6 US.QXD 3/11/99 3:58 PM Page 3
1. Tutorials
This chapter contains a series of tutorials to help you get used to TVPaint and its
functions. They are also a step by step guide to some of the programs more
complex areas: multiple layers, modular functions, etc.
The first few tutorials show all the basic functions, even the simplest ones (drawing
freehand, drawing a rectangle...). As you go on, these basic functions will no
longer be described in detail. If during one of the tutorials you are asked to draw
something on the screen, and there is a window in the way, you shouldn’t hesitate
to drag it away from your drawing area, or to close it for a while. Its up to you to
choose how fast you get up to speed.
Note that the mouse button that is used most often is the Left button. When you are
asked to “Click on something”, and no mouse button is specified, it will always be
the left mouse button that is referred to. When you need to use the Right mouse
button, we will ALWAYS tell you.
Also, when we talk about the “mouse” or the “mouse button”, for those of you
using a digitizing tablet, these correspond to “the tablet’s stylus” and “the stylus’
button”.
3
User's Guide 3.6 US.QXD 3/11/99 3:58 PM Page 4
4
1.1 Tutorial 1
1.1 TUTORIAL 1
Where you will use the different layers, with simple drawing functions (filled
circle, rectangle, freehand polygon) to draw a sunset over the ocean.
Run TVPAINT with the Standard configuration. The Toolbox appears on a black
screen. Click twice on the icon that shows a rectangle. You have just selected the
Filled Rectangle function. Click on a blue cell in the multicolored palette at the
bottom of the toolbox. This blue is now your Current Color.
Create the ocean by drawing a solid blue rectangle covering the lower half of the
screen. To do this, move the mouse pointer to the left of the screen, about half the
way up. Click on the left mouse button, and, whilst keeping the button pressed,
drag the mouse pointer to the bottom right hand corner of the screen. Let go of the
button: a blue rectangle will be drawn.
The screen is now blue at the bottom, and black at the top. At this stage, you should
know that the top of the screen is not really black: it is blank, and you see through
it onto the background color, which is colored black by default, but which can be
changed. It’s as if that you were drawing on a pane of glass, which is placed on top
of a black cloth. You could swap the cloth for a green one, or a red one, but that
would not change what is painted on the pane of glass. You are now going to
change the background color. Click on the icon that will bring up the Layers
window.
The following window will open. Next to the word Backgrd (for Background) is a
button that reads Black. Move the mouse pointer over the button and click and hold
the left mouse button. A pop up menu appears, which has three options: Black
(which is currently selected), Color and Check. Drag the mouse pointer (still
without letting go of the button) over the word Color and release the button. The
Background button now reads Color, and everything that was black on the screen
has now gone blue.
User's Guide 3.6 US.QXD 3/11/99 3:58 PM Page 5
1.1 Tutorial 1
5
Background displ
ay : Bl
ack,
Check orCol
or
Background col
ors displ
ay ,t
hat
appearal
so as t
he background
t
ot
he l
ay ers int
he w indow
The currentl
ay er,t
he one y ou
are draw ing on,is show ninw hit
e
(here,lay erB).
P ict
ure of l
ay erC,w hich y ou
m ustcl
ick on t
o creat
e it
.
You have just seen the effects of the
two background color modes: the
Color mode lets you choose
whatever background color you
like; the Black mode gives a black background, whose main advantage is speed
(speeder than the Color mode), but on which it can be difficult to see dark colors;
the Check mode gives you a “checkboard” background with two colors you can
choose.
The background is now in Color mode. To change its color, you simply click on the
first colored button to the right of the Background button. The mouse pointer
changes: it turns into a question mark, letting you know that you should pick a
color with it. Click anywhere on the screen, even in a window or toolbox, and
move around holding down the left button. You can see that all the colors you pass
over are mirrored in the colored button. Release the mouse button when you have
the color you want. The background then changes to that color. Try it a few times,
and finish by choosing a light blue color. Note that the blue rectangle that makes up
the ocean is not affected by any of these changes to the background color.
Look at the bottom of the Layers window: there are three overlapping rectangles,
that represent the “panes of glass” you can draw on, otherwise known as Layers.
The current layer, the one on which you drew the ocean, is the only one that is
switched On, and is drawn in white. Only layer B exists when the program is
loaded.
You are now going to create a second layer on which you will draw the sun. Click
on the bottom layer, the one that is offset to the right of layer B. Clicking on these
layers can do two things: if the layer exists already, it get selected as the current
layer, the one you will draw on. If it does not yet exist, clicking on the layer will
create it. A little window appears asking you to confirm that this is the right action.
Click on the Create It button to create the layer. This new layer is automatically
selected as the current layer. It turns white in the window (and layer B turns Off).
User's Guide 3.6 US.QXD 3/11/99 3:58 PM Page 6
6
1.1 Tutorial 1
Note that there is a keyboard equivalent to selecting a layer in the Layers window:
keys 1, 2 and 3 represent layers A, B and C. To create layer C, therefore, you could
have simply pressed the 3 key.
You are now going to draw the sun. Close the Layer window (with the close
gadget, top left of the window) or move it out of the way (by clicking on the drag
bar at the top of the window) to the left of the screen.
Click twice on the Circle icon. You have selected the Filled Circle function. Click
on an orange/yellow cell in the current palette (at the bottom of the main toolbox),
which becomes your current color.
Draw the sun by tracing a filled circle: move the mouse pointer just above the
“horizon” of your picture, and three quarters of the way to the right. Click and hold
the left mouse button, and drag the outline of a circle that appears, so that it
overlaps into part of the ocean. Let go of the mouse button, and a yellow circle will
get drawn. Note that the sun disappears behind the ocean.
When several layers are turned on, there is nothing that lets you differentiate
between them visually. The only solution is to remember which layer you are
drawing on. You can use the = key whenever you like to turn off and on all the
layers except the current one. When you are drawing a picture that uses several
layers, and you can’t remember what’s on top and what’s underneath, press the =
key. Only the current layer will then be displayed. To see the overall picture, press
the = key again, and all the layers will reappear.
User's Guide 3.6 US.QXD 3/11/99 3:58 PM Page 7
1.1 Tutorial 1
After having drawn the sun and the ocean, if you want to see exactly what’s
happening, press the = key. The ocean will disappear, leaving only the current layer
displayed. You now see only the sun on an empty background. Note that, whereas
with the ocean displayed, it looked like there was part of the sun missing, now you
will see the sun in its entirety. The lower part of it had been covered by the ocean,
one layer above it.
You can draw, if you so wish, without even seeing what you are drawing. You
could draw a fish in the ocean in the same way you drew the sun. The fish would
get drawn, but would be hidden by the ocean in front of it. Of course, drawing
without seeing what you are doing is not that great an idea (if the ocean was not
100% opaque, but say 50%, then you would see what you are drawing through it).
It would be better, therefore, to draw such a fish after pressing the = button, to
display only the current layer, then press on = again when you are done.
If you left the Layers window open, look what happens when you press the = key:
each of the layers has a little menu that shows its state: On or Off. The = key
switches the state of layer B between On and Off. We will come back to this later.
You are now going to draw a rock in the sea. Click twice on the Freehand Line
icon, which selects the Filled Polygon function. Click on a black color in the
palette, which then is selected as your current color.
Press the 1 key to select layer A. This layer does not yet exist, so TVPaint will ask
you if you want to create it. To do so, click on the Create It button in the window
that appears.
Draw the rock on the left of the screen, starting in the middle of the ocean, and
make it overlap onto the sky. To do this, click and hold the mouse button, and draw
the outline of a rock similar to the one in the picture below. Let go of the mouse
button and the shape will be filled.
If some open windows get in your way, don’t hesitate to drag them to another part
of the screen, or to close them. You can turn the Toolbox On and Off using the
Space bar.
7
User's Guide 3.6 US.QXD 3/11/99 3:58 PM Page 8
8
1.1 Tutorial 1
If you don’t like the rock you have just drawn, don’t worry: simply click on the
Undo icon or press the u key, and it will disappear, allowing you to try again.
Warning: the Undo function can only get rid of the last thing you drew. If you draw
two rocks, then click on Undo, only the last one you drew will disappear.
To be sure you drew the rock on a separate layer, press the = key. The sun and the
ocean should disappear. Press = again, and they will reappear. In this particular
case, the = key lets you see only the rock, as that is all there is on the current layer.
If you want to turn off only the layer with the ocean on it, you have to do things
differently. Open the Layers window (if it is not already displayed) and use the
menus on the left that control each layer individually, and let you turn them On or
Off (see next fig.).
Cont
rolm enus forindividual
l
ay ers A ,B and C.E ach l
ay er
can be O n (displ
ay ed)orO ff
(hidden).
(Three ot
heropt
ions,R ,G and B,
l
ety ou col
ort
he l
ay ers inred,
green orbl
ue,so t
hatt
hey can
st
and outfrom t
he ot
herl
ay ers)
Even after having played a bit with layers, you may not realize how useful they can
be. Here is an example to show how flexible they can make your work:
User's Guide 3.6 US.QXD 3/11/99 3:58 PM Page 9
1.1 Tutorial 1
Imagine that the rock you have drawn isn’t quite right, and that you want to trim its
edges a bit. With the single layer graphics programs you may have used up until
now, if you wanted to erase some of the rock, you would have had to paint over it.
To do this, you would need to select the color(s) of the ocean, draw some lines
freehand to change the outline of the rock in the sea, then select the sky color, and
go through the same outlining process for that. If you had drawn waves in the sea,
after having reworked the rock, you would then have to draw the waves back in.
Working with multiple layers, all you need to do is to rework the contour of the
rock. The sea on the layer under the rock would appear straight away. Remember
the panes of glass analogy: what you would do is scratch away the paint on the top
pane (where the rock is drawn), which would then reveal the paint on the pane
underneath it.
If it is not already selected, click once on the Freehand Line icon. Press the 1 key to
select layer A (or click on layer A in the Layers window). Each time you draw
something on a multi-layered picture, make a quick check of which layer you are
drawing on. To do this, glance at the Layers icon. The current layer is always
shown in white. As long as you are drawing on the right layer, you will not erase
what you don’t want to. In this case, you want to erase part of the rock, which is on
layer A, and not the ocean, which is on layer B.
Press F3 to go into the Erase drawing mode. Check that the Mode button in the
Toolbox does indeed show Erase. Draw a single line through the middle of the
rock: the part of the rock you drew over gets erased, and you can see the ocean
through it. Click on Undo to get the whole rock back, then use this drawing mode
to trim the edges of the rock until you are happy with it. If your pen is too small,
use the + and - keys to change its size.
There is another way to use the Erase mode: it is in fact available all the time with
the right mouse button action. Press on the F1 key to select the Color mode (the
normal drawing mode). Draw two lines one on top of the other, the first with the
left mouse button, the second with the right mouse button. The line drawn with the
right mouse button will erase the one drawn with the left mouse button. The Erase
function is available using the right mouse button whatever mode you are currently
in, like an eraser at the end of your pencil.
Remember that the right button is not always easy to use with the stylus of
digitizing tablets. A better solution is to set your tablet driver so the right button
action can be simulated by pressing at the same time the Shift key and the stylus’
tip.
To show you how flexible using multiple layers can be, you are now going to move
the sun. Usually, in single layer drawing programs, you would need to go through a
whole load of operations to do this. Thanks to the multiple layers of TVPaint, we
will use the Panning Filter to move one layer within the others.
9
User's Guide 3.6 US.QXD 3/11/99 3:58 PM Page 10
10
1.1 Tutorial 1
Click on the Filters icon with the left mouse button, then on the text Panning with
the right mouse button. When you click on a filter button with the left mouse
button, its Settings window will open. When you click with the right mouse button,
the Settings window also appears, but also the cumbersome Filters window gets
closed automatically.
Press the 3 key to select layer C, on which the sun is drawn. Click on the Panning
Y value in the window, and enter the value -20 from the keyboard. Now click on
Apply to Layer: the sun rises! If you keep on clicking, the sun will rise further and
further, eventually coming off the top of the screen, and reappearing at the bottom.
Of course, if all your layers are switched on, then the sun reappearing at the bottom
would be completely covered by the blue sea on the layer above it. This filter does
not change what is drawn in the layer, it simply moves the layer around.
To put the sun at a precise point in the picture, click on the Set Panning button.
This function lets you graphically move the layer. Place the mouse pointer in the
middle of the sun, and click and hold the left mouse button. Move the pointer until
it is where you want the sun to be, then release the mouse button. The Panning X
and Panning Y coordinates are updated automatically to the new position of the
layer. Then click on Apply to Layer to set those as the new layer coordinates.
User's Guide 3.6 US.QXD 3/11/99 3:58 PM Page 11
1.2 Tutorial 2
1.2 TUTORIAL 2
Where we will describe in detail and use the Color, Replace, and Behind modes; we
will talk about smoothing and 8 bit masks, whilst coloring a planet with the pen
and the airbrush.
Run TVPaint with the Standard configuration. If it is already running, exit the
program then restart it by clicking on the arrow icon at the bottom right of the
toolbox. This rather drastic way of resetting the program defaults at least ensures
that the right settings are in place for this step by step guide.
Click on a red cell in the palette in the main toolbox. Click twice on the Circle icon
and draw a circle in the middle of the screen.
You now should have a red circle on the transparent background (which is colored
black). Select the Freehand Line and a light yellow color. Draw one line (and one
only, so that you can use Undo on it later) from past one end of the planet to the
other. In Color mode, you add paint on top of what is currently in the layer. Here,
the yellow line covers the red of the planet and the black background.
Press the u key to undo the stroke, and press F2 to select the Replace mode. To
select this mode, you could also go into the scroll down menu in the Toolbox, and
select Replace there. Draw several lines across the planet, also using the + and keys to alter the size of the brush. This time the yellow lines do not appear on the
black background, as if it were protected by an invisible mask. In Replace mode,
the density of the paint is not changed, only its color which is replaced. Where
there is lots of colored paint, inside the planet, the drawing functions will add a lot
of color. Where there is no color, on the background, no color will be deposited.
11
User's Guide 3.6 US.QXD 3/11/99 3:58 PM Page 12
12
1.2 Tutorial 2
The Replace mode, despite its apparent simplicity, solves the problem of retaining
smoothing in the picture. Click on the Zoom icon in the main toolbox. A rectangle
appears at the end of your mouse pointer. Place the rectangle over an edge of the
planet. The Zoom window appears. If it is in the way, drag it to a different part of
the screen. Click 8 or 9 times on the + button in the window, to increase the
magnification so that you can see the individual pixels of the edge of the planet. If,
after zooming in, the edge of the planet is not visible, then move it back into view
using the sliders or the arrows on the border of the window, or the arrow keys on
the keyboard.
You will see that the edges of the planet
do not go straight from red or yellow to
black. Pixels of progressively darker
color reds surround the circle, so that the
edge of the planet is less clearly defined
and the “jaggies” around the circle are
much less apparent. Note that the pixels
seem to be of different colors. They are
in fact of the same color, but with
different density, i.e. more and more
transparent as they go towards the black
background. The color densities,
therefore, go from 100% opaque inside
the red planet, to a totally transparent
color at the planet’s extreme edges. The
pixels in between only seem to fade to
black because that is the color of the
background.
User's Guide 3.6 US.QXD 3/11/99 3:58 PM Page 13
1.2 Tutorial 2
Open the Layers window and select the Color mode for the background. The
background becomes colored in blue (default color), and the pixels that were of
darker shades of red change too. They are now made up of the intermediate colors
between the red planet and the blue background. Those pixels have not had their
color changed: they are still red with increasing degrees of transparency. If you
change the background color, the pixels seem to change, because you can see more
color behind them. To see more of this effect, select various background colors
(green, white...). Click first on the colored button to the right of the Background
button, then click on your new background color in the toolbox. Once you are
done, select Black as your background mode once again.
Smoothing is done by density variation, and since the Replace mode acts without
modifying density, it preserves the smoothing. Choose for example a light blue
color from the palette, and draw some lines in the Zoom window (be sure you’re
still in Replace mode). See what happens: the smoothing stays intact, whatever the
color added.
The Replace mode therefore lets you paint color wherever there is already some,
whilst retaining the density of the pixels you draw over. It’s as if you were in a
Color mode which uses density as a mask: transparent pixels are protected, opaque
pixels can be changed. The great feature of this mask is that it isn’t a simple binary
mask (all or nothing, pixel masked or not), as often found in other graphic
applications. In TVPaint, the mask has 256 levels of density, or transparency.
Pixels can therefore be more or less masked. Your planet, drawn in Color mode,
automatically becomes a mask when you go into Replace mode: only the inside of
the planet can be altered, whilst the edges remain perfectly smooth.
Now try the Replace mode with the airbrush. Click with the left mouse button four
times on the Pen icon (upper right of the main toolbox). The icon successively
displays a mechanical pen, a pencil, a chalk and finally a airbrush. Press the + and keys to change the size of the airbrush; set a fairly large size, about half the radius
of the planet. Pick black as your current color, then add some shade to the planet by
spraying its right side with the airbrush. If it seems to go too slowly, select the
Dotted Freehand Line icon. Now pick white as your working color, and paint some
sunlight on the left side of the planet.
Warning: for those of you using a mouse, open the Tools window (see next page)
with the right mouse button, and reduce the Power parameter to about 10%. Its at
times like this that you really appreciate having a digitizing tablet with a pressure
sensitive stylus: the more you press, the more power you get from the airbrush.
With the mouse, however, you have to stay more or less time in the same position
to add more or less paint, resulting in a poor control of the intensity.
13
User's Guide 3.6 US.QXD 3/11/99 3:58 PM Page 14
14
1.2 Tutorial 2
You will now paint some stars on the black background. This time, we’ll draw
them on the same layer as the planet. Usually you would probably draw them on a
different layer, but using the same layer can help save memory. If you drew the
stars on a separate layer, you could do so and be certain not to change the planet
whilst drawing them, or applying filters to them (and vice versa).
One of the best ways to get nice looking stars is to use the Airbrush tool and the
Dotted Freehand Line function, which should still be selected. You will need to
change the aspect of the airbrush, however. The default settings give a blurred
smudge of paint, whereas a star is more of a bright center surrounded by a diffuse
halo. You can do this by changing the airbrush curve to give it a more sharp shape.
The airbrush is here sel
ect
ed
am ong t
he t
ool
s.It
s set
t
ings are
displ
ay ed bel
ow .
The aspectcurve of t
he airbrush,
as itshoul
d be sett
o creat
et
he
t
ut
orialst
ars.
Open the Tools window by clicking on the Airbrush icon
with the right mouse button. Set the aspect to something
similar to the picture shown here, by clicking directly on
the big curve, and dragging it whilst holding down the
mouse button.
Select the Color mode (by pressing the F1 key) since the
Replace mode cannot let you paint on the transparent
background. Pick white as you current color, and draw
some dots in the sky. Vary the size of the airbrush by
pressing the + and - keys. Unfortunately, if you draw too
close to the planet, the stars will overlap on to the
planet. Don’t despair, there is a solution! Select the Behind mode by pressing twice
on the F2 key, or by choosing it from the top left menu in the main toolbox. If you
now draw stars that overlap the planet’s borders, they are drawn behind the planet,
not on top of it.
User's Guide 3.6 US.QXD 3/11/99 3:58 PM Page 15
1.2 Tutorial 2
Like the Replace mode, the Behind function uses transparency, except that this
time, it only draws on those areas that are transparent, and not on the areas that are
opaque with paint. To go back to the panes of glass analogy, the Behind mode is the
equivalent of drawing on the back of one of the panes of glass. Paint will therefore
only be visible in places where there is not already a fully opaque coat of paint: it
won’t change the planet, because it is already fully covered in paint, and therefore
the paint behind it is invisible.
As the Replace mode, Behind preserves the smoothing. With the zoom, try to
observe what happens to the edges of the planet when you draw a star that overlaps
them. Change your working color to a light blue, for example, and draw some stars
under the white stars. See what happens in the Zoom window.
15
User's Guide 3.6 US.QXD 3/11/99 3:58 PM Page 16
16
1.3 Tutorial 3
1.3 TUTORIAL 3
Where we will use color ranges and density mapping to draw a city at night.
Run TVPaint with the Standard configuration. If it is already running, exit the
program then restart it. This rather drastic way of resetting the program defaults at
least ensures that the right settings are in place for this step by step guide.
Start by drawing a beautiful night sky: select layer C by pressing the 3 key or
clicking on Layer C in the Layers window. Answer Create It when the dialog box
asks you for confirmation. Click twice on the Rectangle icon and draw a medium
sized filled rectangle in yellow at the center of the screen.
Click on the Fill Options icon at the top of the toolbox, and draw another rectangle.
This time, when you finish drawing the outline of the rectangle, a vector line
appears from the center of the rectangle that follows the mouse pointer around.
Move the mouse so that the line is horizontal, and click. Your rectangle gets drawn
with a color range from red to blue. Draw some more rectangles, and each time
pull the vector line that appears in a different direction.
The vector line that appears after you have drawn the rectangle defines the
direction of the color range. Note that red is always at the center of the rectangle,
turning into blue at the edges.
To draw a nighttime sky that is slightly lit up on the horizon, all you need to do is
draw a rectangle over the whole surface of the screen, and direct the color range
line upwards. The default colors are not very realistic though! It would be better to
have a pale yellow on the horizon that turns blue then finally black at its zenith.
You are going to set the color range so that it does just that. Open the Fill options
window by clicking with the right mouse button on the Fill Options icon.
User's Guide 3.6 US.QXD 3/11/99 3:58 PM Page 17
1.3 Tutorial 3
17
D ispl
ay st
rip fort
he current
col
orrange.
Col
orrange edit
ing st
rip,
w it
ht
he col
orcel
l
s.
E dit
ing funct
ions: Copy
col
or,P ick col
or,
E x change cel
l
s and E rase
The editing functions
for the color range
are grouped in the
upper part of the
window. You will see
the editing strip
whose default setting
is a red cell on the
left and a blue cell on the right. This corresponds to the color range you have been
using up to now. Note also the display strip that shows the end-effect of the current
color range settings.
Click on the blue cell on the right of the editing strip: a small arrow appears under
the cell, meaning that this cell is now selected as the current cell. The editing
functions underneath always apply to the current cell. Click on the Pick button to
choose a new color for the current cell. Click and hold the left mouse button and
move the mouse around over the screen and the windows: whatever colors you
pass over are copied to the current cell, and the resulting color range is displayed
accordingly. As long as you keep the button pressed the display will update in real
time. Put the mouse pointer over something black and let go: the color range now
goes from black to red.
Go through the same process, but this time by replacing the red cell by a dark blue
cell...(remember, it’s night. Don’t choose a light blue) You shouldn’t need to read
the forthcoming instructions again to do it. Click on the red cell to select it (the
selection arrow will appear under it), then on Pick, then on a dark blue color on the
screen (from the palette, for example). The color range now goes from black to
dark blue.
Draw a large rectangle to admire your work: it’s already a lot more like a night
scene. Click on the editing strip between the black and blue cells. The selection
arrow moves to just under where you clicked, but there isn’t yet any color cell
there. You’d better create one then! Click on Pick, and choose a pale yellow color
in the palette. A new yellow cell will appear in in the editing strip, and the display
will be updated to fit the new color range.
User's Guide 3.6 US.QXD 3/11/99 3:58 PM Page 18
18
1.3 Tutorial 3
Your color range now goes from blue to yellow to black. Draw a rectangle with it:
there is still a problem. The yellow color is in the wrong place; you need to swap
the blue and the yellow. Make sure the yellow cell is still selected (as shown by the
small arrow), and click on Exchange, then on the blue color. The two cells will be
swapped round.
Your color range now goes from yellow to blue to black. Draw a rectangle that
covers the screen, and aim the range vector straight up. The nighttime sky effect is
nearly done, except that there is too much yellow compared to the amount of blue.
You need to reduce the range between yellow and blue and widen the range
between blue and black. To do this, you simply move the blue cell towards the
yellow cell: click on the blue cell, then on Exchange, then click in the editing strip
quite nearer the yellow cell. There isn’t any color cell there, but it does the job you
want: the blue cell gets swapped with a nonexistent cell, and thus moves to its new
place nearer the yellow cell.
To check how this new color range looks, you don’t need to draw a new rectangle:
you can automatically redraw the last one. Click on the Undo icon, then on the
ReDo icon. The range vector appears without any further action, and all you need
to do is aim it upwards and click. The rectangle you drew earlier gets repeated with
the new color range. This ReDo function isn’t critically important when drawing
rough rectangles like we are here. However, if you are drawing multi-sided
polygons by hand, and then have to test out different fillings, it can become very
frustrating to repeat the construction process every time. In these cases, use ReDo:
change your settings, click on Undo, then on ReDo (on the keyboard, you can press
u for Undo, and Shift +u for ReDo).
The color range is now ready. Shut the Fill Options window. If it is not yet done,
draw a rectangle the size of the whole screen and aim the range vector straight up.
That’s your nighttime sky. You are about to draw some more rectangles, but these
you want filled in without ranges, so turn the color ranges off by clicking on the
Fill Options icon to deselect them.
User's Guide 3.6 US.QXD 3/11/99 3:58 PM Page 19
1.3 Tutorial 3
You are now going to draw the city. Press 1 to select layer A. If it doesn’t yet exist,
confirm that you want to Create It. Since layer A is empty, nothing in your picture
seems to change when you select it as your current layer. The Layers icon should
however change to show that the top layer is selected. Check that now...
Make sure that you have selected the Filled Rectangle tool, and then click on a
black cell in the color palette. You are going to draw some unlit (black) buildings
against dark skyline. As they will simply be filled rectangles, this should not be too
difficult. While you do it, remember that the right mouse button will let you erase
what you have drawn on this layer, like scratching paint off a pane of glass that lets
what is under it be seen. Now, draw yourself a skyline you can be proud of!
With the city drawn in, what you now need to do is add some lighting effects in the
sky around your city. Press the 2 key to select layer B. If it doesn’t exist, then
confirm that you want to Create it. As it is empty, there won’t be any change on
screen. The only thing that shows which layer you are drawing on is the layers icon
in the toolbox. Check it to be sure you are on layer B, the middle layer. You should
get into the habit of doing this, otherwise you regularly run the risk of painting over
the wrong layer, and losing valuable work in the process.
Click on the Density mapping icon, the one with little clouds in it, then select
yellow as your current color and draw a rectangle in the middle of the screen.
Instead of a nice clean rectangle, it is all blurred at the edges. It is this function that
lets you apply to fill shapes not a color range, but a density map.
19
User's Guide 3.6 US.QXD 3/11/99 3:58 PM Page 20
20
1.3 Tutorial 3
X curve.
D ispl
ay area.
Y curve.
Curve t
y pe sel
ect
ion icons
P resetcurves
Open the Density Mapping window by
clicking on the Density icon with the
right mouse button. You will see a big
square display where the density map is, colored red. The red is most dense at the
center, like the yellow in the rectangle you just drew. Click in the upper left hand
corner of the display area. The red pattern changes immediately, and the most
dense point is where you clicked. Draw a yellow rectangle in the screen. It will
have the same pattern as the one in the display area.
Draw some rectangles one on top of the other, and you will notice that transparency
changes across density maps. As less and less dense color is used, the more
transparent that color becomes.
When you click in the display area, you set the most dense point. In fact, it is the X
and Y curves (located on top of, and to the left of the display area) that are changed
to fit this point, and this also changes the display area. To get a very precise setting,
you can change the curves that set the density map directly. Additionally, we need
to look at how the curves are affected by the small icons at the bottom of the
window.
Click on the icon that shows vertical bars, at the bottom of the window next to the
text X. This icon starts off selected, meaning that the X curve is turned on. By
deselecting it, you turn the X curve off, i.e. it is no longer used. The display area
changes accordingly. Draw a tall rectangle to see what effect it gives.
User's Guide 3.6 US.QXD 3/11/99 3:58 PM Page 21
1.3 Tutorial 3
To draw beams of light that go off into the night sky, the current setting would be
nearly right if it was inverted: the most dense part at the bottom, and the top part
losing itself hazily into the sky. You could edit the Y density curve yourself, but
there is already a preset value that fits what is required. Click on the Preset curves
icon in the bottom right of the window. Doing this copies those preset values onto
whichever curves are selected (the Y curve only in this case). The Y curve is now
exactly how we want it. Clear the current layer by clicking on the Clear icon, then
draw a tall, thin rectangle, like the beam from a projector.
It would be nice to draw something other than rectangles, so as not to limit
ourselves to vertical beams. The best way to do this is to use the Freehand Polygon
function. Select this by clicking twice on the Freehand Line icon.
A freehand polygon is constructed by drawing a series of lines that make up its
edges. Click on one of the buildings in your city (which is in fact on layer A, in
front of anything you draw): a point is anchored, and a line to this point follows the
mouse around. Bring the mouse pointer to the top of the screen and click: another
point gets anchored, and the line following you mouse comes from this new point.
Click again about an inch to the right of the last point, then click one last time just
to the right of the first point you made. You have defined the outline of the beam,
and you now just need to click with the right mouse button or press Return to
close the polygon.
Note that you don’t have to find the first point again to close the polygon: the first
and last points get automatically linked with a straight line. Note also that the line
defining the top of the beam should be as horizontal as possible, since the density
map acts over the vertical length of the polygon. If the top of the polygon is
oblique, it becomes visible, and the light beam effect is spoilt.
21
User's Guide 3.6 US.QXD 3/11/99 3:58 PM Page 22
22
1.3 Tutorial 3
Discard your first attempts using the Clear button, then draw in some light beams.
Give them varying heights so that they get lost into different parts of the sky. You
can also change the current color to vary things a bit, whilst staying within shades
of yellow (more pale, more orange...).
User's Guide 3.6 US.QXD 3/11/99 3:58 PM Page 23
1.4 Tutorial 4
1.4 TUTORIAL 4
Where we will use color ranges, pressure-sensitive straight lines and density maps
to add some special effects to a logo.
Run TVPaint with the Standard configuration. If it is already running, exit the
program then restart it. This rather drastic way of resetting the program defaults at
least ensures that the right settings are in place for this step by step guide.
Press the 3 key to select layer C (click on Create It in the dialog box that appears).
You’re going to put the logo on the rear layer and you’ll paint the light effects on
the layers above it. This separation lets you try things out without damaging the
logo.
Click on the Text icon (the one that shows the letter A) on the main toolbox. The
Text Edit window appears, with the default font loaded. This default will be the
first font in the alphabetically sorted list. You are going to make your logo using
this default font.
Despite all its buttons, this Text window is quite simple to operate. Click on the
edit line at the bottom of the window: a cursor appears and all you need to do is
type in your text. You can use the keyboard in the normal way: letters, numbers,
arrow keys to move within the line, Delete and Backspace to get rid of unwanted
typing. For example, enter “TVPaint” (with the appropriate uppercase letters) and
press Return.
Click on the display area to the right of the window. The first letter of your text (the
“T”) will appear. Note the Line Size value (just above the edit line) that tell you
how long your text brush will be, taking into account what you have typed, and the
test settings. Change the size of the font by clicking on the + and - buttons next to
the Size text. The display area is updated in real time to show your changes. You
can also click inside the size value: a cursor will appear and you can edit the size
from the keyboard.
23
User's Guide 3.6 US.QXD 3/11/99 3:58 PM Page 24
24
1.4 Tutorial 4
F ontsiz e
Currentfont
E ditl
ine
S iz e of t
he l
ine/t
ex tbrush
D ispl
ay area
Increase the font size so that your text brush will be about three quarters of the
width of your screen, as indicated in Line size. Click on Create Brush to create the
text brush. The text will appear at the end of the mouse as if it were a custom brush
cut from the page. It may be that you only get the outline of a rectangle. As with a
normal brush, if the text gets quite big, only its rectangular outline will appear to
increase its drawing speed. If this is the case, press w on the keyboard to force the
display of the whole brush (press w again to hide it). The Dotted Line function
should now be selected. Click in the screen to place the text. You can change the
color of the brush by selecting a new current color in the palette - try it and see.
To draw your logo, paste the text into the screen in one color, then select another
color and paste the text again, slightly offset from the first. The end result looks
quite nice, but lacks a bit of depth.
Clear the screen, then paste the brush into the center of the screen. Click on the Fill
Options icon to select the color range, then click twice on the Rectangle icon to
select the Filled Rectangle function. Finally, select the Replace mode by pressing
F2. Draw a rectangle that surrounds the text. The range vector appears; point in in
any direction you choose, and click. The improvement should be quite apparent. If
you like, try it in a few other directions with ReDo.
User's Guide 3.6 US.QXD 3/11/99 3:58 PM Page 25
1.4 Tutorial 4
Press a second time on the F2 key to select the Behind mode. Deselect the color
range by clicking again on the Fill Options icon. Choose a dark blue or dark grey
color. Click on the Straight Line icon, and draw a line going upwards, slightly off
the vertical. This is what will give depth to your logo.
It’s now time to add some light to your picture. Press on the 2 key to select layer B.
To paint light, you’re going to use pressure sensitive straight lines. Normally,
pressure is varied by using the stylus on the digitizing tablet (with the airbrush for
example). With straight lines, however, pressure is set at the start and end points as
a percentage. You therefore do not need a digitizing tablet to use this function (you
just set the values by hand).
Click on the Straight Line icon with the right mouse button to open its Settings
window. The Start and End values under Line Pressure set the starting and ending
pressures of your line. Set the End value to 0. The line should now have the
following pressure values: Start 100% and End 0%.
25
User's Guide 3.6 US.QXD 3/11/99 3:58 PM Page 26
26
1.4 Tutorial 4
St
art
ing and ending val
ues
fort
he l
ine pressure.
Select a medium sized brush from the preset brushes in
the main toolbox, and draw a line or two to see the
effect of your new settings. Pressure changes along the
length of the line and alters how thick the line is. Try
the same thing with the Airbrush tool selected. This
time, different pressures change the intensity of the lines. Select white as your
current color. To accentuate the effect, set the airbrush aspect to a pointed curve
(like you did in Tutorial 2) and to a size of about 40. You are now ready to draw
some superb stars of light.
Rather than drawing the points of the stars by drawing a straight line, moving the
mouse pointer round, drawing another, etc., you are going to use another method.
Put the pointer over the top left hand corner of the “P” in TVPaint, as if you were
drawing a line. Click and hold the mouse button, and move the pointer. Instead of
letting go of the button, and having the line drawn in, press the Ctrl key (just once,
and release it immediately) while still keeping the mouse button held down. A line
is now drawn from the start point to the current point, and the vector from your
start point is still following the mouse around. Move the vector to bring it
perpendicular to the last line drawn, then press Ctrl again, keeping the mouse
button pressed all the while. A second line is drawn. Keep going around the “P” to
draw all four points of the star.
You can draw 4 big points and 4 little ones, or indeed a whole host of little points,
whatever you choose. Put the pointer on the ending “t” of the logo. Press and hold
the mouse button, and pull the vector until it’s as least as long as the word “Paint”.
Now press the Ctrl key, and, without letting either the key or the button go, draw
in a circular motion around the starting point.
User's Guide 3.6 US.QXD 3/11/99 3:58 PM Page 27
1.4 Tutorial 4
To finish the logo, you are going to add a halo to these stars. Press the 1 key to
create layer A. This lets you edit all the components of the logo separately: the halo
on layer A, the stars on layer B, and the logo on layer C. Select the Filled Circle
tool by clicking twice on the Circle icon. Now open the Density Mapping window
by clicking on the Density icon with the right mouse button. Set the density curves
to what is shown in the following figure.
3
Deselect the Y curve so that it is no
longer used (step 1), and select
Centrifugal mode for the X curve (step
2). You also need to change the X curve
to the way it is in the diagram. For this,
use the right mouse button to draw the
segments directly onto the curve (step
3).
1
2
27
User's Guide 3.6 US.QXD 3/11/99 3:58 PM Page 28
28
1.4 Tutorial 4
Quit this window, then draw a fairly large circle centered on one of the stars. A
range vector appears for you to select the point around which the X curve will be
applied. Click right in the center of the circle, where the vector is as small as
possible. There you go! You can try a few more times for yourself, each time
changing the X curve in the Density Mapping window.
User's Guide 3.6 US.QXD 3/11/99 3:58 PM Page 29
1.5 Tutorial 5
1.5 TUTORIAL 5
Where we will load and save files to disk, split the outline drawing and the coloring
in several layers, whilst drawing a cartoon-style portrait.
Run TVPaint with the Standard configuration. If it is already running, exit the
program then restart it. This rather drastic way of resetting the program defaults at
least ensures that the right settings are in place for this step by step guide.
Click on the Disk icon at the bottom of the main toolbox: the Input/Output (I/O)
window appears. Click on the Load button under the Project title at the top of this
window. A large dialog box, or file requester, will appear to help you find the
project you want to load.
Cl
ick here
The “name” of a project includes an “address” on your
computer’s disks: the disk and the successive directories
pointing to the file. This address is called the path, which
the computer has to follow to get to the file.
We therefore need to select a path and find a project to load. For this, you need to
find the project called “surprise.pro” which is in the “Images” subdirectory, which
is itself in the “TVPaint” directory. The “TVPaint” directory is created when the
program is installed onto your machine, onto whatever disk or directory you
choose (default is C: drive for Windows based systems,
“/usr/people/username/tvpaint” directory for SGI systems and Work: volume for
Amiga systems).
29
User's Guide 3.6 US.QXD 3/11/99 3:58 PM Page 30
30
1.5 Tutorial 5
Icons m ode displ
ay
of t
he direct
ory
cont
ent
s.
Com pl
et
e pat
h of
t
he direct
ory .
N am e of t
he fil
et
o
l
oad.
You can get to the file in several ways. The least efficient (because you have to use
the keyboard) is to click in the Path edit line and to type all of the path (default is
“C:\TVPaint\Images” on Windows based systems, “/usr/people/username/
tvpaint/images” on SGI systems and “work:tvpaint/images” on Amiga systems).
When you press Return, the list of files in that directory will appear at the top of
the requester.
You can display the list of files in two ways: with or without icons. At the moment,
only the file names are displayed. Click on the Icons button just above the Path
line. Files in the display area now have their icons displayed, and also their size in
bytes, last modification date and time, and the dimensions in pixels. Of course,
icons displayed files take up more space in the requester. Use the slider at the side
of the window to move around the list.
User's Guide 3.6 US.QXD 3/11/99 3:58 PM Page 31
1.5 Tutorial 5
Click on the project “surprise.pro”, which has a yellow icon. The file gets selected
(its name is lit up) and the name appears also in the File edit line at the bottom of
the requester. Click once more on the file’s icon, or press the Return key. The
loading starts.
Two things can now happen: the size of the project and the size of the page are the
same, or they are different. If they are the same, then the project is loaded
immediately (skip the next 5 paragraphs). If they are different, a window pops up
and offers you the following options:
Resize page: Alters the size of the page to fit the project you are loading. It will
make the page bigger or smaller to fit the picture. If the project is bigger than the
screen, you will then have to scroll around the page to see it all. If the project is
smaller than the screen, then the image will be placed in the middle of the screen,
and the surrounding area cleared with a neutral color.
Crop project: Loads the project without changing the size of the page. The top left
hand corner of the project is placed onto the top left hand corner of the page. If the
project is bigger than the page, then the bottom and/or right of it will be lost. If the
project is smaller than the screen, then the bottom right hand side of the page will
stay unchanged.
Resize project: Loads the project and scales it to fit the page. If it is smaller than
the page, it is enlarged; if it is larger than the project, then it is reduced. Resizing a
project in this way may alter the project quality. With reduction, pixels are lost
from the project, and with enlargement the project will blur a little. This function is
best avoided if possible.
You need to understand the difference between the screen size (set to a particular
resolution by your graphics card, like 640 x 480 or 800 x 600 pixels), the page size
(which will often be the same size as your screen, but that can be changed to fit
your picture), and the project size (the size of the picture, which will either be
changed to fit the page or will become also the new page size).
31
User's Guide 3.6 US.QXD 3/11/99 3:58 PM Page 32
32
1.5 Tutorial 5
For the purposes of this tutorial, if this window appears, click on the Resize page
button. The size of the project “surprise.pro” is 640 x 480 and the page will now
switch to that size. If the page size is smaller than the screen, you’ll get the project
picture on a yellow background, centered on the screen, and with a grey border.
The borders are neutral. They are empty space between your page and the edge of
the screen when the page is smaller than the screen. They are completely inactive:
you can’t draw on them.
An easier way to get to the path that holds your file is to use the scroll down menus
Volumes and Directories. Put the mouse pointer over the Volumes button and click.
A list of all the available disk drives on your computer appears. Move the cursor
down to the drive you want to get into, and let go of the mouse button. Do the same
thing with the Directories button to open the directory you want. Once there are no
more available directories inside the opened directory, the button becomes disabled
and has No more Dir printed on it.
The project “surprise.pro” is now loaded. It appears exactly as it was when it was
last saved: the same number of defined layers (1,2 and 3), the same current layer,
the same state for each layer (On/Off, or tinted red, green or blue), and the same
background settings (Black, Color or Check modes).
The project “surprise.pro” has two layers: layer A, which is nearly empty (where
you’ll draw) and layer B, which contains several numbered dots (your guides).
Your task is simple: to join the dots in the order they are numbered (1 to 27 and A
to D). Select black as your current color (by clicking on a black cell in the main
toolbox) and the Freehand Line tool. Click once on the - key to reduce the size of
your brush.
Pressure and speed sensitivity can make things a little awkward here, because by
default your brush will get thinner the more you press on the stylus or the more you
accelerate. To turn this feature off, click on the pen icon with the right mouse
button. The Tools window appears, and you should click on both buttons Pressure
and Velocity to disable them (The text No appears). You can now close the window
(or minimize it) and your pen strokes will no longer be sensitive to pressure or
velocity.
User's Guide 3.6 US.QXD 3/11/99 3:58 PM Page 33
1.5 Tutorial 5
S el
ect
ion of t
he P ressure and
V el
ocit
y fort
he pen t
ool
.
Join all the dots to draw the portrait. If your hand slips, use the Undo function.
Remember that you also can use the right mouse button to draw in Erase mode,
which will erase what you draw over.
You are now going to colorize the portrait. Select layer B (by pressing 2) and clear
the screen (using the Clear icon). The numbered dots will get erased. In the palette
at the bottom of the main toolbox, click with the left mouse button on a blue-grey
cell, and then with the right mouse button on a white cell. The color indicator at the
top of the toolbox contains a blue-grey circle surrounded by a white rectangle. To
select the Pencil tool, click two times on the Pen icon with the left mouse button.
33
User's Guide 3.6 US.QXD 3/11/99 3:58 PM Page 34
34
1.5 Tutorial 5
D raw ing t
ool
s sel
ect
ion st
rip (P en,
M echanicalpen,P encil,Chal
k,
A irbrush and Brush).
If you disabled earlier the pressure and the velocity
functions, switch them On now (click on both buttons
Pressure and Velocity).
All you now need to do is color in your portrait. Make
the background color blue-grey, and, to give a bit of
depth to it, press n and apply some reflections to the
edges of the portrait. Press n again to get the blue-grey
color back. If you like, you can touch up the reflections a bit, especially if you are
using a pressure-sensitive stylus. The n key swaps the current color with the
background color. Repeatedly click on this key and look at what happens to the
color indicator. By keeping your finger near the n key, you have two different
colors immediately at your fingertip. You can put in a bit of blue-grey, then a bit of
white, then soften that with a bit more blue-grey, etc.
If you want, you may also select a dark blue color instead of the white one and
draw in some shadows, swapping between the two colors you now have (dark blue
and blue-grey) with the n key. To put the dark blue color cleanly around the edges
of the portrait, you can select the Replace mode with the F2 key. Go for it! Now’s
the time to unleash your creative spirit.
When you’re happy with your drawing, you could take some time to create a jungle
background on layer C. Press the 3 key and draw in some palm trees with green
color ranges and the Pencil tool.
User's Guide 3.6 US.QXD 3/11/99 3:58 PM Page 35
1.5 Tutorial 5
When it’s done, save your project to disk by clicking on the Disk icon, and then on
Save under the Project text. When the file requester appears, type in your project
name and specify the desired path.
Cl
ick here
The file called “ex05.pro” in the “Images” directory of
TVPaint is an example of how the portrait can turn out.
Other projects there are the final drawings from some of
the other tutorials. Load them up and have a look. See
how the layers all fit together.
35
User's Guide 3.6 US.QXD 3/11/99 3:58 PM Page 36
36
1.6 Tutorial 6
1.6 TUTORIAL 6
Where you will learn to get round the problem of separating paint from outlining
ink in a multi layered drawing, a particularly useful skill if you are going to work
regularly on scanned pictures.
Run TVPaint with the Standard configuration. If it is already running, exit the
program then restart it. This rather drastic way of resetting the program defaults at
least ensures that the right settings are in place for this step by step guide.
Load the picture called “man.jpg”, which is in the “Images” directory, which is
itself in the “TVPaint” directory. This “TVPaint” directory is created when the
program is installed onto your machine, onto whatever disk you choose
Cl
ick here
To load this picture, click on the Disk icon, then on the
Load button in the middle of the I/O window. There are
two sets of Load/Save buttons; one is used to load and save
projects only, and the other can be set to load and save all
the other types of data (layers, brushes, pictures, palettes,
etc.). The default object type is Layer. When you click on
the Load button, the file requester appears, where you
should set the filename and path shown above.
The picture “man.jpg” is a scanned engraving. It is mainly made up of black lines
on a white background. Our aim for this tutorial is to colorize this image without
losing the black lines. With a picture drawn from within TVPaint, this would not
pose any problems; Tutorial 5 is an example of this sort of work: you put the ink of
the lines on one layer, and you add the color on a layer underneath it. However,
with a scanned picture, the layer is completely opaque, and thus there is no way to
draw directly “underneath it”. What we aim to do now is to get rid of the white in
the picture, whilst keeping the black lines and their smoothing intact.
User's Guide 3.6 US.QXD 3/11/99 3:58 PM Page 37
1.6 Tutorial 6
Click on the Filters icon, the one with cogs on it and located towards the bottom of
the main toolbox. Click on the Luma Key button with the right mouse button. When
you click on a filter button with the left mouse button, its Settings window will
open. When you click with the right mouse button, the Settings window also
appears, and the cumbersome Filters window gets closed automatically.
The Luma Key filter lets you “dig out” holes in
the picture according to the luminance of an
area (hence its name). The slider is there for
you to set the reference luminance, the one that
will be made transparent. The Range and Fade
values let you set the effect on pixels close to
the reference luminance value.
Here, we want to change the standard smoothing range of the scanned image
(which goes from black to white via shades of grey) into a density map that goes
from opaque black to transparent black. The white color needs to become
completely transparent, and the grey shades that surround the black lines must take
on a degree of transparency.
To take out the white, move the slider completely to the right. Then, so that shades
of grey get taken into account, you need to set the Fade parameter, which defines
the distance between the reference luminance (fully transparent) and the target
luminance (fully opaque). Set this parameter to 50, and click on Apply to Layer.
The filter is applied to the picture, but all the greys do not disappear. The fade is
not as wide as it should be. Press on the u key (Undo) and set the Fade parameter
this time to 255, and click again on Apply to Layer.
All the greys have now been changed: the light shades of grey have become very
transparent, and the darker shades only slightly transparent. However, the picture is
still made up of greys, more or less transparent, when what we want is shades of
black that are more or less transparent. We need to blacken these greys. Select
Replace mode (press on F2 once), select black as your current color, and draw a
large filled rectangle that covers the whole screen.
To colorize the engraving (which is on layer B), create a new layer (press 3), and
add paint with the tools of your choice (pen, airbrush, chalk,...). For example, you
could use a flesh-like color for the skin, and a light yellow for the hair.
This exercise uses an engraving as its basis, but the same procedure could be used
for all sorts of work.
37
User's Guide 3.6 US.QXD 3/11/99 3:58 PM Page 38
User's Guide 3.6 US.QXD 3/11/99 3:58 PM Page 39
2. All the Icons
TVPAINT
2
All the Icons
39
User's Guide 3.6 US.QXD 3/11/99 3:58 PM Page 40
User's Guide 3.6 US.QXD 3/11/99 3:58 PM Page 41
2.1 Toolboxes and Windows
41
2.1 TOOLBOXES AND WINDOWS
All of TVPaint’s windows have common characteristics. They include a number of
buttons around the edges which allow you to close the window, to move it around
the screen, to put it in front or behind other windows,...
D rag Bar.P l
ace t
he m ouse point
er
overt
his bar,cl
ick and hol
dt
he l
eft
m ouse but
t
on,and y ou can m ove t
he
w indow around t
he screen unt
ily ou
rel
ease t
he but
t
on.
Close window but
t
on
Iconify but
t
on so TVPaintappears as
an icon incom put
erint
erface.
Depth but
t
on.If a w indow
is infrontof ot
hers,it
goes behind t
hem .If it
’s
behind,itgoes infrontof
al
lt
he ot
hers.
The main toolbox displays the icons that give access to all TVPaint’s functions.
You select those functions by clicking on their icon with the left mouse button (or
with the tip of the stylus). To access the settings menu of a function (if it exists),
click with the right mouse button (or the corresponding action with the stylus).
When available, keyboard shortcuts can replace these left and right mouse button
clicks, where selection will generally be done with a lower case letter (a) and the
settings will be brought up with the corresponding uppercase letter (A or Shift+a).
Closing the main toolbox using the button in its top left hand corner it is not always
very practical when you have to open and close it regularly. Therefore, the Space
bar on the keyboard toggles the toolbox on and off. Also, when multiple windows
are opened on the screen, hitting F12 will close them all (or open them all again).
With the digitizing tablet’s stylus, you usually obtain the right mouse button action
by pressing simultaneously on the tip of the stylus and on its button. If your stylus
doesn’t have a separate button or if this setting doesn’t suit you, you may consider
configuring differently the right mouse button action. Our advice is the
simultaneous pressing of the stylus’tip and the Shift key.
User's Guide 3.6 US.QXD 3/11/99 3:58 PM Page 42
42
2.1.1 The main toolbox
2.1.1 THE MAIN TOOLBOX
We will now give details on every function of TVPaint. Note that the icons are
grouped by type. The drawing options control the parameters of what is drawn:
color, filling options, tool selection, etc.). The drawing modes determine how
drawing affects the picture: applying colors, color mixing, etc. The drawing
functions define either the type of trace (freehand, straight line, circle, rectangle,...)
or how they act with the picture: cutting out brushes, editing text and so on.
Drawing options:
S m oot
hing ,C ol
or rang es,D ensit
y m apping ,D raw ing t
ool(pen,
m echanicalpen,pencil
,chal
k,airbrush).
Currentcol
ors,E ditcol
orpal
et
t
e,G rid opt
ions,Currentl
ay erindicat
or.
Drawing modes:
D raw w it
ht
he currentcol
or,Bl
urred draw ing,Transparentdraw ing...
Drawing functions:
F reehand dot
t
ed l
ine,F reehand l
ine,S t
raightl
ine,S pl
ine.
R ect
angl
e,Circl
e,E l
l
ipse,F il
l
.
Cutbrush,M odify brush,Tex t
,S cript
s.
Cl
earS creen,Zoom ,R eD o,U nD o
Reference palette:
This is t
he currentw orking pal
et
t
e,not t
he pal
et
t
e of t
he pict
ure.Itis a
setof col
ors w hich are chosen by t
he user,and displ
ay ed here so
t
hey can be readil
y avail
abl
e.
System functions:
Input
/O ut
put(L oad,S ave,P rint
,C apt
ure,...),Im age processing
(fil
t
ers: L um a key ,Chrom a key ,...),Q uit
.
User's Guide 3.6 US.QXD 3/11/99 3:58 PM Page 43
2.1.2 Basic concepts
2.1.2 BASIC CONCEPTS
MOUSE AND STYLUS
All drawing is done with either the mouse or the digitizing tablet’s stylus. These
two tools are complementary: the mouse is the most accurate, whereas using the
stylus is more comfortable. It is best to use the mouse to draw precise lines or
polygons, whereas the stylus allows the greatest creativity when sketching
freehand. Also, the mouse is a switch (on or off, drawing or not); the stylus is
pressure sensitive and adds more information (drawing more or less).
LEFT BUTTON / RIGHT BUTTON
Apart from the differences described above, the mouse and the stylus perform
identical functions. In this manual, when the term “mouse” is used, you should
understand “mouse or stylus”. In the same way, clicking the left mouse button is an
exact equivalent of pressing on the tip of the stylus, and clicking the right mouse
button is equivalent to pressing the button on the stylus while pressing down on the
tip at the same time. If your stylus doesn’t have a separate button or if this setting
doesn’t suit you, you may consider configuring differently the right mouse button
action. Our advice is the simultaneous pressing of the stylus’tip and the Shift key.
BUILT-IN AND CUSTOM BRUSHES
Your picture is drawn by combining a drawing function (freehand, straight line,
circle,...) with a brush. There are two types of brush: built-in and custom. Built-in
brushes are circular, and the user can choose from a range of diameters. They allow
for extremely smooth drawing. Custom brushes are cut out of the page by the user,
but have less powerful smoothing. They can, however, be put through all kinds of
transformations.
The easiest way to select a built-in brush is to click on one of those displayed in the
main toolbox. At any time, the + and - keys let you enlarge or reduce the size of the
current brush. You may also directly adjust the size of a brush by clicking on its
icon with the right mouse button. A round outline of the brush appears. Click and
hold with the left mouse button and move your mouse to enlarge or reduce the
outline. Release the mouse button when you’re satisfied with the brush’s size.
43
User's Guide 3.6 US.QXD 3/11/99 3:58 PM Page 44
44
2.2 Dotted freehand line
2.2 DOTTED FREEHAND LINE
This drawing function performs a dotted line with the current tool (pen, mechanical
pen,...). The selected tool defines the brush: circular and of changing size (pen), a
one pixel size (mechanical pen) or a brush that has been previously cut from the
page.
When drawing, the current brush will be pasted onto the page under the pointer.
Once the program has done this, it will immediately do so again at the new
pointer’s position. The program will take more or less time to draw the current
brush onto the page, depending on the size and complexity of the brush, and which
function(s) the user has selected. The spacing between imprints of the brush will
thus depend on its complexity and the speed at which the user is moving the mouse
(or stylus).
This function creates a dotted line faster than the freehand line function, with a
similar look as long as you do not move the mouse too quickly while drawing.
For more accurate placing of large brushes, it can be useful not to paste the brush
more than once at a time as you click the mouse button. There is an option that
allows you to paste the brush continuously, option Continue, or once at a time,
option Single. In Single mode, the brush is pasted once and only once when you
click the left mouse button. To print the brush again, you need to release the mouse
button and click again. The default setting is the Continue mode; to change this,
you need to call up the Settings window, which you do by clicking with the right
mouse button over the icon. The following window appears:
S el
ect
ion of t
he Continue
ort
he Single m ode.
User's Guide 3.6 US.QXD 3/11/99 3:58 PM Page 45
2.3 Freehand step by step
2.3 FREEHAND STEP BY STEP
Click two times on the Freehand dotted line icon to select the Freehand step by step
function. It lets you place the current brush very precisely, by separating it from the
pointer.
Usually, a selected brush is “glued” to the mouse pointer, which means that the
brush follows your mouse’s movements. The Freehand step by step function
cancels this link: the brush is put on hold over the screen and your mouse
movements no longer affect it. Brush movement is then possible by drawing vector
lines with the mouse: you click and hold the mouse button, move the pointer to the
desired location and release the button. The brush is then moved to the new
position, according to the “displacement vector” you just defined. To definitely
paste the brush to the page, press Return.
This drawing function becomes truly useful when you need to move big
cumbersome brushes and it shouldn’t be used for real-time drawing.
45
User's Guide 3.6 US.QXD 3/11/99 3:58 PM Page 46
46
2.4 Freehand line
2.4 FREEHAND LINE
This drawing function performs a continuous line with the current tool (pen,
mechanical pen,...). The selected tool defines the brush: circular and of changing
size (pen), a one pixel size (mechanical pen) or a brush that has been previously cut
from the page.
When drawing, the current brush is placed continuously between successive
positions of the mouse, according to curved lines interpolated from these sample
points. Using curved lines rather than straight lines makes the stroke always
smooth and fluid, whatever the pointer’s speed. The program will take more or less
time to draw the current brush onto the page, depending on the size and complexity
of the brush, and which function(s) the user has selected. The freehand unbroken
line is considerably slower than the freehand dotted line.
SETTING THE DOT SPACING (STEP)
In the case of the unbroken line above, the brush is continuously pasted on the
page. You can choose, however, to set the Step parameter, which tells the program
to place the brush on the page only at certain regular intervals. It is located in the
Tool Settings window and is available for the complex drawing tools: pen, chalk,
airbrush and brush.
Step works in a very simple manner: With the value 0, the brush is pasted at each
pixel along the interpolated line. With 1 as its value, the brush is pasted, 1 pixel is
skipped, and the brush is pasted again. With a n value, the brush is pasted, n pixels
are skipped, the brush is pasted again, n pixels are skipped, and so on.
By increasing the dot spacing, you can considerably speed up the drawing
functions. However, the brush imprints will get more separated and this may
reduce the tool’s power.
The Step parameter has a special Automatic option (Auto step), appearing in all
relevant Tool settings windows (pen, chalk, airbrush and brush). When Auto Step is
activated, an optimum dot spacing is computed according to the size of the current
brush. This dot spacing value is automatically updated when the brush size is
modified.
User's Guide 3.6 US.QXD 3/11/99 3:58 PM Page 47
2.4 Freehand line
Configuring t
he dotspacing in
t
he A irbrush set
t
ings w indow s.
This opt
ion is al
so avail
abl
e for
t
he pen,t
he chal
k and t
he
brush.
A ut
om at
ic dotspacing (Auto
step)sw it
ch
M anualset
t
ing of t
he dot
spacing param et
er(Step)
Note that the Step value is no longer taken in account if
the Auto Step option is enabled. Auto Step is however
automatically disabled if you type in a new Step value.
The dot spacing settings are also very useful if you want to draw a regularly dotted
line. The Step parameter acts on all drawing functions: freehand, straight line,
rectangle, circle, etc.
47
User's Guide 3.6 US.QXD 3/11/99 3:58 PM Page 48
48
2.5 Freehand shape
2.5 FREEHAND SHAPE
This drawing function is selected by clicking twice on the Freehand Line icon. It is
used to draw a filled freehand shape. As with the freehand line, you draw by
clicking on the left mouse button, but when you release the mouse button, the start
and end of your line are joined with a straight line, and all the resulting enclosed
areas are filled. The filling takes account of whatever functions you have selected,
such as color ranges, density mapping, etc.
With this function, you can draw irregular shapes like, for example, apples and
pears.
As for all filled shapes (filled circle, filled rectangle,...), the ReDO icon lets you
redraw the last shape without having to reconstruct it. You can draw a shape, Undo
it, change the color, ReDo it, Undo it again, change the density, Redo it, etc. You
may even “stack” layers of the same shape by “ReDoing” successively (20%
density white, then 10% red, then 15% blue,...).
User's Guide 3.6 US.QXD 3/11/99 3:58 PM Page 49
2.6 Straight line
2.6 STRAIGHT LINE
This drawing function allows you to draw a straight line between two points with
the current tool (pen, mechanical pen,...). The selected tool defines the brush:
circular and of changing size (pen), a one pixel size (mechanical pen) or a brush
that has been previously cut from the page.
To draw a line, TVPaint needs a starting point and an ending point. Click and hold
the left mouse button where you want the line to start. As you move the mouse, a
“ghosted” line will appear, to show you where the line will be. When you release
the mouse button, the line will be finally drawn.
2.7 FILLED POLYGON
The Filled Polygon drawing function is selected by clicking twice on the Straight
Line icon. It draws a filled polygon, which is defined by drawing a series of
straight lines.
It works in a similar way to drawing straight lines, but the end point of one line
becomes the start point of the next. You end the polygon either by clicking on the
right mouse button, or by pressing Return on the keyboard. All the areas enclosed
in the polygon will get filled. The filling takes all the selected functions into
account, such as color ranges, density mapping, etc.
As for all filled shapes (filled circle, filled rectangle,...), the ReDO icon lets you
redraw the last shape without having to reconstruct it. You can draw a shape, Undo
it, change the color, ReDo it, Undo it again, change the density, Redo it, etc. You
may even “stack” layers of the same shape by “ReDoing” successively (20%
density white, then 10% red, then 15% blue,...).
49
User's Guide 3.6 US.QXD 3/11/99 3:58 PM Page 50
50
2.8 Straight line pressure settings
2.8 STRAIGHT LINE PRESSURE SETTINGS
The way straight lines are drawn, by clicking at the ends, does not allow for
different pressures to be applied along the line. Clicking more or less hard has no
effect.
There is, however, an option in the Settings window that allows you to set a
starting pressure and an ending pressure. The default setting for this is 100% at
each end, giving a line of normal and constant width. Different tools will react
differently to changing these values between 0% and 100%. With the brush tool the
line will get thicker or thinner, and with the airbrush, chalk and pencil tools the line
will get more or less dense.
The Settings window will appear when you click with the right mouse button on
the Straight Line icon. You only need to change the Pressure values.
St
artand E nd l
ine
pressure val
ues
User's Guide 3.6 US.QXD 3/11/99 3:58 PM Page 51
2.9 Spline curve
2.9 SPLINE CURVE
This drawing function performs a spline curve across three points with the current
tool (pen, mechanical pen,...). The selected tool defines the brush: circular and of
changing size (pen), a one pixel size (mechanical pen) or a brush that has been
previously cut from the page.
To draw a spline, TVPaint needs a starting point, an ending point, and a third point
through which the curve will pass. Click and hold to set the starting point, move to
the endpoint (a ghosted line will be drawn from the start point) and release the
button. A ghosted curve will the appear as you move the mouse, and finally, click
once more to draw the curve.
CURVATURE SETTING
If you click on the spline curve icon with the right mouse button, a small window
will appear which displays the curvature of the spline. To change the curvature
value, simply click on the + and - buttons.
A curvature of 0 gives the sharpest possible curvature; 100 gives and averagely
rounded curve; 200 and more will result in very rounded curves. Entering negative
values will result in curves that double back on themselves.
2.10 CONTINUOUS SPLINE CURVE
This drawing function is selected by clicking twice on the Spline Curve icon. It
allows you to draw continuous spline curves.
You start to draw a line, but as soon as the second point has been defined, it
becomes the starting point of the next line. Once you have finished drawing the
points you wish the curve to pass through, press the right mouse button, or Return
on the keyboard. TVPaint will then draw a spline curve through all your chosen
endpoints with the curvature settings.
51
User's Guide 3.6 US.QXD 3/11/99 3:58 PM Page 52
52
2.11 Rectangle
2.11 RECTANGLE
This function draws a rectangle outline with the current tool (pen, mechanical
pen,...). The selected tool defines the brush: circular and of changing size (pen), a
one pixel size (mechanical pen) or a brush that has been previously cut from the
page.
To get a filled rectangle, simply click again on the Rectangle icon. Filling will take
into account the filling options, such as color ranges, density mapping, etc.
When you use the Rectangle function, the pointer will be followed by a crosshair,
which allows the user to place more precisely the rectangle.
To draw a rectangle, outlined or filled, click and hold in the screen to set the first
corner, then move the mouse to set the opposite corner. A ghosted rectangle will
follow the mouse to show the final shape. Release the mouse button to draw the
rectangle.
You may constrain the rectangle to a square if you hold down the Ctrl key while
drawing it.
As for all filled shapes (filled circle, filled rectangle,...), the ReDO icon lets you
redraw the last shape without having to reconstruct it. You can draw a shape, Undo
it, change the color, ReDo it, Undo it again, change the density, Redo it, etc. You
may even “stack” layers of the same shape by “ReDoing” successively (20%
density white, then 10% red, then 15% blue,...).
User's Guide 3.6 US.QXD 3/11/99 3:58 PM Page 53
2.12 Circle
2.12 CIRCLE
This function draws a circle outline with the current tool (pen, mechanical pen,...).
The selected tool defines the brush: circular and of changing size (pen), a one pixel
size (mechanical pen) or a brush that has been previously cut from the page.
To get a filled circle, simply click again on the Circle icon. Filling will take into
account the filling options, such as color ranges, density mapping, etc.
When you use the Circle function, the pointer will be followed by a crosshair,
which allows the user to place more precisely the circle.
To draw a circle, outlined or filled, click and hold on the page where you want the
center to be, and move the mouse to set a radius. A ghosted circle will follow the
mouse to show the final shape. Release the mouse button to draw the circle.
As for all filled shapes (filled circle, filled rectangle,...), the ReDO icon lets you
redraw the last shape without having to reconstruct it. You can draw a shape, Undo
it, change the color, ReDo it, Undo it again, change the density, Redo it, etc. You
may even “stack” layers of the same shape by “ReDoing” successively (20%
density white, then 10% red, then 15% blue,...).
DEFINING A CIRCLE WITH THREE
POINTS
Circl
e draw ing m ode:
Center or3 points
When you need to draw a circle over another one (over
the picture of a wheel, for example), it is sometimes
hard to find the exact center. An alternative method is
to use the option to define a circle using three points on
its circumference.
Click with the right mouse button on the Circle icon to
bring up the Circle Settings window. Then click on the
Circle option to change it from Center to 3 points.
To draw the circle, click and hold on the page to set the
first point and move the mouse to the second point,
where you release the button. A ghosted circle will then
appear, which will show the outline of the circle. The
circle is completed once you click to define the third
and final point.
53
User's Guide 3.6 US.QXD 3/11/99 3:58 PM Page 54
54
2.13 Ellipse
2.13 ELLIPSE
This function draws an outlined ellipse with the current tool (pen, mechanical
pen,...). The selected tool defines the brush: circular and of changing size (pen), a
one pixel size (mechanical pen) or a brush that has been previously cut from the
page.
To get a filled ellipse, simply click again on the Ellipse icon. Filling will take into
account the filling options, such as color range, density mapping, etc.
When you use the Ellipse function, the pointer will be followed by a crosshair,
which allows the user to place more precisely the ellipse.
To draw an ellipse, outlined or filled, click and hold on the page where you want
the center to be, and move the mouse. A ghosted ellipse will follow the mouse to
show you the final shape. Release the mouse button to draw the ellipse.
As for all filled shapes (filled circle, filled rectangle,...), the ReDO icon lets you
redraw the last shape without having to reconstruct it. You can draw a shape, Undo
it, change the color, ReDo it, Undo it again, change the density, Redo it, etc. You
may even “stack” layers of the same shape by “ReDoing” successively (20%
density white, then 10% red, then 15% blue,...).
User's Guide 3.6 US.QXD 3/11/99 3:58 PM Page 55
2.14 Fill
2.14 FILL
This function will fill in areas of the page, taking into account the filling options
that have been selected (color, color range, density mapping, etc.).
To use the Fill function, simply click with the left mouse button in the area to be
filled. The fill will spread out horizontally and vertically from the starting pixel,
until it reaches the edges of the current area. The default setting defines edges as
pixels of a different color, or with a different density (transparency level), to that of
the starting pixel.
The Fill function is to be considered as a filled shape, and as for all filled shapes
(filled circle, filled rectangle,...), the ReDO icon lets you redraw the last shape
without having to reconstruct it. You can draw a shape, Undo it, change the color,
ReDo it, Undo it again, change the density, Redo it, etc. You may even “stack”
layers of the same shape by “ReDoing” successively (20% density white, then 10%
red, then 15% blue,...).
FILLING OPTIONS
To choose your filling options, you need to open the Settings window, which is
done by clicking on the Fill icon with the right mouse button. The edge of the area
to be filled can be defined in four ways:
Color only: The fill will spread until it encounters a pixel of a different color to the
starting pixel; density is not taken into account. Two pixels can have different
densities, but the same color, as is the case with anti-aliased borders.
Density only: The fill will spread until it encounters a pixel of a different density to
the starting pixel. Color is not taken into account.
Color & Density: The fill will spread until it gets to a pixel with either a different
color, or a different density to the starting pixel. The is the default setting.
Until B(ackground) Color: The fill spreads until it gets to a pixel that is the same
color as the background color. The background color is the color that surrounds the
color indicator in the main toolbox. This color can only stop the fill if it is opaque,
i.e. it must have the maximum density setting of 255.
Note that the first three options fill an area until they get to a different type of pixel,
either in color or density, whereas the last option fills until it gets to a pixel with
identical characteristics to the background color.
55
User's Guide 3.6 US.QXD 3/11/99 3:58 PM Page 56
56
2.14 Fill
TOLERANCE LIMITS
To stop paint spreading on the page, the program detects pixels that are either
different or identical. For example, with default settings, two red pixels with RGB
values (255,0,0) and (254,0,0) are treated as different. Using this exacting accuracy
is not always the easiest way of doing things. You could want, for example, to fill
in one pass an area containing several similar shades of red.
The tolerance option (Range) measures the difference that can be accepted, either
in color or in density, between two color values for them to be considered identical.
When tolerance is set to 0, and you fill an area with RGB color values (255,0,0),
only this area will be filled. Colors such as (254,0,0) or (0,2,1) will be considered
as different (tolerance being 0). If the tolerance were set to 2, and you were filling a
red area with values (255,0,0), colors with values within the tolerance limits, such
as (254,0,0), (253,0,0), (254,2,2), (0,2,1), etc. will be considered identical, and will
thus be also filled.
Tolerance Range therefore represents the acceptable variation between the starting
pixels color and the color of the pixel to be filled. Note that with a tolerance value
of 255, all the colors will be considered identical.
E dge definit
ion fort
he fil
l
Tol
erance R ange: t
he difference t
hat
can be t
ol
erat
ed bet
w een t
he init
ial
col
orand t
he col
orof subsequent
pix el
st
o be fil
l
ed.
User's Guide 3.6 US.QXD 3/11/99 3:58 PM Page 57
2.15 Cutting out a brush
2.15 CUTTING OUT A BRUSH
This function is used to cut out a brush from the current layer. A brush acts like a
drawing pen, since you can paint with it, but is different in that it can be made up
of any part of your picture, and that it can be altered by various transformations:
inversion, rotation, enlargement, etc.
Cutting out a brush can be done in three different ways, which can be selected with
successive clicks on the brush icon. They are:
Rectangle cut: It is similar to the Rectangle function, except that rather than
drawing a rectangle, it gets the selected layer area and makes your brush. You may
cut out a square brush if you hold down the Ctrl key during the operation.
Lasso cut: It is similar to the Freehand Shape function, except that rather than
drawing a freehand shape, it gets the selected layer area and makes your brush.
Polygon cut: It is similar to the Filled Polygon function, except that rather than
drawing a polygon, it gets the selected layer area and makes your brush
The brush drawing tool is automatically selected when you cut out a brush (upper
right icon in the main toolbox). As the other drawing tools, it features some
particular options and settings. If you select another tool after cutting out a brush,
you can still recover the brush by clicking again on the brush tool.
LEFT / RIGHT MOUSE BUTTON
When you cut a brush from the page with the left mouse button, your brush will
only copy what is on the screen and will not alter it. When you cut a brush from the
page with the right mouse button, the brush is really cut out of the page, meaning
that an empty space will now cover the cut area.
NOTES
One of the option of the brush settings is the ReCut function. It lets you re-cut the
last drawn filled shape, without having to redraw the outline of the brush.
The Brush cutting function is to be considered as another way to create a filled
shape, and as for all filled shapes (filled circle, filled rectangle,...), the ReDO icon
lets you redraw the last shape without having to reconstruct it.
57
User's Guide 3.6 US.QXD 3/11/99 3:58 PM Page 58
58
2.16 Perspective
2.16 PERSPECTIVE
Once you have cut out a brush, you can apply rotations to it around the three axes,
X, Y and Z. If you click on the Perspective button, the brush will be replaced by a
rectangular outline with a mark that gives you a reference corner for the brush
orientation.
You can change the angles of rotation around the three axes, X, Y and Z, by
clicking on the + and - buttons, or by entering values in from the keyboard. You
can also use the following keys on the keypad: 7 and 4 to rotate the X axis; 8 and 5
to rotate the Y axis; 9 and 6 to rotate the Z-axis. The brush contour will rotate in
real time, and can therefore be very accurately positioned. The reference mark on
the outline allows you to easily remember in which direction your brush is facing.
Once the angles of rotation are set, you can move the brush around with the mouse.
You’ll notice that the brush continues to rotate around the center of the screen as
you move around it. Click on the mouse button, and the brush will be pasted on the
page.
The Center function at the bottom of the Perspective window allows you to set the
point of origin, that is the center from which perspective is applied. Click on the
Place button, then in the screen where you want the new center to be.
User's Guide 3.6 US.QXD 3/11/99 3:58 PM Page 59
2.17 Text
2.17 TEXT
This icon calls up a window that contains all the text functions. The default setting
brings up the vectorial fonts (TrueType).
Tex tedit
ing l
ine
S iz e of t
he l
ine/t
ex tbrush
The text editing functions are quite basic: TVPaint is not a word processor, and is
not designed to edit whole pages of text. Editing is done one line at a time, which is
typed into the space at the bottom of the window. You can select the font for this
line, its color, the font size, boldness, degree of italics, aspect and so on. Once you
have finished setting the parameters, click on the Create Brush button. You text
then becomes a custom brush, like one cut from the page. As with placing a custom
brush, once the text is placed on the screen, you cannot then re-edit it, as it has
become part of your picture.
FONT
The Font button at the top of the window gives the name of the currently selected
font. To choose a different one, simply click and hold on the Font button, and a list
of all the available fonts will appear. You select by scrolling down the list and
releasing the mouse button over your chosen font.
59
User's Guide 3.6 US.QXD 3/11/99 3:58 PM Page 60
60
2.17 Text
EDITING
You type in your text in the space at the bottom of the window. When editing, the
arrow keys allow you to move along the line. The Backspace and Delete keys
work in the normal way, and hitting Shift+Delete deletes the entire line. The actual
length in pixels of the line to be rendered (taking account of font size, rotation etc.),
is shown permanently next to Line Size. This is very useful, as it allows you to set
the font size and tracking to a precise fit in your drawing.
PARAMETERS
To change the value of any of the parameters, you can either use the corresponding
+ and - buttons, or you can click in the appropriate box to enter a value from the
keyboard. With each modification, the changes to the first character of the line are
shown in the display on the right of the window. As soon as one of the parameters
is altered, its function becomes selected and its button is toggled on. To deselect a
function, there is no need to return it to its initial value: simply click on the
function to turn it off, and the values entered will not be taken into account. To
reselect it, click on its button again to turn it on.
Size: The font size (minimum = 4 points)
Scale X: The width scale of the characters (percentage). Entering 50 would mean
that the characters are 50% thinner horizontally than the font default setting.
Italic: Italics measured in degrees of slope. Positive values lean the character to the
right, negative values lean it to the left.
Rotate: Sets the angle of rotation of the line (degrees), in the plane of the screen
(i.e. the Z axis).
Tracking: The proportional tracking of characters (percentage). Gives characters
spacing relative to their size.
Space: Tracking measured as an absolute number of pixels. Character spacing
(which can be added to Tracking) that is not relative to the point size. Space allows
you to set a fixed distance between characters.
Outline: Allows you to set the font as outlined: the characters are not filled and
only their edges are drawn, in the current drawing color. The number represents the
thickness of the contour (Maximum is 4).
User's Guide 3.6 US.QXD 3/11/99 3:58 PM Page 61
2.17 Text
Border: Allows you to have fonts filled in as normal, but with a border that uses
the background color. The value represents the thickness of the border (Maximum
is 4). Outline and Border modes cannot be both selected at the same time.
Smooth: Degree of smoothing of the characters’edges
CREATE BRUSH
This button creates a brush from the current text, using the the parameters you have
set. When the line is of only one color, (i.e. there are no borders), the brush uses the
current color. If you change the current color, the brush color will change too. If
your text has a border, the colors of the text brush will be the current color for the
body of the text and the background color at the time the brush is created for the
border.
61
User's Guide 3.6 US.QXD 3/11/99 3:58 PM Page 62
62
2.18 Clear
2.18 CLEAR
This function clears the current layer. It makes it completely transparent, or, if you
click with the right mouse button, the layer is filled with the background color.
2.19 REDO
This function could also be called Re-Fill. It refills the last object filled. This is
either the last filled polygon, the last brush cut out from the page, or the last Fill
operation.
If you draw a filled polygon, and do not like the way it was set to be filled, simply
click on Undo, change the fill settings (density mapping, color range etc.), then
click on ReDo to apply these new settings to the previously filled space.
BEWARE OF BAD SMOOTHING!
ReDo is a vital function that will save you a lot of time by avoiding having to
redraw the same polygon over and over again. However, take care in using it.
Imagine you are drawing a filled polygon, say a smoothed white circle, on a
completely blue layer. The contour of the circle is smooth, and there is a color
range between the white circle and the blue layer. If you now select red as your
color, and click on ReDo, the polygon will once again be drawn, and will again be
smoothed. However, there will be a problem: at the edges, the smoothing will not
act between the blue background (original background color) and the red pen, but
between the red pen and the white-blue range (current background color). The final
red polygon will therefore have what may be an unwanted amount of white mixed
in at the edges.
Wrongly used, the ReDo function can scatter unwanted colored pixels around your
filled shapes. To get clean results, make sure you click on Undo first, to get rid of
the previous fill, and only then should you click on ReDo.
2.20 UNDO
This function cancels the last action performed in the screen. If you click again on
the icon, you cancel the previous cancellation, meaning that you restore the
previous performed action.
User's Guide 3.6 US.QXD 3/11/99 3:58 PM Page 63
2.21 Zoom
63
2.21 ZOOM
The Zoom function is a very important visual aid. It allows you to magnify (zoom
in) a portion of the screen to work on small details. It also allows you to reduce
(zoom out) a portion of the screen to see the full picture. This is vital if you are
working on a picture that is bigger than the screen.
Click on the Zoom icon: a rectangle will appear around the mouse pointer. Bring it
over the part of the screen you want magnified, and click. The Zoom window
appears. It has many of the standard window features: a Close button, a Drag Bar,
and a Depth button. Additional functions are on the right border of the window.
A very useful Enlargement/Reduction button is also included. With one click, it lets
you enlarge the Zoom window to full screen size, or reduce it to its previous size.
M agnify ing val
ue
E nl
argem ent
/R educt
ion
but
t
on
D ept
h but
t
on
H oriz ont
aland vert
icalsl
iders
show ing where int
he pict
ure is
t
he m agnified sect
ion,w hich
m ay be quickl
y m oved.
A rrow s t
o scrol
linal
ldirect
ions.
You can al
so use t
he key board
arrow s.
+ and -but
t
ons t
o z oom In and
O ut
.
R esiz e w indow but
t
on.
Pl
ace but
t
on t
o posit
ion again
t
he Zoom rect
angl
e.
User's Guide 3.6 US.QXD 3/11/99 3:58 PM Page 64
64
2.22 Smoothing
2.22 SMOOTHING
This icon toggles Smoothing mode on and off.
Normally, smoothing will be left on, but it may be useful to leave it off at certain
times. Smoothing is applied to:
• Freehand drawing outlines;
• Polygon outlines;
• Text outlines;
• Color ranges, smooth or banded;
• Brushes, during transformations (enlargement, reduction...) with a smooth or
pixellized resulting aspect.
User's Guide 3.6 US.QXD 3/11/99 3:58 PM Page 65
2.23 Color ranges
2.23
COLOR RANGES
This icon allows you to turn on and off the filling options for color ranges and
brush fills. These options apply for the Fill function (which fills an area with color)
and all the filled shapes (freehand shapes, circles, rectangles, etc.).
When the icon is not selected, fills are done using the default settings, i.e. no color
ranges, with fills in the working color. When the icon is selected, fills are made
taking into account any options you have set. This icon is an easy way to switch
between the “normal” and “color range” mode.
To open the Settings window, click on the icon with the right mouse button.
D ispl
ay area of t
he
resul
t
ing col
orrange.
E dit
ing st
rip cont
aining
t
he col
ors used fort
he
range.
R ange edit
ing funct
ions
(Copy cel
l
,P ick col
or,
E x change t
w o cel
l
s,
E rase cel
l
)
FOUR COLOR RANGES
The upper part of the window allows you to set the parameters for color ranges
(definition, interpolation type, grain...). You can set four different color ranges at
the same time; you can use them one after another without having to redefine them
each time. The four ranges are numbered 1 to 4, and you select the current one with
the + and - buttons in the top left hand corner of the window.
65
User's Guide 3.6 US.QXD 3/11/99 3:58 PM Page 66
66
2.23 Color ranges
DEFINING A COLOR RANGE
The current color range is shown at the top of the window in two forms: the first
strip shows how the range will appear on screen, and the second strip breaks down
the range into its color cells. These key cells define the range by their position and
their color. The top strip is only a visual aid of how the range looks like with the
current cells positions.
Cells can be given a new color; they can be created, removed, moved, copied, and
swapped around.
EDITING A COLOR RANGE
You edit a color range by arranging the color cells that define it. The editing
functions are grouped under the strip in which they are placed.
The editing functions are applied to the currently selected cell, which is marked
with a small arrow. To select a cell, simply click on it.
Creating a cell: Click in the editing strip, and the selection arrow will appear. Click
on Pick and the mouse pointer changes to let you know you can now select a color
for the cell. You can select this from anywhere on the screen: in the color palette of
the main toolbox, from inside another window, or even from the page itself.
Changing a cell’s color: This is done in the same way as choosing the original
color: click on the cell to be changed, click on Pick, then choose a color from the
screen.
Copying a cell: Select a cell by clicking on it, click on Copy, and finally click in
the strip where you want to place the copied cell. This function can be used either
to replace a cell by another one or to duplicate it (to spread the color range).
Exchange two cells: Click on a cell, click on Exchange, and then click on the cell
you wish to swap colors with. You can also use this function to move a cell, by
exchanging it with a blank cell from the edit strip.
Erase a cell: Click on a cell, then click on Erase to remove it.
User's Guide 3.6 US.QXD 3/11/99 3:58 PM Page 67
2.23 Color ranges
67
COLOR DENSITY
The Color Density value defines the density for each cell, i.e. its transparency. As a
cell is made more transparent, you will better be able to see what is drawn under it.
The color contained in a cell can be varied between totally opaque (with the
maximum value of 255), or completely transparent (with value 0).
As you decrease the color density, the color will become less and less visible.
When that value equals 0, the color is no longer taken into account. Totally
transparent black is exactly the same as totally transparent white.
Warning: If a cell has been set to color density 0, it will lose the color assigned to
it originally; if the density is then increased, its original color will be replaced with
black. Simply re-select its original color to restore it.
INTERPOLATION
Colors can be set in two different ways: using RGB or HSL components (see
section on Color Palette). Similarly, there are two ways to define a color range (i.e.
to calculate its intermediate colors), also using RGB or HSL components.
Currentrange
num ber.
Invertrange
but
t
on.
D ensit
y of t
he
currentcol
or.
R ange t
y pes.
L inear,E ast
,
N ort
h,W est
,
S out
h or
cent
rifugal
Int
erpol
at
ion
t
y pe: R G B or
HSL .
N oise % in
currentrange.
User's Guide 3.6 US.QXD 3/11/99 3:58 PM Page 68
68
2.23 Color ranges
There are advantages and disadvantages to each interpolation method.
Interpolations using RGB values tend to give dark or “dirty” intermediary colors.
In RGB mode, a range between red and green will pass through a greenly-beige
color. Interpolation using HSL components forces the range to pass through pure
colors, which aren’t necessarily the best for the job: a range between red and green
will pass through pure yellow.
NOISE
When working in 16 million colors, you can generate remarkably smooth ranges.
However, these are not always wanted in a realistic drawing. With the Noise
option, you can add grain to the range. The Noise parameter lets you set the
percentage of grain for the range, with 0% being perfectly smooth, and 100% being
fully granular.
RANGE TYPES
Six icons at the bottom of the window allow you to set the way the range will be
applied to the polygon that requires filling: in a linear fashion with a precise or
defined direction, or centrifugal from a point within the area to be filled.
Linear ranges will spread the colors in parallel strips. The program needs to know
along which direction the strips should be drawn (the strips will therefore be
perpendicular to that direction). When you draw a filled object without color
ranges and when you finish drawing the object outline, the filled polygon gets
immediately drawn. When filling an object with a linear color range, after you have
drawn the object, a vector line appears from the center of the object and follows the
mouse pointer. This represents the direction along which the color ranges should be
executed. Click to execute the range along the chosen direction.
Four special Linear ranges are also available: East, North, West and South. They
represent the traditional compass directions. If you choose how of them, you won’t
have to specify the direction during a fill.
Centrifugal ranges spread the strips outward from a central point in concentric
circles. The program needs to know where that center point of the color range will
be. If the filling options icon is not selected when you draw for example a filled
rectangle, the rectangle will get drawn as soon as you release the mouse pointer. If
the Fill Options icon is selected, and after you have drawn the outline of the
polygon to be filled, a vector line will appear between your rectangle’s center and
the pointer; position the mouse where you wish the center of the range to be, then
click to execute the range.
User's Guide 3.6 US.QXD 3/11/99 3:58 PM Page 69
2.24 Brush wrapping
2.24 BRUSH WRAPPING
This icon allows you to select or deselect the brush wrapping or color ranges
options. These options apply for the Fill function (which fills an area with color)
and all the filled shapes (freehand shapes, circles, rectangles, etc.).
When the icon is not selected, fills are done using the default settings, i.e. no color
ranges, with fills in the working color. When the icon is selected, fills are made
taking into account any options you have set. This icon is an easy way to switch
between the “normal” and “color range” mode.
To open the Settings window, click on the icon with the right mouse button.
When one of the range types is selected (Range buttons at the bottom of the
window), all filling operations will be done using color ranges. When one of the
brush icons is selected, filling operations will be done using the current brush to fill
the space, by stretching it or compressing it, either horizontally, vertically, or both,
in order to fill the space.
Icons t
o sel
ecta Col
or
R ange m ode.If any are
sel
ect
ed,t
hen fil
l
ing uses a
col
orrange.
Icons t
o sel
ecta Brush
W rapping m ode.If any are
sel
ect
ed,t
hen fil
l
ing uses
t
he currentbrush.
69
User's Guide 3.6 US.QXD 3/11/99 3:58 PM Page 70
70
2.24 Brush wrapping
WRAPPING OPTIONS
There are several ways to wrap a brush in a shape: horizontally, vertically, or on
both axes. These options are chosen by respectively clicking on the buttons
depicting horizontal arrows, vertical arrows, or both of these buttons.
Wrapping a brush horizontally means that each line of the brush will be deformed
(either stretched or compressed horizontally) to fit the width of the shape you are
filling. Wrapping vertically means that the brush will be similarly deformed on the
vertical plane to fit the shape to be filled.
User's Guide 3.6 US.QXD 3/11/99 3:58 PM Page 71
2.25 Color cycling
2.25 COLOR CYCLING
Color ranges and brush wrapping are applied to filled shapes. In a similar fashion,
Color Cycling is applied to freehand drawings, and uses the same Settings window.
The different color cycling modes use the current color range to alter the working
color dynamically. If color cycling is activated and if your range goes from red to
yellow while your working color is blue, you will draw in shades of red and
yellow, and not in blue.
Color Cycle mode uses the current color range (See Color Ranges) and an extra
parameter (Cycle, bottom of the Fill Options window) creating five different
options:
None: Color cycling is disabled, and it will therefore have no effect. When
drawing, only the working color will be used.
Once: The color cycle is used only once. When you draw with it, the line will use
each of the cycle colors in turn, but when it gets to the last color, it will continue to
use it as the working color until you stop drawing that line. For example, if the
cycle goes from red to yellow, the start of the line will be red, which will gradually
cycle towards yellow as you draw. Once the line has reached the yellow color, it
will continue to be drawn in yellow until you release the mouse button, and thus
end the line. Subsequent lines will be similar, starting with red and cycling to
yellow only once.
Loop: The color cycle runs as a loop. When drawing a line, once you reach the last
color in the cycle, it will start again from the beginning. For example, with a red to
yellow cycle of colors, you start drawing in red, cycle through the colors until you
get to yellow, and then immediately start on red again, cycle through the colors to
yellow, and so on.
Ping pong: The color cycle runs as a round trip loop. It uses all the defined colors
in turn, then retraces its steps back to the start. A line drawn with a red to yellow
cycle will start red, progressively turn to yellow, then progressively turn back into
red, and so on..
Pressure: The pressure level on the stylus as you draw defines which of the cycle
colors is used. As more pressure is applied, the drawing color will be taken further
to the right of the color cycle. If you define a cycle that goes from red to yellow,
then your stroke will be red if you apply small pressure on the stylus, and it will
turn progressively more yellow as you put more pressure on the stylus.
71
User's Guide 3.6 US.QXD 3/11/99 3:58 PM Page 72
72
2.26 Density mapping
2.26 DENSITY MAPPING
With this icon, you can select or deselect a density map to use for filling actions.
This applies for the Fill function (which fills an area with color) and all the filled
shapes (freehand shapes, circles, rectangles, etc.).
When the icon is not selected, the default settings are used to fill the shapes (i.e. the
working color with 100% density). When the icon is selected, the density map
options are taken into account. The icon acts as a switch allowing you to toggle
easily between “normal” and “density map” modes. With Density mapping turned
on, shapes are no longer filled in a uniform manner, but with more or less color
density in different areas. You can define the exact density map to use in the
Density Mapping window. Note that the concept of density relies on the idea of
transparency: the less color you apply, the thinner the layer of paint, and the more
you can see through the color to what is underneath. To open the Settings window,
click on the icon with the right mouse button.
X curve.S et
s horiz ont
aldensit
y
variat
ions.
E dit
ing funct
ions.
X curve int
ensit
y sl
ider.
Y curve.S et
s vert
icaldensit
y
variat
ions.
D ispl
ay area show ing t
he effect
of t
he currentset
t
ings.
But
t
ons t
o sel
ectdifferentset
s of
curves.
A ppl
y curve opt
ions.These set
how t
he X and Y curves are
appl
iedinfil
l
s.
User's Guide 3.6 US.QXD 3/11/99 3:58 PM Page 73
2.26 Density mapping
In this window, you set the way in which density will vary in your fills. There is a
large display area in the center of the Settings window, surrounded by two curves,
one at the left of the area and one at the top. These curves show the horizontal (X
curve at the top) and vertical (Y curve on the left) density settings. The higher the
curve (more white visible), the higher the density at that point. The options at the
bottom of the window allow you to use the two curves independently or together.
The display area will always show the effect of the current settings.
SELECTING A CURVE
The curve editing functions for the X and Y curves will only work on curves that
have been selected. A curve is selected when at least one of its Apply options
(bottom left of the window) is selected. Only one of these options can be selected
for each curve at any one time. If none of the Apply options are selected for a
curve, the editing function will not be applied to that curve which will not be taken
in account in the display area.
This selection method is very useful when editing curves as it lets you choose to
work on either axis, or both at the same time.
Warning: If no curves are selected at all, you will not be editing any plane, the
display area will go black, and no changes can be made. You should always select
at least one curve.
POSITIONING THE POINT OF HIGHEST DENSITY
When you click inside the display area, the mouse pointer will define the point
with the highest density. The X and Y curves will automatically change to reflect
this new point. The display area will update in real time, so you can move around it
holding the mouse button down until you have the desired result. The rest of the
window will be updated as soon as you release the mouse button.
Using the left mouse button draws rounded curves (splines), whereas using the
right mouse button will result in angular curves (broken line).
If only one curve is selected, clicking in the display area defines the point of
highest density for the active curve, resulting in a horizontal or vertical line.
73
User's Guide 3.6 US.QXD 3/11/99 3:58 PM Page 74
74
2.26 Density mapping
EDITING THE DENSITY CURVES
You can draw the X and Y curves directly, by clicking in their display and moving
around without releasing the mouse button. As soon as you release the mouse
button, the display area will be updated. With the left mouse button, you draw the
density curves freehand, whereas with the right mouse button, you will draw
straight lines.
Each curve has an intensity slider (at the right of the X curve and at the top of the
Y curve) which gives you the ability to compress the curves at will. Warning: You
cannot use these sliders to enlarge the curve.
CURVE EDITING FUNCTIONS
You will find the curve editing functions in the top left hand corner of the window.
Their icons have meaningful graphics:
copies the X curve onto the Y curve (which is then lost).
copies the Y curve onto the X curve (which is then lost).
swaps round the X and Y curves.
inverts the selected curves horizontally.
inverts the selected curves vertically.
smooths the selected curves.
PRESET CURVES
To make editing easier, there are a number of preset curves, which are in the
bottom right of the window. Click on the + and - buttons to cycle through them.
There is a small display to show what each of them looks like. If you click in
this small display, it will be transferred to the main display, replacing the
currently selected curves.
APPLYING DENSITY RANGES
User's Guide 3.6 US.QXD 3/11/99 3:58 PM Page 75
2.26 Density mapping
You can apply the X and Y curves of your density map to a filled object in several
ways: Uniform, Elastic, Linear and Centrifugal. These modes are selected with the
7 buttons at the bottom left hand side of the window. There are 7 buttons, not 8 (4
modes x 2 curves), because the centrifugal mode works only with the X curve. The
buttons are toggle switches: click on one once, it gets selected, click on it again, it
is disabled. As mentioned previously, only one button can be selected for each
curve at any one time. If you select no modes at all, density curves are ignored by
the program.
To test out how each setting differs, draw a saw tooth pattern in the X curve.
Deselect all the Y curve buttons to turn it off. Select the first of the Apply modes,
and draw a filled circle. Then change to the second Apply mode, and draw another
circle, and do the same with the third and fourth mode. The differences between
them become very obvious.
U niform
El
ast
ic
L inear
Cent
rifugal
UNIFORM MODE
When using this mode, the corresponding X or Y curve is mapped onto all your
shape according to its maximum dimension in the corresponding plane. When
Uniform mode is selected on the X curve, the curve is applied at the point where
the shape is at its widest, thus giving a uniform effect across the shape, however
irregular its outline may be.
ELASTIC MODE
When this mode is selected, the corresponding curve is applied to each line (or
column) according to the dimension of the shape at that position. The curve is
therefore expanded or contracted to fit the shape being filled. If the Elastic mode is
selected for the X curve, that curve is applied across the width of the shape, line by
line, thus giving the impression that the curve is fitted elastically across the shape.
75
User's Guide 3.6 US.QXD 3/11/99 3:58 PM Page 76
76
2.26 Density mapping
LINEAR MODE
When this mode is selected, the corresponding curve (X or Y) is applied on all the
shape according to its maximum dimension in a defined direction. When Linear
mode is selected on the X curve, the curve is applied at the point where the shape is
at its widest (as the Uniform mode) and along the supplied direction.
CENTRIFUGAL MODE
When this mode is selected, the X curve is applied radially from a center defined
when drawing the shape. It is the equivalent of the Centrifugal mode used with
color ranges. You can only use this mode with the X curve.
INCONSISTENCIES IN ELASTIC MODE
Because of the way it is calculated, Elastic mode can display some inconsistencies
when the width of your polygon changes very suddenly. Draw for example a large
L (freehand polygon, with density mapping set to Elastic mode on the X plane).
You will notice that the filling is very strange where the L becomes wider at the
bottom. The X curve, in changing from a thin area, suddenly has to fill a much
wider area, and thus looks “broken”. This inconsistency is unfortunately an
inevitable by-product of this fill mode. It is best therefore to use smoother width
transitions in your drawing when using the Elastic fill mode.
User's Guide 3.6 US.QXD 3/11/99 3:58 PM Page 77
2.27 Drawing tools
2.27 DRAWING TOOLS
The drawing tools (pen, mechanical pen, pencil, chalk, airbrush and brush) are used
in combination with drawing functions (Freehand, straight line, circle...). The
current drawing tool is displayed at the top right of the main toolbox. The default
tool is the pen.
Currentdraw ing t
ool
(pen int
his case)
The tool icon is a selector: one click selects the pen, another
click selects the mechanical pen, and so on. You can also call
up the Drawing Tools Settings window, by clicking on the tool
icon with the right mouse button. You can then set the
parameters specific to each tool.
SELECTING TOOLS
The tool icon is a 6 levels selector (you need to click 6 times on it to get back to the
starting tool). This may not be very handy if you have to switch often between
tools. That’s why the program provides a small window featuring all six of the
drawing tools icons at once. This window is in fact the reduced tool settings
windows, without the parameter settings. The two display modes can be switched
on and off by using the Reduce/Enlarge button in the window title bar. When not
changing the tool parameters, it is a good idea to keep this window opened in
reduced size.
U se t
he R educe/E nl
arge
but
t
on t
o reduce t
he Tool
s
set
t
ings w indow s.
77
User's Guide 3.6 US.QXD 3/11/99 3:58 PM Page 78
78
2.28 The pen
2.28 THE PEN
The pen draws a full line which width may vary with pressure and/or speed. This
width variation is limited by two parameters: the minimal size (Size 1) and the
maximal size (Size 2). Size 2 can be smaller, greater or equal to Size 1.
Size 1: t
his is t
he radius of t
he
l
ine’s w idt
h w hen pressure
and/orspeed is m inim al.
Size 2: t
his is t
he radius of t
he
l
ine’s w idt
h w hen pressure
and/orspeed is m ax im al
.
P ressure act
ion t
oggl
e.
S peed (V el
ocit
y )act
ion t
oggl
e.
S peed l
im it(from w hich t
he
w idt
h st
ay s m ax im al
).
PRESSURE
Enables or disables the stylus pressure action on the tool. When small pressure is
applied to the stylus, Size1 is used as the line width’s radius. When strong pressure
is applied, Size 2 is used (may be greater, smaller or equal to Size 1).
VELOCITY
Enables or disables the mouse/stylus speed action on the tool. If both Pressure and
Velocity actions are enabled, a mean action is used.
SPEED LIMIT
Defines the velocity action limit in pixels per second. Maximal line size is used
when the mouse/stylus’s speed is past this limit.
User's Guide 3.6 US.QXD 3/11/99 3:58 PM Page 79
2.29 The mechanical pen
79
2.29 THE MECHANICAL PEN
The mechanical pen draws a narrow line (1 pixel fixed size) which density may
vary with pressure and/or speed.
M ax im aldensit
y percent
age.
P ressure act
ion t
oggl
e.
S peed (V el
ocit
y )act
ion t
oggl
e.
S peed l
im it(from w hich t
he
densit
y st
ay s m ax im al
).
P ressure and/orspeed act
ion
inversion.
POWER
Defines the maximal density of the line (percentage).
PRESSURE
Enables or disables the stylus pressure action on the tool.
VELOCITY
Enables or disables the mouse/stylus speed action on the tool. If both Pressure and
Velocity actions are enabled, a mean action is used.
SPEED LIMIT
Defines the velocity action limit in pixels per second. Maximal density is used
when the mouse/stylus’s speed is past this limit.
INVERSION
Inverts the pressure and/or speed action on the tool. When inversion is Off, small
pressure and/or speed gives very faint lines (least dense). When inversion is On,
small pressure and/or speed gives lines with maximal density.
User's Guide 3.6 US.QXD 3/11/99 3:58 PM Page 80
80
2.30 The pencil
2.30 THE PENCIL
The pencil applies fat color particles which get more or less numerous with
pressure and/or speed action.
Currentenvel
op.
P redefined envel
opes.
L Ine w idt
h siz e
M ax im aldensit
y percent
age
P ressure act
ion t
oggl
e.
S peed (V el
ocit
y )act
ion t
oggl
e.
S peed l
im it(from w hich t
he
densit
y st
ay s m ax im al
).
P ressure and/orspeed act
ion
inversion.
A ut
om at
ic dotspacing (Auto
step)sw it
ch
M anualset
t
ing of t
he dot
spacing param et
er(Step)
SIZE
Defines the radius of the line width. Excessive size may lead to a very slow tool;
you may then consider switching to the Freehand dotted line function.
POWER
Defines the maximal density of the line (percentage).
PRESSURE
Enables or disables the stylus pressure action on the tool.
VELOCITY
Enables or disables the mouse/stylus speed action on the tool. If both Pressure and
Velocity actions are enabled, a mean action is used.
User's Guide 3.6 US.QXD 3/11/99 3:58 PM Page 81
2.30 The pencil
SPEED LIMIT
Defines the velocity action limit in pixels per second. Maximal density is used
when the mouse/stylus’s speed is past this limit.
INVERSION
Inverts the pressure and/or speed action on the tool. When inversion is Off, small
pressure and/or speed gives very faint lines (least dense). When inversion is On,
small pressure and/or speed gives lines with maximal density.
AUTO STEP
Enables automatic dot spacing, where the spacing is a function of the tool size. The
Step value below is then no longer taken in account.
STEP
Defines in pixels the spacing separating the imprints of the tool’s brush (0 by
default). Spacing allows you to draw faster, but the lines will be less dense.
ENVELOP
The envelop defines the density map of the pencil, and thus its tip’s shape. It is
graphically represented by a single curve (upper right corner in the window) which
can be edited manually in Freehand mode or in Spline mode (see the Spline button
in upper left corner). To modify the current curve, just click on it and draw. You
may also use predefined curves (under the Spline button) which you can browse
through with the + and - buttons, and select by clicking in the small envelop icon.
Look at the figure below to understand how the curve creates the volume of the
pencil’s tip. The top of the white area is the point of maximal density (Power
value). The right edge of the envelop graphic acts as a vertical axis, and if you
imagine the curve moving around it, the corresponding volume is created.
Two differentenvel
opes
R esul
t
ing densit
y m ap
Corresponding vol
um e
81
User's Guide 3.6 US.QXD 3/11/99 3:58 PM Page 82
82
2.31 The chalk
2.31 THE CHALK
The chalk applies “hard” dusty color particles which get more or less numerous
with pressure and/or speed action.
Currentenvel
op.
P redefined envel
opes.
L Ine w idt
h siz e
M ax im aldensit
y percent
age
P ressure act
ion t
oggl
e.
S peed (V el
ocit
y )act
ion t
oggl
e.
S peed l
im it(from w hich t
he
densit
y st
ay s m ax im al
).
P ressure and/orspeed act
ion
inversion.
A ut
om at
ic dotspacing (Auto
step)sw it
ch
M anualset
t
ing of t
he dot
spacing param et
er(Step)
SIZE
Defines the radius of the line width. Excessive size may lead to a very slow tool;
you may then consider switching to the Freehand dotted line function.
POWER
Defines the maximal density of the line (percentage).
PRESSURE
Enables or disables the stylus pressure action on the tool.
VELOCITY
Enables or disables the mouse/stylus speed action on the tool. If both Pressure and
Velocity actions are enabled, a mean action is used.
User's Guide 3.6 US.QXD 3/11/99 3:58 PM Page 83
2.31 The chalk
SPEED LIMIT
Defines the velocity action limit in pixels per second. Maximal density is used
when the mouse/stylus’s speed is past this limit.
INVERSION
Inverts the pressure and/or speed action on the tool. When inversion is Off, small
pressure and/or speed gives very faint lines (least dense). When inversion is On,
small pressure and/or speed gives lines with maximal density.
AUTO STEP
Enables automatic dot spacing, where the spacing is a function of the tool size. The
Step value below is then no longer taken in account.
STEP
Defines in pixels the spacing separating the imprints of the tool’s brush (0 by
default). Spacing allows you to draw faster, but the lines will be less dense.
ENVELOP
The envelop defines the density map of the chalk, and thus its tip’s shape. It is
graphically represented by a single curve (upper right corner in the window) which
can be edited manually in Freehand mode or in Spline mode (see the Spline button
in upper left corner). To modify the current curve, just click on it and draw. You
may also use predefined curves (under the Spline button) which you can browse
through with the + and - buttons, and select by clicking in the small envelop icon.
The chalk’s envelop works exactly the same way as the pencil’s envelop. See the
figure in the previous section for more details.
83
User's Guide 3.6 US.QXD 3/11/99 3:58 PM Page 84
84
2.32 The airbrush
2.32 THE AIRBRUSH
The airbrush sprays paint onto the screen in a continuous flow. The more you stay
in one spot, the more the colors become dense. Pressure and/or speed lets you
control the flow’s power.
Currentenvel
op.
P redefined envel
opes.
L Ine w idt
h siz e
M ax im aldensit
y percent
age
P ressure act
ion t
oggl
e.
S peed (V el
ocit
y )act
ion t
oggl
e.
S peed l
im it(from w hich t
he
densit
y st
ay s m ax im al
).
P ressure and/orspeed act
ion
inversion.
A ut
om at
ic dotspacing (Auto
step)sw it
ch
M anualset
t
ing of t
he dot
spacing param et
er(Step)
SIZE
Defines the radius of the airbrush spray. Excessive size may lead to a very slow
tool; you may then consider switching to the Freehand dotted line function.
POWER
Defines the maximal density of the spray (percentage).
PRESSURE
Enables or disables the stylus pressure action on the tool.
VELOCITY
Enables or disables the mouse/stylus speed action on the tool. If both Pressure and
Velocity actions are enabled, a mean action is used.
User's Guide 3.6 US.QXD 3/11/99 3:58 PM Page 85
2.32 The airbrush
SPEED LIMIT
Defines the velocity action limit in pixels per second. Maximal density is used
when the mouse/stylus’s speed is past this limit.
INVERSION
Inverts the pressure and/or speed action on the tool. When inversion is Off, small
pressure and/or speed gives very faint sprays (least dense). When inversion is On,
small pressure and/or speed gives sprays with maximal density.
AUTO STEP
Enables automatic dot spacing, where the spacing is a function of the tool size. The
Step value below is then no longer taken in account.
STEP
Defines in pixels the spacing separating the imprints of the tool’s brush (0 by
default). Spacing allows you to draw faster, but the sprays will be less dense.
ENVELOP
The envelop defines the density map of the airbrush. It is graphically represented
by a single curve (upper right corner in the window) which can be edited manually
in Freehand mode or in Spline mode (see the Spline button in upper left corner). To
modify the current curve, just click on it and draw. You may also use predefined
curves (under the Spline button) which you can browse through with the + and buttons, and select by clicking in the small envelop icon.
The airbrush’s envelop works exactly the same way as the pencil’s envelop. See the
figure in the pencil section for more details (section 2.30).
85
User's Guide 3.6 US.QXD 3/11/99 3:58 PM Page 86
86
2.33 The brush
2.33 THE BRUSH
The brush drawing tool uses the last brush cut from the page. The Settings window
associated to that tool includes some options (density, pressure action,...) and some
transformation functions.
Al
lbrush t
ransform at
ion
funct
ions.
M ax im aldensit
y percent
age
P ressure act
ion t
oggl
e.
S peed (V el
ocit
y )act
ion t
oggl
e.
S peed l
im it(from w hich t
he
densit
y st
ay s m ax im al).
P ressure and/orspeed act
ion
inversion.
A ut
om at
ic dotspacing (Auto
step)sw it
ch
M anualset
t
ing of t
he dot
spacing param et
er(Step)
Int
ensit
y of t
he sm oot
hing at
t
he cutbrush’s edges.
DENSITY
Maximal density percentage of the brush (100% by default). Pressure and/or speed
may influence the density of the applied brush.
PRESSURE
Enables or disables the stylus pressure action on the tool.
VELOCITY
Enables or disables the mouse/stylus speed action on the tool. If both Pressure and
Velocity actions are enabled, a mean action is used.
User's Guide 3.6 US.QXD 3/11/99 3:58 PM Page 87
2.33 The brush
SPEED LIMIT
Defines the velocity action limit in pixels per second. Maximal density is used
when the mouse/stylus’s speed is past this limit.
INVERSION
Inverts the pressure and/or speed action on the tool. When inversion is Off, small
pressure and/or speed gives very brush imprints (least dense). When inversion is
On, small pressure and/or speed gives brush imprints with maximal density.
AUTO STEP
Enables automatic dot spacing, where the spacing is a function of the tool size. The
Step value below is then no longer taken in account.
STEP
Defines in pixels the spacing separating the imprints of the tool’s brush (0 by
default). Spacing allows you to draw faster, but the sprays will be less dense.
SMOOTH
Defines the intensity of the smoothing generated at the cut brush’s edges.
87
User's Guide 3.6 US.QXD 3/11/99 3:58 PM Page 88
88
2.33 The brush
BRUSH TRANSFORMATIONS
The brush tool settings windows also includes many transformation functions.
Function description of each icon (line by line and from left to
right):
Resize, Double size, Double X size, Double Y size, Invert
horizontally,
Resize NxN, Half size, Half X size, Half Y size, Invert
vertically,
Optimize, Rotate, Rotate 90Þ, Rotate NÞ, Re-cut,
Background, Transparency, Outline, Pointer offset
User's Guide 3.6 US.QXD 3/11/99 3:58 PM Page 89
2.33 The brush
RESIZING
Click on the Size icon: the brush is replaced with a white rectangle that represents
its outline. Click and hold down the left mouse button and move the mouse. The
brush will get stretched to fit the new outline size.
This technique can also be used to squash the brush either horizontally or
vertically. However, this may be an undesirable effect, and you may wish to keep
the relative proportions of the brush the same. You can do this by pressing Ctrl on
the keyboard while resizing the brush: the horizontal and vertical proportions will
then be retained.
ROTATION
Click on the Rotation icon: the brush is replaced with a white rectangle that
represents its outline. Click and hold on the left mouse button and move the mouse.
The rectangle will pivot around itself. When you release the mouse button, the
brush will be rotated.
The brush always pivots around its top left corner. The closer the mouse pointer is
to the point of rotation, the faster the brush will rotate. Therefore, for optimum
accuracy, the mouse pointer can be moved away from the rotation point, so that
movements with the mouse will result in small changes in the rotation of the brush.
RESIZING AND ROTATING PRECISELY
Resizing and rotating manually a brush are good intuitive functions, but not very
accurate for precise work. That’s why they also exist in a different form, where you
can define the amount of action.
If you click on the Resize NxN icon, a new window appears and displays the
current width. You can type in a new width. Another similar window then appears
to let you type in the new height. After specifying these information, the new brush
is generated.
If you click on the Rotation NÞ icon, a window appears and let you type in the
rotation angle (degrees) to apply to the brush. The rotation center is the top left
corner of the brush.
89
User's Guide 3.6 US.QXD 3/11/99 3:58 PM Page 90
90
2.33 The brush
SMOOTHING WHEN RESIZING AND ROTATING
When you enlarge a brush, each of its pixels will seem to be enlarged. In fact,
pixels are of a constant size, and when you enlarge them, they are simply
duplicated into 2, 3 or 4 pixels. The pixellization of the brush is therefore
increased. To reduce this pixellization effect, brushes are smoothed when they are
resized or rotated. The smoothing effect, rather than simply increasing the apparent
size of the pixels, generates a color range between pixels. The smoothing effect is
switched on and off using the anti-aliasing option in the top left hand corner of the
main toolbox. The larger you magnify a brush, the more blurred it becomes (with
smoothing), or the more pixellized it will be (without smoothing).
RESIZING & RESOLUTION
It's worth noting that enlarging a brush then reducing it has practically no effect on
the brush. As it is enlarged, it will gain extra lines, and when it is reduced it will
lose those extra lines, and the brush remains therefore similar to its original form.
However, if you reduce the size of the brush, then magnify it, it will definitely not
remain the same: reducing the size of a brush removes some of its resolution.
When the reduced brush is then enlarged to its original size, the resolution lost in
reducing the brush is not restored. Rather, the brush appears as a more pixellized
version of the original.
Similarly, it is best to avoid rotating a brush several times, as accuracy will be lost
at each rotation.
BRUSH DISPLAY
When you cut out a very large brush, its image is replaced by a ghosted outline, to
speed up operations. Pressing w on the keyboard will restore its full image if
needed. The Display function in the System window allows you to set under what
conditions you will see the whole brush. There are 3 modes:
Custom: Under a certain size, the brush appears completely; above this size, only
its outline will be displayed. The size is measured in square pixels. When you
select Custom mode, a dialog box appears in which you enter the required size.
Always: The brush is always displayed in its entirety, whatever its size.
Never: The brush is never displayed entirely, only in outline, whatever its size.
User's Guide 3.6 US.QXD 3/11/99 3:58 PM Page 91
2.33 The brush
RECUT
This function automatically recuts the current brush from the current layer. The
contour used for cutting the brush is held in memory, from the last filled drawing
operation, i.e. the last filled polygon, the last fill operation, or the last cut brush.
This function is very important: it allows you, amongst other things, to cut out
circular, elliptical or other such brushes. For example, try drawing a filled circle,
then click on Undo to remove the circle you have just drawn. If you now click on
Recut, the brush will be made up of everything inside the circle you had drawn. If
you want a blurred border, modify the Smooth parameter (see later) and click on
Recut. You can keep doing this until you are satisfied with the brush.
Similarly, you may want to use the Fill function with Recut. For example, fill a
colored area and adjust the tolerance parameter to take into account more or less
colors. The filled contour is then in memory. If you now click on Undo, to remove
the filling, and on Recut, everything that had been filled over becomes the current
brush.
TRANSPARENT COLOR
When you cut out a brush, all of its non-colored areas are transparent; where there
is color, the brush is opaque. There are two options in the Brush Transformations
window that allow you to remove or enable transparency in a cut brush:
• By fixing the background color (selected from the palette with the right mouse
button) under the brush (as the Behind function does), so that no color is
transparent.
• By making everything that is of the background color (selected from the palette
with the right mouse button) transparent.
POINTER POSITION IN BRUSH
When you cut brushes on the page, the pointer is placed automatically at the center
of the brush. When you cut small brushes, the pointer can get in the way. We have
chosen not to allow the pointer to disappear (to avoid losing it), but to allow it to be
shifted away from the brush. When you call up this function, a large cross appears
under the pointer. Click and hold on the left mouse button and move to set the new
position for the pointer. When you release the button, the pointer will be at its new
position relative to the brush.
91
User's Guide 3.6 US.QXD 3/11/99 3:58 PM Page 92
92
2.33 The brush
SMOOTHED CUT
This function allows you to set the sharpness of the edges of brushes you cut from
the page. The default value 0 gives the sharpest possible edges to your brush, and
the higher the value, the more blurred the edges become.
Warning: the smoothing is applied to the edges of the cutting area, and not on the
edges of the brush itself. If you draw a colored circle on a transparent background,
and then cut out that circle using the rectangular brush cut, the smoothing will only
act on the edges of the rectangle, not on the edges of the circle. To achieve the
latter effect, the Smooth filter must be used, at the risk of eating away at the edges
of the circle.
User's Guide 3.6 US.QXD 3/11/99 3:58 PM Page 93
2.34 Color palette
93
2.34 COLOR PALETTE
The working color palette that appears in the toolbox contains only 256 colors.
This is of course not the full page palette, but only a user selected palette of 256
colors. Such a palette makes things more manageable, and allows for a good range
of working colors. The working palette can be changed as often as you like. To edit
it, click on the Palette icon.
R G B orCM Y
com ponent
s sl
iders
(R G B int
his case).
R G B displ
ay m ode
t
oggl
e.
CM Y displ
ay m ode
t
oggl
e.
H S L com ponent
s
sl
iders.
S el
ect
ed col
ordispl
ay .
+ and -but
t
ons t
o
cy cl
et
hrough 4
w orking pal
et
t
es.
W orking pal
et
t
e (t
he
one w hich al
so
appears int
he m ain
t
ool
box ).
E dit
ing funct
ions.
Col
orspect
rum disk
(gradientfrom pure
col
ors t
o a grey ,bl
ack
orw hit
e cent
er).
Col
orS pect
rum t
oggl
e
(sel
ect
ed int
his case).
Col
orspect
rum
neut
ralcol
orsl
ider.
M ix erw indow but
t
on
and Cl
earbut
t
on
User's Guide 3.6 US.QXD 3/11/99 3:58 PM Page 94
94
2.34 Color palette
PALETTE COMPONENTS
Every color can be made up using different component systems. There are several
of these available, each of them approaching colors from a different viewpoint. The
systems are different in that they use different component systems to describe
colors:
• RGB for Red, Green, Blue
• CMY for Cyan, Magenta, Yellow
• HSL for Hue, Saturation, Luminosity
The Palette window allows you to choose between these three component systems.
In the window you will see two groups of sliders, one for RGB and one for HSL.
At the end of each of these is displayed the current value set by the slider. You can
click on the CMY button to change the RGB components into CMY components
(and vice versa).
EDITING COLORS
All parts of the Palette window work simultaneously. If you click on a color in the
palette, it gets copied to the color display (on the left of the window), and its RGB
and HSL values are automatically updated. Conversely, if you alter the RGB or
HSL values of a color, the ensuing color is shown in the color display, and is ready
to be copied into the palette.
Creating new shades of color will usually use these two operating modes of the
palette. You choose a color (from the current palette, the color spectrum or the
page) and then change its components to get exactly the right shade, then copy it
back out to the palette.
CHOOSING A COLOR FROM THE PALETTE
Click directly on a color in the working palette: your chosen color appears in the
color display, and its color components are displayed in the RGB-HSL or
CMY-HSL sliders. If you keep the mouse button pressed whilst moving around the
palette, you select one after the other all the colors that pass under the mouse
pointer, and the sliders are updated in real time.
There are several working palettes: by clicking on the + and - buttons you cycle
through 4 predefined palettes of 256 colors each. These are completely user
configurable and can be saved to disk.
User's Guide 3.6 US.QXD 3/11/99 3:58 PM Page 95
2.34 Color palette
CHOOSING A COLOR FROM THE SPECTRUM
Click directly on the color spectrum disk: your chosen color appears in the color
display and its color components are displayed in the RGB-HSL or CMY-HSL
sliders. If you keep the mouse button pressed while moving around the spectrum,
you select one after the other all the colors that pass under the mouse pointer, and
the sliders are updated in real time.
The disk represents all of the color spectrum. Around the edges are the purest of
colors, and as you go towards the center, these colors shade towards a neutral color,
either a pure black, a pure white or a grey. The neutral color is chosen with a slider
at the right of the disk (white at the top, black at the bottom).
This disk is a visual record of the HSL components of colors. Try going round the
edges of the disks with the mouse, while keeping the mouse button pressed. You
will see how the HSL components vary with this movement. Then try moving in
towards the center and see the effect on the HSL components.
CHOOSING A COLOR FROM YOUR DRAWING
Click with the right mouse button on the color display: the mouse pointer turns into
a question mark. This is the Pick function, which allows you to pick any color from
the page. If you now click on the page, the color under the mouse pointer will be
transferred to the color display, and its RGB (or CMY) and HSL components are
transferred to the sliders. If you keep the mouse button pressed while moving
around the screen, you select one after the other all the colors that pass under the
mouse pointer, and the sliders will be updated in real time.
SETTING A COLOR
To set a color, all you have to do is alter its components using the sliders: more or
less Red, more or less Cyan, higher or lower Saturation, etc. The sliders work in
two ways: you can click on a slider, and, with the mouse button held down, drag it
along its path to set a value; or, for more precise setting, you can click on either
side of the slider to move it one notch in the direction of the mouse. The numeric
representation of the sliders’position will always change as you move the slider.
Every slider’s background is colored with a color range which depends on the other
components values and which show which colors are available if you move the
slider’s cursor. Try for example in RGB mode to set a pure red (Red slider’s cursor
fully to the right). See how the Green slider now represents a gradient from red to
yellow. That means that if you move the Green slider’s cursor to the right, the
resulting color will go from red to yellow.
95
User's Guide 3.6 US.QXD 3/11/99 3:58 PM Page 96
96
2.34 Color palette
COPY, EXCHANGE AND SPREAD
Three editing function help you make up your own palette.
Copy: This function copies the current color (the one in the color display) to one of
the spaces in the current palette. Once you have set the color you want, click in the
color display, then on Copy, then on a space in the palette to place the color. You
can also copy colors from within the palette: click on the color to be copied, then
on Copy, then on the destination space in the palette.
Exchange: Swaps the position of two colors within the palette. Click on one of the
colors, then on Exch(ange), and finally on the second color.
Spread: Generates a range between two colors. Click on the first color of the range,
then on the Spread button, and lastly on the ending color of the range.
MIXER WINDOW
You don’t have to fiddle around with the numbers and sliders to pick a color
accurately: a Mixer window lets you make up your own colors by mixing others.
To open the Mixer window, click on the Mixer button under the palette. An empty
drawing space will replace the color spectrum. There, you can draw freehand with
the pen or the airbrush. With the airbrush, you will get a better mix of colors.
When you draw by pressing with the right mouse button, you add “water” to the
paint, which will dilute the colors already present. The more you go over an area,
the more dilute the colors in it will become.
Once you have got your desired mix of colors, you need to copy them to the
palette, using the Pick function mentioned earlier. Click with the right mouse
button in the color display, then with the left mouse button in the Mixer window on
your chosen color. Click on the Copy button, then on your chosen cell in the
palette.
To clean up the Mixer window, click on the CLR (Clear) button next to the Mixer
button. The mixer is erased with the current color (the one in the color display).
User's Guide 3.6 US.QXD 3/11/99 3:58 PM Page 97
2.34 Color palette
LOADING AND SAVING A COLOR PALETTE
You can save your color palette to disk. Click on the Input/Output icon in the main
toolbox. Select the Palette type, then click on Save. You will need to select which
directory it will be saved in, and under what name.
The same system is used to load a palette from disk. Click on the Input/Output icon
in the main toolbox. Select the Palette type (if it’s not already selected), and click
on Load. You will need to tell the program where to find the palette file in the disk.
Note: All four palettes are saved or loaded together with each operation.
97
User's Guide 3.6 US.QXD 3/11/99 3:58 PM Page 98
98
2.35 Grid
2.35 GRID
The Grid function puts an imaginary grid on the screen, and forces the mouse
pointer to use only the intersection points of the grid. The mouse no longer moves
from pixel to pixel, but from one grid intersection to another. Click on the Grid
icon with the left mouse button to toggle it on and off.
Clicking on the Grid icon with the right mouse button reveals the Grid Settings
window. The four buttons at the top of the window allow you to set the width and
height of the grid, as well as its origin on the page (to move it across, and up or
down). Use the + and - buttons to set these, or click directly in the value to edit it
from the keyboard.
There are two functions to help you set up your grid:
Adjust: Lets you adjust the grid graphically. A rectangle will appear at the end of
the mouse pointer. Simply position this on the page to set the origin, and click and
drag it to the size you want. The appropriate grid settings will be set up accordingly
in the window.
Use brush size: Uses the rectangular size of the current brush to set the grid. This is
great for drawing a tiled pattern: cut out a brush, click on Use brush size, and then
simply fill the screen by hand with the current brush.
X ,Y coordinat
es of t
he origin of t
he
grid
W idt
h and heightof t
he grid
A dj
ustfunct
ion
U se brush siz e funct
ion
User's Guide 3.6 US.QXD 3/11/99 3:58 PM Page 99
2.36 Using layers
2.36 USING LAYERS
Working with multiple layers of drawing is very similar to working on only one
plane. In fact, you only ever draw on one layer at a time, even if the final display is
made up of several images. The only thing that can go wrong is your not realizing
which layer you are drawing on. When displaying several layers, you could
potentially think you are drawing on the topmost one, whereas you may be drawing
on the bottom one and destroying the background scene. So remember: you should
always remain aware of which layer you are drawing on. To make this easier, there
is an icon in the toolbox that will permanently show which is the current layer. You
can see at a glance where you are.
With the icon that is displayed to the left, it is the middle layer (called layer B) that
is selected (in white). If you were to draw, you would do so on layer B. The icon
shows which layer is selected, and also gives access to the Layers window, which
you can get to by clicking with the left or right mouse button over the icon.
The layers are always referred to as A, B and C, rather than calling them the
foreground, middle ground and background. A is in fact at the front, then B, then C
at the back, and finally the background behind layer C. A “Project” is made up of
all three layers and the background.
DISPLAYING LAYERS
The Layers window lets you manipulate the layers (turning them on or off,...) and
shows some information on the whole project, such as (as with the icon) which
layer is selected, also which layers exist (whether A, B, and C are in the display
area), and the state of each layer (on, off, or colored).
L ay ers A and B ex ist
,butonl
y l
ay er
B has been t
urned on fornow .
L ay erC doesn’tex isty et
.
The currentw orking l
ay eris B
(show n inw hit
e).
99
User's Guide 3.6 US.QXD 3/11/99 3:58 PM Page 100
100
2.36 Using layers
We have tried to ensure that distinguishing between layers is as easy as possible.
When a layer exists, a pull down menu (on the left hand side of the Layers
window) allows you to turn it On, Off, or to color it in red, green, or blue (R, G, B).
Coloring a layer makes it easy to distinguish from the others.
Finally, one of the most important functions is the = key. It toggles between all
layers Off other than the current one (which is On, and is the only layer displayed),
and all layers On. Such a switching allows you to visualize the whole project
easily. You can work on a single layer, then quickly switch on all the others to see
the end result. It also makes it easy to see where you are if you get confused
between layers.
SELECTING AND CREATING LAYERS
The Layers window lets you choose which layer to work on. You just need to click
on the layer’s rectangle (A, B or C) to select it. If the layer exists, it gets selected
(if it was Off it goes back On). If it did not exist, then a window opens to let you
Create it, by clicking on the button so labeled.
E very l
ay ercan be On,
Off, orcol
ored (choice
of R, V, B)
You m ay t
oggl
e On or
Off l
ay ers A ,B,and C
by respect
ivel
y using
t
he key s Ctrl+1, Ctrl+2
and Ctrl+3.
To sel
ecta new current
w orking l
ay er,cl
ick on
t
he desired rect
angl
e.
If t
he corresponding
l
ay erdoesn’tex isty et
,
y ou’l
lbe asked t
o
creat
e it
.
K ey s 1, 2, and 3 m ay
al
so be use t
o achieve
t
he sam e sel
ect
ion.
KEYBOARD SHORTCUTS
All these functions can be accessed from the keyboard. Use keys 1, 2 and 3 to
select layers A, B and C. To turn layers ON and OFF (whether they are displayed
or not), use the Ctrl + 1, 2 or 3 keys.
User's Guide 3.6 US.QXD 3/11/99 3:58 PM Page 101
2.36 Using layers
FUNCTIONS
There are 4 buttons at the top of the window that apply functions to the layers:
Exch(ange): This swaps the current layer with another one. Click on the rectangle
of one of the layers to exchange (it gets selected in white) then click on the
Exchange button. Finally, click on the second layer to exchange.
Copy: This copies the current layer to one of the other layers. Click on the
rectangle of the layer you want to copy (it gets selected in white), then click on the
Copy button. Finally, click on the rectangle of the layer you wish to copy to. The
current layer gets copied onto the top of the destination layer. After copying, the
current layer has not been changed, but the destination layer now contains a
mixture of its original state and the current layer. The order of layers is respected,
so that the copied layer may be placed either on top of, or underneath the
destination layer. If you copy layer A onto layer B, layer A will be copied over the
top of the image on layer B. If, however, you copied layer C onto layer A, it will be
copied under what is currently in layer A. The order of layers will always stay the
same.
Merge: Mixes the current layer with a destination layer. Click on the rectangle of
the layer you want to mix (it gets selected in white), then click on the Merge
button. Finally, click on the rectangle of the layer you wish to mix the current layer
with. The layers are mixed together, respecting the order in which they come. The
only difference between the Merge and Copy functions is that with the Merge
function, the current layer ends up empty.
Kill: Eliminates a designated layer. The layer is not just emptied, it is got rid of
completely. Click on the Kill button, then on the rectangle of the layer you want to
eliminate. You cannot eliminate the current layer, so there will always be at least
one layer left.
The Copy and Merge functions are very similar. Copy leaves the current layer
intact, whereas Merge empties it. Merge, as its name implies, is used simply to
merge two layers. Copy allows you to use a layer as a template, so you can stack
satisfying layers on only one layer, while you continue to draw on the current layer.
Each of these functions has a confirmation window. Only Exchange can easily be
undone (it is a reverse operation), whereas the other functions will at least destroy
one layer.
101
User's Guide 3.6 US.QXD 3/11/99 3:58 PM Page 102
102
2.36 Using layers
BACKGROUND
The background is to be considered as a fourth layer, which is permanently
embedded under the three others (layers A, B and C). It is not a layer on which you
can draw: it is the canvas at the back of the painting that lets you see the layers of
paint better. Without it, you would not easily be able to judge the transparency of
the other layers.
The background can be Black, Colored or Checked. When the Color option is
chosen, the first colored square on the right of the selection button lets you choose
the exact background color. Click on this colored square, then click somewhere on
the screen to select a color. When the Check option is selected, the background
looks like a “checkboard” using the two colors contained in the squares on the right
of the selection button. To choose one color, click on a colored square then
somewhere on the screen.
The default setting when you launch TVPaint is a Black background. One
particular feature and advantage of this background is that it is the fastest one for
the program to operate with.
The l
ay ers edit
ing
funct
ions (Copy,
Merge, Exchange and
Kill)
Background t
y pe:
Black,Color orCheck.
If t
he background is
Colored orChecked,
t
hese but
t
ons displ
ay s
t
he background col
ors.
They al
so l
ety ou
sel
ectt
hem .
The background
col
or(s)al
so appears
here,behindt
he t
hree
l
ay ers rect
angl
es.
User's Guide 3.6 US.QXD 3/11/99 3:58 PM Page 103
2.37 Drawing modes
2.37 DRAWING MODES
The drawing tools (pen, airbrush, chalk,...) that are used with the drawing functions
allow you to paint color onto the screen. Sometimes, however, rather than paint
color, it would be useful to lighten parts of the picture, or to blur them, or to
colorize them... These are all different drawing modes.
The current drawing mode is shown in a button at the top of the main toolbox; it is
set by default to Color mode. To select a different mode, click on the button. A
pop-up menu appears giving all the available modes, and their keyboard shortcuts.
Some keys control several modes. For example, Shade and Light modes, which
respectively darken and lighten what is drawn over with the mouse, are both on the
F5 key. Press once, and you go into Shade mode; press again and you go to Light
mode.
In general, all the modes use the left mouse button. The right button is permanently
in Erase mode, letting those with a two button mouse (or a stylus with two buttons)
have permanent access to the Erase mode.
F1:
F2:
F3:
F4:
F5:
F6:
F7:
F8:
F9:
Color, Stamp
Replace, Behind
Erase, Pantograph
Merge, Impress
Shade, Light
Colorize, Tint
Grain
Smooth, Blur
Smear, Shift
COLOR
This is the default mode. It is the “normal” mode that allows you to paint on the
screen with the current color.
STAMP
In Color mode, when you cut a brush from the page, and then draw with it, that
brush will always keep its original colors. If you cut out a red brush, even if you
then select green as your working color, the brush will still paint in red. By
selecting the Stamp mode, the brush will then adopt whatever color is selected, as if
it were a rubber stamp dipped in the working color. It even allows you to use color
cycling.
103
User's Guide 3.6 US.QXD 3/11/99 3:58 PM Page 104
104
2.37 Drawing modes
REPLACE
Replace mode can be very useful. In this mode, you replace the color of all the
pixels your brush passes over. However, it only replaces the color, not the density.
Imagine that you have drawn a glass with almost transparent areas. If you were in
Color mode, painting over the glass would add a fully opaque coat of paint over
what you draw and you’ll lose the transparency information. In Replace mode,
however, you change the color of the glass, but its transparencies are retained.
Replace mode is like a mask: it acts only where there is already color. If you have
drawn a red object on a transparent background, and you wish to draw detailed
designs on that object without risking spilling out onto the background, choose
Replace mode. On the opaque red object, you will draw normally, yet on the
transparent background, nothing can be drawn: because Replace mode acts on
color, not on density, if there is no color, i.e. it is transparent, then there can be no
drawing on it. Additionally, on your red borders, the smoothing (the density range
at the edge of your object) is retained.
BEHIND
As with Replace mode, Behind is very important. It lets you add color to your
drawing, but instead of putting the color on top of the current drawing, it puts it
behind.
Behind mode is like a mask, the opposite of the Replace mode. It only paints where
there’s no color. If you have drawn an object on a transparent background, and
wish to alter the background without affecting your drawing, then select Behind
mode: on the transparent background you draw as normal, but you cannot draw
where color is already present. Behind mode puts color behind your drawing, and
only those areas which have at least some degree of transparency will be painted
on. Additionally, on the contours of your object, the smoothing (the density map at
the edge of your object) will be retained.
ERASE
This mode erases color from your drawing. Remember the analogy of plates of
glass on which you draw? Here, you scratch paint (more or less at a time,
depending on pressure) away from the surface of the glass, thanks to TVPaint’s use
of the Alpha Channel in real time.
Whatever mode is currently active on the left mouse button, the right mouse button
will always be in Erase mode. Therefore, you will rarely need to select this as the
current mode, as it is always ready at your fingertip.
User's Guide 3.6 US.QXD 3/11/99 3:58 PM Page 105
2.37 Drawing modes
PANTOGRAPH
This drawing mode acts like a “magical” pantograph. When you select it, a second
pointer will appear, offset from the main pointer, but linked to it. Once you set the
offset, it remains the same. The second pointer follows exactly the movements of
the normal pointer, but offset horizontally and vertically. When you draw,
everything that passes under the first mouse pointer, will be copied under the
second one.
This seemingly trivial mode is however extremely useful when doing “invisible”
touch up work on scanned pictures. For example, to get rid of a blemish on a
subject’s skin, simply set the second pointer onto an area of smooth skin, then draw
over the blemish. The smooth skin texture will be copied over the blemish.
It is recommended that you use the airbrush as the drawing tool for such tasks, as it
will give the cleanest results. This mode is great if you want, say, to add a third eye
to someone’s face!
You use the P (Shift + p) key to set the offset of the second pointer. You then draw
a line between the source point (the smooth skin) to the destination point (the
blemish), and with this, the pantograph is set. You can also set these coordinates at
the bottom of the Drawing Functions window.
MERGE
TVPaint offers you a second screen, called the spare screen, where you can store a
picture. With the j key, you can swap the current screen (the current layer) with the
spare screen. The J key (Shift+j) copies the current screen onto the spare screen.
Merge is an image mixing mode that uses the spare screen. For example, Load a
picture from a disk; press j to swap this picture with the spare screen. You now
have the picture, hidden from view, on the spare screen. Select a drawing function
and a medium sized pen, press on F4 (Merge) and draw some lines. Instead of
drawing a colored line with the brush, what you do is copy what’s on the spare
screen to the current screen. Merge works a bit like a Pantograph mode using two
images without offset rather than one with. It is also recommended that you use the
airbrush tool to draw with, as it gives the best, smoothest, results.
Merge mode is great for mixing pictures. It is very useful also when you want to
apply filters (see later) to a specific part of the screen. Load a picture, and copy it
to the spare screen (with J), then make the image Negative (for example). It is then
easy, with Merge mode, to mix together the original image and its negative. You
can also use this mode to add texture to a text. The possible use of all drawing
functions contributes to this mode’s power.
105
User's Guide 3.6 US.QXD 3/11/99 3:58 PM Page 106
106
2.37 Drawing modes
IMPRESS(ionism)
The Impress mode grabs a color from the spare screen and uses it to paint with on
the current screen. It is similar to the Merge mode, in that it takes data from the
spare screen, and it also reminds of the Smear mode. Used properly, it can give
results similar to an impressionist painting, hence its name.
There are two ways in which you can use this mode: load a picture, and press j to
swap it with the spare screen. Then fill the current screen with white (or black, or
grey). Now switch into Impress mode, and, with a small brush, draw a whole series
of small lines, or small round brush strokes, all next to each other. To get the best
results, you should use as small a brush as possible (it makes for a more accurate
picture). The second picture will appear bit by bit, in the impressionist style.
The second way to use this mode is with the same picture on the spare screen as
the current screen. You will draw small lines in a similar way to the first example.
The effect you obtain is similar to the Smear mode, but whereas with Smear the
picture becomes more and more smeared as you go over it, in Impress mode, which
uses the original picture as its source, the picture accuracy is improved (as you
reduce your brush size).
Note that drawing a whole series of small lines on the screen can be an arduous
task. The scripting language in TVPaint is there to help make such tasks a lot
easier. Later, we will find out how to automate such tasks.
SHADE and LIGHT
The Shade mode will darken everything that passes under the brush (while the
mouse button is held down). The more you go over an area, the darker it becomes.
Light mode works in exactly the same way, but has the opposite effect: it lightens
everything under the brush.
COLORIZE
As its name would indicate, Colorize adds color to everything under the brush
(using the current working color). Essentially, the color (H)ue of the drawing is
altered, while the (L)uminosity component remains the same. The (S)aturation
component may change, giving more intense colors than the original ones.
Note that this mode does not colorize incrementally: once you have passed over an
area with the brush once, you can go over it again and the initial change will not be
compounded. Additionally, since the luminosity component of the working color
remains fixed, you will get the same effect using a light grey as with a dark grey.
User's Guide 3.6 US.QXD 3/11/99 3:58 PM Page 107
2.37 Drawing modes
TINT
Tint mode acts like Colorize mode, but in a different way: when Colorize only
retains luminosity, Tint retains both luminosity and saturation. Therefore, where in
Colorize mode you can add color to greys, in Tint mode, you cannot. This feature
can make this mode sometimes more appropriate to use than the Colorize mode. As
with the latter, Tint is a once-only effect. Once you have passed over an area of
your painting, going over it again will not make any further difference.
GRAIN
Grain mode generates grain under the brush. It is very useful for creating bumpy
textures and add a bit of realism to those ray traced and other computer generated
pictures that come out so desperately smooth.
SMOOTH
Smooth mode makes the areas it goes over ever so slightly blurred, or out of focus.
As with Blur mode, Smooth mode lets you smooth out the pixels of a picture, to
soften the grain of a scanned image, or to give a bit of depth to “chronically flat”
ray traced pictures. It is used best with a fairly large brush, and you can go over
areas several times until you are satisfied with the level of smoothing.
BLUR
Blur mode will severely blur what passes under your brush. As with Smooth mode,
use it with a fairly large brush, and you can go over areas several times until your
desired effect is achieved.
SMEAR
When drawing in Smear mode, the edges of your brush will smear paint along their
path, as if you were running your finger through fresh paint.
Smear mode gives a pastel effect when used with a medium sized brush in a
continuous line. Also, because it leaves traces behind, it can give a “direction” to
the brush strokes, similar to that of a paint brush on canvas, or the impression of
movement that you get when photographing something moving fast.
107
User's Guide 3.6 US.QXD 3/11/99 3:58 PM Page 108
108
2.37 Drawing modes
Note that when you use Smear with the airbrush, you get maximum benefit from
this mode: violent smearing in the center and the edges relatively unscathed (with
the default settings). You could also try drawing a circle with a medium sized
brush, then (with the Ctrl key) a series of concentric circles through its edges, to
get a prism like effect. Smear mode, that smears what is under it, should not be
confused with Shift mode, that actually moves pixels around.
SHIFT
When you go over an area with the brush in Shift mode, everything under the brush
gets carried along with it. Whereas Smear mode leaves color “stains” where it has
passed, Shift mode will move whole parts of the picture, while keeping them
relatively linked in to the rest of the picture. Load up a scanned image of a face, for
example, and select Freehand Line with a fairly large brush (as large as the area
you want to shift), and place the brush at the end of the nose, or the corner of the
lips. Click and hold on the button and drag the mouse slowly along, and you will
shift the end of the nose, or the lips, outward as you move the mouse. If you move
the mouse quickly, you can completely pull away parts of the face.
As with Smear mode, it is often best to use the airbrush tool, which softens the
transition effect of shifting the picture. With the airbrush, there will be greater
continuity between the original picture and the area that is shifted. To avoid
transparent or blurred looking shifts, you can set the airbrush to 100%, with a high
envelope curve, so that only the edges are pressure sensitive.
Draw a circle (in Shift mode) with a medium sized brush. Note how everything that
was under the circle has been carried away with it. Now trace a series of concentric
circles with the Ctrl key held down, and go over the same circle several times. You
will carry further and further what is under the mouse pointer, in the direction that
the circle rotates. After going over it a few times, you get a nice whirlpool effect.
User's Guide 3.6 US.QXD 3/11/99 3:58 PM Page 109
2.38 Disk operations
2.38 DISK OPERATIONS
This icon opens up the Input/Output window, from where all loading and saving is
done; not just the loading and saving of files, but also, on Windows based systems,
the clipboard control, printer functions (described later) etc.
LOADING / SAVING PROJECTS
A project is made up of all the existing layers A, B and C. They are all saved
together in one file, so you can load or save all three in one go. The project
contains all existing layers, even if they are empty.
To load a project, simply click on the Load button that is under the Project title. A
window appears in which you select your project.
To save a project, click on the Save button under the Project title. A window
appears in which you select or enter the name of the project to be saved.
LOADING / SAVING OTHER TYPES
To load something other than a project, you will need to specify what type of thing
you want to load (using the Type button), then you click on the Load button. A
window will open where you choose the name of the file you want to load.
To save something other than a project, the method is the same: specify what you
want to save with the Type button, then click on Save. A window appears in which
you select or enter the name of the thing to be saved.
Type is a very important piece of information for TVPaint. The program cannot
know on its own if you want to save the current layer, all three layers, the current
brush, the Density curves or the palette. Similarly, when loading, you could be
loading a picture to the screen, a brush, a palette etc.
109
User's Guide 3.6 US.QXD 3/11/99 3:58 PM Page 110
110
2.38 Disk operations
L oad orS ave a proj
ect
(one orm ore l
ay ers w it
ht
he background).
L oad orS ave som et
hing ot
hert
han a
proj
ect
.Ty pe specifies w hatt
ol
oad/save.
It
s form atis show n inM ode.
G eneralinfo on fil
es.
D el
et
e a fil
e.
P rintt
he pict
ure.
A ccess t
o cl
ipboard (forW indow s based
sy st
em s onl
y ).
Twain® access: capt
ure driverfor
scanners,video,et
c.(forW indow s based
sy st
em s onl
y ).
Q uick L oad/S ave of t
he currentl
ay er.
The different types are:
Layer: Only the current layer is saved. If you load a layer, it will replace the picture
in the current layer.
Display: Will save what you see on screen as a single image, whether one, two or
three layers are being displayed. It is the WYSIWYG (What You See Is What You
Get) saving mode.
Brush: The current brush is saved to disk. When loading a brush type, the image is
loaded as a brush under the mouse pointer.
Palette: The current palette (4 palettes of 256 colors each) is loaded or saved.
Mixer: The contents of the Mixer window of the Palette window are loaded or
saved.
Density: The Density Curves from the Density window are loaded or saved.
User's Guide 3.6 US.QXD 3/11/99 3:58 PM Page 111
2.38 Disk operations
FILE INFORMATION
The File info button brings up as much information as possible on the specified
file: format, size, icon (if there is one) and more. The File Requester window opens
up, and you select the file you want information on.
DELETE FILE
The Delete button lets you select a file from disk (any file, not just image files),
and delete it. As with all the delete type functions, be careful when you use it. After
selecting a file for deletion, a window will open asking you to confirm your choice.
Make sure the filename is correct, then click on Yes.
THE FILE REQUESTER WINDOW
The File Requester window lets you choose the name and location of a file to load
or save. It lets you move around the different devices (hard disks, floppy disk) that
are attached to your computer, and the various directories held in them.
Files are displayed in alphabetical order, and two modes are available: Quick
mode, which only shows the file names, and Icon mode, where you see files with
their associated icons. The Icons button lets you swap between these modes. Icons
are saved by TVPaint with only images of specific formats: Project, ILBM, DEEP,
and TIFF. The file scan is slower in Icon mode, as the program has to read all the
icon information in the current directory.
You can select a file in two ways: you can simply double click on a filename or you
can also click once on a file name, which gets copied to the File textbox at the
bottom of the requester. You can then click on that file name and edit it from the
keyboard, then press Return or click on OK to validate it as the chosen file.
111
User's Guide 3.6 US.QXD 3/11/99 3:58 PM Page 112
112
2.38 Disk operations
The num berof fil
es
and direct
ories in
t
he current
direct
ory .
D irect
ories are
sel
ect
ed w it
ht
he
Dir but
t
on.
L istof fil
es w it
ht
he
icons (Icons but
t
on
sel
ect
ed).Indicat
es
F il
e nam e,last
al
t
erat
ion t
im e,fil
e
and pict
ure siz e.
S crol
ldow n m enu
t
o sel
ecta D isk or
V ol
um e.
S crol
ldow n m enu
t
o sel
ecta
direct
ory .
Parent but
t
on t
o go
back one direct
ory .
Com pl
et
e pat
ht
o
currentdirect
ory .
F il
enam e
Note that unlike all the other windows in the program, the opened File Requester
window doesn’t let you continue drawing. The only two things you can do are to
select a file, or Cancel your file selection. In both cases the window closes, and you
can once again draw.
User's Guide 3.6 US.QXD 3/11/99 3:58 PM Page 113
2.38 Disk operations
CHANGING THE PAGE SIZE
When you load a project, two things can happen: the size of the drawing in the
project and the size of the page are the same or are not. If they are the same, then
the project is loaded seamlessly. If they are different, a window pops up and offers
you the following options:
Resize page: Alters the size of the current working page to fit the project’s size you
are loading. It will make the page bigger or smaller to fit the picture. If the project
is bigger than the screen, you will then have to scroll around the page to see it all.
If the project is smaller than the screen, then the image will be placed in the middle
of the screen, and the surrounding area will be cleared with a neutral color.
Crop project: Loads the project without changing the size of the page. The top left
hand corner of the project is placed onto the top left hand corner of the page. If the
project is bigger than the page, then the bottom and right of it will be lost. If the
project is smaller than the page, then the bottom right hand side of the page will be
unchanged.
Resize project: Loads the project and scales it to fit the page. If it is smaller than
the page, it is enlarged to fit; if it is larger than the page, then it is reduced to fit.
Resizing a project in this way is not recommended because when reducing, pixels
are lost from the project, and on enlargement the project will blur a little. This
function is best avoided if possible.
You need to understand the difference between the screen size, set to a particular
resolution by your graphics card (like 640 x 480 or 800 x 600 pixels), your page
size, the size of your drawing area (which will usually be the same size as your
screen, but that can be changed), and the project size, the size of the picture (which
will either be changed to fit the page or will become also the new page size).
113
User's Guide 3.6 US.QXD 3/11/99 3:58 PM Page 114
114
2.38 Disk operations
QUICK LOAD / SAVE
The Hold and Fetch buttons let you respectively save and load the current layer to
a permanent specific file, whose name cannot be changed. Think of it as an instant
Undo option for the current layer.
PICTURE FILE FORMATS
The quality of any file format is set by the number of colors that format can
contain. This number is expressed in bits: n bits generally corresponds to 2n colors,
like 8 bits for 256 colors and 24 bits for 16 million colors. 32 bits formats allow 16
million colors (24 bits) and 256 levels (+8 bits) of transparency (Alpha Channel).
TVPaint will load the following file formats:
.PRO
.DIP
.TGA
.LBM
.JPG
.SGI
.SUN
.6RN
.TIF
.BMP
.PCX
.GIF
Project
Deep
Targa
Ilbm
Jpeg
Silicon
SunRaster
Rendition
32 bits
32 bits
32 bits
24 bits
24 bits (can also appears as .JIF)
32 bits
24 and 32 bits
32 bits
32 bits (version 6.0)
Up to 24 bits
8 bits (file loading only)
8 bits
In which file format should you save the drawings you have made in TVPaint? As
TVPaint works on 32 bit images (24 bits of color and an 8 bit Alpha channel), it
would seem logical for you to opt for one of the 32 bit file formats, which will
retain the transparencies of pixels.
Note that TVPaint can load PCX format pictures but cannot save in that format.
User's Guide 3.6 US.QXD 3/11/99 3:58 PM Page 115
2.39 Printing
115
2.39 PRINTING
Click on the Print button in the Input/Output window (opened by clicking on the
Input/Output icon) to open the Print window. You can choose to print the current
layer or the current display (those layers that are switched On and the background
color; i.e. what is on the screen) by clicking on the appropriate buttons. Note that
the background color is ignored when printing the current layer (transparent areas
are printed in black).
The Print window displays to the left a preview of the final printed page, according
to the printer setup.
N am e of sel
ect
ed print
er.
P rint
outsiz e in% .
P review of t
he
finalprint
ed page.
The w hit
e z one
corresponds t
ot
he
page siz e of y our
print
ersetup.
Configure y ourprint
er.
Y ou m ay printeit
her
t
he currentl
ay er or
t
he displ
ay .
User's Guide 3.6 US.QXD 3/11/99 3:58 PM Page 116
116
2.39 Printing
Several options let you control the printing:
The printer type is displayed at the top of the window. To change this setting, use
the Configuration button (see below).
The size of your printout. The default setting is for the picture to cover your page
as best it can, at 100%. Changing the size parameter will change the size of the
printout on the page. If you want to leave margins around the picture, reduce the
size of the printed picture. The display window will be updated accordingly.
The proportional option lets you retain the proportions of your picture on the
printout, even if it doesn’t cover the whole page. When proportional mode is not
selected, the proportions of the picture will not be retained, and the picture will fill
the page entirely with a size of 100%, .
The Configuration button opens the Printer Setup window (displayed by your
printer driver) of your system.
The Current layer button starts printing the current layer
The Display button starts printing the current display (as defined at the beginning
of this section).
The preview area always shows the final result of a printout using the current
settings. Default settings have the picture centered on the page. If you want to
change the image’s position on the page, click and hold the mouse button while
moving it around with the mouse. Let go of the mouse button when you reach the
desired position.
User's Guide 3.6 US.QXD 3/11/99 3:58 PM Page 117
2.40 Clipboard
2.40 CLIPBOARD (Windows based systems only)
In the Input/Output window (opened by clicking on the Disk icon), the Get and Put
buttons let you use the Windows clipboard. Get copies the picture in the clipboard
to the current brush. Put pastes the current brush into the clipboard.
These two functions always act on the current brush, not the current layer. Note
also that the clipboard must contain image data to use Get, not text or anything
else, otherwise all you will get is an error message. The Put function requires that
a cut out brush is currently at the end of the mouse pointer, or an error message will
also be displayed.
2.41 TWAIN® DEVICES (Windows based systems only)
TVPaint can drive TWAIN® devices. This allows you to directly do your capture
work from TVPaint, without having to use an external program. Clicking on the
button Select displays a window of available devices so you can select the current
one. Click on Acquire to run the control program of the current device. Control
programs are specific to each device, so you should refer to the corresponding
documentation for more details.
117
User's Guide 3.6 US.QXD 3/11/99 3:58 PM Page 118
118
2.42 System menu
2.42 SYSTEM MENU
Click on the System icon in the main toolbox to open the System window. There
you can control the general options of TVPaint.
2.42.1 UNDO MODE
This option turns the Undo feature either onto
Auto(matic), or Off. If your machine’s memory is
running low, you can save some by turning Undo off, at
the cost of no longer being covered by this “safety net”.
2.42.2 FILE REQUESTER (Windows
based systems only)
The Requester option allows you to choose which type
of requester is used to access to files. There are two
options: TVPaint (a custom file requester is used) or
Windows (a Windows standard file requester is used).
2.42.3 SPARE LAYER
These three buttons let you control the spare layer. Swap
(keyboard equivalent: j) will swap the current layer with
the spare layer. Copy (keyboard equivalent: J) will copy
the current layer to the spare layer. Kill spare layer gets
rid of the spare layer, and frees the memory it was using
(useful in cases of low memory).
2.42.4 PAGE SIZE
This function lets you change the page size. A window appears showing the current
size of the page, and options to resize it.
You specify the new size in the Width and Height boxes. If the proportional button
is enabled, modifying one dimension automatically updates the other dimension, so
the proportions of the current page size can be maintained.
User's Guide 3.6 US.QXD 3/11/99 3:58 PM Page 119
2.42.5 Coordinates
The resizing is done by clicking on
one of the three Apply resize buttons.
The corresponding options are similar
to those which are given when you
load a project of a different size than
the current page. Clear project kills
the current project. Crop project
maintains the data of the current
project, but it will be cropped to fit the
new size if it was bigger, or an empty
area will appear on the right and
bottom of the new page if it was
smaller. Finally, Stretch project
enlarges or reduces the project so it
can fully fit the new size.
2.42.5 COORDINATES
This function opens a little window that shows in real time:
• The color (R, G & B values) of the pixel
at the end of the mouse pointer.
• The coordinates (x, y) of the mouse
pointer
• The size (l, h) when drawing rectangles,
circles, etc.
2.42.6 SHOW PAGE
This function will display the current layer fully in the screen. This is only useful
when the current layer is bigger than the screen. If this is the case, the layer is
displayed in reduced form to fit the screen. A rectangle the size of the screen will
appear under your pointer, so you can set the screen view you want by clicking
with the left mouse button. Clicking with the right mouse button lets you quit this
display mode, and return to the normal view.
119
User's Guide 3.6 US.QXD 3/11/99 3:58 PM Page 120
120
2.42.7 Gamma Monitor
2.42.7 GAMMA MONITOR
Gamma is a coefficient that helps you adjust the display’s luminosity. By default,
gamma is equal to 1,0. Higher values (1,8 is a common value) make the display
lighter, whereas lower values darken the display.
Gamma only modifies the display, and only the display. The original colors of the
saved picture on disk are never modified.
Modifying the gamma is dangerous, especially when you distribute a picture made
under a specific gamma value to other parties. If for example you created a picture
under gamma 1,8, and if you send it to someone who will display it under gamma
1,0, then the picture’s colors will look darker than the ones you choose. That
person would have to adjust his own gamma to 1,8 in order to see the original
colors. In fact, displaying a picture with two different gamma values could be
considered as viewing it on a monitor with two different luminosity settings: color
conformity is not preserved.
Normally, you should not use the gamma monitor. The only exception is when
you’re working with an incorrectly tuned display that cannot be set properly, such
as with a monitor which has no setting buttons, or one which suffers from an
internal offset. The gamma can then correct the display to match normal
specifications, so you can view the picture as it should appear on any normal
non-modified gamma displays. Color conformity is then preserved.
R esul
t
ing curve of
t
he gam m a val
ue.
D ispl
ay preview .
G am m a correct
ion
sw it
ch (On orOff).
G am m a val
ue.
L oad a saved
gam m a orS ave t
he
currentone.
S creen updat
e
but
t
on (w hen t
he
gam m a val
ue has
been m odified).
User's Guide 3.6 US.QXD 3/11/99 3:58 PM Page 121
2.42.8 Sensitivity
2.42.8 SENSITIVITY
The Sensitivity window allows you to set the Pressure and Velocity sensitivities,
according to two curves that you can edit. They define TVPaint’s sensitivity to the
data stream coming from the speed of your pointer and from the pressure applied to
the tip of the digitizing tablet’s stylus. By default, each curve is a diagonal, which
means that resulting actions from the program (such as the density variation of a
tool) vary as fast as the pressure (or the velocity) applied.
When you modify a curve, keep in mind that dragging it to the top increases the
slope, and therefore increases the program’s response to the pressure (or the speed).
In this case, this means you could get a more sensitive stylus (softer), because a
large action results from a very small amount of pressure. On the other hand, if you
drag a curve to the bottom, the slope decreases, and so do the program’s response
to the pressure (or the speed). The stylus will feel hard. Of course, the stylus has
not been modified, only TVPaint’s awareness to the data stream coming from it.
2.42.9 RENAMING THE CONFIGURATION
This function lets you rename the current user configuration, which includes all of
your environment (windows positions, palettes, tools settings, etc.). Renaming a
configuration can create new configurations if, after having modified the current
configuration and after having renamed it, you let TVPaint save the configuration
next time you quit the program. Note that the Standard configuration cannot be
modified.
2.42.10 DISPLAY MODE (SGI systems only)
Two options at the bottom of the System window lets you choose the type of
display used by TVPaint. When the Fast Display option is enabled, TVPaint uses
OpenGL optimization to display its screen. The result depends on the graphic card
installed in your system (TVPaint may use a 256 colors screen). When the Best
Display option is enabled, TVPaint always uses the best display available for its
screen (in 16 millions colors mode), even if this display is slower.
121
User's Guide 3.6 US.QXD 3/11/99 3:58 PM Page 122
122
2.43 Filters
2.43 FILTERS
This icon opens up the Filters window. The filters have a chapter all to themselves
further on in this manual.
2.44 QUITTING
Exits the program. A confirmation window appears, including several interesting
things:
• The name under which that program has been saved.
• The version number of the program.
• A control to authorize or not TVPaint to save the working configuration under
the current name. That name can be either the one of the configuration you
started with or a new one (see Renaming the configuration on the previous
page). The Standard configuration cannot be modified.
• A confirmation control to really authorize TVPaint to quit.
User's Guide 3.6 US.QXD 3/11/99 3:58 PM Page 123
3. George, the automatic pilot
TVPAINT
3
George,
the automatic
pilot
123
User's Guide 3.6 US.QXD 3/11/99 3:58 PM Page 124
User's Guide 3.6 US.QXD 3/11/99 3:58 PM Page 125
3.1 Description
3.1 DESCRIPTION
Imagine you want to draw a glass ball. You need to cut out a brush from your page,
set the parameters to use this brush for wrapping, draw a filled circle (that the brush
will fill), set the density mapping parameters to add a “reflection” of the light, and
finally select white and redraw the circle. When you only have one glass ball to do,
you would do this all by hand, clicking on the appropriate icons for these functions.
However, when you have 10 or 20 glass ball to draw, all this clicking can become
extremely boring. The solution is George, a way to automate repetitive tasks.
George is an autopilot that will send instructions to TVPaint (select this function,
use this color, draw this, erase that, etc.). Each instruction corresponds to a button
or an icon in TVPaint. Everything happens as if it were George pressing the
buttons instead of you. Rather than clicking ten or twenty times on the same button,
you just ask George to do it for you. With the ball of glass example, all you would
need to do is draw a circle to set the contours of the ball, and George will look after
everything else.
George runs a series of instructions, or “programs”, which, while they are macros
using the current functions, also make up new TVPaint functions in themselves:
draw a glass ball, draw a light beam... You can stick to using the current library of
functions, but you can also write your own functions, and create your own
programs.
George lets you create an infinite number of functions. It also lets you automate
TVPaint. You could, for example, write a program that loads a picture, colorizes a
part of it, saves it to disk, and then does the same again with another picture. On a
series of two pictures, using George may seem a bit of an overkill; you’d probably
spend more time explaining to George what to do. But, if you have 200 pictures to
process, you can see how useful automation can be. Moreover, what could be nicer
than to see the computer doing all the work for you?
125
User's Guide 3.6 US.QXD 3/11/99 3:58 PM Page 126
126
3.2 How to use George
3.2 HOW TO USE GEORGE
Click with the right mouse button on the icon that depicts a pilot’s cap in the main
toolbox. A window appears showing ten command lines. These let you pre-select
ten functions that can be executed at the touch of a button. Usually, a command
line will contain the name of a program that George should run, but it can also
contains the name of an executable file (for example, on Windows based systems, a
command like “command.com” or “winfile.exe”).
Com m and l
ine #1.H ere,it
cont
ains a G eorge program
t
hatis l
aunched by draw ing a
circl
e (see t
he circl
e sy m bolat
t
he right
).
Com m and l
ine t
hatcont
ains a
non-G eorge program w hich is
l
aunched by pressing Shift
and t
he funct
ion key t
hat
corresponds t
ot
he com m and
l
ine num ber.
Each program can be launched in two ways: with or without parameters.
Without parameters, the program is launched by pressing Shift and the function
key that corresponds to the command line number (F1 for command line 1, F2 for
command line 2, etc.) and the program runs immediately.
With parameters, launching the program is not enough; the program waits for you
to give it certain parameters by drawing in the page. Draw a circle, for example,
and George receives 3 values that are the coordinates (x,y) and the radius of the
circle. Until you click in the screen to draw a circle, the program just waits.
There are 6 different launch parameter modes. Each mode represents a drawing
function. The launch parameter mode used by a command is shown by a little
symbol to the right of the command line.
User's Guide 3.6 US.QXD 3/11/99 3:58 PM Page 127
3.3 Editing command lines
127
To use a command, click on its command button and follow its launch parameter
requirements. If a small F is shown on the right, click a second time on the
command line to run the program. If a little circle is shown, draw a circle on the
screen. If a rectangle is shown, then draw a rectangle...
3.3 EDITING COMMAND LINES
Select one of the 10 command lines by clicking on it with the left mouse button,
then click on the Edit button (or, more directly, you can click on the command line
with the right mouse button). The Editing Commands window appears.
These 6 icons l
ety ou sel
ectt
he param et
er
l
aunch m odes.They are norm al
l
y changed
aut
om at
ical
l
y w hen y ou choose a program .
L et
s y ou Select a
com m and from a F il
e
R equest
erw indow .
Click on the line of text where the program name is, and enter the name of a new
program. Or, simpler, click on the Select button. A window appears from which
you select a program. With the default setting, the window only shows those files
ending with the extension “.grg”; in this window, the Pattern line contains the
letters “*.grg”. There is nothing to stop you changing the pattern line to display
other types of file. Then you can select a program like, on Windows based systems,
“winmine.exe”,...
Close the Editing Commands window: the name of the program you chose now
appears in the command line you had selected. The launch mode is shown in a little
icon to the right of the command line. When you choose a new program, the launch
mode is automatically changed. Normally, you will not have to change it. The
launch mode lets you know how to launch the program. The symbol at the end of
the line lets you know if you need to press Shift with the appropriate function key,
or to draw a circle, a straight line, etc...
User's Guide 3.6 US.QXD 3/11/99 3:58 PM Page 128
128
3.3 Editing command lines
Single Mode: 1 point
Click in the screen. George receives the character string “Single”, the coordinates
(x,y) of where you clicked and the code of the button you pressed (see below).
Continuous Mode: 1 point
You draw a Freehand Line on the screen. With each movement of the mouse,
George is run. Each time, George receives the character string “”, a pair of
coordinates (x,y) and the code of the button you pressed. The program can keep
track of its coordinates in memory, and only use them once the button is released.
Line Mode: 1 Line
You draw a Straight Line. George receives the character string “”, two pairs of
coordinates (x,y) of where your start and end points are, and the code of the button
you pressed.
Rectangle Mode: 1 rectangle
You draw a rectangle. George receives the character string “”, two pairs of
coordinates (x,y) of where your start and end points are, and the code of the button
you pressed.
Circle Mode: 1 circle
You draw a circle. George receives the character string “”, the coordinates (x,y) of
the circle’s center, the radius and the code of the button you pressed.
Spline Mode: 1 spline
You draw a spline. George receives the character string “”, three pairs of
coordinates (the coordinates of the three points on the spline), and the code of the
button you pressed.
None Mode: No parameters
You don’t draw anything. Just press Shift and the appropriate function key to
launch the program. George receives no parameters.
User's Guide 3.6 US.QXD 3/11/99 3:58 PM Page 129
3.4 George multitasks
3.4 GEORGE MULTITASKS
TVPaint and George run separately, but at the same time.
You should always remember that George will use TVPaint as it finds it, i.e. with
the functions and options that are currently set. If you want to draw a red line with
George, the program needs to be told more than just the line coordinates. Unless
you explicitly tell it to use a red color, George will go ahead and use the current
color when the program is run, whatever it may be. Similarly, if when you run the
program it is in the Behind or Smear drawing mode, you won’t exactly be getting
the clean line you were hoping for.
On the other hand you always have control over TVPaint, even while George is
running. For example, if you run the “styx.grg” program, which draws lines on the
screen, you can change the size of the pen while the program is running (by
pressing on the + and - keys). You can also change drawing tools (airbrush for
example) and drawing modes (Smear, Behind,...). The George program will just
keep drawing lines using whatever parameters are set at the time.
3.5 THE STARTUP.GRG FILE
At startup, the first thing that TVPaint does (after displaying the main toolbox, but
before giving control to the user) is to run the “startup.grg” program (which should
be in the “George” directory). When there is no “startup.grg” file, nothing will
happen. Otherwise, you have at your disposal a startup file that gets run every time
you load TVPaint. If, for example, you rename the “logo.grg” file to “startup.grg”,
it will load the TVPaint logo to screen every time you run TVPaint. You could also,
thanks to a simple George program, define all your preferred parameters: to load a
particular background picture, have your own color palette. to set color cycling, to
give different parameters to the airbrush, to set your density curves and so on.
129
User's Guide 3.6 US.QXD 3/11/99 3:58 PM Page 130
130
3.6 George, a scripting language
3.6 GEORGE, A SCRIPTING LANGUAGE
George is a relatively simple language. It’s not aimed at developing heavyweight
applications as are for example the C or C++ languages. George is first and
foremost a scripting language. It can do the basics:
• Loops (do the same thing n times),
• Conditional testing (if this is true then do that),
• Calculations (a+b, sin(a),...).
Make sure you differentiate between George program lines (which may start with a
#) and program lines for TVPaint (whose commands all start with tv_). George
lines make up the structure of the program (loops, tests, calculations) whereas the
lines aimed at TVPaint act on the screen and the TVPaint windows.
CONVENTIONS
Variables are handled seamlessly whether they hold numbers or strings of
characters. You’d write:
a=3
MyVariable="Monday"
You can have only one command per line. The following example is wrong. This
minor constraint makes programs a lot more clear and readable.
PRINT "Hello"
PRINT "Goodbye"
George is not case sensitive. Uppercase and lowercase letters are treated as exact
equivalents. For example, the commands PRINT, Print, PrInT, pRINT and pRiNt
are all the same to George.
George command lines may start with the “#” character. You can write:
#PRINT "Hello"
COMMENTS
Two slashes (“//’) comments out the rest of the line.
//
PRINT "Hello"
prints nothing
PRINT "Hello"
//Prints the word "Hello"
User's Guide 3.6 US.QXD 3/11/99 3:58 PM Page 131
3.6 George, a scripting language
ARITHMETIC OPERATORS
**
*
/
+
-
Negative
Exponent
Multiplication
Division
Addition
Subtraction
COMPARISON OPERATORS
==
!=
>
>=
<
<=
Equals
Does not equal
Greater than
Greater than or equal to
Smaller than
Smaller than or equal to
Don’t confuse between the arithmetic operator = and the comparison operator ==.
The first is used to assign a value to a variable (a=a+1) during calculations, while
the second is used to compare two expressions (a==b) during a test (IF,
WHILE,...).
LOGICAL OPERATORS
&& And
||
Or
RESERVED VARIABLES
George reserves certain variable names for its own usage. The contents of these
variables might be changed at any time by George without letting you know. You
need to read these variables to find out what they contain, but you are strongly
advised not to write to them. An example of these is the “Result” variable, that
George uses to hold the result of TVPaint commands.
GEORGE COMMANDS
The next few pages contain all of the George functions in alphabetical order, with
the details of their syntax and an example.
131
User's Guide 3.6 US.QXD 3/11/99 3:58 PM Page 132
132
3.6 George, a scripting language
ABS()
Syntax: ABS (expression)
Returns the absolute value of the expression. The expression must be numerical.
Example:
a=ABS(-10)
ACOS()
Syntax: ACOS (expression)
Returns the value of the ArcCosine expression. The result is expressed in degrees.
Example:
a=ACOS(0.5)
ASIN()
Syntax: ASIN (expression)
Returns the value of the ArcSine of the expression. The result is expressed in
degrees. Example:
a=ASIN(0.5)
ATAN()
Syntax: ATAN (expression)
Returns the value of the ArcTangent of the expression. The result is expressed in
degrees. Example:
a=ATAN(1.2)
BREAK
Syntax: BREAK
Exits the current loop. It can be used to prematurely end the DO...UNTIL, IF, FOR,
WHILE loops. Example:
// To count from 1 to 10
FOR i = 1 TO 20
PRINT i
IF (i == 10)
BREAK
END
END
CMP()
Syntax: CMP (string1, string2)
Compares the two character strings given. Returns 0 if the strings are different, and
1 if they are the same. Uppercase and lowercase letters are treated as identical.
Example:
Test = CMP (Word1, Word2)
IF (a==1)
PRINT "The two words are identical"
END
User's Guide 3.6 US.QXD 3/11/99 3:58 PM Page 133
3.6 George, a scripting language
COS()
Syntax: COS (expression)
Returns the value of the Cosine of the specified angle (degrees). Example:
a=COS(45)
CONNECT
Syntax: CONNECT programname
Tells George to which program it should send commands. This function must be at
the start of each program. George is not solely aimed at TVPaint. Other programs
can also talk to it. The George functions are common to all of these, while the
program you are running with George will have its own command set. Example:
CONNECT TVPaint
DATE()
Syntax: DATE()
Returns the current system date (day, month and year). Example:
today = DATE()
PARSE today d m y
DO...UNTIL
Syntax: DO
(commands)
UNTIL (condition)
Executes a series of instructions while the specified condition remains true. Unlike
the WHILE function, the commands are executed at least once because the first test
is done only after the first execution of the commands inside the loop. Example:
// To count to 10
i=0
DO
i=i+1
PRINT i
UNTIL (i < 10)
EXIT
Syntax: EXIT
Exits the George program. Example:
IF (a==0)
EXIT
END
133
User's Guide 3.6 US.QXD 3/11/99 3:58 PM Page 134
134
3.6 George, a scripting language
FOR
Syntax:
FOR variable=expression TO expression (STEP expression)
(commands)
END
Executes a series of commands while the index variable is smaller than or equal to
the limit expression (after TO). By default, at each new loop, the index variable is
increased by 1, then compared to the limit expression. A different increment
(STEP) can be defined. If this is negative, the loop will continue while the index
variable is greater than or equal to the limit expression. Example:
// To count from 1 to 10
FOR i = 1 TO 10
PRINT i
END
IF
Syntax:
IF (condition)
(commands)
ELSE
(commands)
END
Executes a series of commands if the condition is true. You can also use the ELSE
function to execute a different set of commands if the condition is false. The series
of commands that should be executed must finish with an END command.
Example:
//Test variable a.
IF (a == 2)
PRINT "The variable A equals " a
END
MAX()
Syntax: MAX (variable1, variable2,...)
Returns the highest of all the given variables. Example:
// Find maximum value
maximum = MAX (note1, note2, note3, note4)
MIN()
Syntax: MIN (variable1, variable2,...)
Returns the lowest of all the given variables. Example:
// Find minimum value
minimum = MIN (note1, note2, note3, note4)
User's Guide 3.6 US.QXD 3/11/99 3:58 PM Page 135
3.6 George, a scripting language
PARAM
Syntax: PARAM variable1, variable2,...
Tells George what sort of variables it’s about to receive (center and radius of a
circle; list of points,...). This lets TVPaint select the appropriate drawing function
in the Editing Commands window. Although this function is optional, it is strongly
recommended to use it (at the start of each program). Without it, the user will have
to select for himself the right function during the editing of the command. The
different types are: Function, Single, Continue, Line, Circle, and Rectangle.
Example:
PARAM Circle
PARSE
Syntax: PARSE sourcestring string1 string2 ...
Analyzes a string of characters and cuts it up into several smaller strings. Spaces
within the source string act as the separators for cutting it up. Example:
String = "Monday Tuesday Wednesday Thursday Friday"
PARSE String day1 day2
PRINT day1
PRINT day2
PAUSE
Syntax: PAUSE variable
Pauses the program for the specified number of seconds. Example:
PAUSE 2
PRINT
Syntax: PRINT expression
Prints an expression to the screen in a dialog box. Example:
a = "Hello World"
PRINT a
RND()
Syntax: RND (expression)
Returns a random value between 0 (included) and the limit specified in expression
(excluded). Example:
// Dice game: random number between 1 and 6 inclusive.
a = RND (6) +1
PRINT a
SIN()
Syntax: SIN (expression)
Returns the value of the sine of the specified angle (degrees). Example:
a=SIN(45)
135
User's Guide 3.6 US.QXD 3/11/99 3:58 PM Page 136
136
3.6 George, a scripting language
SQRT()
Syntax: SQRT (expression)
Returns the square root of the expression. Example:
a = SQRT (2)
TAN()
Syntax: TAN (expression)
Returns the value of the tangent of the specified angle (degrees). Example:
a=TAN(45)
TIME()
Syntax: TIME
Returns the current system time in hours, minutes and seconds. Example:
time = TIME()
PARSE time h m s
TRUNC()
Syntax: TRUNC (expression, value)
Returns the specified expression after having truncated it to the specified value
number of decimal places. Example:
// Pi to two decimal places
pi = TRUNC (3.1415926, 2)
// Returns 3.14
VERSION
Syntax: VERSION
Returns the version number of the George program currently running. Example:
a=VERSION
PRINT a
WHILE
Syntax: WHILE (condition)
(commands)
END
Executes a series of instructions while the condition is true. Unlike the
DO...UNTIL function, the commands here could not get executed at all if the
condition starts off as false. The first test happens before the first loop is executed.
Example:
// To count to 10
a=0
WHILE (a < 10)
a=a+1
PRINT a
END
User's Guide 3.6 US.QXD 3/11/99 3:58 PM Page 137
3.7 TVPaint commands
3.7 TVPAINT COMMANDS
Make sure you differentiate between George program lines (which may start with a
#) and program lines for TVPaint (whose commands all start with tv_). George
lines make up the structure of the program (loops, tests, calculations) whereas the
lines aimed at TVPaint act on the screen and the TVPaint windows.
DIVERSITY
George is not the only program that can send commands to TVPaint. Any other
program could theoretically do so. Examples using an Excel script, a C program
and others are given later.
NOTATION
TVPaint sees no difference between uppercase and lowercase letters. Tv_AliasOn,
tv_aliason, TV_ALIASON, tv_AliASoN... are all exactly the same command.
LEFT BUTTON / RIGHT BUTTON
The [0/1] parameter indicates that you can use either the left [0] or the right [1]
mouse button. This is optional; by default, it’s always the left button that will be
used. To draw a straight line with the right mouse button, you would enter: “tv_line
x1 y1 x2 y2 1”.
COLOR RANGES AND DENSITY MAPS
The [cx,cy] coordinates are used when drawing filled shapes with a color range or
a density map. In these cases, TVPaint must know the direction for the range (or its
center if its a circular range), as well as the position coordinates of the shape. The
[cx,cy] coordinates are the coordinates of the end of the vector line (whose other
end is in the middle of the shape).
POLYGONS
Polygons are drawn by filling the area table of numbers representing the
coordinates of the different points of the polygon, and pointing the function to that
table. At the start of each polygon you must clear the table to initialize it
(tv_AreaInit), before stacking into it pairs of coordinates one after the other
(tv_AreaMove).
137
User's Guide 3.6 US.QXD 3/11/99 3:58 PM Page 138
138
3.7 TVPaint commands
TVPAINT COMMANDS DESCRIPTION
Each command is followed by the syntax of the variables it requires. For example,
to draw a straight line from one point to another, you must give the coordinates of
the start point then the end point. The syntax to draw such a line would be: tv_Line
x1 y1 x2 y2.
[]
/
Variables inside square brackets are optional.
The “/” symbol separates several options of which only one is used: 0/1
means either 0 or 1.
tv_Airbrush size
Selects the airbrush and sets its radius. All commands beginning with “Air” refer to
the airbrush.
tv_AirPower power
Sets the airbrush power (in %)
tv_AirSpline x y
Defines the airbrush aspect as a spline. This is the equivalent of clicking in the
aspect curve of the Airbrush window to draw a spline. You set the coordinates of
the point where you would click, between (0,0) and (255,255).
tv_AirProfile x y
Defines the aspect of the airbrush point by point. The x parameter is the distance on
the horizontal axis and y is the intensity of the airbrush. The nearer x is to 255, the
closer you are to the center of the airbrush.
tv_AliasOff
Turns off anti-aliasing
tv_AliasOn
Turns on the antialiasing that acts on line smoothing, the edges of polygons, color
ranges and brush transformations.
tv_AreaDraw [cx,cy] [0/1]
Draws the filled polygon made up of the points that are in the area table (see
tv_AreaMove). If Cycle or Density modes are active, the (cx,cy) point gives the end
point of the vector line ((0,0) by default).
tv_AreaInit
Initializes the area table that is used to draw filled polygons.
User's Guide 3.6 US.QXD 3/11/99 3:58 PM Page 139
3.7 TVPaint commands
tv_AreaMove x y
Adds coordinates (x,y) to the table used to draw filled polygons. It is advised to
initialize this table each time you draw a new polygon.
tv_Background BLACK / COLOR R G B
Sets the background mode: Black or Color. If using Color, you must enter the RGB
component values for the color you want).
tv_BrushCut x1 y1 x2 y2 [0/1]
Cuts a rectangular brush from (x1,y1) to (x2,y2). Note the possibility to use either
the left mouse button (0) or the right mouse button (1). The left button copies what
you cut, whereas the right mouse button literally cuts the brush away from the
page, and fills the empty space with the background color.
tv_BrushInfo
Gives information about the current brush: length, height, X offset, Y offset and
type. The offset (X,Y) is the distance between the top right hand corner of the
brush and the point where the mouse pointer is. The type is a code that relates to
whether the brush is a built-in one, one cut out from the screen, or anything else.
tv_BrushMap
Transforms a mask (a text brush for example) into a real brush (so you can stretch
it, wrap it, etc.).
tv_BrushPoly [0/1]
Cuts out a brush using the polygon described in the area table (see commands
tv_AreaInit and tv_AreaMove). You may use the left mouse button to just copy the
polygon shape, or the right mouse button to literally cut the polygon away from the
page (the background color is used to fill the gap).
tv_BrushRestore
Reselects the last brush you cut out from the page (after you’ve used a built-in
brush for example).
tv_BrushRotate dx dy
Rotates the current brush. (dx,dy) are the coordinates of the vector giving the
rotation angle. The rotation angle is equal to zero when the vector is horizontal and
pointing to the right. (10,10) represents a rotation of 45Þ upwards.
tv_BrushStretch dx dy
Changes the size of the cut out brush.
tv_Chalk size
Selects the Chalk and sets its action radius.
139
User's Guide 3.6 US.QXD 3/11/99 3:58 PM Page 140
140
3.7 TVPaint commands
tv_Circle x y r [0/1]
Draws a circle with the center (x,y) and the radius r
tv_CircleFill x y r [cx,cy] [0/1]
Draws a filled circle with the center (x,y) and the radius r. If Cycle or Density
modes are turned on, the point (cx,cy) gives the endpoint of the vector line.
tv_Clear [0/1]
Clears the current layer with the background color by default (0) or with the current
color (1).
tv_Convolve33 a b c d e f g h i
Applies to the current layer the 3 x 3 convolution matrix whose 9 parameters are a,
b, c, d, e, f, g, h and i.
tv_Convolve55 a b c d e ... x y
(25 parameters in all)
Applies to the current layer the 5 x 5 convolution matrix whose 25 parameters are a
to y.
tv_CycleOff
Turns off the Cycle mode.
tv_CycleOn
Turns on the Cycle mode.
tv_DensityLevelX value
Lets you set the level of the X density curve. It is equivalent to drawing a uniform
X density curve. You simply set the height of the curve, between 0 and 255.
tv_DensityLevelY value
Lets you set the level of the Y density curve. It is equivalent to drawing a uniform
Y density curve. You simply set the height of the curve, between 0 and 255.
tv_DensityLineX x1 y1 x2 y2
Sets the X density curve. This command is equivalent to drawing a straight line in
the X curve. The coordinates give the start and end points of the line.
tv_DensityLineY x1 y1 x2 y2
Sets the Y density curve. This command is equivalent to drawing a straight line in
the Y curve. The coordinates give the start and end points of the line.
User's Guide 3.6 US.QXD 3/11/99 3:58 PM Page 141
3.7 TVPaint commands
tv_DensityOff
Turns off Density mode.
tv_DensityOn
Turns on Density mode.
tv_DensitySpline x y [0/1]
Lets you set the density curve as a spline. This is the equivalent of clicking inside
the display area of the Density window to set the point of highest density. Simply
give the (x,y) coordinates of that point between (0,0) and (255,255).
tv_DensityX x y
Lets you set points on the horizontal density curve. This is the equivalent of
clicking on the X density curve. You give a position (x,y) where x is the horizontal
position, and y is the density value at that point (values 0..255).
tv_DensityY x y
Lets you set points on the vertical density curve. This is the equivalent of clicking
on the Y density curve. You give a position (x,y) where x is the vertical position,
and y is the density value at that point (values 0..255).
tv_Dot x y [0/1]
Draws a point with the current brush at coordinates (x,y). You should be aware that
this will not necessarily be a one pixel dot, but be the imprint of the current brush.
If that is large, then you will get a very large “dot”.
tv_Ellipse x y a b [0/1]
Draws an ellipse with center (x,y), horizontal radius a, and vertical radius b.
tv_EllipseFill x y a b [cx,cy] [0/1]
Draws a filled ellipse with center (x,y), horizontal radius a, and vertical radius b. If
Cycle or Density modes are turned on, the point (cx,cy) gives the endpoint of the
vector line.
tv_FastLine x1 y1 x2 y2 r g b a
Draws a fast straight line from coordinates (x1,y1) to (x2,y2) and with color
(red,green,blue,alpha). This line will not be smoothed and will always be drawn in
Color mode, whatever the current drawing mode.
tv_FieldCopy [0/1]
Creates a “full” picture from individual fields in an interlaced image (such as one
extracted from a 60 fields per second video). The odd field is used by default (line
1 copied to line 2, line 3 copied to line 4,...). If parameter 1 is transmitted to the
tv_FieldCopy function, the even field is used (line 2 copied to line 1, line 4 copied
to line 3,...).
141
User's Guide 3.6 US.QXD 3/11/99 3:58 PM Page 142
142
3.7 TVPaint commands
tv_FieldDouble [0/1]
Creates a video interlaced image from two individual images (fields). Image 1 must
be in the spare layer and image 2 in the current layer before using this function.
The resulting interlaced image is composed of successive lines, by using first a line
from the spare layer, then the next line from the current layer, and so on. The
sampling order can be reversed if you use parameter 1 (taking first a line from the
current layer, then one from the spare layer,...). This interlaced image can be saved
to an animation recorder for example.
tv_Fill x y [cx,cy] [0/1]
Executes the Fill function from point (x,y) on the screen. If Cycle or Density modes
are turned on, the point (cx,cy) gives the endpoint of the vector line.
tv_Filter filename x1 y1 x2 y2 parameters
Executes the specified plug-in filter. The filename parameter is the real executable
filename, not the name with which the filter is listed in the TVPaint Filters
window. Coordinates (x1,y1) and (x2,y2) represent the opposite corners of the
rectangular zone in which the filter will apply. Specific parameters may then be
required. Consult your plug-in filters documentation for more details.
tv_FlipX
Flips the current layer horizontally.
tv_FlipY
Flips the current layer vertically.
tv_FixMotion
Smooths the picture vertically. It’s generally used to reduce interlace flicker for
interlaced display modes, and particularly on grabbed pictures.
tv_GetAPen
Returns 4 character strings that contain the Red, Green, Blue, and Alpha values of
the current color.
tv_GetBPen
Returns 4 character strings that contain the Red, Green, Blue, and Alpha values of
the background color.
tv_GetHeight
Returns the height of the working page.
tv_GetMouse
Returns a string with the (x,y) coordinates of the mouse.
User's Guide 3.6 US.QXD 3/11/99 3:58 PM Page 143
3.7 TVPaint commands
tv_GetPixel x y
Returns 4 character strings that contain the Red, Green, Blue, and Alpha values of
the color of the pixel (x,y) in the working layer.
tv_GetPixelLayer layer x y
Returns 4 character strings that contain the Red, Green, Blue, and Alpha values of
the color of the pixel (x,y) in the specified layer.
tv_GetUser
Returns a character string containing the name of the current user configuration.
tv_GetWidth
Returns the width of the working page.
tv_GhostLine a x1 y1 x2 y2
If a = 1, then this command draws a temporary line (using XOR logic to contrast
the line) from (x1,y1) to (x2,y2). If a = 0, it restores the original image under the
line. You can also use the command tv_ResetDisplay to restore the whole screen.
tv_Gouraud x1 y1 x2 y2 x3 y3 r1 g1 b1 255 r2 g2 b2 255 r3 g3 b3 255
Draws a smoothed triangular surface using the Gouraud method. You specify the
coordinates of the three points of the triangle, along with the color values for each
of the three points (RGB values). The surface is filled with a color range between
the three points. Its edges are not smoothed. Note that this command does not take
the current drawing mode into account.
tv_Handle Xoffset Yoffset
Repositions the handle of the mouse pointer on the current brush. (Xoffset, Yoffset)
become the new coordinates of the handle (the origin point is at the top left hand
corner of the brush).
tv_LayerControl layer state
Changes the state of a layer. You enter the layer you want to alter (A, B or C) and
its new state: On, Off, Red, Green or Blue.
tv_LayerCopy source destination
Copies the source layer (A, B or C) to the destination layer. Copying takes the
order of the layers into account. Layer A will always be applied in front of layers B
or C, whereas layer B will always be applied behind layer A, etc.
tv_LayerExchange source destination
Exchanges the source layer (A, B or C) with the destination layer.
143
User's Guide 3.6 US.QXD 3/11/99 3:58 PM Page 144
144
3.7 TVPaint commands
tv_LayerFetch
Loads a layer (saved with tv_LayerHold) to the current layer.
tv_LayerHold
Does a quick save of the current layer. This save is made into the default “temp”
directory of your system (eg. on Windows based systems, this is the “Temp”
directory used by Windows).
tv_LayerInfo layer
Returns information on the specified layer. This command lets you know if the
layer is selected or unselected; it tells you the type of display currently in place
(none, on, off, r, g or b) and the layer’s protection (locked or unlocked). With this
command, programs can know which layers are accessible and which have been
protected by the user.
tv_LayerKill layer
Destroys the specified layer (A, B or C).
tv_LayerMerge source destination
Copies the source layer (A, B or C) to the destination layer and erases the source
layer. Copying takes the order of the layers into account. Layer A will always be
applied in front of layers B or C, whereas layer B will always be applied behind
layer A, etc.
tv_LayerSet layer
Selects the specified layer (A, B or C) as the current one. It is immediately created
if it doesn’t exist.
tv_Line x1 y1 x2 y2 [0/1]
Draws a straight line from (x1,y1) to (x2,y2).
tv_LoadBrush filename
Loads the specified brush from disk. The filename must contain both the name of
the file and its complete path.
tv_LoadLayer filename
Loads the specified image from disk into the current layer. The filename must
contain both the name of the file and its path.
Windows example: “tv_LoadLayer C:\TVPaint\Images\logo.jpg”.
SGI example: “tv_LoadLayer /usr/people/username/tvpaint/images/logo.jpg”.
Amiga example: “tv_LoadLayer work:tvpaint/images/logo.jpg”.
tv_LoadPic filename
This is a duplicate function of tv_LoadLayer.
User's Guide 3.6 US.QXD 3/11/99 3:58 PM Page 145
3.7 TVPaint commands
tv_LoadProject filename
Loads the specified project from disk. The filename must contain both the name of
the file and its path.
Windows example: “tv_LoadProject C:\TVPaint\Images\logo.pro”
SGI example: “tv_LoadProject /usr/people/username/tvpaint/images/logo.pro”
Amiga example: “tv_LoadProject work:tvpaint/images/logo.pro”
tv_LoadSpare filename
Loads the specified picture from disk to the spare layer. The filename must contain
both the name of the file and its path.
Windows example: “tv_LoadSpare C:\TVPaint\Images\logo.jpg”
SGI example: “tv_LoadSpare /usr/people/username/tvpaint/images/logo.jpg”
Amiga example: “tv_LoadSpare work:tvpaint/images/logo.jpg”
tv_LockDisplay
Locks TVPaint’s display. This may be helpful to increase the speed of heavy duty
drawing functions (screen refreshing takes processor time). You must unlock the
display (tv_UnlockDisplay) when the drawing is over. You may temporarily unlock
a locked screen with the Space bar, so you can have a look at the drawing’s
progress.
tv_LockUser
Blocks access to the windows and the keyboard. Make sure you give control back
at the end of the program with the tv_UnlockUser command. Using this command
can speed up certain functions. Note that you can override this function by pressing
Alt + Del.
tv_Lut
Applies to the current layer the changes you have made to the Look Up Table of
the red, green and blue components. To use only the red look up table, you would
use the tv_LutR command, and so on.
tv_LutSet x y
Lets you set the Look Up Table curve. You give a point (x,y) where x is the
horizontal position on the curve (0...255) and y is the height of the curve at this
point (0...255). This command modifies the LUT’s Red, Green and Blue color
components. To modify only the red component, you would use the tv_LutSetR
command, and similarly, tv_LutSetG for green, and tv_LutSetB for blue.
tv_LutSpline x y
Lets you draw a spline curve in the LUT. You specify the coordinates (x,y) which
give the place where you would have clicked to get that spline. This command
modifies the splines for the Red, Green and Blue color components. To modify the
Red component only you would use the tv_LutSplineR command, and so on for the
other two colors.
145
User's Guide 3.6 US.QXD 3/11/99 3:58 PM Page 146
146
3.7 TVPaint commands
tv_MenuOff
Hides the main toolbox.
tv_MenuOn
Displays the main toolbox.
tv_MouseOff
Hides the mouse pointer.
tv_MouseOn
Displays the mouse pointer.
tv_Pen size
Selects a round pen of radius “size”.
tv_Pencil size
Selects the Pencil and sets its radius to “size”.
tv_Pers x y
Places the current brush at point (x,y) with the current perspective settings.
tv_PolySpline [0/1]
Draws the multiple spline as defined by the coordinates in the area table.
tv_PressureProfile x y
Defines a spline as the pressure sensitivity curve. This function is the equivalent to
clicking on the pressure curve in the Pressure window and drawing a spline. You
give the coordinates of the point you want to “click on”, between (0,0) and
(255,255).
tv_Quit
Quits TVPaint
tv_RangeC
Selects Centrifugal range mode
tv_RangeV
Selects Linear range mode.
tv_Rect x1 y1 x2 y2 [0/1]
Draws a rectangle from (x1,y1) to (x2,y2).
tv_RectFill x1 y1 x2 y2 [cx,cy] [0/1]
Draws a filled rectangle from (x1,y1) to (x2,y2). If Cycle or Density modes are
turned on, the point (cx,cy) gives the endpoint of the vector line.
User's Guide 3.6 US.QXD 3/11/99 3:58 PM Page 147
3.7 TVPaint commands
tv_ReqString string
Opens a dialog box (with the specified string printed in the title bar) where the user
can enter a character string. The command returns this user string to the program.
tv_ReqNum init min max string
Opens a dialog box (with the specified string printed in the title bar) where the user
can enter a number (“init” value used by default) which must be between the min
and max values. The command returns this number value to the program.
tv_Request string
Opens a dialog box with the specified string printed in the title bar and with two
buttons: Yes or No. Choosing Yes returns 1 to the program and 0 if No.
tv_ResetDisplay
Redraws the whole display (to erase ghost lines for example).
tv_SaveBrush filename
Saves the current brush to disk with the specified filename and the current format.
tv_SaveDisplay filename
Saves what is shown on the screen as a single image in the current format. The
screen contents will include all the layers that are being displayed and the
background. Layers with a specific color (R, G or B) displayed have their real
contents saved, however, not just the color mask.
tv_SaveLayer filename
Saves the current layer to disk with the specified filename and the current format.
tv_SaveMode formatname
Selects the format save mode: ilbm, ilbm12, deep, delta, jpeg, rendition, tga...
tv_SaveProject filename
Saves the current project to disk with the specified filename and the current format.
The project is made up of all the layers that exist (even if they are not displayed)
and the background.
tv_SetPenA R G B
Sets the current color to the specified RGB components.
tv_SetPenB R G B
Sets the current background color to the specified RGB components.
tv_SetColor n
Sets the current color to color n in the current palette (0...255).
147
User's Guide 3.6 US.QXD 3/11/99 3:58 PM Page 148
148
3.7 TVPaint commands
tv_SetCycle cyclenumber start end
Defines the specified color cycle (0 to 3) with start and end colors from the current
palette (0...255).
tv_SetDrawMode color / smooth / blur / smear ...
Sets the drawing mode.
tv_SetPalette n R G B
Sets color number n in the current palette to the given Red, Green, Blue values.
tv_SetPers a b g xc yc z
Sets the perspective coordinates. a,b,c are the rotation angles (in degrees) around
the alpha, beta and gamma axes. The coordinates (xc,yc) give the perspective’s
center, and z is the distance on the depth axis.
tv_SpareCopy
Copies the current layer to the spare layer.
tv_SpareKill
Kills the spare layer.
tv_SpareSwap
Swaps the current layer with the spare layer.
tv_Spline x1 y1 x2 y2 x3 y3 [0/1]
Draws a spline along the points (x1,y1) (x2,y2) (x3,y3).
tv_Tension t
Sets the tension of splines to t.
tv_Text x y 0/1 string
Writes the specified text string in the current font at coordinates (x,y). Note that the
mouse button to use is to be precised (0 for left, 1 for right).
tv_UpdateUndo
Copies the current layer to the Undo buffer. This is the only one of the commands
here that will affect the Undo buffer. If, after running a George program, you click
on Undo, then everything George has drawn will be undone in one pass. This
function lets you update the Undo buffer when you want, at the start of a program
for example.
tv_UnlockDisplay
Unlocks a previously locked display (with tv_LockDisplay).
User's Guide 3.6 US.QXD 3/11/99 3:58 PM Page 149
3.7 TVPaint commands
tv_UnlockUser
Unlocks user access to the keyboard and windows. Used in conjunction with
tv_LockUser.
tv_Version
Returns a character string containing the version number of the TVPaint program.
tv_vfBorder value
Defines the thickness of the border for vector fonts. This value is expressed in
pixels (default = 0).
tv_vfGetFont n
Selects the n’th’font from the working directory.
tv_vfItalic value
Defines the slope of the italics for vector fonts. This value is expressed in degrees
(default = 0).
tv_vfOutline value
Defines the thickness of the outline for vector fonts. The characters can be either
filled (with or without borders), or in outline (therefore only their edges are
shown). This value is expressed in pixels (default = 0).
tv_vfRotate value
Defines the angle of rotation for vector fonts. This value is expressed in degrees
(default = 0).
tv_vfScale value
Defines the horizontal scale of vector fonts. This value is expressed in percent
(default = 100). A 50% setting gives characters whose width is 50% of their normal
value.
tv_vfSetFont fontname
Defines which font is to be used. The font must be present in the system fonts
directory.
tv_vfSize value
Defines the size of vector fonts. This value is expressed in pixels (default = 40).
tv_vfSmooth value
Defines the smoothing value to be used on the edges of vector fonts.
tv_vfSpace value
Defines a fixed spacing for the font’s characters, in percent (default = 0). The
spacing is relative to the size you are using and it is the same for all characters.
149
User's Guide 3.6 US.QXD 3/11/99 3:58 PM Page 150
150
3.7 TVPaint commands
tv_vfStringSize string
Returns the length of the text brush which would be created if you used the
tv_vfText command (taking in account the specified string and all font settings).
tv_vfText string
Generates a text brush that spells the character string you specify and uses all the
current font settings.
tv_vfTracking value
Defines the tracking (variable spacing) for the characters. This value is expressed
in percent (default = 0). The tracking is relative to the size of font and it varies
according to the characters layout.
tv_WaitButton
Waits for the user to click a mouse button (either pressing or releasing one), and
returns to the program a character string containing b, x and y. (x,y) are the current
coordinates of the mouse pointer, and b is a code representing what happened with
the mouse buttons:
b=1
The left mouse button was pressed in.
b=2
The left mouse button was let go.
b=3
The right mouse button was pressed in.
b=4
The right mouse button was let go.
tv_Warn string
Opens a dialog box containing the specified message.
tv_WrapX 1/0
Enables or disables brush wrapping on the X axis.
tv_WrapY 1/0
Enables or disables brush wrapping on the Y axis.
tv_WritePixel x y R G B Alpha
Draws a pixel with colors R, G, B and transparency Alpha at coordinates (x,y).
Note that this command draws one pixel only, without taking drawing modes into
account. This command is faster than the equivalent tv_Dot command.
tv_ZDot
Draws a dot with the current tool or brush at coordinates (x,y). You should be
aware that this will not necessarily be a one pixel dot, but be the imprint of the
current brush. If that is large, then you will get a very large “dot”.
User's Guide 3.6 US.QXD 3/11/99 3:58 PM Page 151
3.7 TVPaint commands
tv_ZLine x1 y1 x2 y2 0/1 p1 p2
Draws a straight line from point (x1, y1) to point (x2,y2), with starting pressure p1
and ending pressure p2. Note that you must give the mouse button value 0 or 1
(left or right) with this command.
tv_ZSpline x1 y1 x2 y2 x3 y3 0/1 p1 p2
Draws a spline between points (x1, y1) (x2,y2) and (x3,y3) with starting pressure
p1 and ending pressure p2. Note that you must give the mouse button value 0 or 1
(left or right) with this command.
151
User's Guide 3.6 US.QXD 3/11/99 3:58 PM Page 152
152
3.8 Writing George programs
3.8 WRITING GEORGE PROGRAMS
To control TVPaint, all you have to do is send it commands (that start with “tv_”).
You could use C, BASIC, or even an Excel macro. The simplest solution however
is probably to use a George program. The George language is not particularly fast,
but it is flexible and very easy to use.
The best way to get used to George programs is probably to try the example
programs that come with TVPaint. Study them and make small alterations to them,
then run them and see the effects of your changes. All the George programs are
held in the “George” directory of TVPaint. External programs examples (written in
other languages) are in the “DDE” directory of TVPaint.
To create a George program, run a text editor (like Notepad on Windows based
systems) and type in one of the examples that follow. Save it to the “George”
directory of TVPaint giving its filename a “.grg” extension. Then, run it from
inside TVPaint. To do this, open the George window (by clicking in the main
toolbox on the icon that depicts a pilot’s cap). Click on one of the ten command
lines in the George window with the right mouse button, and an Editing Commands
window will appear. Click on the Select button (at the far right of the window). A
choice window will open. Select the name of your program and close the Editing
Commands window. To run the program, do what is requested by the icon to the
right of the command line (which tells you whether you need to draw a circle in the
page, a straight line, a pixel...).
Everything on a line that is after a double slash (//) is ignored. They are only
comments that have been put into the program to make it more understandable and
readable.
User's Guide 3.6 US.QXD 3/11/99 3:58 PM Page 153
3.8 Writing George programs
FIRST EXAMPLE
// All George programs must start with Param and Connect commands
Param None
// TVPaint doesn’t have to wait for any parameters to run this program.
// There’s no need to draw anything on screen, just double click on the
// command line.
Connect TVPaint Commands
tv_version
// Asks TVPaint to specify its real version number
tv_warn result
// Displays the result in a TVPaint message window
// End of first example
153
User's Guide 3.6 US.QXD 3/11/99 3:58 PM Page 154
154
3.8 Writing George programs
SECOND EXAMPLE
Param line
// TVPaint should wait for the coordinates of a line before running the
// program. The user must therefore draw a line to start the program.
Connect TVPaint commands
// This program draws an arrow of variable length.
Parse result command x1 y1 x2 y2 b
// Fetches the coordinates of the user’s line
if cmp(command, "Line") == 0
tv_warn "This program needs the coordinates of a line!"
exit
// If there are no coordinates for a line, warn the user and end the program.
end
// Calculation of various constants so as not to have to do them several times
// later.
a=(x2-x1)/4
b=(y2-y1)/4
c=(x2-x1)/8
d=(y2-y1)/8
tv_AreaInit
// we are about to draw a polygon: clear out the coordinates table into
// which our polygon’s coordinates will go.
tv_AreaMove x2 y2
// The first point is passed to the table
tv_AreaMove x2-b-a y2-b+a
// The second point is passed to the table
tv_AreaMove x2-d-a y2-b+c
// Etc...
tv_AreaMove x1-d y1+c
tv_AreaMove x1+d y1-c
tv_AreaMove x2-a+d y2-b-c
tv_AreaMove x2-a+b y2-b-a
tv_AreaDraw x2 y2
// Starts the polygon drawing
// End of Second example
User's Guide 3.6 US.QXD 3/11/99 3:58 PM Page 155
3.8 Writing George programs
THIRD EXAMPLE
Param Circle
// TVPaint should wait for the coordinates of a circle before running the
// program. The user must therefore draw a circle to start the program.
Connect TVPaint commands
// This program draws a clock showing the current time.
Parse result command x y r button
// Fetches the coordinates of the user’s circle.
if cmp(command, "Circle") == 0
tv_warn "This program needs the coordinates of a circle!"
exit
// If there are no coordinates for a circle, warn the user and end the program.
end
t=time
parse t h m s
// Fetches the hours (h), minutes (m) and seconds (s) of the current time.
m=m+s/60
// The seconds can slightly alter the minutes arm of the clock.
tv_Pen r/30
// Selects a pen proportional to the clock size.
tv_Circle x y r
// Draws the outline of the clock.
ang =360/12
d = r-(r/10)
for i=0 to 360-ang step ang
// Loop to draw the 12 hour markers on the clock
a=cos(i)*d
b=sin(i)*d
tv_dot x+a y-b
end
i=h*360/12
// Draw in the hours
d=r/2
a=sin (i)*d
b=cos (i)*d
tv_line x y x+a y-b
i=m*360/60
// Draw in the minutes
d=r-(r/8)
a=sin(i)*d
b=cos(i)*d
tv_line x y x+a y-b
// End of third example
155
User's Guide 3.6 US.QXD 3/11/99 3:58 PM Page 156
User's Guide 3.6 US.QXD 3/11/99 3:58 PM Page 157
4. Filters
TVPAINT
4
Filters
157
User's Guide 3.6 US.QXD 3/11/99 3:58 PM Page 158
User's Guide 3.6 US.QXD 3/11/99 3:58 PM Page 159
4. Filters
HOW TO USE THE FILTERS
Most of the filters will affect the whole layer you are working on. Few of them let
you choose only a certain part of your image that should be filtered. Did we forget
such a feature? Could we not program it? Not at all - TVPaint has an exceptional
range of functions that let you bypass the filters on certain parts of the screen.
Merge mode drawing, if you remember, lets you draw “holes” in the current layer
through which you can see the spare screen. In fact, it doesn’t so much make a hole
in the first screen as copy the part of the spare screen that comes under the brush to
the current screen.
So, you have a picture that you want to use one of the filters on: copy it to the spare
layer (by pressing Shift+j). Then apply the filter to the current layer and select
Merge Mode by pressing F4. Swap the current layer with the spare layer, by
pressing j, thus restoring the original picture. All you now need to do is draw over
the part of the screen you want filtered with whatever tool you like: rectangle,
circle, freehand, with the airbrush, or a custom brush, or the pencil...
Rather than simply defining a rectangular area over which the filter will act, we
have chosen the afore mentioned method because it lets you select exactly what
part of the picture should be filtered, with all the shape and density variations that
you could ever wish to use.
Using the Airbrush and drawing freehand is the best method when mixing images
(the original image, and the one to which the filter has been applied). This tool lets
you get the smoothest possible integration of filtered areas into your drawing, and
lets you retain a large degree of realism when working on pictures such as
photographs.
It is highly recommended to use density variations when merging with polygons
(rectangles, circles...). They let you vary how much the two images get mixed
together inside the polygons.
159
User's Guide 3.6 US.QXD 3/11/99 3:58 PM Page 160
User's Guide 3.6 US.QXD 3/11/99 3:58 PM Page 161
4.1 Filter: LUT
161
The curve represent
st
he
t
ransform at
ion t
o appl
y t
oa
S ource val
ue inordert
o get
t
he R esul
tval
ue.
255
R esul
t
0
S ource
4.1 LUT (LOOK UP TABLE)
This filter allows you to change graphically the Look Up Table. The LUT curve
represents, for any given color component, a transformation to be applied to that
component, and the resulting value. The Source value is on the horizontal plane,
and the Resulting value is on the vertical plane.
The color component on which the filter will act is selected with one of the little
buttons at the top of the LUT window. These are: Red, Green, Blue, Saturation,
Light, Density.
Look at the above example: With a diagonal line, the transformation is entirely
neutral: for each Source value, the Resulting value is exactly proportional to it.
However, if you pull the diagonal upwards, the transformation will give higher
resulting values than source values. If you were to apply that to the Light
component, then it would result in more brightness in the picture.
USING THE LUT
Select the component that you wish to act on by clicking on its button at the top of
the window (R, G, B, S, L or D) before defining a new curve. There are two curve
drawing modes: with the left mouse button, you draw straight lines, and with the
right mouse button, you draw a spline between the two reference corners.
255
User's Guide 3.6 US.QXD 3/11/99 3:58 PM Page 162
162
4.1 Filter: LUT
Click on the Apply button to apply the filter to the current layer. You can cancel the
effect of the filter by clicking on the Undo icon in the main toolbox.
EXAMPLES
255
STRONGER
Used with the (L)ight component, this curve will
lighten the picture whilst keeping the black and
white parts of the picture pure. Used with the
(S)aturation component, it will strengthen the
colors.
0
255
255
MORE CONTRAST
Used with the (L)ight component, this curve will
increase the contrast of the picture. Dark colors will
become black (the 0 level at the bottom of the
curve) and very light colors will become white (the
level at the top of the curve). The rest of the colors
will range between these two extremes.
0
255
User's Guide 3.6 US.QXD 3/11/99 3:58 PM Page 163
4.1 Filter: LUT
ALL OR NOTHING
163
255
Used with the (L)ight component, this curve will give the
maximum contrast possible: every point on the left side
of the curve will go black, and every point to the right of
the curve will go white. This is the most radical way of
increasing contrast. The picture is made up of only pure
colors: white, black, red, green, blue, yellow, cyan and
magenta. There will be no more intermediary greys, no
more oranges; it’s all or nothing, black or white, red or
yellow. You can alter the effect by moving the curve to
the right or to the left.
0
255
0
255
0
255
255
LESS CONTRAST
Used with the (L)ight component, this curve will reduce
the contrast of your picture. Dark colors are lightened
somewhat, and light colors are darkened a bit, and colors
in between remain pretty much the same. You can
compare this curve to the first one (Stronger) where the
intermediary colors were altered quite a lot, whilst light
or dark colors stayed more or less the same. It is also
symmetrically opposite to the “More Contrast” curve.
INVERSE
255
Used with the (L)ight component, this curve will make
the image into a negative of itself.
User's Guide 3.6 US.QXD 3/11/99 3:58 PM Page 164
164
4.1 Filter: LUT
STRANGE
255
Used with the (L)ight component, this curve will
falsify the colors of your picture. Half the colors are
inverted, and the contrast of other half is very much
increased.
0
255
User's Guide 3.6 US.QXD 3/11/99 3:58 PM Page 165
4.2 Filter: Chroma key
4.2 CHROMA KEY
This filter uses chrominance values to make the
current layer transparent. It more or less alters
the density of the pixels according to the
saturation of a pure color. Not to be confused
with the Color key filter (which acts relative to
the proximity with a color) and the Luma key
filter (which acts relative to the luminance).
Here, you select a pure color and all the pixels
that “contain” that color will be made more or
less transparent.
In video work, the chroma key is usually used with the blue color. Here, it’s
possible to use any of the pure colors (red, green, blue, cyan, magenta, yellow).
To use this filter, you must first select the pure color that will become transparent.
Click on the horizontal strip that shows the spectrum of saturated pure colors. You
can also click on the little color cell that then lets you select a color from the
screen. Then, all you need to do is click on the Apply To Layer button, and the filter
will be applied. There are three parameters that set the effect of the filter: Range,
Fade Min, and Fade Max.
Range: Defines the range of colors over which the filter will act. If you select pure
blue, with value 0, the filter will only act on pure blue colors. With a range of 20,
the 20 closest colors (ranging towards cyan on one side, and magenta on the other)
will also be taken into account. Note that this value affects the width of the cursor
inside the color strip.
Pixels in your picture will rarely contain the exact selected pure color. They can
use the same color, but with lower saturation. They are likely to be slightly paler, or
darker. Pure colors have maximum saturation (255) since they are saturated 100%
by themselves. Intermediary colors, greys or pale colors, have lower saturation
values. You can select what variations in saturation are tolerated by the filter.
Fade min: Saturation value below which colors become completely opaque
(density = 255). The pixels no longer have enough of the reference color, so they
stay opaque.
Fade max: Saturation value above which colors become completely transparent
(density = 0). The pixels have enough of the reference color to be totally
transparent.
165
User's Guide 3.6 US.QXD 3/11/99 3:58 PM Page 166
166
4.2 Filter: Chroma key
Between these two values, transparency varies in a linear manner. A pixel whose
saturation is half way between the Min and Max values will be 50% transparent
(density = 128). This allows for smoother transitions between opaque and
transparent pixels.
This filter can be interrupted by pressing the Delete key.
Color spectrum (all colors)
Resulting density curve
255
P ure col
ors
(ful
l
y sat
urat
ed)
R
Y
G
C
B
M
R
F ade M ax
F ade M in
Bl
ack orw hit
e
(no sat
urat
ion)
0
0
Chosen col
or.
N eighboring col
ors are
m ore orl
ess t
aken int
o
accountdepending on
t
he R ange val
ue.
255
R esul
t
ing densit
y
User's Guide 3.6 US.QXD 3/11/99 3:58 PM Page 167
4.3 Filter: Color Key
167
4.3 COLOR KEY
This filter makes transparent all pixels close to
a reference color. This differs from the Chroma
key filter, which works with the saturation of a
pure color, whereas the Color Key filter acts
around a single specified color, whether it be
pure or not. The Luma Key filter bases its
actions around the luminance, or brightness of
the pixels. With the Color Key filter, you select a color and the filter will make
make similar colors more or less transparent.
To use this filter, you must first select which color will become transparent. Click
on the little colored button and pick your reference color from the current layer.
Click then on the Apply to Layer button to run the filter. There are two parameters
you can set to change how the filter acts: Range and Fade.
Range: Defines the variation from the reference color under which the colors will
be totally transparent (and over which they will be totally opaque). If you select a
pure red color and a range of 0, then only that red color will be filtered. With a
range of 20, slightly orange or violet reds will also become completely transparent.
Fade: Lets you smooth out the transition between opaque and transparent pixels. It
avoids sudden transitions between the colors in the transparent range (those close
to the reference color), and those that do not enter into your selected range and thus
remain opaque. The Fade parameter lets you set the distance over which colors get
progressively more transparent. Colors will only be completely transparent over the
distance Range + Fade.
You can interrupt this filter by pressing the Delete key.
Color Key filter curve
P ix eldensit
y aft
erfil
t
er
t
ransform at
ion.
255
0
F ade
R ange
R ange
F ade
0 (reference col
or)
D ist
ance t
ot
he reference
col
or.
User's Guide 3.6 US.QXD 3/11/99 3:58 PM Page 168
168
4.4 Filter: Luma Key
4.4 LUMA KEY
This filter makes transparent all pixels whose
luminance is close to a given value. Don’t
confuse it with the Chroma key filter, which
bases its action around the relative saturation of
a pure color, or the Color key filter, which
works with pixels close to any reference color.
The Luma key filter takes account of the
luminance, or luminosity value of pixels. You
select a particular luminance and all the pixels
whose luminance is “close” to this value will be made more or less transparent.
To use this filter, you must first select which luminance will become transparent.
To do this, click on the luminance spectrum strip (that ranges from black to white)
or click on the Pick button to select the luminance of a pixel in the current layer.
Click then on the Apply to Layer button to run the filter. There are two parameters
you can set to change how the filter acts: Range and Fade.
Range: Defines the variation from the reference luminance under which the colors
will be totally transparent (and over which they will be totally opaque). If you
select a grey color and a range of 0, then only that color will be filtered. With a
range of 20, slightly lighter or darker greys will also become fully transparent.
Fade: Lets you smooth out the transition between opaque and transparent pixels. It
avoids sudden transitions between the colors in the transparent range (those close
to the reference luminance), and those that do not enter into your selected range
and thus remain opaque. The Fade parameter lets you set the distance over which
colors get progressively more transparent. Colors will only be completely
transparent over the distance Range + Fade.
Luma Key filter curve
P ix eldensit
y aft
erfil
t
er
t
ransform at
ion.
255
0
F ade
R ange
R ange
F ade
0 (reference l
um inance)
D ist
ance t
ot
he reference
l
um inance.
User's Guide 3.6 US.QXD 3/11/99 3:58 PM Page 169
4.5 Filter: Convolutions
4.5 CONVOLUTIONS
A convolution is a “magic formula” that
can make an image sharper, or more
blurred, can give it depth, or just extract
its outlines. It calculates new values for
each pixel based on the surrounding
pixels. This new value is simply the
average of the pixel’s color and the
colors of the pixels next to it. The
Convolutions filter can weight the
surrounding pixels differently
(coefficients).
Varying
these
coefficients and arranging their layout
around the current pixel can give rise to
some very differing effects. The
simplest representation of these
coefficients is a 3 x 3 matrix (takes in
account only immediate neighboring pixels) or a 5 x 5 matrix (pixels further away).
In the matrix, you enter the different weightings that you want to apply to each
neighboring pixel so they can have more or less influence on the new value for the
central pixel.
With the 3 x 3 matrix:
a b c and the on screen pixels: v1 v2 v3,
d e f
v4 v5 v6
g h i
v7 v8 v9
V, the new value of the pixel currently being processed (the central pixel, with start
value v5), is obtained by working out the weighted value of all the neighboring
pixels: the sum of the products of all the values of the pixels multiplied by their
particular coefficients, or:
V = a . v1 + b . v2 + c . v3 + d . v4 + e . v5 + f . v6 + g . v7 + h . v8 + i . v9
a+b+c+d+e+f+g+h+i
That’s the theory; what matters is the result, and the examples that follow will start
you down a few paths worth exploring. All you have to do is enter the coefficients
into the appropriate matrix slots then click on the Apply button to start the
calculation. You can also load or save a convolution matrix to disk with the Load
and Save buttons. Load up some examples, or input the example values yourself.
169
User's Guide 3.6 US.QXD 3/11/99 3:58 PM Page 170
170
4.5 Filter: Convolutions
CONVOLUTION MATRICES EXAMPLES
The convolution functions are very useful, like making a digitized picture clearer,
or creating what looks like a stone carving at the touch of a button.
Blur: Each pixel contains a simple average of the surrounding pixels. It is in fact
more efficient to use either the Smooth filter or the Blur tool to obtain this effect,
but this example should help to make you understand the effect of the
convolutions.
1
1
1
1
1
1
1
1
1
More blurred: Here, the neighboring pixels count for more than the central point:
the blurring gets more intense.
2
2
2
2
1
2
2
2
2
Contours: This convolution extracts the contours of the image. Ranges of similar
colors will turn black, and the borders between two areas will show up lighter. The
more color varies from pixel to pixel, the lighter the contour will become. If you
make the image negative, the effect will be different.
0
1
0
1
-4 1
0
1
0
The rule that lets you show up contours is that the center value should be the
negated sum of all the surrounding values. In the above example, the surrounding
pixel values 1+1+1+1 = 4. Therefore, the central point = -4. A variation of this
could be:
1
2
1
2
-12 2
1
2
1
Sharper: This convolution increases the contrast between each pixel. Be careful:
the sharper you make an image, the more you show up its imperfections (grain,
noise...). To sharpen an image, you vary the contours convolution matrix a little.
The closer the central value is to its “pivoting point” (the negated sum of the
surrounding values), the greater the sharpening effect will be. The further away
from this pivoting point you go, the less the sharpening effect will be.
0
1
0
1
-5 1
0
1
0
User's Guide 3.6 US.QXD 3/11/99 3:58 PM Page 171
4.5 Filter: Convolutions
Very powerful variation:
1
2
1
2
-13 2
1
2
1
Softer variation:
1
2
1
2
-16 2
1
2
1
Depth: This convolution works like a low angled light ray hitting the image.
Ranges of similar colors will go unaltered, while the borders between different
colored areas will be lightened or darkened depending on their position relative to
the light source. The better defined the border is, the more it will be shown up,
either darkened or lightened. You define the position of the light source by placing
positive and negative values symmetrically around the central point. The light
comes from the positive side. In the following example, light comes from the top
left hand side:
1
0
0
0
1
0
0
0
-1
Or a more powerful variation, with the light coming from the bottom
0
-2 0
0
1
0
0
2
0
You aren’t limited to these few examples. All variations are possible, like mixing
together the outline and depth effects:
2
0
0
0
0
0
0
0
-2
Between the 3 x 3 matrices and the 5 x 5 matrices there is only a difference of
scale. The 5 x 5 matrix can take into account a much greater number of pixels (25
instead of 9), and lets you obtain more precise and subtle effects (with smoothing,
for example).
Contours with smoothing:
1
2
3
2
2
3
4
3
3
4
-60 4
2
3
4
3
1
2
3
2
1
2
3
2
1
Very accentuated depth, with smoothing:
2
0
0
0
0
0
3
0
0
0
0
0
1
0
0
0
0
0
-3 0
0
0
0
0
-2
You can interrupt the processing of this filter by pressing the Delete key. To get
back the part of the screen that has already been processed, simply click on the
UnDo button.
171
User's Guide 3.6 US.QXD 3/11/99 3:58 PM Page 172
172
4.6 Filter: Bump
L ightsource direct
ion.
P ow erof t
he fil
t
er.
S m oot
hing val
ue.
A ppl
y set
t
ings t
ot
he currentl
ay er,
w it
h an unidirect
ionall
ightsource.
Cent
ercoordinat
es of t
he radiat
ing
l
ightsource.
Pl
ace l
ightsource cent
eron current
l
ay er.
A ppl
y set
t
ings t
ot
he currentl
ay er,
w it
h a cent
rall
ightsource radiat
ing
out
w ard.
4.6 BUMP
This filter uses the spare layer to give an impression of depth in the current layer.
The varying luminance of the image in the spare layer creates the depth. Wherever
the spare layer is brighter, you get a “bump” on the current layer, and wherever it is
darker, you get a hollow.
It’s as if your current layer were made of bendable metal, and it gets deformed by
pressing it onto a contoured mask (the spare layer). A low angled light source
placed to the side of your picture will then show up these differences in depth. With
this filter, you can get standard “embossing” effects, but you can also simulate the
grain of paper, the pattern of cloth, etc.
Draw a completely grey screen, with a white square and a black circle on it. Press
the j key to swap the current layer with the spare layer. Load an image (or Project),
and apply the Bump filter. Over the square you drew, the picture looks raised, and
over the circle, it looks hollow.
The Bump window lets you use two variations of the same filter: one with an
unidirectional light source (whose angle you can set) and the other with a radiating
light source (whose center you can set either through coordinates, or by placing it
on the screen).
User's Guide 3.6 US.QXD 3/11/99 3:58 PM Page 173
4.6 Filter: Bump
When applying the unidirectional light source, the center coordinates are ignored;
when applying the radiating light source, the directional setting is ignored.
There are two parameters that set the effect of the filter:
Depth: Controls the power of the filter, how far raised or hollowed out the bumps
get.
Smooth: Makes the contours of bumps and hollows more or less smoothed out.
This parameter softens the “mechanical” aspect of the filter, and adds realism to the
effect. Note that smoothing tends to lessen the depth effect somewhat.
You can interrupt the processing of this filter by pressing the Delete key.
173
User's Guide 3.6 US.QXD 3/11/99 3:58 PM Page 174
174
4.7 Filter: Flip horizontal
4.7 FLIP HORIZONTAL
This filter simply flips the screen around the axis of the horizontal plane. Note that
this filter works directly: you click on the button and the filter runs without opening
a needless Settings window.
4.8 FLIP VERTICAL
This filter simply flips the screen around the axis of the vertical plane. Note that
this filter works directly: you click on the button and the filter runs without opening
a needless Settings window.
4.9 LUMIX
This filter uses the spare layer to alter the luminance of the current layer pixel by
pixel. If the luminance of a given pixel in the spare layer is greater than average
(128), then the corresponding pixel on the current layer will be lightened. If the
pixel on the spare layer is darker than average (128), then the corresponding pixel
on the current layer will be darkened.
The best example is to try this filter: load an image, press j to swap it with the
spare layer, draw on the current layer a color range or a texture (wood, sand,
water...) and apply the Lumix filter.
You can add to the effect by running the filter several times.
Note that this filter works directly: you click on the button and the filter runs
without opening a Settings window. You can interrupt the processing of this filter
by pressing the Delete key.
User's Guide 3.6 US.QXD 3/11/99 3:58 PM Page 175
4.10 Filter: Mosaic
4.10 MOSAIC
This filter pixellizes the current layer. The
image is reduced to large pixels whose size
(width = Size X, height = Size Y) is defined in
the Settings window that appears. You run the
filter by pressing on the Apply Mosaic button.
There is also an option to apply smoothing
between the large pixels. The resulting irregular
blur can be quite interesting. You get this variation by clicking on the Apply
Smooth Mosaic button.
You can interrupt the processing of this filter by pressing the Delete key.
4.11 NEGATIVE
This filter turns the image on the current layer into a negative of itself. Run it
again, and, of course, you will get back your original positive image.
Note that this filter works directly: you click on the button and the filter runs
without opening a Settings window. You can interrupt the processing of this filter
by pressing the Delete key.
4.12 NOISE
This filter adds “noise” to the current layer.
This noise is generated by dispersing the pixels.
Each pixel is shifted in a random direction,
along a variable number of pixels. The Shift
parameter sets the maximum distance a pixel
will be shifted along. The Intensity parameter
defines the percentage of pixels that will be
shifted.
To apply the filter click on the Apply button. You can interrupt the processing of
this filter by pressing the Delete key. To get back the part of the screen that has
already been processed, simply click on the Undo button.
175
User's Guide 3.6 US.QXD 3/11/99 3:58 PM Page 176
176
4.13 Filter: Panning
4.13 PANNING
This filter shifts the current layer (or all the
layers of your project) along a set distance.
You can set the horizontal distance (Panning
X) and the vertical distance (Panning Y), then
apply the filter to the current layer by
pressing on Apply to Layer, or to the whole
project by pressing on Apply to project.
The Set Panning button lets you set the
panning coordinates graphically. Click on it,
and you then draw a line on the image to represent the movement you want. The
Panning X and Panning Y coordinates are updated accordingly.
When you apply the Panning filter, all the parts of the image that go off the screen
will reappear on the other side. If you move an image 100 pixels to the right, the
100 pixels that are on the right hand side of the screen will be shifted off the
screen, but they will reappear on the left. The image is not therefore changed, no
pixels are ever lost, they are just shifted. If you shift a picture 10 pixels to the right,
then shift it 10 pixels to the left, it will be identical to the picture you started with.
This filter is extremely useful for placing a layer very accurately in relation to
another layer. If you’ve drawn an object on layer A, and a background on layer B,
and the object isn’t positioned quite right, simply select the Panning filter and
move the object by shifting Layer A.
Using the Panning filter lets you avoid cutting the object out as a brush, moving it,
then placing it back on the screen; these tasks can be slow with large objects, and
large brushes can use up a fair bit of memory.
Finally, you should be aware that the Panning filter is particularly suited for editing
pictures that are to be used as 3D mapping objects. This type of image needs to be
able to “tile” properly and seamlessly. The Panning filter lets you control and edit
the image under all its different angles, and lets you get its joining edges
pixel-perfect. Draw an initial object, then shift it to the right by around half its size.
The right border moves to the middle of the image, and the join between the right
border and left border is now visible in the center of the screen. You can now
touch-up the seam between the borders to give the best possible transition, and
there you have it: a picture that tiles perfectly on the horizontal plane. You can now
map this image onto, say, a cylinder, knowing that it will not look at all shabby or
badly designed. Should you need to, you can also use this to make a perfect vertical
fit.
User's Guide 3.6 US.QXD 3/11/99 3:58 PM Page 177
4.14 Filter: Print dots
4.14 PRINT DOTS
This filter applies a printing dot matrix to the
current layer. There are two variations: Apply
with color, and Apply with Black & White. The
maximum size of the printing dots is set with
the Size parameter.
With the black and white filter, the image gets
transformed into a series of black dots with various sizes, interspaced at regular
intervals on a white background. With the color filter, the image gets turned into a
series of cyan, magenta, yellow and black dots that are interspaced at regular
intervals on a white background.
This filter tends to reduce the quality of the image you are filtering. The bigger the
dots are, the more the detail of your picture will be lost. Make sure you don’t set
too high a Size value.
You can interrupt the processing of this filter by pressing the Delete key.
4.15 SHADOW
This filter generates a shadow across the current
layer. The shadow is applied under the current
layer (like Behind mode does). Therefore, the
shadow will only be seen through transparent
parts of the picture. If you generate a shadow on
a completely opaque layer, it will have no
visible effect, as it will be hidden under the
picture.
To test this filter, it is best to use a layer that is
transparent and that has a small object drawn on
it. It is also a good idea to have a shadow color
that is different to the Background color (as it’s
rather difficult to see a black shadow on a black
background!), To apply the filter, simply click
on the Apply to layer button.
177
User's Guide 3.6 US.QXD 3/11/99 3:58 PM Page 178
178
4.15 Filter: Shadow
There are several parameters that let you control the Shadow filter’s effect:
The Light direction is set on the dial at the top of the Settings window. It changes
the position of the shadow. If the light comes from the top left hand side, then the
shadow will be on the bottom right hand side.
The Color of the shadow is shown in the colored cell. Click on it, then click in the
screen or in the main toolbox’s palette to set a new color for the shadow.
The Distance parameter set the distance in pixels between the object and its
shadow.
The intensity of the shadow is defined as a Power percentage. A 50% shadow will
be 50% transparent: you will see half shadow, half what is under the shadow (a
picture in the background, or the background color).
Finally, the Smooth parameter lets you blur the shadow a little to make it blend in
naturally. The higher you set it, the more blurred the shadow will get (you will only
very rarely use a smooth value greater than 15). This blurring of the shadow adds
realism and depth to it. Note that when using Smooth, the intensity of the shadow
will tend to fall a little. Don’t hesitate to increase the intensity a bit if the blurred
shadow seems too transparent to you. You can also apply the filter several times
over.
This filter generates shadows, but can also be used to give neon or
phosphorescence effects. For example, choose white as the shadow Color, set the
Power to 100%, Distance to 0, and Smooth to at least 4 or 5. The shadow is
generated just under the object, but the smoothing will make it spill out a little: a
white halo now surrounds the object. You can apply the filter a second time (and
maybe reduce the Smooth value a little) to intensify the halo.
You can interrupt the processing of this filter by pressing the Delete key.
User's Guide 3.6 US.QXD 3/11/99 3:58 PM Page 179
4.16 Filter: Smooth
4.16 SMOOTH
This filter makes the image smoother, or
more blurred. The higher you set the Smooth
parameter, the more blurred it will get.
Making the first layer or the background
layer blurred increases the apparent depth of
field and emphasizes the contents of the layer
that stays sharp.
Apply the filter to the current layer by clicking on the Apply to layer button. You
can also make only the density of the current layer blurred by clicking on the Apply
to density only button. You should be aware that doing this will eat up the contours
of your objects; but the insides stay intact.
You can interrupt the processing of this filter by pressing the Delete key.
179
User's Guide 3.6 US.QXD 3/11/99 3:58 PM Page 180
180
4.17 Filter: Spare mixer
4.17 SPARE MIXER
This filter gives you access to several
functions using the spare layer.
Add spare before: Copies the contents of the spare layer on top of the current layer.
The contents of the current layer will therefore only be visible where the spare
layer is transparent.
Add spare behind: Copies the contents of the spare layer under the current layer.
The contents of the spare layer will therefore only be visible where the current
layer is transparent.
Add density spare: Adds the density of the spare layer to that of the current layer.
Clear the screen and draw a circle of any color in the middle of it. Press j to move
this drawing to the spare layer. Load a picture into the current layer and apply the
filter. All the picture disappears except a circle in the middle of the current layer.
Sub density spare: Subtracts the density of the spare layer to that of the current
layer. Clear the screen and draw a circle of any color in the middle of it. Press j to
move this drawing to the spare layer. Load a picture into the current layer and
apply the filter. A circular hole appears in the middle of the current layer.
These two last functions let you use the spare layer’s picture as a mask for the
current layer. Try these two functions again, but this time draw a circle with a
density range instead of an opaque one. Also, try drawing freehand with the pen
and the airbrush.
User's Guide 3.6 US.QXD 3/11/99 3:58 PM Page 181
4.18 Filter: Tornado
D efinit
ion of t
he circul
ararea affect
ed
by t
he fil
t
er,com m on t
o bot
h Twirl
and W ave.Itis m ade up of t
he cent
er
coordinat
es (x ,y )and t
he radius.
G raphicaldefinit
ion of t
he circul
ar
area.
Twirlangl
e of rot
at
ion.
A ppl
y TwirlF il
t
erbut
t
on
N um berof W aves
A m pl
it
ude (dept
h of W aves)
A ppl
y W aves F il
t
erbut
t
on
4.18 TORNADO
Two for the price of one! Tornado combines two filters that use similar active area
parameters but that have differing effects. The active area is defined by its center
coordinates and its radius. The processing of both the Twirl and Wave filters can be
aborted using the Delete key.
TWIRL
This filter makes the image inside the active area rotate around its center. Set the
angle of rotation and apply the filter by pressing on the Apply Twirl to layer button.
The pixels are put through decreasing rotation from maximum angle (Angle value)
at the area’s center to no rotation at all at the area’s outer limit.
This filter lets you bend the picture (with a fairly low angle, like 45Þ) or wrap it
around itself in a spiral (with a more severe angle, like 360Þ or 1000Þ). It’s worth
trying it out on a picture of someone’s face.
WAVE
This filter generates concentric waves inside the active area. The effect is
somewhat like that of the concentric waves that appear when you throw a stone
into still water. You set the number of waves and their maximum amplitude. As
you go towards the edge of the active area, so the amplitude will tend to drop,
becoming nil on the outer edge.
181
User's Guide 3.6 US.QXD 3/11/99 3:58 PM Page 182
182
4.19 Filter: Video fix motion
4.19 VIDEO FIX MOTION
This filter smooths pictures vertically for proper use in video work.
Video pictures are displayed in two sections: all the even lines of the picture first,
then all the odd lines (then the even ones of the next frame, then its odd ones, etc.).
Normally, this interlacing of even and odd lines is not visible, as it is compensated
by the blurring of the images and the high frame rate of the displaying device. But
when the images have very high contrasts, the sudden passing from dark to light
sections causes a flickering that is symptomatic of the video signal.
Computer generated pictures, that are often very sharp, tend to flicker when passed
to video. In the same way, when you capture a video image, it will often be
“chopped” horizontally, with the even and odd lines slightly skewed.
In both these cases, this filter is the solution: it mixes together even and odd lines.
It generates a smoothing on the vertical plane only, which makes pictures a lot
more stable when passed to video. Similarly, video screen captures become
coherent again (although sometimes at the cost of a visible blurring).
Note that this filter works directly: you click on the button and the filter runs
without opening a Settings window. You can interrupt the processing of this filter
by pressing the Delete key.
User's Guide 3.6 US.QXD 3/11/99 3:58 PM Page 183
4.20 Filter: Extended LUT
183
4.20 EXTENDED LUT
This filter extends the abilities of the Look Up Table filter (see page 161). The
functions used to modify the curve are simply different. Instead of changing the
curve by hand, two sets of sliders let you set it precisely. Also, this filter contains a
display to preview the effect of any changes you make.
By moving the sliders on the left of the window, you will
change the LUT curve (in the center of the window). The effect
of any changes you make is shown in the Preview window on
the right. The sliders are grouped together under Brightness and
Contrast. Each group has three sliders, (S)mall, (M)edium and
(H)igh. Each slider acts on one of the three control points of the
curve.
H
M
S
The Brightness sliders change the position of the control points on the curve.
The Contrast sliders change the slope of the tangents of the curve’s control points.
The Constraint button lets you retain the coherence of the curve; it forbids it to flip
over at the control points when you alter its parameters.
User's Guide 3.6 US.QXD 3/11/99 3:58 PM Page 184
184
4.20 Filter: Extended LUT
The simplest way to understand how this filter works is to try it out. Move the
sliders while looking at the changes such movements make to the curve, and their
effect on the preview display. The changes you can make with the sliders are more
accurate than those made with the LUT filter, though they work using the same
principles.
The other buttons available in the window are:
Reset: Sets all the sliders back to their original positions (i.e. in the center)
Load and Save: These buttons let you load and save LUT settings for future use.
Click on the Preview window to update it after changing the picture with a drawing
tool or another filter.
Apply: This button lets you apply the LUT curve to the current layer.
4.21 PLUG-IN FILTERS
Plug-in filters allow users to add custom functions to TVPaint. Many standard
filters are included with TVPaint. But, until now, only TVPaint programmers were
able to create new filters. It is now possible for third-party companies and
developers to create plug-in filters that can be used with TVPaint to apply some
effects on pictures, to add new drawing modes, new tools or new functions.
Plug-in filters appear as new filters in the Filters window. By default, plug-in filter
names start with an underscore (_). To use a plug-in filter, click on its name. The
Settings window of the selected plug-in filter appears. Its contents and aspect
depend on the purpose of the plug-in filter. A help file is supplied with each plug-in
filter. To read this help file, use the “_Help” plug-in filter.
For programmers who want to create plug-in filters, a development kit is available.
This kit contains source codes for interface functions, documentation and a
detailled plug-in example. To obtain this kit, contact CiS.
CiS
Europarc
14 avenue Hertz
33600 PESSAC - FRANCE
Fax: (+33) 56 362 846
Compuserve: 100101,2465
For more information on plug-in filters configuration, see chapter 2 of the Getting
Started manual.
User's Guide 3.6 US.QXD 3/11/99 3:58 PM Page 185
Appendix A: Textures in the windows
A-1
TEXTURES IN THE WINDOWS
All windows and toolboxes of TVPaint can display textures in background, behind
the buttons and the controls. You can change the current texture if you want. To do
that, you need to edit the configuration file you’re using. Find the line
“PATTERN=x” and replace “x” with the number of the texture you want (see
below). Note that texture #2 (not displayed below) corresponds to a plain grey
background.
0: G rainy w it
h hol
l
ow s
1: G rainy w it
h bum ps
3: TVPaintl
ogo
4: W ooden boards
5: Cracked l
eat
her
6: F l
ow erpow er
7: Carved fl
ow ers
8: Tal
lgrass
9: W etsand
User's Guide 3.6 US.QXD 3/11/99 3:58 PM Page 186
User's Guide 3.6 US.QXD 3/11/99 3:58 PM Page 187
Appendix B: Keyboard shortcuts
DRAWING FUNCTIONS:
a
Shift + a
b
Shift + b
c
cc
d
dd
e
ee
f
j
Shift + j
Shift + k
m
<>
p
q
qq
r
rr
s
t
v
;
airbrush
airbrush settings window
brush
restore last brush
circle
filled circle
freehand line
filled shape
ellipse
filled ellipse
fill
display spare layer
copy current layer to spare layer
clear screen
zoom
increase and decrease zoom magnification
palette
spline curve
continuous splines
rectangle
filled rectangle
dotted line
text
straight line
pick a color
MODES:
F1
F2
F3
F4
F5
F6
F7
F8
F9
Color, Stamp
Replace, Behind
Erase, Pantograph
Merge, Impress
Shade, Light
Colorize, Tint
Grain
Smooth, Blur
Smear, Shift
B-1
User's Guide 3.6 US.QXD 3/11/99 3:58 PM Page 188
B-2
Appendix B: Keyboard shortcuts
BRUSH:
w
x
y
z
+h
Shift + h
Shift + x
Shift + y
Shift + z
:
forces the display of large brushes
inverts the brush horizontally
inverts the brush vertically
rotates the brush by 90Þ
change the size of the brush
halve brush size
double brush size
double brush horizontally
double brush vertically
stretch brush
select pen with size 1
OTHER FUNCTIONS:
Shift + l
Shift + s
Shift + q
Space
F12
u
Shift + u
n
Ctrl
Tab
~
Del
Shift+Pen
|
[ ]
Esc
load project
save project
quit TVPaint
toggles main toolbox on/off
close all windows
UnDo
ReDo
swaps background color with current color
With the Brush cut and Rectangle tools, forces a
square cut. When loading a Brush, forces it to keep
its original proportions. Otherwise, it turns repetition
mode on/off.
turns cycle mode on/off
turns mask mode on/off
aborts the current function
equivalent to right mouse button
turns coordinates on/off
inverts the whole screen horizontally or vertically
updates the UnDo buffer
User's Guide 3.6 US.QXD 3/11/99 3:58 PM Page 189
Index
A
Airbrush
84
B
Background color 102
Behind
104
Blur 107
Brush
43
Brush
cutting out
57
pointer 91
recut
57, 91
text 61
tool
86
transformations
88
wrapping
69
Bump 172
C
Centrifugal
77
Chalk
82
Chroma key
155
Circle
53
Clear 62
Clipboard
117
Color
cycling
71
density
67
key
167
mode
103
palette
93
ranges
65
spectrum
95
Colorize
106
Concept
43
Configuration
rename
121
Convolutions 69
Coordinates
119
Curvature settings
51
Curves
density
73, 74
spline
51
D
Density mapping
72
Disk operations 109
Dot spacing
46
Dotted freehand line
44
Drawing modes 103
E
Elastic
75, 76
Ellipse
64
Erase
104
Extended LUT 183
F
File
formats
114
requester 111
Fill
55
options
55
Filled polygon
49
Filters 122, 159
bump 172
chroma key
165
color key
167
convolutions
169
extended LUT 183
flip
174
luma key
168
lumix
174
LUT 161
mosaic
175
negative
175
noise
175
panning
176
plug-in
184
print dots 177
shadow
177
smooth
179
spare mixer 180
tornado
181
video fix motion
182
Flip
174
Font 59
Freehand
line
46
shape
48
step by step 45
User's Guide 3.6 US.QXD 3/11/99 3:58 PM Page 190
Index
G
Gamma 120
George
description
125
command lines 130
writing programs
152
Grain
107
Grid
98
I
Impress
106
Interpolation
67
K
Keyboard shortcuts
Q
Quit
B-1
L
Layer 99
spare
119
Light
106
Linear 76
Luma key
168
Lumix
174
LUT 161
M
Matrices
170
Mechanical pen
79
Merge
105
Mixer 96
Mosaic
175
Mouse
43
buttons
43, 57, 137
N
Negative
175
Noise
68
filter 175
P
Page
show
120
size
113
Palette
93
Panning
176
Pantograph
105
Pen
78
Pencil
80
Perspective
58
Plug-in
184
Polygon
filled
49
Pressure
sensitivity
121
settings 50
Print 115
Print dots 177
122
R
Ranges
color 65
types 68
Rectangle
52
Recut 57, 91
Redo
62
Replace
104
S
Sensitivity
121
Shade
106
Shadow
177
Shift 108
Smear 107
Smooth
107
filter 179
Smoothing
62, 64
Spare
layer 119
mixer 180
Speed
sensitivity
121
Splines curves 51
Stamp 103
Straight line
49
Stylus 43
System
118
T
Text 59
editing
60
parameters 60
User's Guide 3.6 US.QXD 3/11/99 3:58 PM Page 191
Index
Textures A-1
Tint 107
Tolerance limits 56
Toolboxes
41, 42
Tools
drawing
77
Tornado
181
Transparent color 91
TVPaint
commands
137
Twain
117
Twirl
181
U
Undo
62, 118
Uniform
75
V
Video fix motion
W
Wave
181
Windows
41
Z
Zoom
63
182
User's Guide 3.6 US.QXD 3/11/99 3:58 PM Page 192
- Ed. 0995 -