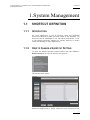
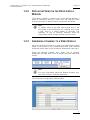
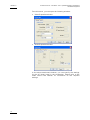
1
User's Manual
- PART 4 - Version 4.3 - October 2007
Video Production Management Software
www.evs.tv
C OPYRIGHT
EVS Broadcast Equipment – Copyright © 2005-2007. All rights
reserved.
D ISCLAIMER
The inform ation in this manual is furnished for inform ational use
only and subject to change without notice. While every effort has
been made to ensure that the information contained in this user
manual is accurate, up-to-date and reliable, EVS Broadcast
Equipment cannot be held responsible for inaccuracies or errors
that may appear in this publication.
I MPROVEMENT R EQUESTS
Your comments will help us improve the quality of the user
documentation. Do not hesitate to send improvement requests, or
report any error or inaccuracy on this user manual, by e-mail to
[email protected].
i
Issue 4.3.C
ii
IP Director Version 4.3 – User Manual – Part 4 – System Management & Troubleshooting
EVS Broadcast Equipment
IP Director Version 4.3 – User Manual – Part 4 – System Management & Troubleshooting
EVS Broadcast Equipment
Issue 4.3.C
Table of Contents
1.
1.1
System Management ............................................................................................ 1
Shortcut Definition .................................................................................................................. 1
1.1.1
1.1.2
1.1.3
1.1.4
1.1.5
1.2
Video Display.......................................................................................................................... 6
1.3
ShuttlePRO Configuration .................................................................................................... 11
1.2.1
1.2.2
1.2.3
1.2.4
1.2.5
1.2.6
1.2.7
1.3.1
1.3.2
1.3.3
1.3.4
2.
Introduction...................................................................................................................................... 1
How to Change a Shortcut Setting .................................................................................................. 1
General Shortcuts............................................................................................................................ 2
Channel Management Shortcuts ..................................................................................................... 4
Clip Editor Shortcuts........................................................................................................................ 5
2.1
2.2
2.3
2.4
Introduction...................................................................................................................................... 6
Displaying Video on the Video display Window............................................................................... 7
Assigning a Channel to a Video Display.......................................................................................... 7
Selecting the A/V Board in the Video Display .................................................................................. 8
Association Between player channel in Video Display and Database Explorer............................... 9
Association Between player channel in Video Display and Control Panel....................................... 9
Selecting the A/V Board Settings..................................................................................................... 9
Introduction.................................................................................................................................... 11
Default Button Configuration.......................................................................................................... 11
Quick Reference in Clip Mode ....................................................................................................... 12
Quick Reference in Play-List Mode ............................................................................................... 13
Troubleshooting Guide ...................................................................................... 14
Connections: Main status in the IP Director interface ........................................................... 14
Channel Explorer.................................................................................................................. 15
Channel Control.................................................................................................................... 16
IP Logger .............................................................................................................................. 17
iii
IP Director Version 4.3 – User Manual – Part 4 – System Management & Troubleshooting
EVS Broadcast Equipment
Issue 4.3.C
Document History
Date
Author
Document Modifications
Issue
Oct. 2007
Anne
Delbruyère
4.3.C
User manual for IP Director version 4.3.
•
User Manual split into four parts
Sections on new features:
•
Metadata on clips
Part 1: sections 2.2.5, 2.7
Part 2: section 3.2.6
Part 3: section 4.7, 4.9, 4.19.3
•
Control Panel: Clip-List tab
Part 3, section 4.11
•
Control Panel: Grab Frame
Part 3: sections 4.5.16, 4.13.4
•
Play-Lists: export into / import
from .xml file
Part 2: sections 3.3.4, 3.3.6
Part 3: sections 4.20.4, 4.20.5, 6.6.6,
6.6.5, 6.6.7
New or improved sections on existing
features:
•
IP Logger: general review + new
sections
Part 1: new sections 1.3, 1.6.2, 1.6.3,
1.6.6
•
Database Explor er: contextual
menus
Part 2: new sections 3.2.4, 3.3.4,
3.4.4 + 3.2.21
•
Keyword Management: Keyword
Grid creation
Part 2: reviewed section 2.3.3
•
Control Panel: reviewed or new
sections
Part 3: sections 4.4.3, 4.5.1, 4.5.6,
4.8.12, 4.16.1, 4.16.3; 4.18.1, 4.18.3
to 4.18.9.
•
iv
Play-List Editor: contextual menu
IP Director Version 4.3 – User Manual – Part 4 – System Management & Troubleshooting
EVS Broadcast Equipment
Issue 4.3.C
from Play-List Name field
Part 3: new section 6.6.5
•
Terminology changes
Control Panel: View pane Î Channel
Media pane
Layout: Layout pane, Layout toolbar
and Layout shortcuts
Mini Database Explorer: Object list
Î Element list
Sep. 2007
Mike Davis, 4.3.B
James
Stellpflug,
Martin
Tirtiaux
Reviews and comments
modified sections.
Sep. 2007
Anne
Delbruyère
Initial draft version
4.3.A
on
new
and
v
IP Director Version 4.3 – User Manual – Part 4 – System Management & Troubleshooting
EVS Broadcast Equipment
Issue 4.3.C
About this Manual
This manual is intended to cover all aspects of IP Director. It
should be seen as a reference guide that provides a detailed
description on the various modules of IP Director, as well as
procedural inform ation on how to work with the IP Director
system.
The user manual for IP Director Version 4.3 is divided into 4
parts:
P ART 1: I NTRODUCTION
The first part contains the following chapters:
Chapter
Description
Introduction
This chapter gives an overview on the
product and describes the components of
the IP Director suite.
IP Director Main
Window
This chapter details the various areas in
the IP Director main window, i.e. the
window that opens when IP Director is
started.
Channel
Explorer
This chapter describes the Channel
Explorer, i.e. the module that provides an
overview on the components of the XNet
network. It allows the users, among others,
to take control of one or several channels
from different XT servers connected on the
XNet.
P ART 2: L OGGING AND B ROWSING
The second part contains the following chapters:
vi
Chapter
Description
IP Logger
This chapter provides inform ation on the IP
Logger module, which is used to create
logs that relate to recorded events with
timecodes, camera angles, clip numbers
and metadata.
Keyword
Management
This chapter covers the management of
keywords, i.e. the creation and setup of the
various tools which allow the users to
assign keywords to logs or clips in a
unified manner. Assigning keywords to logs
and clips make it possible to search on the
video material stored on the XNet network
IP Director Version 4.3 – User Manual – Part 4 – System Management & Troubleshooting
EVS Broadcast Equipment
Chapter
Issue 4.3.C
Description
and easily find it back.
Database
Explorer
This chapter explains the Database
Explorer module, which has been designed
to allow the users to organize and search
all media and data available within the
XNet network.
Mini Database
Explorer
This chapter explains the Mini Database
Explorer, i.e. a compact version of the
Database Explorer integrated into the PlayList Editor module and the Clip Editor
module.
P ART 3: I NGEST AND P LAY -O UT
The third part contains the following chapters:
Chapter
Description
Recorder Panel
This chapter provides inform ation on the
Recorder Panel, i.e. the module used to
control the recorder channels of an XT
Server.
Ingest
Scheduler
This chapter covers the Ingest Scheduler
module that allows for clips to be
automatically made on any channel under
the IP Director control at a time scheduled
in advance.
VTR Control
Panel
This chapter describes the VTR Control
Panel module that allows the users to
control a VTR from IP Director and to
extract clips from a tape to an XT Server.
Player Control
Panel
This chapter explains in details the Player
Control Panel, i.e. the module used to
control player channels of an XT server
and to make clips and simple play-lists.
Fill & Key
This chapter explains the Fill & Key
function in IP Director, which make it
possible to gang channels of the XT Server
together in a Fill and Key relationship to
allow the operator to perform synchronised
clip recalls in a Fill & Key scenario.
Play-List Editor
This chapter describes the Play-List Editor
module that allows complex play-lists to be
made, modified and played to air using an
efficient workflow.
vii
IP Director Version 4.3 – User Manual – Part 4 – System Management & Troubleshooting
EVS Broadcast Equipment
Issue 4.3.C
P ART
4:
S YSTEM
T ROUBLESHOOTING
AND
Chapter
Description
System
Management
This chapter contains a description of
overall system settings:
Troubleshooting
viii
M ANAGEMENT
•
shortcut definitions
•
ShuttlePRO configuration and button
layout
This chapter contains descriptions on the
problems you could encounter when
configuring the system. It gives all the
checks which must be performed to solve
the problems.
IP Director Version 4.3 – User Manual – Part 4 – System Management & Troubleshooting
EVS Broadcast Equipment
Issue 4.3.C
1. System Management
1.1
SHORTCUT DEFINITION
1.1.1
INTRODUCTION
For each application in the IP Director there are keyboard
shortcuts available to make operation faster to the Operator. All
shortcuts can be redefined to suit individual preferences. A list
of the default shortcuts applied on system delivery is shown
under the heading for each application.
1.1.2
HOW TO CHANGE A SHORTCUT SETTING
To open the Define Shortcut window select the menu Tools >
Define Shortcut from the IP Director main menu.
The window then opens:
Select the application to define shortcuts in by choosing a tab.
1
IP Director Version 4.3 – User Manual – Part 4 – System Management & Troubleshooting
EVS Broadcast Equipment
Issue 4.3.C
IP Director tab shows all short cuts which are global to the
system and not specific to one application.
Select a shortcut action from the list. It is entered into the
shortcut properties area at the base of the window.
By choosing a keystroke on the keyboard to make the shortcut
available on, it is entered into the keystroke area at the base of
the screen, and the area becomes green in colour. If it becomes
red then the chosen key is already in use in the application
Select Change to confirm the choice of shortcut if the key is
available.
When all changes are complete, click the Apply button at the
bottom of the window.
To restore the default values for an application use the button in
the bottom left of the window.
1.1.3
GENERAL SHORTCUTS
In the IP Director main window, the menu Tools > Define
Shortcuts in the menu bar allows the users to define shortcuts
for most of the common operations with the IP Director.
Shown in the screenshots below are all general shortcuts item s
that are available, the default values are shown. These can be
modified and saved by the system user if desired.
2
IP Director Version 4.3 – User Manual – Part 4 – System Management & Troubleshooting
EVS Broadcast Equipment
Issue 4.3.C
3
IP Director Version 4.3 – User Manual – Part 4 – System Management & Troubleshooting
EVS Broadcast Equipment
Issue 4.3.C
1.1.4
CHANNEL MANAGEMENT SHORTCUTS
In the IP Director main window, the menu Tools > Define
Shortcuts in the menu bar allows the users to define shortcuts
for most of the common operations with the IP Director.
Shown in the screenshots below are all Channel Management
shortcuts that are available, the default values are shown. These
can be modified and saved by the system user if desired.
4
IP Director Version 4.3 – User Manual – Part 4 – System Management & Troubleshooting
EVS Broadcast Equipment
1.1.5
Issue 4.3.C
CLIP EDITOR SHORTCUTS
In the IP Director main window, the menu Tools > Define
Shortcuts in the menu bar allows the users to define shortcuts
for most of the common operations with the IP Director.
Shown in the screenshots below are all items that are available
in the Clip Editor with shortcuts, the default values are shown.
These can be modified and saved by the system user if desired.
The greyed-out shorcuts are defined as Channel Management
shortcuts and available in the Clip Editor.
5
IP Director Version 4.3 – User Manual – Part 4 – System Management & Troubleshooting
EVS Broadcast Equipment
Issue 4.3.C
1.2
VIDEO DISPLAY
1.2.1
INTRODUCTION
The Video Display allows the user to see a display of video in a
window on the VGA output of an IP Director Workstation.
Open the Video Display panel by selecting the Video Display
icon from the Application toolbar in the IP Director main window.
Before you can actually display a channel in the Video display,
you need to perform the following tasks:
•
Make a physical connection from the required video source to
the input of the A/V board on the IP Director workstation.
For more inform ation, refer to section 1.2.2 ‘Displaying Video
on the Video display Window’, on page 7.
•
Assign a channel to the Video Display in the Remote Installer
application.
For more information, refer to section 1.2.3 ‘Assigning a
Channel to a Video Display’, on page 7.
•
Select the A/V board in the Video Display to open the related
channel.
For more information, refer to section 1.2.4 ‘Selecting the
A/V Board in the Video Display’, on page 8.
6
IP Director Version 4.3 – User Manual – Part 4 – System Management & Troubleshooting
EVS Broadcast Equipment
1.2.2
Issue 4.3.C
DISPLAYING VIDEO ON THE VIDEO DISPLAY
WINDOW
To be able to display a channel in the Video Display window, a
physical connection must be made from the required video
source to the input of the IP Director workstation A/V board.
Note
To display video on the VGA uses around 25% of the
CPU power of the workstation for a display size of 384
x 288, more if a larger display is required. The
reactivity of the IP Director interface could be
significantly slower if larger window sizes are used.
1.2.3
ASSIGNING A CHANNEL TO A VIDEO DISPLAY
Once the physical connection is made, the Video Display panel
needs to be linked to the corresponding PGM video channel
connected to the input of the IP Director Workstation video card.
Using the Remote Installer tool, select the IP Director
workstation and right click on the IP Director box and select Edit
Config.
Note
For more information about the Remote Installer tool,
see the IP Director Technical Reference.
The IP Director Configuration window opens:
7
IP Director Version 4.3 – User Manual – Part 4 – System Management & Troubleshooting
EVS Broadcast Equipment
Issue 4.3.C
The Channel Management allows you to link a Player channel of
one specific XT to one Video Display (Video Board).
To define a link between a PGM and a video display, proceed as
follows:
1. Check the box in the Linked column
2. Select which video display device it is linked to from the drop
down list in the video display column.
The linked box can be checked without being linked to a Video
Display. For example, this is used when an external monitor is
connected at your workstation.
Note
All these parameters are local to the IP Director
workstation and must be set independently on all IP
Director Workstations using the Remote Installer tool.
When a Player channel is linked to an IP Director, you can see it
on the Title bar of the Video Display panel.
1.2.4
SELECTING THE A/V BOARD IN THE VIDEO
DISPLAY
When you open the Video Display, you need to select the
appropriate A/V board to be able to view the channel associated
to the board.
To select the appropriate A/V board in the Video Display window,
proceed as follows:
1.
Right-click the Video Display window.
This opens a contextual menu that displays the names
of the A/V board(s) connected to the IP Director
workstation.
8
2.
From the contextual menu, select the A/V board linked
to the Video Display in the Remote Installer application.
3.
With A/V boards other than AVH boards, a dialog box
specific to the selected board opens:
IP Director Version 4.3 – User Manual – Part 4 – System Management & Troubleshooting
EVS Broadcast Equipment
4.
Issue 4.3.C
Select the audio and video settings in the dialog box
and click.
The player channel will open in the Video Display window.
1.2.5
ASSOCIATION BETWEEN PLAYER CHANNEL IN
VIDEO DISPLAY AND DATABASE EXPLORER
To create thumbnails, a video display window must be associated
to the Database Explorer.
To establish the association between the Video Display window
and in a Database Explorer window, you need to do the
following:
1.2.6
•
Assign a player channel to the Database Explorer window.
For more information, refer to Part 2, Database Explorer
chapter.
•
Assign the same player channel to the Video Display window.
ASSOCIATION BETWEEN PLAYER CHANNEL IN
VIDEO DISPLAY AND CONTROL PANEL
The association between the player channel in the Video Display
and in the Control Panel is now done in the Control Panel since
the Video Display is integrated into the Control Panel.
1.2.7
SELECTING THE A/V BOARD SETTINGS
When the player channel is loaded on the Video Display window,
right-clicking the window will open a contextual menu:
9
IP Director Version 4.3 – User Manual – Part 4 – System Management & Troubleshooting
EVS Broadcast Equipment
Issue 4.3.C
From this menu, you can open the following windows:
•
Video Properties window
•
Audio Properties window
In the above-mentioned windows, you can specify the settings
for the A/V board used in the workstation. Please refer to the
Video board User Manual for information on the required
settings.
10
IP Director Version 4.3 – User Manual – Part 4 – System Management & Troubleshooting
EVS Broadcast Equipment
Issue 4.3.C
1.3
SHUTTLEPRO CONFIGURATION
1.3.1
INTRODUCTION
ShuttlePRO consists of two components:
•
the ergonomically designed device
•
the software that allows you to manage it
It has a Jog wheel and a Shuttle ring that are programmable, and
fifteen programmable buttons. The two top rows of buttons on
the ShuttlePRO series have labels inserted for quick reference
as to which functions each button is programmed to perform.
As it is a third party device a detailed User Guide can be found
at: h t t p : / / 6 3 . 1 1 1 . 5 9 . 1 7 2 / d o w n l o a d s / s h u t t l e p r o / p c u s e r s g u i d e . p d f
A configuration file has been created specifically for use with IP
Director. To load the file, please see the instructions in the
Management Console section of the Installation chapter.
1.3.2
DEFAULT BUTTON CONFIGURATION
When the CDIShuttle.pref file has been loaded using the
Management Console there are shortcuts loaded to the
programmable buttons of the ShuttlePRO. There is different
functionality to the controller depending upon which mode the IP
Director is being operated in. There are buttons on the lower
part of the controller that have a function at either end. Other
buttons have CTRL from the Keyboard as a modifier to change
the button function, in the diagrams below these functions are
shown in red.
Details of the functionality of the buttons are included in the
Control Panels section of the manual. The diagrams below are
quick reference guides to the location of the functions
11
IP Director Version 4.3 – User Manual – Part 4 – System Management & Troubleshooting
EVS Broadcast Equipment
Issue 4.3.C
1.3.3
QUICK REFERENCE IN CLIP MODE
to the following layout: - buttons 1 to 4 are on the top row, - buttons 5 to 9 are on the second row, - buttons 10 to 11 are on the third row, - buttons 12 to 13 are on the fourth row, - button 14
12
IP Director Version 4.3 – User Manual – Part 4 – System Management & Troubleshooting
EVS Broadcast Equipment
1.3.4
Issue 4.3.C
QUICK REFERENCE IN PLAY-LIST MODE
13
IP Director Version 4.3 – User Manual – Part 4 – System Management & Troubleshooting
EVS Broadcast Equipment
Issue 4.3.C
2. Troubleshooting
Guide
2.1
CONNECTIONS: MAIN STATUS IN
THE IP DIRECTOR INTERFACE
T HE DATABASE STATUS IS RED .
It means the IP Director has not established the link with the IP
Director database. In the console management application, in
categories/configuration, check
•
the name of the database, it must be IP Remote
•
the login and password (EVS default is Login : sa, Password
: evs)
•
the server name where the database is physically located
•
the Ethernet connection to the database server
Those checks must be done for:
•
the SynchroDB service
•
IP Director application
•
IP Scheduler if in use
If after those checks you still cannot established the link with the
database, check:
•
icon in the
if the SQL server engine is running (check the
main status bar of Windows XP. It must appear with a green
arrow).
T HE XT STATUS IS RED OR YELLOW
It means your physical connection is not established with the XT
server on the XNet network. At start up, it can take a few
seconds before this status becomes green. If after one minute,
the status is not green:
•
Check all your physical connections
o
14
on the XT side, check if the cable is physically
connected to the COM port defined on the XT server (in
the EVS configuration menu if you are running slave
mode or in the setup of the EVS remote control device if
IP Director Version 4.3 – User Manual – Part 4 – System Management & Troubleshooting
EVS Broadcast Equipment
Issue 4.3.C
you are running LSM mode)
o
on the IP Director side, check in the routing service in
the transport tab, the type of the connection (C OM or
USB) and the host ID. The host ID must correspond to
the num ber of the XT server the IP Director workstation
is connected to.
•
Check in all routing service applications on all IP Director
workstations connected to on XT server if the connection is
established with the XT server. In the transport tab, the
connection must be started (green status in front of the COM
or USB connection).
•
Make sure you do not have 2 IPDP serial connections to one
XT server.
T HE SYNCHRO DB STATUS IS RED
It means the IP Director has not established the link with the
SynchroDB service. This is generally the case when the IP
Director workstation is started.
Wait a few more seconds and if the link is still not established
after 1 minute, please contact EVS.
2.2
CHANNEL EXPLORER
THE USER DOES NOT SEE AN XT SERVER OR
X FILE DEVICE IN C HANNEL E XPLORER
To see an XT server or an XFILE device in the channel explorer,
this XT must be assigned to be managed by one SynchroDB
service. If managed and connected with a serial connection to
one IP Director workstation, it will appear with a black font in the
channel explorer, if it has no direct serial connection but is
connected via the XNET network to an XT which has a serial
connection to one IP Director workstation, it will appear grey in
the channel explorer.
Check if the following conditions are fulfilled:
•
You have at least one serial connection to the XNet network
•
This connection is started in the routing application. If the
link has not been started in the routing application, check
•
o
You have correctly defined your COM port number on the
XT server
o
You have correctly defined your port type on your IP
Director workstation (COM or USB)
o
You have correctly defined your port number on your IP
Director workstation.
One SynchroDB service manages your XT server or XFile
device.
15
IP Director Version 4.3 – User Manual – Part 4 – System Management & Troubleshooting
EVS Broadcast Equipment
Issue 4.3.C
O NE XT SERVER APPEARS WITH A GREY FONT IN
THE C HANNEL E XPLORER AND I CANNOT
CONTROL ITS CHANNELS
This means that there are no direct serial connections to that XT
Server, you cannot control the channels of that XT Server.
2.3
CHANNEL CONTROL
T HE USER CANNOT CONTROL A CHANNEL
If a channel cannot be controlled, check if:
•
The control panel interface has not been locked (check the
padlock icon in the control panel interface)
•
The channel has not been locked on another IP Director
workstation. Check if there is a red padlock in front of the
name of the channel in the channel explorer application.
On your XT server, check if your channel can be controlled by
the IP Director workstations. If the channel has been configured
into parallel mode, make sure the IP Director is the main or the
secondary controller.
If the IP Director has been defined as a secondary controller of
the channel in exclusive mode, make sure the control of the
channel has been passed to the IP Director from the main device
(typically an LSM remote device).
If the IP Director has been defined as primary controller of the
channel in exclusive mode, make sure the control of the channel
has not been passed to the secondary controller from the IP
Director Control Panel interface (Check the state of the 2 N D
button)
Do not forget that you need a serial link to one XT if you wish to
control its channels. Check if the channel you would like to
control is available in the channel explorer application.
T HE CHANNEL OUTPUT IS BLACK
This means your channel is in IDLE state. Load a clip or a cliplist on that channel OR press the E/E button on the panel.
If an XT Server is configured in XT Server IPDP mode the
recorders are not automatically started. It is then possible that
when you click on E/E the channel displays a frozen picture (the
last one recorded on the corresponding recorder channel). At
this point, you must open a recorder panel to start the recorder
for that channel.
A channel can be set to IDLE state when operated as a fill
16
IP Director Version 4.3 – User Manual – Part 4 – System Management & Troubleshooting
EVS Broadcast Equipment
Issue 4.3.C
channel when no key elem ent is loaded. In that case, the output
of the channel can be black.
2.4
IP LOGGER
T HE T/C IS NOT RUNNING IN THE ‘ LIVE ’ ZONE
The T/C information is taken from the preview recorder. The
preview recorder is defined in the 3 r d step of the ‘new log sheet
wizard’: Relevant recorders definition.
You must have a serial connection to the XT where this recorder
is located. Otherw ise you do not get the information of this
recorder.
M Y CLIPS DO NOT ASSOCIATE WITH THE LOGS
1. Date and time must be the same on the XT network and on
the IP Director database workstation.
o
Check the time and date on your XT server (press
SHIFT-F2 on the XT server keyboard to confirm the
date/time on the Setup Screen in the Information
Window)
o
Check the time and date on your database system
2. The date associated with a clip is the date when the clip has
been created and not the date corresponding to the A/V data.
If the T/C of a log is equal to 11:00pm, and if the clip is
created after midnight, the date of the clip and the date of
the log will not match and the clip will not be associated to
the log.
o
Check when the clip has been created (see in the
Database Explorer, clips, creation date) and compare
that date to the log.
3. Check your clip association rule.
4. Check in the SynchroDB configuration if the parameter Auto
Associate Clips to Logs is checked.
5. If after all those checks, your clips still do not associate with
the clips, in the main menu of the IP Director, select Tools >
Logging Association. Force a manual clip association to
your log sheet.
o
Select the log sheet
o
Click on START.
17
Issue 4.3.C
IP Director Version 4.3 – User Manual – Part 4 – System Management & Troubleshooting
EVS Broadcast Equipment
T HE KEYWORDS ASSOCIATED WITH MY LOGS ARE
NOT PUSHED TO ITS ASSOCIATED CLIPS
The clips are created on an XT server which has no serial
connection to any IP Director workstation.
Check if the Edit Clip by Network parameter is activated on the
corresponding XT server. This allows the IP Director to edit the
clips on the server to be able to assign keywords to them.
I GET THE MESSAGE ‘ ERROR WHILE CREATING
CLIP ’ WHEN I PROTECT THE MEDIA ASSOCIATED
WITH THE LOGS
The preview recorder cannot be changed when the first log has
been entered. If you do so, it is possible the ‘protect media
associated to logs’ operation fails.
18
IP Director Version 4.3 – User Manual – Part 4 – System Management & Troubleshooting
EVS Broadcast Equipment
Issue 4.3.C
Europe, Africa & Middle East:
EVS Broadcast Equipment s.a.
Rue Bois Saint-Jean 16 – Liege Science Park
4102 Ougree - BELGIUM
Tel: +32-4-361 7000 - Fax : +32-4-361 7099
E-mail: [email protected]
France: EVS France s.a.
32-36 rue de Bellevue
92100 Boulogne Billancourt – FRANCE
Tel: +33-1-49379761 - Fax : +33-1-49379758
E-mail: [email protected]
Italy: EVS Italia s.r.l.
Via Cipro 96 – 25124 Brescia – ITALY
Tel: +39-030 242 71 34 Fax: +39-030 2478182
E-mail: [email protected]
United Kingdom: EVS Broadcast UK Limited
Kingfisher House - 21-23 Elmfield Road - Bromley
Kent BR1-1LT - UNITED KINGDOM
Tel: +44 (0)20 8315 6551/2 - Fax:+44 (0)20 8315 6560
E-mail: [email protected]
Spain: EVS Iberica
Avenida de Europa, 12-2C – Edifico Monaco – Parque Empresarial de la Moraleja
28108 Alcobendas, Madrid – SPAIN
Tel: +34 91 490 20 18
E-mail: [email protected]
Middle East – EVS Middle East Ltd
Dubai Studio City - Office n° 328 / Building 02
Dubai - United Arab Emirates
Tel: +971 50 88 78 758
E-mail: [email protected]
The Americas: EVS Broadcast Equipment Inc.
9 Law Drive, Suite 200 – FAIRFIELD - NJ 07004 - USA
Tel : +1 (973) 575 7811 – Hotline: +1 (973) 575 7813 - Fax : +1 (973) 575 7812
E-mail: [email protected]
Asia - Pacific: EVS Broadcast Equipment s.a.
430 DB Plaza - Discovery Bay - HONG KONG
Tel : +852-2914 2501 - Fax : +852-2914 2505
19
IP Director Version 4.3 – User Manual – Part 4 – System Management & Troubleshooting
EVS Broadcast Equipment
Issue 4.3.C
E-mail: [email protected]
China – EVS China
Canway Building, Rm. 702A - 66 Nan Li Shi Lu
Beijing - CHINA
Tel.: +86 10 6808 0248
Fax: +86 10 6808 0246
E-mail: [email protected]
www.evs.tv
20