1
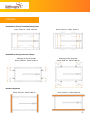
Manual Guide
Monocrystalline Modules and Polycrystalline Modules
Version: Jan 2014
--
This manual contains information regarding the safe installation and handling of photovoltaic modules produced
by Sunhappy Power GmbH ( “ SUNHAPPY POWER ” ). All the instructions provided in this manual should be
read carefully and understood before attempting to install the modules. Please contact SUNHAPPY POWER
Customer Service for further explanation.
These instructions are intended for dealers and installers involved in the planning, installation and
commissioning of photovoltaic systems with polycrystalline or monocrystalline solar modules by SUNHAPPY
POWER. They are meant to provide you with valuable information to ensure a smooth and correct installation of
SUNHAPPY POWER modules. SUNHAPPY POWER modules are made of carefully selected materials. They
are tested and approved by acknowledged independent certification authorities and may only be installed by
qualified professional companies. Please observe the standards and regulations applying to photovoltaic
systems in the relevant countries, as well as the rules of the employers´ liability insurance associations for
accident protection. Failure to comply with these can result in major injuries and damage.
Specifications and assembly instructions from this installation guide are based on the standards applicable in
Europe. Special conditions should always be clarified by an expert so that the roof requirements as well as
other individual requirements are duly taken into account. Keep these installation instructions in a safe place!
Overview
1.
2.
3.
4.
5.
6.
7.
8.
Product Identification
Safety
2.1
General Safety
2.2
Handling Safety
2.3
Installation Safety
2.4
Fire Safety
Installation
3.1
Mechanical Installation
3.1.1
Installations Using Frame Mounting Holes
3.1.2
Installations Using Pressure Clamps
3.1.3
Insertion Systems
3.1.4
Module Resistance
3.2
Electrical Installation
3.2.1
General Considerations
3.2.2
System Grounding
Maintenance
4.1
General Maintenance
4.2
Cleaning
Modules’ End of Life
Module Specification
Disclaimer of Liability
Contact Information
……pag.2
……pag.2
……pag.5
……pag.6
……pag.10
……pag.13
……pag.15
……pag.15
……pag.16
……pag.16
1
--
Annex 1
Installations Using Frame Mounting Holes
Installations Using Pressure Clamps
Insertion Systems
……pag.17
1. Product Identification
Each module can be identified by means of the following embedded information:
Nameplate: it is to be found on the module backside. According to EN 50380 Directives it provides information
about the main parameters of the module: Product Type, Maximum Power, Current at Maximum Power, Voltage
at Maximum power, Open Circuit Voltage, Short Circuit Current, all as measured under Standard Test
Conditions, weight, dimensions, Maximum System Voltage, Maximum series fuse etc.
Serial number: each individual module is identified by a unique serial number coupled with a barcode. They
are permanently inserted inside the laminate, under the front glass of the module, visible when viewing from the
front of the module. There is only one serial number coupled with one barcode on the module.
2. Safety
2.1 General Safety
All PV modules shall be installed according to all local and national applicable
standards, codes and regulations. Installation should be performed only by qualified
persons. The installer bear the risk of all injury that might occur during installation
including, without limitation, the risk of electric shock. Check and follow all safety
precautions specified even for the other components of the system.
►
Rooftop installations should be placed over fire resistant roofs only.
►
Do not attempt to disassemble the modules, and do not remove any attached
nameplates or components from the modules.
►
Do not apply paint or adhesive to module top surface.
►
Do not use mirrors or other magnifiers to artificially concentrate sunlight on the
modules.
►
Do not expose back sheet foils directly to sunlight.
2
--
2.2 Handling Safety
► Do not exceed the maximum height of pallets stacked on top of each other.
Maximum height is 2 pallets (standard packaging for shipment).
► Do not damage or scratch the PV module surfaces.
► Do not stand or step on module.
► Do not drop module or allow objects to fall on module.
► Do not use the junction boxes and the cables as a grip.
► To avoid glass breakage, do not place any heavy objects on the module.
► Do not set the module down hard on any surface.
► Inappropriate transport and installation may break module.
FRAGLE
HANDLE
WITH CARE
DO NOT STEP
STACKING
LIMITATION
2.3 Installation Safety
Installing solar photovoltaic systems requires specialized skills and knowledge. One
individual module may generate DC voltages greater than 30 V when exposed to
light of any intensity. Contact with a DC voltage of 30 V or more is potentially
hazardous. Series or parallel connection of the modules increases the voltage or
electric current respectively.
► Do not disconnect modules under load to avoid electrical arcs. Keep
connectors dry and clean.
► Do not insert electrically conductive parts into the plugs and sockets.
► Do not install solar modules and wiring with wet plugs and sockets.
3
--
► Exercise extreme caution when carrying out and work on the wiring.
► High contact voltage can occur in the inverter when it is isolated.
► Protect solar modules from overvoltage e.g. voltage peaks of battery charges,
generators, etc.
► At installation, modules should be kept entirely away from light or covered with a
dark opaque material. When working with modules without any cover, the safety
regulations for live electrical equipment need to be followed.
► Do not wear metallic rings, watchbands, ear, nose or lip rings or other metallic
devices while installing or troubleshooting photovoltaic systems in order to avoid
electric shock.
► Use only insulated tools that are approved for working on electrical installations.
Abide with the safety regulations for all other components used in the PV
system, including wiring and cables, connectors, charging regulators, inverters,
storage batteries and rechargeable batteries, etc.
► Use only equipment, connectors, wiring and support frames suitable for a solar
electric system. Always use the same type of module within a particular
photovoltaic system.
► Do not attempt to repair any part of the PV module.
2.4 Fire Safety
SUNHAPPY POWER PV modules have passed all the required safety tests
according to the IEC EN 61730 Directives with Application Class A and fire safety
has been rated as Class C. The devices of onroof systems can affect the fire safety
of a building. Improper installations can result in a hazard in case of fire. In the case
of onroof applications, the modules must be mounted above a fireresistant surface.
► Rooftop installations should be placed over fire resistant roofs only; fire class A
is recommended.
► For rooftop installations only fire resistant components should be used.
► Do not use panels near equipment or in places where flammable gases may be
generated.
4
--
3. Installation
SUNHAPPY POWER PV modules should be installed in a location where they will
receive the maximum amount of sunlight throughout the year. In the Northern
Hemisphere modules should face south, while in the Southern Hemisphere modules
should face north.
► SUNHAPPY POWER PV modules connected in series should be installed at
same orientation and tilt angle. Different orientations or angles may cause a
loss of power output due to the change in sunlight exposure.
► The module should not be exposed to unusual chemical loads.
► Do not immerse the module in liquid (IP 65). The installation of the modules to
sea water lakes and seas should be about 500 meters.
► Protect solar modules from overvoltage e.g. voltage peaks of battery charges,
generators, etc.
► If the module is connected to a storage battery all precautions of the battery
manufacture should be adhered.
► Do not carry out installation in high winds. Protects every worker of slipping and
falling from the roof. Prevent possible fallings from objects. Secure the work
area so that nobody on the roof and beneath the roof can be injured.
When designing the final layout of the modules in the photovoltaic system (on the ground or on a roof), we
recommend the designer to keep suitable access space to allow easy maintenance and inspection works.
SUNHAPPY POWER PV modules must be installed and stored in the following conditions:
Operating
environment
temperature
from
-40°C
to
+85°C
Storage
temperature
from
-40°C
to
+60°C
Humidity
below 85 RH%
5
--
► When installing a module on a roof or building, ensure that it is securely
fastened and prevented from falling because of wind, snow or other mechanical
loads.
► Provide adequate ventilation under a module for cooling. SUNHAPPY POWER
recommends 10 cm minimum air space between module and mounting surface.
► Modules should not to be shaded at any time of trees, antennas, cables, houses
etc. If a module is shaded or even partially shaded, it will fail to perform at ideal
conditions and results in lower power output.
3.1 Mechanical Installation
► Always use structures and materials specifically developed and certified for
photovoltaic modules installation.
► The minimum distance between two fixed modules for linear thermal expansion
of the module frames should be 5 mm. Nevertheless the recommended
distance between two solar modules is 20 mm to allow wind circulation, in order
to reduce pressure loads and improve module ventilation. The PV module
should not be mounted in such a way that the drain holes of PV module can
incur blockage.
► The PV modules are suitable for mechanical mounting both with a horizontal or
vertical orientation. In choosing the orientation, please keep in mind the internal
PV module bypass diode configuration to ensure the optimum electrical
behaviour from any potential shading over the modules.
► Galvanic corrosion can occur between the aluminium frame of the PV module
and mounting hardware, if such hardware is composed of dissimilar metals,
especially in harsh environments (such as environments with high humidity). In
those cases, it is recommended to place neoprene tape, PVC washers or
stainless steel washers between the PV module frame and the support structure
to prevent corrosion.
► Additionally, all module support structures used to support PV modules at
correct tilt angles should be wind and snow load rated by appropriate local and
civil Directives prior to installation.
It is not allowed to dismount, drill or modify the frame or any other part of the PV
module. Please contact SUNHAPPY Technical Service Contact if module
mounting procedure is not clear.
6
--
PV modules by SUNHAPPY POWER can be installed by means of the following processes:
► Installations Using Frame Mounting Holes
► Installations Using Pressure Clamps
► Insertion Systems
3.1.1 Installations Using Frame Mounting Holes
Modules must be securely fixed to the mounting structure using the four predrilled
mounting holes (10mm*6.5mm) placed in the long frame rails at 390 mm from the
eage. Use M6 stainless steel hardware, spring washers and flat washers with a
torque of approximately 10 newton metre [Nm] for normal installation. Galvanized or
hot dipped zinc plated hardware is also acceptable.
Please refer to the drawings on the Annex 1 to get more information about the proper use of mounting holes and
load resistance of all module types. SUNHAPPY POWER recommends to use all eight mounting holes, if
excessive wind or snow loads are expected for the PV installation.
Picture2: Installation with Frame Mounting Holes
Picture1: Mounting Holes
7
--
3.1.2 Installations Using Pressure Clamps
Installation using pressure clamps may be executed along both sides of the module
frame according to instructions on Annex 1. The obligatory position of the clips
along the frame depends on which side of the module is used for the installation as
follows:
► Fixing on the long side: the clamps must be mounted along the frame at the
position of the mounting hole. The clamps must be fixed at a distance 25% of
the total side length from the frame edge with a tolerance of +/50 mm.
► Fixing on the short side: The clamps must be mounted along the frame at the
edges of the module, the clamp fixing area lies within 25% of the overall length
of the short side from the frame edge.
Note that on both sides of the module the pressure clamps should be mounted always in a symmetric position
with respect to the middle line for a proper load distribution. Refer to the drawings on the Annex 1.
► Clamps must be installed according to the manufacturer’s specific instructions.
Do not apply excessive pressure on the frame such that the frame deforms.
SUNHAPPY POWER recommends a torque of approximately 10 newton metre
[Nm], however, please refer to the clamp manufacturer for specific hardware
and torque requirements.
► The clamps must only fix the modules through the contact with the frame only.
Do not allow contact between clamp and glass and avoid shadowing effects
from the module clamps.
► Pressure clamps should not be mounted outside the specified areas, otherwise
the module mechanical resistance could be affected.
Picture3: Installation with Pressure Clamps
8
--
3.1.3 Insertion Systems
Insertion systems on the short sides of the module are allowed with a limitation on
the maximum load resistance of 2400 Pa. Insertion systems on the long side of the
module are not affected by any limitation and are allowed with a maximum of 5400
Pa for snow load. See Annex 1 for more information.
Picture4: Installation System
Note: When using insertion systems where the modules are installed sliding through the inner side of the rails,
SUNHAPPY POWER recommends to use PVC frame protectors in order to prevent damage in the anodized
layer of the frame.
Picture5: Installation System
9
--
3.1.4 Module Load Resistance
Wind Load:
Snow Load:
2400 Pa
5400 Pa
According to IEC 61215, clause 10.16, 2400 Pa corresponds to a wind pressure of 130 km/h (approximately
+/- 800 Pa) with a safety factor of 3 for gusty winds. Please note that information provided above could vary
according to the different mounting systems and configurations as described in the Annex 1.
3.2 Electrical Installation
The installation requires the execution of electrical connection works, for which
knowledge of the relevant safety requirements is necessary. Having them carried
out by unqualified personnel would be a risk.
Modules electrically connected together in a series/parallel configuration generate
DC electrical energy which may be converted to AC by mean of a solar inverter. The
resulting PV System may be therefore connected to the local utility grid system. As
local utilities’ policies and technical rules on connecting a renewable energy system
to their power grids vary from region to region, consult a qualified system designers
or integrators to design such a system to comply with the Directives. Permits are
normally required for installing a PV system and the utility must formally approve
and inspect the system before its connection to the grid can be accepted. The
connection of the inverter to the grid needs to be done by a competent, authorized
company.
► The PV system electrical installation must be executed in accordance with the
respective National Electrical Code or applicable National Regulations.
► Use only insulated tools that are approved for working on electrical installations.
Abide with the safety regulations for all the components used in the system,
including wiring and cables, connectors, charge regulators, inverters, storage
batteries etc.
► To avoid conductor loops the strings (+and-) should be laid together. The cable
groove on the cross profile can hereby be used. If possible roof penetration
should only be at one point.
10
--
3.2.1 General Considerations
► Modules are fitted with two preassembled sunlight resistant, isolated cable
leads, which are terminated with PV fast connectors. The positive (+) terminal
has a female connector while the negative (-) terminal has a male connector.
These cable leads and connectors must not be removed or cut off.
► Several modules are connected in series and then in parallel to form a PV array,
especially for applications with high operating voltage. When modules are
connected in series, the total voltage of the resulting sting is the sum of the
individual voltages of the modules. Do not use different type of modules in the
same circuit in order to avoid mismatch, power loss or damage to the PV
system.
► When selecting the size of the cables that connect the module strings to the
solar inverter, it is recommended to refer to the nameplate electrical parameters
of the related module type.
► When selecting the size of the cables that connect the module strings to the
solar inverter, it is recommended to refer to the nameplate electrical parameters
of the related module type.
► For electrical design considerations, the values given in the module label or
datasheet of the related model type should be multiplied by a factor of 1.25 for
Short Circuit Current (Isc) and 1.10 for Open Circuit Voltage (Voc), when
determining component voltage ratings, conductor current ratings, fuse sizes
and the rest of electrical hardware connected to the module strings.
Nevertheless, consult rated local wiring regulations to determine system wire
size, type, and temperature allowed for your installation.
► Parallel interconnection of more than two strings requires the installation of
string fuses. The maximum fuse current is stated to be 15 amps. If more than 2
strings are interconnected in parallel this value might be exceeded in the event
of a fault.
3.2.2 System Grounding
SUNHAPPY modules are certified for Class A applications (IEC 61730) Safety
Class II, 1000Vdc Maximum System Voltage. Refer to respective National Electrical
Code requirements and standards for safetyrelated grounding of racking system
and/or module frames.
In case of executing the grounding of the module frames, SUNHAPPY POWER recommends taking into
account the following considerations:
11
--
► The long frame rails are equipped with predrilled grounding holes in their centre.
These holes shall be used only for grounding purposes and must not be used
for mounting purposes.
► Proper grounding is achieved by connecting the module frame(s) and structural
members contiguously using a suitable grounding conductor. The grounding
wire must be properly fastened to the module frame to assure good electrical
contact. Use copper, copper alloy or any other conductive material accepted by
the applicable National Electrical Regulation.
► Make electrical contact by penetrating the anodized coating of the aluminum
frame.
► To break the anodized layer, SUNHAPPY POWER suggests a stainless steel
toothed washer to be inserted between the nut and the frame. When carrying
out the grounding of the modules, the aluminum frame must not enter in
permanent direct contact with dissimilar metals, which contact could result in a
galvanic corrosion. Stainless steel flat washers can be inserted between frame
and grounding lug.
► SUNHAPPY POWER recommends the use of stainless steel grounding bolts or
grounding lugs specifically designed for photovoltaic applications.
Picture6: Grounding Holes and Grounding Bolt
12
--
4. Maintenance
4.1 General maintenance
SUNHAPPY POWER recommends the following maintenance in order to ensure optimum performance of the
module:
► Check the electrical and mechanical connections every six months to verify that
they are clean, secure and undamaged;
► Check that mounting hardware, terminal screws and grounding components are
tightly secured and are not affected by corrosion;
► Replacement modules must be the same type of those to be replaced;
► Modules generate high voltage when exposed to sunlight. Please cover the
front surface of modules with an opaque no scratching material when repairing.
Repairing works must be performed by specialized and properly trained
personnel only;
► Follow the maintenance instructions for all components used in the system,
► such as support frames, charge regulators, inverters, batteries etc.
► If any problem arises, have them investigated by a competent specialist.
Do not touch live parts of cables and connectors;
► Use appropriate safety equipment (insulated tools, insulating gloves, etc.) when
handling modules;
► Do not disconnect the grounding when doing system maintenance!
► For any electrical maintenance, the PV system must first be shut down.
Improper maintenance can cause lethal electric shock and/or burns!
►
13
--
4.2 Cleaning
Dirt and dust can accumulate on the glass surface of the PV module over time,
particularly in low inclination installations. This can cause a general decrease of
power output and also sedimentation on the lower edge of the modules due to dirt
accumulation. SUNHAPPY POWER recommends a periodic cleaning of PV
modules to ensure maximum power output, especially in regions with high quantity
of dust in the air or low precipitations as follows:
► Under most weather conditions, normal rainfall is enough to keep the PV
module glass surface clean. Clean the glass surface of the module as
necessary and consider that lower inclination requires more cleaning
frequency;
► Always use water and a soft sponge or cloth for cleaning. A mild, nonabrasive
cleaning agent can be used to remove stubborn dirt. High mineral content water
is not recommended, as it may leave residual deposits on the module;
► SUNHAPPY POWER modules may be equipped with antireflective coating
glass. This technology provides SUNHAPPY POWER modules with high
transmittance and low reflectivity features, which improves the module power
output, reduces the dust and dirt deposition and produces very low glare. To
avoid any damage to this layer do not clean the modules with high pressure
washers, steam or corrosive chemicals. Do not use abrasive sponges or
aggressive tools that could scratch the module surface; under no circumstance
should the dirt be dry removed, as this would cause micro scratches which
could have a negative impact on the module´s performances.
► To avoid a possible thermal shock clean the modules during early morning,
when the module is still cold. This is especially recommended in regions with
hotter temperatures;
► In cold environments with snow do not try to remove the frozen snow or ice from
the module scratching on the front glass. Only soft snow can be removed gently
with a soft brush in order to improve the production;
► Don’t clean modules having broken glass or exposed wiring. This can cause a
general electrical failure of the module or electrical shock hazard.
14
--
5.Modules’ End of Life
SUNHAPPY POWER is a member of the PV CYCLE Association, a European
nonprofit as sociation managing a fully operational collection and recycling
scheme for endoflife photovoltaic modules throughout Europe.
6.Modules Specifications
Drawing for SUNHAPPY POWER standard PV modules shown as below.
Picture7: Module Drawing
15
--
5M72
5M96
6M60 / 6P60
6M72 / 6P72
A
1580
1580
1640
1956
B
808
1082
992
992
C
800
800
860
1176
D
1300
1300
1360
1676
E
40
40
40
40
F
27
27
27
27
Cable ( mm )
100
100
100
100
Weight ( kg )
15.2
21.5
19.5
27
Cell Type
Mono 125
Mono 125
Mono / Poly 156
Mono / Poly 156
Nr. of Cells
72
96
60
72
Connector
MC4 compatible
MC4 compatible
MC4 compatible
MC4 compatible
Max Fuse Rating
10A
10A
10A
10A
7.Disclaimer of Liability
Installers must follow all safety precautions as described in this guide as well as local requirement and
regulations by law or authorised organisations.
Because the use of this manual and the conditions or methods of installation, operation, use and maintenance
of photovoltaic (PV) product are beyond SUNHAPPY POWER’s control, SUNHAPPY POWER will not accept
any responsibility and expressly disclaims any liability for loss, damage, or expense arising out of or in any way
connected with such installation, operation, use or maintenance. No responsibility will be assumed by
SUNHAPPY POWER for any infringement of patents or other rights of third parties, which may result from use
of the PV module. No license is granted by implication or otherwise under any patent or patent rights.
The information in this manual is based on SUNHAPPY POWER’s knowledge and experience and it is believed
to be reliable. Nevertheless such information, including product specification (without limitations) and
suggestions do not constitute a warranty, expresses or implied. SUNHAPPY POWER reserves the right to
change the manual, the PV modules, the specifications, or product information sheets without prior notice.
8.Contact Information
Sunhappy Power GmbH
Website : www.sunhappy.de
Address: Am Gewerbegebiet 12, 27243 Groβ Ippener, Germany
Tel :+49 (0)42241419470
Email : [email protected]
16
--
Annex1
Installations Using Frame Mounting Holes
Snow: 2400 Pa - Wind: 2400 Pa
Snow: 5400 Pa - Wind: 2400 Pa
Installations Using Pressure Clamps
Clamping on the short side
Snow: 2400 Pa - Wind: 2400 Pa
Clamping on the long side
Snow: 5400 Pa - Wind: 2400 Pa
Insertion Systems
Snow: 2400 Pa - Wind: 2400 Pa
Snow: 5400 Pa - Wind: 2400 Pa
17