1
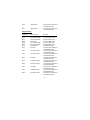
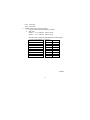
PCI I/O User’s Manual
1. Introducing the PCI I/O Card
The series products of PCI I/O Card are high speed Plug -and-Play PCI add on
cards which provide many combination functions of UART serial port and
ECP/EPP parallel port.
1-1 PCI I/O Card Product list
Standard Slot Series
Model No.
P001
P002
P018
P003
P004
P019
P005
P006
P007
Product Name
1 Serial
1 Serial(16650)
1 Serial(16850)
Dual Serial
Dual Serial(16650)
Dual Serial(16850)
1 Parallel
Dual Parallel
1P1S
P008
1P1S(16650)
P020
1P1S(16850)
P009
1P2S
Function
1 16550 UART Serial
1 16650 UART Serial
1 16850 UART Serial
2 16550 UART Serial
2 16650 UART Serial
2 16850 UART Serial
1 ECP/EPP Parallel
2 ECP/EPP Parallel
1 16550 UART Serial and
1 ECP/EPP Parallel
1 16650 UART Serial and
1 ECP/EPP Parallel
1 16850 UART Serial and
1 ECP/EPP Parallel
2 16550 UART Serial and
1 ECP/EPP Parallel
-1 -
P010
1P2S(16650)
P021
1P2S(16850)
2 16650 UART Serial and
1 ECP/EPP Parallel
2 16850 UART Serial and
1 ECP/EPP Parallel
Single Slot Series
Model No.
P011
P012
P013
P028
P029
P030
P014
P015
Product Name
AV-4 Serial
AV-4 Serial(16650)
AV-4 Serial(16850)
AV-8 Serial
AV-8 Serial(16650)
AV-8 Serial(16850)
AV-2 Parallel
AV-1P2S
P016
AV-1P2S(16650)
P017
AV-1P2S(16850)
P025
AV-2P1S
P026
AV-2P1S(16650)
P027
AV-2P1S(16850)
P022
AV-2P2S
P023
AV-2P2S(16650)
P024
AV-2P2S(16850)
Function
4 16550 UART Serial
4 16650 UART Serial
4 16850 UART Serial
8 16550 UART Serial
8 16650 UART Serial
8 16850 UART Serial
2 ECP/EPP Parallel
2 16550 UART Serial and
1 ECP/EPP Parallel
2 16650 UART Serial and
1 ECP/EPP Parallel
2 16850 UART Serial and
1 ECP/EPP Parallel
1 16550 UART Serial and
2 ECP/EPP Parallel
1 16650 UART Serial and
2 ECP/EPP Parallel
1 16850 UART Serial and
2 ECP/EPP Parallel
2 16550 UART Serial and
2 ECP/EPP Parallel
2 16650 UART Serial and
2 ECP/EPP Parallel
2 16850 UART Serial and
2 ECP/EPP Parallel
-2 -
1-2 Key Features and Benefits
i Conforms to PCI v2.1 Plug and Play
i Full support for DOS, Windows-based, and Linux-based software
i Fast I/O access speed reduces CPU load and improves system
performance dramatically
i IRQ sharing feature eliminates IRQ conflicts
1-3 Special Features and Benefits
According to the Model No. you purchase, PCI I/O card providesome advanced
special features to your PC system.
1-3.1 16850 UART Serial
i High-speed 16850 UART serial port (9-pin) supports baud rates up to
920Kbps. Works with 56K external modems, ISDN terminal adapters
and other serial port devices.
i Built-in 128-byte FIFO buffers dramatically increase data transmit
/receive speed, especially under Windows multitasking environment
1-3.2 16650 UART Serial
i High-speed 16650 UART serial port (9-pin) supports baud rates up to
920Kbps. Works with 56K external modems, ISDN terminal adapters
and other serial port devices.
i Built-in 32-byte FIFO buffers dramatically increase data transmit
/receive speed, especially under Windows multitasking environment
-3 -
1-3.3 16550 UART Serial
i High-speed 16550 UART serial port (9-pin) supports baud rates up to
920Kbps. Works with 56K external modems, ISDN terminal adapters
and other serial port devices.
i Built-in 16-byte FIFO buffers dramatically increase data transmit
/receive speed, especially under Windows multitasking environment
1-3.4 ECP/EPP Parallel
i High-speed parallel port support all types of parallel port devices
including removable cartridge drives, CDR/RWs, printers ,SuperDiskTM
LS-120 drives, scanners and more
i Supports EPP, ECP (PIO mode), Bi-directional Parallel Port (BPP) and
Standard Parallel Port (SPP) modes
i Data Transfer rates up to 2MB/sec
2. Installation Guide
2-1 Hardware Installation
1. Turn OFF the power to your computer and any other connected
Peripheral devices.
2. Unplug the power cord from the back of the computer.
-4 -
3. Remove the computer’s cover, select an available 32-bit PCI slot and
remove the bracket. Save the screw for securing the board after it’s
installed.
4. To install the PCI I/O card. Align the board’s connector to the
expansion slot on the motherboard. Push the board down gently until it
is well seated.
5. Replace the slot bracket holding screw to secure the board to the rear
slot panel.
6. Replace the computer cover and reconnect the power cord. Restart the
system and refer to the next section for Software Installation.
2-2 Software Installation
2-2.1 Windows 2000 Driver Installation
1. At the Add New Hardware Wizard windows, click on “Next”.
2. Select the option “Search for the best driver for your devices
(Recommend), and click on “Next”.
3. Select the option “Specify the location”, insert the Driv er Installation
diskette in the floppy drive and type in a:\win2000 and click on “Next”.
4. Click on “Next” and then “Finish” respectively.
5. Remove the diskette and restart the computer.
2-2.2 Windows 98 Driver Installation
-5 -
1. At the Add New Hard ware Wizard windows, click on “Next”.
2. Select the option “Search for the best driver for your devices
(Recommend), and click on “Next”.
3. Select the option “Specify the location”, insert the Driver Installation
diskette in the floppy drive and type in a:\win98 and click on “Next”.
4. Click on “Next” and then “Finish” respectively.
5. Remove the diskette and restart the computer.
2-2.3 Windows 95 Driver Installation
For proper installation in your system, verify the version of Windows 95 in your
system by going to My Computer/Control Panel/System/General. Then follow
the steps below to install the Windows 95 drivers:
1.
When you first turn on your computer after installing the PCI I/O
Card, Windows will notify you of “New Hardware Found” .
2. Select “Driver from disk provided by hardware manufacturer” and
click “OK”..
3. Insert the Driver Installation diskette in the floppy drive and type in
a:\win95 and click on “OK.”
4. Remove the diskette and restart the computer.
2-2.4 Windows NT 4.0 Driver Installation
1.
2.
3.
4.
Go to Start and Run.
Insert the Driver Installation diskette in the floppy drive and type in
a:\nt4\setup, then click on “OK”.
The “Intek 21 PCI IO Welcome” windows will appear. Click on
“Next” , and “Next” again.
From the next "Setup Complete" window, select “Yes, I want to
restart my computer now” and click on “Finish”.
-6 -
5.
Remove the diskette and restart the computer for the setup to take
effect.
Note: If you plan to connect a parallel device other than a printer
such as zip drive, scanner etc to the port, please follow the next
section to change the I/O address for the port to support the device.
To change the I/O address:
1. Go to Start/Setting/Control Panel, double - click on Itk PCI IO
device icon.
2. Hightlight the LPT address and click on setting.
3. Select or type in an I/O address supported by the device and click on
OK. Make sure the selected I/O address does not conflict with other in
your system.
4. Select Restart Now for the new setup to take effect.
2-2.5 DOS/Windows 3.x Driver Installation
1.
2.
3.
4.
5.
Insert Driver Installationdiskette in the floppy drive and from the
C:\> prompt, type in: copy a:\dos\*.* and press<enter>.
Type in: edit autoexec.bat and press <Enter>
Add C:\ITK21adr.exe at the bottom of the autoexec.bat file.
Go to file, save the changes and exit.
Remove the floppy diskette and restart the systemfor the new setup
to take effect..
2-2.6 Linux setup for PCI Serial Port
1.
2.
3.
4.
5.
Boot with a DOS or Windows Startup Disk.
Run the utility ITK21MOD.EXE in the DOS folder on the Installation
Disk to set the baud rate to 921.6Kb. The default baud rate setting is
115200 on the card. If no high speed is required, you don't need to run this
utility.
Boot to Linux.
Go to the proc directory.
Use vi to open the pci file.
-7 -
6.
7.
8.
9.
10.
11.
12.
13.
14.
Search for vendor ID 14db.
Write down the port address and IRQ number (for example: 0xd400 and
IRQ 12).
Go to the dev directory.
Use the setserial command to set up the serial port:
setserial ttyS3 port 0xd400 uart 16550A irq 12 baud_base 921600 spd_cust
divisor 4
ttyS3: port number, could be ttyS4 if the system already have three serial
ports installed
uart: UART type, use 16550A if the UART is 16550
spd_cust: set custom speed
divisor: baud rate divide by the divisor number equals to modem data
transfer speed. If the baud_base is set to 921600, then the divisor has to be
4 to get a transfer speed of 230Kb.
Run Minicom configuration utility by typing:
minicom -s
In Minicom, go to Serial Port Setup, then Serial Device.
Change the modem to use port /dev/ttyS3.
Set the baud rate to 38400.
Save the changes as a dfl file.
Note: We tested the serial port with RedHat Linux 6.0 with a Motorola
Bitsurfr Pro EZ to run at 230Kb. The procedure should work with earlier
versions of RedHat Linux or other Linux-like operating systems.
2-2.7 Linux setup for PCI Parallel Port
1.
Load addresses in kernel. Define them as LPT0,1,and 2(use default
addresses)
Default addresses:
LPT0 - 03BC-03BE
-8 -
LPT1 - 0378-037A
LPT2 - 0278-027A
2. RedHat 6.0 use version 2.2 kernel or higher
a. Load PCIUTILS using the SETUPPCI command
b. ADD lines:
SETPCI -V –D 14db:2120 0X10.L=0x278
SETPCI -V –D 14db:2120 0X14.L=0x678
2120: device ID, it could be another ID number as following table,
according to the Model No. you purchase:
Model No
Device ID
Model No Device ID
P005
2120
P017
2162
P006
2121
P020
2112
P007
2110
P021
2162
P008
2111
P022
2144
P009
2160
P023
2145
P010
2161
P024
2146
P014
2121
P025
2140
P015
2160
P026
2141
P016
2161
P027
2142
02-002D
-9 -