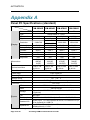
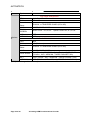
1
Digital Signage Touch Panel PC USER MANUAL AKTIVATECH Copyright © 2009 Brotek Technology Inc. Ltd. All Rights Reserved No part of this publication may be reproduced, transmitted, transcribed, stored in a retrieval system, or translated into any language or computer language, in any form or by any means, including, but not limited to, electronic, magnetic, optical, chemical, manual, or otherwise without prior written permission of Brotek Technology Inc. Ltd. Disclaimer The information in this document is subject to change without notice. Brotek Technology Inc. Ltd. makes no representations or warranties with respect to the contents hereof and specifically disclaim any implied warranties of merchantability or fitness for a particular purpose. Brotek Technology Inc. Ltd. reserves the right to revise this publication and to make changes from time to time in the content hereof without obligation of Brotek Technology Inc. Ltd. to notify any person of such revisions or changes. Trademark Acknowledgments All other product names mentioned herein that are trademarks or registered trademarks are the property of their respective companies. All rights of these documents are reserved by Brotek Technology Inc. Ltd. FCC Notice This device complies with Part 15 of the FCC Rules. Operation is subject to the following two conditions: (1) This device may not cause harmful interference (2) This device must accept any interference received, including interference that may cause undesired operation. Page 1 of 23 A Leading OEM Touch Solutions Provider AKTIVATECH Table of Contents Copyright © 2009 ....................................................................................................... 1 Disclaimer ............................................................................................................ 1 Trademark Acknowledgments .............................................................................. 1 FCC Notice .......................................................................................................... 1 Table of Contents ....................................................................................................... 2 Important safety notice......................................................................................... 4 1 ................................................................................................................................. 6 IN T R O D U C T I O N ................................................................................................ 6 About this Manual ................................................................................................ 6 Contact information.............................................................................................. 7 Overview .............................................................................................................. 7 2 ................................................................................................................................. 7 S P E C I F I C A T I O N................................................................................................ 7 About Specification .............................................................................................. 7 TFT Features ....................................................................................................... 8 SYSTEM Features ............................................................................................... 9 Mini ITX Intel GM45 ............................................................................................... 9 Mini ITX 945 ATOM .............................................................................................. 10 Monitor Features................................................................................................ 11 HD Preset Timing Modes .................................................................................... 11 FHD Preset Timing Modes.................................................................................. 11 Monitor OSD Control Guide ............................................................................... 12 MONITOR BUTTON OVERVIEW ......................................................................... 12 Monitor Remote Control OVERVIEW.................................................................... 12 ON SCREEN DISPLAY FUNCTIONS................................................................ 13 FHD OSD Control Function List......................................................................... 13 HD OSD Control Function List ........................................................................... 16 3 ............................................................................................................................... 20 Installation & Mounting....................................................................................... 20 System Installation............................................................................................. 20 Mounting ............................................................................................................ 22 4 ............................................................................................................................... 23 Touch Screen....................................................................................................... 23 Touch Screen Specification................................................................................ 23 SAW Touch ........................................................................................................ 23 Optical Touch ..................................................................................................... 24 SAW Touch Screen Installation and Calibration guide ....................................... 25 SAW Touch Calibration...................................................................................... 32 SAW Touch-kit Setting Property ........................................................................ 35 Page 2 of 23 A Leading OEM Touch Solutions Provider AKTIVATECH OPTICAL Touch Setting Property ...................................................................... 39 5 ............................................................................................................................... 41 Troubleshooting ............................................................................................... 41 No picture .......................................................................................................... 41 Power Button does not respond......................................................................... 41 Image is unstable, unfocused ............................................................................ 41 LED on monitor is not lit (no green or amber color can be seen) ....................... 41 Display image is not properly sized.................................................................... 42 Selected resolution is not displayed properly ..................................................... 42 Cursor jumping problem..................................................................................... 42 Mist on the Glass inside the screen ................................................................... 42 Appendix A............................................................................................................ 43 Panel PC Specifications (standard) ................................................................... 43 Page 3 of 23 A Leading OEM Touch Solutions Provider AKTIVATECH Important safety notice Please read this manual carefully and save to use in the future. Make sure to unplug the power lead before cleaning the product. Unplug the power lead from the power outlet and wipe the product using a soft, dry cloth. Do not use components except those recommended by the manufacturer, failure to do so may cause damage. Do not try to move the monitor by pulling only the cord nor touch the plug with wet hands. Do not excessively bend the plug and wire nor place heavy objects upon them, which could cause damage. Keep the product away from places exposed to oil, smoke or moisture; do not install inside a vehicle, this may cause malfunction, an electric shock or fire. Especially avoid operating the monitor near water or outdoors where it could be exposed to snow or rain. Do not cover the vents on the monitor case, do not place the monitor or power adapter on the bed, sofa, carpet etc, as bad ventilation may cause a breakdown or fire. When installing the product, make sure to keep it away from the wall (more than 76mm (3 inch) for ventilation purposes. Only the type of power listed in the label of the LCD can be used. If you have questions of power type, please contact local dealer or power supply department. Use only a properly grounded plug and receptacle. An improper ground may cause electric shock or equipment damage. If you can’t insert the plug into outlet, please change the outlet. Make sure the outlet can support total electricity of products be plug into it, do not connect too many extension cords or plugs to an outlet. Otherwise it may cause fire. Do not place the product on an unstable or small surface area. Place the product on an even, stable surface, as the product may fall and cause harm Page 4 of 23 A Leading OEM Touch Solutions Provider AKTIVATECH to someone walking by, specifically children. Do not try to extend the power wire, otherwise it may cause fire. Do not open the monitor cabinet by yourself, if monitor needs to be examined or repaired, please contact the professional service. Firstly pull out the power plug and connect the professional service when it happens following: a. power wire or power cable is damaged. b. monitor fall into ground or monitor cabinet is damaged. c. monitor displays obviously out of the way, needs to be repaired. Unplug the power cord from the power outlet when monitor is not used. Do not install the product in places with poor ventilation, high light, high temperature or moisture. Do not install the product PORTRAIT, specially the size over 42”. If you need Portrait screens, please contact us. Page 5 of 23 A Leading OEM Touch Solutions Provider AKTIVATECH 1 INTRODUCTION About this Manual This manual is intended as a reference guide for the BROTEK Technology INC. LTD. A.I.O. Touch Panel PC. This Manual provides the information needed to install, set up and maintain the BROTEK Technology INC. LTD. A.I.O. Touch Panel PC. In addition, this manual describes basic technical information about the Touch Panel, troubleshooting and contact information. Page 6 of 23 A Leading OEM Touch Solutions Provider AKTIVATECH Contact information Representatives of BROTEK Technology INC. LTD. can be contacted on the numbers/emails below for further information and to resolve any issues you might have with our products. BROTEK Technology INC. LTD. 9F-1, NO.11 Jingguo Rd. Taoyuan City, 330, Taiwan (R.O.C) Tel: 886-3-3251135 Fax: 886-3-3578375 http://www.brotek.com.tw Please check our web site on a regular basis for updates, press information, application notes, latest software drivers and utilities. Overview Thank you for purchasing the BROTEK A.I.O. Touch Panel PC, it is a smart multi-functional PC monitor with an active matrix TFT LCD that displays sharp and brilliant images of text and graphics. The embedded Touch Panel manufactured by Next Window, will enhance the whole interface between man and machine in multimedia application. Page 7 of 23 A Leading OEM Touch Solutions Provider AKTIVATECH 2 SPECIFICATION About Specification BROTEK Panel PC designed in all size, 19” 26” 32” 42” 47” 52” and even 65”, BROTEK also provides High-Tech solutions for different customers needs and to fit different environment, such as Sunlight solution, PID Control, PMMA & Tempered Glass Protection sheet, and Touch Screen. This chapter provides the information about LCD Panel, Touch Screen and PC system which you might using now, and descriptions about the OSD control function. Page 7 of 23 A Leading OEM Touch Solutions Provider AKTIVATECH TFT Features Size LCD Maker 19” 26” 32” 42” AUO AUO AUO Resolution 1440x900 1366x768 1366x768 Lifetime Color Contract R.t. V.a. (HxV) Cd/m2 50,000 16.7(million) 1000 : 1 5ms 160∘ 50,000 16.7(million) 2500 : 1 6.5ms 170∘ 50,000 16.7(million) 2500 : 1 6.5ms 170∘ LG 1366x768 1920x1080 50,000 16.7(million) 1400 : 1 6ms 176∘ 300 550 550 500 Size LCD Maker Resolution Lifetime Color Contract R.t. V.a. (HxV) Cd/m2 47” 52” 65” LG 1920x1080 50,000 16.7(million) 2000 : 1 8ms 176∘ SHARP 1920x1080 50,000 16.7(million) 1500 : 1 6ms 176∘ SHARP 1920x1080 50,000 16.7(million) 2000 : 1 6ms 176∘ 500 450 450 ※Subject to change without notice, please contact us and confirm. ※All information provided by AUO, LG, and SHARP. Page 8 of 23 A Leading OEM Touch Solutions Provider AKTIVATECH SYSTEM Features Mini ITX Intel GM45 System CPU Intel Core 2 Duo / Celeron M FSB 667 / 800 / 1066 MHz (Celeron M only 667) BIOS AWARD 16 Mbit, SPI System Chipset GM45 + ICH9M System Memory H/W Status Monitor SmartFan Control DDR3 800 / 1066 MHz SDRAM, 204-pin SODIMM type, MAX Capacity 4GB Monitoring CPU temperature, voltage, and fan status with auto throttling control Yes I/O Rear I/O 1 x VGA, 1 x DVI, 2 x Ethernet, 4 x USB 2.0, 3 x Audio, 2 x Serial, 2 x PS/2 Display Chipset Intel GM45 GMCH integrated Graphics Media Accelerator X4500 VRAM Shared system memory up to 384 MB video memory Dual Display CRT + LVDS; CRT + DVI; DVI + LVDS LVDS Single channel 18/24-bit/Dual channel 36/48-bit LVDS Audio Audio Interface Page 9 of 23 Mic in, Line in, (CD Audio in), Line out A Leading OEM Touch Solutions Provider AKTIVATECH Mini ITX 945 ATOM System Processor Intel® Atom™ processor 270 Main Memory • One 240-pin SDRAM Dual Inline Memory Module (DIMM) socket • 667/533 MHz single channel DDR2 SDRAM interface • Supports up to 2 GB of system memory Chipset Intel® 945GC Express Chipset consisting of: • Intel® 82945GC Express Chipset Graphics and Memory Controller Hub (GMCH) • Intel® 82801GB I/O Controller Hub (ICH7) Graphics Intel® 945GC Express Chipset with Intel® Graphics Media Accelerator 950 (Intel® GMA 950) Audio • RealTek* ALC662 audio codec • Support for Intel® High Definition Audio • Support for 4-channel audio (two independent 2-channel audio streams) Peripheral Interfaces • Up to six USB 2.0 ports ― Four ports routed to the back panel ― Two ports routed to an onboard USB header • One IDE interface with ATA-100/66 support (two devices) • Two Serial ATA (3.0 Gb/s) interfaces • One VGA connector • One parallel port • One serial port • PS/2* keyboard and mouse ports BIOS • Intel® BIOS • Support for SMBIOS • Intel® Rapid BIOS Boot • Intel® Express BIOS Update LAN Support • 10/100 Mb/s LAN Subsystem Power Management • Support for Advanced Configuration and Power Interface (ACPI) • Wake on USB, PCI, PS/2, LAN, and front panel Supported Operating Systems • Microsoft Windows Vista* Starter Edition • Microsoft Windows Vista Basic Edition • Microsoft Windows* XP Professional • Microsoft Windows XP Home For more information about Desktop Board DG945GCLF, including the Technical Product Specification (TPS), BIOS updates, and device drivers, go to : http://support.intel.com/support/motherboards/desktop/. Page 10 of 23 A Leading OEM Touch Solutions Provider AKTIVATECH Monitor Features Configure Graphics card Configure the graphics card of the PC System to the native resolution of the supplied monitor (or less than) and make sure the timing frequency is set to the standard frequency to ensure the LCD display will function. HD or FHD Timing Modes depends on the Panel which you are using. HD Preset Timing Modes Mode 1 2 3 4 5 Resolution H Freq.(KHz) V Freq.(Hz) 640*480@60 31.469 59.940 800*600@60 37.879 60.317 1024*768@60 48.363 60.004 1280*768@60 47.776 59.870 1360*768@60 47.720 59.799 ※Subject to change without notice, please contact us and confirm. FHD Preset Timing Modes Mode 1 2 3 4 5 6 7 8 9 10 11 Resolution H Freq.(KHz) V Freq.(Hz) 640*480@60 31.469 59.940 800*600@60 37.879 60.317 1024*768@60 48.363 60.004 1280*768@60 47.776 59.870 1280*1024@60 63.980 60.000 1360*768@60 47.700 60.000 1440*900@60 59.9 75 1600*1200@60 75.0 60 1680*1050@60 65.3 60 1920*1080@60 74.3 60 1920*1200@60 74.6 60 ※Subject to change without notice, please contact us and confirm. Page 11 of 23 A Leading OEM Touch Solutions Provider AKTIVATECH Monitor OSD Control Guide MONITOR BUTTON OVERVIEW ○,1 POWER ○,2 MENU ○,3 AUTO ○,4 ~ ○,5 There is a 3-second wait between on/off cycles. Use the MENU key to display the OSD (On-Screen Display) menu of monitor. Note : 1) Confirm the selection of OSD 2) Exit the selection of OSD This function is for Auto Adjust Use both buttons to toggle between selections in the On Screen Display (OSD), or to adjust settings (i.e. volume, brightness, etc). Monitor Remote Control OVERVIEW POWER AUTO MENU Page 12 of 23 A Leading OEM Touch Solutions Provider AKTIVATECH ON SCREEN DISPLAY FUNCTIONS FHD OSD Control Function List Press / to locate the item you desire to change, then press “Menu” to make the adjustment, then press “Menu” again to go back main menu. 1) Brightness Press “MENU” to enter OSD function. Press / to make a selection to choose ” Brightness ”.Use the / buttons to adjust their values. After the adjustments are done, press “AUTO” to exit. 2) Contrast Press “MEUN” to enter OSD function menu. And use the / to choose ”Contrast”. Use the / buttons to adjusts the difference between the light and dark areas. When the adjustments are done, press “ AUTO” to exit. 3) Clock Press “MEUN” to enter OSD function menu. And use the / to choose ” Clock”. Use the / buttons to adjust the video distortion. It will appear horizontal noise on the screen while adjust the Clock. 4) Phase Press “MEUN” to enter OSD function menu. And use the / to choose ” Phase”. Use the / buttons to adjust the video distortion. It will appear vertical noise on the screen while adjust the Phase. 5) Horizontal Position Press “MEUN” to enter OSD function menu. And use the / Horizontal Position”. Moves the display picture left or right. Page 13 of 23 A Leading OEM Touch Solutions Provider to choose ” AKTIVATECH 6) Vertical Position Press “MEUN” to enter OSD function menu. And use the Position”. Moves the display picture up or down. 7) / to choose ” Vertical Sharpness Press “MEUN” to enter OSD function menu. And use the / to choose ” Sharpness”. Use the / buttons to adjust the sharpness(available in scaling –up mode). 8) Text Mode Press “MENU” to enter OSD function. Press / to make a selection to choose ” Text Mode ”. Zoom ratio change between VGA and Text mode Press “Menu” to executing. 9) OSD Language Press “MENU” to enter OSD function. Press / to make a selection to choose ” OSD Language ”. Change the OSD language, and press “Menu” to executing. 10) OSD H-Position Press “MENU” to enter OSD function. Press OSD H-Position ”. Adjusts the OSD position. 11) to make a selection to choose ” / to make a selection to choose ” OSD V-Position Press “MENU” to enter OSD function. Press OSD V-Position ”. Adjusts the OSD position. 12) / OSD Transparence Press “MENU” to enter OSD function. Press / to make a selection to choose ” OSD Transparence ”. Adjust the OSD transparency. 13) Switch Color Press “MENU” to enter OSD function. Press Switch Color ”. Adjusts color temperature. Page 14 of 23 / to make a selection to choose ” A Leading OEM Touch Solutions Provider AKTIVATECH 14) Set Color USER Press “MENU” to enter OSD function. Press / to make a selection to choose ” Set Color USER ”. Adjust color temperature for User mode. 15) Reset Press “MENU” to enter OSD function. Press / to make a selection to choose ” Reset”. Restore the default value(factory mode). Press “Men u” to executing. 16) Exit Press “MENU” to enter OSD function. Press / to make a selection to choose ” Exit ”. Exit the OSD menu and save the values. Press “Menu” to executing. 17) Volume Press “MENU” to enter OSD function. Press / to make a selection to choose ” Volume ”. Use the / buttons to adjust the volume setting. 18) Input Source Press “MENU” to enter OSD function. Press / to make a selection to choose ” Input Source ”. Use the / buttons to select input source, and press “Menu” to executing. Page 15 of 23 A Leading OEM Touch Solutions Provider AKTIVATECH HD OSD Control Function List 1) Brightness Press “MENU” to enter OSD function. Press / to make a selection to choose ” Brightness ”.Use the / buttons to adjust their values. After the adjustments are done, press “AUTO” to exit. 2) Contrast Press “MEUN” to enter OSD function menu. And use the / to choose ”Contrast”. Use the / buttons to adjust the values. When the adjustments are done, press “AUTO” to exit. 3) Color Press “MENU” to enter OSD function. Press / to make a selection to choose ”Color”. Press / to choose from the selections (9300°K,6500°K,User color) settled. Press “MENU” to confirm the selections. Press “AUTO” back to the main menu. 3-1 (Sub menu) User color Use the / buttons to toggle among sub-choices (Red, Green, Bl u e ) a n d press ”MENU” to enter. Use the / buttons to adjust the values of each color. When the adjustments are done, press “AUTO” to exit. Page 16 of 23 A Leading OEM Touch Solutions Provider AKTIVATECH 4) Manager Press “MENU” to enter OSD function. Press / to make a selection to choose “Manager”. Press ”MENU” to enter “Manager” settings and then use / buttons to select the sub-item (H. Position, V.Position, Clock, Phase) you would adjust and press “MENU” to enter. Use / buttons to adjust the values. When the adjustments are done, press “AUTO” to exit. 5) Tools Press “MENU” to enter OSD function and use the Press “AUTO” to return to the main menu. / buttons to choose ”Tools”. 5-1 (Sub menu) OSD Timer To choose the “OSD Timer” function and then use / buttons to toggle between the selections. Press the / button to select the time you want the OSD menu to remain on the screen when it is not in use. Press “MENU” to confirm the selections. Press “AUTO” back to the main menu. 5-2 (Sub menu) Reset If you choose to “Reset” option which will return settings to the default settings. The monitor will turn off, then power up again to adjust to the default setting. Press “MENU” to confirm the selections. Press “AUTO” back to the main menu. 5-3 (Sub menu) Power Save Choosing the “Power Save” function, use / buttons to toggle between the selections. Press the / button to make a selection. Press “MENU” to confirm the selections. Press “AUTO” back to the main menu. 5-4 (sub menu) Language If you choose the language sub-menu, use / buttons to toggle between the Language selections. Press / button to select a language. Press the “AUTO” to exit. 6) Volume : Press “MENU” to enter OSD function and use the choose ”Volume”. Press “AUTO” to return to the main menu. ※Note: You can use the remote control to adjust “Volume”. (No require to press through “MENU”) increase volume decrease volume Page 17 of 23 A Leading OEM Touch Solutions Provider / buttons to AKTIVATECH 7) Input source : Press “MENU” to enter OSD function and use the / source”. Press “ AUTO” to return to the main menu. buttons to choose ”Input 7-1 (sub menu) Input Source If you choose the “Input Source” sub-menu, use / buttons to toggle between the Input Source selections. Press / button to select “ VGA” or “DVI” .Press “ MENU” to confirm. Press the “AUTO” to exit. Page 18 of 23 A Leading OEM Touch Solutions Provider AKTIVATECH 8) Scaling Select : Press “MENU” to enter OSD function and use the / Select”. Press “ AUTO” to return to the main menu. buttons to choose ”Scaling 8-1 (sub menu) Scaling Select If you choose the Scaling Select sub-menu, use / buttons to toggle between the scaling source selections. Press / button to select “16:9” or “4:3”. Press the “AUTO” to exit. 9) Press “ AUTO” that the display will be auto adjusted to its optimal performance. Page 19 of 23 A Leading OEM Touch Solutions Provider AKTIVATECH 3 Installation & Mounting System Installation Before OS(Operating System) Installation, you need to prepare following equipments in order to make Installation smooth. Small size Monitor x 1. (for 65” Installation only) VGA wire x 1. Keyboard, Mouse x 1. O.S. CD x 1. USB type DVD/CD ROM. Step 1 Connect PC VGA Output and Monitor VGA Input on your Panel PC by using VGA wire. Step 2 Connect your USB DVD/CD ROM with the USB port on your Panel PC, put OS Disc in the DVD/CD ROM. Enter Bios settings and select your USB DVD/CD ROM as 1st boot device. Save Bios settings, Reboot Panel PC and start your Installation. Page 20 of 23 A Leading OEM Touch Solutions Provider AKTIVATECH ※Step 3 (Display troubleshooting) In the first time you start the Panel PC system, you might can’t see anything after you seen the photo as below. Please press Ctrl + Alt + F1 on your keyboard to switch display mode. Then you can see your desk-top again. ※ Every time you re-connect PC VGA Output and Monitor VGA Input, you will need to do Step 3. Page 21 of 23 A Leading OEM Touch Solutions Provider AKTIVATECH Mounting Blue Circle : Landscape wall mount hole. Red Circle : Portrait wall mount hole. ※ Screw for wall mount : 19”, 26”, 32”, 42”─ M4 47”, 52”, 55”, 60”, 65”─ M6 ※ Panels for Landscape and Portrait are totally different, please make sure your usage before you purchase the screens or mount them on the wall. We won’t take any responsibility if there is any damage caused by incorrect usage of the units. Page 22 of 23 A Leading OEM Touch Solutions Provider AKTIVATECH 4 Touch Screen Touch Screen Specification SAW Touch Features Plug and play compatible. Support complete line of Windows and Linux OS. Support panels of flat type for LCD. Character recognition for English,Chinese and Japanese. Can support any special request for panel,controller or driver. SAW Touch Environmental Conditions SAW Tempered Glass Operating Temp. Operating Hum. Storage Temp. Touch Activation Force Positional Accuracy Touch Life Input Medium Break Resistance Surface Hohs’ hardness rating Light Transmission Page 23 of 23 -20°C ~ 50°C. 90% RH at 40°C. (no dew falls) -40°C ~ 70°C. Less than 85 grams. Deviation of error less than ±1%. More than 50 million touches. Finger, gloved hand, rubber, cloth or leather. 6mm Heat Tempered Glass. Meets UL-1950 Steel Ball Drop Test. 7. 90%. (per ASTM D1003) A Leading OEM Touch Solutions Provider AKTIVATECH SAW Control Board Operating Temp. Operating Hum. Storage Temp. Operating Altitude Electrostatic Protection Interface Touch Resolution Reliability 0°C ~ 65°C. 10% ~ 90% RH. (no dew falls) -25°C ~ 85°C. 10,000 feet. (3048 m) Per EN 61000-4-2, 1995 : Meets Level 4. USB 1.1. (Plug and play compatible) 4096 x 4096, size independent. MTBF greater than 300,000 hours. Optical Touch Features Plug and play compatible. (HID for XP, VISTA) Support complete line of Windows, Mac OSX and Linux OS (requires drivers). Support panels of flat type for LCD. Support Windows 7 Two-point touch. (need Driver) Optical Touch Specifications Operating Temp. Operating Hum. Storage Temp. Touch Activation Force Positional Accuracy Touch Life Input Medium Break Resistance Surface Hohs’ hardness rating Light Transmission Touch Technology Touch Accuracy Response time Calibration Software Page 24 of 23 -20°C ~ 60°C. 90% RH at 40°C. (non-condensating) -25°C ~ 85°C. No pressure required. Deviation of error less than ±1%. Unlimited. Finger, Rubber, Pen or leather. 6mm Heat Tempered Glass. Meets UL-1950 Steel Ball Drop Test. 7. >92%. (per ASTM D1003) NextWindow Optical Imaging. ± 2 mm (for 40” screen) over 90% of the touch sensitive area. 9ms to 22ms, typical 14ms. 4-point driverless calibration. (Mac and Linux need to use the external calibration button.) Works with Windows native HID mouse driver. A Leading OEM Touch Solutions Provider AKTIVATECH SAW Touch Screen Installation and Calibration guide Touchkit driver software installation package was created with Installshiled tool. The installation package contains files as below. Double click at the setup.exe file to start software driver installation. Then, the setup program will guide user to complete software installation. Page 25 of 23 A Leading OEM Touch Solutions Provider AKTIVATECH Press Next button to continue installation, then, a new dialog popped up as below, This dialog shows to ask user if the PS2 filter driver for touch screen to be installed. User can check this check for PS2 filter driver installation. The standard PS2 mice can still work well after this filter driver installed because Touch kit PS2 filter driver can work with both standard PS2 mice and PS2 touch screen. But, this filter driver may does not work with other devices with the PS2 mouse port. After check or uncheck this check box, press Next button to continue installation. Then, it shows new dialog as below, Page 26 of 23 A Leading OEM Touch Solutions Provider AKTIVATECH Also, Touchkit software provides user with a fast 4 points calibration. If the system needs 4 points calibration to make sure the touch accuracy every system reboot, user can check this check box. The 4 points calibration window will be popped up for calibration whenever system boot up if this check box was checked during driver software installation. Press Next button to continue installation. The setup program prompts a message box to hint user to make sure that the Touchkit USB controller devices were well connected with system USB ports to guarantee the USB touchkit device drivers updated after driver installation. Then, just press OK to continue, Page 27 of 23 A Leading OEM Touch Solutions Provider AKTIVATECH A pop up window for user to choose the target path the files will be copied to. Then, Press Next to continue, A dialog popped up for user to assign the target program folder. Press Next Page 28 of 23 A Leading OEM Touch Solutions Provider AKTIVATECH The setup program will scan system COM ports to detect if any Touchkit serial device was connected. If yes, it also pops up a message box for user to make sure if setup program install driver for this new found device. Just Press Yes or No to confirm driver installation for this new found device. Finally, if PS2 filter driver was installed during this software installation, a reboot dialog is Page 29 of 23 A Leading OEM Touch Solutions Provider AKTIVATECH popped up for system reboot request to complete driver installation. Page 30 of 23 A Leading OEM Touch Solutions Provider AKTIVATECH After driver installation, a shortcut will be generated and shown on the desktop. And, a new file group generated for Touchkit as below, Page 31 of 23 A Leading OEM Touch Solutions Provider AKTIVATECH SAW Touch Calibration Calibration, draw test tools and the linearity curve of the touchscreen were list in this property page shown as below for user to do touchscreen calibration and touch position test. User can do calibration or draw test by pressing the function push buttons. 1. Linearization Curve Linearization curve of the touchscreen is list in this page for reference and trouble shooting purpose. 2. 4 points calibration It needs calibration before the touchscreen can work accurately. Whenever the user feel the accuracy lost, user can do calibration again to get a more accuracy touch function. Pressing this button, a new window will be popped-up at the location when the touchscreen was mapped to area for this touch system to guide the user do 4 points calibration. User should follows the guide to touch and hold the blinking X symbol in the calibration window until it does not blink to make sure that the utility can gather enough data for computation. In addition, a time line bar is shown in the bottom of the window to indicate time elapsed. If the touchscreen was not touched before the time line bar going to right end, the calibration task will be terminated automatically. Page 32 of 23 A Leading OEM Touch Solutions Provider AKTIVATECH 3. Clear and Calibration Press this button to erase the 25 points calibration/linearization parameters and force user to do 4 points calibration again. After 25 points calibration data was clear, the 4 points calibration data will be invalid. It needs to do 4 points calibration. 4. Linearization Linearization ( 25 or 9 points calibration ) function is used to compensate the touchscreen linearity. After linearization completed, the linearity of the touchscreen will be shown in the Linearity curve window. Pressing this button, a new window will be popped-up at the location when the touchscreen was mapped to area for this touch system to guide the user do 25 points calibration. User should follows the guide to touch and hold the blinking X symbol in the calibration window until it does not blink to make sure that the utility can gather enough data for computation. In addition, a time line bar is shown in the bottom of the window to indicate time elapsed. If the touchscreen was not touched before the time line bar going to right end, the calibration task will be terminated automatically. Page 33 of 23 A Leading OEM Touch Solutions Provider AKTIVATECH 5. Draw Test This function is used for accuracy and performance check. Press this button and a new pop up window will be popped up in the location where the touchscreen was mapped to the touch system as below, User can press the Clear button to clear the window. Press Quit button to terminate this draw test. Page 34 of 23 A Leading OEM Touch Solutions Provider AKTIVATECH SAW Touch-kit Setting Property The Setting property page can be shown both in Windows Device Manager and Touchkit Utility as below, There are function buttons and check boxes described as below 1. Beep 1-1 ) Beep On Touch Check this check box to enable driver to generate a beep sound when touch touchscreen state is switched from untouched to touched state. 1-2 ) Beep On Release Check this check box to enable driver to generate a beep sound when touchecreen state is switched from touched state to untouch state. 1-3 )Frequency Adjust this frequency to control the beep sound frequency generated by the driver. Page 35 of 23 A Leading OEM Touch Solutions Provider AKTIVATECH 1-4 ) Duration Adjust this duration to control the beep sound duration. 2 Linearization Style Touchkit utility provides user with both 9 points and 25 points calibration for linearization. User can select the suitable kind of linearization type. 3 Double Click Time The double Click Time group is used to set system double click time. Change this value will affects the double click behavior for all of the mice devices in the system. Two continuous clicks at the same area. Within this specified time period will be recognized as a double click event. 4 Double Click Area The double click area group is used to set the system double click area. Change this value will affects the double click behavior for all of the mice devices in the system. Two continuous click with this specified area in the specified double click time will be recognized as a double click event. 5 Mouse Emulation mode There are 5 mouse emulation modes for Touchkit touchscreen controllers. Press on the button to change the emulation mode, 4-1) Normal Mode Normal mode behaves mouse button down and mouse move. User can select this mode to select object, and dragging the object. 4-2) Click On Touch With this Click On Touch mode, the driver emulates a mouse click event when the touchscreen state was switched from un-touched state to touched state. Then, the driver always generate mouse move event and is tracking the touch position until the touchscreen state switched to un-touch state. 4-3)Click On Release With this Click On Release mode, the driver emulates a mouse click event when the touchscreen state was switched from touched state to un-touched state. Page 36 of 23 A Leading OEM Touch Solutions Provider AKTIVATECH 4-4) Click On Touch without moving cursor With this mode, the driver behaves similar as Click On Touch mode. The cursor does not move to the touch position except the first touch point. 4-4)Click On Release without moving cursor With this mode, the driver behaves similar as Click On Release mode. The cursor does not move to the touch position except the lift-off point. 6 Option User can set configuration for some advanced functions with this option button. Press this button, a pop up property sheet window will be popped up and shown as below. Page 37 of 23 A Leading OEM Touch Solutions Provider AKTIVATECH The advanced functions are 5-1) Enable Constant Touch( Hold ) Constant Touch is the function to check if the most recent touched position is same as the previous touched point. If the points difference is smaller than the defined area, the driver does not generate any mouse event to reduce system loading. Check this check box to enable this function ( Hold ) and un-check it to disable this function. 5-2) Enable Auto Right Click If the touchscreen was kept touched for a specified time, the driver will generate a mouse right button click event if this function was enabled. Check the check box to enable this function and uncheck it to disable this function. 5-3) Enable Touch The driver read the data input from controller to generate mouse event. However, it can be enabled or disabled to generate the mouse event. Check this check box to make driver to generate the mouse event when it receives the touch point input from Touchkit touchscreen control and un-check it to stop driver generating the mouse event. 5-4) Enable cursor stabilization A software filter was implemented inside the driver to filter some noise to stabilize and smooth the touch points. Then, the user can see a more stable cursor. Check this check box to enable this software filter and un-check it to disable this function. 5-5) Constant Touch Area ( Hold area ) Adjust the parameter for Constant Touch( Hold ) function. This is a criterion to judge if the most recent touched point is same as the previous touched point. If the points difference is within this area, it will be recognized as the same touch point and the driver does not generate new mouse event for this new touch point. Page 38 of 23 A Leading OEM Touch Solutions Provider AKTIVATECH 5-6) Auto Right Click Time Adjust the Right click time for auto right click function. If the touchscreen was touched and hold for this period of time, the driver generates a mouse right click event. OPTICAL Touch Setting Property Installation Procedure • Download the NextWindow Multi-Touch Device Driver from this URL: 5 http://www.nextwindow.com/windriver • Run the installation file and follow the installation instructions. • After the installation, your touch screen is ready for use with multi-touch and Windows 7. • To verify that the driver has been installed correctly, open a command prompt and type regedit and check that NWFilter (with Enum under NWFilter) exists under HKEY_LOCAL_MACHINE > SYSTEM > CurrentControlSet > Services. Figure 2.NWFilter in Registry screen shot. • This completes the installation procedure. Page 39 of 23 A Leading OEM Touch Solutions Provider AKTIVATECH Touch Calibration • Press “Scroll Lock” key on your keyboard for 6 times. (Mac or Linux need to use the external calibration button) • The Mouse pointer will move to the calibration point automatically. • Press the calibration point by your finger or object such as Pan or Pencil. • After you press the calibration point, the mouse pointer will move to next point automatically. • The calibration procedure will be completed after you finish 4 points calibration. Page 40 of 23 A Leading OEM Touch Solutions Provider AKTIVATECH 5 Troubleshooting No picture The signal cable should be fully connected to the PC system. Press Ctrl + Alt + F1 to switch VGA signal output mode. Power Button and computer power switch should be in the ON position. Check to make sure that a supported mode has been selected on the graphics card or system being used. (Please consult graphics card or system manual to change graphics mode). Check the monitor and your graphics card with respect to compatibility and recommended settings. Check the signal cable connector for bent or pushed-in pins. Check that the BNC or D-SUB button is in the correct position. Power Button does not respond Unplug the power cord of the monitor from the AC outlet to turn off and reset the monitor, or simultaneously press the RESET and Power buttons. Image is unstable, unfocused Signal cable should be fully connected to the computer. Use the OSD Image Adjust controls to focus and adjust display by increasing or decreasing the Fine control. When the display mode is changed, the OSD Image Adjust settings may need to be re-adjusted. Check the monitor with respect to compatibility and recommended signal timings. If your text is garbled, change the video mode to non-interlace and use 60Hz refresh rate. LED on monitor is not lit (no green or amber color can be seen) Power Button should be in the ON position and power lead should be connected. Make certain the computer is not in a power-saving mode (touch the keyboard, mouse or Touch screen if present). Page 41 of 23 A Leading OEM Touch Solutions Provider AKTIVATECH Display image is not properly sized Use the OSD Image Adjust controls to increase or decrease the H. Size. Check to make sure that a supported mode and signal timing has been selected on the graphics card or system being used (Please consult the graphics card or system manual to change graphics mode or refresh rate). Selected resolution is not displayed properly Select the Display Resolution in the OSD Information menu to confirm that the appropriate resolution has been selected. If not, select corresponding option by pressing the control button. Cursor jumping problem The possible reasons for cursor jumping are: 1 Reflection stripe area is covered by something. Please clean the reflection stripe on touchscreen (see last section). 2 Controller is faulty; the unit will need to be returned to the Service .department of Brotek Technology. Mist on the Glass inside the screen The possible reasons for this problem: 1 The big difference of temperature, and high Humidity of the environment. Turn on the screen and run for 2~3 hours, the mist will evaporate automatically. Page 42 of 23 A Leading OEM Touch Solutions Provider AKTIVATECH Appendix A Panel PC Specifications (standard) Model VB-32965 Item Display Size Type Aspect ratio Supplier 32” 16:9 AUO Resolution 1366x768 Lifetime(hrs) Color(million) Contrast Response ViewAngle Brightness Dimensions Optimal resolution 50,000 16.7 2500:1 6.5ms 170∘ 550 790(L) 485(W) 124(D) 1360 x 768 @ 60 Hz VB-42965 42” 47" Active matrix TFT LCD 16:9 16:9 LG LG 1366x768 1920x1080 1920x1080 50,000 50,000 16.7 16.7 1400:1 2000:1 6ms 8ms 176∘ 176∘ 500 1028(L) 620(W) 124.5(D) 1360 x 768 @ 60 Hz Case Material 500 1132(L) 675(W) 124.5(D) 1920 x 1080 @ 60 Hz VB-52965 52" 16:9 SHARP 1920x1080 50,000 16.7 1500:1 6ms 176∘ 450 1272(L) 768(W) 134.5(D) 1920 x 1080 @ 60 Hz Metal Power input 110V / 220V AC 0∘~ 50∘C Operating Temp. -20∘~ 60∘C Storage Temp. 5~90% @40∘C non-condensing Relative Humidity Certificate System VB-47965 CE / FCC CPU Intel ATOM 1.6GHz up to Core 2 Duo 2.4GHz RAM 1GB up to 4GB Storage Space for 1x 2.5" HDD Expansion PCI slot x 1 , MiniPCI slot x 1(optional) Fan NO FAN Touch(optional) SAW Touch─19”,26”,32” Optical Touch─42”,47”,52”,65” Power Input ,1 x PS/2 keyboard & mouse,1 x Ethernet Port (or 2 for Optional),4 x USB 2.0 1 x COM(or 2 for optional), 1 x VGA, 1 x Line-out,1 x Optional I/O HDMI(optional), 1 x DVI ※Subject to change without notice, please contact us and confirm. Standard I/O Page 43 of 23 A Leading OEM Touch Solutions Provider AKTIVATECH Speaker Options CPU RAM Protection Sheet H.D.D. TOUCH SCREEN WIFI WEBCAM CPU RAM Protection Sheet H.D.D. 5w x 2 Intel GM45 Motherboard Intel Core 2 Duo/Celeron M. 2G or 4G P.M.M.A. or TEMPERED GLASS (AR or AG) 160GB, 250GB, 320GB SAW Touch─19”,26”,32” Optical Touch─42”,47”,52”,65” YES YES GME 945 ATOM N270 Motherboard N/A 2G (Maximum) P.M.M.A. or TEMPERED GLASS (AR or AG) 160GB, 250GB, 320GB SAW Touch─19”,26”,32” Optical Touch─42”,47”,52”,65” Touch Screen (TOUCH , WIFI , WEBCAM , THREE CHOOSE TWO) WIFI YES (TOUCH , WIFI , WEBCAM , THREE CHOOSE TWO) WEBCAM YES (TOUCH , WIFI , WEBCAM , THREE CHOOSE TWO) ※Subject to change without notice, please contact us and confirm. Page 44 of 23 A Leading OEM Touch Solutions Provider