1
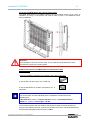
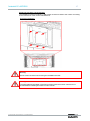
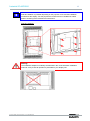
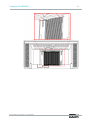
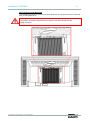
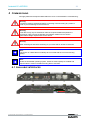
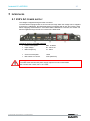
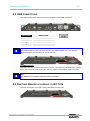
Version 2.0 User Manual Industrial PCs MCR5000 Industrial PCs MCR5000 2 Product Portfolio Copyright ads-tec GmbH Heinrich-Hertz-Str. 1 D-72622 Nürtingen Germany © ads-tec GmbH • Heinrich-Hertz-Str. 1 • D-72622 Nürtingen Industrial PCs MCR5000 3 INDEX About us ...................................................................................................................................... 5 1 Remarks ..................................................................................................................... 6 1.1 1.2 1.3 1.4 1.5 1.6 1.7 1.8 Relevant device documentation ............................................................................................... 6 Description of the warning symbols used in this guide ........................................................ 6 Data, Images, Amendments and Variations ............................................................................ 6 Trademarks................................................................................................................................. 7 Copyright .................................................................................................................................... 7 Environmental conditions ......................................................................................................... 8 Standards ................................................................................................................................... 8 Scope of delivery ....................................................................................................................... 9 2 Operating instructions ............................................................................................ 10 2.1 2.2 2.3 2.4 2.5 Operating location ................................................................................................................... 10 Damages due to Improper Use ............................................................................................... 10 Warranty / Repairs ................................................................................................................... 11 Treatment and disposal of lithium batteries ......................................................................... 11 Safety Instructions .................................................................................................................. 11 3 Assembly ................................................................................................................. 12 3.1 3.2 Overall Device Dimensions..................................................................................................... 12 Order of installation ................................................................................................................. 13 4 Commissioning ....................................................................................................... 23 4.1 4.2 4.3 4.4 Available interfaces ................................................................................................................. 23 Cable installation ..................................................................................................................... 24 Readiness for Operation Checks ........................................................................................... 24 Status displays......................................................................................................................... 24 5 Interfaces ................................................................................................................. 25 5.1 5.2 5.3 5.4 5.5 5.6 5.7 5.8 5.9 230 V AC power supply ........................................................................................................... 25 USB connections ..................................................................................................................... 26 Sim Card Reader according to ISO 7816 ............................................................................... 26 IEEE1394 Firewire 4-pin connection (without power) ......................................................... 27 Network connection (RJ45) .................................................................................................... 27 COM (RS232) Serial Interface ................................................................................................. 28 Optional radio network card ................................................................................................... 28 DVI interface ............................................................................................................................. 29 AUDIO L / R.............................................................................................................................. 30 © ads-tec GmbH • Heinrich-Hertz-Str. 1 • D-72622 Nürtingen Industrial PCs MCR5000 4 6 Drives ....................................................................................................................... 32 6.1 6.2 6.3 Hard drives / compact flash drive (IDE interface) ................................................................ 32 DVD drive / integrated model (notebook) ............................................................................. 32 External drives ........................................................................................................................ 33 7 Technical details ..................................................................................................... 34 7.1 7.2 Computer data ......................................................................................................................... 34 General data............................................................................................................................. 35 8 Service and Support ............................................................................................... 36 8.1 8.2 ads-tec Support ....................................................................................................................... 36 Company Address .................................................................................................................. 36 9 Battery replacement................................................................................................ 37 10 Fuse replacement ................................................................................................... 41 © ads-tec GmbH • Heinrich-Hertz-Str. 1 • D-72622 Nürtingen Industrial PCs MCR5000 5 ABOUT US ads-tec GmbH Heinrich-Hertz-Str. 1 D-72622 Nürtingen Germany Phone: +49 (0) 7022 2522-0 Fax: +49 (0) 7022 2522-400 E-Mail: [email protected] Home: www.ads-tec.com ads-tec GmbH provides large enterprises and globally active corporations with cutting edge technology, up-to-date know-how and comprehensive services in the area of automation technology, data processing technology and systems engineering. ads-tec GmbH implements full automation solutions from planning to commissioning and is specialized in handling and material handling technologies. The data systems division develops and produces PC based solutions and offers a broad range of industrial PCs, thin clients and embedded systems. ads-tec is specialized in modifying and optimizing embedded operating systems and develops software tools to complement its hardware platforms. © ads-tec GmbH • Heinrich-Hertz-Str. 1 • D-72622 Nürtingen Industrial PCs MCR5000 1 6 REMARKS 1.1 RELEVANT DEVICE DOCUMENTATION Consult the following documentation for information pertaining to device setup and operation: USER MANUAL ON THE SERVICE CD (THIS DOCUMENTATION): Contains information pertaining to device mounting, startup and operation as well as the technical data for the device hardware. SERVICE CD: Contains drivers, user manual and installation instructions for installing drivers, calibration and using the touch screen. a 1.2 DESCRIPTION OF THE WARNING SYMBOLS USED IN THIS GUIDE Warning: The “Warning” symbol precedes warnings on uses or operations that might either lead to personal injury and/or hazards, or to any hardware and software damages. Note: This Symbol indicates special notes, terms and/or conditions that strictly need to be observed to ensure optimised and/or zero-defect operations. It also precedes tips and suggestions for efficient unit implementation and software optimisation. 1.3 DATA, IMAGES, AMENDMENTS AND VARIATIONS The texts, data and images herein are not binding. The right to any subsequent amendment and/or variation due to any technical and engineering progresses in the art whatsoever is hereby reserved. © ads-tec GmbH • Heinrich-Hertz-Str. 1 • D-72622 Nürtingen Industrial PCs MCR5000 7 1.4 TRADEMARKS It is hereby notified that any software and/or hardware trademarks further to any company brand names as mentioned in this User’s Guide are all strictly subject to the various trademark, brand name and patent protection rights. ® ® ® WINDOWS , WINDOWS CE and WINDOWS CE.net™ are registered trademarks of Microsoft Corp. ® ® Citrix and ICA are registered trademarks of Citrix Systems Inc. ® ® Intel and Pentium are registered trademarks of Intel Corp. ® ® ® IBM , PS/2 and VGA are registered trademarks of IBM Corp. CompactFlash™ and CF™ are registered trademarks of SanDisk Corp. Any further additional trademarks and/or brand names herein, be they domestic or international, are hereby duly acknowledged. 1.5 COPYRIGHT This User’s Guide inclusive of all the images it contains is entirely proprietary and subject to copyright. Any irregular use of this Guide by third parties infringing copyright terms is thus strictly forbidden. Reproduction, translation, as well as electronic and photographic image storage and/or amendment processes, are subject to prior written authorisation directly by M/s. ads-tec GmbH. Any violation and infringement thereto will be held liable for compensation of all damages. © ads-tec GmbH • Heinrich-Hertz-Str. 1 • D-72622 Nürtingen Industrial PCs MCR5000 8 1.6 ENVIRONMENTAL CONDITIONS The device may be operated under the following conditions. Failure to observe these specifications will terminate any warranty for this device. Ads-tec cannot be held liable for any damages arising due to improper use and handling. Temperature for devices including a HDD In operation 0 … 40°C For storage -20 … 60°C (Because of the integrated maximum temperature memory) Temperature for devices including a compact flash memory In operation 0 … 40°C For storage -20 … 60°C (Because of the integrated maximum temperature memory) Humidity In operation For storage Vibrations In operation Shock resistance In operation 10 … 85% without any condensate 10 … 85% without any condensate 1 G, 10 … 150 Hz (DIN EN 60068-2-6) 15 G, with a half-wave of 11 ms duration (DIN EN 60068-2-27) 1.7 STANDARDS This device complies with the requirements and protective aims of the following EC regulations: This device meets the test requirements for granting the CE sign and according to the European test standards EN 61000-6-3: 2001+ A11:2004 and EN 61000-6-2: 2005 This device complies with the test requirements in accordance with DIN EN 609501:2001 (VDE0805, IEC950) "Safety of Information Technology Equipment" The device meets the DIN EN 60068-2-6 test requirements (sinus excitation). The device meets the DIN EN 60068-2-27 test requirements (shock resistance test). Note: A respective conformity declaration for the authority in charge is available on request from the manufacturer. All connected components, as well as cable connections must also meet these requirements for compliance with the EMC legislation. For this reason, screened bus and LAN cables including screened connectors must be used and installed according to the instructions in this user manual. © ads-tec GmbH • Heinrich-Hertz-Str. 1 • D-72622 Nürtingen Industrial PCs MCR5000 1.8 SCOPE OF DELIVERY Please check that all of the following components are contained in the packaging: 1 x MCR 5000 1 x Installation bracket (pre-installed) 1 x Locking plate (pre-installed) 1 x Set of keys for locking-plate lock The optional cable set might include the following individual cables: 1 x Rubber power lead 1 x Rubber power lead extension for monitor / display 1 x DVI cable 1 x Serial null-modem cable © ads-tec GmbH • Heinrich-Hertz-Str. 1 • D-72622 Nürtingen 9 Industrial PCs MCR5000 2 10 OPERATING INSTRUCTIONS This device contains electrical voltages and extremely sensitive components. The manufacturer or a service partner authorised by the manufacturer should be consulted if you plan to make any modifications. For this type of work, the device must be switched off at the mains and the power lead must be disconnected. Suitable measures for avoiding electrostatic discharge towards parts of the components when touching the equipment must be taken. If the device is opened by an unauthorised person, hazards for the user might arise and any warranty claim will cease. GENERAL INSTRUCTIONS: All users must read this manual and have access to it at all times. Installation, commissioning and operation may only be carried out by trained and qualified staff. The security instructions and the manual itself must be observed by all persons who work with this device. At the location of use the valid guidelines and regulations for accident prevention must be observed. The accident prevention regulations according to the "BGV C1" Accident Prevention & Insurance regulation must be observed, in particular. The manual contains the most important instructions on how to use this device in a safe way. Appropriate storage, proper transport, installation and commissioning, as well as careful operation are prerequisites for ensuring safe and proper operation of the device. Warning: Any leads (e.g. power leads, interface cables) may only be connected if the device is switched off in order to avoid damaging the device. 2.1 OPERATING LOCATION The MCR 5000 model is designed for use with a monitor. You have to take care that the environmental conditions specified in the "Technical data" chapter are met. Using the device in non-specified environments, like e.g. onboard of ships, in areas that might contain explosive gases or in extreme heights is prohibited. Warning: This device may only be switched on after the required ambient temperature is reached in order to avoid condensate accumulation. The same applies if the device has previously been exposed to extreme temperature variations. To avoid overheating: The device must not be exposed to direct radiation by sunlight or any other light or heat source. 2.2 DAMAGES DUE TO IMPROPER USE Should the service system have evident signs of damages incurred e.g. due to wrong operation or storage conditions or due to improper unit use, the unit must be decommissioned or scrapped. Ensure that it is safe from accidental re-implementation. © ads-tec GmbH • Heinrich-Hertz-Str. 1 • D-72622 Nürtingen Industrial PCs MCR5000 11 2.3 WARRANTY / REPAIRS During the unit warranty period, any repairs thereto must strictly be conducted solely by the manufacturer or by service personnel that has been duly authorised by the manufacturer. 2.4 TREATMENT AND DISPOSAL OF LITHIUM BATTERIES Warning: There is an acute risk of explosion should the wrong type of battery be used. Do not put lithium batteries into fire, do not solder on the cell body, do not recharge them, open them, short-circuit them, do not reverse their polarity or heat them up over 100°C; dispose of them properly and protect lithium batteries from direct sun light, humidity and condensation. Lithium batteries may only be replaced by the same type or by a type recommended by the manufacturer. The lithium battery must be disposed of according to the local legislation at the end of its life cycle. Note: You'll find a detailed instruction on how to replace the lithium battery in the chapter “Battery replacement". 2.5 SAFETY INSTRUCTIONS Warning: All unit assembly operations must be strictly conducted only under safe, secure and zero-potential conditions. Special Note: When handling parts and components susceptible to electrical discharge, please accurately observe all the relevant safety provisions. (DIN EN 61340-5-1 / DIN EN 61340-5-2 refers) © ads-tec GmbH • Heinrich-Hertz-Str. 1 • D-72622 Nürtingen Industrial PCs MCR5000 3 ASSEMBLY 3.1 OVERALL DEVICE DIMENSIONS © ads-tec GmbH • Heinrich-Hertz-Str. 1 • D-72622 Nürtingen 12 Industrial PCs MCR5000 3.2 ORDER OF INSTALLATION The following must be checked before starting the installation: Check the bearing capacity of the wall Monitor is permitted for fixing with M6 screws by VESA 100/200 Monitor weight ≤ 50kg Monitor size ≤ 50" Installation incline ≤ 30° from vertical line (0° with DVD operation!) Observe the monitor data sheet! Note: The maximum torque for fixing the MCR 5000 installation screws is 5 Nm for wallmount installation. Tighten screws evenly. © ads-tec GmbH • Heinrich-Hertz-Str. 1 • D-72622 Nürtingen 13 Industrial PCs MCR5000 14 PREPARATION FOR FIXING Warning: The MCR 5000 device is designated for installation with a TFT or plasma display. Before the MCR 5000 can be fixed to the display, the respective brackets or retainers for protecting the MCR 5000 from falling must be in place. The fall protection measures must correspond to the "BGV C1" regulations. Respective retainers must be installed above the MCR 5000 device. As soon as the retainers have been installed, the device should be secured with these brackets or retainers (as it can be seen in the figure, for example). © ads-tec GmbH • Heinrich-Hertz-Str. 1 • D-72622 Nürtingen Industrial PCs MCR5000 15 ATTACHING THE MCR 5000 IN THE PLACE OF INSTALLATION The MCR 5000 device is installed including the pre-installed bracket at the place of installation by using 6 x M6 screws and must be held in place by an additional person during installation. . Attention: a thread depth of at least 12 and at most 15 mm inside the MCR 5000 device must be observed. Use all six screwing points. EXAMPLE FOR INSTALLING THE MCR 5000 TO A WOODEN WALL FROM 18 MM PLYWOOD Required installation materials (not included in the scope of delivery): 6 units of M6 x 35 Allen screw acc. to DIN 912 6 units of M6 washer for wooden constructions acc. to DIN 440R Note: The screw length for each individual place of installation is determined in the following way: Wall thickness (18mm) + washer thickness (2 mm) + required penetration depth (12 - 15mm) = screw length = 35 mm. The 6 screws together with their washers will directly beneath the screw head be put through holes drilled in the wall, screwed into the blind-rivet nuts in the MCR 5000 device, and subsequently tightened with a torque of 5 Nm. © ads-tec GmbH • Heinrich-Hertz-Str. 1 • D-72622 Nürtingen Industrial PCs MCR5000 16 REMOVING THE LOCKING PLATE The locking plate on the device must be removed in order to continue with the installation. This is done by opening the lock and by removing the locking plate upwards. REMOVING THE INSTALLATION BRACKET For removing the installation bracket it is required to unhinge the previously attached brackets or retainers. In this case, the MCR 5000 must be supported by another person. The installation plate is unhinged after removing both safety screws from the MCR 5000. © ads-tec GmbH • Heinrich-Hertz-Str. 1 • D-72622 Nürtingen Industrial PCs MCR5000 17 INSTALLING THE INSTALLATION BRACKET The installation bracket including 6 x M6 screws must be screwed to the monitor according to the instructions of the monitor manufacturer. Horizontal installation: Warning: All six screws must be used for fixing the installation bracket. Warning: The permissible thread depth of the fixing screws inside the monitor case has to be checked before installing the bracket on the monitor. © ads-tec GmbH • Heinrich-Hertz-Str. 1 • D-72622 Nürtingen Industrial PCs MCR5000 Note: Vertical installation is possible depending on the purpose of use and the installation conditions at the display. For this purpose the monitor has to be installed in a tilted position according to the manufacturer instructions. Vertical installation: Warning: The installation adapter must always be attached in the centre with both installation methods. Verify if vertical operation is permitted for your display unit. © ads-tec GmbH • Heinrich-Hertz-Str. 1 • D-72622 Nürtingen 18 Industrial PCs MCR5000 19 MONITOR INSTALLATION AT THE MCR 5000 Warning: The installation procedure described below must be carried out by at least 3 persons, due to the weight of the equipment. Fix the monitor to the MCR 5000 device by using the pre-installed installation bracket. Note: The figure shows the installation bracket from the point of view of the monitor. Please take care that the monitor plate is properly pushed into the guides provided on the MCR 5000 case when attaching the monitor. Subsequently, the monitor must be pushed beyond the retainer lobes. Make sure that the installation bracket is flush with the MCR 5000 unit after installation. © ads-tec GmbH • Heinrich-Hertz-Str. 1 • D-72622 Nürtingen Industrial PCs MCR5000 © ads-tec GmbH • Heinrich-Hertz-Str. 1 • D-72622 Nürtingen 20 Industrial PCs MCR5000 21 SECURING MONITOR AND MCR 5000 The installation bracket is screwed to the MCR 5000 case by using the previously removed fixing screws (M6x10mm). Warning: The monitor must still be supported by two persons until both components are safely connected. © ads-tec GmbH • Heinrich-Hertz-Str. 1 • D-72622 Nürtingen Industrial PCs MCR5000 22 Subsequently, the brackets or retainers must be hinged back into place in the provided eyes on the monitor. Warning: You finally have to check, that the monitor is properly installed; this can be done by visual inspection and by carefully trying to pull the monitor to the front at the bottom edge. The locking plate is pushed into the provided holes by using both tabs, as shown in the figure, and finally pushed into the device until the lock snaps audibly and noticeably into place. © ads-tec GmbH • Heinrich-Hertz-Str. 1 • D-72622 Nürtingen Industrial PCs MCR5000 4 23 COMMISSIONING All supply leads and all required data leads have to be connected before commissioning. Warning: The device must be switched off before connecting or disconnecting any cables in order to prevent damage to the electronics! Warning: This device may only be switched on after the required ambient temperature is reached in order to avoid condensate accumulation. Make sure to meet the permissible voltage requirements for this device. Warning: After switching off and before switching on you must wait for at least 10 seconds. Note: The screen of a data cable must always be connected with the connector housing (EMC). Note: Under the embedded operating system, interfaces must explicitly be enabled and required drivers must be installed for being able to use them. 4.1 AVAILABLE INTERFACES © ads-tec GmbH • Heinrich-Hertz-Str. 1 • D-72622 Nürtingen Industrial PCs MCR5000 24 4.2 CABLE INSTALLATION 1) Install all required cables and leads. Make sure that the cables are secured against slipping off. 2) Connect the MCR 5000 device with a power source by using the "AC in" socket. If you'd like to supply a monitor or any other component with power as well, you could do this by connecting the component to the "AC out" socket at the MCR 5000. 3) Verify that all cables and leads are correctly installed. 4) The power supply is enabled by pushing the Power button (1.). Subsequently turn the device on by using the ATX button (2.). 4.3 READINESS FOR OPERATION CHECKS Accurately check the unit for any hidden damages possibly incurred during improper transport and/or handling or wrong operation site and/or storage conditions (e.g. smoke emissions or formation by the unit, etc.). If any damages are found, the unit must be decommissioned or scrapped. Ensure that it is safe from accidental re-implementation. 4.4 STATUS DISPLAYS SYS LED (BICOLOURED) Depending on the colour and type of flashing different device states are displayed by the SYS LED. The following signals are displayed: LED lights green LED is off © ads-tec GmbH • Heinrich-Hertz-Str. 1 • D-72622 Nürtingen The device is ready for operation. (Power ON) The device is switched off. (Power OFF) Industrial PCs MCR5000 5 25 INTERFACES 5.1 230 V AC POWER SUPPLY The voltage is supplied through a rubber connector. The MCR 5000 is equipped with an AC IN socket, through which the voltage can be supplied to the device. Additionally, the MCR 5000 device is equipped with an AC OUT socket, which allows supplying external devices. If the MCR 5000 is attached to a monitor, the monitor can also be supplied through the AC OUT socket of the MCR 5000. TECHNICAL DATA OF THE POWER ADAPTER Power consumption: Max. 72 Watts Input voltage: 90…264 V AC Mains frequency: 47…63Hz Current consumption: 1.85A Max. switch-on current: 100A (230V AC) Warning: The load at the switched AC power supply output must not exceed 500W. AC out: Max. 5A / 100V, max. 2.1A / 240V © ads-tec GmbH • Heinrich-Hertz-Str. 1 • D-72622 Nürtingen Industrial PCs MCR5000 26 5.2 USB CONNECTIONS The USB interfaces are used for connecting peripherals with USB connection. PIN NUMBER SIGNAL NAME 1 VDC 2 D- 3 D+ 4 GND Note: The USB interfaces may be locked using the Lock USB software tool. You'll find the software and the documentation on the service CD. TOP USB INTERFACE One USB interface can be accessed from the front. The interface is located under a plastic cover. The cover has a tab on the right, which is used for protecting the USB connection. Note: All USB interfaces available meet the USB 2.0 standard. 5.3 SIM CARD READER ACCORDING TO ISO 7816 The SIM card reader is currently under preparation for future use. © ads-tec GmbH • Heinrich-Hertz-Str. 1 • D-72622 Nürtingen Industrial PCs MCR5000 27 5.4 IEEE1394 FIREWIRE 4-PIN CONNECTION (WITHOUT POWER) The FireWire interface is used for fast data exchange between peripherals, e.g. in industrial and automotive electronics. PIN NUMBER SIGNAL NAME 1 TPB- 2 TPB+ 3 TPA- 4 TPA+ Note: The FireWire interface complies with the IEEE 1394a standard (FireWire 400). 5.5 NETWORK CONNECTION (RJ45) If the drivers required for functioning are installed on the device, the control system may be integrated in an Ethernet network supporting the 10/100/1000 Mbit standard by using the Ethernet 10/100BaseT network connector. Specifications of this network topology must be observed in this case. You can install the drivers required for functioning from the enclosed service CD, should they not be installed on the device. PIN NUMBER SIGNAL NAME 1 TX + 2 TX - 3 RX + 4 NC 5 NC 6 RX - 7 NC 8 NC © ads-tec GmbH • Heinrich-Hertz-Str. 1 • D-72622 Nürtingen Industrial PCs MCR5000 28 5.6 COM (RS232) SERIAL INTERFACE PIN-NUMBER SIGNAL NAME 1 DCD 2 RxD 3 TxD 4 DTR 5 GND 6 DSR 7 RTS 8 CTS 9 RI Special Note: The interface is not electrically isolated. 5.7 OPTIONAL RADIO NETWORK CARD If a slot with a radio network card and an externally attached antenna is installed in the device, and if this card is supported by the corresponding drivers in the operating system, this device may be integrated in an Ethernet network supporting 11 Mbit or 54 Mbit (802.11b/g compatible) connections. Specifications of this network topology must be observed in this case. Devices from ads-tec including wireless LAN are equipped with a Mini-PCI WLAN card including Atheros chips. If a device is delivered including operating system by ads-tec, all required device drivers will also be integrated in the system. Under the "Windows XP Professional" and "Windows XP Embedded" operating systems, the original "Atheros Client Utility (ACU)" will also be installed, which can be used for defining new WLAN networks and WLAN connection settings. The mentioned utility offers a large variety of settings, which in most cases will be sufficient for meeting individual network requirements. However, there is still an opportunity lacking for making the following settings: Setting the region (e.g. Germany, France, USA, etc.) An ad-hoc channel setting, to be specified by region Note: Please refer to the service CD for a more detailed instruction on how to configure the WLAN. © ads-tec GmbH • Heinrich-Hertz-Str. 1 • D-72622 Nürtingen Industrial PCs MCR5000 29 5.8 DVI INTERFACE The DVI interface is used for transmitting analogue and digital video signals. A standard DVI cable is required for connecting a digital monitor. VGA monitors may also be used by means of a DVI-VGA adapter. Note: The interface is a DVI-I single link interface. Signals are transmitted in an analogue and digital way. PIN NUMBER SIGNAL NAME 1 TMDS Data2- 2 TMDS Data2+ 3 TMDS Data2/4 Shield 4 N/C 5 N/C 6 DDC Clock [SCL] 7 DDC Data [SDA] 8 Analogue vertical sync 9 TMDS Data1- 10 TMDS Data1+ 11 TMDS Data1/3 Shield 12 N/C 13 N/C 14 +5V Power 15 Ground (for +5V) 16 Hot Plug Detect 17 TMDS Data0- 18 TMDS Data0+ 19 TMDS Data0/5 Shield 20 N/C 21 N/C 22 TMDS Clock Shield 23 TMDS Clock+ 24 TMDS Clock- C1 Analogue Red C2 Analogue Green C3 Analogue Blue C4 Analogue Horizontal Sync C5 Analogue GND Return:(analogue RGB) © ads-tec GmbH • Heinrich-Hertz-Str. 1 • D-72622 Nürtingen Industrial PCs MCR5000 5.9 AUDIO L / R © ads-tec GmbH • Heinrich-Hertz-Str. 1 • D-72622 Nürtingen 30 Industrial PCs MCR5000 DESCRIPTION 31 AUDIO INTERFACE The MCR 5000 is equipped with an S/PDIF interface. Analogue audio signals may be played on other pieces of equipment by using a commercially available cinch cable. The Audio L / R cinch input jack allows transmitting analogue audio signals to other pieces of equipment. The input jacks may be connected with commercially available cinch cables. Note: The integrated stereo speakers may be enabled or disabled by using the "Internal Speaker Control" extension module. You'll find a detailed documentation for installation of this extension module on the service CD supplied with the equipment. © ads-tec GmbH • Heinrich-Hertz-Str. 1 • D-72622 Nürtingen Industrial PCs MCR5000 6 32 DRIVES 6.1 HARD DRIVES / COMPACT FLASH DRIVE (IDE INTERFACE) The storage medium is selected according to the customer requirements. The following options are available for storage: Compact Flash memory: A compact flash memory is used. Its capacity depends on the desired operating system and the additional programmes to be installed. Hard disk: A 2.5" hard disk with at least 60 GB (UDMA) is used. On delivery, the hard disk is formatted in NTFS format (default for Windows XP). Warning: Never remove or insert a hard disk during operation, when the device is powered. 6.2 DVD DRIVE / INTEGRATED MODEL (NOTEBOOK) The DVD drive is located beneath the locking plate. The device must be switched on for opening the drive. After pushing the Eject button, the drawer jumps open and must be pulled out completely. The CD/DVD is now placed with the opening on top of the centre piece and carefully pushed downwards until the disk holder snaps in. Subsequently the drive must be pushed in. Note: The DVD drive is of the slim-line drive type. Warning: If the device includes a DVD drive, this drive may only be operated perpendicular to the installation position. © ads-tec GmbH • Heinrich-Hertz-Str. 1 • D-72622 Nürtingen Industrial PCs MCR5000 6.3 EXTERNAL DRIVES One drive for removable media is integrated in the device by default. Additionally the system provides USB interfaces, to which an external drive could be connected. Warning: Removing an external drive during the reading/writing process is not permitted. Data loss or damage could be the result if this is not observed! © ads-tec GmbH • Heinrich-Hertz-Str. 1 • D-72622 Nürtingen 33 Industrial PCs MCR5000 7 34 TECHNICAL DETAILS 7.1 COMPUTER DATA Processor RAM Graphic controller Graphic memory Mass storage device Interfaces Video Audio Removable disk drives Network Wireless Power supply © ads-tec GmbH • Heinrich-Hertz-Str. 1 • D-72622 Nürtingen Pentium M 1.8GHz / Pentium M 1.6GHz / Pentium M 1.1 GHz / Celeron 800 MHz ULV 512 MB to 2GB DDR RAM Intel 855 GME A max. of 64 MB shared memory Up to 1600 x 1200 pixels resolution 2.5" hard disk with at least 60 GB (UDMA) Compact flash memory slot (master), external access 1 x RS232 (SUB-D 9-pin), 2 x USB 2.0, 1 x Firewire, 1 x USB 2.0 incl. rubber cap (on the service side) DVI-I connection Stereo L / R (cinch sockets), S/PDIF Out (coaxial, cinch socket), sound output via four internal speakers As an option: Integrated slim-line DVD drive 1 x Ethernet (10/100/1000 Mbit) RJ45 As an option: WLAN card incl. 2 integrated antennas 100V / 240V AC via rubber connector and power supply circuit breaker, AC OUT incl. shared fuse (max. value of 500W) ON / OFF / SUSPEND-ACPI pushbutton Industrial PCs MCR5000 35 7.2 GENERAL DATA External dimensions Weight Environmental temperature Protection class Shock resistance In operation Vibrations In operation EMC 404 mm x 325 mm x 56.2 mm (W x H x D) incl. the VESA retainer unit Approx. 4.7 kg 5…40°C IP20 15 G, with a half-wave of 11 ms duration (DIN EN 60068-2-27) 1 G, 10 … 150 Hz (DIN EN 60068-2-6) EN 61000-6-3:2001 + A11:2004 EN61000-6-2:2005 A corresponding CE-conformity declaration can be delivered by the manufacturer on request. © ads-tec GmbH • Heinrich-Hertz-Str. 1 • D-72622 Nürtingen Industrial PCs MCR5000 8 36 SERVICE AND SUPPORT ads-tec and appointed partner companies offer you comprehensive maintenance and support services, ensuring quick and competent support should you have any questions or concerns with regard to ads-tec products and equipment. ads-tec products may also be provided and installed by partner companies. Such devices may have customised configurations. Should any questions arise with regard to such specific settings and software installations, please contact the system supplier in question as ads-tec will not be able to reply to such questions. ads-tec does not provide support services for any device or unit that was not bought directly from ads-tec. In any such case, maintenance and support is provided solely by the partner company that supplied the device or unit. 8.1 ADS-TEC SUPPORT The ads-tec support team is available for direct clients from Monday to Friday from 08:30 AM to 05:00 PM using the following phone number: Phone: +49 (0) 7022 2522-202 Fax: +49 (0) 7022 2522-2602 Email: [email protected] 8.2 COMPANY ADDRESS ads-tec GmbH Heinrich-Hertz-Str. 1 D-72622 Nürtingen Germany Phone: +49 (0) 7022 2522-0 Fax: +49 (0) 7022 2522-400 E-Mail: [email protected] Home: www.ads-tec.de © ads-tec GmbH • Heinrich-Hertz-Str. 1 • D-72622 Nürtingen Industrial PCs MCR5000 9 37 BATTERY REPLACEMENT Please follow this procedure for replacing the lithium battery inside the device: Disconnect all cables between the MCR 5000 and its TFT or plasma display. Warning: Make sure the power plug has been disconnected before starting disassembly. OPENING THE LOCKING PLATE Open the locking plate by using the supplied set of keys. After that, the locking plate can completely be unhinged and removed. REMOVING THE INSTALLATION BRACKET 1) Remove both safety screws connecting the installation adapter with the device. 2) Push and slide the installation adapter upwards and out of the guide. Warning: If a TFT or plasma display has been installed, disassembly should be carried out by at least two persons. Also make sure, that the TFT or plasma display is sufficiently supported in order to avoid falling after loosening. © ads-tec GmbH • Heinrich-Hertz-Str. 1 • D-72622 Nürtingen Industrial PCs MCR5000 38 3) Remove the installation adapter from the MCR 5000 device. BATTERY COMPARTMENT LOCATION The location of the battery compartment is highlighted in the figure. OPENING THE BATTERY COMPARTMENT 1) Remove the safety screw lid by using a suitable screw driver. © ads-tec GmbH • Heinrich-Hertz-Str. 1 • D-72622 Nürtingen from the battery compartment Industrial PCs MCR5000 39 REMOVING THE RETAINING CLIP 2) The battery is kept in place with a plugged in retaining clip. The retaining clip can be removed from the battery compartment by carefully lifting the external tabs by using a flat-bladed tool (screw driver). REPLACING THE BATTERY 3) Now the lithium battery can be removed. It must be replaced by the same battery type, only. The type of battery to be used is: Saft LS 14250 / 1/2AA 3.6V 1000mAh / Lithium battery Please observe the correct polarity when replacing the battery. Warning: There is a risk of explosion if the battery is replaced with the wrong type or with the wrong polarity. Adhere to the valid regulations for environmentally-friendly disposal of batteries if the battery has reached the end of its life cycle. ASSEMBLY: © ads-tec GmbH • Heinrich-Hertz-Str. 1 • D-72622 Nürtingen Industrial PCs MCR5000 40 Please reverse the order of steps described before for re-assembling the MCR 5000 device. Place the retaining clip on top of the newly inserted battery first. Subsequently fit the screws to the battery compartment and to the MCR 5000 casing. Observe the required security measures when attaching the installation adapter. You can find information about the design of the MCR 5000 device incl. its TFT or plasma display in more detail in the user manual. © ads-tec GmbH • Heinrich-Hertz-Str. 1 • D-72622 Nürtingen Industrial PCs MCR5000 41 10 FUSE REPLACEMENT Please follow this procedure for replacing the fuse inside the device: Disconnect all cables between the MCR 5000 and its TFT or plasma display. Warning: Make sure the power plug has been disconnected before starting disassembly. LOCATION OF THE FUSE The MCR 5000 fuse is located in the position highlighted in the picture. REMOVING THE FUSE In order to remove the fuse inside the MCR 5000 device, please push a suitable tool (e.g. a screw driver) into the red marked area in order to release the lock, as shown in the figure. Keep the fuse retainer slightly pushed in and twist it until reaching the notch at the device. The fuse retainer can now be removed. REPLACING THE FUSE You can now remove the fuse from the fuse retainer and replace it with the same type of fuse. The type of fuse to be used is: Vendor: Littelfuse © ads-tec GmbH • Heinrich-Hertz-Str. 1 • D-72622 Nürtingen Industrial PCs MCR5000 42 Part number: 215 010.P INSTALLATION: Use the reverse order of steps in this description for re-installing the fuse. Push the fuse into the retainer and push both components together back into the unit. Activate the locking mechanism by using a suitable tool (screw driver) and slightly pushing the fuse retainer in while twisting it into its initial position. Make sure to check that the fuse retainer is properly positioned. © ads-tec GmbH • Heinrich-Hertz-Str. 1 • D-72622 Nürtingen