1
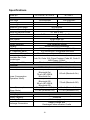
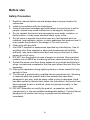
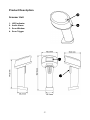
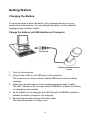
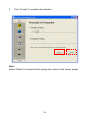
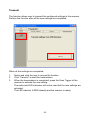
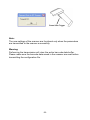
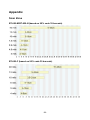
User Manual BT-650 Series Wireless Bluetooth Barcode Scanner BT-650-M/BT-650-N/BT-650-C Ver. 1.0 © Copyright Fametech Inc. (TYSSO), 2012 Contents Contents......................................................................................... 1 Introduction ................................................................................... 3 Features ............................................................................................... 3 Specifications ....................................................................................... 4 Package ............................................................................................... 5 Before Use ..................................................................................... 6 Safety Precaution ................................................................................. 6 Product Description .............................................................................. 7 Getting Started .............................................................................. 9 Charging the Battery ............................................................................ 9 Establishing the Wireless Connection ................................................ 11 Operating Your Scanner ............................................................. 12 Perform Scan ..................................................................................... 12 Operation Mode ................................................................................. 13 Configuring Your Scanner .......................................................... 15 Utility installation ................................................................................ 16 Scanner Configuration ....................................................................... 20 File ............................................................................................. 21 Setting ....................................................................................... 22 Transmit..................................................................................... 32 Appendix ...................................................................................... 34 Scan Zone .......................................................................................... 34 Status Indicator .................................................................................. 35 -1- -2- Introduction The BT-650 series handheld barcode scanner is designate for long distance data scan applications. Incorporating Bluetooth wireless technology, BT-650 scanner offers the users up to 50 meters of transmission range from the receiver (recharge/communication cradle). Even the radio link breaks, the Bluetooth radio link can still attempt to connect with the receiver. With the highly sensitive scan module, BT-650 can capture barcodes easily even the barcodes are in poor condition. This feature ensures BT-650 capable of fast-capture and process demands. By adapting exceptional power saving design, the BT-650 wireless barcode scanner can operate much longer than ordinary scanners and ensure the high grade reliability. Furthermore, the user-friendly operation and large memory capacity characteristics enable BT-650 be a cost-effective yet reliable data-scan solution. Features Light-weight and easy to operate Scan Speed: 100 scans/sec Integrated recharge/communication cradle with Bluetooth class 1 receiver Wireless Transmission Range: up to 50 meters (open space) High barcode readability Multiple operating modes selectable (On-line/Batch/Recapture) Various barcode standards support Large memory capacity (up to 15,000 scans/EAN 13 barcode) USB HID Interface -3- Specifications Model No. General Scan Rate Sensor Type Wavelength Maximum Pitch Angle Minimum Skew Angle Minimum Barcode Width Depth of Field Contrast Ratio Scan Patten Resolution System Interface Indicator Buffer Capacity RF Frequency Band Transmission Range* Readable Bar Code Symbologies Configuration Utility Electrical Power Input Power Consumption (Operation Mode) Power Consumption (Sleep Mode) Battery Battery Type Battery Capacity Recharge Time Recharge Connection BT-650-M / BT-650-N BT-650-C 100 scans/sec Laser diode 650nm±20nm 100 scans/sec CCD 660nm ± 10nm ±65 degrees ±50 degrees 0.1 mm (4 mil) 3~55 cm 30% 3~46 cm 45% Single scan line 0.1mm (4 mil) USB Keyboard Wedge Buzzer and LED illumination 192KB or approx. 15,000 scans (EAN 13 ) 2.4~2.4835GHZ, unlicensed ISM band Max. 50m, possibly over 70m in open spaces RSS Codes, EAN, UPC, I 2 of 5, Codabar, Code 39, Code 128, China Postage, Code 93, Code 11, MSI-Plessy, Code 4 Windows-base, 2000/XP/Vista/Windows 7 5VDC ±5% (Scanner) / 5VDC ±5% (Cradle) 120 mA (BT-650-M, Bluetooth On) 85 mA (Bluetooth On) 70 mA (BT-650-N, Bluetooth On) 110 mA(BT-650-M, Bluetooth Off) 75 mA (Bluetooth Off) 60 mA (BT-650-N, Bluetooth Off) 10 mA (Bluetooth On) 10 mA (Bluetooth On) 0.7 mA (Bluetooth Off) 0.7 mA (Bluetooth Off) Rechargeable Lithium-ion Battery 2200mAh 6-8 Hours (approx.) Battery charge with Recharge/Communication Cradle -4- Others Operating Time Material Color (Upper Cap/Handgrip) Compliance Weight Dimension Ambient Light Operating Temperature Operating Humidity Storage Temperature Storage Humidity > 8 Hour (approx.) (approx. 40,000 scans/per charge) ABS White/Grey, Black/Black FCC class A Scanner: 170g / Cradle: 190g 167.5 x 72 x 78 mm (Scanner Unit) 90.5 x 70 x 60 mm (Cradle) 3000 lux ~ 8000 lux 4500 lux 0°C~40°C 0°C~40°C 20% - 80% RH, 20% - 80% RH, non-condensing non-condensing -20°C~ 65°C -20°C~ 65°C 5% - 95% RH, 5% - 95% RH, non-condensing non-condensing * The transmission range may vary due to local conditions. ** The specifications may be changed/updated without prior notice. Package Standard Package Scanner Utility CD Recharge/Communication Cradle x1 x1 x1 -5- Before Use Safety Precaution 1. Read the manual before use and always keep in proper location for references. 2. Install in accordance with the instructions. 3. Heed all warnings messages and notifications to avoid injury to self or people; misuse may cause malfunction or damage to the product 4. Do not operate the product and accessories near water, moisture, or dusty location; it may cause electrical shock injury or fire. 5. Do not place or operate the product near any heat sources such as radiators, heat registers, stoves, or other apparatus that produce heat. It may expose the product to the danger of Fire and Explosion. 6. Clean only with dry cloth. 7. Use ONLY supplied or accessories specified by manufacturer. Use of anything other than supplied or approved accessories will void the warranty, may cause malfunction and, and may put the User or other person at risk of injury. 8. DO NOT aim the product at eyes of people or animals. Some product models use a LASER as a scanning aid may cause serious eye injury. 9. Protect the power cord from being walked on or pinched particularly at plugs, convenience receptacles, and the point where they exit from the apparatus. 10. Unplug this apparatus during lightning storms or when unused for long periods of time. 11. The Service is performed by qualified service personnel only. Servicing is required when the product and/or the accessories have been damaged in any way, such as power cable or plug is damaged, liquid has been spilled or objects have fallen into the product, the product has been exposed to rain or moisture, does not operate normally, or has been dropped. 12. DO NOT dissemble or modify the product, accessories, and the components (i.e. the pre-installed rechargeable battery). It should cause damage to the product and injury to people and the warranty is terminated. -6- Product Description Scanner Unit 1. LED Indicator 2. Audio Alarm 3. Scan Window 4. Scan Trigger -7- Recharge/Communication Cradle 5. Connector for Scanner Unit (Recharge and Communication Cradle) 6. Communication Status Indicator 7. Bluetooth Pairing Indicator -8- Getting Started Charging the Battery It’s recommended to have the battery fully charged before using your wireless barcode scanner. You can charge the battery via the supplied recharge/communication cradle. Charge the battery via USB Interface of Computer To Host PC Recharge/Communication Cradle 1. Turn on the computer. 2. Connect the cradle to the USB port on the computer. The Communication Status Indicator flashes RED and ready for battery recharge. 3. Install the barcode scanner to the recharge/communication cradle. The LED indicator of the scanner flashes GREEN to indicate the battery is recharging automatically. 4. As the battery is fully charged, the LED indicator lit GREEN steadily to indicate the battery charge is fully charged. 5. Remove the barcode scanner from the cradle. The barcode scanner is ready to use. -9- Warning: Use only the supplied cradle to charge the battery. DO NOT dissemble or modify the barcode scanner and the pre-installed rechargeable battery. It should cause damage to the product and the injury to the people near the product. -10- Establishing the Wireless Connection between Scanner and Receiver (Recharge/Communication Cradle) The paring between BT-650 scanner and the data receiver (Bluetooth 1.1 communication cradle) is pre-configured in factory. User can establish communication automatically when the recharge/communication cradle is installed to host PC and the scanner is activated. Connect to PC (USB Port) Host PC Recharge/Communicati on Cradle 1. Turn on the computer. 2. Connect the Cable to the data collector. 3. Connect the USB connector to the USB port on the computer. The Communication Status Indicator flashes RED to indicate that the receiver is functioning (device searching mode). 4. Press and keep hold the Scan Trigger for over 5 seconds to initiate the link to the receiver. The LED indicator of the scanner may blink RED and connect to the receiver 5. When the connection is properly established, both the LED Indicators of receiver (recharge/communication cradle) and scanner lit RED steadily and the scanner is ready to use. -11- Operating Your Scanner Perform Scan To perform the scan, point the scanner to the barcode and press the scan trigger; the visible red light for easy alignment will guide you to scan the barcode. Scan Trigger ScanZone Scanner Red-Light alignment Point the scanner with the RED-Light alignment projected horizontally to the barcode. Adjust the distance to capture the barcode, and the beep sound will notice you that the data is properly scanned. Scan Distance Note: Please properly adjust the distance between the barcode scanner and the barcode in order to acquire the barcode data. (please refer to appendix “Scan Zone” for further information) Keep the scanner and the receiver in an open space. The transmission range may vary due to local conditions. -12- Operation Mode There are three scan modes supported by the scanner and users can select proper scan mode depending on the requirements. You can access BT configuration utility to setup your scan mode (refer to “Scanner Configuration”, page 23) The supported scan modes are as follows: Batch Mode (default): In Batch Mode, scanner performs scan process and transmits scanned data through receiver immediately as the scan trigger is pressed. When the scanner is failed to link with the receiver and the scanned data is unable to transmit to the computer, the data will be saved to the buffer of the scanner temporarily (the LED indicators blink and audio indicators beep to notice that the scanner is off-line). As the connection recovered (both the indicators of the scanner and the receiver lit RED), press the scan trigger and the scanned barcode data (scanned during the off-line state) will recover and send to the computer. Note: The barcode data in the buffer will be clear as the connection is recovered and sent to the computer. -13- On-Line Mode: In On-Line Mode, scanner performs scan process and transmits scanned data through receiver only when the scanner connection is in good condition. When the scanner is failed to link with the receiver, the scanner will not be functional whenever the scan trigger is pressed. The LED and audio indicators will notice that the scanner is off-line. As the connection recovered (both the indicators of the scanner and the receiver lit RED), the scanner is ready to perform scan process. -14- Recapture Mode: In Recapture Mode, scanner performs scan process immediately as the scan trigger is pressed. All the scanned barcode data are transmitted to the computer and saved in the buffer of the scanner as well. When the scanner is failed to link with the receiver, the scanned data will be saved to the buffer of the scanner as well. The LED and audio indicators will notice that the scanner is off-line. As the connection recovered (both the indicators of the scanner and the receiver lit RED), press the scan trigger and the scanned barcode data (scanned during the off-line state) will recover and send to the computer. To transmit the saved barcode data, aim the scanner at the data transmission function barcode below and press scan trigger to start. All the saved barcode data will be transmitted to the computer Data Transmission Function Barcode Note: Delete the saved Barcode Data The scanned barcode data will be saved in buffer memory even after the data transmission is performed by using Data Transmission Function Barcode. To delete the barcode data saved in the scanner, aim the scanner at the Data Purge Function Barcode and press scan trigger to start delete process. Data Purge Function Barcode -15- Configuring Your Scanner The BT scanner configuration utility provide user with easy configurations of barcode settings, function settings and operating modes according to user requirement. Utility installation 1. Please browse the CD and select folder “Utility”. 2. Move the cursor to the folder “BT Scanner” and double click to access the sub folders. -16- 3. Select and double click the folder “BT Scanner Utility_3805&4505_3880&4550_655_V1.20” to access the utility files. 4. Click “Setup” to start installation. 5. Click “OK to proceed. -17- 6. Click the button to start installation. Note: To change the directory, click “Change Directory” to assign the directory desired. 7. Setup will add group “BT Scanner” to the group box. Click “Continue” to proceed. -18- 8. Wait for several seconds while the installation is processing. 9. Installation completed. Click “Ok” to exit. -19- Scanner Configuration 1. Initiate the program “BT Scanner” in your computer. 2. Select the Interface “USB Keyboard” and click “OK” button to continue. Warning: Performing the scanner configuration and then transmit the settings to the scanner will clear the entire bar code data buffer. Please make sure the barcode data in the scanner are read before configuration. -20- File There are selections to manage the configuration parameter files. Users can save or load the configuration parameter files according to the applications required. Default: this function allows user to restore the scanner to the factory preset. Perform “Transmit” to transmit default settings to the scanner Open: this function allows user to access the configuration parameter file previously saved in order to restore the specified settings of the scanner (*.msr); perform “Transmit” to send the configured settings to scanner. Save: this function allows user to save all the specified settings of the scanner to a configuration parameter file (*.msr). Exit: exit the configuration utility. -21- Setting The functions of Setting allow user to configure the scanner to the specified settings ideal for the applications and task. Operational Mode: Select the Scan Mode for the scanner. Keyboard Language: user can define the keyboard language layout (default: US keyboard) or advanced ALT-Mode layout. Barcode: the settings of the supported barcodes. General Parameter: user can select the conversion of the scanned data in upper/lower case, and the buzzer settings. Terminator: user can define the prompt character at the end of each scanned barcode data. Preamble & Postamble: user can define the preamble or postamble string and add to each barcode data. -22- Operational Mode The function of Operational Mode allows user to select the operating modes (Online / Batch / Recapture) according to the applications and task required. (Please refer to Operation Mode, page 13 for further information). 1. 2. 3. Select and click the icon to access the function. Click the mode required (Online / Batch / Recapture). Click “Accept” to complete the selection. Note: To restore the factory preset, select “Default” to discard the setting. All the settings will restore to the factory default and ready for transmitting to the scanner. Perform transmit to complete the default setting. -23- Keyboard Language The function allows user to enable the scanner be compatible with the computer keyboard layout (the language support may vary according to the language version of operating system in the computer). For some of barcode may have advanced characters in it and can be read by scanner with the keyboard layout with ALT-Mode. Please refer to the technical support of the computer provider for keyboard language layout 1. 2. 3. Select and click the icon to access the function. Select the keyboard interface (US / ALT Mode). Click “Accept” to complete the selection. Note: Select “Default” to discard all the setting and restore the factory preset. -24- Barcode The function allows user to configure various types of barcodes. User can enable or disable the specified barcode, and configure the parameters according to the characteristics of each barcode. 1. 2. 3. Select and click the icon to access the function. Select the barcode type desired and configure the settings. Click “Accept” to complete the selection. Note: Select “Default” to discard all the setting and restore to the factory preset. -25- General Parameter The function allows user to convert the characters that encoded in barcode to upper or lower case (similar to the function key “Caps Lock”). And the pitch and the duration of the audio indicator are adjustable as well. 1. 2. 3. 4. Select and click the icon to access the functions. Character Case: click to select the character case desired. Buzzer Setup: move the arrows to adjust the buzzer pitch or duration. Click “Accept” to complete the selection. Note: The status of Caps Lock and Shift Key in the physical keyboard (computer) may reverse the setting of the Upper Case/Lower Case/Universal Conversion while scanning the barcode. Do Not press the Caps Lock or Shift key while operating scanner Select “Default” to discard all the setting and restore to the factory preset. -26- Terminator The function allows user to define the prompt character at the end of each scanned barcode data. 1. 2. 3. Select and click the icon to access the function. Select the prompt character desired (default: CR [Enter].) Click “Accept” to complete the selection. Note: Select “Default” to discard all the setting and restore to the factory preset. -27- Preamble & Postamble The function allows user to define the preamble string or postamble string and add to the scanned barcode data. 1. 2. 3. Select and click the icon to access the function. Move the cursor to Preamble Setting or Postamble Setting Select the first icon to define the first character of the string. Click mouse left button to enter the character. (10 characters max.) -28- 4. There is an on-screen keyboard for user to input the character by using the mouse. 5. Select the next icon to enter the next character. Repeat step 3 to step 5 until all the characters of the string are entered. Tip: Click Right Mouse button to clear the character. -29- Note: Always enter the characters successively or there is a warning message to notice that the string setting is invalid Tip: To enter the string with empty character, enter [space] and then enter the next character successively. -30- 6. Click “Accept” to complete the selection. Note: Select “Default” to discard all the setting and restore to the factory preset. -31- Transmit The function allows user to transmit the configured settings to the scanner. Perform the function after all the new settings are completed. When all the settings are completed: 1. 2. 3. Select and click the icon to access the function. Click “Transmit” to start the transmission. When the transmission is completed, press the Scan Trigger of the scanner to activate the new setting. The audio and LED indicators will notice user that the new settings are activated. The LED indicator lit RED steadily and the scanner is ready. -32- Press Scan Trigger Note: The new settings of the scanner are functional only when the parameters are transmitted to the scanner successfully. Warning: Performing the transmission will clear the entire bar code data buffer. Please make sure the barcode data saved in the scanner are read before transmitting the configuration file. -33- Appendix Scan Zone BT-650-M/BT-650-N (based on 90% code 39 barcode) BT-650-C (based on 90% code 39 barcode) -34- Status Indicator The following table indicates the LED status indicators and audio indicator. Scanner Unit Turn-On / Turn-Off Connection Scanner LED Indicator Audio Ascending beep sound Descending beep sound On-Line/ Perform Scan Process Scanner LED Indicator Audio The scanner is turned and the communication is establishing. The connection is turned-off. Description The connection is good and the scanner is ready for operation. Press the scan trigger to perform scan process --- Blink Green Description 2 beep sound (as scan trigger pressed) The LED indicator blinks GREEN 2 times with 2 beep sound to notice the barcode is properly scanned. Off-Line Scanner LED Indicator Description Audio --- The connection between scanner and Recharge/Communication Cradle is not established. 3 beep sound (as scan trigger pressed) As the scan trigger is pressed, The LED indicator blinks GREEN together with 3 beeps to notice that the scanner is off-line Blink RED Blink Green -35- Buffer Memory Full Scanner LED Indicator --- Audio 1+1+2 beep sound (as scan trigger pressed) Battery Recharge Scanner LED Indicator Description The memory is full. Description Audio ---- The scanner is in recharge mode. --- The battery is fully charged. Blink Green GREEN Battery Low Scanner LED Indicator Audio 2 beeps sound (as scan trigger --pressed) Scanner Configuration Scanner LED Indicator Description Press the scan trigger and there are 2 beeps to notice that the battery is low. Description Audio Blink GREEN 7 beep sound (scan trigger pressed) RED 2 beep sound -36- Press the scan trigger and the indicators (RED +GREEN+7 beep) notice that the scanner is initialing the new setting. The scanner is ready for operation (2 beeps). Recapture Mode Data Transmission Scanner LED Indicator Blink GREEN Blink Description Audio 1 beep sound (as scan trigger pressed) There is 1 beep sound to notice that the data transmission is start. ---- The LED indicator blinks RED and GREEN alternatively while the scanner is transmitting data. 1 beep sound The LED indicator blinks GREEN with 1 beep sound to indicate the data is successfully transmitted. RED GREEN Blink GREEN Data Purge (Delete the saved Barcode Data) Scanner Description LED Indicator Audio 1 beep sound The LED indicator lit GREEN with (as scan trigger 1 beep sound to notice that the GREEN pressed) data purge is start. 5 beep sound Blink GREEN -37- The LED indicator blinks GREEN with 5 beep sound to notice that the data is deleted.. Recharge/Communication Cradle Bluetooth Pairing Indicator Status Indicator Cradle Bluetooth Pairing Indicator --Blink Green --Blink RED --- Description Status Indicator The Recharge/Communication Cradle is pairing with the Scanner. (It is pre-configured in factory and need not pairing in general) 1. The scanner is in recharge mode. The LED blinks RED continuously while battery is recharging. 2. The wireless communication between cradle and scanner is establishing (it should be established within 2~3 second.) The wireless communication between cradle and scanner is established and ready for use. -38-