1
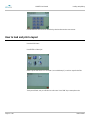
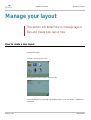
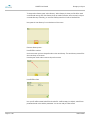
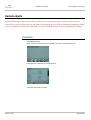
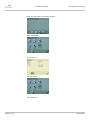
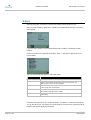
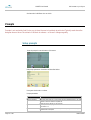
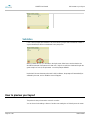
MiniKEY User Manual 2.0 ENGLISH Updated for MiniKEY firmware version 1.65 (12 December 2011) MINIKEY User Manual Congratulations on your purchase. MiniKEY is one of the most advanced, compact and userfriendly inkjet controllers available. This manual covers the usage of the controller. Before using the product, please read the manual carefully. Please also refer to: Manual Content Installation Manual Quick Guide Remote Communication for the Mini series MiniDraw for HSAJet MINIKEY/MiniKEY Technician's guide to installation of this product. Technician's guide to setting up this product. Commands for ethernet and RS232 connections. Optional software for creating and uploading print jobs. This manual covers MiniKey with firmware 1.65 Page 2 of 60 HSA SYSTEMS MINIKEY User Manual Safety Instructions Page 3 of 60 The MINIKEY is a controller unit for inkjet printing. Only use this device for the intended use. Do not subject the controller to strong shocks or vibrations. Install the MINIKEY in the recommended installation environment only. Connect power supply to input voltage 100-240 VAC Follow the wiring instructions in the installation manual carefully. Wrong wiring could destroy the controller unit. Shut down MINIKEY properly before turning off the power supply. Power loss during normal operation may result in memory card write failure and data loss. Do not clean controller with strong solvents. Do not let liquids get in touch with any electrical parts. The MINIKEY is only to be repaired by trained personnel. Do not forget your administrator password, or delete the administrator account. HSA SYSTEMS MINIKEY User Manual Table of Content Introduction............................................................................................................ 6 Features and performance ....................................................................6 Navigation ............................................................................................7 What are layout, object & Content? ....................................................10 Limits to the system ............................................................................11 Loading and printing ............................................................................................ 12 Login to the system.............................................................................12 How to load and print a layout ...........................................................13 Manage your layout ............................................................................................. 14 How to create a new layout ................................................................14 Create a new layout, based on another ..............................................16 How to delete a layout........................................................................16 Add content to your layout ................................................................................... 18 Text objects .........................................................................................19 Barcode objects...................................................................................23 Graphical objects.................................................................................26 Prompts...............................................................................................31 How to preview your layout................................................................33 Edit the message .................................................................................................. 35 Edit object properties ..........................................................................35 Change print settings ........................................................................................... 36 How to setup your print head(s) .........................................................40 How to setup input and output...........................................................43 How to test your equipment ...............................................................44 How to purge the pens .......................................................................45 How to change system settings ............................................................................ 47 Edit user accounts ...............................................................................47 Change the language..........................................................................49 Change network settings ....................................................................50 Change screen settings .......................................................................51 Page 4 of 60 HSA SYSTEMS MINIKEY User Manual Set system clock ..................................................................................52 Display system info .............................................................................53 Use the USB feature .............................................................................................. 54 How to upload Layout and resources from USB ..................................54 How to export log files to USB ............................................................54 How to update firmware .....................................................................55 Reference Section ................................................................................................. 56 List of date formats .............................................................................56 List of system events ...........................................................................57 Overview of Connectors ......................................................................58 Data Exchange ....................................................................................60 Support ...............................................................................................60 Page 5 of 60 HSA SYSTEMS MINIKEY User Manual Introduction Introduction Features and performance Features Text, barcode and graphical objects Simple inclusion of stamps by a list Multilingual keyboard Prompts Real time printing 2 configurable hardware outputs 2 configurable hardware inputs Performance Number of pens: Up to 4 pens. (max 2 physical heads) Printing speed: depending on resolution, 35 m/min at 600 dpi. Resolution: Variable in print direction, in 18 steps from 75 to 2400 dpi Manual row select Print length: up to 2700 mm. Integrated keyboard Documented protocol for remote operation (Ethernet and RS232) External PC software "MINIDRAW" for creation of print jobs. This software is supplied on the CD that follows the controller. Quadrature encoder supported Power supply 100-240VAC included Interface Hardware Page 6 of 60 HSA SYSTEMS MINIKEY User Manual Introduction Navigation The MINIKEY has a flat menu with direct access from keys. At any time you can switch to a new function by keypress (notice: you need to exit menus by green checkmark to save changes you have made) Page 7 of 60 HSA SYSTEMS MINIKEY User Manual Introduction Function of keys KEY FUNCTION Start / stop print mode Work with TEXT content Work with COUNTER content Work with DATE content Work with GRAPHICS content Work with BARCODE content Work with STAMP content Load / Save files Change settings Go back to main menu/ previous menu. Does NOT cancel addition of an object. Changes between "symbol" keyboard and normal keyboard. Symbol keyboard contains characters in other encodings (ex:Cyrillic, Greek, ...), depending on font selected. Next character should be upper case. Press twice to activate CAPS LOCK. Insert a SPACE character. Also used to toggle menu items and icons at bottom ENTER: Change values in selected menu item, select icon, accept value in inputbox Arrow keys navigate between menu items, icons and Page 8 of 60 HSA SYSTEMS MINIKEY User Manual Introduction Shortcuts SHORTCUT FUNCTION Toggle between menu lines and icons at the bottom Accept changes in the menu (same as space + arrow keys to green checkmark) Create a new text object, and edit it instantly Same can be applied to to counter, date, graphics and barcode Shuts down controller Create a new stamp, directly selected from list of stamps (visually) Common navigation icons At the bottom of each screen, a menu with navigation shortcuts can be found. Save changes and proceed. Delete object (cancel add) and go back. Do not save changes. Go back to previous menu. BACK to previous menu. Entering content When you edit content, you are presented with a single-line edit field. Under it the 11 content keys are illustrated with their values. Each time you press a button it will cycle the values, with characters first. A long press will give the number value. Example: 5jkl will cycle between j,k,l and 5. If you release the key for 1 second the character is accepted. To get shifted characters, press SHIFT To get the international characters press SYMB. The characters displayed depends on the encoding of the selected font for the object. Notice that you also have shifted values in the international characters. Page 9 of 60 HSA SYSTEMS MINIKEY User Manual Introduction What are layout, object & Content? On the MINIKEY layouts, objects and content constitute your print job. It is important to understand the difference. The following will explain: Your layout is like a white piece of paper where you place content. Objects are placeholders for content. They are like post it notes on your paper. On the post it note you write something. That is your content. You can see the principle illustrated here: When you create a layout, it is a blank piece of paper. When you place an object on your layout, content will be created at the same time and the two will be linked together. NOTICE: On MiniKey you can not link multiple content to textual objects. This is ONLY possible for barcodes! There are 3 types of objects. Text objects Barcode objects Graphical objects Page 10 of 60 Displays content as text or numbers. Displays content as barcode. display a logo, a line or a box. Not linked to a content HSA SYSTEMS MINIKEY User Manual Introduction There are 4 types of content. Content type Static text Counter Date/time Indentifier Meaning A static text is content that is the same on every print. Counters increment every time the start sensor is activated. Displays the date and/or time based on the system clock. Application identifier for EAN 128 barcode. Limits to the system Property Number of folders on internal memorycard Number of layouts Number of objects in one layout Number of contents in one layout Number of fonts in one layout Number of locales in one layout Language files String length: Printing speed Limit Unlimited. (up to 2 GB. Each layout is 16.349 bytes.) 50 layouts in each folder on the internal memory card. 40 text objects. 10 barcode objects. 10 graphical objects (Max. 50 altogether) 16 static texts. 10 counters. 10 date/time. 10 identifiers. 10 fonts. (Max. 50 fonts altogether). 5 locales (Max 50 locales altogether). 50 language files altogether. Object/content name: 15 characters. Content 127 characters. Frequency of print head 15 kHz. Resolution is variable, so maximum speed depends on chosen resolution. Theoretical maximum speed in 75 x 300 dpi close to 600 m/min. File transfer rate Length of prompt question Page 11 of 60 600x600 dpi Speed limit is 37 m/min 300x300 dpi Speed limit is 148 m/min 150x300 dpi Speed limit is 296 m/min 300x300 dpi (One row) Speed limit is 74 m/min USB 400KBit/second Ethernet 4000kBit/second RS232 115kbit/second 21 characters HSA SYSTEMS MINIKEY User Manual Loading and printing Loading and printing This section will briefly introduce you to basic operations of the MiniKey controller, so the user is able to log in, load a layout and start print function. Login to the system If MINIKEY is password protected a login screen will be shown when you start the controller. Graphical login is default. When graphical login is enabled, all user accounts on the unit will be represented by an icon. The default user account is admin. The default password is 1234. It is recommended to change the default for security reasons. If more than 8 user accounts have been setup, a scroll bar will appear. To login in, press an icon to select a user account. Next type in the password. You cannot see password as you type it. Passwords are limited to numbers on this controller. Page 12 of 60 HSA SYSTEMS MINIKEY User Manual Loading and printing Press ENTER when done or ESC to cancel and go back to select another user account. How to load and print a layout Press the MSG button Press ENTER on "Select job". Select a layout from the list. You can create / use a subdirectory if you wish to organise the files. The layout will load, and you will return to main menu. Press "RUN” key to enter print mode. Page 13 of 60 HSA SYSTEMS MINIKEY User Manual Manage your layout Manage your layout This section will detail how to manage layout files and create new layout files How to create a new layout Press the MSG button. To create a new layout, press "new". Press "filename" to enter a file name for the new file. Enter a new filename in the text field. Press ENTER to finish. You can use maximum 7 characters for the file name. Page 14 of 60 HSA SYSTEMS MINIKEY User Manual Manage your layout To change active directory press "active directory". Active directory is where your file will be saved on the internal memory card. Each directory level can contain 50 entries, where an entry is a layout or another directory. Effectively, you can have 2500 layouts with a 2 levels of subdirectories. Next, press the "new directory" icon at the bottom of the screen. Enter new directory name . Press ENTER to continue On the next screen you have changed location to the new directory. The new directory name will be shown at the top of the screen. Press the green check mark to return to the previous screen. Press ENTER to finish. Now your file will be created and will be the active file. It will be empty (no objects), and will have parameters based on the machine parameters. You are now ready to create content. Page 15 of 60 HSA SYSTEMS MINIKEY User Manual Manage your layout Create a new layout, based on another The option "New (based on)" will save a layout under a new name. This option is an advantage if you want to create a new layout using the settings from another layout. Select "New (based on)" Select source layout. Enter name for the new layout. Press the green check mark to continue. The MINIKEY will automatically save your new layout to the internal memory card How to delete a layout Press the MSG key To delete a layout, select "delete". Select a layout to delete. Page 16 of 60 HSA SYSTEMS MINIKEY User Manual Manage your layout Press Yes to confirm. Notice that if you delete the active (current) layout, it will still remain in memory and can actually be saved again. Page 17 of 60 HSA SYSTEMS MINIKEY User Manual Add content to your layout Add content to your layout This section details how to add content to your layout. As detailed above, there are 3 types of objects: text, barcode and graphics. Text and barcode objects can contain one of the different content types. The procedure for adding objects with content is the same for text and barcode objects, and will only be described in detail for text objects. Page 18 of 60 HSA SYSTEMS MINIKEY User Manual Add content to your layout Text objects Text objects display the content inside as TEXT - letters and numbers. There is no limit on the type of content that can be added to a text object. How to add objects Press one of the text object keys: TEXT, 123 or Calendar. From here select “New” icon. Or just press SHIFT-object key to create directly Doing so will display the properties for the object. General properties for objects Many of the properties are general for all objects regardless of content. The following properties list will not be repeated for each content type. Page 19 of 60 Property Description Name Descriptive name, must be unique to the layout, and can not be empty. X Position in the print direction, starting from upper left corner. The distance is set in current units (mm/inch/pixel) Y Position in the vertical direction, starting from upper left corner. The distance is set in current units (mm/inch/pixel) If the object is positioned outside the canvas the message "Warning object out of canvas" will be shown. Rotation Allows you to rotate the object in 90 degree steps. If the selected font cannot be rotated, [select font] will be shown in the font line. Please go to the font menu and select a different font that can be rotated. Font Select font. You can use MiniDraw to create new fonts. No more than 50 fonts can be stored on the MINIKEY . Up to 10 fonts can be used in one layout. HSA SYSTEMS MINIKEY User Manual Add content to your layout Text object with static content Static text will not change automatically, and acts like a label in the message. You can enter the text content at last line. Page 20 of 60 Property Description Text String content - maximum 127 characters HSA SYSTEMS MINIKEY User Manual Add content to your layout Text object with counter Enter parameters. Parameters are described below. Press green check mark to finish. Parameter list(text object with counter) Property Description Value Current value at print mode start Digits Number of digits shown. The maximum number of digits is 10. Minimum value The minimum value displayed in the counter. Minimum value is −2,147,483,648, after which it will display maximum value. Maximum value The maximum value displayed in the counter Maximum value is +2,147,483,647, after which it will display minimum value. If the maximum value exceeds the selected number of digits, only the last digits will be displayed. Example: Digits = 3. Max = 1000. Counter will display 998, 999, 000, 001. Lead-in What should be in front of current value. Select either: Zero (displays 000123) Space (displays 123) Nothing(displays123) Step value Counter increments. With a setting of 3, the counter will display 0,3,6,9,12....... Step count How many times the counter is repeating. This is independent from the message, repeat, set in the layout settings. If step count has been set to two, print will be 99,99,100,100,101,101. If layout repeat has been set to two and the counter repeat has been set to off, the print will be[99,100] [101,102] (Sensor signals enclosed in [ ] ) Reset step on print start Select this option to reset step count when you enter print mode. Page 21 of 60 Reset on print start Continue counting at print mode start, or reset to a value Reset value The value to start from if “Reset on print start” is selected. May be equal to or different from minimum. HSA SYSTEMS MINIKEY User Manual Add content to your layout Text object with date/time Enter parameters. Parameters are described below. Press the green check mark to finish. Parameter list(text object with date/time) Page 22 of 60 Property Description Format Format determines how date and times is displayed. If you enter dd-mmyyyy, the date will be displayed like 28-04-2009. Refer to the "date formats" in the reference sections for a full list of date codes. Anything entered that is not on the list, is interpreted literally (such as comma, full-stop, dash etc). Also strings that are in quotes are interpreted literally. Locale Determines long and short names for days and months. Press locale and select a locale file from the menu. The MINIKEY contains locales for various different languages. Offset Select a different date and time than the one set by your system clock. You can make offset year, month, day, hour, minute and seconds, independently, and both forward and back. Use blue arrows to add/subtract one, or click the number to edit directly Example Not a setting, but the resulting (printing) date code, formatted with format pattern, locale and offset HSA SYSTEMS MINIKEY User Manual Add content to your layout Barcode objects Barcode objects display the content inside as a barcode. You can place any type of content inside a barcode object, but you are only allowed to add the object if the resulting string is valid for the barcode symbology chosen. If f.ex 12 characters, numbers only is expected, you are not allowed to add a string or a longer/shorter number. Properties Press BARCODE button. Select content to add in barcode. As an example, static text content is selected here. Enter parameters. Parameters are described below. Press green check mark to continue. Page 23 of 60 HSA SYSTEMS MINIKEY User Manual Add content to your layout Properties for the barcodes Property Description Name Descriptive name, must be unique to the layout, and can not be empty. X Position in the print direction, starting from upper left corner. The distance is set in current units (mm/inch/pixel). Y Position in the vertical direction, starting from upper left corner. The distance is set in current units (mm/inch/pixel) If the object is positioned outside the canvas the message "Warning object out of canvas" will be shown. Height Enter barcode height. Separator Optional, 1 character that is used to separate content. Example: you wish to concatenate Batch number and a counter. Put both in the same text object, and use e.g. space as separator. You will get an output like XCBVJF 3345. Symbology The barcode type. Select one of the options shown below. EAN8 EAN 13 UPC-A Interleaved 2 of 5 Code 3 of 9 Code 128 EAN 128 DataMatrix DataMatrix with GS1/EAN128 structure Checksum Change calculation of the check sum for the chosen barcode type. Modules Multiplication of barcode size. 1 is the smallest possible size barcode. Module size cannot be smaller than font size, otherwise the human readable font will not be readable. Recommended module size is 6 or above. Ink Spacing Add extra space between the black bars to compensate for ink bleeding into the printed material. Extra Lines This will add extra width to the black lines. Human readable Turns human readable part of barcode on or off. Human Readable Font Font type for the human readable part of the barcode. You can create new fonts with MiniDraw . No more than 50 fonts can be stored on the MINIKEY . Up to 10 fonts can be used in one layout. EAN 128 barcodes Use the the barcode wizard to create EAN 128 structured barcodes. These contain data identifiers that tell what the following data is (semantic meaning), in order to differ between f.ex item number from weight and size. Identifiers and data must ALWAYS be in the order [identifier][data][identifier][data] etc An example on how to create a EAN 128 barcode is shown below. Page 24 of 60 HSA SYSTEMS MINIKEY User Manual Add content to your layout Select "New text wizard" from the barcodes menu. Select "add identifier". Set "ID code" to 1. Select "Add static". Select "Enter text". Page 25 of 60 HSA SYSTEMS MINIKEY User Manual Add content to your layout Enter 13 numbers. (since ID 01 is defined as n02+13+1 check digit) Select ok to enter barcode setup menu. "Symbology" must be set to EAN 128 or DataMatrix (GS1). Press green check mark to finish. Graphical objects Logos Press the LOGO button. In the graphics menu, press the "New logo" button. Page 26 of 60 HSA SYSTEMS MINIKEY User Manual Add content to your layout Enter parameters. Parameters are described below. Press green check mark to continue. Parameter list(logos) Property Description Name Descriptive name, must be unique to the layout, and can not be empty. Graphic Type Chose between logo, line, or box. Depending on choice you will get additional menu items. X Position in the horizontal direction, starting from upper left corner.The distance is set in current units (mm/inch/pixel) Y Position in the vertical direction, starting from upper left corner. The distance is set in current units (mm/inch/pixel) Logo Press logo, to select a logo currently stored on the MINIKEY Logo files must be 2 colors maximum for best result. To upload new logos to the MINIKEY please install the MiniDraw software. The MINIKEY has a maximum capacity of 10 graphical objects(logos, lines, boxes) in one layout (MAX 50 altogether). Boxes Page 27 of 60 HSA SYSTEMS MINIKEY User Manual Add content to your layout Press green check mark to continue. Parameter list(Boxes) Property Description Name Descriptive name, must be unique to the layout, and can not be empty. Graphic Type Chose between logo, line, or box. X Position in the horizontal direction, starting from upper left corner. The distance is set in current units (mm/inch/pixel) Y Position in the vertical direction, starting from upper left corner. The distance is set in current units (mm/inch/pixel) X2 When graphic type is box, x2 is the x coordinate of the lower right corner. Y2 When graphic type is box, Y2 is the Y coordinate of the lower right corner. Width Select the line width. Available for both lines and rectangles. Fill Fill the rectangle or not. Available only for rectangles. The MINIKEY has a maximum capacity of 10 graphical objects(logos, lines, boxes) in one layout (MAX 50 altogether). Lines Page 28 of 60 HSA SYSTEMS MINIKEY User Manual Add content to your layout Parameter list (lines) Property Description Name Descriptive name, must be unique to the layout, and can not be empty. Graphic Type Chose between logo, line, or box. X Position in the horisontal direction, starting from upper left corner. The distance is set in current units (mm/inch/pixel) Y Position in the vertical direction, starting from upper left corner. The distance is set in current units (mm/inch/pixel) Length The length of the line. Available only when line is selected as graphic type. Direction Select either vertical and horizontal lines.Available only when line is selected as graphic type. Width Select the line width. Available for both lines and boxes. The MINIKEY has a maximum capacity of 10 graphical objects(logos, lines, boxes) in one layout (MAX 50 altogether). Page 29 of 60 HSA SYSTEMS MINIKEY User Manual Add content to your layout Stamps Although having their own button for quick access, STAMPS content actually is a logo. When you create a stamp by stamp menu=>NEW you are presented with selection of the stamp and properties. If you press SHIFT+STAMP you are instead presented with a visual list of the stamps currently installed. Select by cursor up/down or left/right and ENTER to select – or just type a 2 digit number if you know it already. Then you are presented with options for the stamp chosen. Property Description Name Descriptive name, must be unique to the layout, and can not be empty. X Position in the horisontal direction, starting from upper left corner. The distance is set in current units (mm/inch/pixel) Y Position in the vertical direction, starting from upper left corner. The distance is set in current units (mm/inch/pixel) Size Either half (150 pixel high / ½ pen) or 300 pixel high / 1 pen. Size is scaled correctly according to content. Stamp A visual representation of the stamp selected. Press enter here to select another stamp A collection of stamps may be up to 50 different stamps. It is possible to create these via MiniDraw. You can also upload your own images if you prefer instead. As long as the size is adequate from the beginning (300 pixel in height per print engine) Page 30 of 60 HSA SYSTEMS MINIKEY User Manual Add content to your layout See instruction in MiniDraw how to do this. Prompts Prompts is not content by itself, but a way to force the user to input data at print start. Typically used where the designer does not know the content of this data in advance - or where it changes regularly. Setup prompts Press the prompt icon at the bottom of the screen Edit prompt parameters. Parameters are described below. Press green check mark to continue. Prompt parameters: Property Active Requires validation Question Mask Page 31 of 60 Description To activate the prompt, select on. When this option is set to on, the prompt cannot be accepted before a user with "validator" status has entered his password. Please refer to the chapter on user accounts. Enter a question to display, for instance "Enter batch no ?" If you enter N, only numbers will be accepted as input. If you enter X, only characters will be accepted. HSA SYSTEMS MINIKEY User Manual Property Add content to your layout Description If you have a mask on the prompt, the keyboard will change automatically during input, and you are locked to that keyboard. Example: NNNN will display the numeric keypad for entry of 4 characters. Visible mask Notice: SPACE will allow you to use literals that you jump over. Default value shown in input box. If you have chosen SPACE in mask above, the visible mask will be printed literally at that position and jumped over in input. Example Mask = NN[S]NN[S]NN Visible = 00-00-00 Input = 123456 Result = 12-34-56 Use prompts at print start Prompts are used when you start print mode. You will be asked to enter the values for each of the content where you have activated prompts. Depending on the prompt view mode selected in Settings->Screen->Prompt display, you may see the prompts as one of the following: Appearance Mode selected Single view Prompts are shown one by one, always in edit mode At the end you are presented with a list of values entered. You can click any of them again to edit, or accept all. List view Prompts are shown directly as a list of current values, click to edit one or accept all. Page 32 of 60 HSA SYSTEMS MINIKEY User Manual Add content to your layout Validation If one or more prompts have Validation=ON, the final list of prompts will look different. Instead of a green checkmark, it will have a checkmark over a prompt icon. When you select this icon, you are taken to the login screen. Select here a user that has the role VALIDATOR activated. Enter password for that user. If login is succesful, the checkmark is again the green accept icon. Press it, and print starts - now with prompts validated. Notice that if the user that starts print mode is ALSO a validator, the prompts will automatically be validated by that user, and no validation screen will appear. How to preview your layout The preview is always shown when a menu is not active. You can choose in the settings->Screen->Preview zoom setting how to fit the layout to the screen. Page 33 of 60 HSA SYSTEMS MINIKEY User Manual Page 34 of 60 Add content to your layout HSA SYSTEMS MINIKEY User Manual Edit the message Edit the message This section details how to edit your layout (objects and content) to change properties in an existing message. Edit object properties Use this method to edit existing content based on a list of object names. An alternative and perhaps simpler method is to select the object from the preview screen (red border) then select object properties icon. Press the TEXT button Select a text from the list of active text objects. Make the required changes. Parameters are described above. Page 35 of 60 HSA SYSTEMS MINIKEY User Manual Change print settings Change print settings Print settings is where all parameters for the printout is stored. Settings these right are crucial in order to get a good looking printout. Please also refer to installation manual Enter setup To enter setup press the SETUP key. How to edit Machine parameters Machine parameters are where the setup related to printout is stored. Please refer to installation manual for a detailed explanation of parameters. To edit machine parameters, select "machine". Length The total length of your layout. Page 36 of 60 HSA SYSTEMS MINIKEY User Manual Change print settings Vertical resolution In vertical resolution it’s possible to select between the following: 300 dpi (row A) 300 dpi (row B) 600 dpi 300 dpi (alternating row A+B) Horizontal Resolution In horizontal resolution you can choose from 75 to 2400 dpi in 18 different steps. This allows you to choose very fast and cost-saving print (with a little lower quality), or very high resolution print (compromising speed and cost), or a setting in-between. Use the arrows to select lower / higher DPI. The list will wrap, so the lower part of 75 dpi will be 2400 dpi. Print direction Print direction is the travel direction of your media. Select either Right->left, Left-> Right or bidirectional. In bidirectional mode, your controller prints one line from left to right, then the following line from right to left. Start direction This option applies only to bidirectional printing and will only be displayed if bidirectional has been selected under "print direction". Your print head must be set to go either Left->Right or Right->left when a sensor signal is detected. Select Input 1 -> Input 4 to set the print direction remotely. If the signal goes from low to high, the head will print from Left->right. If the signal goes from high to low, the head will print from right->left. Connect input 1-2 to the I/O connector. Connect input 3-4 on the control connector. Print mode Select either Velocity, Position Encoder or Modular Encoder. If you select the position option, encoder pulses will be used to calculate the speed. If modular is selected, firing of the nozzles is synchronized with the encoder pulses. Velocity This value must be set, if print mode is set to velocity. Please make sure the velocity equals the speed of your media and that your media moves with a constant speed during printing. Encoder This value must be set, if print mode is set to position. The value entered here is the encoder resolution. Resolution is calculated by dividing the circumference of the measuring wheel by the number of pulses per revolution generated from the encoder Modular Page 37 of 60 HSA SYSTEMS MINIKEY User Manual Change print settings This options must be set if print mode has been set to modular. If you enter 1, the nozzles will fire each time an encoder signal is received. If you enter 4, the nozzle rows will fire ones for every 4 encoder signals received. Quadrature Select quadrature to measure on the back edge of the encoder signal. This will double your pulses (single-channel encoder) or quadruple your pulses (double channel encoder). Divide distance per pulse accordingly. Sensor edge Set the sensor settings to positive or negative, depending on the type of sensor you are using. If you want printing to start when the sensor's signal goes active, the sensor edge should be positive. If you want printing to start when the sensor's signal goes inactive, the edge should be negative. Start distance An important part of setting up your system is to measure the distance between the start sensor and the head. This is to ensure the product is printed at the right spot. Remember the value must correspond to the physical setup. If bidirectional printing is selected, two options are available, start distance Left->right and start distance Right->left. Select a start distance for the Left->right travel direction and one for the Right->left travel direction. Repeat Count How many times the controller will print every time the sensor is activated. Notice that counters have their own repeat setting, meaning that if you want to print same counter values, you should also adjust counter repeat. Repeat Distance Distance between two repeats, from end of one to the start of next. There will always be a minimal gap of 4 mm for all DPI modes except 300x300 dpi (One row). Endless If endless is selected, the controller will continue printing as long as the photo cell input is active. Buffer mode The buffer is a location in the controller memory that holds data waiting to be printed when printing of other data is in progress. You can choose between the following settings: Normal buffer The controller will always keep 1 or 2 images in the buffer, ready for next print. Choose this option for best performance and high speed print of f.ex dates or fixed text. The controller will never be “behind” in this setting. Page 38 of 60 HSA SYSTEMS MINIKEY User Manual Change print settings No buffer The image is always generated only when the start sensor is released. This will guarantee that you always print up to date information – typically you will use this mode if printing the accurate time / date is important. Start block distance and end block distance The purpose of block distance is to prevent the sensor from being triggered twice. For instance if the media is an envelope with a window, the sensor will "believe" the front edge of the window to be the back edge of the media. Thus the back edge of the window will trigger the sensor again. If you are printing on medias of equal length, you can enter the media length as your start block distance and set the end block distance to 0. However this is not possible if you are printing on medias of various size. If that is the case, your start block distance should be a little longer than your start distance. Set the end block distance to 1cm or less. Line name What you enter here will be displayed when you create an object with systemdata content and select linename as your data. Page 39 of 60 HSA SYSTEMS MINIKEY User Manual Change print settings How to setup your print head(s) Print Head parameters and type are selected in the stitching menu. It is very important that these settings are accurate. The settings here must very accurately match your physical hardware configuration. Choose "Head Setup" in the settings menu The MiniKey can use one or two physical heads, head 1 connected to the side, head 2 to the back, which each may be off, 1pen or 2pen. Inside head setup, choose the physical head to edit properties. Print head options Head size Page 40 of 60 HSA SYSTEMS MINIKEY User Manual Change print settings The type of the physical head. This can be a 1 pen stall, 2 pen stall or Disabled. Offset Head offset is only relevant if you have more than one head on your system. If this is head one, offset must be set to zero. If this is head two, offset is the distance from the the first nozzle row of the first pen in the first head to the first nozzle row of the first pen in the second head. Upside Down This option will mirror the image horizontally. Select this option if you are printing "up" instead of down. Typically you will want to ENABLE this on web printing, if the latch is facing the operator. Other side This option will mirror the image vertically. Select this option if the head is printing from the other side of the conveyor. Mirrored This option will make the head print in reverse (mirror). Use this option if the print media is transparent, like f.ex a web or clear plastic. Pen Voltage and Fire pulse width These settings can greatly influence the quality of your printout. Please refer to settings in the Quick start manual. Setting up the pen Select a pen to enter the pen setup menu. The number of pens displayed depends on the head size. It will be from 1 or 2. The settings may be different for each pen. Make the required changes. Press the green check mark to continue. Page 41 of 60 HSA SYSTEMS MINIKEY User Manual Change print settings Offset Offset for this pen in the current head. Offset for the first pen will be zero. offset for the second pen will be the distance from the first nozzle row in the first pen to the first nozzle row in the second pen. This is typically a distance off 600 pixels. Overlap The number of nozzles that are turned off. Will compensate for a small overlap of nozzles. Ink supply Size (ml) How much ink at 100% (full) is available to this pen Ink warning level Change this setting if you want the MINIKEY to display a warning when the ink level(measured in %) is low. Offline Turn off power on the cartridge Page 42 of 60 HSA SYSTEMS MINIKEY User Manual Change print settings How to setup input and output The MINIKEY has 2 output and 2 input channels. Select hardware i/o in the settings menu. For each output, select one of the following: Property Off Print Mode Printing Low Ink Description No output ON when the unit is in print mode. ON when the unit is actively printing a message. ON when one of the pens has low ink warning. Error ON when controller is overheating. For each input, select one of the following: Property Off Purge Start/stop print Description Input is ignored. A signal will cause the printer to purge. A signal will initiate printing. The printer will stop printing if printing is in progress. Spit enable(active low) Activate remote spit when signal goes low. Spit enable(active high) Activate remote spit when signal goes high. Reset alarm Reset alarm condition. Use this to allow acknowledge by push-button In addition, one of the inputs may be used to select the direction for bidirectional printing. Page 43 of 60 HSA SYSTEMS MINIKEY User Manual Change print settings How to test your equipment When the MINIKEY is being installed, you can check that all hardware connected to the controller is working as expected. Select Test I/O in the settings menu. On this screen you will find the start switch, the encoder plus the input and output channels. When a signal is ON, the light bulb will light up. Example: Activate your start switch. If the controller receives a signal from the start switch, the light bulb will light up. Start your conveyor. If the controller receives a signal the lightbulbs "encoder a" and "encoder b" will start flashing. Click the lightbulb icon to toggle the output signals Page 44 of 60 HSA SYSTEMS MINIKEY User Manual Change print settings How to purge the pens Purge and spit are used as maintenance tools to keep the ink from clogging the nozzle rows. Spit is firing of all channels, controlled by a timer. Purge is a constant firing of all channels for as long as function is activated. Select purge/spit in the head setup menu. In the purge menu, you can purge each head in your head(s). At the bottom of the screen, you can enter the spit settings menu. Spit is short firing of all channels, typically few drops per channel very fixed period of time. Select spit between prints to fire a few nozzles between each print. Property Interval Burst size Description Number of seconds between each spit. Number of times each nozzle fires. Select sensor spit to spit every time the photocell is triggered. Property Distance Burst size Page 45 of 60 Description How far from the photocell you want the spit. Number of times each nozzle fires. HSA SYSTEMS MINIKEY User Manual Change print settings The delay is the number of seconds from one spit to the next. If the sensor is triggered more frequently, the nozzles will not fire. For instance, with a 2 second delay, the system will never spit with less than two seconds between prints. Page 46 of 60 HSA SYSTEMS MINIKEY User Manual How to change system settings How to change system settings System settings have influence on the “look and feel” of the controller, but not directly on the printout. This is where users are edited, the menu language is changed, and clock and network settings are changed. Edit user accounts In the settings menu, select "system". Select "users" in the system menu. Page 47 of 60 HSA SYSTEMS MINIKEY User Manual How to change system settings A list of active user accounts will be displayed. Select a user account to edit. You now have the following options: Property Username Password Validator Admin File access Object access Parameter access Load access Icon Description Select a name for the user account. Enter a password for the user account. Limited to 4 digits. The user can "sign" prompts where validation is required. The user can change any parameter and access all menus. The user can load files, saves file and add new files. The user can edit objects and content The user can change parameters in the settings menu. The user can only load and print layouts. Select an icon to display when graphical login has been selected. If you want to create a new user account, select the "new user" icon at the bottom of the screen. WARNING! DO NOT DELETE YOUR ADMIN ACCOUNT OR FORGET THE PASSWORD. The machine will have to be sent back for factory reset. Page 48 of 60 HSA SYSTEMS MINIKEY User Manual How to change system settings Change the language Select "language" in the system menu. In the language menu, select which language to use for the MINIKEY interface. Press a language name to switch to that language. You will return to the main menu with the new language in effect. If your language is not on the list, you can make your own. HSA SYSTEMS provides the tools necessary to upload a new language. Page 49 of 60 HSA SYSTEMS MINIKEY User Manual How to change system settings Change network settings Select "network" in the system menu. Network settings allows you to configure your MINIKEY for communication with the local area network. Parameter list Property Network Network name DHCP IP address Netmask Gateway Port File port Network address Page 50 of 60 Description Enable or disable network option. Used to identify the unit, when connected to the Communicator software. If this option is set to on, theMINIKEY will search the network for a DHCP server, to automatically obtain an IP address, netmask and gateway. To add an IP address manually select "off". Standard settings for IP access. Works just like with a PC network. Typical settings are: IP = 192.168.1.10 Netmask = 255.255.255.0 Gateway = 192.168.1.1 This port is used when the MINIKEY is operated by remote control. Port for sending files to the machine A unique address that cannot be changed. Mac addresses allow network administrators to allow or disallow the MINIKEY access to a network. HSA SYSTEMS MINIKEY User Manual How to change system settings Change screen settings Select the "screen" in the system menu. The screen menu has the following options. Property Confirmations Description If this option is selected, you will be asked to confirm, for instance if you delete a file. Info Screens This option will display info screens when a command has been carried out. Screensaver The time that elapses before the screen saver starts. Screensaver Password If screensaver password is set to on, the user must enter the password to regain access to the MINIKEY Login Select graphical login (user accounts shown as icons), Text Login (enter username and password) or No Login. Notice that if No Login is selected, this forces “Simple Mode” operation. Brightness Select screen brightness. ( 0..100) Log Level What data is saved to the internal log file. Choose between none, minimum, normal or maximum log level. A detailed list is in the reference section Unit Measurement units. Choose between mm, inch or pixel. Item Selection "Click to change" will allow you to edit the parameters and activate menus immediately. "Click to select" will highlight the parameter and menu first. Select again to activate. Prompt display When entering print mode, prompts can be listed or shown one by one. Page 51 of 60 HSA SYSTEMS MINIKEY User Manual How to change system settings Set system clock Select "Clock" in the system menu The available options are: Property Current date Current time Use DST DST on DST off Description Current date. This is entered in your local format, which will depend on menu language chosen. Current time in your area. (hh:mm:ss) If set to on, the controller compensate for Daylight Saving Time. The date when Daylight Saving time starts. The date when Daylight Saving time ends. Objects with date/time content are synchronized with the system clock therefore it is important that the settings are correct. Page 52 of 60 HSA SYSTEMS MINIKEY User Manual How to change system settings Display system info Select "info" in the system menu. Page 53 of 60 HSA SYSTEMS MINIKEY User Manual Use the USB feature Use the USB feature How to upload Layout and resources from USB You can create a print job with the software MiniDraw and upload it to the MINIKEY from USB. To load print jobs from a USB key, please insert the key into the USB slot. The MINIKEY will search for available scripts in the root of the flash drive, and display them on the screen. Click on the script to execute and confirm when prompted For instructions on how to create print jobs and save them to USB, please refer to the MiniDraw Manual. How to export log files to USB Two log files are stored on the internal memory card. The content of the data log is stored in one logfile. The log file format is defined from MiniDraw. There are 3 different log levels. Please refer to the section "Screen settings". You will find a list of systems events in the reference section. The logfiles can be extracted and saved to a USB key. Insert a USB key in the USB slot on the MINIKEY . Select "Export log". This will start the extraction process. The extraction process is completed when the "busy symbol" is gone. The log files will be saved on the USB drive as Page 54 of 60 LOGFILE.LOG for system events PRINTER.LOG for print data log HSA SYSTEMS MINIKEY User Manual Use the USB feature How to update firmware To update from a USB key, please complete the following steps. Obtain the update files from your supplier. You typically get this as a zip file. Copy all files from “USB UPDATE” directory inside to the USB key. Insert memory stick in MINIKEY. Wait for a list of files to display on the MINIKEY (you must be logged in as admin to see this) Load firmupd.tsc script and confirm When asked, recycle power You can also update firmware from your pc. To update firmware from your pc, please setup an ethernet connection. The procedure is described in MiniDraw manual Next install the software MiniDraw and follow the instructions in the MiniDrawmanual. Page 55 of 60 HSA SYSTEMS MINIKEY User Manual Reference Section Reference Section List of date formats Variable Explanation y,yy,yyyy Year with ( 1, 2 or 4 digits) m Month number (1 digit) mM Month number (1 digit, space leadin) mm Month number (2 digits) mmm Jan mmmm January #w Week number (1 digit) #W Week number (2 digits) d Day of month (1 digit) dD Day of month (1 digit, space leadin) dd Day of month (2 digit) ddd Short name for day (such as mon for Monday) dddd Full name for day (such as Monday) #d Number of weekday (start of week as per language file is number “1”) #j Day of year (1 digit) #J Day of year (3 digits) h,hh, Hour ( 1 or 2 digits) n, nn Minute ( 1 or 2 digits) s, ss Second (1 or 2 digits) Notes: 1) Month names depend on the locale selected 2) Month / Day names are capitalized according to format string. Ex: mmm=>jan, MMM=>JAN 3) To put literals, quote the string. "ddd is " ddd produces ddd is Mon 4) In general, date calculation and formatting follows ISO-8601 Page 56 of 60 HSA SYSTEMS MINIKEY User Manual Reference Section List of system events If loglevel has been set to minimum, the actions with minimum log level will be logged. If loglevel has been set to normal, actions with minimum log level and normal log level will be logged. If loglevel has been set to maximum, all actions will be logged. Page 57 of 60 Log level Maximum Maximum Maximum Maximum Minimum Minimum Minimum Action Entering prompts New value Entered value Entering prompts for next job Logged on Failed login Shut down Log level Normal Normal Normal Normal Normal Normal Normal Minimum Log out Normal Minimum Minimum Minimum Minimum Minimum Minimum Remote log out Starting print New file Load file Load file to print queue Delete file Normal Normal Normal Normal Normal Normal Minimum Minimum Minimum Minimum Minimum Load file template Renaming file New user added User deleted Edit user Normal Normal Normal Normal Normal Minimum Minimum Minimum Minimum Minimum Minimum Minimum Minimum Minimum Minimum Minimum Screen settings changed Switching job Data log file edit Pen auto switch on/off Firmware update initiated FPGA update initiated Logged on (remote) Failed remote login Log out(remote) Load file (remote) System reboot(remote) Normal Normal Normal Normal ACTION Remote shutdown Prompting Stopping print Data edit (object) Data edit (content) Editing finished Create object (wizard) Create object with content Edit object/content Delete object/text Edit shift content Delete shift content Change font Change locale Date/time Edit logo Save file Language changed Calibration Spit settings changed Printhead edit Pen edit Logs exported Logs reset HSA SYSTEMS MINIKEY User Manual Reference Section Overview of Connectors Necessary equipment 1 Print head (1) 8 Power connector Recommended equipment 2 Print head (2) 3 External start sensor 4 Encoder Optional equipment 5 USB connection, for loading jobs 6 Ethernet connection, for remote control and transfer 7 RS232 connector CONNECTOR SUB-D 15 pin female 100-240 VDC SUB-D 15 pin female SUB-D 9 pin female SUB-D 9 pin female USB RJ45 female socket SUB-D 9 pin male For wiring diagrams on connectors, please refer to installation manual. Page 58 of 60 HSA SYSTEMS MINIKEY User Manual Reference Section Fuses The Minikey controller has 4 fuses, 2 on the outside and 2 on the inside. On the outside are the mains fuses 5x20mm glass 2A T The controller can supply external equipment with 5 and 12V DC from the internal power supply. F1 is the 5V fuse and F2 is the 12V fuse both are 0,5A SMD Fast acting. The value of the fuses is related to the power available from the PCB. Use only 0,5A - if you need more power you must use an external power supply. F1 and F2 are located on the inside of the Minikey right behind the USB connector. You can buy the fuses from HSA or locally, if you choose locally make sure you get the right fuses, warranty does not cover replacement of burned PCB’s because of wrong fuses. Part numbers HSA Page 59 of 60 FARNELL MOUSER ACEL-Fuse-0,5A-SMD 9922156 576-0451.500MRL ACEL-Fuse-2A-5x20 1123244 504-BK/S506-2-R HSA SYSTEMS MINIKEY User Manual Reference Section Data Exchange Please refer to "Remote Communication with MiniTouch/MiniKey" Support For product support, please contact HSA SYSTEMS Customer Service department HSA SYSTEMS CUSTOMER SERVICE DEPARTMENT Phone: +45 66103401 Email: [email protected] Page 60 of 60 HSA SYSTEMS