1
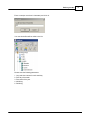
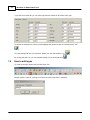
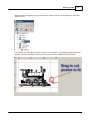
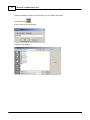
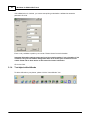
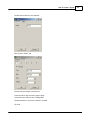
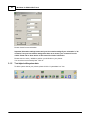
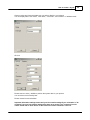
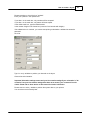
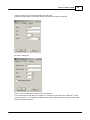
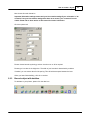
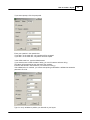
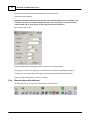
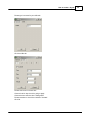
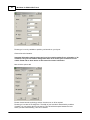
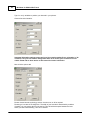
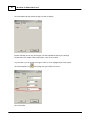
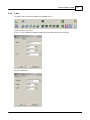
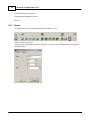
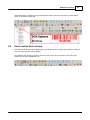
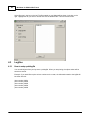
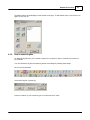
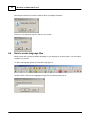
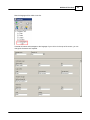
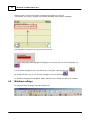
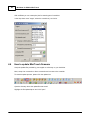
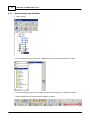
User Manual
Minidraw
Version 1.8
© 2010 HSA SYSTEMS
2
Minidraw for HSAJet MiniTouch
Table of Contents
Before you start
4
How to...................................................................................................................................
create a package
4
How to...................................................................................................................................
add fonts
5
How to...................................................................................................................................
add locales
8
How to
...................................................................................................................................
add logos
10
How to create a layout
14
How to
...................................................................................................................................
add text object with content
15
Text
Text
Text
Text
Text
object
object
object
object
object
w ith
..........................................................................................................................................................
text
15
w ith
..........................................................................................................................................................
counter
17
w ith
..........................................................................................................................................................
date/tim e
19
w ith
..........................................................................................................................................................
shiftcode
22
w ith
..........................................................................................................................................................
system data
24
How to
...................................................................................................................................
add barcode objects with content
26
Barcode
Barcode
Barcode
Barcode
Barcode
object
..........................................................................................................................................................
w ith text
26
object
..........................................................................................................................................................
w ith counter
28
object
..........................................................................................................................................................
w ith date/tim e
31
object
..........................................................................................................................................................
w ith shiftcode
34
object
..........................................................................................................................................................
w ith system data
37
How to
...................................................................................................................................
add graphical objects
39
Logos
Lines
Boxes
.......................................................................................................................................................... 39
.......................................................................................................................................................... 41
.......................................................................................................................................................... 42
Finish...................................................................................................................................
your printout
43
Calculate
...................................................................................................................................
costs
44
Make ...................................................................................................................................
a test print
45
Upload your files to the controller
45
How to
...................................................................................................................................
setup an ethernet connection
45
How to setup ..........................................................................................................................................................
lan connection
45
How to setup ..........................................................................................................................................................
direct Connection
49
How to upload..........................................................................................................................................................
your files
54
How to
...................................................................................................................................
upload via USB
55
Additional Functions
56
How to
...................................................................................................................................
download layouts
56
How to
...................................................................................................................................
delete files remotely
57
Logfiles
................................................................................................................................... 58
How to setup ..........................................................................................................................................................
printlogfile
58
How to extract..........................................................................................................................................................
logfiles
61
How to
...................................................................................................................................
create language files
62
© 2010 HSA SYSTEMS
Contents
3
Minidraw
...................................................................................................................................
settings
64
How to
...................................................................................................................................
update MiniTouch firmware
68
Stamps
...................................................................................................................................
for the Minikey controller
69
Upload stam ps
..........................................................................................................................................................
from harddrive
70
Create and upload
..........................................................................................................................................................
new stam ps
71
Support
73
© 2010 HSA SYSTEMS
3
4
Minidraw for HSAJet MiniTouch
1
Before you start
1.1
How to create a package
The first step is to create a package. A package is like a placeholder for layout files, logo files, font files
etc.
To create a new package click the "New Package" icon at the top of the page.
Please choose a name for your package and click ok.
As part of the package, you can create files, font, logos, locales language files or stamps. Once created
they will appear in the list on the left.
You can save your package to your hard drive på clicking the "Save package" icon
To load the
package later , please click to "Load package" icon.
© 2010 HSA SYSTEMS
Before you start
1.2
How to add fonts
Before you create the layout , you will need to do the following:
1. Add a font. You will need a font to add text and barcode objects later.
2. Add a locale file, if you want to display date or time on your layout.
3. Upload a logo from your pc, if you want a logo on your layout.
The following will explain.
To add a new font to your list, please click the "New Font" icon.
Please choose a name for your font. The name cannot be longer than 7 characters.
© 2010 HSA SYSTEMS
5
6
Minidraw for HSAJet MiniTouch
Please choose font properties. Scripts refer to the languages you have installed on your computer. At
the bottom of the menu, you can choose a different character set, such as Russian and Japanese.
Now the name of your new font will appear in the list on the left.
© 2010 HSA SYSTEMS
Before you start
7
You can make your fonts narrower or wider by adjusting the horizontal stretch settings.
Next, select font rotation and horizontal stretch. If for instance you want to rotate your text 90 degrees,
font rotation must be set to 90 degrees.
Important! If you want to rotate an object, the rotation settings on the font and rotation settings on
the object must be the same, otherwise your content will not be displayed. Rotating a font will
effect the font size.Therefore do not check more than one box.
You can also crop your fonts by adjusting two red dotted lines. There is one line at the top and one at
the bottom of the text field. Only the part of your font within the dotted lines will be displayed on the
Mthp4.
To adjust the line, place the cursor at the border between the text field and the ruler.
Hold down the left mouse button and drag.
© 2010 HSA SYSTEMS
8
Minidraw for HSAJet MiniTouch
To adjust the second line, place the cursor at the bottom of the text filed. Press the left mouse button
and drag.
To remove the font from your list, please highlight the font and click the "remove font" icon.
By clicking the save icon, you can save the font to your local hard drive.
If you want to open a font file from your hard drive, please click the "load font" icon.
1.3
How to add locales
The locale file contains information such as long and short names for months and weekdays.
miniDraw comes with default locale files for the following languages:
1. Albanian
2. Bosnian
3. Czech
4. Danish
5. German
6. Greek
7. English
8. Estonian
9. Finnish
10.French
11.Croatian
12.
13.
14.
15.
16.
17.
18.
19.
20.
21.
22.
Hungarian
Icelandic
Italian
Dutch
Norwegian
Polish
Portuguese
Russian
Slovakian
Spanish
Swedish
If you language is not on the list, please go through the following steps to create a new locale file.
To create new locale settings, please click the "New Locale" icon.
© 2010 HSA SYSTEMS
Before you start
Enter a name(no more than 8 characters) and click ok.
Your new locale files will be visible in the list.
Please enter the following parameters:
1.
2.
3.
4.
5.
Long and short names for each week day.
First day of the week.
First week of the year.
AM String.
PM String.
© 2010 HSA SYSTEMS
9
10
Minidraw for HSAJet MiniTouch
If you click the months tab, you can enter long and short names for all months of the year.
To remove the settings from your list, please highlight the name and click the "remove locales" icon.
To load a settings file from your hard drive, please click the "load locales" icon.
By clicking the save icon, you can save the settings to your local hard drive.
1.4
How to add logos
To create a new logo, please click the "New Logo" icon.
Please choose a name for your logo. The name cannot be longer than 7 characters.
© 2010 HSA SYSTEMS
Before you start
11
Please choose the image file from your hard drive you intend to use as your logo.Now your new logo is
visible in the list.
You can both crop and rotate your picture. There is no "crop button". If you position the dotted lines and
upload the picture to the Mthp4, only the part of the picture within the dotted lines will be visible.
© 2010 HSA SYSTEMS
12
Minidraw for HSAJet MiniTouch
Instead of uploading a file from your hard drive, you can create a 2D barcode.
Select "New logo"
Enter a name for your 2D barcode.
Cancel the load window.
© 2010 HSA SYSTEMS
Before you start
13
Next, choose symbology and enter a value in the content box. The number of modules determines the
width of your barcode. If your barcode type is 2 pixel wide and modules is set to 10, you barcode will be
20 pixels wide.
Next click the properties icon.
Code format determines the encoding. UCC/EAN is most commonly used. Symbol size determines the
height and the width of your barcode measured in fields. If symbol size is set to automatic and the box
"force square" is checked, only square barcodes are available.
Click ok to continue.
To remove the logo, please highlight the name and click the "remove logo" icon.
© 2010 HSA SYSTEMS
14
Minidraw for HSAJet MiniTouch
You can load a logo from your hard drive(*.tcl) by clicking the "load logo" icon.
By clicking the save icon, you can save your logo to your local hard drive.
2
How to create a layout
To create a layout, please click the "new file" icon.
Enter a name for your file and click ok.
The name of your file will be visible in the window on the left.
Select a file by clicking on its name in the list.
To remove the selected file from your list, please click the "remove file" icon.
You can save your selected file to your hard drive by clicking the "Save file" icon.
© 2010 HSA SYSTEMS
How to create a layout
If you want to load a print job stored on your pc, please click the "Load file" icon.
2.1
How to add text object with content
2.1.1
Text object with text
To create a static text, please click the Static text icon.
Please enter the name of your text file and the content of the text field.
© 2010 HSA SYSTEMS
15
16
Minidraw for HSAJet MiniTouch
If you want a prompt, click the prompt tab.
Please remember to check the box "activate".
Enter your question in the question box.
If you write n in the mask box, only numbers will be accepted.
If you write x in the mask box, only letters will be accepted.
In the visible mask box, type the default answer.
If the validation box is checked, you cannot enter printing mode before a validator has entered a
password.
Click Ok.
Next choose the position of your text field, defined by x and y variables.
Choose text orientation and choose font.
© 2010 HSA SYSTEMS
How to create a layout
17
Important! Orientation settings must match your font rotation settings.If your orientation is "90
clockwise" but your font rotation settings have been set to normal, your content will not be
visible. Please refer to fonts section of this manual for further information.
Click ok to finish.
2.1.2
Text object with counter
To add a counter to your printout, please click the new counter icon.
Please enter the following:
1.
2.
3.
4.
Name of your counter
Start value
Number of digits
Lead in as either spaces, zeros or nothing.
© 2010 HSA SYSTEMS
18
Minidraw for HSAJet MiniTouch
Click the counting tab.
Enter a minimum value and a maximum value if so desired. You can also enter a step value. If for
instance you choose 3 as your step value, instead of 1,2,3 the counter will print 3, 6, 9, 12. Number of
repeats is how many times the counter will print a certain value before printing the next value.
If you want a prompt, click the prompt tab.
Enter your question in the question box.
If you write n in the mask box, only numbers will be accepted.
If you write x in the mask box, only letters will be accepted.
In the number of digits in the format box (nnnnn for a 5 digit counter).
In the visible mask box, type the default answer.
If the validation box is checked, you cannot enter printing mode before a validator has entered a
© 2010 HSA SYSTEMS
How to create a layout
19
password.
Click Ok.
Enter x and y variables to position your counter.
Please choose font and orientation.
Important! Orientation settings must match your font rotation settings.If your orientation is "90
clockwise" but your font rotation settings have been set to normal, your content will not be
visible. Please refer to fonts section of this manual for further information.
Click ok to finish.
2.1.3
Text object with date/time
To add a date to your printout please click the new date icon.
© 2010 HSA SYSTEMS
20
Minidraw for HSAJet MiniTouch
Choose a name for your date stamp. From the drop down menu, please select a locale file.
Next, enter format. Please select from the list below.
y,yy,yyyy Year with ( 1, 2 or 4 digits)ddd
m
mm
mmm
mmmm
#w
#W
d
dd
Month number (1 digit)
Month number (2 digits)
Jan
January
Week number (1 digit)
Week number (2 digits)
Day of month (1 digit)
Day of month (2 digit)
dddd
#d
#j
#J
h,hh,
n, nn
s, ss
Short name for day (such as mon for
Monday)
Full name for day (such as Monday)
Number of weekday
Day of year (1 digit)
Day of year (3 digits)
Hour ( 1 or 2 digits)
Minute ( 1 or 2 digits)
Second (1 or 2 digits)
© 2010 HSA SYSTEMS
How to create a layout
21
Click the offset tab. Here you can offset any variable. For instance, if you offset years with 2, 2009 will
be displayed as 2011. This is particular useful, if you wish to add a "best before" stamp to your printout.
If you want a prompt, click the prompt tab.
Enter your question in the question box.
If you write n in the mask box, only numbers will be accepted.
If you write x in the mask box, only letters will be accepted.
In the visible mask box, type the default question.
If you want the user to enter the date of today, you can for instance write mm-dd-yy.
The letters will be replaced as the user enters the numbers.
Enter the date format in the format box (for instance mm-dd-yy)
© 2010 HSA SYSTEMS
22
Minidraw for HSAJet MiniTouch
If the validation box is checked, you cannot enter printing mode before a validator has entered a
password. Click Ok.
Enter x and y variables to position your counter. Please choose font and orientation.
Important! Orientation settings must match your font rotation settings. If your orientation is "90
clockwise" but your font rotation settings have been set to normal, your content will not be
visible. Please refer to fonts section of this manual for further information.
Click ok to finish.
2.1.4
Text object with shiftcode
To add a shiftcode to your printout, please click the "new shiftcode" icon.
© 2010 HSA SYSTEMS
How to create a layout
Please enter a name for your shiftcode.
Next click the "Shifts" tab.
Please enter your output in the text box.
Choose for which day the rule is going to apply.
Choose the hour when the rule is taking effect.
Please remember to check the checkbox "Activate".
Click Ok.
© 2010 HSA SYSTEMS
23
24
Minidraw for HSAJet MiniTouch
Please choose font and orientation.
Important! Orientation settings must match your font rotation settings.If your orientation is "90
clockwise" but your font rotation settings have been set to normal, your content will not be
visible. Please refer to fonts section of this manual for further information.
Please enter a x and a y variable to position your shiftcode on your printout.
You can also move it manually later. Click ok.
2.1.5
Text object with system data
To add a system data to your printout, please click the "systemdata icon" icon.
© 2010 HSA SYSTEMS
How to create a layout
25
Choose a name and choose the data type you wish to display in your printout.
You can display either "user name", "Line name", "File name", "Print counter" or "validator name".
Click ok.
Please enter a x and a y variable to position the system data on your printout.
You can also move it manually later.
Please choose font and orientation.
Important! Orientation settings must match your font rotation settings.If your orientation is "90
clockwise" but your font rotation settings have been set to normal, your content will not be
visible. Please refer to fonts section of this manual for further information. Click ok.
© 2010 HSA SYSTEMS
26
Minidraw for HSAJet MiniTouch
2.2
How to add barcode objects with content
2.2.1
Barcode object with text
To create a static barcode, please click the barcode with text icon.
Choose a name for your barcode and type in the text you wish to display in your printout.
If you want a prompt, click the prompt tab.
© 2010 HSA SYSTEMS
How to create a layout
27
Please remember to check the box "activate".
Enter your question in the question box.
If you write n in the mask box, only numbers will be accepted.
If you write x in the mask box, only letters will be accepted.
In the visible mask box, type the default answer.
In the number of digits in the format box (nnnnnnnn for a barcode with 8 digits)
If the validation box is checked, you cannot enter printing mode before a validator has entered a
password.
Click Ok.
Type in x and y variables to position your barcode on the layout.
Choose font and orientation.
Important! Orientation settings must match your font rotation settings.If your orientation is "90
clockwise" but your font rotation settings have been set to normal, your content will not be
visible. Please refer to fonts section of this manual for further information.
Please enter a x and a y variable to position the system data on your printout.
You can also move it manually later.
© 2010 HSA SYSTEMS
28
Minidraw for HSAJet MiniTouch
Next click the Options tab.
Please choose barcode symbology and turn checksum on or off as required.
Please type in a value in the height box. The width of your barcode is determined by modules.
If needed, you can enter a value for ink spacing. This will add extra space between the bars.
When you have finished editing, click ok to continue.
2.2.2
Barcode object with counter
To add a counter to your printout, please click the counter icon.
© 2010 HSA SYSTEMS
How to create a layout
29
Type in a name for your counter and choose the start value.
Choose how many digits you want and if led-in should be zeros, spaces or nothing.
Click the counting tab.
Enter a minimum value and a maximum value if so desired.
You can also enter a step value. If for instance you choose 3 as your step value, instead of 1,2,3 the
counter will print 3, 6, 9,12. Number of repeats is how many times the counter will print a certain value
before printing the next value.
© 2010 HSA SYSTEMS
30
Minidraw for HSAJet MiniTouch
If you want a prompt, click the Prompt tab.
Enter your question in the question box.
If you write n in the mask box, only numbers will be accepted.
If you write x in the mask box, only letters will be accepted.
In the number of digits in the format box (nnnnn for a 5 digit counter).
In the visible mask box, type the default answer.
If the validation box is checked, you cannot enter printing mode before a validator has entered a
password.
Click Ok.
Please type in x and y variables to position your barcode on your layout.
© 2010 HSA SYSTEMS
How to create a layout
31
Next choose font and orientation.
Important! Orientation settings must match your font rotation settings.If your orientation is "90
clockwise" but your font rotation settings have been set to normal, your content will not be
visible. Please refer to fonts section of this manual for further information.
Click the options tab.
Please choose barcode symbology and turn checksum on or off as required.
Please type in a value in the height box. The width of your barcode is determined by modules.
If needed, you can enter a value for ink spacing. This will add extra space between the bars.
When you have finished editing, click ok to continue.
2.2.3
Barcode object with date/time
To add date to your printout, please click the date icon.
© 2010 HSA SYSTEMS
32
Minidraw for HSAJet MiniTouch
Please type in a name for your date stamp.
Choose local settings and in the format box please choose how you want the date to be displayed.
Click the offset tab. Here you can offset any variable. For instance, if you offset years with 2, 2009 will
be displayed as 2011.
© 2010 HSA SYSTEMS
How to create a layout
If you want a prompt, click the prompt tab.
Enter your question in the question box.
If you write n in the mask box, only numbers will be accepted.
If you write x in the mask box, only letters will be accepted.
In the visible mask box, type the default answer.
If you want the user to enter the date of today, you can for instance write mm-dd-yy.
The letters will be replaced as the user enters the numbers.
Enter the date format in the format box ( for instance mm-dd-yy)
If the validation box is checked, you cannot enter printing mode before a validator has entered a
password. Click Ok.
Type in x and y variables to position your barcode on your layout.
© 2010 HSA SYSTEMS
33
34
Minidraw for HSAJet MiniTouch
Later you can position your barcodes manually by using your mouse.
Choose font and orientation.
Important! Orientation settings must match your font rotation settings.If your orientation is "90
clockwise" but your font rotation settings have been set to normal, your content will not be
visible. Please refer to fonts section of this manual for further information.
Next click the options tab.
Please choose barcode symbology and turn checksum on or off as required.
Please type in a value in the height box. The width of your barcode is determined by modules.
If needed, you can enter a value for ink spacing. This will add extra space between the bars.
When you have finished editing, click ok to continue.
2.2.4
Barcode object with shiftcode
To add a shift code to your printout, please click the shift code icon.
© 2010 HSA SYSTEMS
How to create a layout
Please type in a name for your shiftcode.
Click the shifts tab.
Please enter a text in the text box.
Choose for which day the rule is going to apply.
Choose the hour when the rule is taking effect.
Please remember to check the checkbox "Activate".
Click Ok.
© 2010 HSA SYSTEMS
35
36
Minidraw for HSAJet MiniTouch
Please type in x and y variables to position your barcode on your layout.
Choose font and orientation.
Important! Orientation settings must match your font rotation settings.If your orientation is "90
clockwise" but your font rotation settings have been set to normal, your content will not be
visible. Please refer to fonts section of this manual for further information.
Next click the options tab.
Please choose barcode symbology and turn checksum on or off as required.
Please type in a value in the height box. The width of your barcode is determined by modules.
If needed, you can enter a value for ink spacing. This will add extra space between the bars.
When you have finished editing, click ok to continue.
© 2010 HSA SYSTEMS
How to create a layout
2.2.5
37
Barcode object with system data
To add system data to your printout, please click the system data code icon.
Please type in a name for your barcodes and choose the type of data you want to be displayed in your
printout. Click ok to continue.
© 2010 HSA SYSTEMS
38
Minidraw for HSAJet MiniTouch
Type in x and y variables to position your barcode in your printout.
Choose font and orientation.
Important! Orientation settings must match your font rotation settings.If your orientation is "90
clockwise" but your font rotation settings have been set to normal, your content will not be
visible. Please refer to fonts section of this manual for further information.
Next click the options tab.
Please choose barcode symbology and turn checksum on or off as required.
Please type in a value in the height box. The width of your barcode is determined by modules.
If needed, you can enter a value for ink spacing. This will add extra space between the bars.
When you have finished editing, click ok to continue.
© 2010 HSA SYSTEMS
How to create a layout
2.3
How to add graphical objects
2.3.1
Logos
To add a logo to your printout, please click the add logo icon.
Choose a name for your logo.
Type in x and y variables to position your logo on your layout.
© 2010 HSA SYSTEMS
39
40
Minidraw for HSAJet MiniTouch
Click the details tab and choose the logo you wish to display.
Please note that you can only show logos you have uploaded as part of your package.
Please refer to the chapter "How to add Logos". Click ok to continue.
Any time later, you can change your logo to a line or a box. Highlight object in the layout.
Click the properties icon
and change the type to either line or box.
Click ok to finish.
© 2010 HSA SYSTEMS
How to create a layout
2.3.2
Lines
To add a line to your printout, please click the add line icon.
Choose a name for your line.
Type in x and y variables to determine where on the layout you want your line to start.
Click the details tab.
© 2010 HSA SYSTEMS
41
42
Minidraw for HSAJet MiniTouch
Choose the direction of your line.
Choose length and width of your line.
Click ok.
2.3.3
Boxes
To create a box in your printout, please click the "create box" icon.
Choose a name for your box.
Type in x and y coordinates to position your box on your layout. The coordinates refer to the upper left
corner of the box.
© 2010 HSA SYSTEMS
How to create a layout
43
Click the details tab.
Choose the height and width of your box.
To make your box visible, please remember to check the box "outline".
Enter a value in mm that refers to the thickness of the lines.
If you check the box "Fill" the box will be displayed solid.
Click ok to continue.
2.4
Finish your printout
If your layout is bigger than the program window, you can take advantage of the miniDraw zoom function.
Simply highlight an object on your canvas and use +/- on your keyboard to zoom in and out.
When all elements have been added, you can re-arrange them with your mouse.
© 2010 HSA SYSTEMS
44
Minidraw for HSAJet MiniTouch
You can delete any element by highlighting it and clicking the paper basket icon.
You can change the layout settings by clicking the layout settings icon.
You can edit the properties of any static text or barcode by clicking the "edit properties" icon.
2.5
Calculate costs
To calculate costs, click on the cost button.
Enter the following information:
1. Drop size
2. Ink price
3. Production (number of prints)
Drop size differs from ink ink. Please contact your ink supplier for advice.
miniDraw will calculate:
1. Coverage
2. Dots/print
3. Cost/production
© 2010 HSA SYSTEMS
How to create a layout
2.6
Make a test print
To print the layout on your office printer, click on the print button.
3
Upload your files to the controller
3.1
How to setup an ethernet connection
3.1.1
How to setup lan connection
Connect Mthp4 and office pc to the local area network as shown below.
© 2010 HSA SYSTEMS
45
46
Minidraw for HSAJet MiniTouch
Go to the main menu on the Mthp4 and choose settings.
In the settings menu, choose System.
© 2010 HSA SYSTEMS
Upload your files to the controller
In the system menu, please choose network.
Please write down the IP address, port number, netmask and gateway. DHCP is set to on.
Start miniDraw. In the main menu, please click the settings icon.
© 2010 HSA SYSTEMS
47
48
Minidraw for HSAJet MiniTouch
In the settings menu, please enter the Mthp4 IP address. The network name can be used as well and
this is often preferred if DHCP is turned on, as the IP address can change. Press ok to continue.
To connect to the Mthp4, please click the connect icon.
If your Mthp4 is password protected, you will be prompted for username and password.
If connection is successful, the message "Remotely controlled" will be shown on theMthp4.
If connection is unsuccessful, the following message will be shown in miniDraw. Check your network
preferences.
© 2010 HSA SYSTEMS
Upload your files to the controller
To disconnect, please click the disconnect icon.
3.1.2
How to setup direct Connection
Connect the Mthp4 to your office pc using a crossover cable (nulmodem cable).
Next , go to network settings on theMthp4.
In the main menu, select settings.
In the settings menu, choose System.
© 2010 HSA SYSTEMS
49
50
Minidraw for HSAJet MiniTouch
In the system menu, please choose network.
Please write down the IP address, netmask and gateway shown in the network menu. DHCP is set to
off.
If no values are shown except a line of zeros, please enter the values manually.
Next, change the settings on your pc.
Go to “Settings” -> “Control panel” - > “Network connections”
© 2010 HSA SYSTEMS
Upload your files to the controller
Highlight the connection icon, left click on the icon and the right click on “Properties”
Now the menu “Connection properties” should be on your screen.
In the window please highlight the icon “Internet protocol” and click properties.
© 2010 HSA SYSTEMS
51
52
Minidraw for HSAJet MiniTouch
Check the box “use the following IP address”.
In the box “Ip address” enter the ip address from the Mthp4 but change the last digit.
Example. If the IP address from the Mthp4 is 192.168.167.130 please enter 192.168.167.131.
In the box “subnet mask” enter the netmask numbers from the Mthp4 .
In the box “default gateway” please enter the gateway numbers from the Mthp4 .
Click ok to continue. You may have to restart your computer.
Start miniDraw. In the main menu, please click the settings icon.
© 2010 HSA SYSTEMS
Upload your files to the controller
53
In the settings menu, please enter the Mthp4 IP address. Press ok to continue.
To connect to the Mthp4, please click the connect icon.
If your Mthp4 is password protected, you will be prompted for username and password.
If connection is successful, the message "Remotely controlled" will be shown on theMthp4.
If connection is unsuccessful, the following message will be shown in miniDraw. Check your network
preferences.
© 2010 HSA SYSTEMS
54
Minidraw for HSAJet MiniTouch
To disconnect, please click the disconnect icon.
3.1.3
How to upload your files
You can upload your files in two ways. You can upload each file individually or you can upload the entire
file package.
In the list on the left, please highlight the item you wish to upload.
To start the upload click one of the icons shown below.'
Upload font
Upload logo
Upload locale settings
Upload language
Upload layout
Upload entire package
Important. If you are uploading a language file, you will be prompted for a password.
To obtain the password, please contact HSA Systems.
© 2010 HSA SYSTEMS
Upload your files to the controller
3.2
55
How to upload via USB
Click on the USB button.
Find the location of your USB key, type in a filename and click save as.
Next, the following prompt will be displayed.
You can opt to either keep or delete the files presently stored on the Mthp4 when upload begins.
Warning! If you select no, all files on the Mthp4 will be deleted when upload begins. The files
cannot be retrieved later.
To upload , plug the USB into the Mthp4 . Please refer to the Mthp4 User Manual for further information.
© 2010 HSA SYSTEMS
56
Minidraw for HSAJet MiniTouch
4
Additional Functions
4.1
How to download layouts
To download layouts from your controller, setup a lan connection or direct connection and connect to the
controller.
Next, click the download button.
miniDraw will display a list of the layouts presently stored on the Mthp4.
To download, please highlight the name of a layout and click ok.
© 2010 HSA SYSTEMS
Additional Functions
57
When download is complete, the layout name will be shown in the list on the left and content will be
shown in the window on the right.
4.2
How to delete files remotely
The following will describe how to delete files on the Mthp4 remotely. Please notice that this is the only
way fonts and locale files can be deleted.
First, setup a lAN connection or direct connection and connect to the controller. In the main menu,
please click the files management icon.
© 2010 HSA SYSTEMS
58
Minidraw for HSAJet MiniTouch
Select file type in the box on the left. The files stored on your Mthp4 will be shown in the box on the
right. Highlight the file you wish to remove and click the delete button. This will remove the file.
4.3
Logfiles
4.3.1
How to setup printlogfile
You can add objects from your layout to a printlogfile. When you are printing, the object values will be
saved to a text file.
Example. If you would like to print an item number and a counter, the information saved to the logfile will
be shown like this:
(Item
(Item
(Item
(Item
(Item
number),
number),
number),
number),
number),
00001
00002
00003
00004
00005
© 2010 HSA SYSTEMS
Additional Functions
To setup the logfile function, click logfile button.
Check the "active" box and enter a symbol in the separator box , to separate the content.
© 2010 HSA SYSTEMS
59
60
Minidraw for HSAJet MiniTouch
Click the content tab. Next, select the link icon at the bottom of the screen.
This window displays the object currently on your layout. Select the object you want to add to the
printlog and click ok to return to the previous screen.
© 2010 HSA SYSTEMS
Additional Functions
61
The added objects will be displayed in the window on the right. To add another object, click the link icon
again.To exit, click ok.
4.3.2
How to extract logfiles
To download log files from your controller, setup a lan connection or direct connection and connect to
the controller.
You can retrieve the log file or the Data log stored on the Mthp4 by following these steps:
Click on the log file button
Select either log file or printer log.
Choose a location on your hard drive, type inn a name and click "save".
© 2010 HSA SYSTEMS
62
Minidraw for HSAJet MiniTouch
Next step is to decide if you want to keep the file on your Mthp4 or delete it.
Finally you can display the log file content on your screen.
4.4
How to create language files
Mthp4 comes with a number of different languages. If your language is not among them, you can make a
translation of your own.
To add a new language, please click the New Language icon.
Please choose a name for the language(no longer than 8 characters) and click ok.
© 2010 HSA SYSTEMS
Additional Functions
63
Now the language will be visible in the list.
Translate all names and messages to the language of your choice. At the top of the screen, you can
change the character set if required.
© 2010 HSA SYSTEMS
64
Minidraw for HSAJet MiniTouch
However, there is a limit to the number of characters and spaces you can use.
If a translation is too long, it will partly cover another translation thus making it unreadable.
If the translation in the box is too long, the box will turn red.
To remove a language, please highlight the language in the list and click the "remove language" icon.
You can load a language file from your hard drive by clicking the "load language" icon.
By clicking the save icon, you can save the language to your local hard drive.
To upload the language file to the Mthp4, please read the section "upload your files to the controller".
4.5
Minidraw settings
To change the menu language, select the settings icon.
© 2010 HSA SYSTEMS
Additional Functions
65
Select a new language from the drop down menu and click ok.
If your language is not available, you can create a translation of your own. Select "create new language"
from the drop down menu. Enter a name for your new language and click ok.
© 2010 HSA SYSTEMS
66
Minidraw for HSAJet MiniTouch
Go to the installation directory and locate the sub folder "language". Open the language file with an
ordinary text editor such as notepad in windows.
Translate the content on the right side of the equal sign and click save. Return to the settings menu and
select the new language file.
© 2010 HSA SYSTEMS
Additional Functions
To change the fonts used in the menus, select "program font".
Select font type, font style and size. Click ok to finish.
© 2010 HSA SYSTEMS
67
68
Minidraw for HSAJet MiniTouch
With miniDraw you can create print jobs for several types of controllers.
In the drop down menu "target", select the controller of your choice.
4.6
How to update MiniTouch firmware
Unzip the update files provided by your supplier to a directory on your hard drive.
Next, setup a lan connection or direct connection and connect to the controller.
To start the update process, please click the update icon.
Open the directory where the update files are stored.
Highlight the file updatscript.tsc and click "open".
© 2010 HSA SYSTEMS
Additional Functions
69
When update is in progress the update form is displayed on your pc.
On the Mthp4 screen the message "Firmware update in progress" is displayed.
When upgrade is complete, your Mthp4 will reboot.
4.7
Stamps for the Minikey controller
Stamps are graphical files with predefined messages to be printed by the Minikey controller.
With miniDraw you can upload stamps from your hard drive or make new stamps from scratch.
On information how to print stamps with the Minikey controller, please refer to the Minikey user manual.
© 2010 HSA SYSTEMS
70
4.7.1
Minidraw for HSAJet MiniTouch
Upload stamps from harddrive
1. Select stamps.
2. Locate a bitmap file on your hard drive. Highlight a file(1) and select blue arrow(2) to continue.
3. Connect to Minikey controller. See chapter in this manual on setting up an ethernet connection.
4. Select upload button to transfer stamps to Minikey controller.
© 2010 HSA SYSTEMS
Additional Functions
4.7.2
Create and upload new stamps
1. Save the stamp messages to a text file on your hard drive. If a file contains multiple messages,
please arrange them on separate lines underneath each other.
2. Select stamps.
3. Select a text file from your hard drive (1).
Each line in the text file will be saved as a bitmap file and shown in the window below (2).
To change the order of the files, highlight a line and use the arrow buttons (3).
To delete a line, highlight it and select the paper basket (4).
4. Connect to Minikey controller. See chapter in this manual on setting up an ethernet connection.
© 2010 HSA SYSTEMS
71
72
Minidraw for HSAJet MiniTouch
5. Select upload button to transfer stamps to Minikey controller.
© 2010 HSA SYSTEMS
Additional Functions
5
Support
For product support, please contact HSA SYSTEMS Customer Service department
HSA SYSTEMS CUSTOMER SERVICE DEPARTMENT
Phone: (+45) 66103401
Email: [email protected]
© 2010 HSA SYSTEMS
73