1
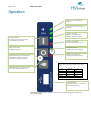
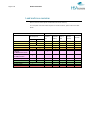
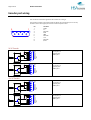
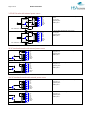
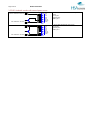
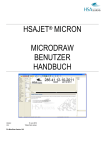
Page 1 of 28 MICRON USER GUIDE HSAJET MICRON USER GUIDE A guide to operate the HSAJET MICRON controller Firmware release 2.10 Page 2 of 28 MICRON USER GUIDE HSAJET MICRON user manual By Torben Dam Jensen Version: 12-10-2011 HS Systems ApS 2770 Mileparken 16, Skovlunde Current version numbers Part / Software MICRON Firmware Microdraw Version / Date 2.10 1.05 10 Oct 2011 10 Oct 2011 Please also refer to the following Manual MICRON QUICK START Purpose Getting started with Micron MICRODRAW USER GUIDE About design of layouts for the MICRON. MICRODRAW demo videos Video demonstrations of MicroDraw. Available online Page 3 of 28 MICRON USER GUIDE Table of Content Introduction ................................................................................................................................................ 4 Operation .................................................................................................................................................... 5 Overview of LEDs and function................................................................................................................. 6 USB Functions .......................................................................................................................................... 8 Load a layout ....................................................................................................................................... 8 Move a layout to another machine ...................................................................................................... 8 Load and save overview ....................................................................................................................... 9 Print operations ......................................................................................................................................10 Print a layout ......................................................................................................................................10 Purge ..................................................................................................................................................10 Reset counters ....................................................................................................................................11 Change cartridge .................................................................................................................................11 Adjust, update and calibrate ...................................................................................................................12 Update time of internal clock ..............................................................................................................12 Adjust start distance ...........................................................................................................................13 Calibrate internal photo cell ................................................................................................................13 Update firmware on controller............................................................................................................14 Connector Wiring Diagrams ........................................................................................................................15 Connector overview ................................................................................................................................15 Fuses ......................................................................................................................................................16 I/O connector .........................................................................................................................................17 Using inputs and outputs ........................................................................................................................20 Encoder port wiring ................................................................................................................................24 Page 4 of 28 MICRON USER GUIDE Introduction Congratulation on your purchase of the HSAJET MICRON. You have one of the easiest to integrate inkjet controllers available, yet powerful features are available out of the box. Some features of the MICRON: Text, graphics, barcodes, variable counter and dates Fully UNICODE compatible layout software Counter and dates with digits in roman, arab, farsi or user defined characters Built-in sensor Support for external sensor and encoder included Low ink alarm with user-defineable level Print height 12,7mm (1/2” inch) User-defined resolution in print direction 75..600 dpi Ink reduction 0 to 50% (4 levels) for reduced costs Separation between design and operation. Nothing in the layout can be destroyed by the operator. Spit function to keep fast drying inks open Purge function can be activated remotely using digital input These features make the MICRON ideal for integration in packaging lines and machines where simple text / date / counter printing is needed, as a replacement for CIJ machines or older date stamping equipment. Page 5 of 28 MICRON USER GUIDE Operation [1] Start sensor. Lit when signal is received [2] Encoder sensor. Lit when signal is received [3] SOLID = ON, ready Blink slow = loading/saving job Blink fast = adjust start distance START PRINT button Long push: Enter start distance mode. Short: INCREASE start distance [4] SOLID = PRINT MODE Blink = confirm load / fault on load RESET counter button DECREASE start distance [5] Confirm reset and High bit indicator of step distance B [6] Blink = No cartridge and Low bit indicator of step distance A: Photocell adjust mode is entered when holding RESET + PURGE for 3 seconds. START steps through the step values. A B: step value in start distance adjust, read as binary value. PURGE button. Change start distance step. LED’s next to RESET reads step value. STEP 1 mm 5 mm 25 mm 100 mm YELLOW OFF OFF ON ON RED OFF ON OFF ON USB CONNECTOR Insert stick with layout / clock file here FAT or FAT32 format only The MICRON provides signals to end users by LEDs. The meaning of LED signals are explained in the following pages. Page 6 of 28 MICRON USER GUIDE Overview of LEDs and function Function Sensor (Green) Encoder (Green) ON (Green) Print mode (Red) Reset (yellow) Cartridge (Red) Startup - When machine is turned on Controller will always try to load USB layout when turned on, thereafter from internal memory. Startup Blink slow Ready to use Solid No layout present on USB Blink slow Checksum error on USB OFF No internal layout. Please insert USB Checksum error on internal file Blink fast OFF Blinking slow until USB removed, then load from internal memory Blinking fast 2 sec / slow 1 sec until USB removed, then load from internal memory Blink fast until USB is inserted Blinking Fast 2 sec / slow 1 sec until USB is inserted. During ready state (job is loaded) From ready state, you can start print, reset counters and purge Reset counters ON Blink fast 10 sec Press again before timeout ON 1 second to confirm reset At power up (when connecting power cable) Certain functions are only available while connecting power Update clock ON ON file from USB Will try for 2 Will try for 2 seconds to find seconds to find HOLD clock file clock file Update ON ON firmware HOLD and ON ON ON ON Page 7 of 28 Function MICRON USER GUIDE Sensor (Green) Encoder (Green) ON (Green) Print mode (Red) Reset (yellow) Cartridge (Red) During print mode In printing only interaction is for the low ink warning. Warning level is user definable in layout file printing ON ON printing, sensor signal printing, encoder signal printing, encoder AND sensor signal printing but low ink warning ON ON ON ON ON ON ON ON ON ON ON ON Blink slow until user presses RESET. Continue print and clear warning. During start distance setup Hold START for 3 seconds to enter. Hold START for 3 seconds again to exit with new value. To increment value press START, to decrement press RESET, to change step size press PURGE. With each sensor trigger a vertical bar is printed at "print start" along with a visual readout of the start distance setting. Step = 1 mm Blink fast OFF OFF Blink slow Step = 5 mm Blink fast OFF ON Blink slow Step = 25 mm Blink fast ON OFF Blink slow Step = 100 mm Blink fast ON ON Blink slow During internal photocell adjust Hold RESET + PURGE for 3 seconds to enter. Hold RESET + PURGE for 3 seconds to exit. Press START to step through calibration of photocell. After 2’nd START the calibration is ended. Sense with NO Blink slow Blink slow media in front until START Until START Sense WITH Blink fast Blink fast media in front until START until START Confirm measurement OK When cartridge is open (normal or during print) User can actively reset ink level by pressing RESET within 5 seconds Cartridge open ON Cartridge closed again ON ON (only printmode) ON (only printmode) Blink slow until cartridge back Blink slow 5 sec Reset inklevel if RESET pressed If speed exceeds maximum during print (15 kHz) No action needed, but print will be stretched proportionally with speed. Excessive speed ON Speed OK OFF ON until timeout or reset Page 8 of 28 MICRON USER GUIDE USB Functions Load a layout When turned on the controller will detect if a USB key is inserted, and load a layout if possible. Otherwise, it will load from internal memory. To load a new layout do the following: Make sure an ink cartridge is inserted and you are not in print mode. Insert USB stick with layout stored from Microdraw. If a correct layout is found, it will be loaded. Green LED [3] will blink slowly while loading. Once the layout is loaded, the machine will be ready to use. Green LED [3] will become active and constantly lit. The job is now stored in internal memory, and the USB stick can be removed. You can start print with the new layout. The layout will be remembered even when you turn off the controller. Move a layout to another machine To move a job from one machine to another machine: Insert an empty USB stick into the machine to be copied. After LED’s stops blinking move the USB stick to another machine. It may be possible that start distance should be adjusted on the destination machine. Page 9 of 28 MICRON USER GUIDE Load and save overview Micron saves and stores layouts to both USB and internal memory. For a complete overview of when layouts are stored and where, please refer to the table below: Scenario Load/Store job action USB stick present Load from USB Load from memory Store to USB No USB stick USB insert, job different from loaded USB insert, job same as loaded No USB stick No USB stick with job Boot 1 Boot 2 Boot 3 USB remove 1 USB remove 2 USB insert no job Print mode end 1 Print mode end 2 Start dist adjust 1 Start dist adjust 2 no job Store to memory Error state Page 10 of 28 MICRON USER GUIDE Print operations Print a layout To start the print function, press the button. The red LED [4] will become constantly lit. Notice: there is a maximum speed limit depending on the resolution set in Microdraw. If you exceed the speed limit, the yellow led [5] will be lit, and the layout will be stretched. You may continue printing if this is desired (f.ex to get higher speed at same dpi) While the print function is on, each activation of the product sensor (internal or external) will release one print. At the same time, output 1 is active. To STOP print function, press the print. button again. You can stop at any time, even within a Purge To purge the printer, press the button and hold it as long as needed. Page 11 of 28 MICRON USER GUIDE Reset counters It is possible to reset counters to their start value. This is useful for counters that do not automatically reset during print start, example batch counters. To perform a counter reset Press reset button Yellow led [5] will blink Press reset button again within a few seconds to confirm Change cartridge Change cartridge when you get a low ink alarm or when ink is empty. You may also take cartridge out to clean it or store for a production stop (prevent dryout) Open green latch Red led [6] will be ON Carefully take out cartridge, backwards then up Insert new cartridge, down then inwards Close green latch If you wish to reset ink level, press within 5 seconds. Otherwise it will be assumed that you inserted the same cartridge, and ink counter will continue from same value. Page 12 of 28 MICRON USER GUIDE Adjust, update and calibrate Update time of internal clock The Micron has an internal clock used to print date and time. As it does not know about Daylight Savings Time (where used), it may be necessary to adjust the clock every 6 months. Create a clock file on the USB using MicroDraw (press USB+CLOCK icon). File will be micron.clk Disconnect power from Micron Hold down Connect power LEDs [1] AND [2] will light constantly while updating clock After updating clock the Micron will start normally Page 13 of 28 MICRON USER GUIDE Adjust start distance Start distance is the distance the product travels from product sensor has been activated until print is started. This distance is normally set from design software. Typically it is not necessary to set from the controller. If you wish to select start distance anyway (for example, if the designer is far away from you), do the following: Hold the The green led [3] will blink fast. For each sensor signal a vertical line of 10 px is printed at current position, along with a readout of current value Press button to INCREASE distance Press button to DECREASE distance Press button to toggle distance step. EXIT setup by holding button for 3 seconds button 3 seconds again Calibrate internal photo cell If you use the internal photo cell, you may need to calibrate for different media. Do the following: Hold Remove the media in front of sensor Press Place the media to sense onto in front of sensor Press Test that calibration is OK by passing product by sensor and for 3 seconds to enter. Leds [5] and [6] will blink. Page 14 of 28 MICRON USER GUIDE Update firmware on controller On rare occasions it may be necessary to update the firmware (internal program) on the controller. Do this ONLY when directed from HSA SYSTEMS. Turn power off Insert USB stick with updated firmware files, as per direction. You need micronfp.frm and micronup.frm Hold Micron will signal firmware load mode with the 2 red LEDs ON. ALL LEDs will light up after some seconds and will stay ON while loading new firmware. When ALL LEDs turn OFF the update is done (Led [3] may start blinking). Recycle power to Micron to end firmware update. The update process normally takes around 1-2 minutes and while you turn on power. Page 15 of 28 MICRON USER GUIDE Connector Wiring Diagrams The following pages contain all recommended ways of connecting external equipment to your controller. Almost all possible variants of encoders and sensors are supported. Please ask if you are in doubt about how to wire connectors. Failure to wire correctly may damage your controller. Connector overview The Micron has 3 connectors: Power, 15 VDC I/O for external start switch and 2 input and 2 output Encoder Page 16 of 28 MICRON USER GUIDE Fuses The Micron has 2 fuses, both are located inside the unit. F1 is for the USB port the type is 0,5A SMD Fast acting. F2 is the main power fuse the type is 1A SMD Fast acting. If there is no reaction at all when you turn on the unit please check these fuses. You can buy the fuses from HSA or locally, if you choose locally make sure you get the right fuses, warranty does not cover replacement of burned PCB’s because of wrong fuses. Part number: HSA ACEL-Fuse-0,5A-SMD ACEL-Fuse-1A-SMD Farnell 9922156 9922164 Mouser 576-0451.500MRL 576-0451001.MRL Page 17 of 28 MICRON USER GUIDE I/O connector Main function for this connector is to provide the start signal, to begin print. In the same connector are also additional inputs as well as 2 output signals. It is located in the back of the printer, as a 9-pin female D-SUB connector. Output 1 = Active low in Print mode (open collector) Output 2 = Active low on low ink warning (open collector) Input 1 = Print start/stop negative edge trigger toggle function (trigger signal min. 50 mSec.) Input 2 = Purge active low level trigger If the external sensor is enabled in the layout, you will not get a print without proper wiring of this connector. You can use either a simple mechanical switch or a photo cell for the start signal. The I/O connector can supply 5V and 15V DC for the sensor but you can use any sensor in the 3-33V range if you connect an external power source. You can buy an I/O-ENC test box set from HSA which enables you to test: I/O connector - Input 1, Input 2, Output 1, Output 2, Start signal input, 5V and 12V on the I/O connector and an adjustable automatically continuous start signal is available. Encoder connector - Enc A & Enc B channels, Low ink, 5V and 12V and an automatically continuous encoder pulse generator is available. Part number: HSA I/O-ENC test box set Product category Electric spare parts Page 18 of 28 MICRON USER GUIDE 5 PIN 1 2 3 4 5 6 7 8 9 1 9 6 MEANING V I/O 5V IN 2 - Purge START GND IN 1 – Print start/stop 15 V OUT 1 - Active low in print mode OUT 2 - Active low on ink low warning Mechanical start switch 1 6 2 7 3 8 4 9 5 VIO IN1 5V 15V IN2 OUT1 STSW OUT2 GND 1 6 2 7 3 8 4 9 5 VIO IN1 5V 15V IN2 OUT1 STSW OUT2 GND Pushbutton Loop pins 1-2 and connect the switch between pins 4 and 5 N/O contact setup layout to negative edge trigger N/C contact setup layout to positive edge trigger Relay Loop pins 1-2 and connect the switch between pins 4 and 5 N/O contact setup layout to negative edge trigger N/C contact setup layout to positive edge trigger Page 19 of 28 MICRON USER GUIDE 5V DC Sensor PRODUCT SENSOR PRODUCT SENSOR 1K 1 6 2 7 3 8 4 9 5 VIO IN1 5V 15V IN2 OUT1 STSW OUT2 GND 5 Volt NPN or PUSH/PULL sensor VCC to pins 1,2 Signal to pin 4 GND to pin 5 1 6 2 7 3 8 4 9 5 VIO IN1 5V 15V IN2 OUT1 STSW OUT2 GND 5 Volt PNP sensor VCC to pins 1,2 Signal to pin 4 GND to pin 5 1 K resistor between pin 4 and 5 1 6 2 7 3 8 4 9 5 VIO IN1 5V 15V IN2 OUT1 STSW OUT2 GND 15 Volt NPN or PUSH/PULL sensor VCC to pins 1,7 Signal to pin 4 GND to pin 5 1 6 2 7 3 8 4 9 5 VIO IN1 5V 15V IN2 OUT1 STSW OUT2 GND 15 Volt PNP sensor VCC to pins 1,7 Signal to pin 4 GND to pin 5 1 K resistor between pin 4 and 5 15V DC Sensor PRODUCT SENSOR PRODUCT SENSOR 1K 3-33V DC Sensor with external power source 3-33VDC EXTERNAL SOURCE PRODUCT SENSOR GND EXTERNAL SOURCE 3-33VDC EXTERNAL SOURCE PRODUCT SENSOR 1K GND EXTERNAL SOURCE 1 6 2 7 3 8 4 9 5 VIO IN1 5V 15V IN2 OUT1 STSW OUT2 GND NPN or PUSH/PULL sensor VCC to pin 1 Signal to pin 4 GND to pin 5 1 6 2 7 3 8 4 9 5 VIO IN1 5V 15V IN2 OUT1 STSW OUT2 GND PNP sensor VCC to pin 1 Signal to pin 4 GND to pin 5 1 K resistor between pin 4 and 5 Page 20 of 28 MICRON USER GUIDE Using inputs and outputs Input 1 – Print start/stop negative edge trigger toggle function 1K 1K 1 6 2 7 3 8 4 9 5 VIO IN1 5V 15V IN2 OUT1 STSW OUT2 GND N/O normal open mechanical switch or relay Connect the switch between pins 6 and 5 1 6 2 7 3 8 4 9 5 VIO IN1 5V 15V IN2 OUT1 STSW OUT2 GND N/C normal closed mechanical switch or relay Connect the switch between pins 1 and 6 1 K resistor between pin 6 and 5 1 6 2 7 3 8 4 9 5 VIO IN1 5V 15V IN2 OUT1 STSW OUT2 GND NPN or PUSH/PULL output trigger Signal to pin 6 GND to pin 5 1 6 2 7 3 8 4 9 5 VIO IN1 5V 15V IN2 OUT1 STSW OUT2 GND PNP output trigger VCC to pin 1 Signal to pin 6 1 K resistor between pin 6 and 5 ON PRINTMODE OFF 50mSec A 50mSec B 50mSec C INACTIVE TRIGGER ACTIVE Signal timing and function The trigger signal must be at least 50 mSec for the input to toggle print mode start/stop. A = Trigger pulse >50mSec B = Locked period 50mSec after trigger is released, printing cannot be disabled in this period C = Trigger pulse >50mSec Page 21 of 28 MICRON USER GUIDE Input 2 – Purge active low level trigger 1K 1K 1 6 2 7 3 8 4 9 5 VIO IN1 5V 15V IN2 OUT1 STSW OUT2 GND N/O normal open mechanical switch or relay Connect the switch between pins 3 and 5 1 6 2 7 3 8 4 9 5 VIO IN1 5V 15V IN2 OUT1 STSW OUT2 GND N/C normal closed mechanical switch or relay Connect the switch between pins 1 and 3 1 K resistor between pin 3 and 5 1 6 2 7 3 8 4 9 5 VIO IN1 5V 15V IN2 OUT1 STSW OUT2 GND NPN or PUSH/PULL output trigger Signal to pin 3 GND to pin 5 1 6 2 7 3 8 4 9 5 VIO IN1 5V 15V IN2 OUT1 STSW OUT2 GND PNP output trigger VCC to pin 1 Signal to pin 3 1 K resistor between pin 3 and 5 Page 22 of 28 MICRON USER GUIDE Output 1 = Active low in Print mode (open collector) Warning: Do not connect a relay with a higher voltage than the voltage already connected to the VIO pin1 you will damage the unit. R VALUE 1 6 2 7 3 8 4 9 5 LED indicator Connect the components between pins 2 and 8 The R value can be calculated using the equation below VIO IN1 5V 15V IN2 OUT1 STSW OUT2 GND 1N4001 DIODE RELAY 1N4001 DIODE R 1 6 2 7 3 8 4 9 5 VIO IN1 5V 15V IN2 OUT1 STSW OUT2 GND 1 6 2 7 3 8 4 9 5 VIO IN1 5V 15V IN2 OUT1 STSW OUT2 GND 3-33VDC EXTERNAL SOURCE 1N4001 DIODE GND EXTERNAL SOURCE 1 6 2 7 3 8 4 9 5 5 Ud Id Where Ud is diode voltage and Id is diode current 5V DC relay Connect the relay coil between pins 2 and 8 Some relays have a built in diode, if not please also mount the protection diode on the coil connections. 15V DC relay Connect the relay coil between pins 7 and 8 Some relays have a built in diode, if not please also mount the protection diode on the coil connections. VIO IN1 5V 15V IN2 OUT1 STSW OUT2 GND 3-33V DC relay with external power source Connect the relay coil between external VCC and pin 8 Connect external GND to pin 5 Some relays have a built in diode, if not please also mount the protection diode on the coil connections. Warning: Do not connect a relay with a higher voltage than the voltage already connected to the VIO pin1 you will damage the unit. Page 23 of 28 MICRON USER GUIDE Output 2 = Active low on low ink warning (open collector) Warning: Do not connect a relay with a higher voltage than the voltage already connected to the VIO pin1 you will damage the unit. R VALUE 1 6 2 7 3 8 4 9 5 LED indicator Connect the components between pins 2 and 9 The R value can be calculated using the equation below VIO IN1 5V 15V IN2 OUT1 STSW OUT2 GND 1N4001 DIODE RELAY 1N4001 DIODE R 1 6 2 7 3 8 4 9 5 VIO IN1 5V 15V IN2 OUT1 STSW OUT2 GND 1 6 2 7 3 8 4 9 5 VIO IN1 5V 15V IN2 OUT1 STSW OUT2 GND 3-33VDC EXTERNAL SOURCE 1N4001 DIODE GND EXTERNAL SOURCE 1 6 2 7 3 8 4 9 5 5 Ud Id Where Ud is diode voltage and Id is diode current 5V DC relay Connect the relay coil between pins 2 and 9 Some relays have a built in diode, if not please also mount the protection diode on the coil connections. 15V DC relay Connect the relay coil between pins 7 and 9 Some relays have a built in diode, if not please also mount the protection diode on the coil connections. VIO IN1 5V 15V IN2 OUT1 STSW OUT2 GND 3-33V DC relay with external power source Connect the relay coil between external VCC and pin 9 Connect external GND to pin 5 Some relays have a built in diode, if not please also mount the protection diode on the coil connections. Warning: Do not connect a relay with a higher voltage than the voltage already connected to the VIO pin1 you will damage the unit. Page 24 of 28 MICRON USER GUIDE Encoder port wiring This connector is where the signals for the encoder are coming in. The encoder connector can supply 5V and 15V DC for the encoder but you can use any encoder in the 3-33V range if you connect an external power source. 5 1 9 6 PIN 1 2 3 4 5 6 7 8 9 MEANING V ENC 5V Not used EncB GND Not used 15 V Not used /EncB 5V DC Encoder 1 6 2 7 3 8 4 9 5 VENC N/C 5V 15V N/C N/C EncB #EncB GND 5V DC NPN or PUSH/PULL VCC to pins 1, 2 Signal to pin 4 GND to pin 5 1 6 2 7 3 8 4 9 5 VENC N/C 5V 15V N/C N/C EncB #EncB GND 5V DC PNP VCC to pins 1, 2 Signal to pin 9 GND to pin 5 1 6 2 7 3 8 4 9 5 VENC N/C 5V 15V N/C N/C EncB #EncB GND 15V DC NPN or PUSH/PULL VCC to pins 1, 7 Signal to pin 4 GND to pin 5 1 6 2 7 3 8 4 9 5 VENC N/C 5V 15V N/C N/C EncB #EncB GND 15V DC PNP VCC to pins 1, 7 Signal to pin 9 GND to pin 5 15V DC Encoder Page 25 of 28 MICRON USER GUIDE 3-33V DC Encoder with external power source 3-33VDC EXTERNAL SOURCE 1 6 2 7 3 8 4 9 5 VENC N/C 5V 15V N/C N/C EncB #EncB GND 1 6 2 7 3 8 4 9 5 VENC N/C 5V 15V N/C N/C EncB #EncB GND 3-33V DC NPN or PUSH/PULL with external power source VCC to pin 1 Signal to pin 4 GND to pin 5 GND EXTERNAL SOURCE 3-33VDC EXTERNAL SOURCE 3-33V DC PNP with external power source VCC to pin 1 Signal to pin 9 GND to pin 5 GND EXTERNAL SOURCE 5V DC simulated encoder with external power source 1 6 2 7 3 8 4 9 5 VENC N/C 5V 15V N/C N/C EncB #EncB GND 5V DC NPN or PUSH/PULL with external power source Loop pins 1-2 Signal to pin 4 GND to pin 5 1 6 2 7 3 8 4 9 5 VENC N/C 5V 15V N/C N/C EncB #EncB GND 5V DC PNP with external power source Loop pins 1-2 Signal to pin 9 GND to pin 5 15V DC simulated encoder with external power source 1 6 2 7 3 8 4 9 5 VENC N/C 5V 15V N/C N/C EncB #EncB GND 15V DC NPN or PUSH/PULL with external power source Loop pins 1-7 Signal to pin 4 GND to pin 5 1 6 2 7 3 8 4 9 5 VENC N/C 5V 15V N/C N/C EncB #EncB GND 15V DC PNP with external power source Loop pins 1-7 Signal to pin 9 GND to pin 5 Page 26 of 28 MICRON USER GUIDE 3-33V DC simulated encoder with external power source 3-33VDC EXTERNAL SOURCE GND EXTERNAL SOURCE 3-33VDC EXTERNAL SOURCE GND EXTERNAL SOURCE 1 6 2 7 3 8 4 9 5 VENC N/C 5V 15V N/C N/C EncB #EncB GND 3-33V DC NPN or PUSH/PULL with external power source VCC to pin 1 Signal to pin 4 GND to pin 5 1 6 2 7 3 8 4 9 5 VENC N/C 5V 15V N/C N/C EncB #EncB GND 3-33V DC PNP with external power source VCC to pin 1 Signal to pin 9 GND to pin 5 Page 27 of 28 MICRON USER GUIDE Support EC Declaration of conformity Page 28 of 28 MICRON USER GUIDE Support contact For support on the MICRON please contact your local distributor. Manufacturer: